2011 MERCEDES-BENZ SLS tow
[x] Cancel search: towPage 228 of 436

RHelp CD changerRHelp DVD
R Help DVD changerRHelp DVD audio
R Help DVD audio changerRHelp MP3
R Help MP3 changerRHelp navigation
R Help route guidance
R Help nav
Phone Commands
RPhone
R Telephone on/phone onRSave
R Save name
R Save number
R Save phone numberRDial number
R Dial phone numberRConfirm
R Confirm number
R Confirm phone numberRList phone book
R Read out phone bookRRedial
R Redial last number
R Redial last phone numberRCorrection
R Incorrect
R Wrong number
R Wrong phone numberRDelete
R Delete name
R Delete phone numberNavigation CommandsRNavigation
R Route guidance
R NavRGuidance/ route guidance instructions
on
R Switch guidance/ route guidance
instructions on
R Listen to guidance/ route guidance
instructionsR Guidance/ route guidance instructions
off
R Switch off guidance/ route guidance
instructions
R Mute guidance/ route guidance
instructionsR House number
R Enter house numberRMap
R Show map
R Map on/switch on mapRZoom in
R Zoom in on mapRZoom out
R Zoom out of mapRZoom out completelyRZoom in completelyREnter state
R Change state
R Enter province
R Change province
R Enter destination area
R Another stateRLast destinationsR
Enter town
R Enter name of town226Voice ControlCOMAND APS
BA 197 USA, CA Edition A 2011; 1; 27, en-UShereepeVersion: 3.0.3.52010-03-24T15:31:10+01:00 - Seite 226
Page 229 of 436
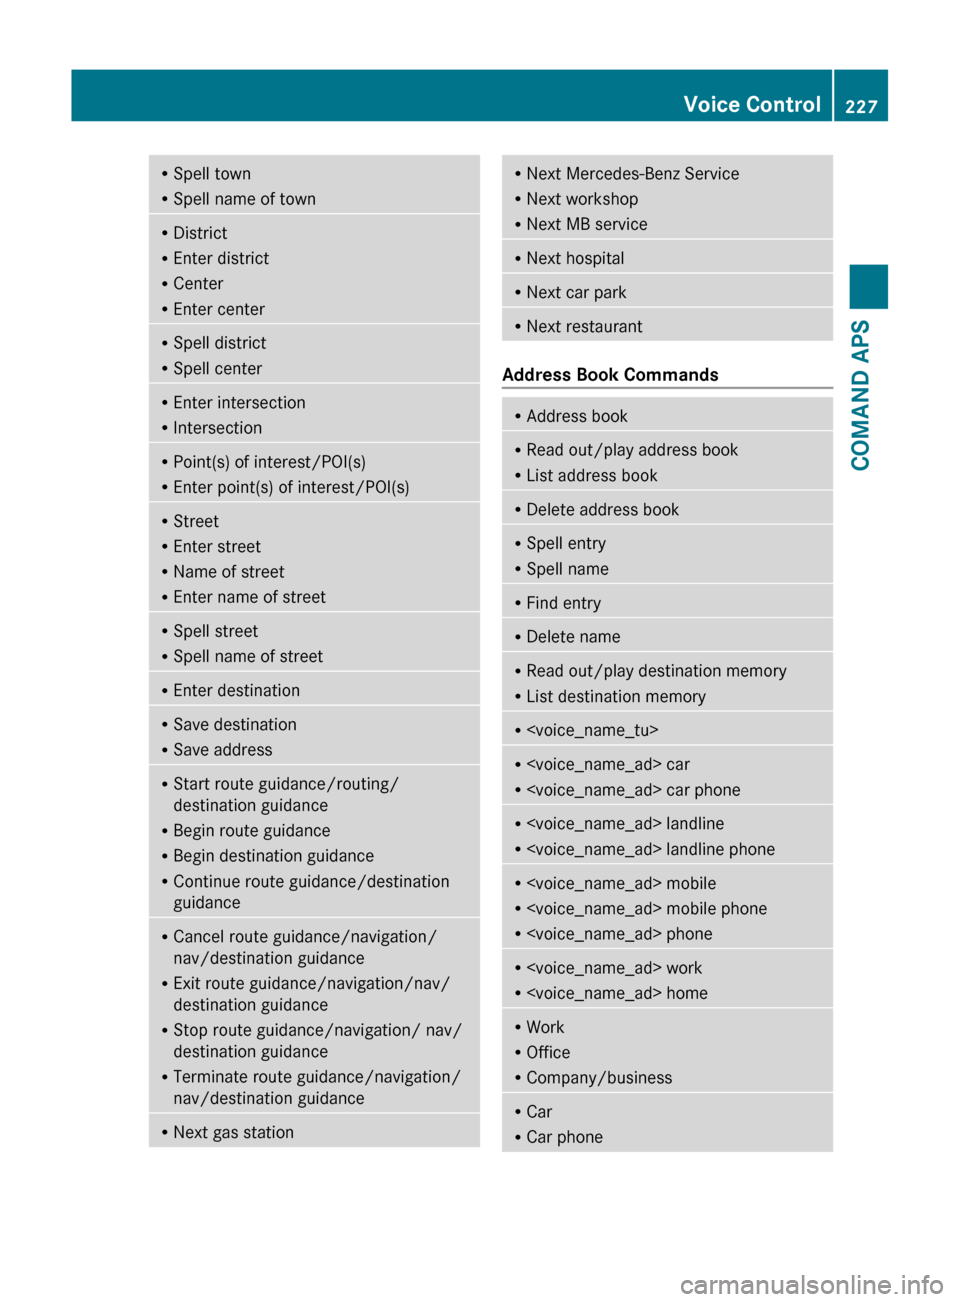
RSpell town
R Spell name of townRDistrict
R Enter district
R Center
R Enter centerRSpell district
R Spell centerREnter intersection
R IntersectionRPoint(s) of interest/POI(s)
R Enter point(s) of interest/POI(s)RStreet
R Enter street
R Name of street
R Enter name of streetRSpell street
R Spell name of streetREnter destinationRSave destination
R Save addressRStart route guidance/routing/
destination guidance
R Begin route guidance
R Begin destination guidance
R Continue route guidance/destination
guidanceR Cancel route guidance/navigation/
nav/destination guidance
R Exit route guidance/navigation/nav/
destination guidance
R Stop route guidance/navigation/ nav/
destination guidance
R Terminate route guidance/navigation/
nav/destination guidanceR Next gas stationR
Next Mercedes-Benz Service
R Next workshop
R Next MB serviceRNext hospitalRNext car parkRNext restaurant
Address Book Commands
RAddress bookR
Read out/play address book
R List address bookRDelete address bookRSpell entry
R Spell nameRFind entryRDelete nameRRead out/play destination memory
R List destination memoryR
R
R
R
R
R
R Office
R Company/businessRCar
R Car phoneVoice Control227COMAND APSBA 197 USA, CA Edition A 2011; 1; 27, en-UShereepeVersion: 3.0.3.52010-03-24T15:31:10+01:00 - Seite 227Z
Page 241 of 436
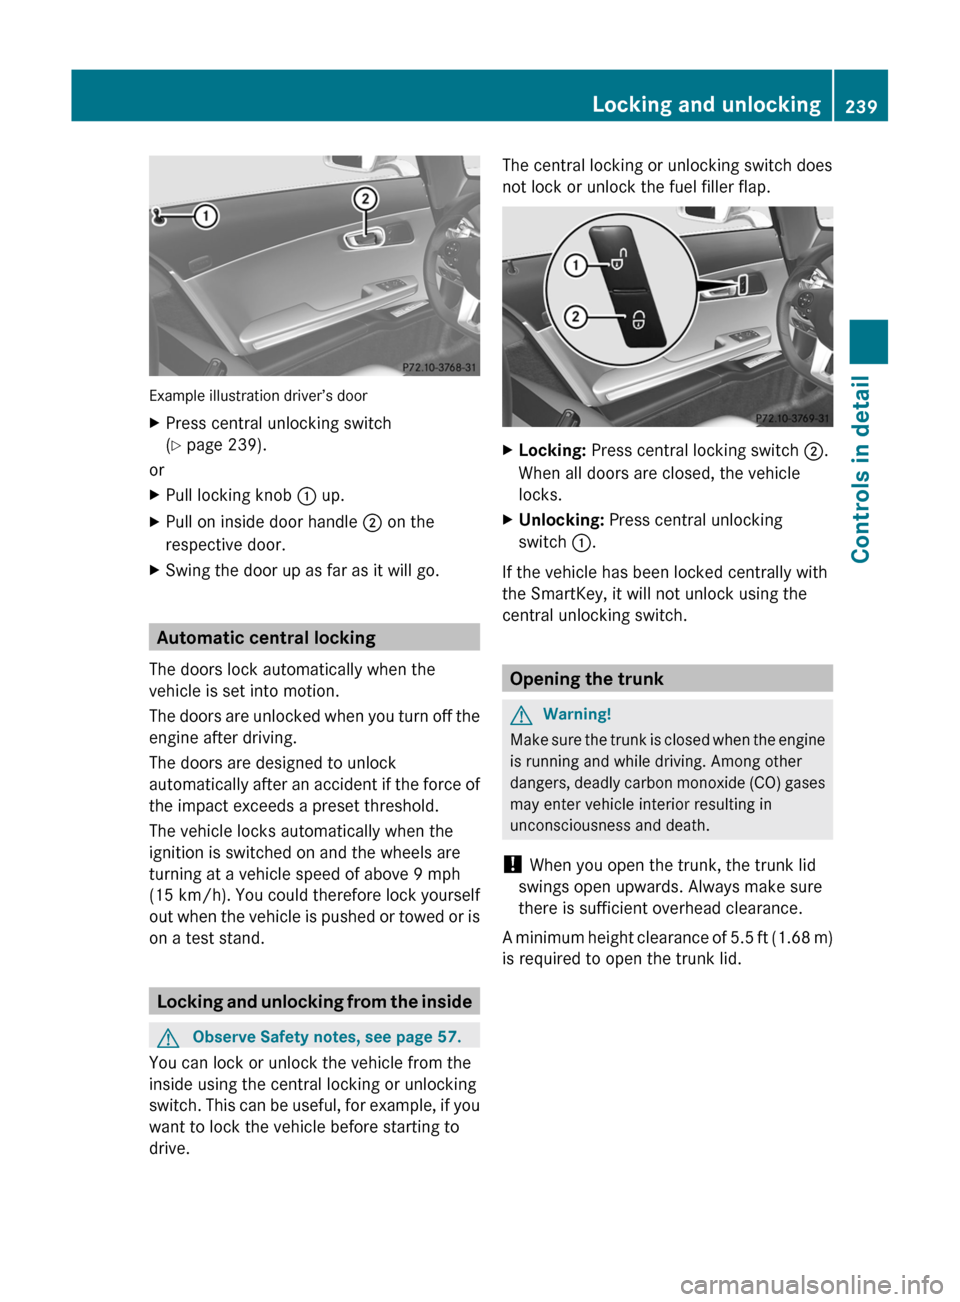
Example illustration driver’s door
XPress central unlocking switch
( Y page 239).
or
XPull locking knob : up.XPull on inside door handle ; on the
respective door.XSwing the door up as far as it will go.
Automatic central locking
The doors lock automatically when the
vehicle is set into motion.
The doors are unlocked when you turn off the
engine after driving.
The doors are designed to unlock
automatically after an accident if the force of
the impact exceeds a preset threshold.
The vehicle locks automatically when the
ignition is switched on and the wheels are
turning at a vehicle speed of above 9 mph
(15 km/h) . You could therefore lock yourself
out when the vehicle is pushed or towed or is
on a test stand.
Locking and unlocking from the inside
GObserve Safety notes, see page 57.
You can lock or unlock the vehicle from the
inside using the central locking or unlocking
switch. This can be useful, for example, if you
want to lock the vehicle before starting to
drive.
The central locking or unlocking switch does
not lock or unlock the fuel filler flap.XLocking: Press central locking switch ;.
When all doors are closed, the vehicle
locks.XUnlocking: Press central unlocking
switch :.
If the vehicle has been locked centrally with
the SmartKey, it will not unlock using the
central unlocking switch.
Opening the trunk
GWarning!
Make sure the trunk is closed when the engine
is running and while driving. Among other
dangers, deadly carbon monoxide (CO) gases
may enter vehicle interior resulting in
unconsciousness and death.
! When you open the trunk, the trunk lid
swings open upwards. Always make sure
there is sufficient overhead clearance.
A minimum height clearance of 5.5 ft (1.68 m)
is required to open the trunk lid.
Locking and unlocking239Controls in detailBA 197 USA, CA Edition A 2011; 1; 27, en-UShereepeVersion: 3.0.3.52010-03-24T15:31:10+01:00 - Seite 239Z
Page 263 of 436

If the extent of the damage cannot be
determined:
XContact an authorized Mercedes-Benz
Center or call Roadside Assistance.
If no damage on major assemblies, fuel
system, and engine mount can be
determined:
XStart the engine in the usual manner.
Parking
GWarning!
Do not park in areas where the hot exhaust
system could come into contact with
combustible materials. Combustible
materials such as grass, hay or leaves could
be ignited and cause a vehicle fire.
Unintended vehicle movement could cause
serious personal injury or damage to the
vehicle or the vehicle drivetrain. To reduce
such risks, always do the following before
turning off the engine and leaving the vehicle:
RKeep right foot on the brake pedal.
REngage the electronic parking brake.
RShift the transmission into park position P.
RSlowly release the brake pedal.
RWhen parked on an incline, always turn the
front wheels towards the road curb.
RPress the KEYLESS-GO start/stop button,
or turn the SmartKey in the starter switch
to position 0 and remove the SmartKey
from the starter switch.
RTake the SmartKey with you and lock the
vehicle when leaving.
Electronic parking brake
GWarning!
When leaving the vehicle, always remove the
SmartKey from the starter switch, take it with
you, and lock the vehicle. Do not leave
children unattended in the vehicle, or with
access to an unlocked vehicle. Children could
release the electronic parking brake and/or
shift the transmission out of park position P,
either of which could result in an accident
and/or serious personal injury.
Engaging electronic parking brake
XPress handle :.
The red indicator lamp F (USA only)
or ! (Canada only) in the instrument
cluster comes on.
iYou can engage the electronic parking
brake even when the SmartKey is removed
from the starter switch.
Releasing electronic parking brake
manually
XSwitch on the ignition.XPull handle :.
The red indicator lamp F (USA only)
or ! (Canada only) in the instrument
cluster goes out.
Releasing electronic parking brake
automatically
The electronic parking brake releases
automatically when all of the following
conditions are fulfilled:
RThe engine is running.
RThe transmission is in drive position D or
reverse gear R. With the transmission in
reverse gear R the trunk lid must be closed.
RThe hood is closed.
RYou have fastened your seat belt.
RYou depress on the accelerator pedal.
Driving and parking261Controls in detailBA 197 USA, CA Edition A 2011; 1; 27, en-UShereepeVersion: 3.0.3.52010-03-24T15:31:10+01:00 - Seite 261Z
Page 268 of 436
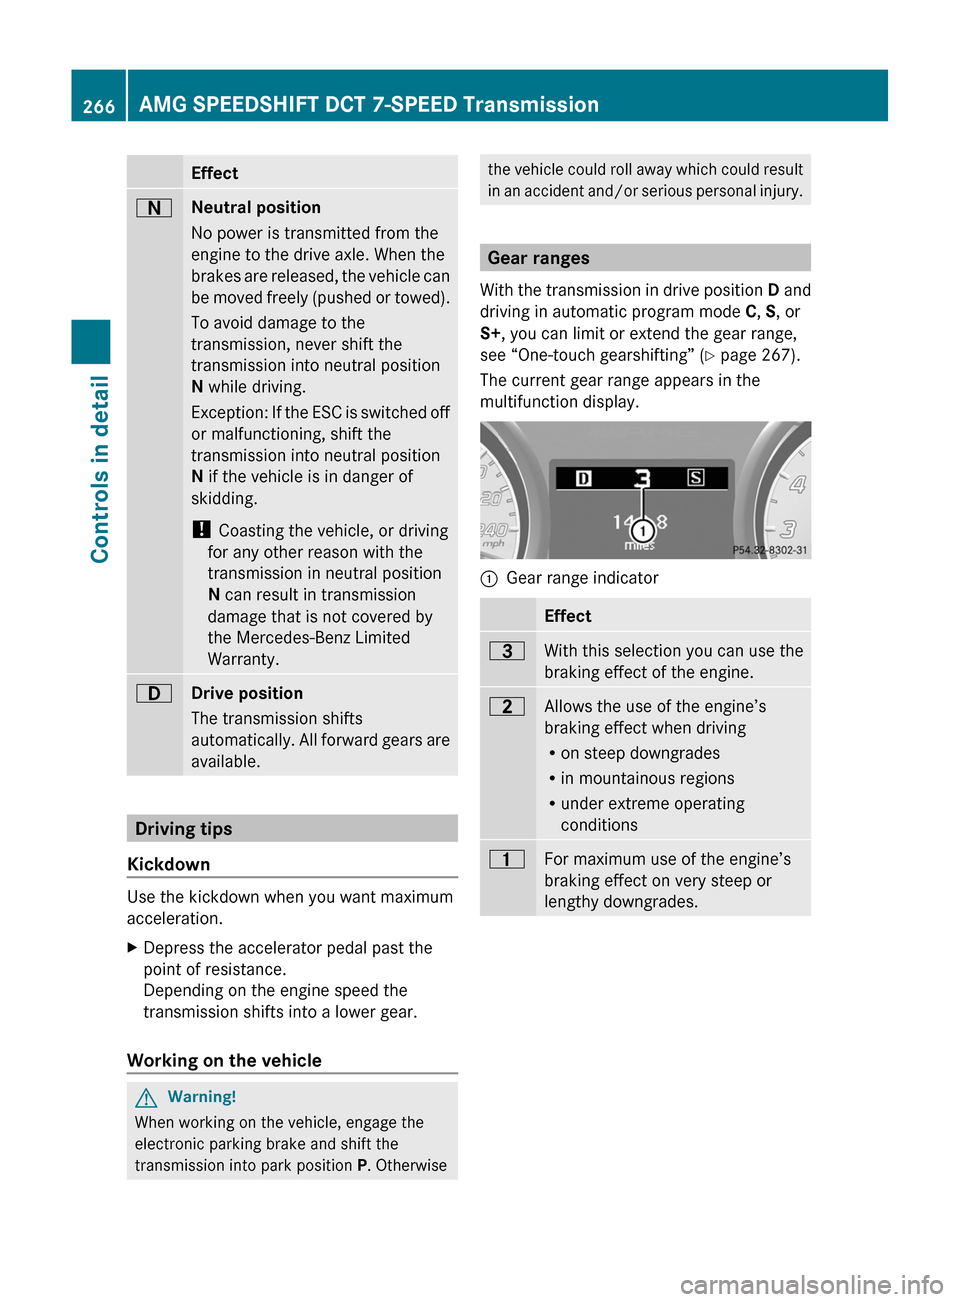
EffectANeutral position
No power is transmitted from the
engine to the drive axle. When the
brakes are released, the vehicle can
be moved freely (pushed or towed).
To avoid damage to the
transmission, never shift the
transmission into neutral position
N while driving.
Exception: If the ESC is switched off
or malfunctioning, shift the
transmission into neutral position
N if the vehicle is in danger of
skidding.
! Coasting the vehicle, or driving
for any other reason with the
transmission in neutral position
N can result in transmission
damage that is not covered by
the Mercedes-Benz Limited
Warranty.7Drive position
The transmission shifts
automatically. All forward gears are
available.
Driving tips
Kickdown
Use the kickdown when you want maximum
acceleration.
XDepress the accelerator pedal past the
point of resistance.
Depending on the engine speed the
transmission shifts into a lower gear.
Working on the vehicle
GWarning!
When working on the vehicle, engage the
electronic parking brake and shift the
transmission into park position P. Otherwise
the vehicle could roll away which could result
in an accident and/or serious personal injury.
Gear ranges
With the transmission in drive position D and
driving in automatic program mode C, S , or
S+ , you can limit or extend the gear range,
see “One-touch gearshifting” ( Y page 267).
The current gear range appears in the
multifunction display.
:Gear range indicatorEffect=With this selection you can use the
braking effect of the engine.5Allows the use of the engine’s
braking effect when driving
R on steep downgrades
R in mountainous regions
R under extreme operating
conditions4For maximum use of the engine’s
braking effect on very steep or
lengthy downgrades.266AMG SPEEDSHIFT DCT 7-SPEED TransmissionControls in detail
BA 197 USA, CA Edition A 2011; 1; 27, en-UShereepeVersion: 3.0.3.52010-03-24T15:31:10+01:00 - Seite 266
Page 313 of 436
XTerminating calls: Press button ~ on
the multifunction steering wheel.
or
XPress the respective button for ending a
telephone call on the COMAND system.
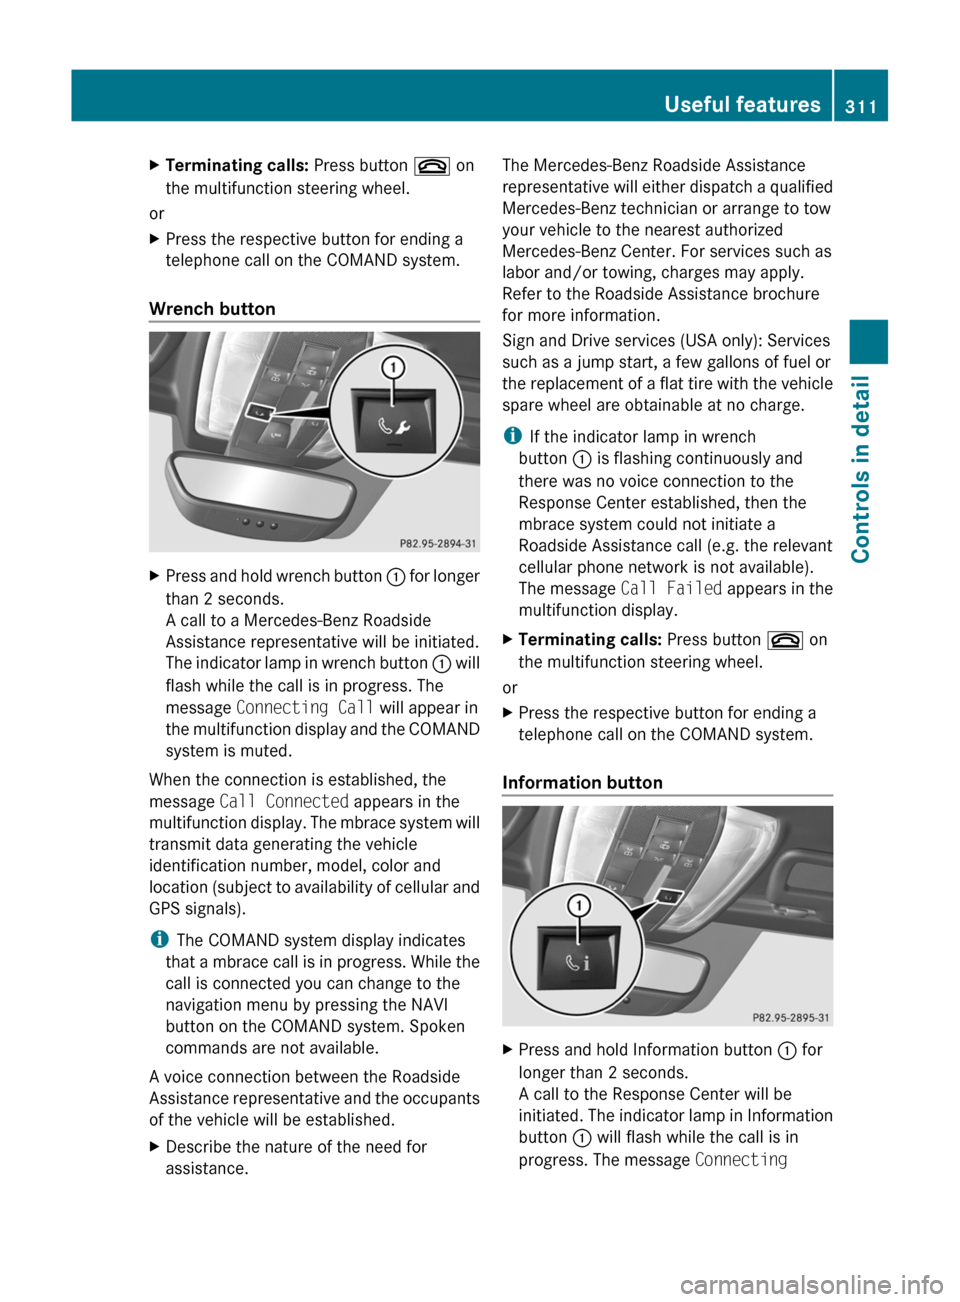
Wrench button
XPress and hold wrench button : for longer
than 2 seconds.
A call to a Mercedes-Benz Roadside
Assistance representative will be initiated.
The indicator lamp in wrench button : will
flash while the call is in progress. The
message Connecting Call will appear in
the multifunction display and the COMAND
system is muted.
When the connection is established, the
message Call Connected appears in the
multifunction display. The mbrace system will
transmit data generating the vehicle
identification number, model, color and
location (subject to availability of cellular and
GPS signals).
i The COMAND system display indicates
that a mbrace call is in progress. While the
call is connected you can change to the
navigation menu by pressing the NAVI
button on the COMAND system. Spoken
commands are not available.
A voice connection between the Roadside
Assistance representative and the occupants
of the vehicle will be established.
XDescribe the nature of the need for
assistance.The Mercedes-Benz Roadside Assistance
representative will either dispatch a qualified
Mercedes-Benz technician or arrange to tow
your vehicle to the nearest authorized
Mercedes-Benz Center. For services such as
labor and/or towing, charges may apply.
Refer to the Roadside Assistance brochure
for more information.
Sign and Drive services (USA only): Services
such as a jump start, a few gallons of fuel or
the replacement of a flat tire with the vehicle
spare wheel are obtainable at no charge.
i If the indicator lamp in wrench
button : is flashing continuously and
there was no voice connection to the
Response Center established, then the
mbrace system could not initiate a
Roadside Assistance call (e.g. the relevant
cellular phone network is not available).
The message Call Failed appears in the
multifunction display.XTerminating calls: Press button ~ on
the multifunction steering wheel.
or
XPress the respective button for ending a
telephone call on the COMAND system.
Information button
XPress and hold Information button : for
longer than 2 seconds.
A call to the Response Center will be
initiated. The indicator lamp in Information
button : will flash while the call is in
progress. The message Connecting Useful features311Controls in detailBA 197 USA, CA Edition A 2011; 1; 27, en-UShereepeVersion: 3.0.3.52010-03-24T15:31:10+01:00 - Seite 311Z
Page 323 of 436
! To prevent damage to the catalytic
converters, only use premium unleaded
gasoline in this vehicle.
Any noticeable irregularities in engine
operation should be repaired promptly.
Otherwise, excessive unburned fuel may
reach the catalytic converter, causing it to
overheat and potentially start a fire.
i Only use premium unleaded gasoline with
a minimum Posted Octane Rating of 91
(average of 96 RON/86 MON).
Information on gasoline quality can
normally be found on the fuel pump. Please
contact gas station personnel in case
labels on the pump cannot be found.
For more information on gasoline, see
“Premium unleaded gasoline”
( Y page 425), see “Fuel requirements”
( Y page 427), or contact an authorized
Mercedes-Benz Center, or visit
http://www.MBUSA.com (USA only).
Locking/unlocking the vehicle with the
SmartKey automatically locks/unlocks the
fuel filler flap.
i In case the central locking system does
not release the fuel filler flap, or the
opening mechanism is clamping, contact
Roadside Assistance or an authorized
Mercedes-Benz Center.
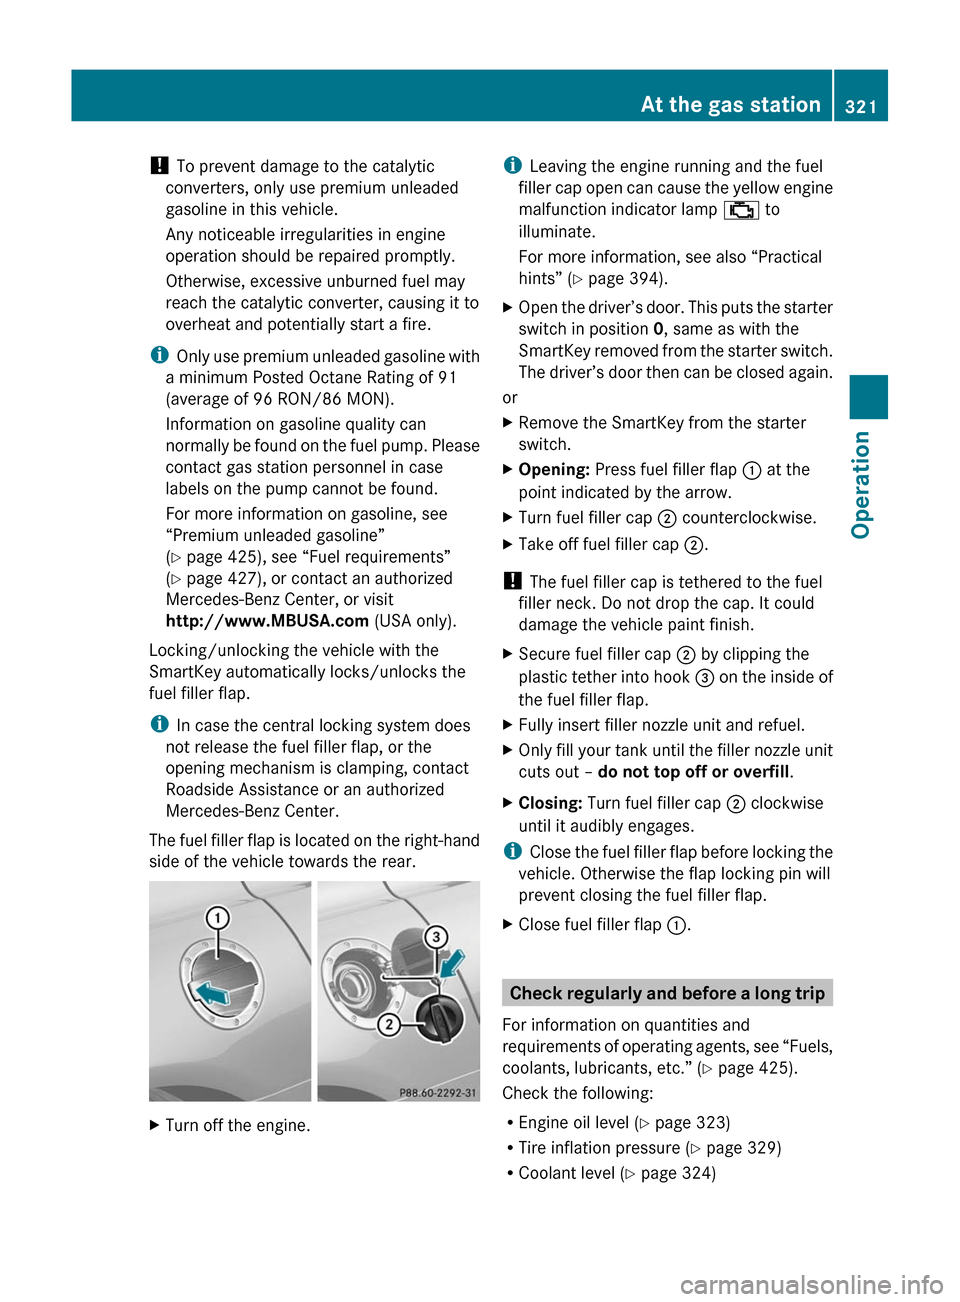
The fuel filler flap is located on the right-hand
side of the vehicle towards the rear. XTurn off the engine.i Leaving the engine running and the fuel
filler cap open can cause the yellow engine
malfunction indicator lamp ; to
illuminate.
For more information, see also “Practical
hints” ( Y page 394).XOpen the driver’s door. This puts the starter
switch in position 0, same as with the
SmartKey removed from the starter switch.
The driver’s door then can be closed again.
or
XRemove the SmartKey from the starter
switch.XOpening: Press fuel filler flap : at the
point indicated by the arrow.XTurn fuel filler cap ; counterclockwise.XTake off fuel filler cap ;.
!
The fuel filler cap is tethered to the fuel
filler neck. Do not drop the cap. It could
damage the vehicle paint finish.
XSecure fuel filler cap ; by clipping the
plastic tether into hook = on the inside of
the fuel filler flap.XFully insert filler nozzle unit and refuel.XOnly fill your tank until the filler nozzle unit
cuts out – do not top off or overfill .XClosing: Turn fuel filler cap ; clockwise
until it audibly engages.
i Close the fuel filler flap before locking the
vehicle. Otherwise the flap locking pin will
prevent closing the fuel filler flap.
XClose fuel filler flap :.
Check regularly and before a long trip
For information on quantities and
requirements of operating agents, see “Fuels,
coolants, lubricants, etc.” ( Y page 425).
Check the following:
R Engine oil level ( Y page 323)
R Tire inflation pressure ( Y page 329)
R Coolant level ( Y page 324)
At the gas station321OperationBA 197 USA, CA Edition A 2011; 1; 27, en-UShereepeVersion: 3.0.3.52010-03-24T15:31:10+01:00 - Seite 321Z
Page 328 of 436
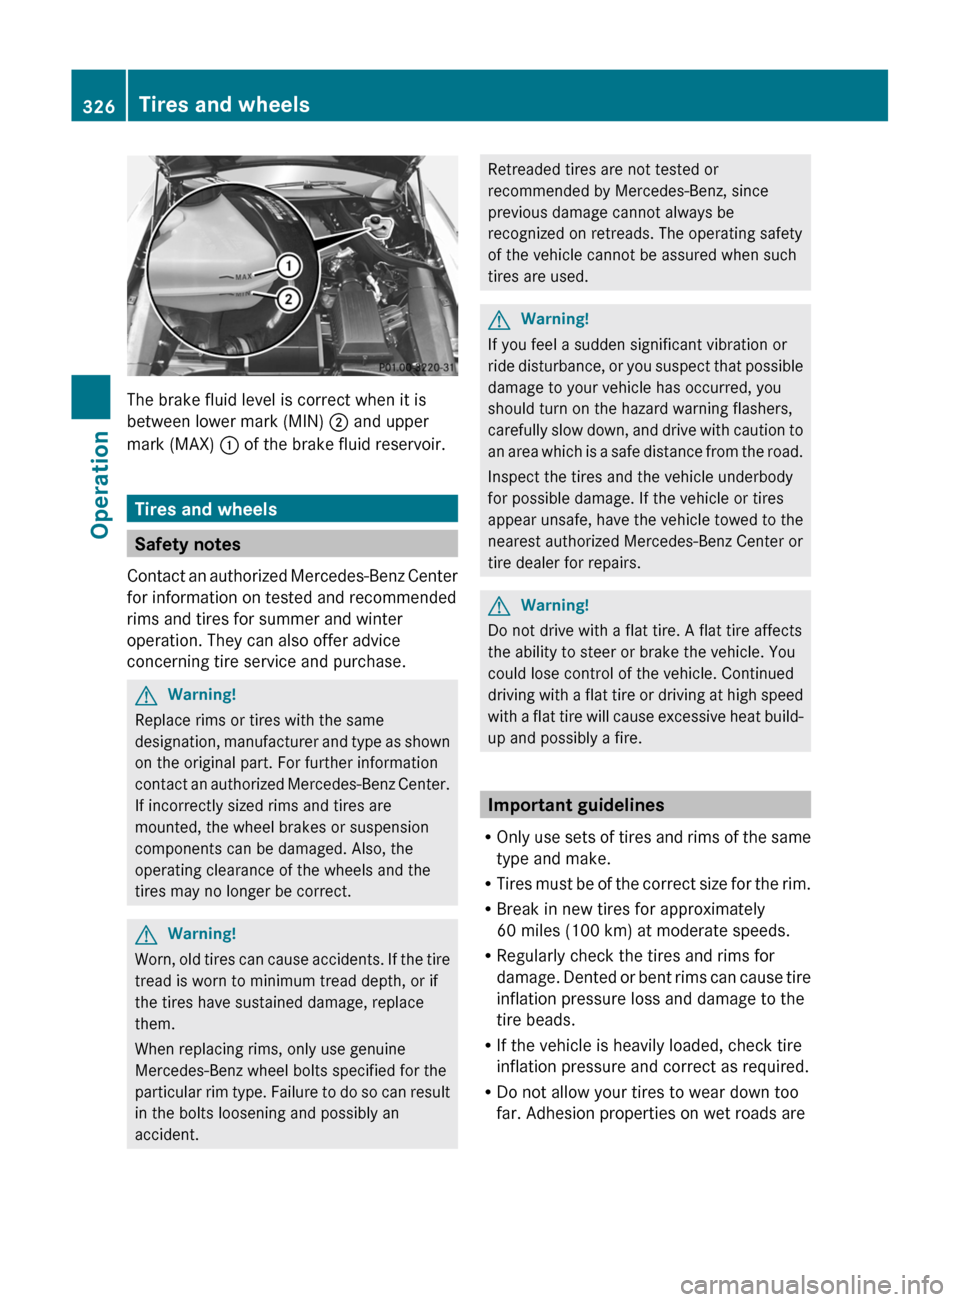
The brake fluid level is correct when it is
between lower mark (MIN) ; and upper
mark (MAX) : of the brake fluid reservoir.
Tires and wheels
Safety notes
Contact an authorized Mercedes-Benz Center
for information on tested and recommended
rims and tires for summer and winter
operation. They can also offer advice
concerning tire service and purchase.
GWarning!
Replace rims or tires with the same
designation, manufacturer and type as shown
on the original part. For further information
contact an authorized Mercedes-Benz Center.
If incorrectly sized rims and tires are
mounted, the wheel brakes or suspension
components can be damaged. Also, the
operating clearance of the wheels and the
tires may no longer be correct.
GWarning!
Worn, old tires can cause accidents. If the tire
tread is worn to minimum tread depth, or if
the tires have sustained damage, replace
them.
When replacing rims, only use genuine
Mercedes-Benz wheel bolts specified for the
particular rim type. Failure to do so can result
in the bolts loosening and possibly an
accident.
Retreaded tires are not tested or
recommended by Mercedes-Benz, since
previous damage cannot always be
recognized on retreads. The operating safety
of the vehicle cannot be assured when such
tires are used.GWarning!
If you feel a sudden significant vibration or
ride disturbance, or you suspect that possible
damage to your vehicle has occurred, you
should turn on the hazard warning flashers,
carefully slow down, and drive with caution to
an area which is a safe distance from the road.
Inspect the tires and the vehicle underbody
for possible damage. If the vehicle or tires
appear unsafe, have the vehicle towed to the
nearest authorized Mercedes-Benz Center or
tire dealer for repairs.
GWarning!
Do not drive with a flat tire. A flat tire affects
the ability to steer or brake the vehicle. You
could lose control of the vehicle. Continued
driving with a flat tire or driving at high speed
with a flat tire will cause excessive heat build-
up and possibly a fire.
Important guidelines
R Only use sets of tires and rims of the same
type and make.
R Tires must be of the correct size for the rim.
R Break in new tires for approximately
60 miles (100 km) at moderate speeds.
R Regularly check the tires and rims for
damage. Dented or bent rims can cause tire
inflation pressure loss and damage to the
tire beads.
R If the vehicle is heavily loaded, check tire
inflation pressure and correct as required.
R Do not allow your tires to wear down too
far. Adhesion properties on wet roads are
326Tires and wheelsOperation
BA 197 USA, CA Edition A 2011; 1; 27, en-UShereepeVersion: 3.0.3.52010-03-24T15:31:10+01:00 - Seite 326