2011 MERCEDES-BENZ SLS change language
[x] Cancel search: change languagePage 89 of 436
A possible option:XTo switch predictive speller language
(character set): Select !.
With Number Keypad
Alternatively, you can enter characters using
the number keypad (direct input).
Example:
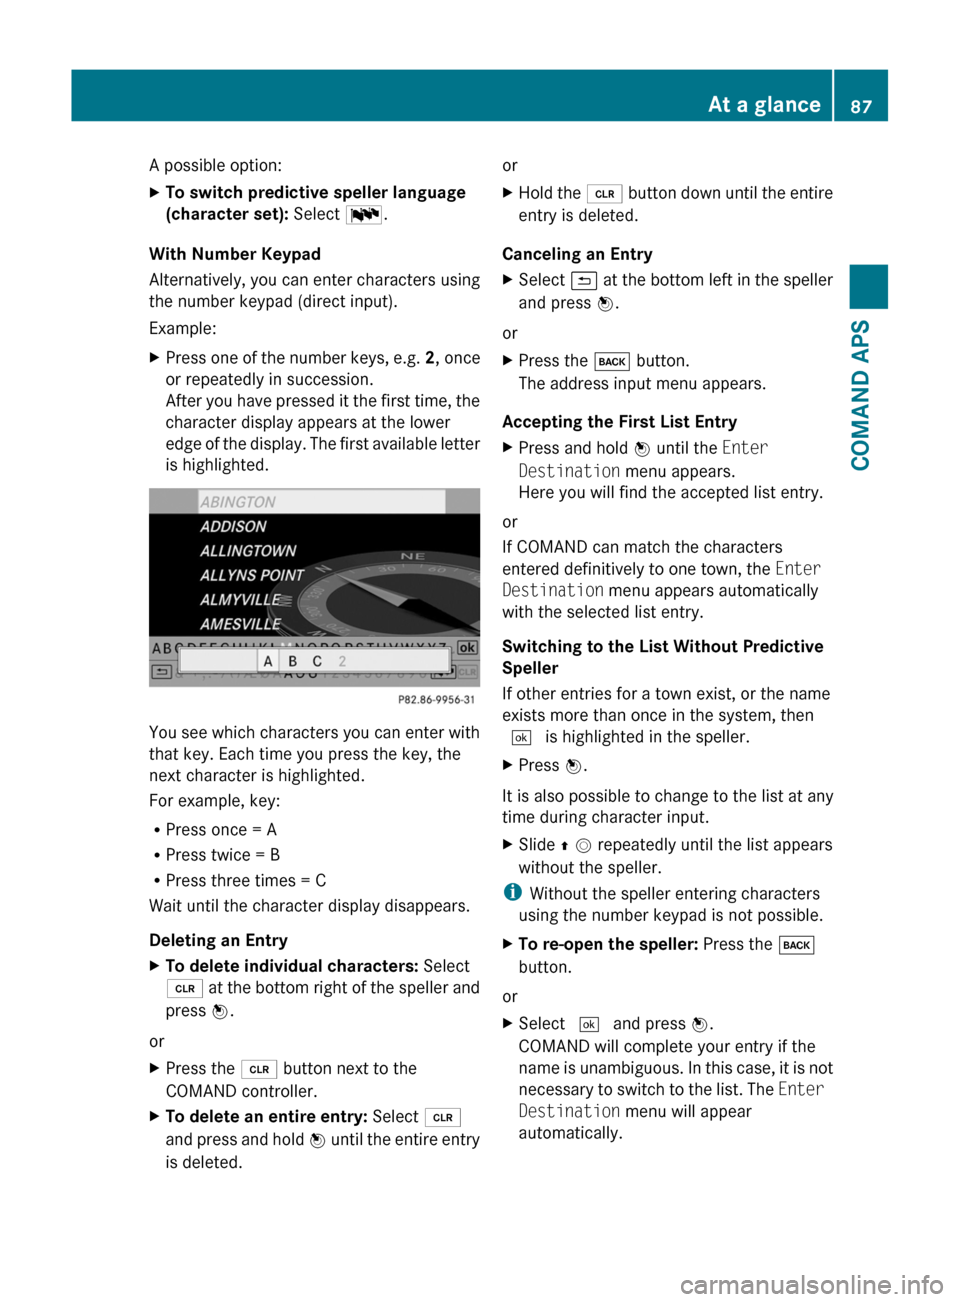
XPress one of the number keys, e.g. 2, once
or repeatedly in succession.
After you have pressed it the first time, the
character display appears at the lower
edge of the display. The first available letter
is highlighted.
You see which characters you can enter with
that key. Each time you press the key, the
next character is highlighted.
For example, key:
RPress once = A
RPress twice = B
RPress three times = C
Wait until the character display disappears.
Deleting an Entry
XTo delete individual characters: Select
õ at the bottom right of the speller and
press n.
or
XPress the 2 button next to the
COMAND controller.
XTo delete an entire entry: Select õ
and press and hold n until the entire entry
is deleted.
orXHold the 2 button down until the entire
entry is deleted.
Canceling an Entry
XSelect á at the bottom left in the speller
and press n.
or
XPress the k button.
The address input menu appears.
Accepting the First List Entry
XPress and hold n until the Enter
Destination menu appears.
Here you will find the accepted list entry.
or
If COMAND can match the characters
entered definitively to one town, the Enter
Destination menu appears automatically
with the selected list entry.
Switching to the List Without Predictive
Speller
If other entries for a town exist, or the name
exists more than once in the system, then
d is highlighted in the speller.
XPress n.
It is also possible to change to the list at any
time during character input.
XSlide q m repeatedly until the list appears
without the speller.
iWithout the speller entering characters
using the number keypad is not possible.
XTo re-open the speller: Press the k
button.
or
XSelect d and press n.
COMAND will complete your entry if the
name is unambiguous. In this case, it is not
necessary to switch to the list. The Enter
Destination menu will appear
automatically.
At a glance87COMAND APSBA 197 USA, CA Edition A 2011; 1; 27, en-UShereepeVersion: 3.0.3.52010-03-24T15:31:10+01:00 - Seite 87Z
Page 101 of 436

Rear View Camera
COMAND shows the camera picture on the
display when
Rthe function is switched on in the System
Settings menu and
Rthe vehicle is shifted into reverse gear
As soon as you shift out of reverse gear, the
previous display is shown.
Switching On/Off the Display of the
Rear View Camera
XSwitch to System Menu
System settings menu with Rear View Cameraoption
XSelect Settings £ Rear View Camera.XSelect Activation by R gear.
Depending on the previous state the
function is switched on Ç or offc.
Reset
iYou can fully reset COMAND to the
factory settings. This process deletes all
personal data, among other things, (e.g.
station memory, address book entries,
entries in the destination memory and in
the last destinations of the navigation
system). It is recommended that you
perform a reset before the vehicle is
handed over or sold, for example.
XSelect System £ Settings £ Reset.
A prompt appears asking whether you wish
to reset.
XSelect Yes or No.
If you select Yes, a prompt will appear again
asking whether you really wish to reset.
XSelect Yes or No.
If you select Yes, a message will be shown.
COMAND is reset and restarted.
Language Setting
This function allows you to determine the
language for the menu displays and the
navigation messages. The language selection
affects the input options in the editing and
smart speller.
XSelect System £ Settings £
Language.
The list of languages appears. The R dot
indicates the current setting.
XTo select a language: Rotate y m z or
slide q m r.
The selection moves up and down.
XTo confirm the language selection:
Press n.
COMAND loads the selected language and
sets it.
iIf you change the system language, the
language for Voice Control will be also be
changed. If the selected language is not
supported by the Voice Control system,
“English” will be selected.
Navigation (Introduction)
Vehicle Equipment
iThis Operator’s Manual describes all
features, standard or optional, potentially
available for your vehicle at the time of
purchase. Please be aware that your
vehicle might not be equipped with all
features described in this manual.
Navigation (Introduction)99COMAND APSBA 197 USA, CA Edition A 2011; 1; 27, en-UShereepeVersion: 3.0.3.52010-03-24T15:31:10+01:00 - Seite 99Z
Page 156 of 436
Initiating Call to an EntryXSelect entry (Y page 153).XPress n
or
XPress the 6 button on the COMAND
control unit.
Creating a New Entry
iWhen a new entry is added through the
COMAND phone book, it is saved to the
address book.
XSelect Options £ New Entry in the
COMAND phone book.
XSelect a number category, e.g. Home.XSelect a telephone category, e.g. Mobile
Phone.
XSelect Save.
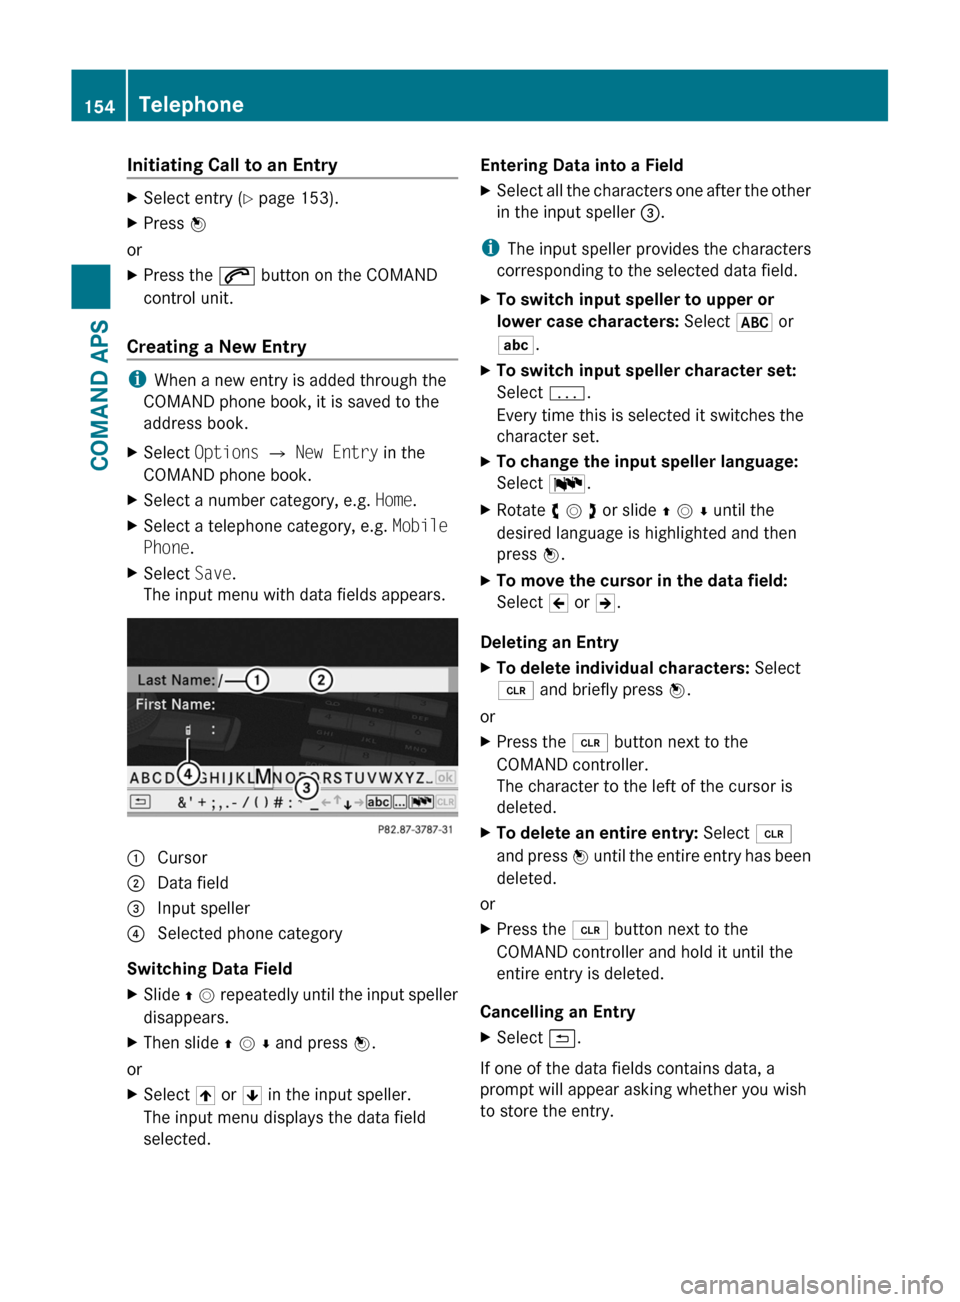
The input menu with data fields appears.1 Cursor2 Data field3 Input speller4 Selected phone category
Switching Data Field
XSlide q m repeatedly until the input speller
disappears.
XThen slide q m r and press n.
or
XSelect [ or ] in the input speller.
The input menu displays the data field
selected.
Entering Data into a FieldXSelect all the characters one after the other
in the input speller 3.
iThe input speller provides the characters
corresponding to the selected data field.
XTo switch input speller to upper or
lower case characters: Select & or
(.
XTo switch input speller character set:
Select k.
Every time this is selected it switches the
character set.
XTo change the input speller language:
Select !.
XRotate y m z or slide q m r until the
desired language is highlighted and then
press n.
XTo move the cursor in the data field:
Select Y or Z.
Deleting an Entry
XTo delete individual characters: Select
õ and briefly press n.
or
XPress the 2 button next to the
COMAND controller.
The character to the left of the cursor is
deleted.
XTo delete an entire entry: Select õ
and press n until the entire entry has been
deleted.
or
XPress the 2 button next to the
COMAND controller and hold it until the
entire entry is deleted.
Cancelling an Entry
XSelect á.
If one of the data fields contains data, a
prompt will appear asking whether you wish
to store the entry.
154TelephoneCOMAND APS
BA 197 USA, CA Edition A 2011; 1; 27, en-UShereepeVersion: 3.0.3.52010-03-24T15:31:10+01:00 - Seite 154
Page 159 of 436
Saving in the Address Book as a New EntryXSelect the list entry.XSelect Options £ Save £ New Entry.
i Save has no function if the selected list
entry is already stored in the address book.
XSelect a number category, e.g. Home.XSelect a telephone category, e.g. Mobile
Phone.
Number categoryDisplay (phone
and address book)
Not classified°Home@Work\Phone categoryDisplay (phone
and address book)
Not classified°Mobile¢Car^PagerïXSelect Save.
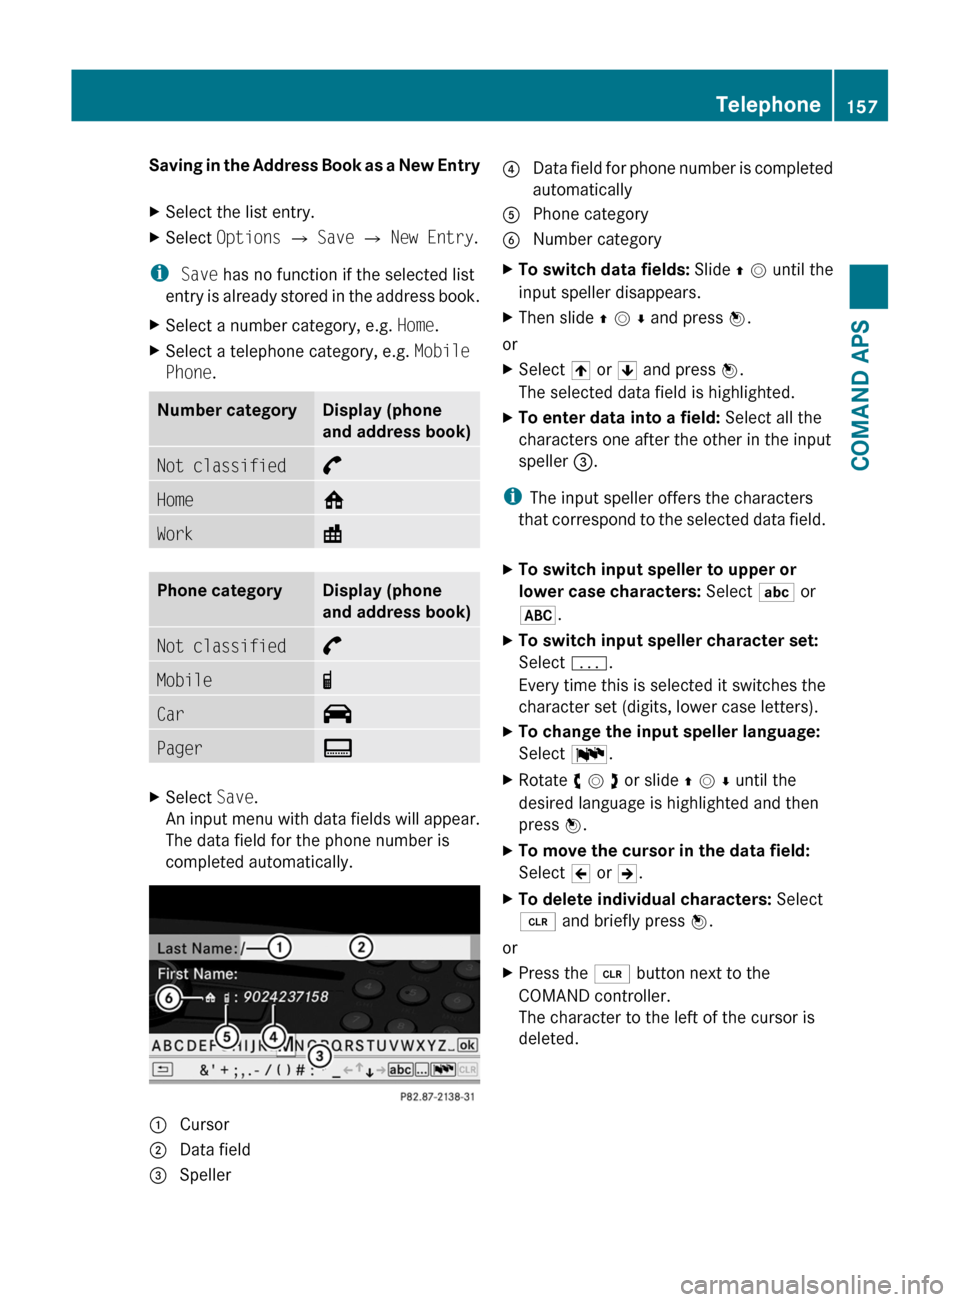
An input menu with data fields will appear.
The data field for the phone number is
completed automatically.
1 Cursor2 Data field3 Speller4 Data field for phone number is completed
automatically
5 Phone category6 Number categoryXTo switch data fields: Slide q m until the
input speller disappears.
XThen slide q m r and press n.
or
XSelect [ or ] and press n.
The selected data field is highlighted.
XTo enter data into a field: Select all the
characters one after the other in the input
speller 3.
iThe input speller offers the characters
that correspond to the selected data field.
XTo switch input speller to upper or
lower case characters: Select ( or
&.
XTo switch input speller character set:
Select k.
Every time this is selected it switches the
character set (digits, lower case letters).
XTo change the input speller language:
Select !.
XRotate y m z or slide q m r until the
desired language is highlighted and then
press n.
XTo move the cursor in the data field:
Select Y or Z.
XTo delete individual characters: Select
õ and briefly press n.
or
XPress the 2 button next to the
COMAND controller.
The character to the left of the cursor is
deleted.
Telephone157COMAND APSBA 197 USA, CA Edition A 2011; 1; 27, en-UShereepeVersion: 3.0.3.52010-03-24T15:31:10+01:00 - Seite 157Z
Page 164 of 436
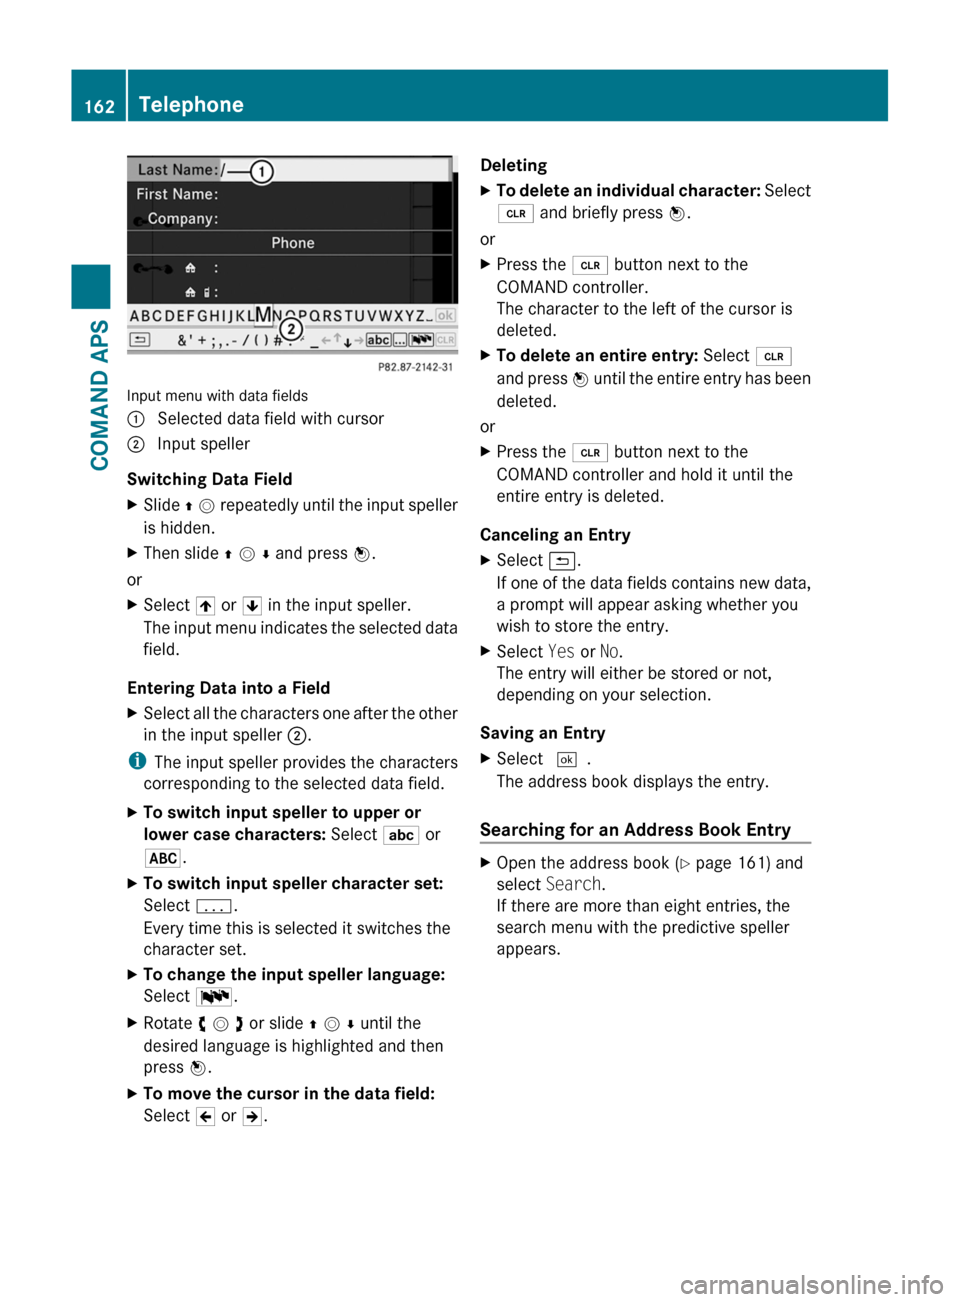
Input menu with data fields
1 Selected data field with cursor2 Input speller
Switching Data Field
XSlide q m repeatedly until the input speller
is hidden.
XThen slide q m r and press n.
or
XSelect [ or ] in the input speller.
The input menu indicates the selected data
field.
Entering Data into a Field
XSelect all the characters one after the other
in the input speller 2.
iThe input speller provides the characters
corresponding to the selected data field.
XTo switch input speller to upper or
lower case characters: Select ( or
&.
XTo switch input speller character set:
Select k.
Every time this is selected it switches the
character set.
XTo change the input speller language:
Select !.
XRotate y m z or slide q m r until the
desired language is highlighted and then
press n.
XTo move the cursor in the data field:
Select Y or Z.
DeletingXTo delete an individual character: Select
õ and briefly press n.
or
XPress the 2 button next to the
COMAND controller.
The character to the left of the cursor is
deleted.
XTo delete an entire entry: Select õ
and press n until the entire entry has been
deleted.
or
XPress the 2 button next to the
COMAND controller and hold it until the
entire entry is deleted.
Canceling an Entry
XSelect á.
If one of the data fields contains new data,
a prompt will appear asking whether you
wish to store the entry.
XSelect Yes or No.
The entry will either be stored or not,
depending on your selection.
Saving an Entry
XSelect d.
The address book displays the entry.
Searching for an Address Book Entry
XOpen the address book (Y page 161) and
select Search.
If there are more than eight entries, the
search menu with the predictive speller
appears.
162TelephoneCOMAND APS
BA 197 USA, CA Edition A 2011; 1; 27, en-UShereepeVersion: 3.0.3.52010-03-24T15:31:10+01:00 - Seite 162
Page 165 of 436
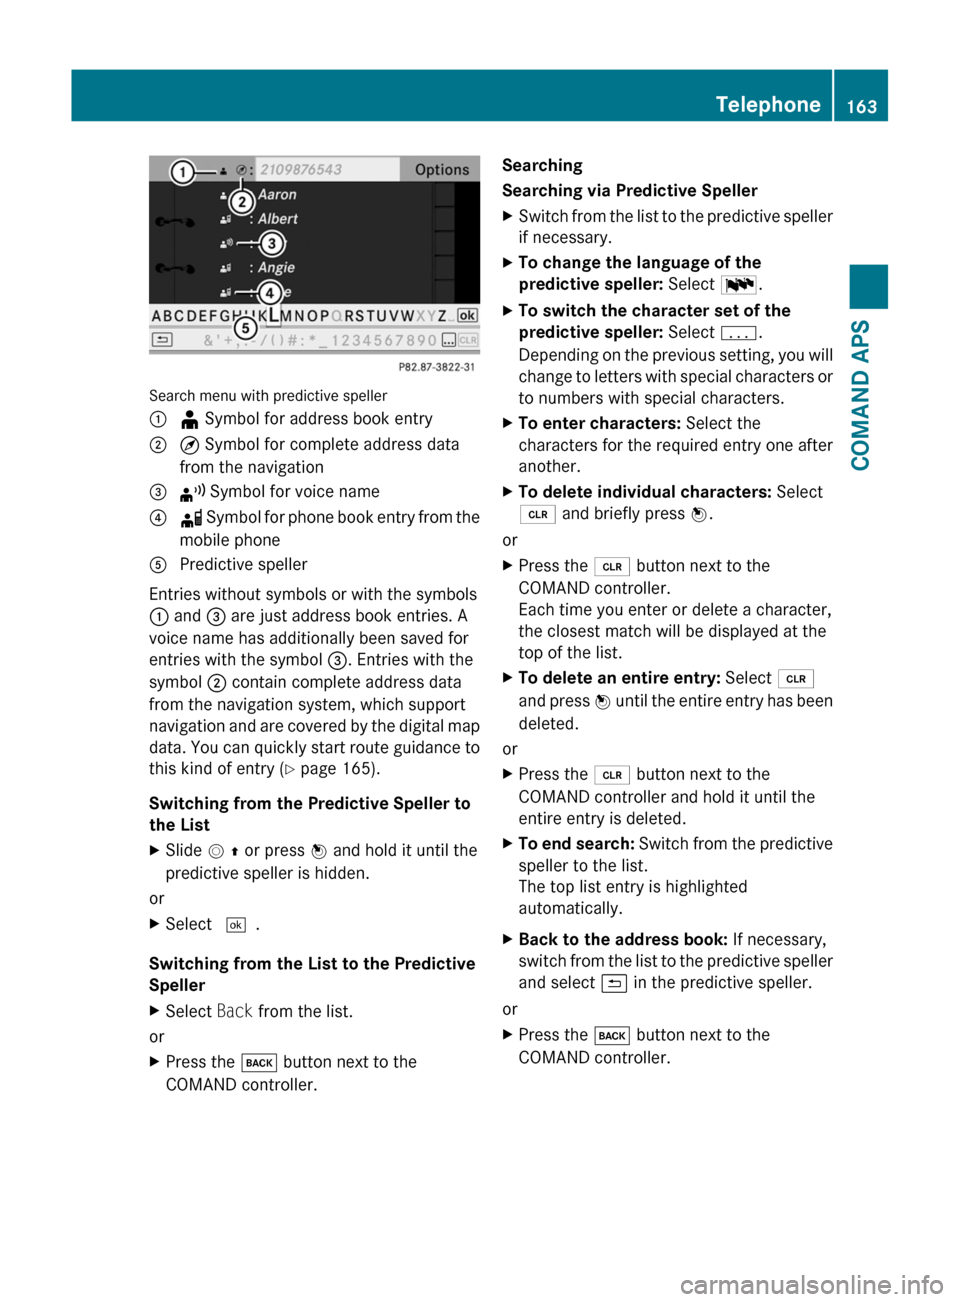
Search menu with predictive speller
1 ¥ Symbol for address book entry2 ¤ Symbol for complete address data
from the navigation
3 ¦ Symbol for voice name4 å Symbol for phone book entry from the
mobile phone
5 Predictive speller
Entries without symbols or with the symbols
1 and 3 are just address book entries. A
voice name has additionally been saved for
entries with the symbol 3. Entries with the
symbol 2 contain complete address data
from the navigation system, which support
navigation and are covered by the digital map
data. You can quickly start route guidance to
this kind of entry (Y page 165).
Switching from the Predictive Speller to
the List
XSlide m q or press n and hold it until the
predictive speller is hidden.
or
XSelect d.
Switching from the List to the Predictive
Speller
XSelect Back from the list.
or
XPress the k button next to the
COMAND controller.
Searching
Searching via Predictive Speller
XSwitch from the list to the predictive speller
if necessary.
XTo change the language of the
predictive speller: Select !.
XTo switch the character set of the
predictive speller: Select k.
Depending on the previous setting, you will
change to letters with special characters or
to numbers with special characters.
XTo enter characters: Select the
characters for the required entry one after
another.
XTo delete individual characters: Select
õ and briefly press n.
or
XPress the 2 button next to the
COMAND controller.
Each time you enter or delete a character,
the closest match will be displayed at the
top of the list.
XTo delete an entire entry: Select õ
and press n until the entire entry has been
deleted.
or
XPress the 2 button next to the
COMAND controller and hold it until the
entire entry is deleted.
XTo end search: Switch from the predictive
speller to the list.
The top list entry is highlighted
automatically.
XBack to the address book: If necessary,
switch from the list to the predictive speller
and select á in the predictive speller.
or
XPress the k button next to the
COMAND controller.
Telephone163COMAND APSBA 197 USA, CA Edition A 2011; 1; 27, en-UShereepeVersion: 3.0.3.52010-03-24T15:31:10+01:00 - Seite 163Z
Page 207 of 436
Setting the Language and Audio Format
iThis function is not available on all DVDs.
Where available, you can set the DVD menu
language and the audio language or audio
format. The number of possible settings is
dependent on the DVD content. It is
possible that the settings may also be
accessed in the DVD menu (Y page 203).
XDisplay the menu system if necessary
(Y page 202).
XSelect DVD-Video £ DVD Functions.XSelect Menu Language or Audio
Language.
Both of these will bring up a selection menu
after a few seconds. The R dot in front of
an entry indicates the currently selected
language.
XTo change the setting: Rotate y m z or
slide q m r until the desired setting is
reached.
XTo save the setting: Press n.
Subtitles and Camera Angle
iThese functions are not available on all
DVDs. The number of subtitle languages
and camera angles available depends on
the content of the DVD. The settings may
also be accessed in the DVD menu
(Y page 203).
XDisplay the menu system if necessary
(Y page 202).
XSelect DVD-Video £ DVD Functions.XSelect Subtitles or Camera Angle.
Both of these will bring up a selection
menu. The R dot in front of an entry
indicates the current setting.
XTo change the setting: Rotate y m z or
slide q m r until the desired setting is
reached.
XTo save the setting: Press n.Interactive Content
DVDs may have interactive content (e.g. a
video game).
In a video game, for example, you can control
the play by selecting or triggering actions. The
type and number of actions is dependent on
the DVD.
XTo select an action: Slide q m r or
o m p.
XTo trigger an action: Press n.
A menu appears and the first entry,
Select, is highlighted.
XPress n.
or
XIn DVD Video mode, if necessary display
the control menu (Y page 202).
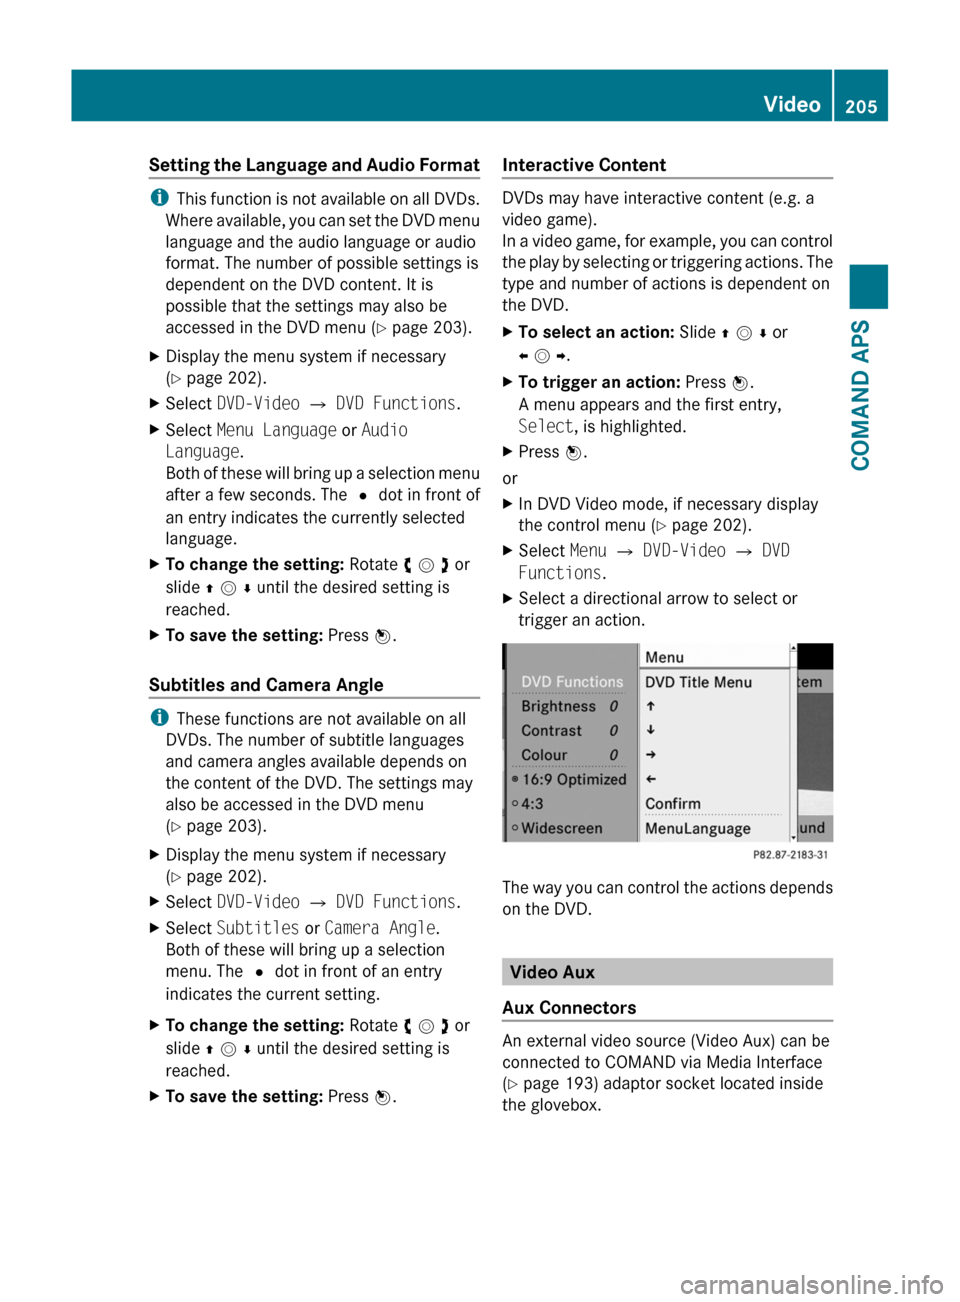
XSelect Menu £ DVD-Video £ DVD
Functions.
XSelect a directional arrow to select or
trigger an action.
The way you can control the actions depends
on the DVD.
Video Aux
Aux Connectors
An external video source (Video Aux) can be
connected to COMAND via Media Interface
(Y page 193) adaptor socket located inside
the glovebox.
Video205COMAND APSBA 197 USA, CA Edition A 2011; 1; 27, en-UShereepeVersion: 3.0.3.52010-03-24T15:31:10+01:00 - Seite 205Z
Page 273 of 436
Instrument cluster
Introduction
For a full view illustration of the instrument
cluster, see “Instrument cluster”
( Y page 34).
GWarning!
No messages will be displayed if either the
instrument cluster or the multifunction
display is inoperative.
As a result, you will not be able to see
information about your driving conditions,
such as
R speed
R outside temperature
R warning/indicator lamps
R malfunction/warning messages
R failure of any systems
Driving characteristics may be impaired.
If you must continue to drive, do so with added
caution. Contact an authorized Mercedes-
Benz Center as soon as possible.
The language setting for the multifunction
display can be changed via COMAND system
( Y page 99).
Activating the instrument cluster
The instrument cluster is activated when you
R open the driver’s door
R switch on the ignition
R switch on the exterior lamps
Engine oil temperature gauge
The engine oil temperature gauge is located
in the instrument cluster. The engine oil
temperature may rise up to 140† under
normal driving conditions.
! The engine should not be operated with
the engine oil temperature above 140†.
Doing so may cause serious damage which
is not covered by the Mercedes-Benz
Limited Warranty.
The temperature of the transmission fluid and
coolant are displayed in the AMG menu
( Y page 287).
Tachometer
The red marking on the tachometer
( Y page 34) denotes excessive engine speed.
! Avoid driving at excessive engine speeds,
as it may result in serious engine damage
that is not covered by the Mercedes-Benz
Limited Warranty.
To help protect the engine, the fuel supply is
interrupted if the engine is operated within
the red marking.
Outside temperature indicator
The outside temperature indicator is
displayed in the multifunction display
( Y page 273).
GWarning!
The outside temperature indicator is not
designed to serve as an ice-warning device
and is therefore unsuitable for that purpose.
Indicated temperatures just above the
freezing point do not guarantee that the road
surface is free of ice. The road may still be icy,
especially in wooded areas or on bridges.
Fuel gauge
The fuel gauge is on the left-hand side of the
instrument cluster (Y page 34). Once the fuel
level has fallen below the reserve mark, the
yellow fuel tank reserve warning lamp 8
for the fuel reserve comes on.
Instrument cluster271Controls in detailBA 197 USA, CA Edition A 2011; 1; 27, en-UShereepeVersion: 3.0.3.52010-03-24T15:31:10+01:00 - Seite 271Z