2011 MERCEDES-BENZ SLS reset
[x] Cancel search: resetPage 177 of 436
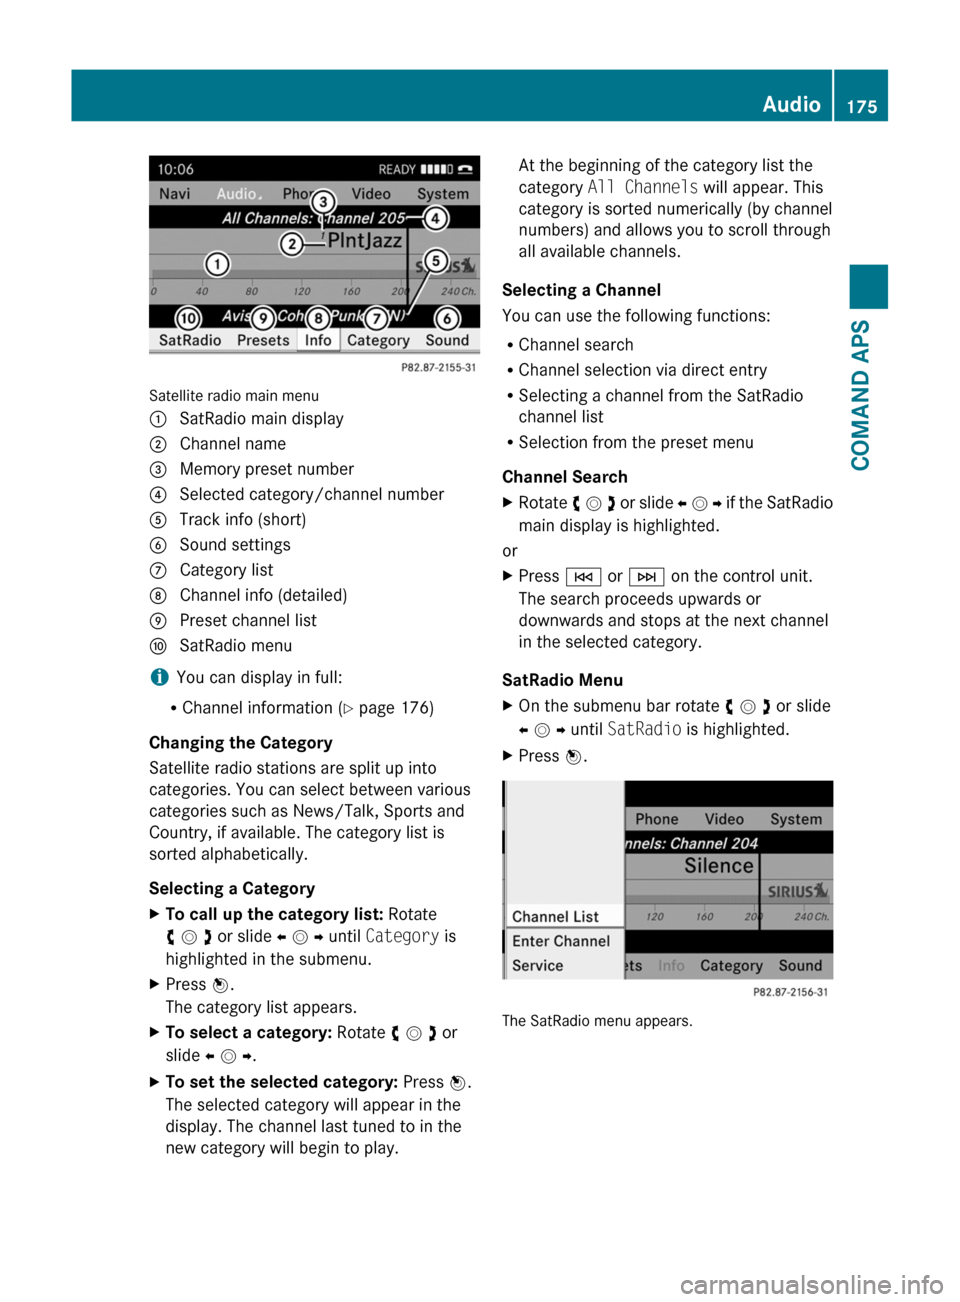
Satellite radio main menu
1 SatRadio main display2 Channel name3 Memory preset number4 Selected category/channel number5 Track info (short)6 Sound settings7 Category list8 Channel info (detailed)9 Preset channel lista SatRadio menu
iYou can display in full:
RChannel information (Y page 176)
Changing the Category
Satellite radio stations are split up into
categories. You can select between various
categories such as News/Talk, Sports and
Country, if available. The category list is
sorted alphabetically.
Selecting a Category
XTo call up the category list: Rotate
y m z or slide o m p until Category is
highlighted in the submenu.
XPress n.
The category list appears.
XTo select a category: Rotate y m z or
slide o m p.
XTo set the selected category: Press n.
The selected category will appear in the
display. The channel last tuned to in the
new category will begin to play.
At the beginning of the category list the
category All Channels will appear. This
category is sorted numerically (by channel
numbers) and allows you to scroll through
all available channels.
Selecting a Channel
You can use the following functions:
RChannel search
RChannel selection via direct entry
RSelecting a channel from the SatRadio
channel list
RSelection from the preset menu
Channel Search
XRotate y m z or slide o m p if the SatRadio
main display is highlighted.
or
XPress E or F on the control unit.
The search proceeds upwards or
downwards and stops at the next channel
in the selected category.
SatRadio Menu
XOn the submenu bar rotate y m z or slide
o m p until SatRadio is highlighted.
XPress n.
The SatRadio menu appears.
Audio175COMAND APSBA 197 USA, CA Edition A 2011; 1; 27, en-UShereepeVersion: 3.0.3.52010-03-24T15:31:10+01:00 - Seite 175Z
Page 178 of 436

Entering a Channel Number DirectlyXSelect SatRadio £ Enter Channel in
the SatRadio menu.
An input dialog appears.
or
XPress õ on the control unit.XTo enter a channel: Press corresponding
number buttons on the control unit.
COMAND will tune to the channel entered.
iYou can only select numbers that are
currently permissible.
Selecting a Channel from the SatRadio
Channel List
XSelect SatRadio £ Channel List in the
SatRadio menu.
The channel list appears.
XTo select a channel: Rotate y m z or slide
q m r
XTo tune to the selected channel:
Press n.
Memory Functions
iThere are 10 presets available.
You can use the following functions:
RStoring channels
RSelecting a channel from the Satellite
preset memory
Storing Channels
XPress n if the main area is highlighted.
or
XSelect Presets on the SatRadio submenu
bar.
In both cases, the channel memory will
appear. The dot R in front of a preset
indicates that the currently tuned channel
is stored there.
Channel Memory
XTo select a preset: Rotate y m z or slide
q m r.
XTo store a channel to a selected preset:
Press and hold n until a signal tone
sounds.
or
XPress and hold a number key, e.g. 4, until
a signal tone sounds.
The channel is stored.
Selecting a Channel from the Memory List
XTo call up the channel list: In the
submenu rotate y m z or slide o m p until
Presets is highlighted.
The presets list appears.
XTo select a channel: Rotate y m z or slide
q m r.
XTo tune to the selected channel:
Press n.
or
XPress a number key, e. g. 4 on the control
unit.
Displaying Information
XIn the submenu rotate y m z or slide
o m p until Info is highlighted.
XPress n.
Information about the current program
appears.
176AudioCOMAND APS
BA 197 USA, CA Edition A 2011; 1; 27, en-UShereepeVersion: 3.0.3.52010-03-24T15:31:10+01:00 - Seite 176
Page 241 of 436
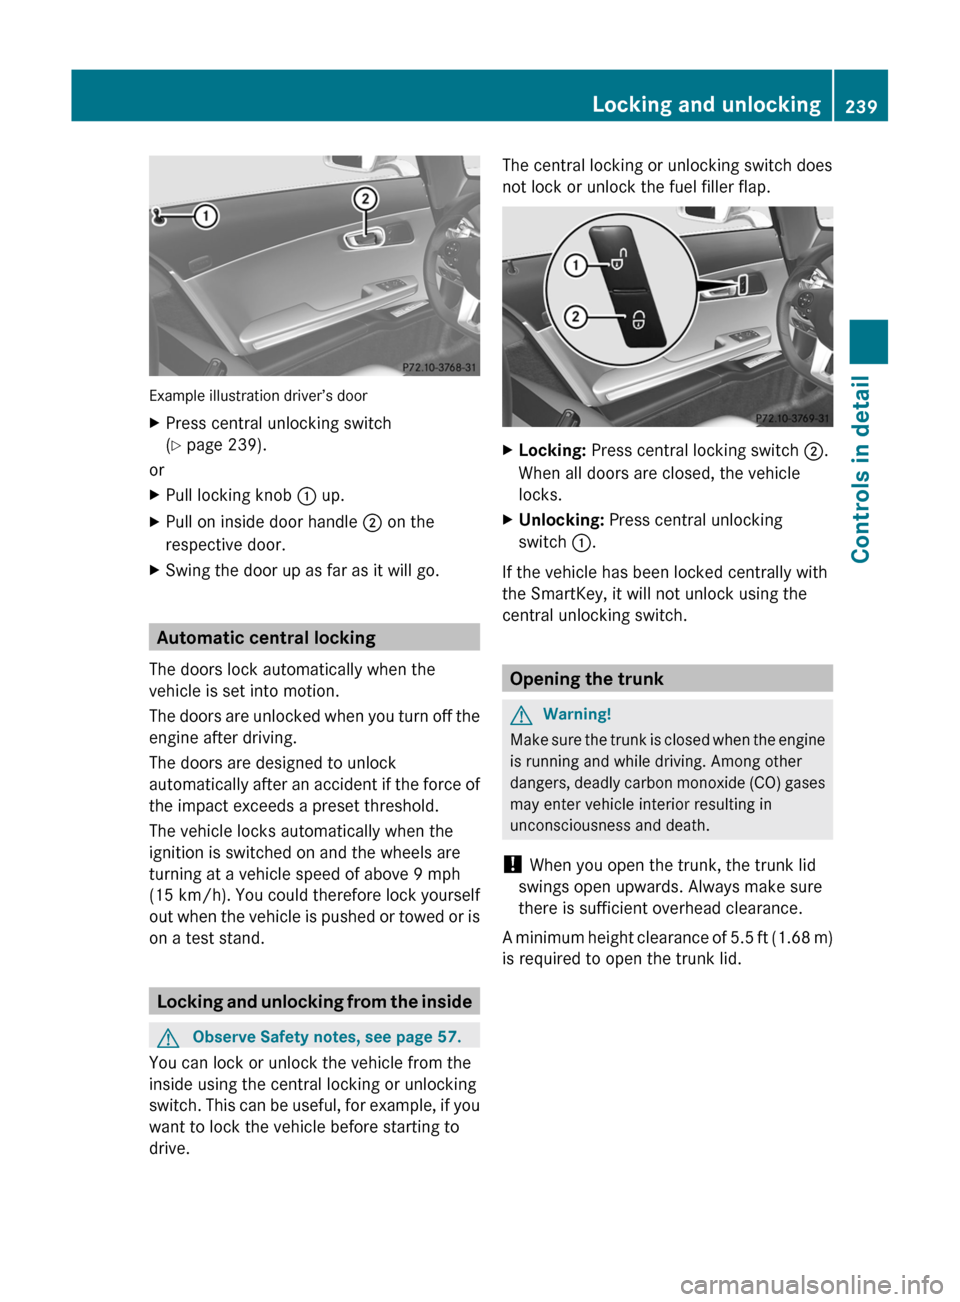
Example illustration driver’s door
XPress central unlocking switch
( Y page 239).
or
XPull locking knob : up.XPull on inside door handle ; on the
respective door.XSwing the door up as far as it will go.
Automatic central locking
The doors lock automatically when the
vehicle is set into motion.
The doors are unlocked when you turn off the
engine after driving.
The doors are designed to unlock
automatically after an accident if the force of
the impact exceeds a preset threshold.
The vehicle locks automatically when the
ignition is switched on and the wheels are
turning at a vehicle speed of above 9 mph
(15 km/h) . You could therefore lock yourself
out when the vehicle is pushed or towed or is
on a test stand.
Locking and unlocking from the inside
GObserve Safety notes, see page 57.
You can lock or unlock the vehicle from the
inside using the central locking or unlocking
switch. This can be useful, for example, if you
want to lock the vehicle before starting to
drive.
The central locking or unlocking switch does
not lock or unlock the fuel filler flap.XLocking: Press central locking switch ;.
When all doors are closed, the vehicle
locks.XUnlocking: Press central unlocking
switch :.
If the vehicle has been locked centrally with
the SmartKey, it will not unlock using the
central unlocking switch.
Opening the trunk
GWarning!
Make sure the trunk is closed when the engine
is running and while driving. Among other
dangers, deadly carbon monoxide (CO) gases
may enter vehicle interior resulting in
unconsciousness and death.
! When you open the trunk, the trunk lid
swings open upwards. Always make sure
there is sufficient overhead clearance.
A minimum height clearance of 5.5 ft (1.68 m)
is required to open the trunk lid.
Locking and unlocking239Controls in detailBA 197 USA, CA Edition A 2011; 1; 27, en-UShereepeVersion: 3.0.3.52010-03-24T15:31:10+01:00 - Seite 239Z
Page 253 of 436
Once the low-beam headlamps are on, the
high-beam headlamps are also available.
Daytime running lamp mode
In Canada, the daytime running lamp mode is
mandatory and therefore in a constant mode.
In the USA, the daytime running lamp mode
is activated by default.
XMake sure the daytime running lamp mode
is activated in the control system, see
“Switching daytime running lamp mode on
or off (USA only)” ( Y page 284).XTurn the exterior lamp switch to position
c .
When the engine is running and the
ambient light is bright, the daytime running
lamps come on.
In low ambient lighting conditions, the
following lamps will come on additionally:
R Low-beam headlamps
R Parking lamps 5
R green indicator lamp L in the
instrument cluster
You can only switch on the high-beam
headlamps when the low-beam headlamps
are on.
The high-beam flasher is available at all times.
Canada only
When the engine is running, and you
R shift from a driving position to park
position P with the vehicle at a standstill,
the daytime running lamps or the low-beam
headlamps will go out with a delay of
3 minutes
R turn the exterior lamp switch to position
T , the daytime running lamps and the
parking lamps 5
come on in bright ambient
lighting conditions.
R turn the exterior lamp switch to position
L , the manual headlamp mode has
priority over the daytime running lamp
mode
The corresponding exterior lamps come on
( Y page 250).
USA only
When the engine is running, and you turn the
exterior lamp switch to position T or
L , the manual headlamp mode has
priority over the daytime running lamp mode.
The corresponding exterior lamps come on
( Y page 250).
Locator lighting
The locator lighting is described in the
“Control system” section, see “Switching
locator lighting on or off” ( Y page 285).
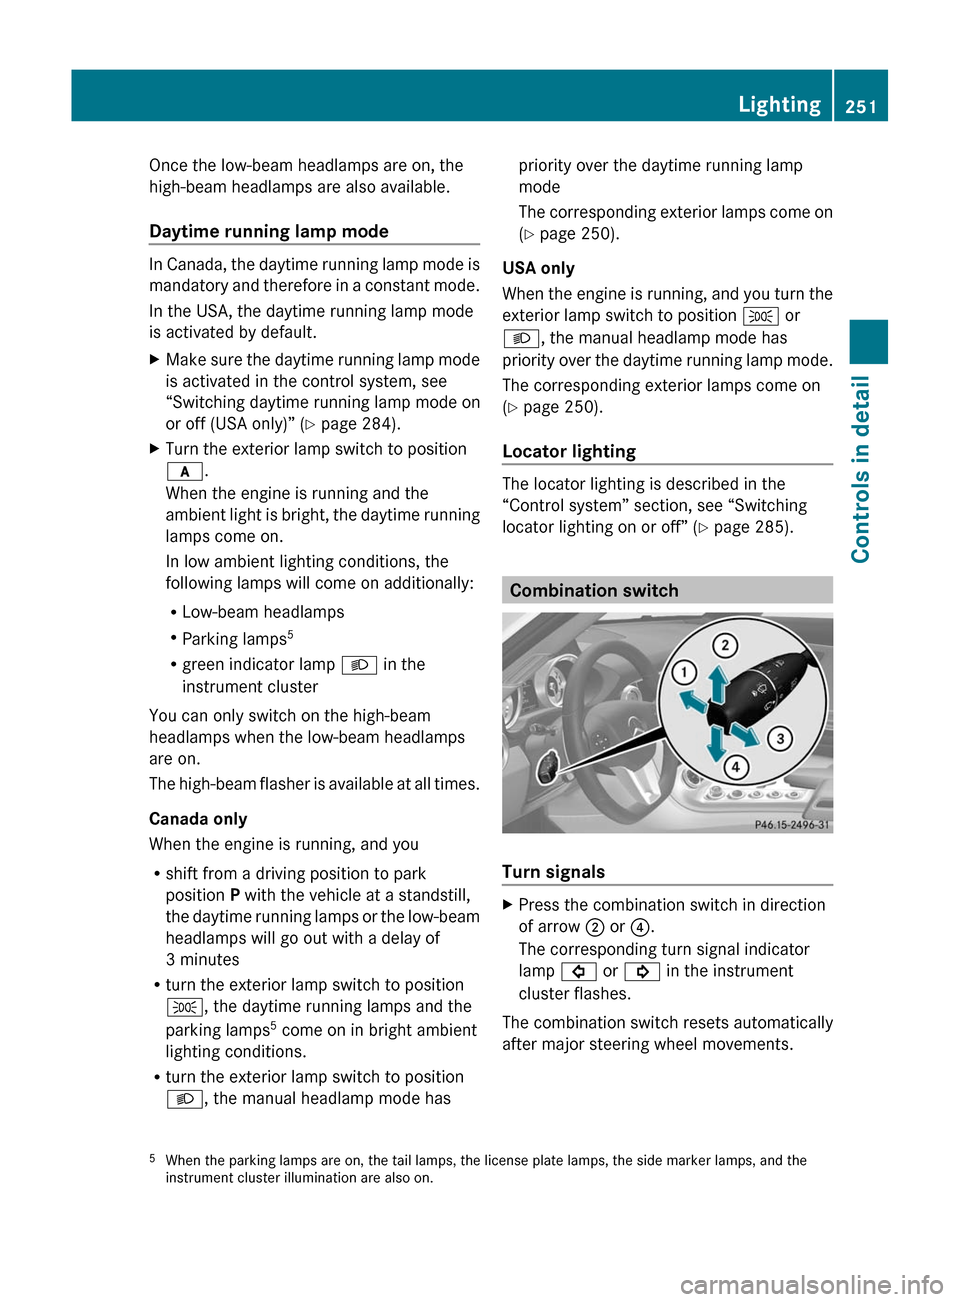
Combination switch
Turn signals
XPress the combination switch in direction
of arrow ; or ?.
The corresponding turn signal indicator
lamp # or ! in the instrument
cluster flashes.
The combination switch resets automatically
after major steering wheel movements.
5 When the parking lamps are on, the tail lamps, the license plate lamps, the side marker lamps, and the
instrument cluster illumination are also on.Lighting251Controls in detailBA 197 USA, CA Edition A 2011; 1; 27, en-UShereepeVersion: 3.0.3.52010-03-24T15:31:10+01:00 - Seite 251Z
Page 254 of 436

To signal minor directional changes:XPress the combination switch only to the
point of resistance in direction of
arrow ; or ? and release.
The corresponding turn signal lamps will
flash three times.
High beam
XTurn the exterior lamp switch to position
L (Y page 250).
XSwitching on: Push the combination
switch in direction of arrow :.
The high-beam headlamp indicator lamp
K in the instrument cluster comes on.
XSwitching off: Pull the combination switch
in direction of arrow = to its original
position.
iAlso note the information on high-beam
headlamps with activated automatic
headlamp mode (Y page 250) or the
daytime running lamp mode (Y page 251).
High-beam flasher
XSwitching on: Pull the combination switch
briefly in direction of arrow =.
Hazard warning flasher
The hazard warning flasher can be switched
on at all times, even with the SmartKey
removed from the starter switch.
The hazard warning flasher comes on
automatically when an air bag deploys.
XSwitching on: Press hazard warning
flasher switch :.
All turn signal lamps are flashing.
iWith the hazard warning flasher activated
and the combination switch set for either
left or right turn, only the respective left or
right turn signals will operate when the
ignition is switched on.
XSwitching off: Press hazard warning
flasher switch : again.
iIf the hazard warning flasher has been
activated automatically, press hazard
warning flasher switch : to switch it off.
Headlamp cleaning system
The headlamps will be cleaned with a high-
pressure water jet automatically when the
engine is running and you have
Rswitched on the headlamps
and
Rthe windshield wipers have wiped the
windshield with washer fluid for the first
time
The headlamps are cleaned every tenth time
the windshield is washed with washer fluid.
The counter resets when you switch off the
ignition.
For information on filling up the washer
reservoir, see “Washer system and headlamp
cleaning system” (Y page 325).
252LightingControls in detail
BA 197 USA, CA Edition A 2011; 1; 27, en-UShereepeVersion: 3.0.3.52010-03-24T15:31:10+01:00 - Seite 252
Page 272 of 436
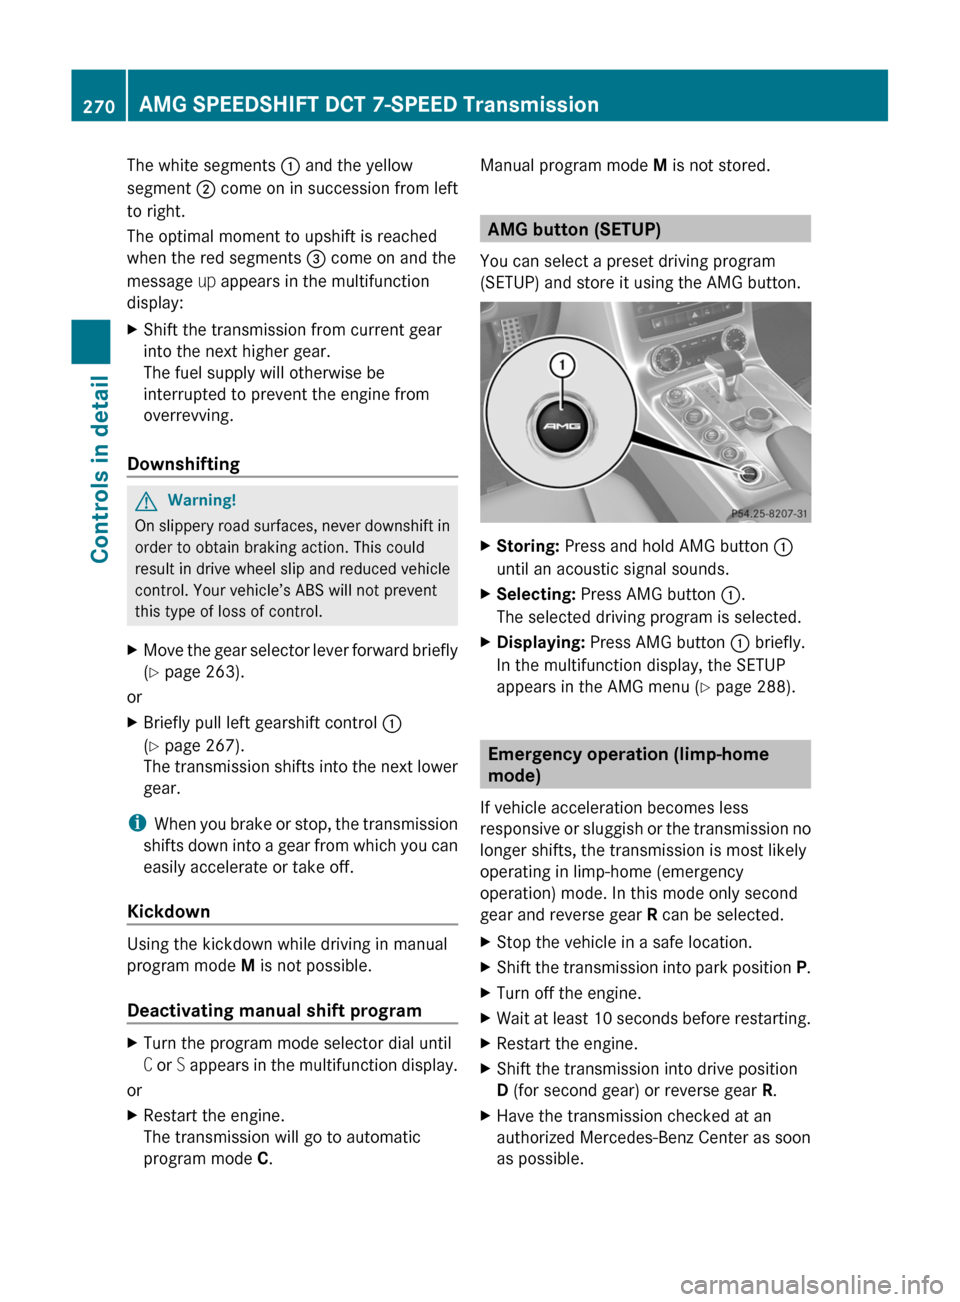
The white segments : and the yellow
segment ; come on in succession from left
to right.
The optimal moment to upshift is reached
when the red segments = come on and the
message up appears in the multifunction
display:
XShift the transmission from current gear
into the next higher gear.
The fuel supply will otherwise be
interrupted to prevent the engine from
overrevving.
Downshifting
GWarning!
On slippery road surfaces, never downshift in
order to obtain braking action. This could
result in drive wheel slip and reduced vehicle
control. Your vehicle’s ABS will not prevent
this type of loss of control.
XMove the gear selector lever forward briefly
(Y page 263).
or
XBriefly pull left gearshift control :
(Y page 267).
The transmission shifts into the next lower
gear.
iWhen you brake or stop, the transmission
shifts down into a gear from which you can
easily accelerate or take off.
Kickdown
Using the kickdown while driving in manual
program mode M is not possible.
Deactivating manual shift program
XTurn the program mode selector dial until
C or S appears in the multifunction display.
or
XRestart the engine.
The transmission will go to automatic
program mode C.
Manual program mode M is not stored.
AMG button (SETUP)
You can select a preset driving program
(SETUP) and store it using the AMG button.
XStoring: Press and hold AMG button :
until an acoustic signal sounds.
XSelecting: Press AMG button :.
The selected driving program is selected.
XDisplaying: Press AMG button : briefly.
In the multifunction display, the SETUP
appears in the AMG menu (Y page 288).
Emergency operation (limp-home
mode)
If vehicle acceleration becomes less
responsive or sluggish or the transmission no
longer shifts, the transmission is most likely
operating in limp-home (emergency
operation) mode. In this mode only second
gear and reverse gear R can be selected.
XStop the vehicle in a safe location.XShift the transmission into park position P.XTurn off the engine.XWait at least 10 seconds before restarting.XRestart the engine.XShift the transmission into drive position
D (for second gear) or reverse gear R.
XHave the transmission checked at an
authorized Mercedes-Benz Center as soon
as possible.
270AMG SPEEDSHIFT DCT 7-SPEED TransmissionControls in detail
BA 197 USA, CA Edition A 2011; 1; 27, en-UShereepeVersion: 3.0.3.52010-03-24T15:31:10+01:00 - Seite 270
Page 277 of 436
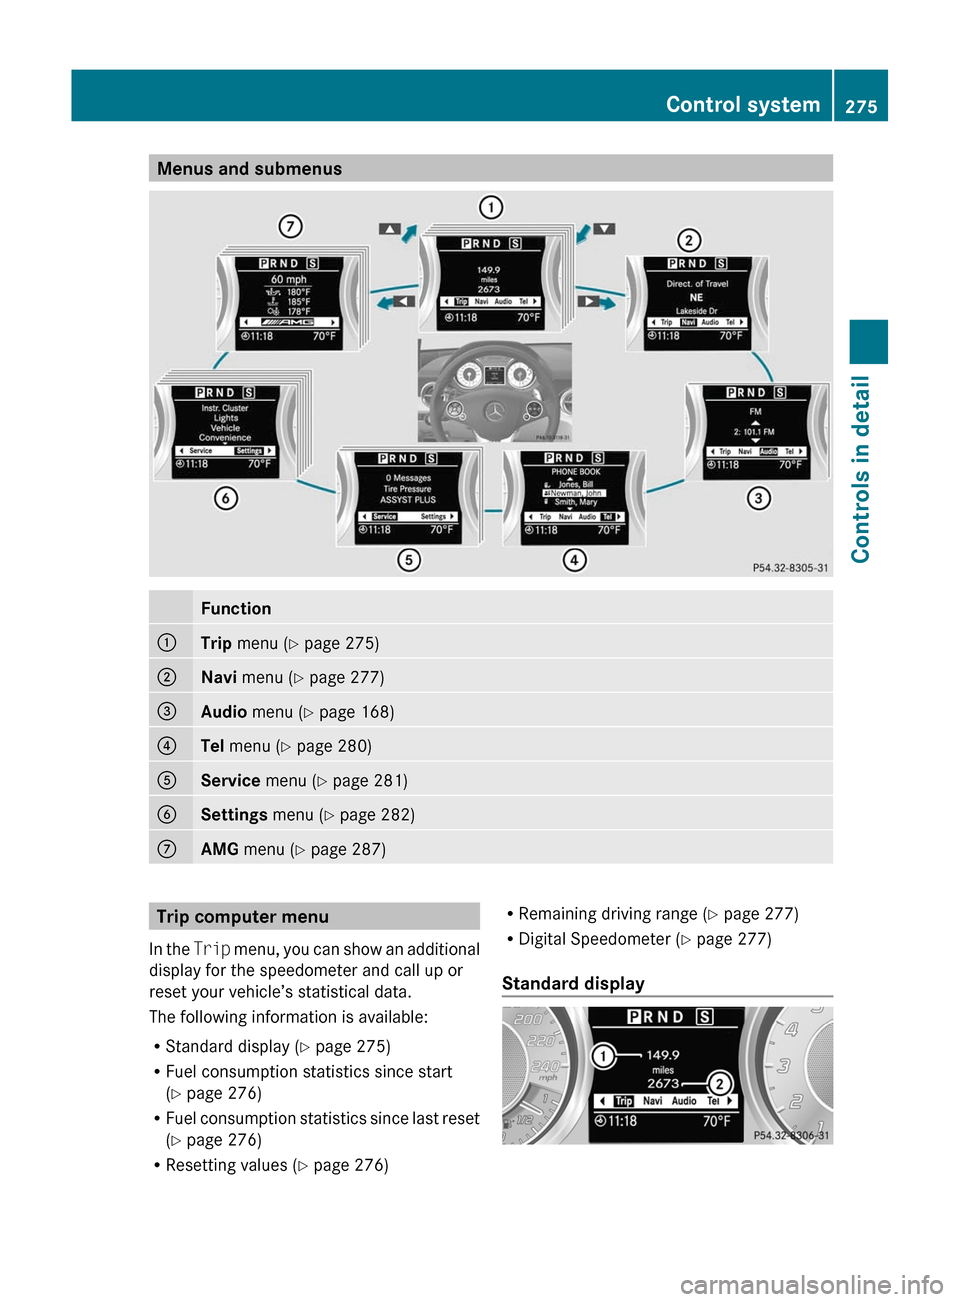
Menus and submenusFunction:Trip menu ( Y page 275);Navi menu ( Y page 277)=Audio menu ( Y page 168)?Tel menu ( Y page 280)AService menu (Y page 281)BSettings menu (Y page 282)CAMG menu ( Y page 287)Trip computer menu
In the Trip menu, you can show an additional
display for the speedometer and call up or
reset your vehicle’s statistical data.
The following information is available:
R Standard display ( Y page 275)
R Fuel consumption statistics since start
( Y page 276)
R Fuel consumption statistics since last reset
( Y page 276)
R Resetting values ( Y page 276)R
Remaining driving range ( Y page 277)
R Digital Speedometer ( Y page 277)
Standard display Control system275Controls in detailBA 197 USA, CA Edition A 2011; 1; 27, en-UShereepeVersion: 3.0.3.52010-03-24T15:31:10+01:00 - Seite 275Z
Page 278 of 436
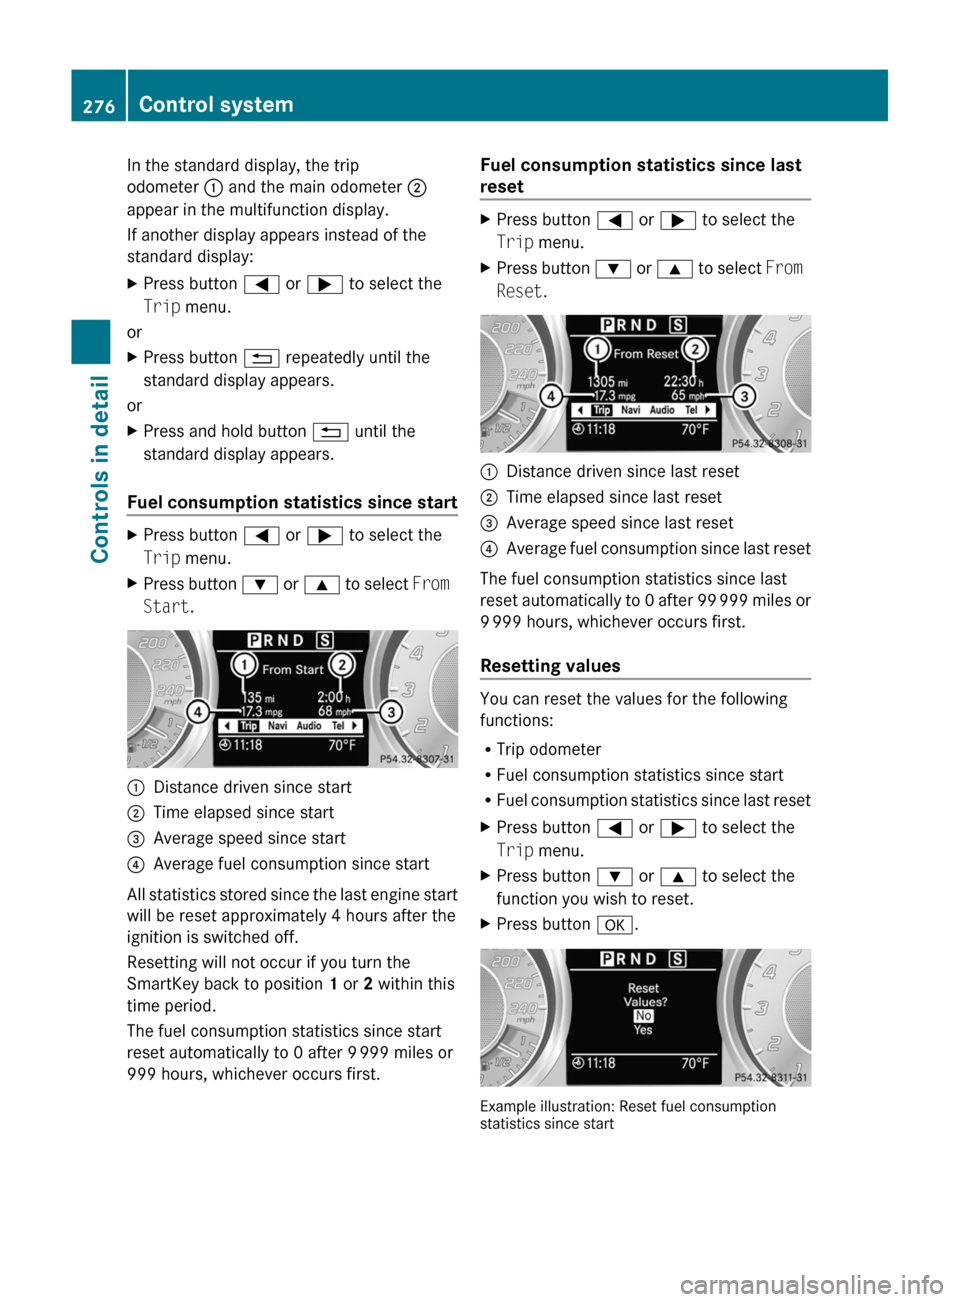
In the standard display, the trip
odometer : and the main odometer ;
appear in the multifunction display.
If another display appears instead of the
standard display:XPress button = or ; to select the
Trip menu.
or
XPress button % repeatedly until the
standard display appears.
or
XPress and hold button % until the
standard display appears.
Fuel consumption statistics since start
XPress button = or ; to select the
Trip menu.XPress button : or 9 to select From
Start .:Distance driven since start;Time elapsed since start=Average speed since start?Average fuel consumption since start
All statistics stored since the last engine start
will be reset approximately 4 hours after the
ignition is switched off.
Resetting will not occur if you turn the
SmartKey back to position 1 or 2 within this
time period.
The fuel consumption statistics since start
reset automatically to 0 after 9 999 miles or
999 hours, whichever occurs first.
Fuel consumption statistics since last
resetXPress button = or ; to select the
Trip menu.XPress button : or 9 to select From
Reset .:Distance driven since last reset;Time elapsed since last reset=Average speed since last reset?Average fuel consumption since last reset
The fuel consumption statistics since last
reset automatically to 0 after 99 999 miles or
9 999 hours, whichever occurs first.
Resetting values
You can reset the values for the following
functions:
R Trip odometer
R Fuel consumption statistics since start
R Fuel consumption statistics since last reset
XPress button = or ; to select the
Trip menu.XPress button : or 9 to select the
function you wish to reset.XPress button a.
Example illustration: Reset fuel consumption
statistics since start
276Control systemControls in detail
BA 197 USA, CA Edition A 2011; 1; 27, en-UShereepeVersion: 3.0.3.52010-03-24T15:31:10+01:00 - Seite 276