2011 MERCEDES-BENZ SLS window
[x] Cancel search: windowPage 34 of 436

Exterior viewiThis Operator’s Manual describes all
features, standard or optional, potentially
available for your vehicle at the time of
purchase. Please be aware that your
vehicle might not be equipped with all
features described in this manual.FunctionPage:Trunk:Locking and unlocking236, 397Opening and closing239Valet locking241;Rear window defroster304=Rear lamps400?Fuel filler flap320ADoors:Locking and unlocking236,397FunctionPageBWindshield:Wiping with washer fluid253Cleaning358CExterior rear view mirrors246DWipers253Wiper blades, replacing400Wiper blades, cleaning358EHood322FHeadlamp cleaning system252GTowing eye415HFront lamps400ITires and wheels326Rims and tires42232Exterior viewAt a glance
BA 197 USA, CA Edition A 2011; 1; 27, en-UShereepeVersion: 3.0.3.52010-03-24T15:31:10+01:00 - Seite 32
Page 43 of 436
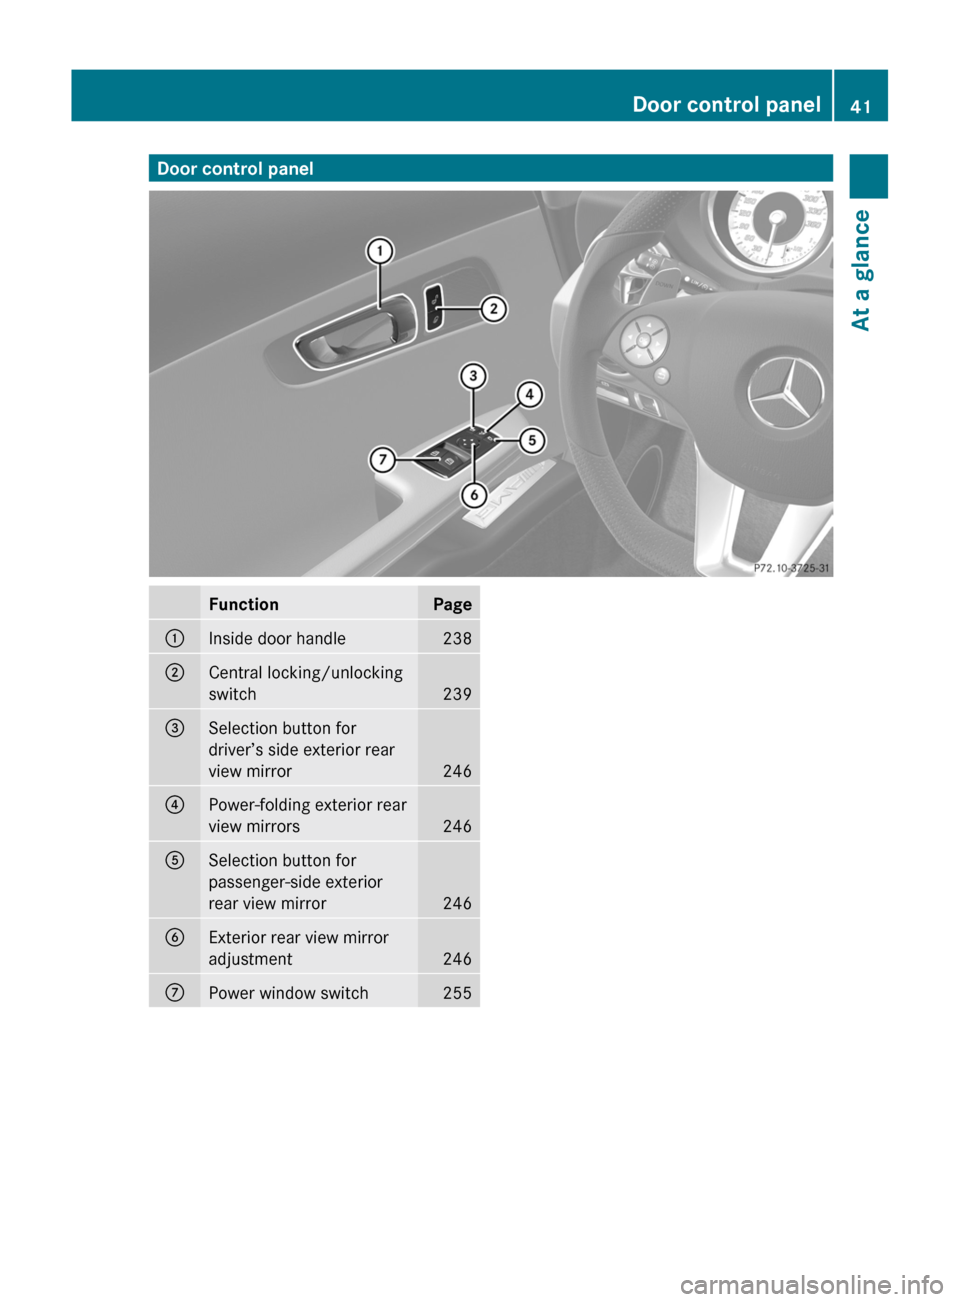
Door control panelFunctionPage:Inside door handle238;Central locking/unlocking
switch239
=Selection button for
driver’s side exterior rear
view mirror246
?Power-folding exterior rear
view mirrors246
ASelection button for
passenger-side exterior
rear view mirror246
BExterior rear view mirror
adjustment246
CPower window switch255Door control panel41At a glanceBA 197 USA, CA Edition A 2011; 1; 27, en-UShereepeVersion: 3.0.3.52010-03-24T15:31:10+01:00 - Seite 41
Page 47 of 436
on the SRS must therefore only be performed
by qualified technicians. Contact an
authorized Mercedes-Benz Center.
If it is necessary to modify an air bag system
to accommodate a person with disabilities,
contact an authorized Mercedes-Benz Center.
USA only: Call our Customer Assistance
Center at 1-800-FOR-MERCedes
(1-800-367-6372) for details.
Air bags
GWarning!
Air bags are designed to reduce the potential
of injury and fatality in certain
R frontal impacts (front air bags and knee
bags)
R side impacts (side impact air bags and head
air bags)
However, no system available today can
completely eliminate injuries and fatalities.
Deployment of the air bags temporarily
releases a small amount of dust from the air
bags. This dust, however, is neither harmful
to your health, nor does it indicate a fire in the
vehicle. The dust might cause some
temporary breathing difficulty for people with
asthma or other breathing trouble. To avoid
this, you may wish to get out of the vehicle as
soon as it is safe to do so. If you have any
breathing difficulty but cannot get out of the
vehicle after the air bag inflates, then get fresh
air by opening a window or door.
GWarning!
To reduce the risk of injury when the front air
bags inflate, it is very important for the driver
and passenger to always be in a properly
seated position and to wear their seat belts.
For maximum protection in the event of a
collision always be in normal seated position
with your back against the seat backrest.
Fasten your seat belt and make sure it is
properly positioned on your body.
Since the air bag inflates with considerable
speed and force, a proper seating position
and correct positioning of the hands on the
steering wheel will help to keep you at a safe
distance from the air bag. Occupants who are
not wearing their seat belt, are not seated
properly or are too close to the air bag can be
seriously injured or killed by an air bag as it
inflates with great force instantaneously:
R Sit with the seat belt properly fastened in a
position that is as upright as possible with
your back against the seat backrest.
R Move the driver’s seat as far back as
possible, still permitting proper operation
of vehicle controls. The distance from the
center of the driver’s chest to the center of
the air bag cover on the steering wheel
must be at least 10 inches (25 cm) or more.
You should be able to accomplish this by
adjusting the seat and steering wheel. If
you have any difficulties, please contact an
authorized Mercedes-Benz Center.
R Do not lean your head or chest close to the
steering wheel or dashboard.
R Keep hands on the outside of the steering
wheel rim. Placing hands and arms inside
the rim can increase the risk and potential
severity of hand/arm injury when the driver
front air bag inflates.
R Adjust the passenger seat as far as possible
rearward from the dashboard when the
seat is occupied.
R Occupants, especially children, should
never place their bodies or lean their heads
in the area of the door where the head air
bag inflates. This could result in serious
injuries or death should the head air bag be
deployed. Always sit as upright as possible,
wear the seat belt properly and use an
appropriately sized infant restraint, toddler
restraint, or booster seat recommended for
the size and weight of the child.
Failure to follow these instructions can result
in severe injuries to you or other occupants.
If you sell your vehicle, it is important that you
make the buyer aware of this safetyOccupant safety45Safety and securityBA 197 USA, CA Edition A 2011; 1; 27, en-UShereepeVersion: 3.0.3.52010-03-24T15:31:10+01:00 - Seite 45Z
Page 72 of 436
Introduction
Where to Find it
This operator's manual has been designed to
help you use your COMAND control unit in all
situations. Since not all models have the
same standard equipment, your COMAND
system equipment may deviate from some
descriptions and illustrations.
At a Glance
Here you will find an overview of the
components of COMAND. Then you will find
examples illustrating how to operate
COMAND and information on the basic
functions. If you are operating a COMAND for
the first time or have rented the vehicle, you
should first read this chapter.
System Settings
Here you will find all the important
information regarding the system settings of
the COMAND.
Navigation
Here you will find detailed information
regarding the following topics:
R Setting options for the map display and the
route calculation
R Destination input
R Search & Send
R POI input
R Route guidance
R Traffic information
R Destination memory
Telephone
The telephone functions are described here.
You will also find information on the address
book.
Audio
Here you will find all information regarding
the audio function and its Radio, SatRadio,
CD-audio/DVD audio/MP3, Music Register,
Media Interface and Audio Aux modes.
Video
Here you will find all information regarding
the video system.
Voice Control
Here you will find information about operating
several COMAND functions via Voice Control.
Indexes
Content and keyword indexes are intended to
help you find information quickly.
Symbols
Trademarks ®
:
R Bluetooth ®
is a registered trademark of
Bluetooth SIG Inc.
R Microsoft ®
is a registered trademark of
Microsoft Corporation in the United States
and other countries
R SIRIUS and related marks are trademarks
of SIRIUS Satellite Radio Inc.
R Windows media ®
is a registered trademark
of Microsoft Corporation in the United
States and other countries
You will find the following symbols in these
operating instructions:
GWarning!
Warning notices draw your attention to
hazards that may endanger your health or life,
or the health or life of others.
! Highlights hazards that may result in
damage to your COMAND.
i Helpful hints or further information you
may find useful.
70IntroductionCOMAND APS
BA 197 USA, CA Edition A 2011; 1; 27, en-UShereepeVersion: 3.0.3.52010-03-24T15:31:10+01:00 - Seite 70
Page 90 of 436

Selecting a list entry
Town list in navigation mode
: G symbol for additional optionsXTo select a town: Rotate y m z or slide
q m r.
XTo confirm selection: Press n.
A town with the G symbol exists more
than once in the selected state/province
or it has subentries. Confirming this type of
town will result in a further selection. The
G symbol then switches to I.
Operating Example
Switching to Radio Mode and Calling up
the Station List
Initial situation: You would like to switch, for
example, from the phone function to radio
mode and request the Presets list from
there.
iIn this guide, the path to a menu item is
shown as an action in a special typeface.
Audio £ Audio £ FM/AM Radio £
Radio £ Presets.
iDepending on the initial situation, this
sequence of actions may be shorter.
If radio mode was active last, it is sufficient
to select Audio £ Radio £ Presets.
The individual steps for the above example
are described below.
Switching to the Current Audio Mode
iYou can also call up the current audio
mode using the buttons $ or h.
XTo move to the main function line:
Slide q m.
XTo select the audio main function:
Rotate y m z or slide o m p.
XTo confirm your selection: Press n.
The main display of the previous audio
operating mode, e.g. CD audio, appears.
The selection bar is in the display/selection
window.
1 Selection bar
Switching to Radio Mode
XTo select Audio again: Slide q m.XTo confirm selection: Press n.
The Audio menu appears.
XTo select FM/AM Radio: Rotate y m z or
slide q m.
XTo confirm selection: Press n.
The radio main display appears.
88At a glanceCOMAND APS
BA 197 USA, CA Edition A 2011; 1; 27, en-UShereepeVersion: 3.0.3.52010-03-24T15:31:10+01:00 - Seite 88
Page 97 of 436
Voice Control
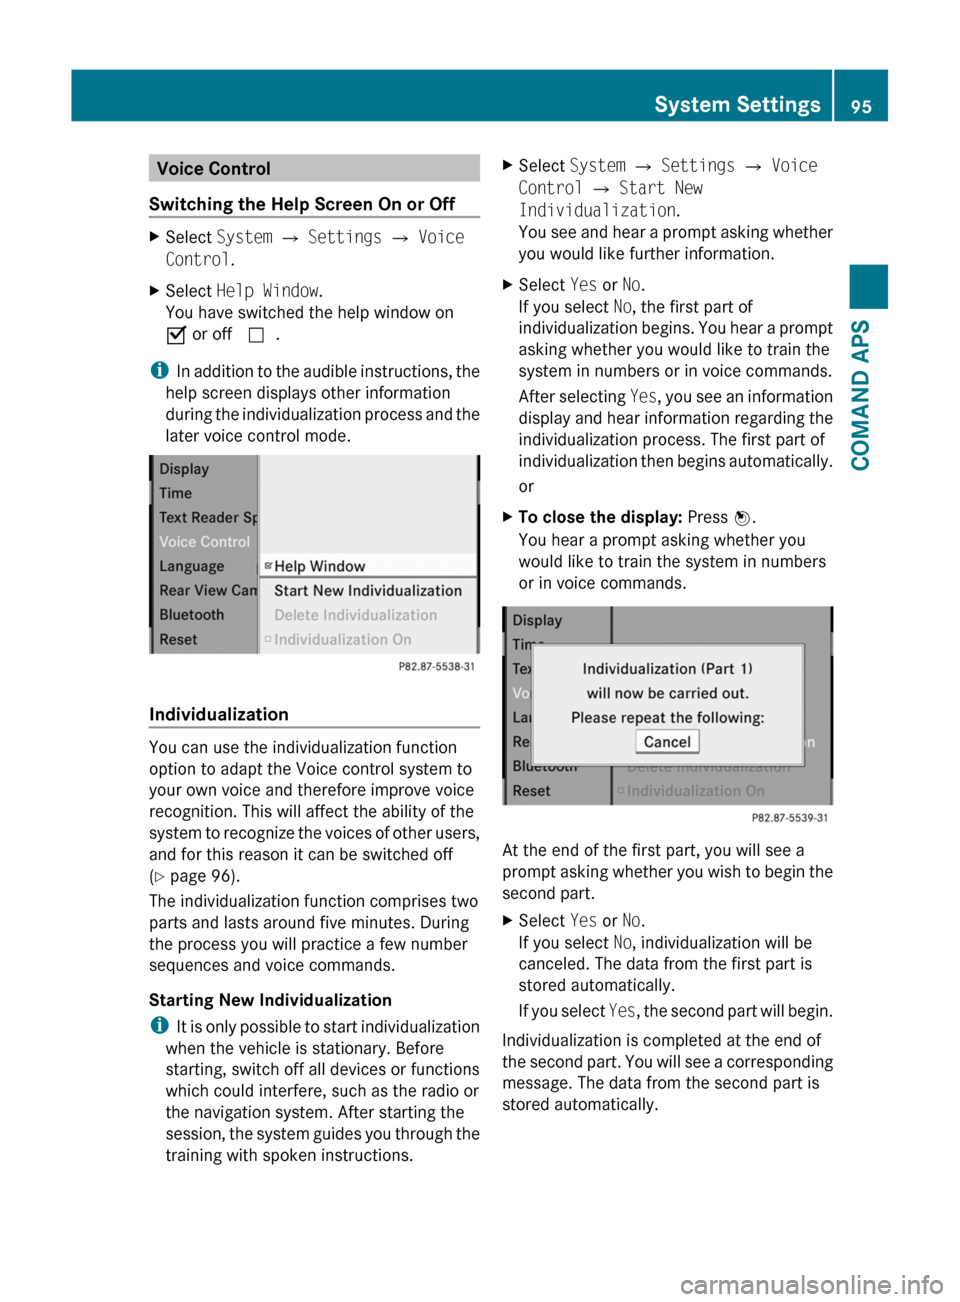
Switching the Help Screen On or Off
XSelect System £ Settings £ Voice
Control.
XSelect Help Window.
You have switched the help window on
Ç or off c.
iIn addition to the audible instructions, the
help screen displays other information
during the individualization process and the
later voice control mode.
Individualization
You can use the individualization function
option to adapt the Voice control system to
your own voice and therefore improve voice
recognition. This will affect the ability of the
system to recognize the voices of other users,
and for this reason it can be switched off
(Y page 96).
The individualization function comprises two
parts and lasts around five minutes. During
the process you will practice a few number
sequences and voice commands.
Starting New Individualization
iIt is only possible to start individualization
when the vehicle is stationary. Before
starting, switch off all devices or functions
which could interfere, such as the radio or
the navigation system. After starting the
session, the system guides you through the
training with spoken instructions.
XSelect System £ Settings £ Voice
Control £ Start New
Individualization.
You see and hear a prompt asking whether
you would like further information.
XSelect Yes or No.
If you select No, the first part of
individualization begins. You hear a prompt
asking whether you would like to train the
system in numbers or in voice commands.
After selecting Yes, you see an information
display and hear information regarding the
individualization process. The first part of
individualization then begins automatically.
or
XTo close the display: Press n.
You hear a prompt asking whether you
would like to train the system in numbers
or in voice commands.
At the end of the first part, you will see a
prompt asking whether you wish to begin the
second part.
XSelect Yes or No.
If you select No, individualization will be
canceled. The data from the first part is
stored automatically.
If you select Yes, the second part will begin.
Individualization is completed at the end of
the second part. You will see a corresponding
message. The data from the second part is
stored automatically.
System Settings95COMAND APSBA 197 USA, CA Edition A 2011; 1; 27, en-UShereepeVersion: 3.0.3.52010-03-24T15:31:10+01:00 - Seite 95Z
Page 108 of 436
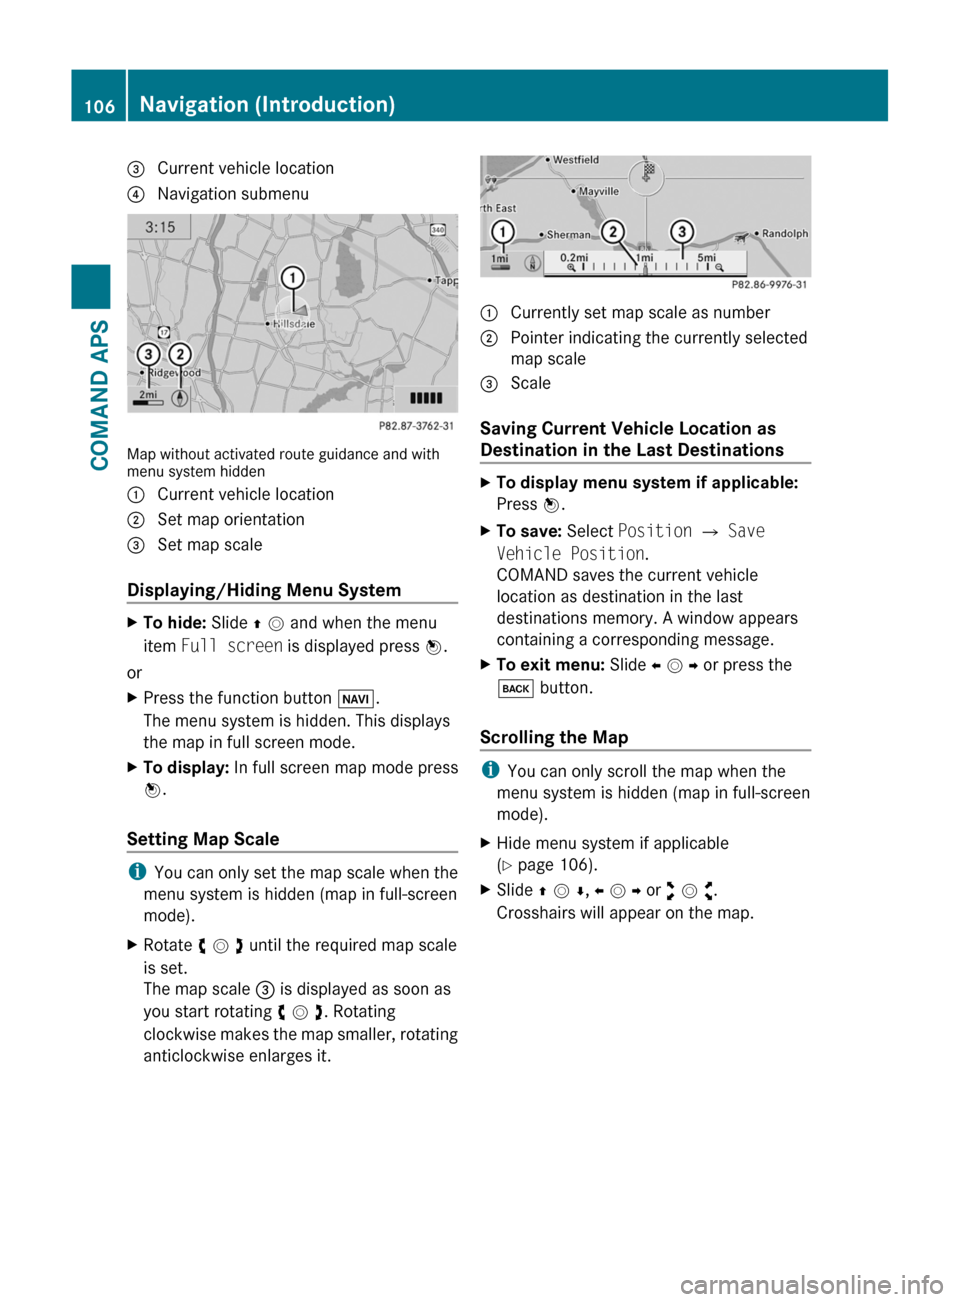
3 Current vehicle location4 Navigation submenu
Map without activated route guidance and withmenu system hidden
1 Current vehicle location2 Set map orientation3 Set map scale
Displaying/Hiding Menu System
XTo hide: Slide q m and when the menu
item Full screen is displayed press n.
or
XPress the function button Ø.
The menu system is hidden. This displays
the map in full screen mode.
XTo display: In full screen map mode press
n.
Setting Map Scale
iYou can only set the map scale when the
menu system is hidden (map in full-screen
mode).
XRotate y m z until the required map scale
is set.
The map scale 3 is displayed as soon as
you start rotating y m z. Rotating
clockwise makes the map smaller, rotating
anticlockwise enlarges it.
1 Currently set map scale as number2 Pointer indicating the currently selected
map scale
3 Scale
Saving Current Vehicle Location as
Destination in the Last Destinations
XTo display menu system if applicable:
Press n.
XTo save: Select Position £ Save
Vehicle Position.
COMAND saves the current vehicle
location as destination in the last
destinations memory. A window appears
containing a corresponding message.
XTo exit menu: Slide o m p or press the
k button.
Scrolling the Map
iYou can only scroll the map when the
menu system is hidden (map in full-screen
mode).
XHide menu system if applicable
(Y page 106).
XSlide q m r, o m p or w m x.
Crosshairs will appear on the map.
106Navigation (Introduction)COMAND APS
BA 197 USA, CA Edition A 2011; 1; 27, en-UShereepeVersion: 3.0.3.52010-03-24T15:31:10+01:00 - Seite 106
Page 109 of 436
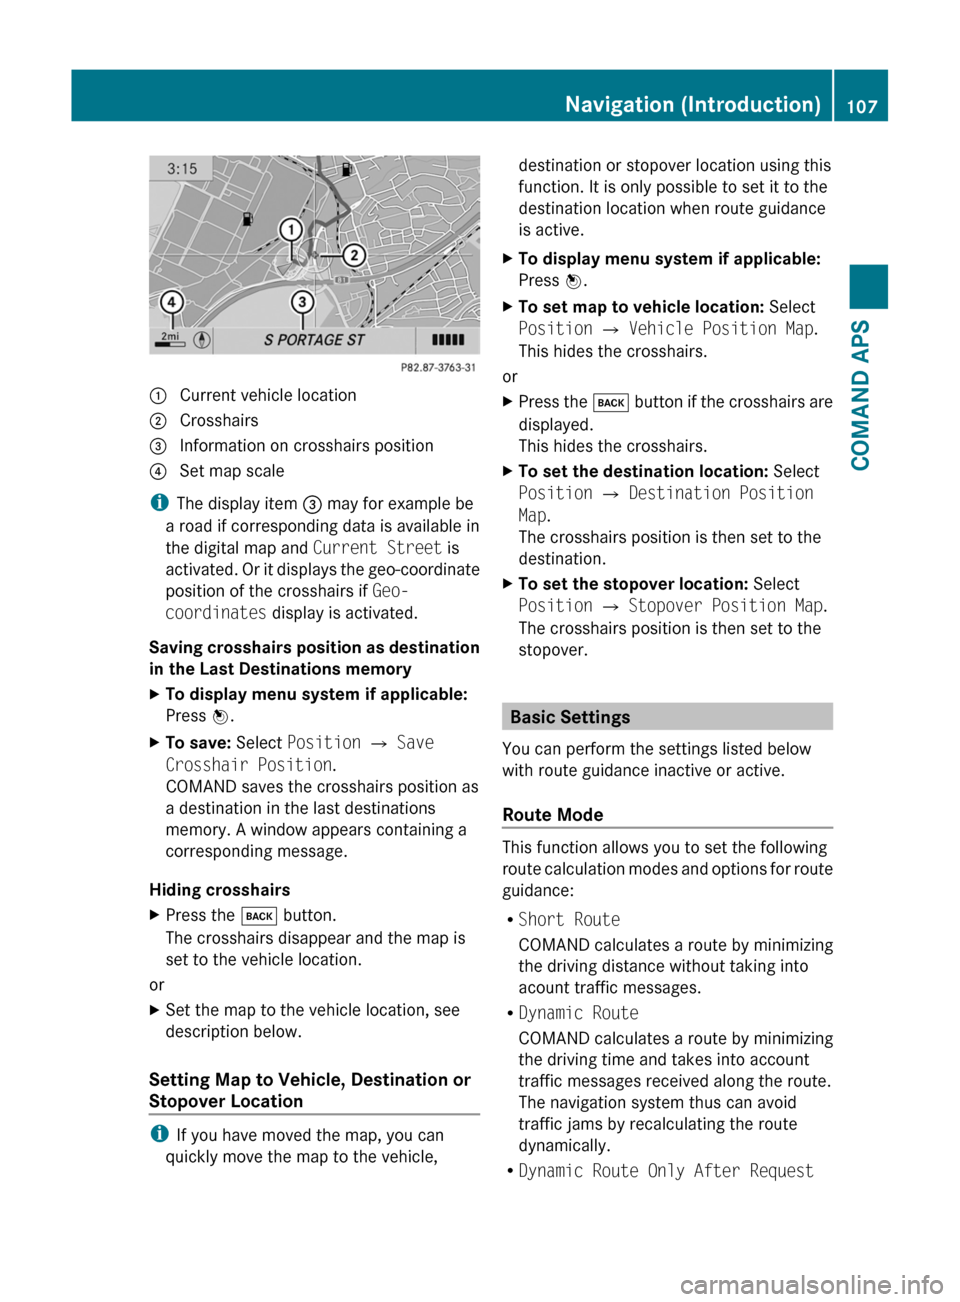
1 Current vehicle location2 Crosshairs3 Information on crosshairs position4 Set map scale
iThe display item 3 may for example be
a road if corresponding data is available in
the digital map and Current Street is
activated. Or it displays the geo-coordinate
position of the crosshairs if Geo-
coordinates display is activated.
Saving crosshairs position as destination
in the Last Destinations memory
XTo display menu system if applicable:
Press n.
XTo save: Select Position £ Save
Crosshair Position.
COMAND saves the crosshairs position as
a destination in the last destinations
memory. A window appears containing a
corresponding message.
Hiding crosshairs
XPress the k button.
The crosshairs disappear and the map is
set to the vehicle location.
or
XSet the map to the vehicle location, see
description below.
Setting Map to Vehicle, Destination or
Stopover Location
iIf you have moved the map, you can
quickly move the map to the vehicle,
destination or stopover location using this
function. It is only possible to set it to the
destination location when route guidance
is active.
XTo display menu system if applicable:
Press n.
XTo set map to vehicle location: Select
Position £ Vehicle Position Map.
This hides the crosshairs.
or
XPress the k button if the crosshairs are
displayed.
This hides the crosshairs.
XTo set the destination location: Select
Position £ Destination Position
Map.
The crosshairs position is then set to the
destination.
XTo set the stopover location: Select
Position £ Stopover Position Map.
The crosshairs position is then set to the
stopover.
Basic Settings
You can perform the settings listed below
with route guidance inactive or active.
Route Mode
This function allows you to set the following
route calculation modes and options for route
guidance:
RShort Route
COMAND calculates a route by minimizing
the driving distance without taking into
acount traffic messages.
RDynamic Route
COMAND calculates a route by minimizing
the driving time and takes into account
traffic messages received along the route.
The navigation system thus can avoid
traffic jams by recalculating the route
dynamically.
RDynamic Route Only After Request
Navigation (Introduction)107COMAND APSBA 197 USA, CA Edition A 2011; 1; 27, en-UShereepeVersion: 3.0.3.52010-03-24T15:31:10+01:00 - Seite 107Z