2011 MERCEDES-BENZ SLS AMG radio
[x] Cancel search: radioPage 92 of 436
During a telephone call:XTurn the \000C rotary/push button.
or
XPress the \000Z or \000[ button on the multi-
function steering wheel.
Sound Settings
You can select different sound settings for
each audio and video source. The sound
menu can be opened from the submenu of the
desired operating mode.
Examples:
RAudio £ FM/AM Radio £ Sound
RAudio £ Disc £ Sound
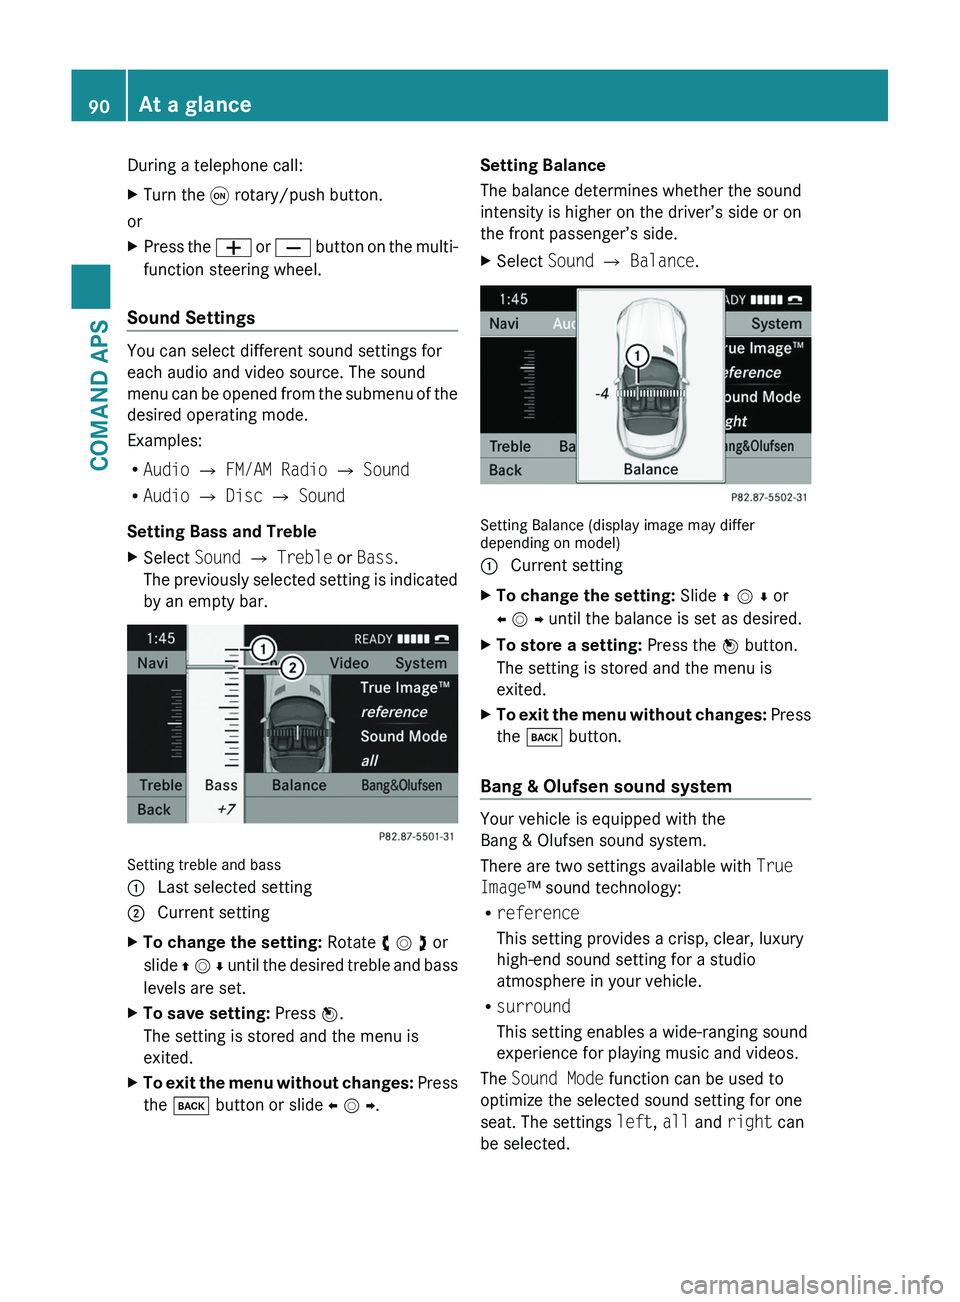
Setting Bass and Treble
XSelect Sound £ Treble or Bass.
The previously selected setting is indicated
by an empty bar.
Setting treble and bass
1 Last selected setting2 Current settingXTo change the setting: Rotate y m z or
slide q m r until the desired treble and bass
levels are set.
XTo save setting: Press n.
The setting is stored and the menu is
exited.
XTo exit the menu without changes: Press
the \000= button or slide o m p.
Setting Balance
The balance determines whether the sound
intensity is higher on the driver’s side or on
the front passenger’s side.
XSelect Sound £ Balance.
Setting Balance (display image may differdepending on model)
1 Current settingXTo change the setting: Slide q m r or
o m p until the balance is set as desired.
XTo store a setting: Press the n button.
The setting is stored and the menu is
exited.
XTo exit the menu without changes: Press
the \000= button.
Bang & Olufsen sound system
Your vehicle is equipped with the
Bang & Olufsen sound system.
There are two settings available with True
Image™ sound technology:
Rreference
This setting provides a crisp, clear, luxury
high-end sound setting for a studio
atmosphere in your vehicle.
Rsurround
This setting enables a wide-ranging sound
experience for playing music and videos.
The Sound Mode function can be used to
optimize the selected sound setting for one
seat. The settings left, all and right can
be selected.
90At a glanceCOMAND APS
BA 197 USA, CA Edition A 2011; 1; 27, en-UShereepeVersion: 3.0.3.52010-03-24T15:31:10+01:00 - Seite 90
Page 93 of 436
The Bang & Olufsen sound system provides
the following operating modes:
RRadio (FM only)
RSat radio
RAudio CD
RAudio DVD (MLP, DTS, PCM and Dolby
Digital audio formats)
RMP3 (including PCMCIA memory card)
RMedia Interface
RVideo DVD (PCM, DTS and Dolby Digital
audio formats)
RAUX
Since many DVDs contain both stereo and
multi-channel audio formats, it may be
necessary to set the audio format
(Y page 189).
Discs which support the audio formats
mentioned have the following logos:
Dolby® Digital
DTS™
MLP™
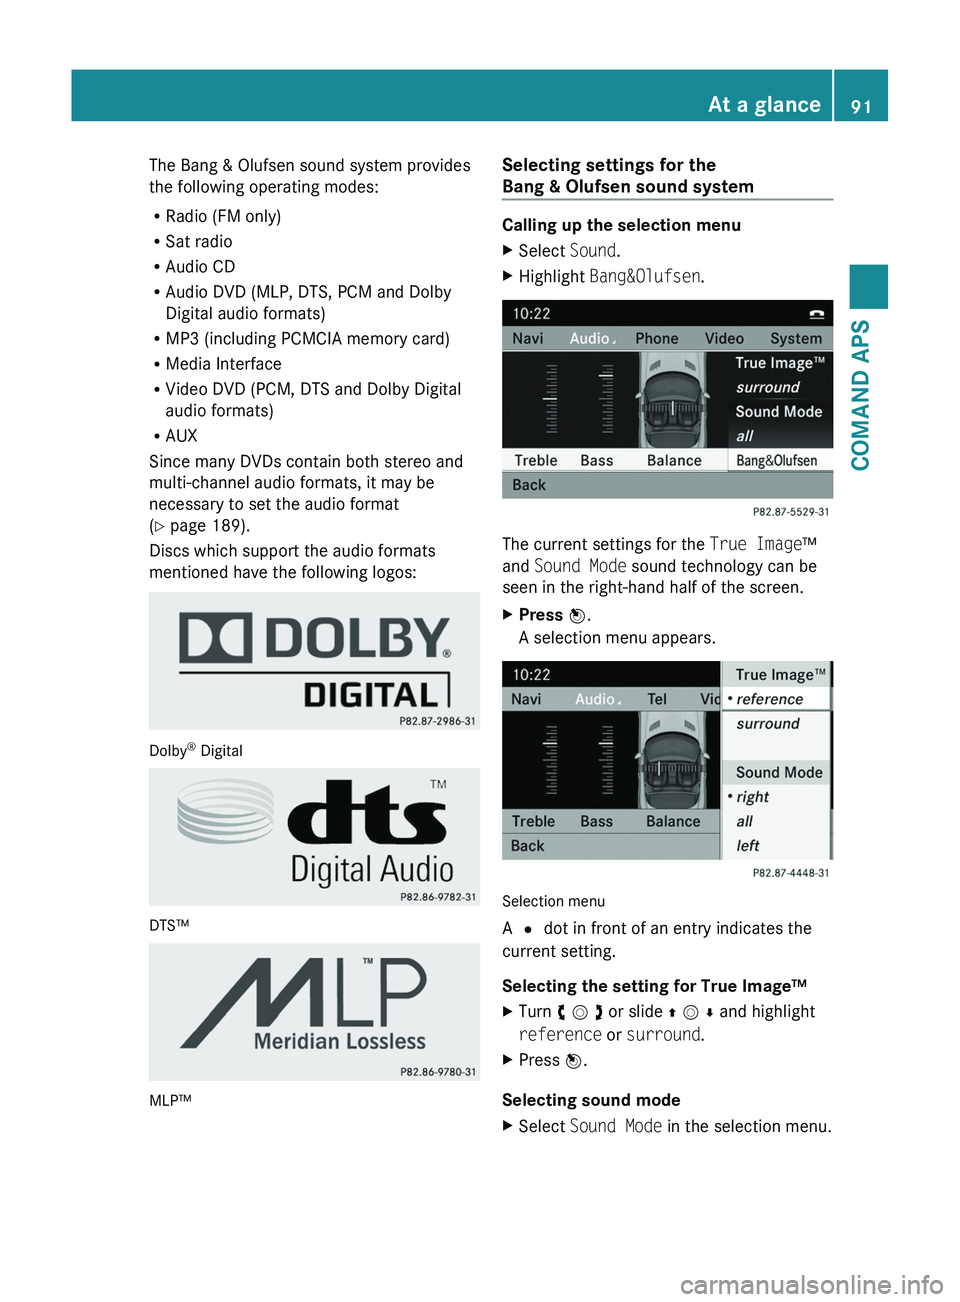
Selecting settings for the
Bang & Olufsen sound system
Calling up the selection menu
XSelect Sound.XHighlight Bang&Olufsen.
The current settings for the True Image™
and Sound Mode sound technology can be
seen in the right-hand half of the screen.
XPress \000
Page 97 of 436
Voice Control
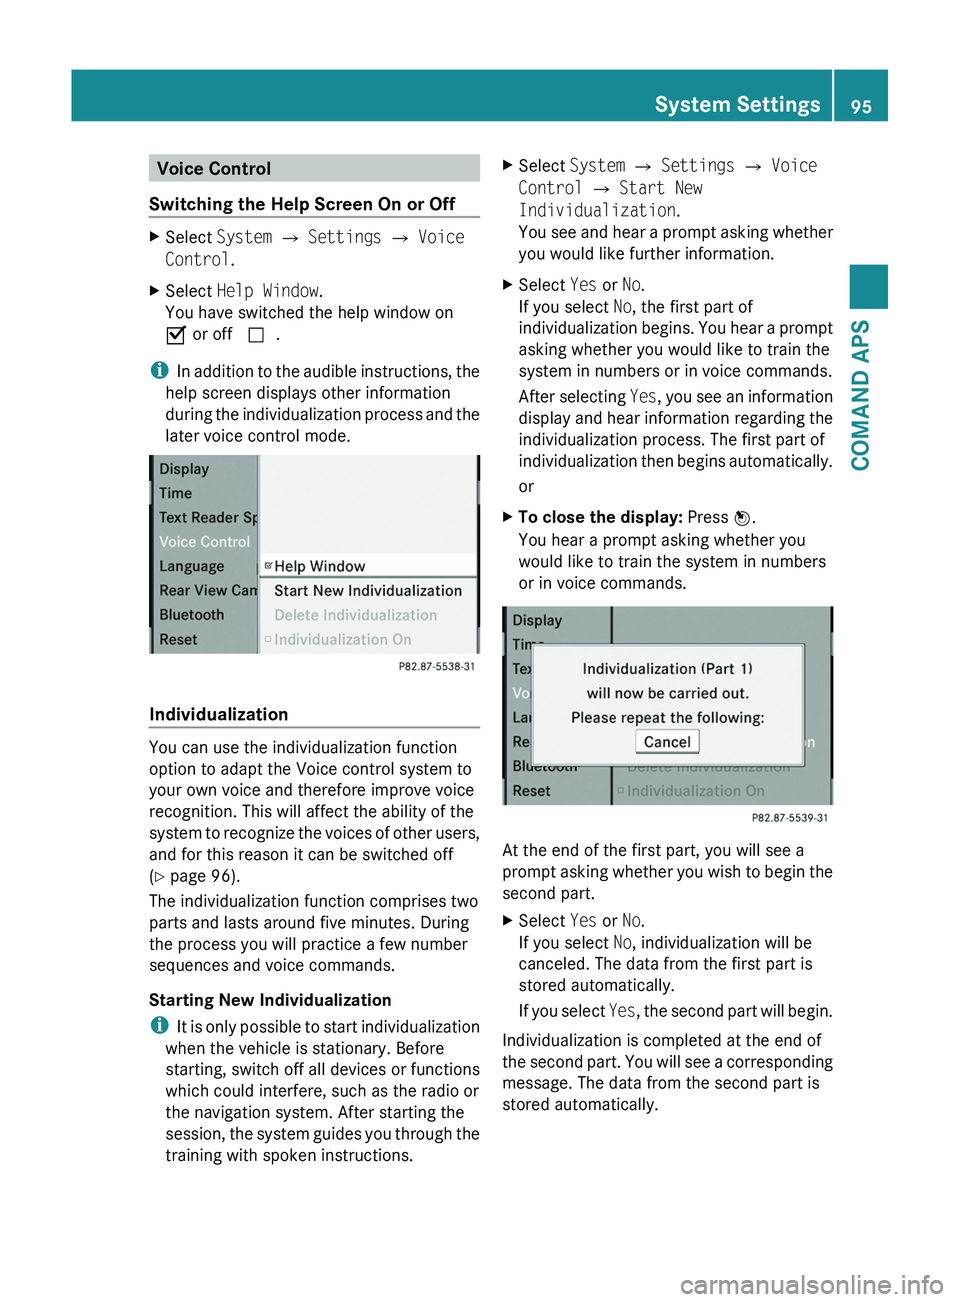
Switching the Help Screen On or Off
XSelect System £ Settings £ Voice
Control.
XSelect Help Window.
You have switched the help window on
Ç or off c.
iIn addition to the audible instructions, the
help screen displays other information
during the individualization process and the
later voice control mode.
Individualization
You can use the individualization function
option to adapt the Voice control system to
your own voice and therefore improve voice
recognition. This will affect the ability of the
system to recognize the voices of other users,
and for this reason it can be switched off
(Y page 96).
The individualization function comprises two
parts and lasts around five minutes. During
the process you will practice a few number
sequences and voice commands.
Starting New Individualization
iIt is only possible to start individualization
when the vehicle is stationary. Before
starting, switch off all devices or functions
which could interfere, such as the radio or
the navigation system. After starting the
session, the system guides you through the
training with spoken instructions.
XSelect System £ Settings £ Voice
Control £ Start New
Individualization.
You see and hear a prompt asking whether
you would like further information.
XSelect Yes or No.
If you select No, the first part of
individualization begins. You hear a prompt
asking whether you would like to train the
system in numbers or in voice commands.
After selecting Yes, you see an information
display and hear information regarding the
individualization process. The first part of
individualization then begins automatically.
or
XTo close the display: Press n.
You hear a prompt asking whether you
would like to train the system in numbers
or in voice commands.
At the end of the first part, you will see a
prompt asking whether you wish to begin the
second part.
XSelect Yes or No.
If you select No, individualization will be
canceled. The data from the first part is
stored automatically.
If you select Yes, the second part will begin.
Individualization is completed at the end of
the second part. You will see a corresponding
message. The data from the second part is
stored automatically.
System Settings95COMAND APSBA 197 USA, CA Edition A 2011; 1; 27, en-UShereepeVersion: 3.0.3.52010-03-24T15:31:10+01:00 - Seite 95Z
Page 111 of 436
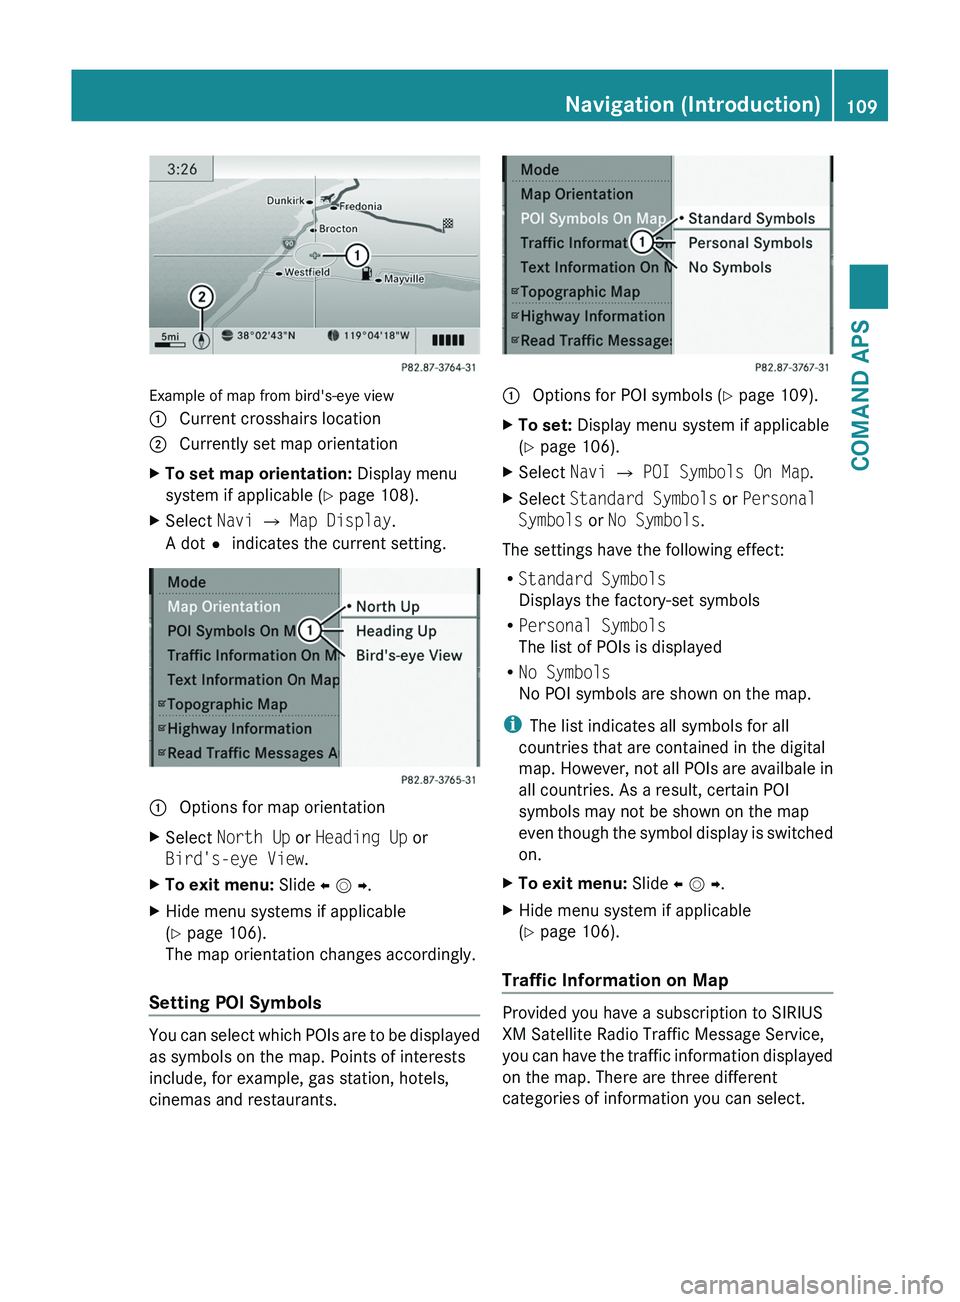
Example of map from bird's-eye view
1 Current crosshairs location2 Currently set map orientationXTo set map orientation: Display menu
system if applicable (Y page 108).
XSelect Navi £ Map Display.
A dotR indicates the current setting.
1 Options for map orientationXSelect North Up or Heading Up or
Bird's-eye View.
XTo exit menu: Slide o m p.XHide menu systems if applicable
(Y page 106).
The map orientation changes accordingly.
Setting POI Symbols
You can select which POIs are to be displayed
as symbols on the map. Points of interests
include, for example, gas station, hotels,
cinemas and restaurants.
1 Options for POI symbols (Y page 109).XTo set: Display menu system if applicable
(Y page 106).
XSelect Navi £ POI Symbols On Map.XSelect Standard Symbols or Personal
Symbols or No Symbols.
The settings have the following effect:
RStandard Symbols
Displays the factory-set symbols
RPersonal Symbols
The list of POIs is displayed
RNo Symbols
No POI symbols are shown on the map.
iThe list indicates all symbols for all
countries that are contained in the digital
map. However, not all POIs are availbale in
all countries. As a result, certain POI
symbols may not be shown on the map
even though the symbol display is switched
on.
XTo exit menu: Slide o m p.XHide menu system if applicable
(Y page 106).
Traffic Information on Map
Provided you have a subscription to SIRIUS
XM Satellite Radio Traffic Message Service,
you can have the traffic information displayed
on the map. There are three different
categories of information you can select.
Navigation (Introduction)109COMAND APSBA 197 USA, CA Edition A 2011; 1; 27, en-UShereepeVersion: 3.0.3.52010-03-24T15:31:10+01:00 - Seite 109Z
Page 115 of 436
Displaying and Changing an Existing
Block Area
XTo select the area you want to display
or change: Slide q m r.
XSelect Options £ Display/Change.
The map display appears with the block
area marked red.
XTo set the map scale: Rotate y m z.X To scroll the map: Slide q m r, o m p or
w m x.
XTo define the center of the block area:
Press n.
XTo set the desired size of the block area:
Rotate y m z.
XTo confirm the area and exit map
display: Press n.
XHide menu system if applicable
(Y page 106).
Defining a New Block Area
XSelect Options £ Avoid New Area
The map is displayed.
XTo set the map scale: Rotate y m z.XRotate y m z until the desired size of the
new block area is set.
XSlide q m r, o m p or w m x to shift the
new block area to the desired region.
XTo confirm the area and exit map
display: Press n.
XHide menu system if applicable
(Y page 106).
Deleting a Block Area
XTo select the area you want to delete:
Slide q m r.
XSelect Options £ Delete.
You will be prompted to confirm that you
wish to delete the block area.
XSelect Yes or No.
If you select Yes COMAND deletes the
entry.
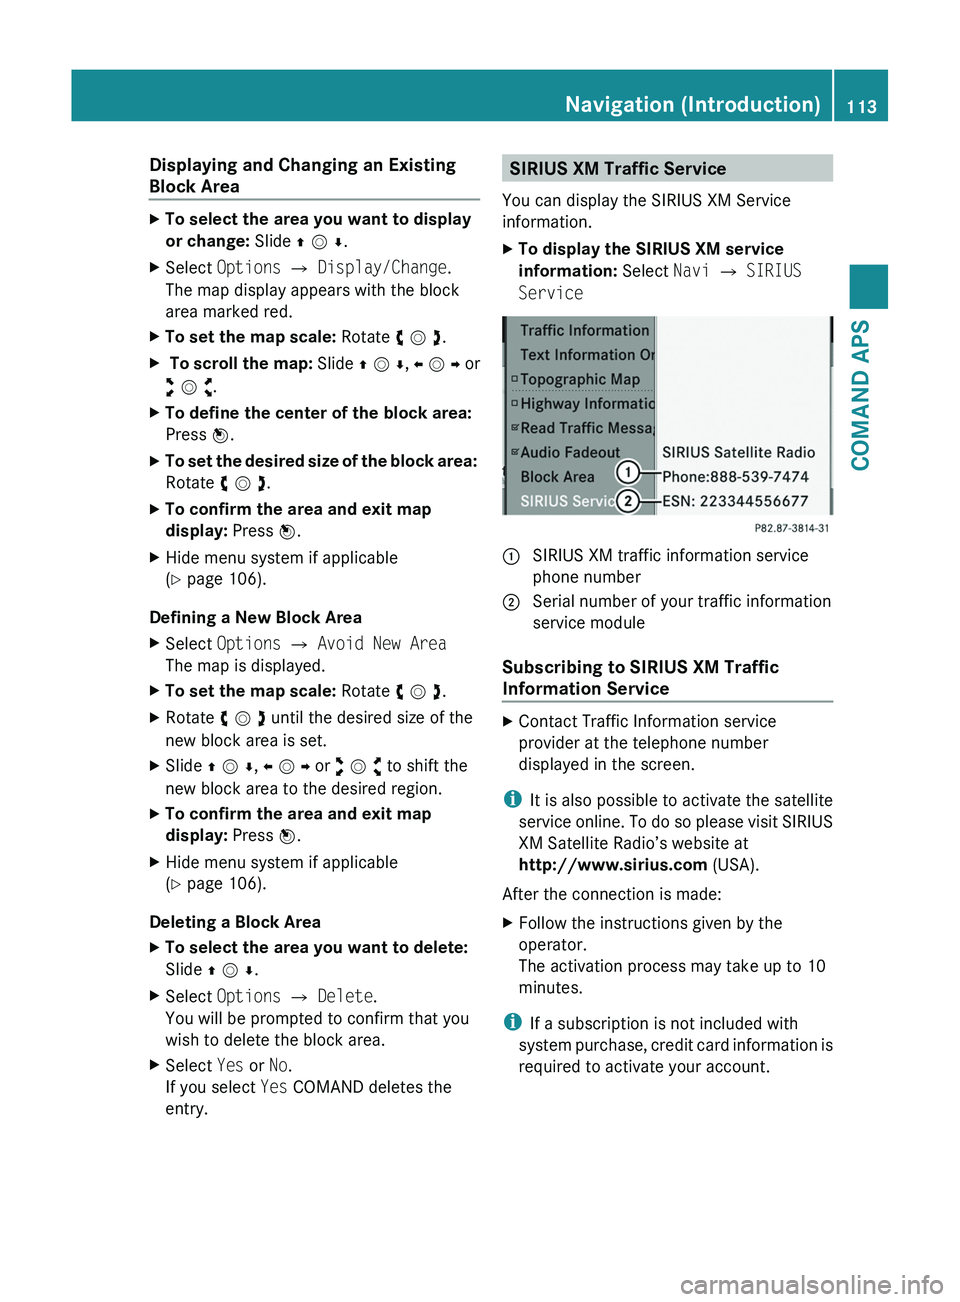
SIRIUS XM Traffic Service
You can display the SIRIUS XM Service
information.
XTo display the SIRIUS XM service
information: Select Navi £ SIRIUS
Service
\000F SIRIUS XM traffic information service
phone number
\000G Serial number of your traffic information
service module
Subscribing to SIRIUS XM Traffic
Information Service
XContact Traffic Information service
provider at the telephone number
displayed in the screen.
iIt is also possible to activate the satellite
service online. To do so please visit SIRIUS
XM Satellite Radio’s website at
http://www.sirius.com (USA).
After the connection is made:
XFollow the instructions given by the
operator.
The activation process may take up to 10
minutes.
iIf a subscription is not included with
system purchase, credit card information is
required to activate your account.
Navigation (Introduction)113COMAND APSBA 197 USA, CA Edition A 2011; 1; 27, en-UShereepeVersion: 3.0.3.52010-03-24T15:31:10+01:00 - Seite 113Z
Page 141 of 436
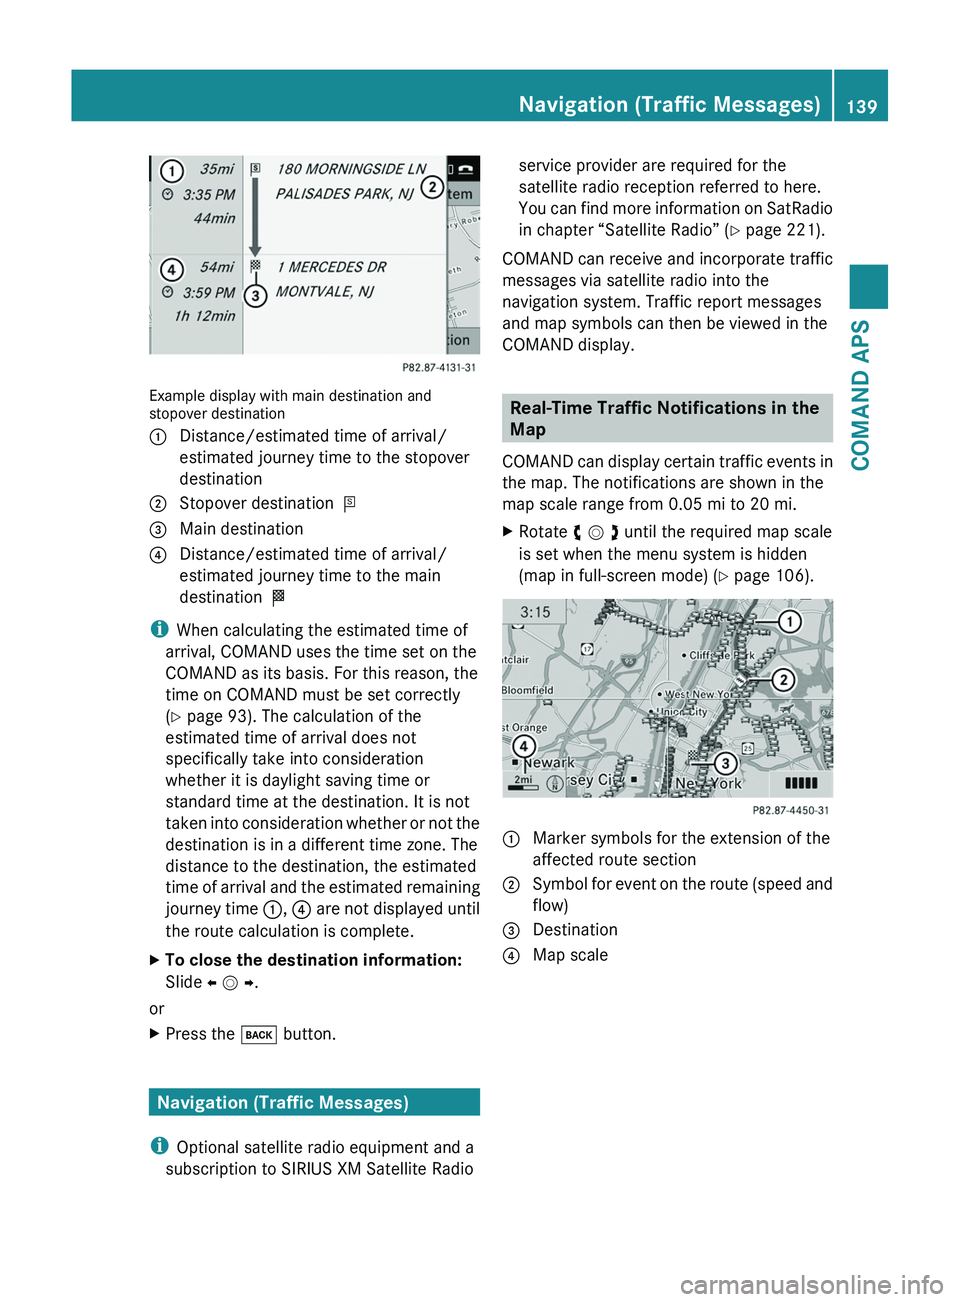
Example display with main destination andstopover destination
1 Distance/estimated time of arrival/
estimated journey time to the stopover
destination
2 Stopover destination =3 Main destination4 Distance/estimated time of arrival/
estimated journey time to the main
destination <
iWhen calculating the estimated time of
arrival, COMAND uses the time set on the
COMAND as its basis. For this reason, the
time on COMAND must be set correctly
(Y page 93). The calculation of the
estimated time of arrival does not
specifically take into consideration
whether it is daylight saving time or
standard time at the destination. It is not
taken into consideration whether or not the
destination is in a different time zone. The
distance to the destination, the estimated
time of arrival and the estimated remaining
journey time 1, 4 are not displayed until
the route calculation is complete.
XTo close the destination information:
Slide o m p.
or
XPress the \000= button.
Navigation (Traffic Messages)
iOptional satellite radio equipment and a
subscription to SIRIUS XM Satellite Radio
service provider are required for the
satellite radio reception referred to here.
You can find more information on SatRadio
in chapter “Satellite Radio” (Y page 221).
COMAND can receive and incorporate traffic
messages via satellite radio into the
navigation system. Traffic report messages
and map symbols can then be viewed in the
COMAND display.
Real-Time Traffic Notifications in the
Map
COMAND can display certain traffic events in
the map. The notifications are shown in the
map scale range from 0.05 mi to 20 mi.
XRotate y m z until the required map scale
is set when the menu system is hidden
(map in full-screen mode) (Y page 106).
1 Marker symbols for the extension of the
affected route section
2 Symbol for event on the route (speed and
flow)
3 Destination4 Map scaleNavigation (Traffic Messages)139COMAND APSBA 197 USA, CA Edition A 2011; 1; 27, en-UShereepeVersion: 3.0.3.52010-03-24T15:31:10+01:00 - Seite 139Z
Page 171 of 436
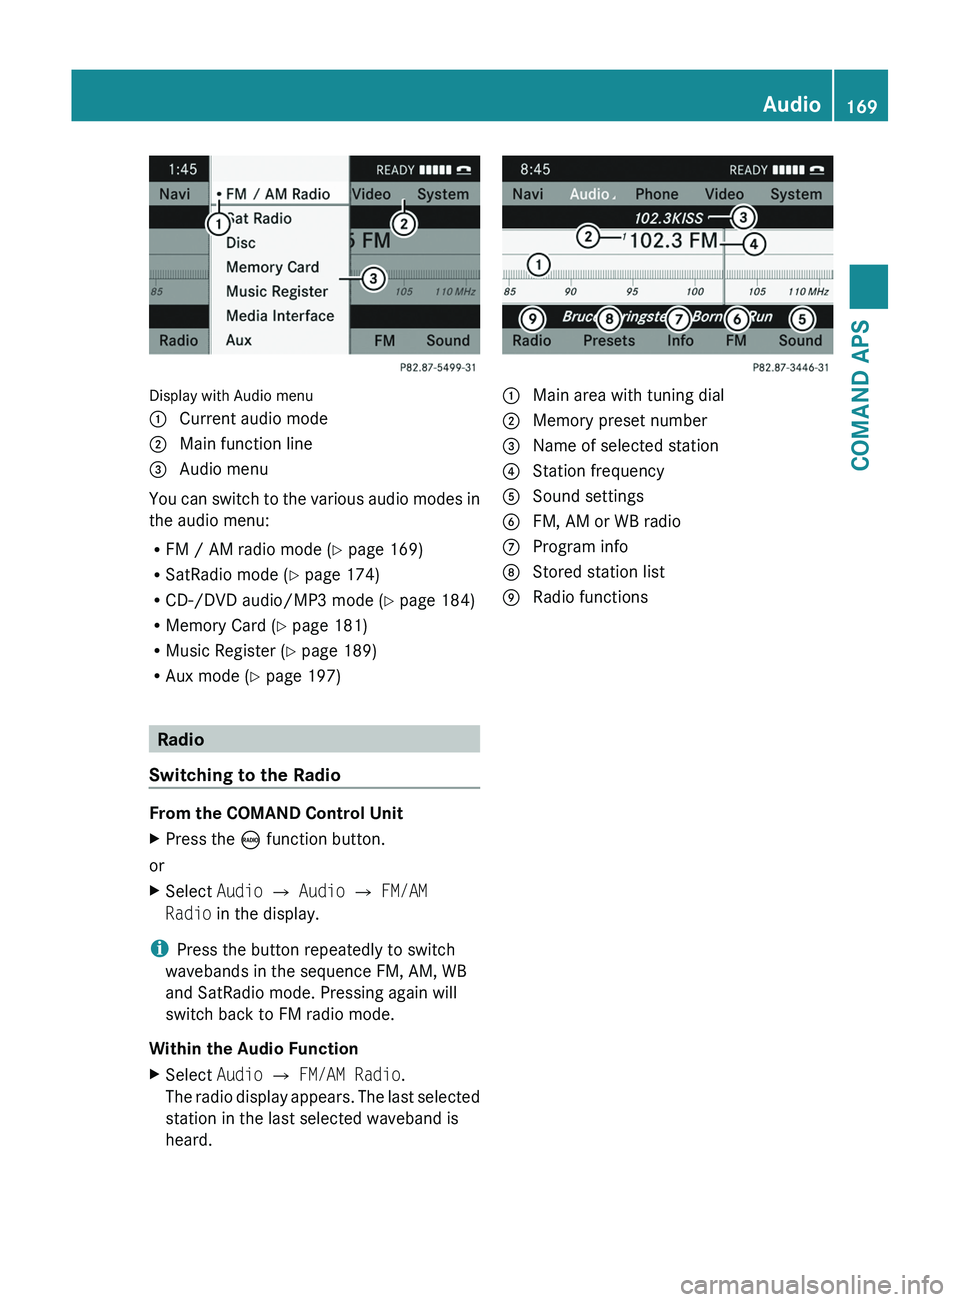
Display with Audio menu
1 Current audio mode2 Main function line3 Audio menu
You can switch to the various audio modes in
the audio menu:
RFM / AM radio mode (Y page 169)
RSatRadio mode (Y page 174)
RCD-/DVD audio/MP3 mode (Y page 184)
RMemory Card (Y page 181)
RMusic Register (Y page 189)
RAux mode (Y page 197)
Radio
Switching to the Radio
From the COMAND Control Unit
XPress the \000
Page 172 of 436
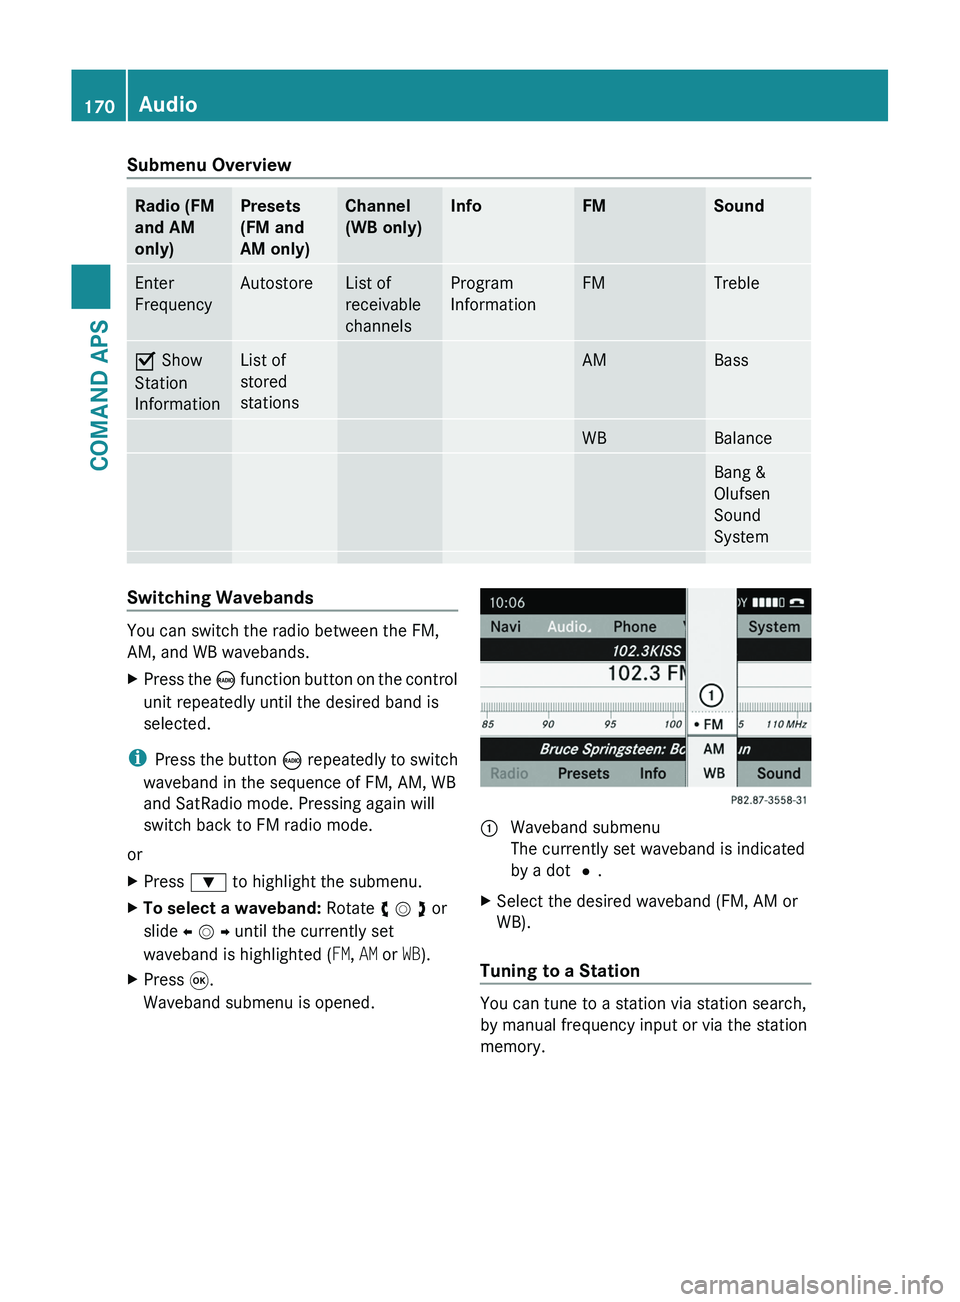
Submenu OverviewRadio (FM
and AM
only)
Presets
(FM and
AM only)
Channel
(WB only)
InfoFMSoundEnter
Frequency
AutostoreList of
receivable
channels
Program
Information
FMTrebleÇ Show
Station
Information
List of
stored
stations
AMBassWBBalanceBang &
Olufsen
Sound
System
Switching Wavebands
You can switch the radio between the FM,
AM, and WB wavebands.
XPress the \000