2011 MERCEDES-BENZ SLS AMG steering wheel
[x] Cancel search: steering wheelPage 395 of 436
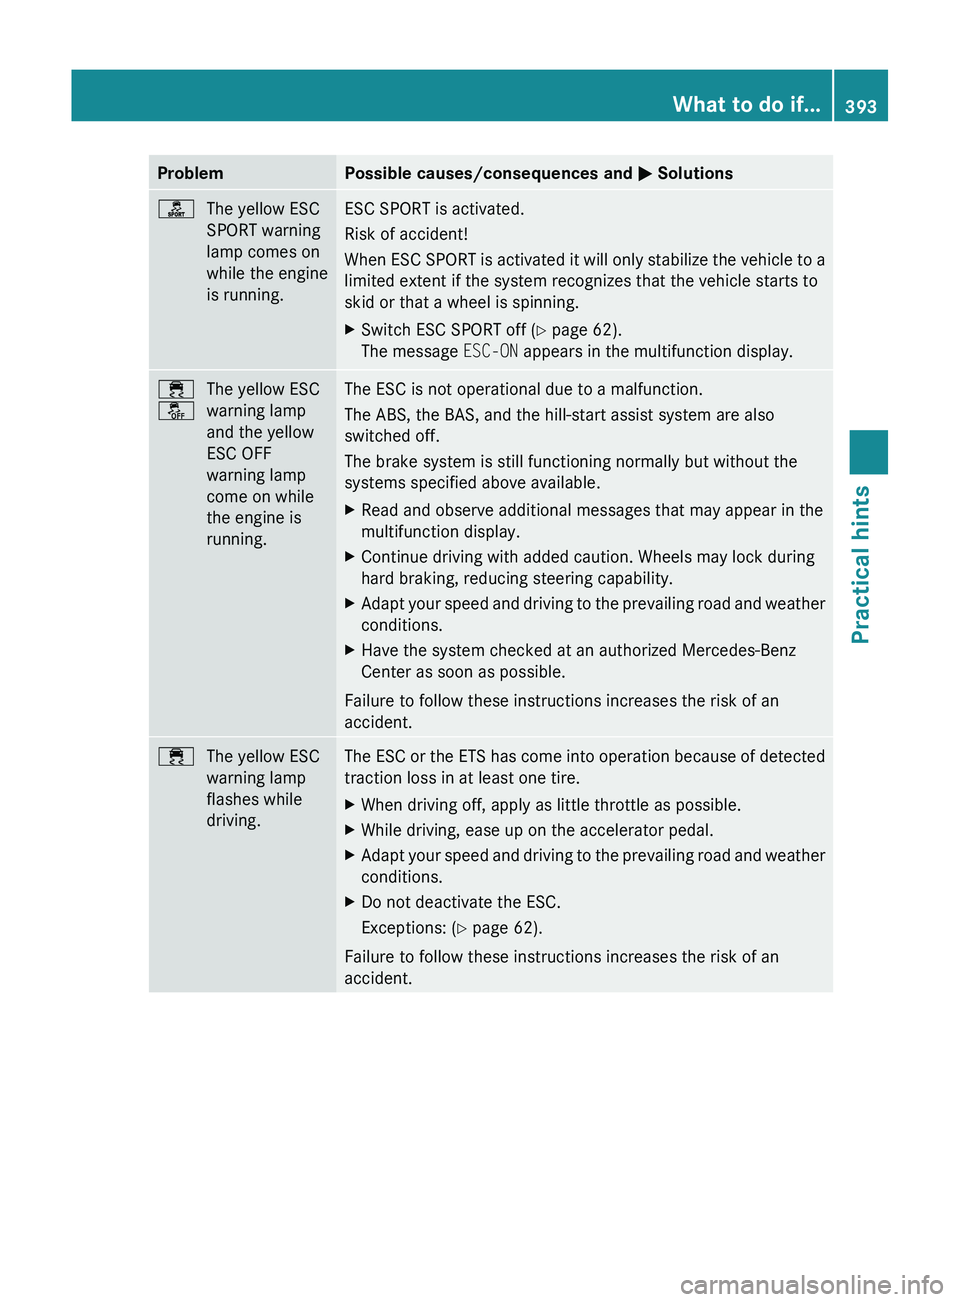
ProblemPossible causes/consequences and 0050 Solutions00D5The yellow ESC
SPORT warning
lamp comes on
while the engine
is running.ESC SPORT is activated.
Risk of accident!
When ESC SPORT is activated it will only stabilize the vehicle to a
limited extent if the system recognizes that the vehicle starts to
skid or that a wheel is spinning.XSwitch ESC SPORT off ( Y page 62).
The message ESC-ON appears in the multifunction display.00F2
00C7The yellow ESC
warning lamp
and the yellow
ESC OFF
warning lamp
come on while
the engine is
running. The ESC is not operational due to a malfunction.
The ABS, the BAS, and the hill-start assist system are also
switched off.
The brake system is still functioning normally but without the
systems specified above available.XRead and observe additional messages that may appear in the
multifunction display.XContinue driving with added caution. Wheels may lock during
hard braking, reducing steering capability.XAdapt your speed and driving to the prevailing road and weather
conditions.XHave the system checked at an authorized Mercedes-Benz
Center as soon as possible.
Failure to follow these instructions increases the risk of an
accident.
00F2The yellow ESC
warning lamp
flashes while
driving.The ESC or the ETS has come into operation because of detected
traction loss in at least one tire.XWhen driving off, apply as little throttle as possible.XWhile driving, ease up on the accelerator pedal.XAdapt your speed and driving to the prevailing road and weather
conditions.XDo not deactivate the ESC.
Exceptions: ( Y page 62).
Failure to follow these instructions increases the risk of an
accident.
What to do if...393Practical hintsBA 197 USA, CA Edition A 2011; 1; 27, en-UShereepeVersion: 3.0.3.52010-03-24T15:31:10+01:00 - Seite 393Z
Page 404 of 436
Flat tire
Notes
Your vehicle is equipped with a TIREFIT kit
(Y page 362).
Preparing the vehicle
XWhenever possible, park the vehicle in a
safe distance from moving traffic on a hard,
flat surface.
XTurn on the hazard warning flasher.XTurn the steering wheel so that the front
wheels are in a straight-ahead position.
XEngage the electronic parking brake.XShift the transmission into park position P.XTurn off the engine.XKEYLESS-GO: Open the driver’s door (this
puts the starter switch in position 0, same
as with the SmartKey removed from the
starter switch). The driver’s door can then
be closed again. Open doors only when
conditions are safe to do so.
or
XRemove the SmartKey from the starter
switch.
XHave any passenger exit the vehicle at a
safe distance from the roadway. Open
doors only when conditions are safe to do
so.
Sealing tires with TIREFIT
Small tire punctures, particularly those in the
tread, can be sealed with TIREFIT.
TIREFIT can be used in ambient temperatures
down to -40‡ (-40†).
GWarning!
TIREFIT is a limited repair device. TIREFIT
cannot be used for cuts or punctures larger
than approximately 0.16 in (4 mm) and tire
damage caused by driving with extremely low
tire inflation pressure, or on a flat tire, or a
damaged wheel.
Do not drive the vehicle under such
circumstances.
Contact the nearest authorized Mercedes-
Benz Center for assistance or call Roadside
Assistance.
XForeign objects (e.g. screws or nails)
should not be removed from the tire.
XTake the TIREFIT kit, the sticker, and the
electric air pump out of the trunk
(Y page 362).
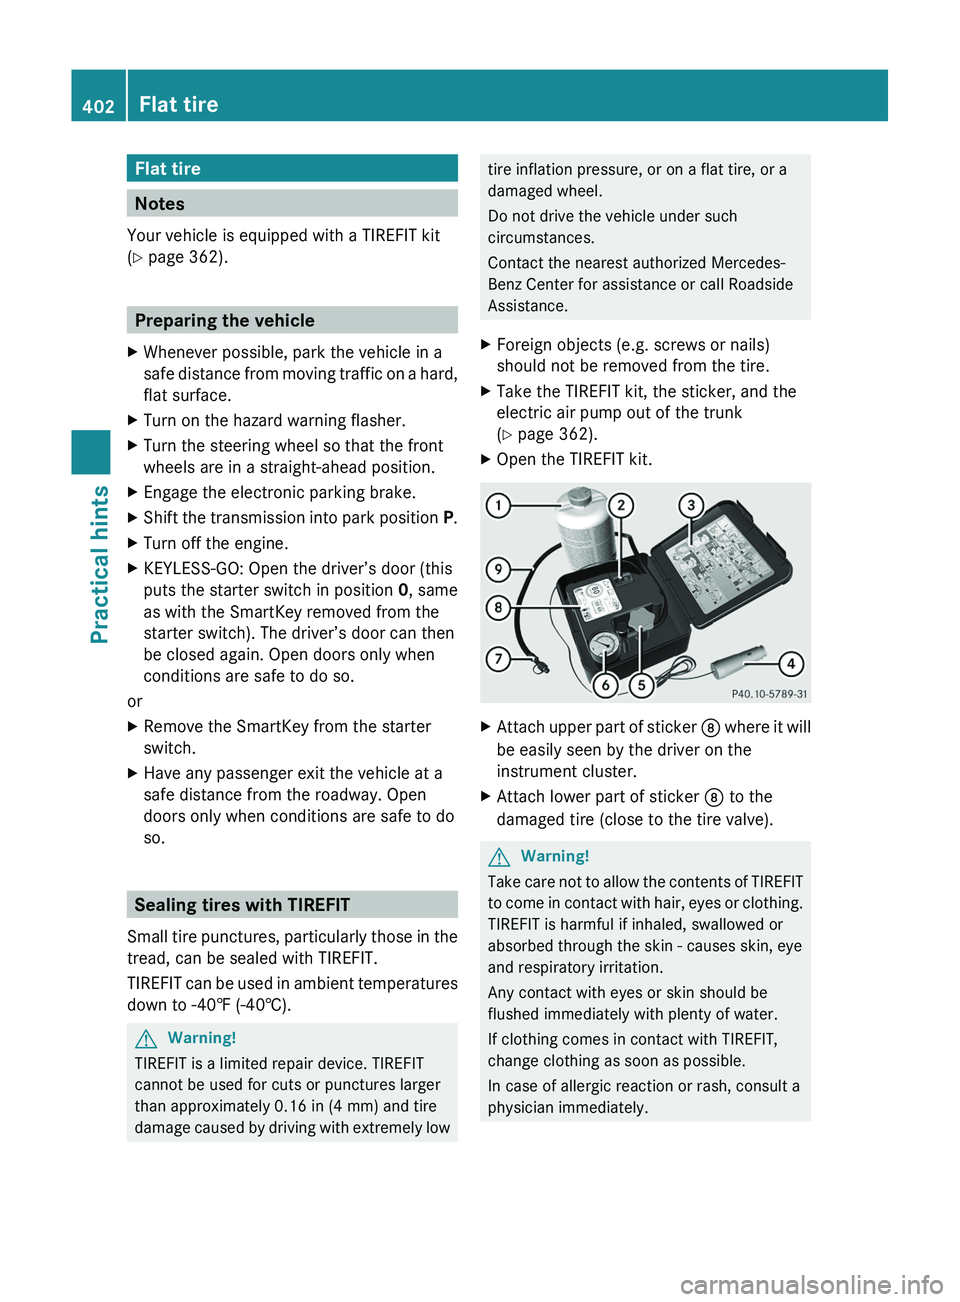
XOpen the TIREFIT kit.XAttach upper part of sticker \000o where it will
be easily seen by the driver on the
instrument cluster.
XAttach lower part of sticker \000o to the
damaged tire (close to the tire valve).
GWarning!
Take care not to allow the contents of TIREFIT
to come in contact with hair, eyes or clothing.
TIREFIT is harmful if inhaled, swallowed or
absorbed through the skin - causes skin, eye
and respiratory irritation.
Any contact with eyes or skin should be
flushed immediately with plenty of water.
If clothing comes in contact with TIREFIT,
change clothing as soon as possible.
In case of allergic reaction or rash, consult a
physician immediately.
402Flat tirePractical hints
BA 197 USA, CA Edition A 2011; 1; 27, en-UShereepeVersion: 3.0.3.52010-03-24T15:31:10+01:00 - Seite 402
Page 407 of 436
GWarning!
Do not exceed a vehicle speed of 50 mph
( 80 km/h). A TIREFIT repair is not designed to
operate at higher speeds.
The sticker must be attached on the
instrument cluster where it will be easily seen
by the driver.
Vehicle handling characteristics of a TIREFIT
repaired tire may change. Adapt your driving
accordingly.
XAfter driving for approximately 5 miles
(3 km) or 10 minutes, stop the vehicle and
check the tire inflation pressure using the
electric air pump.
i The TIREFIT sealing may impair the
function of the sensors in the tire. Proper
operating sensors are necessary to check
the tire inflation pressure with the
Advanced Tire Pressure Monitoring
System. When the sensors are not
operating properly, the measured tire
inflation pressure may be inaccurate or the
tire inflation pressure may not be displayed
at all. Error messages may appear.
Therefore, check and adjust the tire
inflation pressure with pressure gauge 0087
on the electric air pump.
GWarning!
If tire inflation pressure has fallen below
130 kPA (1.3 bar, 20 psi) do not continue to
drive the vehicle.
Park your vehicle safely away from the
roadway and contact the nearest authorized
Mercedes-Benz Center or Roadside
Assistance.
Have the damaged tire replaced.
If the tire inflation pressure is at least 130 kPA
(1.3 bar, 20 psi), inflate or deflate the tire to
the correct tire inflation pressure (see Tire
and Loading Information placard on the
driver’s door B-pillar):XTo increase tire inflation pressure:
Switch on the electric air pump.XTo decrease tire inflation pressure:
Open vent screw 006E on air hose 0070.XDrive to the nearest qualified workshop,
e.g. an authorized Mercedes-Benz Center,
to have the damaged tire replaced.XContact an authorized Mercedes-Benz
Center as soon as possible to obtain a new
TIREFIT kit.XBring used TIREFIT materials to an
authorized Mercedes-Benz Center for
proper disposal.XReplace your TIREFIT container every
4 years. Replacement containers are
available at any authorized Mercedes-Benz
Center.
Wheel change
Preparing the vehicle
XPark the vehicle on a hard, flat surface.XTurn the steering wheel so that the front
wheels are in a straight-ahead position.XEngage the electronic parking brake.XShift the transmission into park position P.XTurn off the engine.XKEYLESS-GO: Open the driver’s door (this
puts the starter switch in position 0, same
as with the SmartKey removed from the
starter switch). The driver’s door can then
be closed again. Open doors only when
conditions are safe to do so.
or
XRemove the SmartKey from the starter
switch.XTake the following out of the vehicle:Wheel change405Practical hintsBA 197 USA, CA Edition A 2011; 1; 27, en-UShereepeVersion: 3.0.3.52010-03-24T15:31:10+01:00 - Seite 405Z
Page 417 of 436
Towing the vehicle
Safety notes
Mercedes-Benz recommends that the vehicle
be transported with all wheels off the ground
using flatbed or appropriate wheel lift/dolly
equipment. This method is preferable to other
types of towing.
! To prevent damage during transport, do
not tie down vehicle by its chassis or
suspension parts.
If circumstances do not permit the
recommended towing methods, the vehicle
may be towed with all wheels on the ground
or rear axle raised only so far as necessary to
have the vehicle moved to a safe location
where the recommended towing methods
can be employed.
! Before towing the vehicle observe the
following instructions:
RDo not tow-start the vehicle. You could
otherwise seriously damage the
transmission which is not covered by the
Mercedes-Benz Limited Warranty.
RDo not tow with sling-type equipment.
Towing with sling-type equipment over
bumpy roads will damage radiator and
supports.
RTowing of the vehicle should only be
done using the properly installed towing
eye bolt. Never attach a tow cable, tow
rope or tow rod to the vehicle chassis,
frame or suspension parts.
GWarning!
With the engine not running, there is no power
assistance for the brake and steering
systems. In this case, it is important to keep
in mind that a considerably higher degree of
effort is necessary to brake and steer the
vehicle. Adapt your driving accordingly.
! Avoid pulling the vehicle abruptly or
diagonally, since it could result in damage
to the chassis alignment.
! Do not use the towing eye bolt for
recovery, as this could damage the vehicle.
If in doubt, recover the vehicle with a crane.
iIf the battery is disconnected or
discharged
Rthe transmission will remain in park
position P
Rthe SmartKey will not turn in the starter
switch
For more information see “Battery”
(Y page 410) or “Jump starting”
(Y page 413).
Installing towing eye bolt
The towing eye bolt is supplied with the
vehicle tool kit, located in the storage
compartment underneath the trunk floor
(Y page 362).
XTake the towing eye bolt and the wheel
wrench out of the trunk.
Your vehicle is equipped with a front towing
eye bolt only. You cannot tow other vehicles
with your vehicle.
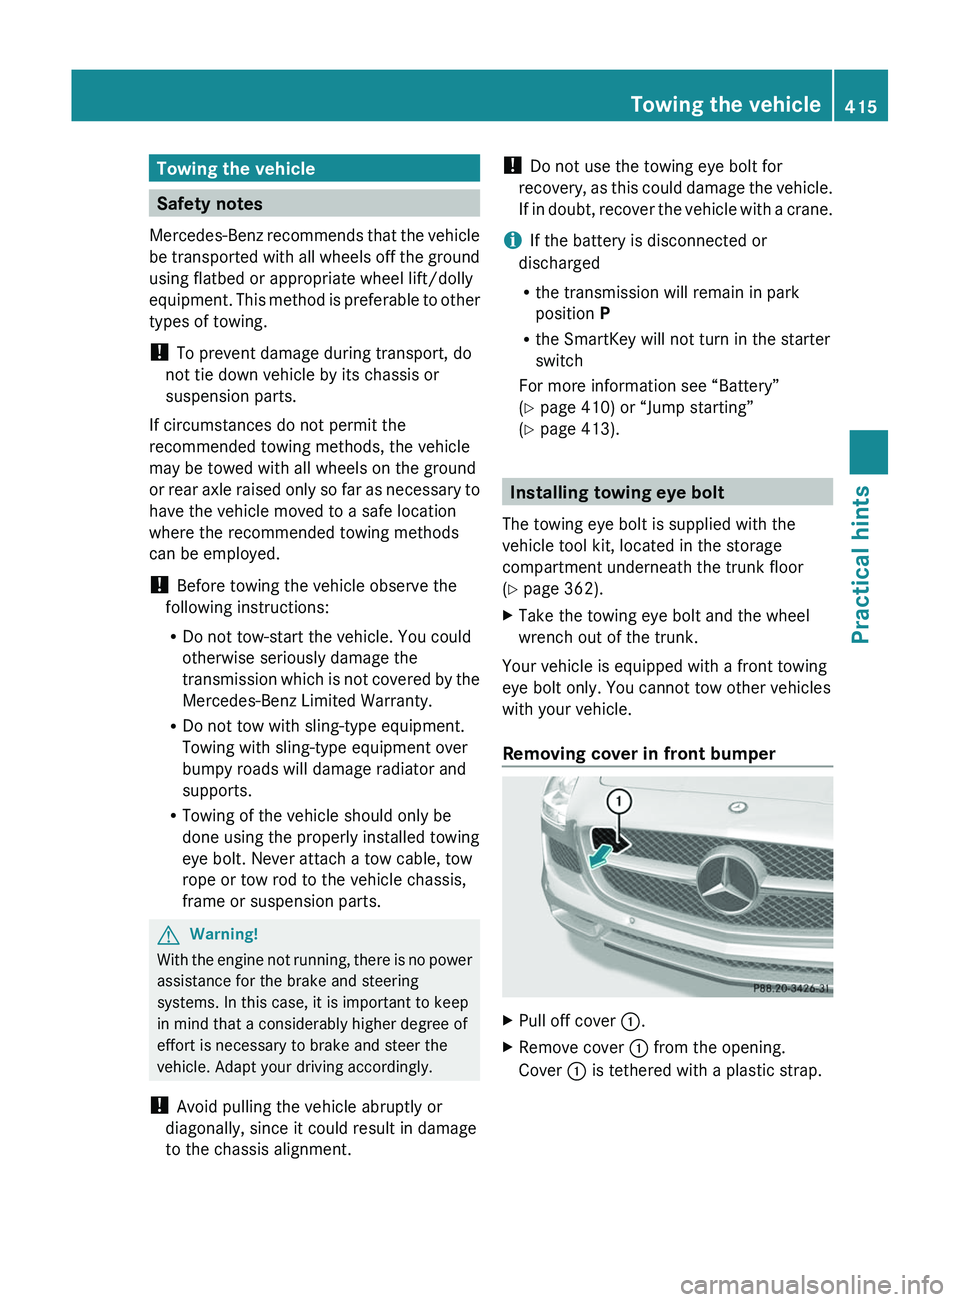
Removing cover in front bumper
XPull off cover \000F.XRemove cover \000F from the opening.
Cover \000F is tethered with a plastic strap.
Towing the vehicle415Practical hintsBA 197 USA, CA Edition A 2011; 1; 27, en-UShereepeVersion: 3.0.3.52010-03-24T15:31:10+01:00 - Seite 415Z
Page 418 of 436
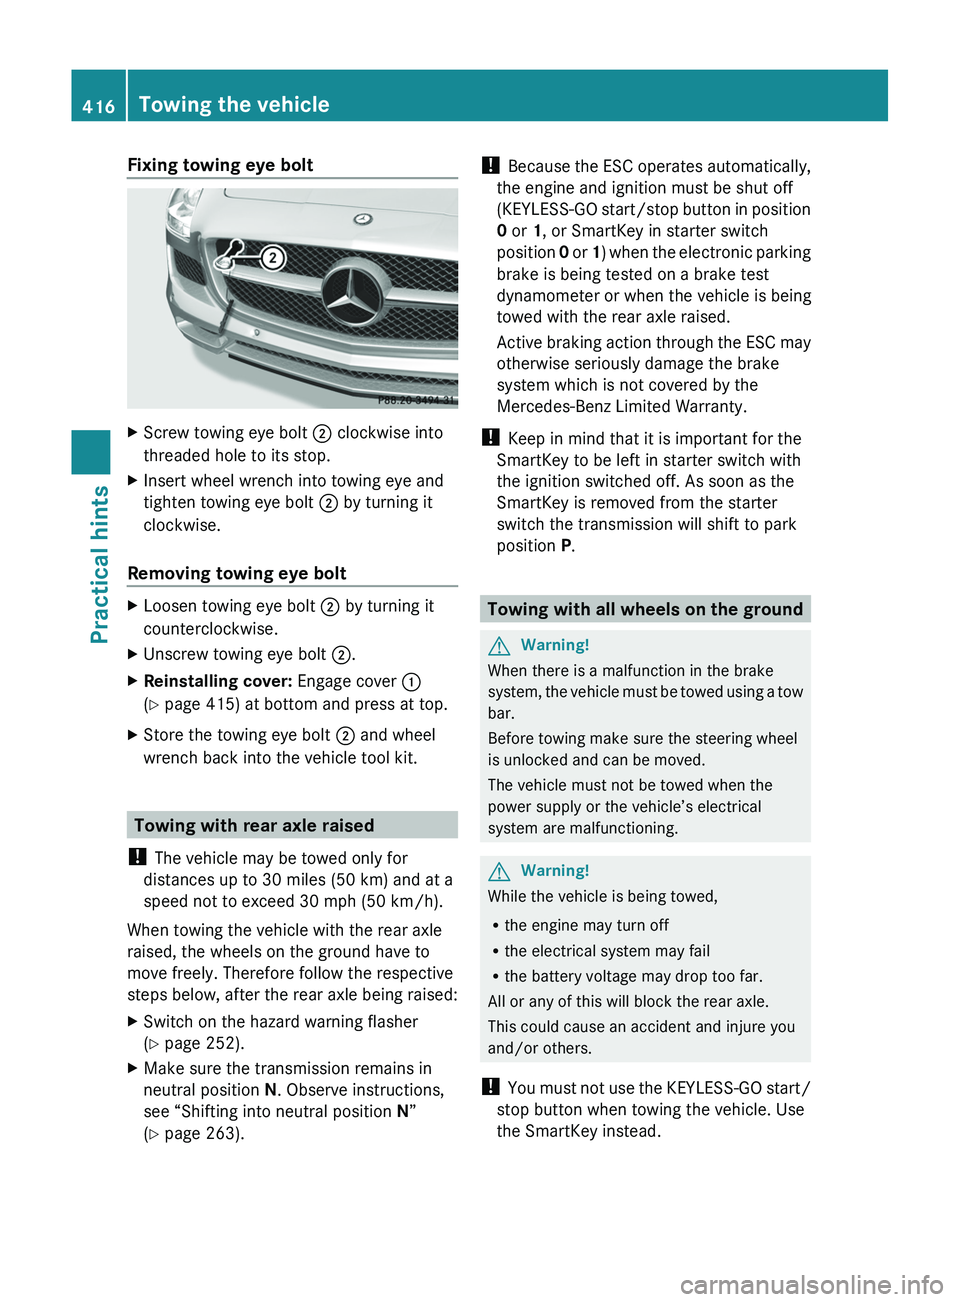
Fixing towing eye boltXScrew towing eye bolt 0047 clockwise into
threaded hole to its stop.XInsert wheel wrench into towing eye and
tighten towing eye bolt 0047 by turning it
clockwise.
Removing towing eye bolt
XLoosen towing eye bolt 0047 by turning it
counterclockwise.XUnscrew towing eye bolt 0047.XReinstalling cover: Engage cover 0046
( Y page 415) at bottom and press at top.XStore the towing eye bolt 0047 and wheel
wrench back into the vehicle tool kit.
Towing with rear axle raised
! The vehicle may be towed only for
distances up to 30 miles (50 km) and at a
speed not to exceed 30 mph (50 km/h).
When towing the vehicle with the rear axle
raised, the wheels on the ground have to
move freely. Therefore follow the respective
steps below, after the rear axle being raised:
XSwitch on the hazard warning flasher
( Y page 252).XMake sure the transmission remains in
neutral position N. Observe instructions,
see “Shifting into neutral position N”
( Y page 263).!
Because the ESC operates automatically,
the engine and ignition must be shut off
(KEYLESS-GO start/stop button in position
0 or 1, or SmartKey in starter switch
position 0 or 1) when the electronic parking
brake is being tested on a brake test
dynamometer or when the vehicle is being
towed with the rear axle raised.
Active braking action through the ESC may
otherwise seriously damage the brake
system which is not covered by the
Mercedes-Benz Limited Warranty.
! Keep in mind that it is important for the
SmartKey to be left in starter switch with
the ignition switched off. As soon as the
SmartKey is removed from the starter
switch the transmission will shift to park
position P.
Towing with all wheels on the ground
GWarning!
When there is a malfunction in the brake
system, the vehicle must be towed using a tow
bar.
Before towing make sure the steering wheel
is unlocked and can be moved.
The vehicle must not be towed when the
power supply or the vehicle’s electrical
system are malfunctioning.
GWarning!
While the vehicle is being towed,
R the engine may turn off
R the electrical system may fail
R the battery voltage may drop too far.
All or any of this will block the rear axle.
This could cause an accident and injure you
and/or others.
! You must not use the KEYLESS-GO start/
stop button when towing the vehicle. Use
the SmartKey instead.
416Towing the vehiclePractical hints
BA 197 USA, CA Edition A 2011; 1; 27, en-UShereepeVersion: 3.0.3.52010-03-24T15:31:10+01:00 - Seite 416