2011 MERCEDES-BENZ SLK55AMG change wheel
[x] Cancel search: change wheelPage 214 of 312
excessive heat build-up and possible tire
failure.
The temperature grades are A (the highest),
B,
and C, representing the tire’s resistance to
the generation of heat and its ability to
dissipate heat when tested under controlled
conditions on a specified indoor laboratory
test wheel. Sustained high temperature can
cause the material of the tire to degenerate
and reduce tire life, and excessive
temperature can lead to sudden tire failure.
The grade C corresponds to a level of
performance which all passenger car tires
must meet under the Federal Motor Vehicle
Safety Standard No. 109. Grades B and A
represent higher levels of performance on the
laboratory test wheel than the minimum
required by law. Rotating tires
G
Warning!
Rotate front and rear wheels only if the tires
are of the same dimension.
If your vehicle is equipped with mixed-size
tires
(different tire dimensions front vs. rear),
tire rotation is not possible. G
Warning!
Have the tightening torque checked after
changing a wheel. The wheels could come
loose if they are not tightened to a torque of
80 lb-ft (110 Nm).
Only
use genuine Mercedes-Benz wheel bolts
specified for your vehicle’s rims.
Tire rotation can be performed on vehicles
with tires of the same dimension all around.
If your vehicle is equipped with tires of the
same dimension all around, tires can be
rotated, observing a front-to-rear rotation
pattern that will maintain the intended
rotation (spinning) direction of the tire
(Y page 209).
In some cases, such as when your vehicle is
equipped with mixed-size tires (different tire dimension front vs. rear), tire rotation is not
possible.
If applicable to your vehicle’s tire
configuration, tires can be rotated according
to the tire manufacturer’s recommended
intervals in the tire manufacturer’s warranty
pamphlet located in your vehicle literature
portfolio. If none is available, tires should be
rotated every 3 000 to 6
000 miles (5 000 to
10 000
km), or sooner if necessary, according
to the degree of tire wear. The same rotation
(spinning) direction must be maintained.
Rotate tires before the characteristic tire
wear pattern becomes visible (shoulder wear
on front tires and tread center wear on rear
tires).
Thoroughly clean the mounting face of wheels
and brake disks, i.e. the inner side of the
wheels/tires, during each rotation. Check for
and ensure proper tire inflation pressure.
For information on wheel change, see “Flat
tire” ( Y page 273). Tire labeling
Besides tire name (sales designation) and
manufacturer name, a number of markings
can be found on a tire.
Following are some explanations for the
markings on your vehicle’s tires: 212
Tires and wheels
Operation
171_AKB; 3; 60, en-US
d2ureepe,
Version: 2.11.8.1 2009-05-11T16:00:23+02:00 - Seite 212
Page 232 of 312
G
Warning!
For safety reasons, switch off wipers and
remove SmartKey from starter switch before
cleaning the windshield and/or the wiper
blades. Otherwise, the wiper motor could
suddenly turn on and cause injury.
! Do not pull on the wiper blade inserts.
They could tear.
X Fold the wiper arms forward until they snap
into place.
X Clean the windshield and the wiper blade
inserts with a clean cloth and mild
detergent solution.
X Use a soft, clean cloth and a mild window
cleaning solution on all outside and inside
glass surfaces.
An automotive glass cleaner is
recommended.
! Fold the windshield wiper arms back onto
the windshield before turning the SmartKey
in the starter switch.
Hold on to the wiper when folding the wiper
arm back. If released, the force of the
impact from the tensioning spring could
crack the windshield.
! To clean the window interior, do not use
a dry cloth, abrasives, solvents or cleaners
containing solvents. Do not touch the
inside of the windows with hard objects
such as an ice scraper or ring. Doing so may
damage the windows.
Rear window cleaning
Clean the rear window with the hardtop fully
raised and closed. G
Warning!
Do not clean the rear window with the hardtop
in a position other than the fully raised and
closed position. Otherwise, the hardtop may
move unexpectedly which may result in
personal injury to you or others. X
Use a soft, clean cloth and a mild window
cleaning solution on all outside and inside
glass surfaces.
An automotive glass cleaner is
recommended.
Light alloy wheels If possible, clean wheels once a week.
X
Use Mercedes-Benz approved Wheel Care,
a soft bristle brush and a strong spray of
water for cleaning the light alloy wheels.
! Only use acid-free cleaning materials.
Acid may cause corrosion or damage the
clear coat.
! The vehicle should not be parked for an
extended period of time immediately after
it
has been cleaned. This applies especially
after the wheel rims have been cleaned
with wheel rim cleaner. Wheel rim cleaners
can lead to increased corrosion of the
brake disks and brake pads. Non-approved
wheel cleaners may also damage the wheel
paint if the vehicle is not driven after
cleaning.
Therefore, the vehicle’s brake system
should always be warmed-up before it is
parked after cleaning. Drive your vehicle for
several minutes to allow the brakes to dry.
When applying Mercedes-Benz approved
Tire Care and Mercedes-Benz approved
Wheel Care products, take care not to
spray them on the brake disks.
Plastic and rubber parts X
Use a gentle dishwashing detergent or mild
detergent
for delicate fabrics as a washing
solution.
X Wipe with a cloth moistened in a lukewarm
solution.
The
surface may temporarily change color.
If this is the case, wait for it to dry. 230
Vehicle care
Operation
171_AKB; 3; 60, en-US
d2ureepe,
Version: 2.11.8.1 2009-05-11T16:00:23+02:00 - Seite 230
Page 236 of 312
Vehicle equipment
i This Operator’s Manual describes all
features, standard or optional, potentially
available for your vehicle at the time of
purchase. Please be aware that your
vehicle might not be equipped with all
features described in this manual. Where will I find ...?
First aid kit
i Check expiration dates and contents for
completeness at least once a year and
replace missing/expired items.
The first aid kit is located in a parcel net
behind the driver’s seat. Vehicle tool kit
The vehicle tool kit is located in the space
underneath the trunk floor.
i Vehicles without spare wheel are not
factory-equipped with the tools required for
a wheel change such as a jack or a wheel
wrench. Some tools required for a wheel
change are specific to your vehicle.
Contact an authorized Mercedes-Benz
Center to obtain the tools approved for
your vehicle.
X Removing: Open the trunk (Y page 59).
X Lift the trunk floor.
X Remove the spare wheel (if so equipped)
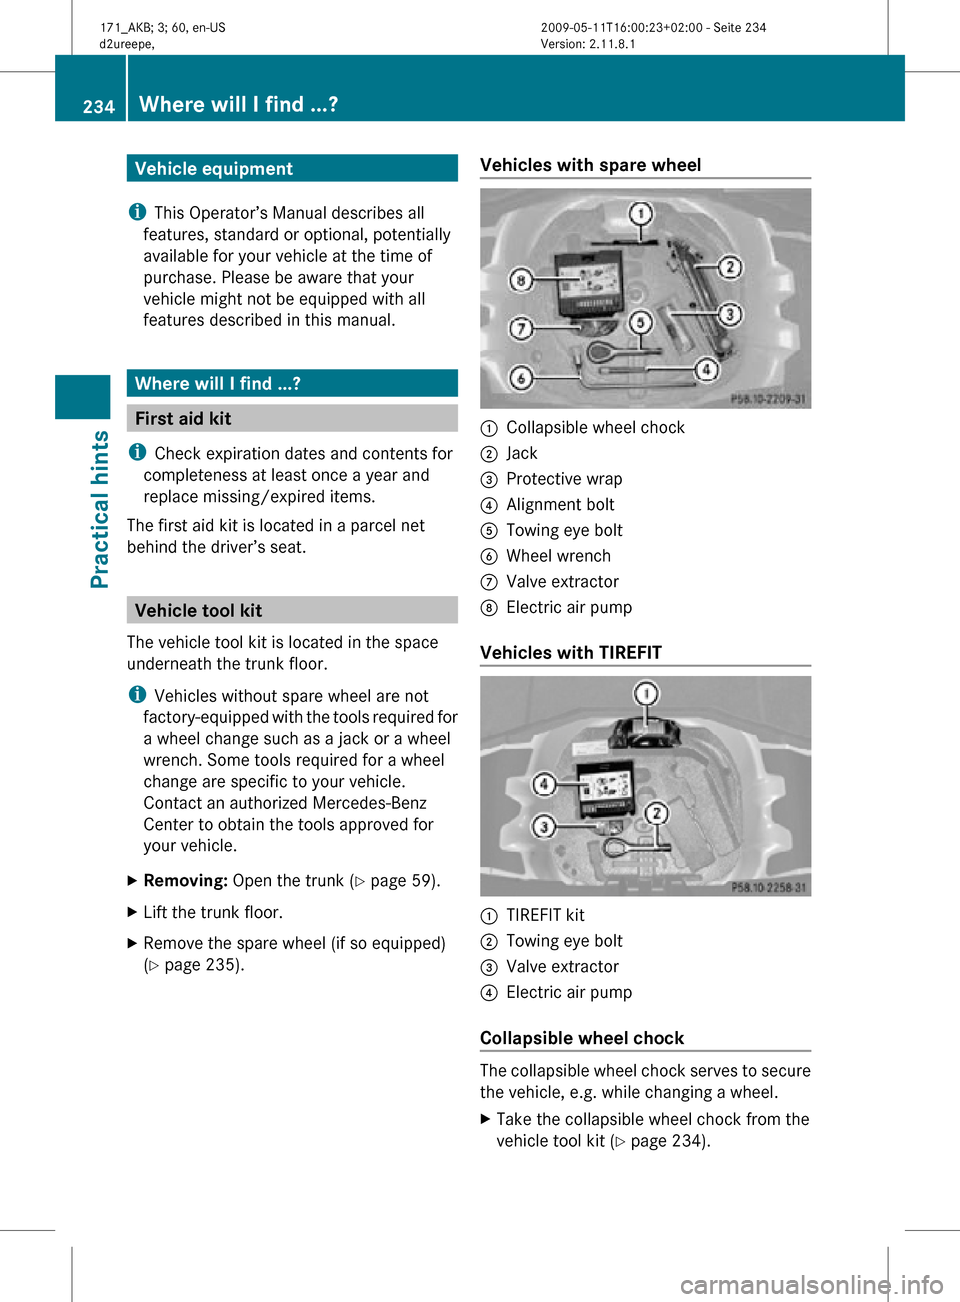
(Y page 235). Vehicles with spare wheel :
Collapsible wheel chock
; Jack
= Protective wrap
? Alignment bolt
A Towing eye bolt
B Wheel wrench
C Valve extractor
D Electric air pump
Vehicles with TIREFIT :
TIREFIT kit
; Towing eye bolt
= Valve extractor
? Electric air pump
Collapsible wheel chock The collapsible wheel chock serves to secure
the vehicle, e.g. while changing a wheel.
X
Take the collapsible wheel chock from the
vehicle tool kit (Y page 234). 234
Where will I find ...?Practical hints
171_AKB; 3; 60, en-US
d2ureepe,
Version: 2.11.8.1 2009-05-11T16:00:23+02:00 - Seite 234
Page 237 of 312
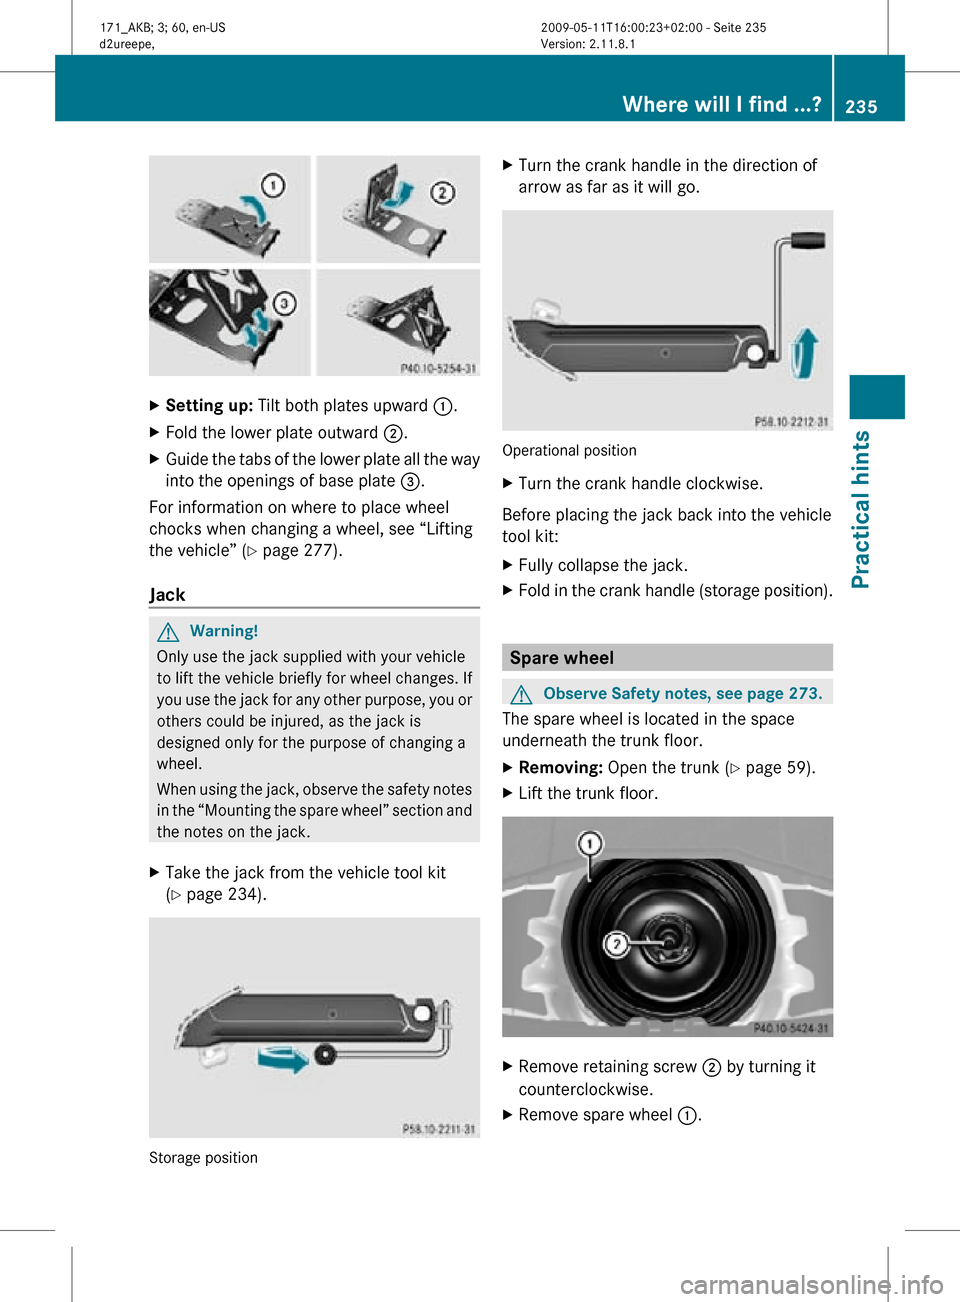
X
Setting up: Tilt both plates upward :.
X Fold the lower plate outward ;.
X Guide the tabs of the lower plate all the way
into the openings of base plate =.
For information on where to place wheel
chocks when changing a wheel, see “Lifting
the vehicle” ( Y page 277).
Jack G
Warning!
Only use the jack supplied with your vehicle
to lift the vehicle briefly for wheel changes. If
you use the jack for any other purpose, you or
others could be injured, as the jack is
designed only for the purpose of changing a
wheel.
When using the jack, observe the safety notes
in the “Mounting the spare wheel” section and
the notes on the jack.
X Take the jack from the vehicle tool kit
(Y page 234). Storage position X
Turn the crank handle in the direction of
arrow as far as it will go. Operational position
X
Turn the crank handle clockwise.
Before placing the jack back into the vehicle
tool kit:
X Fully collapse the jack.
X Fold in the crank handle (storage position). Spare wheel
G
Observe Safety notes, see page 273.
The spare wheel is located in the space
underneath the trunk floor.
X Removing: Open the trunk (Y page 59).
X Lift the trunk floor. X
Remove retaining screw ; by turning it
counterclockwise.
X Remove spare wheel :. Where will I find ...?
235Practical hints
171_AKB; 3; 60, en-US
d2ureepe, Version: 2.11.8.1 2009-05-11T16:00:23+02:00 - Seite 235 Z
Page 245 of 312
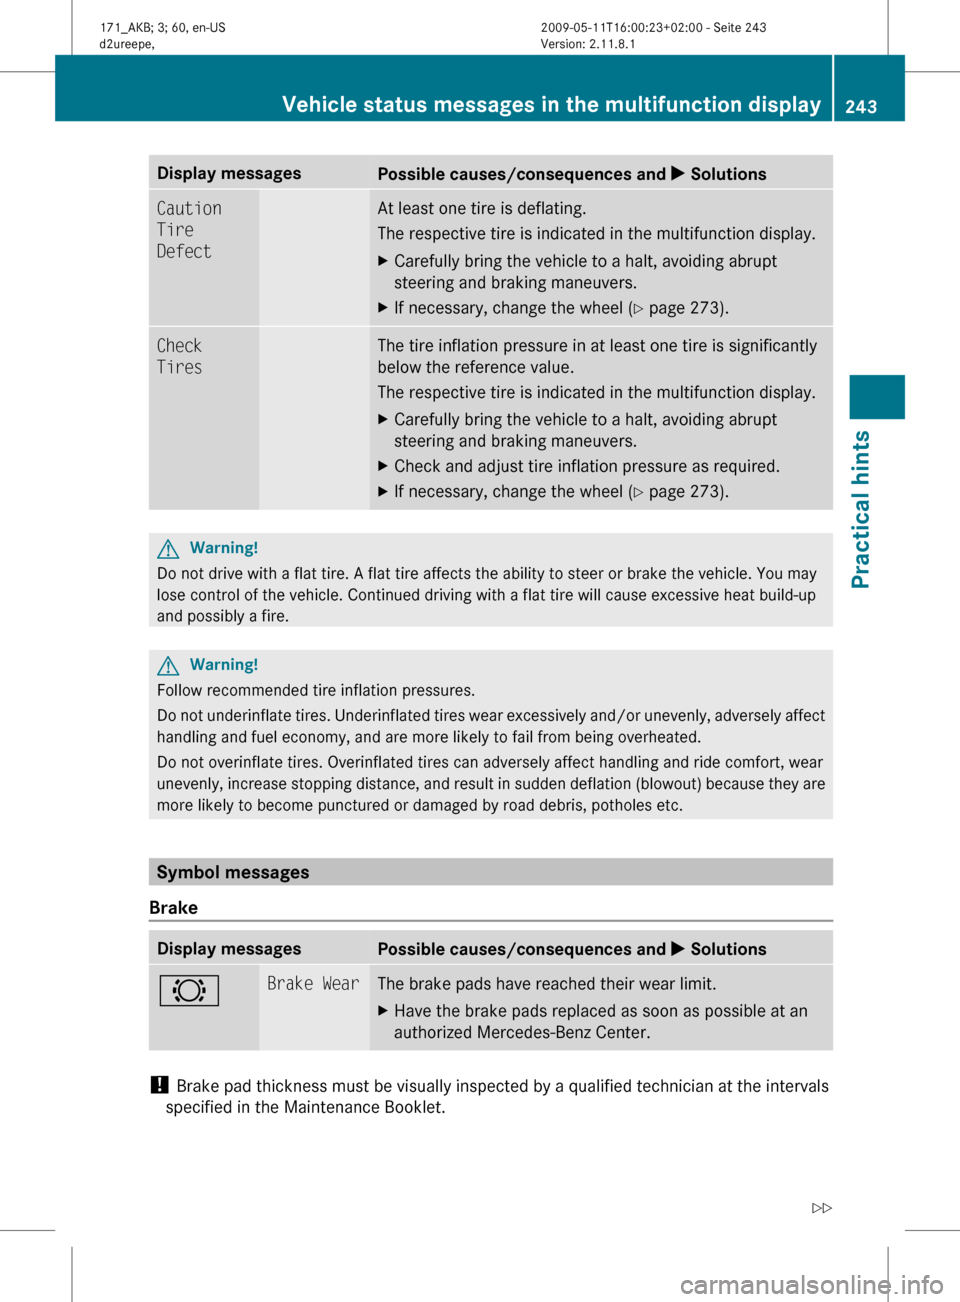
Display messages
Possible causes/consequences and
X SolutionsCaution
Tire
Defect At least one tire is deflating.
The respective tire is indicated in the multifunction display.
X
Carefully bring the vehicle to a halt, avoiding abrupt
steering and braking maneuvers.
X If necessary, change the wheel (Y page 273). Check
Tires The tire inflation pressure in at least one tire is significantly
below the reference value.
The respective tire is indicated in the multifunction display.
X
Carefully bring the vehicle to a halt, avoiding abrupt
steering and braking maneuvers.
X Check and adjust tire inflation pressure as required.
X If necessary, change the wheel (Y page 273). G
Warning!
Do not drive with a flat tire. A flat tire affects the ability to steer or brake the vehicle. You may
lose control of the vehicle. Continued driving with a flat tire will cause excessive heat build-up
and possibly a fire. G
Warning!
Follow recommended tire inflation pressures.
Do not underinflate tires. Underinflated tires wear excessively and/or unevenly, adversely affect
handling and fuel economy, and are more likely to fail from being overheated.
Do not overinflate tires. Overinflated tires can adversely affect handling and ride comfort, wear
unevenly, increase stopping distance, and result in sudden deflation (blowout) because they are
more likely to become punctured or damaged by road debris, potholes etc. Symbol messages
Brake Display messages
Possible causes/consequences and
X Solutions# Brake Wear The brake pads have reached their wear limit.
X
Have the brake pads replaced as soon as possible at an
authorized Mercedes-Benz Center. !
Brake pad thickness must be visually inspected by a qualified technician at the intervals
specified in the Maintenance Booklet. Vehicle status messages in the multifunction display
243
Practical hints
171_AKB; 3; 60, en-US
d2ureepe,Version: 2.11.8.1 2009-05-11T16:00:23+02:00 - Seite 243 Z
Page 257 of 312
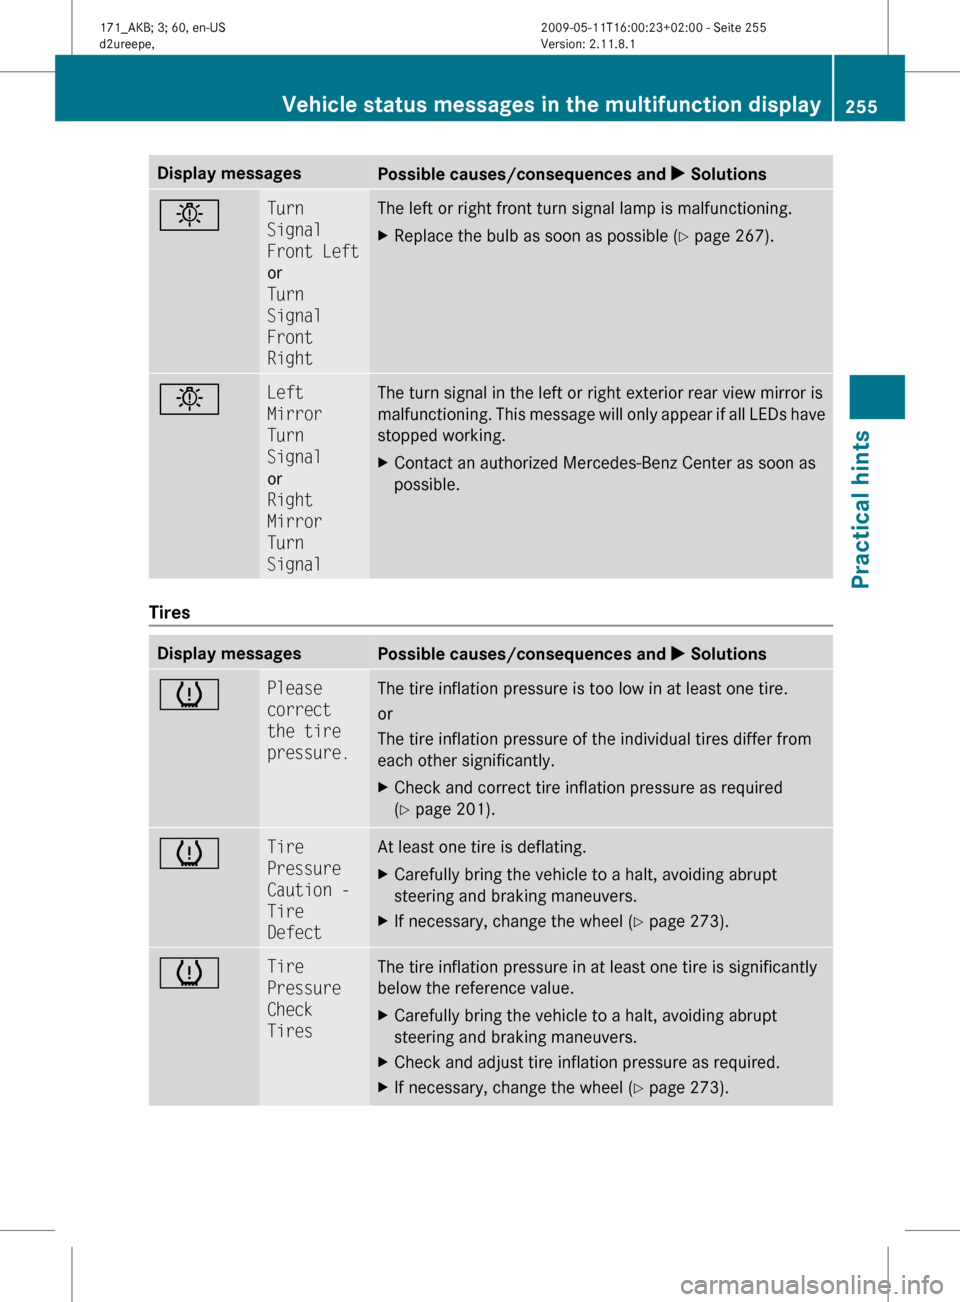
Display messages
Possible causes/consequences and
X Solutionsb Turn
Signal
Front Left
or
Turn
Signal
Front
Right The left or right front turn signal lamp is malfunctioning.
X
Replace the bulb as soon as possible (Y page 267). b Left
Mirror
Turn
Signal
or
Right
Mirror
Turn
Signal The turn signal in the left or right exterior rear view mirror is
malfunctioning.
This message will only appear if all LEDs have
stopped working.
X Contact an authorized Mercedes-Benz Center as soon as
possible. Tires
Display messages
Possible causes/consequences and
X Solutionsh Please
correct
the tire
pressure. The tire inflation pressure is too low in at least one tire.
or
The tire inflation pressure of the individual tires differ from
each other significantly.
X
Check and correct tire inflation pressure as required
(Y page 201). h Tire
Pressure
Caution -
Tire
Defect At least one tire is deflating.
X
Carefully bring the vehicle to a halt, avoiding abrupt
steering and braking maneuvers.
X If necessary, change the wheel (Y page 273). h Tire
Pressure
Check
Tires The tire inflation pressure in at least one tire is significantly
below the reference value.
X
Carefully bring the vehicle to a halt, avoiding abrupt
steering and braking maneuvers.
X Check and adjust tire inflation pressure as required.
X If necessary, change the wheel (Y page 273). Vehicle status messages in the multifunction display
255
Practical hints
171_AKB; 3; 60, en-US
d2ureepe,Version: 2.11.8.1 2009-05-11T16:00:23+02:00 - Seite 255 Z
Page 275 of 312
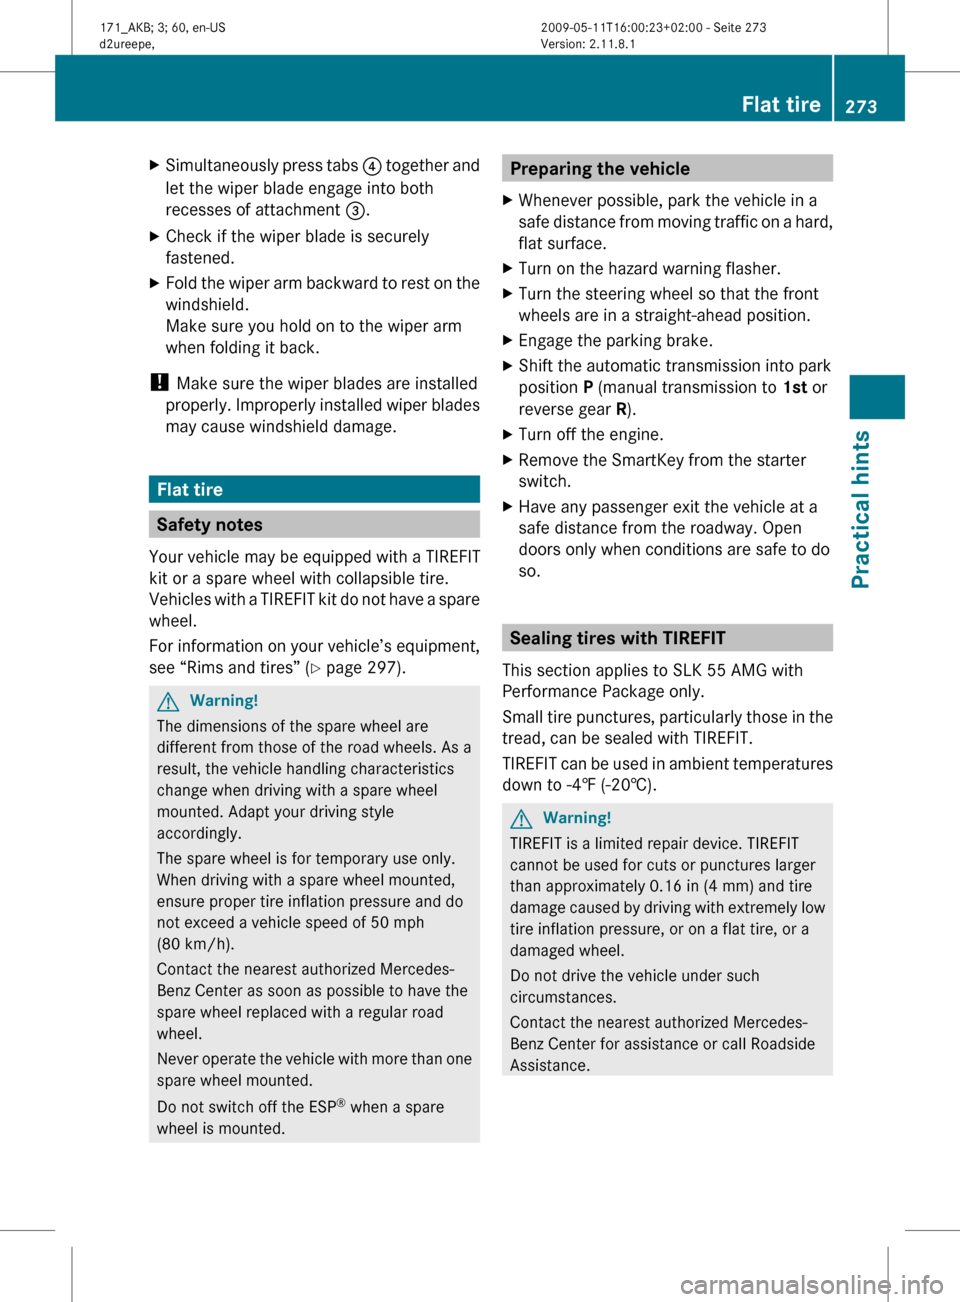
X
Simultaneously press tabs ? together and
let the wiper blade engage into both
recesses of attachment =.
X Check if the wiper blade is securely
fastened.
X Fold the wiper arm backward to rest on the
windshield.
Make sure you hold on to the wiper arm
when folding it back.
! Make sure the wiper blades are installed
properly.
Improperly installed wiper blades
may cause windshield damage. Flat tire
Safety notes
Your vehicle may be equipped with a TIREFIT
kit or a spare wheel with collapsible tire.
Vehicles
with a TIREFIT kit do not have a spare
wheel.
For information on your vehicle’s equipment,
see “Rims and tires” ( Y page 297).G
Warning!
The dimensions of the spare wheel are
different from those of the road wheels. As a
result, the vehicle handling characteristics
change when driving with a spare wheel
mounted. Adapt your driving style
accordingly.
The spare wheel is for temporary use only.
When driving with a spare wheel mounted,
ensure proper tire inflation pressure and do
not exceed a vehicle speed of 50 mph
(80 km/h).
Contact the nearest authorized Mercedes-
Benz Center as soon as possible to have the
spare wheel replaced with a regular road
wheel.
Never
operate the vehicle with more than one
spare wheel mounted.
Do not switch off the ESP ®
when a spare
wheel is mounted. Preparing the vehicle
X Whenever possible, park the vehicle in a
safe
distance from moving traffic on a hard,
flat surface.
X Turn on the hazard warning flasher.
X Turn the steering wheel so that the front
wheels are in a straight-ahead position.
X Engage the parking brake.
X Shift the automatic transmission into park
position P (manual transmission to 1st or
reverse gear R).
X Turn off the engine.
X Remove the SmartKey from the starter
switch.
X Have any passenger exit the vehicle at a
safe distance from the roadway. Open
doors only when conditions are safe to do
so. Sealing tires with TIREFIT
This section applies to SLK 55 AMG with
Performance Package only.
Small
tire punctures, particularly those in the
tread, can be sealed with TIREFIT.
TIREFIT can be used in ambient temperatures
down to -4‡ (-20†). G
Warning!
TIREFIT is a limited repair device. TIREFIT
cannot be used for cuts or punctures larger
than approximately 0.16 in (4 mm) and tire
damage
caused by driving with extremely low
tire inflation pressure, or on a flat tire, or a
damaged wheel.
Do not drive the vehicle under such
circumstances.
Contact the nearest authorized Mercedes-
Benz Center for assistance or call Roadside
Assistance. Flat tire
273
Practical hints
171_AKB; 3; 60, en-US
d2ureepe, Version: 2.11.8.1 2009-05-11T16:00:23+02:00 - Seite 273 Z
Page 279 of 312
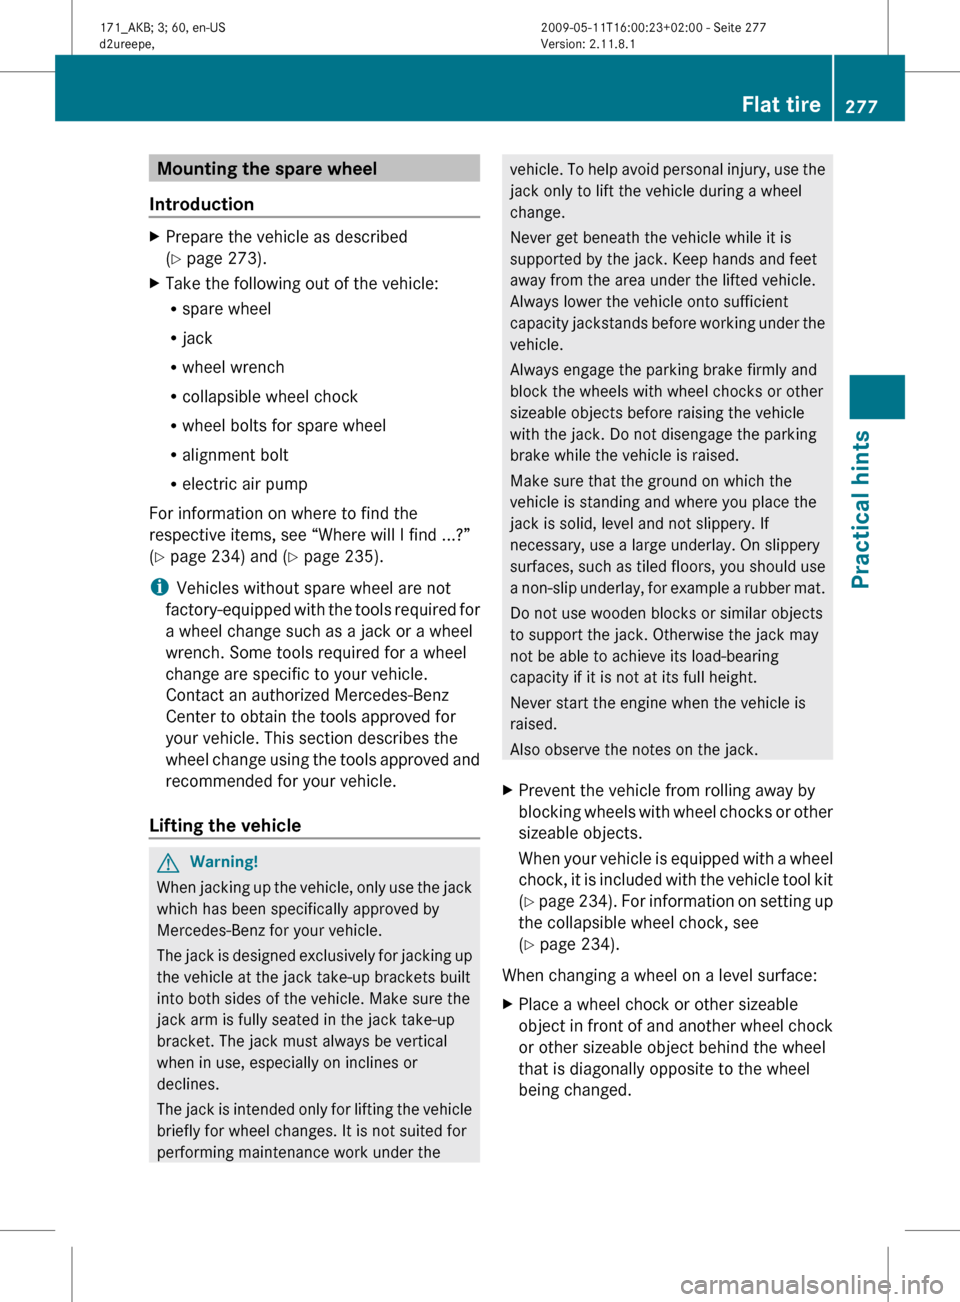
Mounting the spare wheel
Introduction X
Prepare the vehicle as described
(Y page 273).
X Take the following out of the vehicle:
R
spare wheel
R jack
R wheel wrench
R collapsible wheel chock
R wheel bolts for spare wheel
R alignment bolt
R electric air pump
For information on where to find the
respective items, see “Where will I find ...?”
(Y page 234) and ( Y page 235).
i Vehicles without spare wheel are not
factory-equipped
with the tools required for
a wheel change such as a jack or a wheel
wrench. Some tools required for a wheel
change are specific to your vehicle.
Contact an authorized Mercedes-Benz
Center to obtain the tools approved for
your vehicle. This section describes the
wheel change using the tools approved and
recommended for your vehicle.
Lifting the vehicle G
Warning!
When jacking up the vehicle, only use the jack
which has been specifically approved by
Mercedes-Benz for your vehicle.
The
jack is designed exclusively for jacking up
the vehicle at the jack take-up brackets built
into both sides of the vehicle. Make sure the
jack arm is fully seated in the jack take-up
bracket. The jack must always be vertical
when in use, especially on inclines or
declines.
The jack is intended only for lifting the vehicle
briefly for wheel changes. It is not suited for
performing maintenance work under the vehicle. To help avoid personal injury, use the
jack only to lift the vehicle during a wheel
change.
Never get beneath the vehicle while it is
supported by the jack. Keep hands and feet
away from the area under the lifted vehicle.
Always lower the vehicle onto sufficient
capacity
jackstands before working under the
vehicle.
Always engage the parking brake firmly and
block the wheels with wheel chocks or other
sizeable objects before raising the vehicle
with the jack. Do not disengage the parking
brake while the vehicle is raised.
Make sure that the ground on which the
vehicle is standing and where you place the
jack is solid, level and not slippery. If
necessary, use a large underlay. On slippery
surfaces, such as tiled floors, you should use
a non-slip underlay, for example a rubber mat.
Do not use wooden blocks or similar objects
to support the jack. Otherwise the jack may
not be able to achieve its load-bearing
capacity if it is not at its full height.
Never start the engine when the vehicle is
raised.
Also observe the notes on the jack.
X Prevent the vehicle from rolling away by
blocking
wheels with wheel chocks or other
sizeable objects.
When your vehicle is equipped with a wheel
chock, it is included with the vehicle tool kit
(Y page 234). For information on setting up
the collapsible wheel chock, see
(Y page 234).
When changing a wheel on a level surface:
X Place a wheel chock or other sizeable
object
in front of and another wheel chock
or other sizeable object behind the wheel
that is diagonally opposite to the wheel
being changed. Flat tire
277
Practical hints
171_AKB; 3; 60, en-US
d2ureepe, Version: 2.11.8.1 2009-05-11T16:00:23+02:00 - Seite 277 Z