2011 MERCEDES-BENZ SLK300 windshield wipers
[x] Cancel search: windshield wipersPage 18 of 312

Indicator lamps ................................
26
Messages in the multifunction
display
........................................... 255U
Uniform Tire Quality Grading
Standards .................................. 210, 219
Units Selecting speedometer display
mode ............................................. 104
Unleaded gasoline, premium ........... 303
Unlocking the vehicle
Manually
........................................ 264
SmartKey ......................................... 56
Upholstery, cleaning .........................231
USB devices (media interface) .........139
Useful features .................................. 176V
Valet locking ........................................ 61
Vehicle
Battery ........................................... 282
Care ............................................... 227
Control system ................................ 93
Identification Number (VIN) ........... 292
Locking/unlocking
........................... 56
Lowering (wheel change) ...............281
Modifications and alterations,
Operating safety .............................. 20
Towing ........................................... 285
Unlocking/locking manually .......... 264
Vehicle dimensions
see Vehicle specification
Vehicle Identification Number
(VIN) ................................................... 292
Vehicle jack see Jack
Vehicle lighting .................................... 70
Vehicle loading
Load limit ....................................... 206
Terminology ................................... 217
Vehicle maximum load on the tire ... 219
Vehicle specification
SLK 300 ......................................... 294
SLK 350 ......................................... 295
SLK 55 AMG .................................. 296Vehicle status message memory ....
101
Vehicle tool kit .................................. 234
Vehicle washing see Vehicle care
Vehicle weights
see Vehicle specification W
Warning sounds Driver’s or passenger’s seat belt
.....42
Parking brake ................................ 244
Seat belt telltale ............................ 259
Warranty coverage ............................ 292
Washer and headlamp cleaning
system ................................................ 306
Washer fluid
Messages in the multifunction
display ........................................... 247
Mixing ratio .................................... 306
Refilling .......................................... 196
Washing the vehicle .......................... 227
Wear pattern (tires) ..........................212
Weights (vehicle) see Vehicle specification
Wheel
Changing ....................................... 273
Removing ....................................... 278
Spare ............................................. 273
Tightening torque ........................... 281
Wheels, sizes ..................................... 297
Wheels, Tires and .............................. 197
Windows see Power windows
Windows, cleaning ............................229
Wind screen ....................................... 173
Windshield Cleaning wiper blades .................... 229
Defogging ...................................... 169
Washer fluid ................................... 306
Wipers ............................................. 76
Windshield wipers
Replacing wiper blades .................. 271
Winter driving
Instructions .................................... 220
Snow chains .................................. 220
Tires ............................................... 219
Winter tires ................................ 219, 297 16
Index 171_AKB; 3; 60, en-US
d2ureepe,
Version: 2.11.8.1 2009-05-11T16:00:23+02:00 - Seite 16
Page 26 of 312

Exterior view
i
This Operator’s Manual describes all features, standard or optional, potentially available
for your vehicle at the time of purchase. Please be aware that your vehicle might not be
equipped with all features described in this manual. Function Page
:
Trunk:
Locking and unlocking 56
Opening and closing 59
Valet locking 61
;
Rear window defroster 170
=
Fuel filler flap 190
?
Doors:
Locking and unlocking 56,
264 A
Exterior rear view mirrors 68
B
Retractable hardtop 170
C
Windshield:
Wiping with washer fluid 77 Function Page
Cleaning 229
D
Wipers 76
Wiper blades, replacing 271
Wiper blades, cleaning 229
E
Hood 192
F
Front lamps 267
G
Front towing eye 286
H
Headlamp cleaning system 74
I
Tires and wheels 197
Rims and tires 297
J
Rear lamps 267
K
Rear towing eye 28624
Exterior viewAt a glance
171_AKB; 3; 60, en-US
d2ureepe,
Version: 2.11.8.1 2009-05-11T16:00:23+02:00 - Seite 24
Page 76 of 312

To signal minor directional changes:
X
Press the combination switch only to the
point of resistance in direction of
arrow ; or ? and release.
The corresponding turn signal lamps will
flash three times.
High beam X
Turn the exterior lamp switch to position
L (Y page 71).
X Switching on: Push the combination
switch in direction of arrow :.
The high-beam headlamp indicator lamp
K in the instrument cluster comes on.
X Switching off: Pull the combination switch
in direction of arrow = to its original
position.
i Also note the information on high-beam
headlamps with activated automatic
headlamp mode (Y page 71) or the daytime
running lamp mode ( Y page 72).
High-beam flasher X
Switching on: Pull the combination switch
briefly in direction of arrow =.Hazard warning flasher
The hazard warning flasher can be switched
on at all times, even with the SmartKey
removed from the starter switch.
The hazard warning flasher comes on
automatically when an air bag deploys. X
Switching on: Press hazard warning
flasher switch :.
All turn signal lamps are flashing.
i With the hazard warning flasher activated
and the combination switch set for either
left or right turn, only the respective left or
right turn signals will operate when the
ignition is switched on.
X Switching off: Press hazard warning
flasher switch : again.
i If the hazard warning flasher has been
activated automatically, press hazard
warning flasher switch : to switch it off. Headlamp cleaning system
The headlamps will be cleaned with a high-
pressure water jet automatically when the
engine is running and you have
R switched on the headlamps
and
R the windshield wipers have wiped the
windshield with washer fluid five times
The counter resets when you switch off the
headlamps.
For information on filling up the washer
reservoir, see “Washer system and headlamp
cleaning system” ( Y page 196).74
LightingControls in detail
171_AKB; 3; 60, en-US
d2ureepe,
Version: 2.11.8.1 2009-05-11T16:00:23+02:00 - Seite 74
Page 78 of 312

Shut-off must be switched on
(Y page 107))
R open a door
The interior lighting goes out after a short
time.
i If a door remains open, the interior lamps
go out automatically after approximately
5 minutes when the SmartKey is removed
or in starter switch position 0.
X Deactivating: Press switch q.
Manual control !
An interior lamp switched on manually
does not go out automatically.
Leaving an interior lamp switched on for an
extended period of time with the engine
turned off could result in a discharged
battery.
X Switching interior lighting on/off: Press
switch c.
i The footwell lighting is switched on and
off simultaneously with the manual control.
The standard reading lamps are located to the
left and right of the overhead control panel.
Reading lamps as part of the interior lighting
package are located on the lower edge of the
interior rear view mirror.
X Switching reading lamps on/off: Press
respective switch p.
Emergency lighting The interior lighting comes on automatically
if the vehicle is involved in an accident.
Switching off:
X
Press switch q.
or
X Press hazard warning flasher switch
(Y page 74). Wipers
Notes
! Do not operate the wipers when the
windshield is dry. Dust that accumulates on
a windshield might scratch the glass and/
or damage the wiper blades when wiping
occurs on a dry windshield. If it is necessary
to operate the wipers in dry weather
conditions, always operate the wipers with
washer fluid. Windshield wipers
X Observe notes on page (Y page 76).
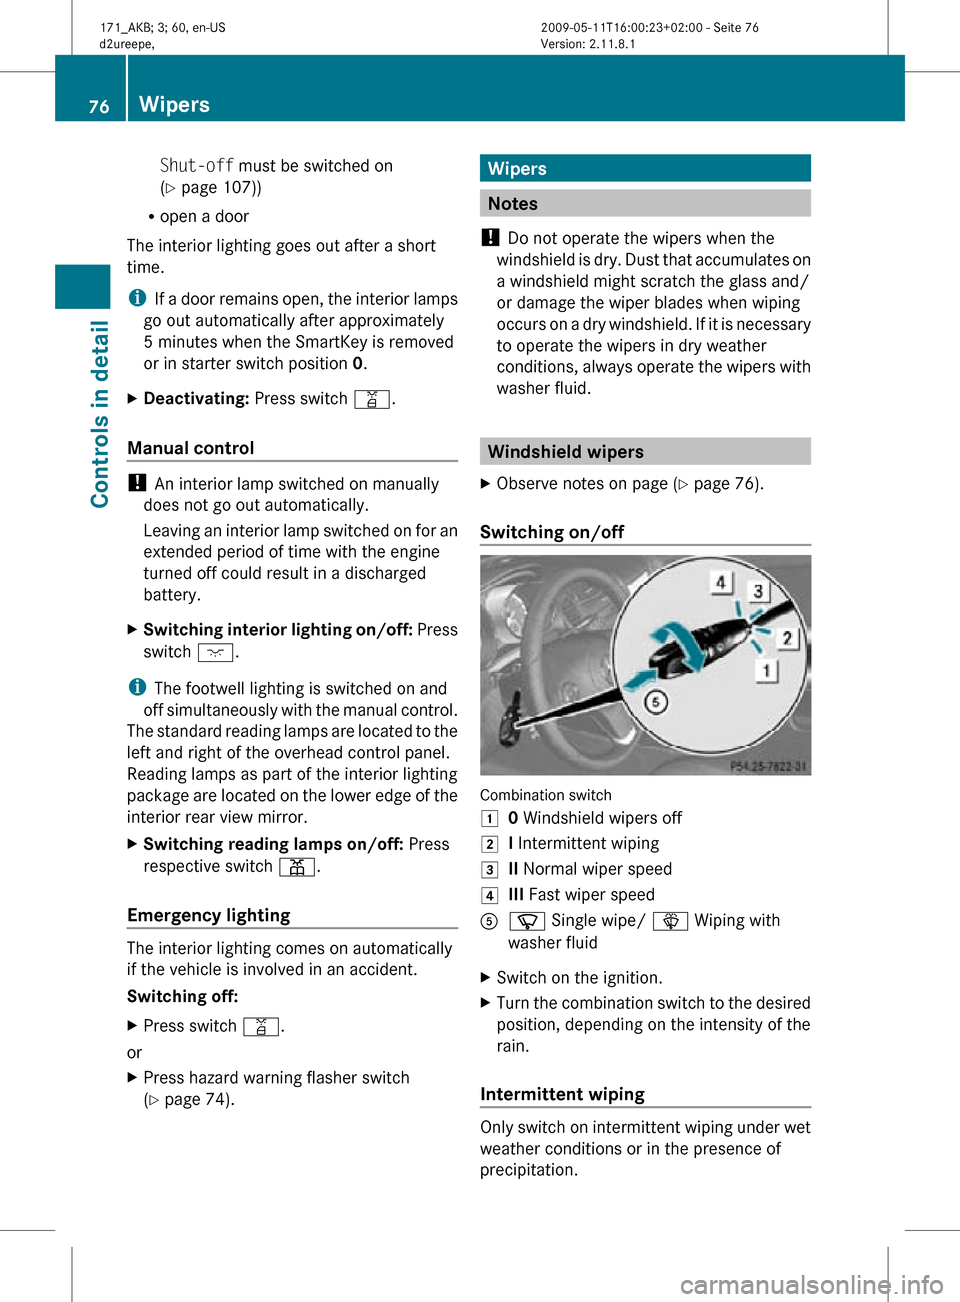
Switching on/off Combination switch
1
0 Windshield wipers off
2 I Intermittent wiping
3 II Normal wiper speed
4 III Fast wiper speed
A í Single wipe/ î Wiping with
washer fluid
X Switch on the ignition.
X Turn the combination switch to the desired
position, depending on the intensity of the
rain.
Intermittent wiping Only switch on intermittent wiping under wet
weather conditions or in the presence of
precipitation.76
WipersControls in detail
171_AKB; 3; 60, en-US
d2ureepe,
Version: 2.11.8.1 2009-05-11T16:00:23+02:00 - Seite 76
Page 79 of 312

!
Vehicles with rain sensor: Do not leave
windshield wipers on an intermittent
setting when the vehicle is taken to an
automatic car wash or during windshield
cleaning. Windshield wipers will operate in
the presence of water sprayed on the
windshield, and windshield wipers may be
damaged as a result.
! Vehicles with rain sensor: If you have set
intermittent wiping, dirt on the surface of
the
rain sensor or optical effects may cause
the windshield wipers to wipe in an
undesired fashion. This could then damage
the windshield wiper blades or scratch the
windshield. You should therefore switch off
the windshield wipers when weather
conditions are dry.
Vehicles with rain sensor: Intermittent wiping
interval is dependent on the wetness of the
windshield. After the initial wipe, pauses
between wipes are controlled by the rain
sensor automatically.
X Turn the combination switch to position I.
Intermittent wiping is interrupted when the
vehicle
is at a standstill and a door is opened.
This protects persons getting into or out of
the vehicle from being sprayed.
Intermittent wiping will be continued when all
doors are closed and
R the clutch pedal is depressed (vehicles with
manual transmission)
or
R the automatic transmission is in drive
position D or reverse gear R (vehicles with
automatic transmission)
the automatic transmission is in drive
position D or reverse gear R
or
R the wiper setting is changed using the
combination switch Single wipe X
Press the combination switch briefly in
direction of arrow A to the resistance
point.
The windshield wipers wipe one time
without washer fluid.
Wiping with washer fluid X
Press the combination switch in direction
of arrow A past the resistance point.
The
windshield wipers operate with washer
fluid.
i To prevent smears on the windshield or
noisy/chattering wiper blades, wipe with
washer
fluid every now and then even when
it is raining.
For information on filling up the washer
reservoir, see “Washer system and headlamp
cleaning system” ( Y page 196).
For information on cleaning the headlamps
with washer fluid, see “Headlamp cleaning
system” ( Y page 74). Problems with wipers
! If anything blocks the windshield wipers
(leaves, snow, etc.), switch them off
immediately.
For
safety reasons, do the following before
attempting to remove any blockage:
R Stop the vehicle in a safe location.
R Remove the SmartKey from the starter
switch.
R Engage the parking brake.
R Remove blockage.
R Turn the windshield wipers on again. Wipers
77
Controls in detail
171_AKB; 3; 60, en-US
d2ureepe, Version: 2.11.8.1 2009-05-11T16:00:23+02:00 - Seite 77 Z
Page 80 of 312

If the windshield wipers fail to function at
all with the combination switch in position
I,
R
set the combination switch to the next
higher wiper speed
R have the windshield wipers checked at
the nearest authorized Mercedes-Benz
Center Power windows
Opening and closing
The windows are opened and closed
electrically. The switches for all windows are
located on the driver’s door. The switch for
operating the passenger-side windows is
located on the passenger door. G
Observe Safety notes, see page 45. G
Warning!
When closing the windows, make sure there
is no danger of anyone being harmed by the
closing procedure.
The door windows are equipped with the
express operation and automatic reversal
function. If in express operation mode a door
window encounters an obstruction that
blocks its path, the automatic reversal
function will stop the door window and open
it slightly.
The door windows operate differently when
the switch is pulled and held. See the “Closing
when a door window is blocked” section for
details.
The closing of the door windows can be
immediately halted by releasing the switch or,
if the switch was pulled past the resistance
point and released, by pressing or pulling the
respective switch.
The closing of the rear side windows can be
immediately halted by releasing the switch.
If a window encounters an obstruction that
blocks its path in a circumstance where you
are closing the windows by pressing and holding button & on the SmartKey the
automatic reversal function will not operate.
i You can also open or close the windows
using the SmartKey, see “Summer opening
feature” ( Y page 172) and “Convenience
closing feature” ( Y page 172).
i After switching off the ignition or
removing the SmartKey from the starter
switch, you can operate the windows until
you open a door. If no door was opened you
can operate the windows for up to
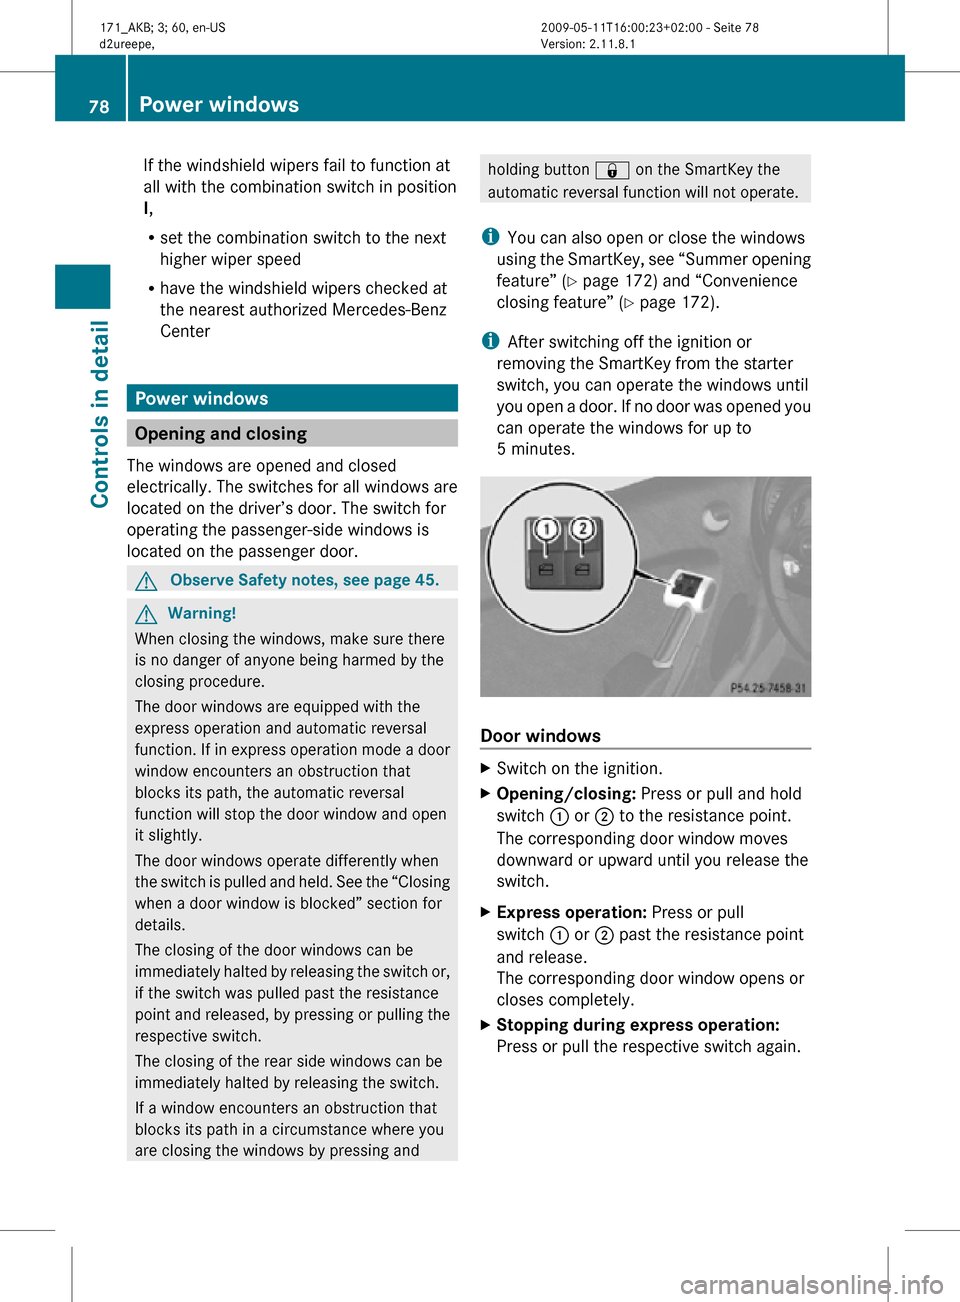
5 minutes. Door windows
X
Switch on the ignition.
X Opening/closing: Press or pull and hold
switch : or ; to the resistance point.
The corresponding door window moves
downward or upward until you release the
switch.
X Express operation: Press or pull
switch : or ; past the resistance point
and release.
The corresponding door window opens or
closes completely.
X Stopping during express operation:
Press or pull the respective switch again. 78
Power windowsControls in detail
171_AKB; 3; 60, en-US
d2ureepe,
Version: 2.11.8.1 2009-05-11T16:00:23+02:00 - Seite 78
Page 171 of 312

Windshield fogged on the outside
X
Switch the windshield wipers on
(Y page 76).
X Press button à 12
.
The indicator lamp in the button comes on.
Air distribution and air volume are adjusted
automatically.
or
X Turn air distribution control to P or
O. Maximum cooling MAX COOL
MAX COOL is only available in U.S. vehicles
with automatic climate control.
MAX COOL is only operational when the
engine is running.
If the air distribution controls as well as the
air volume control are set to à and there
is a high demand for cooling, MAX COOL is
activated. MAX COOL appears in display H
(Y page 163).
This provides the fastest possible cooling of
the
vehicle interior (when retractable hardtop
is closed). Air recirculation mode
Switch to air recirculation mode to prevent
unpleasant odors from entering the vehicle
from the outside (e. g. before driving through
a tunnel). This setting cuts off the intake of
outside air and recirculates the air in the
passenger compartment. G
Warning!
Fogged windows impair visibility,
endangering you and others. If the windows
begin to fog on the inside, switching off the
air recirculation mode immediately should
clear interior window fogging. If interior
window fogging persists, make sure the air conditioning is activated, or press button
¬.
X Activating: Press button g.
The
indicator lamp in the button comes on.
i The air recirculation mode is activated
automatically at high outside
temperatures.
The
indicator lamp in button g is not lit
when the air recirculation mode is switched
on automatically.
A quantity of outside air is added after
approximately 30 minutes.
X Deactivating: Press button g again.
The indicator lamp in the button goes out.
i The manually selected air recirculation
mode is deactivated automatically:
R after 5 minutes if the outside
temperature is below approximately
41‡ (5†)
R after 5 minutes if the air conditioning is
turned off
R after 30 minutes if the outside
temperature is above approximately
41‡ (5†) Residual heat and ventilation
With the engine turned off, it is possible to
continue to heat or ventilate the interior for
up to 30 minutes. This feature makes use of
the residual heat produced by the engine.
i If
you switch on the residual heat function
when outside temperatures are high, only
the ventilation will be switched on.
i How long the system will provide heating
depends on the coolant temperature and
the selected temperature. The blower will
run at speed setting 1 regardless of the air
volume control setting.
12 Vehicles with automatic climate control Climate control system
169
Controls in detail
171_AKB; 3; 60, en-US
d2ureepe, Version: 2.11.8.1 2009-05-11T16:00:23+02:00 - Seite 169 Z
Page 194 of 312

Check the following:
R
Engine oil level ( Y page 193)
R Tire inflation pressure ( Y page 201)
R Coolant level ( Y page 196)
R Vehicle lighting ( Y page 267)
R Washer system and headlamp cleaning
system (Y page 196)
R Brake fluid ( Y page 197) Engine compartment
Hood
G
Warning!
Do not pull the release lever while the vehicle
is in motion. Otherwise the hood could be
forced open by passing air flow.
This could cause the hood to come loose and
injure you and/or others.
Opening G
Warning!
Do not open the hood when the engine is
overheated. You could be seriously injured.
Observe the coolant temperature display to
determine whether the engine may be
overheated. If you see flames or smoke
coming from the engine compartment, move
away from the vehicle. Wait until the engine
has cooled. If necessary, call the fire
department. G
Warning!
You could be injured when the hood is open –
even when the engine is turned off.
Parts of the engine can become very hot. To
prevent burns, let the engine cool completely
before touching any components on the
vehicle. Comply with all relevant safety
precautions. G
Warning!
To help prevent personal injury, stay clear of
moving parts when the hood is open and the
engine is running.
The radiator fan may continue to run for
approximately 30 seconds or may even
restart after the engine has been turned off.
Stay clear of fan blades. G
Warning!
The engine is equipped with a transistorized
ignition system. Because of the high voltage
it is dangerous to touch any components
(ignition coils, spark plug sockets, diagnostic
socket) of the ignition system
R with the engine running
R while starting the engine
R when the ignition is switched on and the
engine is turned manually X
Pull hood lock release lever :.
The hood is unlocked.
! Never open the hood if the wiper arms are
folded forward away from the windshield.
Otherwise the windshield wipers or the
hood could be damaged. 192
Engine compartmentOperation
171_AKB; 3; 60, en-US
d2ureepe,
Version: 2.11.8.1 2009-05-11T16:00:23+02:00 - Seite 192