Page 145 of 316

The vehicle chassis ride height is raised or
lowered according to the selected level
setting and to the vehicle speed. With
increasing speed, the ride height is reduced
by up to approximately 0.5 in (12 mm). With
decreasing speed, the ride height is again
raised to the selected vehicle level.
These height adjustments are so small that
you may not notice any change.
Setting the vehicle level
GWarning!
To help avoid personal injury, keep hands and
feet away from wheel housing area, and stay
away from under the vehicle when lowering
the vehicle chassis.
The following vehicle level settings can be
selected when the vehicle is stationary and
the engine is running:
LevelUse forIndicator
lamps
NormalFor driving on
normal roads.
Both lamps
are off.
Level 1For driving on
rough roads or
with snow chains
(Y page 208).
One lamp
is on.
Level 2For driving on very
rough road surface
conditions.
Both lamps
are on.
Select the level 1 and level 2 settings only
when required by current driving conditions.
Otherwise the fuel consumption may
increase and/or the handling may be
impaired.
iThe selected setting remains stored in
memory, even when the engine is turned
off and restarted.
XStart the engine.XPress vehicle level control button \000
Page 146 of 316

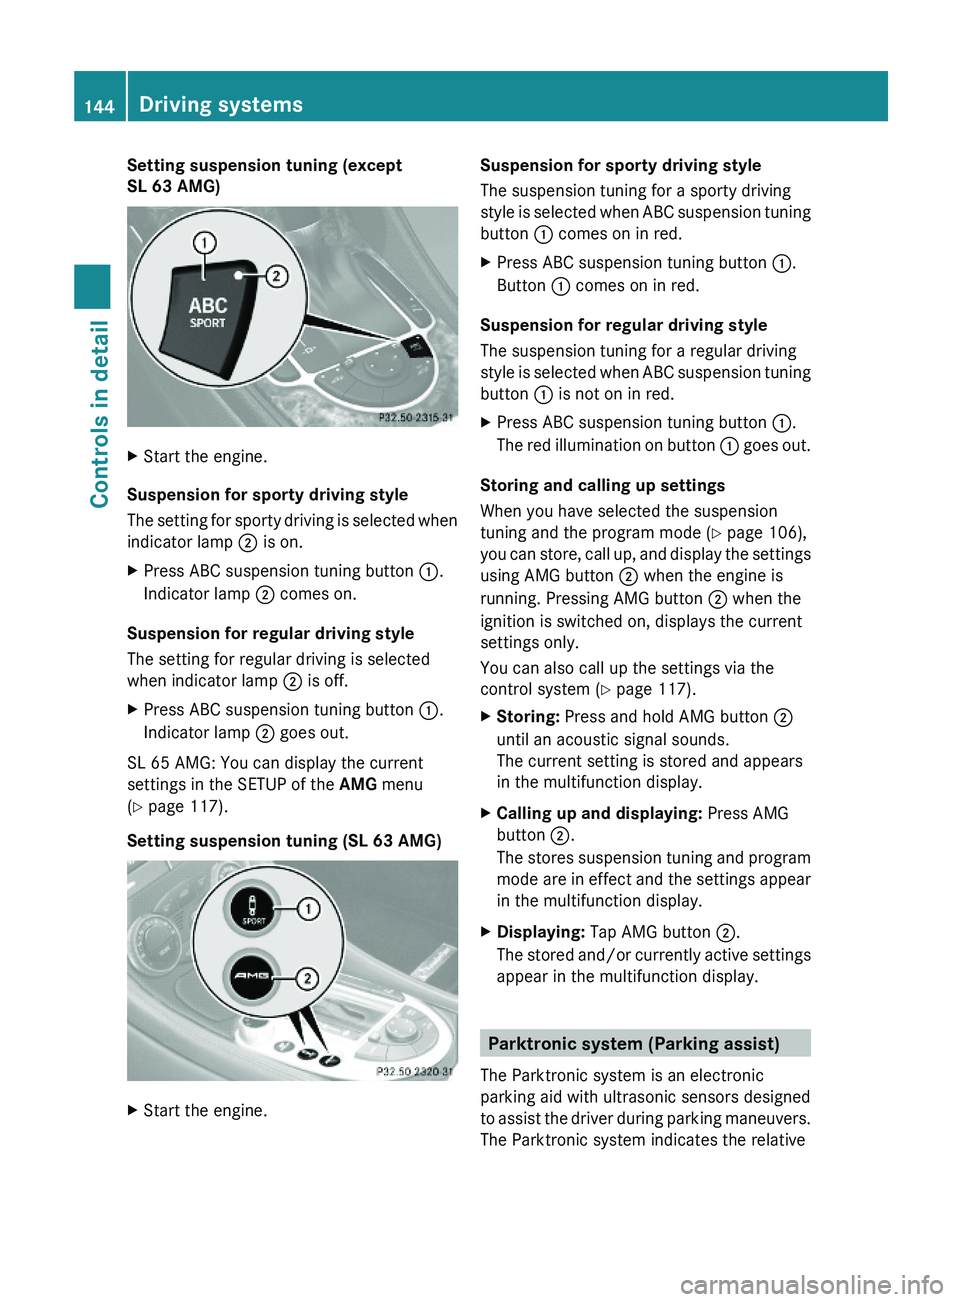
Setting suspension tuning (except
SL 63 AMG)
XStart the engine.
Suspension for sporty driving style
The setting for sporty driving is selected when
indicator lamp \000G is on.
XPress ABC suspension tuning button \000F.
Indicator lamp \000G comes on.
Suspension for regular driving style
The setting for regular driving is selected
when indicator lamp \000G is off.
XPress ABC suspension tuning button \000F.
Indicator lamp \000G goes out.
SL 65 AMG: You can display the current
settings in the SETUP of the AMG menu
(Y page 117).
Setting suspension tuning (SL 63 AMG)
XStart the engine.Suspension for sporty driving style
The suspension tuning for a sporty driving
style is selected when ABC suspension tuning
button \000F comes on in red.
XPress ABC suspension tuning button \000F.
Button \000F comes on in red.
Suspension for regular driving style
The suspension tuning for a regular driving
style is selected when ABC suspension tuning
button \000F is not on in red.
XPress ABC suspension tuning button \000F.
The red illumination on button \000F goes out.
Storing and calling up settings
When you have selected the suspension
tuning and the program mode (Y page 106),
you can store, call up, and display the settings
using AMG button \000G when the engine is
running. Pressing AMG button \000G when the
ignition is switched on, displays the current
settings only.
You can also call up the settings via the
control system (Y page 117).
XStoring: Press and hold AMG button \000G
until an acoustic signal sounds.
The current setting is stored and appears
in the multifunction display.
XCalling up and displaying: Press AMG
button \000G.
The stores suspension tuning and program
mode are in effect and the settings appear
in the multifunction display.
XDisplaying: Tap AMG button \000G.
The stored and/or currently active settings
appear in the multifunction display.
Parktronic system (Parking assist)
The Parktronic system is an electronic
parking aid with ultrasonic sensors designed
to assist the driver during parking maneuvers.
The Parktronic system indicates the relative
144Driving systemsControls in detail
230_AKB; 6; 22, en-USd2ureepe,Version: 2.11.8.12009-07-28T18:49:58+02:00 - Seite 144
Page 147 of 316

distance between the vehicle and an obstacle
visually and audibly.
The Parktronic system is activated
automatically when
Ryou switch on the ignition
and
Ryou release the parking brake
and
Rthe automatic transmission is in drive
position D, reverse gear R, or neutral
position N
The Parktronic system deactivates at speeds
above approximately 11 mph (18 km/h). At
lower speeds, the Parktronic system
activates again.
The Parktronic system also deactivates when
you shift the automatic transmission into
park position P or engage the parking brake.
The Parktronic system monitors the
surroundings of your vehicle with six sensors
in the front bumper and four sensors in the
rear bumper.
Example illustration, sensors in the front bumper
To function properly, sensors \000F must be free
of dirt, ice, snow and slush. Clean
sensors \000F regularly. Be careful not to
scratch or damage sensors \000F, see “Cleaning
the driving systems sensors” (Y page 218).
GWarning!
The Parktronic is a supplemental system. It is
not intended to, nor does it replace, the need
for extreme care. The responsibility during
parking and other critical maneuvers always
remains with the driver.
GWarning!
Make sure no persons or animals are in or
near the area in which you are parking/
maneuvering. Otherwise, they could be
injured.
! Special attention must be paid to objects
with smooth surfaces or low silhouettes
(e.g. trailer couplings, painted posts,
elevated crossbars or road curbs). Such
objects may not be detected by the system
and can damage the vehicle.
During parking maneuvers, pay special
attention to objects located above or below
the height of the sensors (e.g. street curbs,
painted posts, or trailer hitches etc.). The
Parktronic system will not detect such
objects at close range and damage to your
vehicle or the object may result.
! Ultrasonic signals from outside sources
(e.g. truck air brakes, car wash, or
jackhammers) may impair the operation of
the Parktronic system.
Range of the sensors
Driving systems145Controls in detail230_AKB; 6; 22, en-USd2ureepe,Version: 2.11.8.12009-07-28T18:49:58+02:00 - Seite 145Z
Page 148 of 316

Front sensors
Centerapprox. 40 in (100 cm)Cornersapprox. 24 in (60 cm)
Rear sensors
Centerapprox. 48 in (120 cm)Cornersapprox. 32 in (80 cm)
Minimum distance
Centerapprox. 8 in (20 cm)Cornersapprox. 6 in (15 cm)
If the Parktronic system detects an obstacle
in this range, all the distance warning
segments illuminate and you hear a warning
signal. If the obstacle is closer than the
minimum distance, the actual distance may
no longer be indicated by the Parktronic
system.
Warning indicators
Visual signals indicate the relative distance
between the sensors and an obstacle.
Front area warning indicators
Rear area warning indicators
Each warning indicator is divided into six
yellow and two red distance segments for left
side \000F and right side \000G of the vehicle. The
Parktronic system is ready to measure when
the border around the indicator is illuminated.
The current transmission position determines
which warning indicator will be activated.
Current
transmission
position
Warning indicatorDFront area activatedR or NFront and rear area
activated
As your vehicle approaches an object, one or
more distance segments will illuminate,
depending on the distance. When the eighth
distance segment illuminates, you have
reached the minimum distance.
RFront area: An intermittent acoustic
warning will sound as the first red distance
146Driving systemsControls in detail
230_AKB; 6; 22, en-USd2ureepe,Version: 2.11.8.12009-07-28T18:49:58+02:00 - Seite 146
Page 149 of 316

segment illuminates and a constant
acoustic warning lasting a maximum of
2 seconds will sound for the second red
distance segment. The signal is canceled
when the automatic transmission is shifted
into park position P or the parking brake is
engaged.
RRear area: An intermittent acoustic
warning will sound when the first distance
segment illuminates. This signal quickens
with each additional distance segment lit.
When the eighth distance segment
illuminates, the acoustic warning becomes
a constant signal. The signal is canceled
when the automatic transmission is shifted
into drive position D, or park position P, or
the parking brake is engaged.
Switching the Parktronic system on/
off
The Parktronic system switches on
automatically when the ignition is switched
on.
XSwitching off: Press Parktronic
switch \000F.
Indicator lamp \000G comes on.
XSwitching on: Press Parktronic switch \000F
again.
Parktronic system malfunction
There is a malfunction in the Parktronic
system, if only the red distance segments
illuminate and an acoustic warning sounds.
The Parktronic system will switch off
automatically after 20 seconds and indicator
lamp \000G in Parktronic switch \000F comes on.
XHave the Parktronic system checked at an
authorized Mercedes-Benz Center as soon
as possible.
If only the red distance segments illuminate
and no acoustic warning sounds, the
Parktronic system sensors are dirty (e.g. dirt,
ice, snow and slush). Another cause could be
interference from other radio or ultrasonic
signals (e.g. truck air brakes, car wash, or
jackhammers). The Parktronic system will
switch off automatically after 20 seconds and
indicator lamp \000G in Parktronic switch \000F
comes on.
XSwitch off the ignition.XClean the Parktronic system sensors
(Y page 218).
XSwitch on the ignition.
or
XCheck the Parktronic system operation at
another location to rule out interference
from outside radio or ultrasonic signals.
Driving systems147Controls in detail230_AKB; 6; 22, en-USd2ureepe,Version: 2.11.8.12009-07-28T18:49:58+02:00 - Seite 147Z
Page 150 of 316

Climate control system
Control panel
Automatic climate control
FunctionRecommendation/Notes1Air distribution
display, driver’s side
2Front defrosteriKeep this setting selected only until the
windshield or the side windows are clear
again.
(Y page 153)3Air recirculationiOnly use this function for a short time,
e.g. in a tunnel. Otherwise, the windows
can fog up due to lack of fresh air.
(Y page 154)4Rear window
defroster
(Y page 155)5Air distribution
display, passenger
side
6Air distribution,
passenger side
(Y page 153)7Temperature control,
passenger side
iSet the temperature to 72‡ (22†).(Y page 151)8AC cooling on/offiSwitch on/off the air conditioning.(Y page 150)Residual heat/
ventilation
iWith the engine turned off, it is possible
to continue to heat or ventilate the interior.
(Y page 154)9Climate control on/
off
iSwitch on/off the climate control
system.
(Y page 149)aAir volume control(Y page 153)148Climate control systemControls in detail
230_AKB; 6; 22, en-USd2ureepe,Version: 2.11.8.12009-07-28T18:49:58+02:00 - Seite 148
Page 151 of 316

FunctionRecommendation/NotesbAir distribution and
air volume
(automatic mode)i Switch on the automatic mode. The
indicator lamp in button 005A comes on.(Y page 150)cTemperature control,
driver’s sidei Set the temperature to 72‡ (22†).(Y page 151)dAir distribution,
driver’s side( Y page 153)Notes on climate control system
The climate control system is operational
whenever the engine is running. You can
operate the climate control system in either
the automatic or manual mode. The system
cools or heats the interior depending on the
selected interior temperature.
It can only function optimally when you are
driving with the windows and the retractable
hardtop closed.
Nearly all dust particles, pollutants and odors
are filtered out before outside air enters the
passenger compartment through the air
distribution system.GWarning!
Severe conditions (e.g. strong air pollution)
may require replacement of the filter before
its scheduled replacement interval. A clogged
filter will reduce the air volume to the interior
and the windows could fog up, impairing
visibility and endangering you and others.
Have a clogged filter replaced as soon as
possible at an authorized Mercedes-Benz
Center.
The air conditioning will not engage (no
cooling) if the A/C mode ( Y page 150) is
deactivated.
GWarning!
Follow the recommended settings for heating
and cooling given on the following pages.
Otherwise the windows could fog up,
impairing visibility and endangering you and
others.XKeep the air intake grille in front of the
windshield free of snow and debris.
When the retractable hardtop is closed, do
not obstruct air flow by placing objects on the
air flow-through exhaust slots below the rear
window.
i If the vehicle interior is hot, ventilate the
interior before driving off. The climate
control will then adjust the interior
temperature to the set value much faster.
Deactivating the climate control
system
GWarning!
When the climate control system is
deactivated, the outside air supply and
circulation are also deactivated. Only choose
this setting for a short time when the
retractable hardtop is closed. Otherwise the
windows could fog up, impairing visibility and
endangering you and others.
XDeactivating: Press button 0061.
The indicator lamp in the button comes on.XReactivating: Press button 0061.
The indicator lamp in the button goes out.
The previous settings are once again in
effect.
or
Climate control system149Controls in detail230_AKB; 6; 22, en-USd2ureepe,Version: 2.11.8.12009-07-28T18:49:58+02:00 - Seite 149Z
Page 152 of 316

XTurn temperature controls 006E or 0073
( Y page 148) clockwise or
counterclockwise.
The indicator lamp in button 0061 goes out.
or
XPress button 005A.
The indicator lamp in button 005A comes
on. The air volume and air distribution are
adjusted automatically.
or
XPress button 0066.
The indicator lamp in button 0061 goes out.
Air conditioning
The air conditioning is operational while the
engine is running and cools the interior air to
the temperature set by the operator. In
addition, the air conditioning dehumidifies
the interior air and helps prevent window
fogging.
GWarning!
If you deactivate the air conditioning, the
vehicle will not be cooled when weather
conditions are warm. The windows can fog up
more quickly. Window fogging may impair
visibility and endanger you and others.
i Condensated water may drip out from
underneath the vehicle. This is normal and
not an indication of a malfunction.
The air conditioning uses the refrigerant
R134a. This refrigerant is free of CFCs which
are harmful to the ozone layer.
Deactivating
It is possible to deactivate the air
conditioning. The interior air will then no
longer be cooled or dehumidified.
XPress button 0058.
The indicator lamp in the button goes out.
The cooling function switches off after a
short delay.Activating
Moist air can fog up the windows. You can
dehumidify the interior air with the air
conditioning.
XPress button 0058.
The indicator lamp in the button comes on.
Automatic mode
Air distribution and air volume can be
adjusted automatically by the climate control
system. You can also adjust the settings for
air distribution and air volume manually.
When operating the climate control system in
automatic mode, the interior air temperature,
air volume and air distribution are adjusted
automatically.
In automatic mode, cooling with
dehumidification is switched on. This function
can be switched off if necessary.
GWarning!
If you deactivate the air conditioning, the
vehicle will not be cooled when weather
conditions are warm. The windows can fog up
more quickly. Window fogging may impair
visibility and endanger you and others.
XSet the desired temperature
( Y page 151).XActivating: Press button 005A.
The indicator lamp in the button comes on.
The air volume and air distribution are
adjusted automatically.XDeactivating: Press button 005A.
The indicator lamp in the button goes out.
The blower will run at speed setting 3. The
air flows through the center and side air
vents.
or
XPress one button 0056.
The indicator lamp in button 005A goes out.
The climate control settings for the
respective side of the passenger
compartment is adjusted manually.150Climate control systemControls in detail
230_AKB; 6; 22, en-USd2ureepe,Version: 2.11.8.12009-07-28T18:49:58+02:00 - Seite 150