2011 MERCEDES-BENZ S-Class message
[x] Cancel search: messagePage 216 of 524

of Mercedes-Benz USA, LLC. Operation
may also be impaired in certain locations
(e.g. tunnels, parking garages or inside or
next to buildings) or near certain
constructions.
iSIRIUS XM Radio offers more than 130
digital-quality radio channels providing
100% commercial-free music, sport, news
and entertainment.
SIRIUS XM Radio employs a fleet of high-
performance satellites to broadcast around
the clock in the contiguous USA and
Canada.
Satellite radio is available for a monthly fee.
Details are available from the SIRIUS XM
Service Center and at
http://www.sirius.com (USA) or
http://www.siriuscanada.com
(Canada).
Registering satellite radio
XSelect Audio in the main function bar by
sliding ZV and turning cVd the COMAND
controller and press W to confirm.
XSelect Satellite radio and press W to
confirm.
Service information screen
1Provider's phone number (SIRIUS XM)2SIRIUS XM ID of your satellite receiverXCall the phone number of your satellite
radio provider shown on the screen.
iYou can also have the satellite service
activated online. To do so, visit the SIRIUS
XM Radio website at
http://www.sirius.com (USA) or
http://www.siriuscanada.com
(Canada).
Once the connection has been established:
XFollow the instructions of the service staff.
The activation process may take up to ten
minutes. If the activation is completed
successfully, the No Service message
appears in the display, followed by the
satellite radio main menu.
iIf registration is not included when
purchasing the system, your credit card
details will be required to activate your
account.
If the satellite receiver is not installed or is
not installed correctly, the Device not
available. message will appear.
Switching to satellite radio mode
Notes
Important notes on registration, see
"Registering satellite radio" (Y page 214).
Switching to satellite radio mode
XSelect Audio in the main function bar by
sliding ZV and turning cVd the COMAND
controller and press W to confirm.
If satellite radio mode was the last mode
selected, it will now be active.
If another audio mode is switched on, you
can now switch to satellite radio mode in
the audio menu.
XSelect Audio by sliding ZV the COMAND
controller and press W to confirm.
The audio menu appears.
XSelect Sat. Radio and press W to
confirm.
The No Service message appears when
starting up or if no signal is being received.
If the satellite receiver is not installed or is
not installed correctly, the Device not
available. message will appear.
214AudioCOMAND
Page 218 of 524

Option 2XSelect Sat. Radio in the submenu bar by
turning cVd the COMAND controller and
press W to confirm.XSelect Enter Channel and press W to
confirm.
An input menu appears.XTo enter a channel: irrespective of the
option chosen, press the corresponding
number keys on the control panel one after
the other.
COMAND sets the selected channel.
i You can only select currently permitted
digits.
Selecting a channel from the SatRadio
channel list
XSelect Sat. Radio in the submenu bar by
turning cVd the COMAND controller and
press W to confirm.XSelect Channel List and press W to
confirm.
The channel list appears.XSelect a channel by turning cVd the
COMAND controller and press W to
confirm.
Memory functions
Storing channels
i There are ten presets available.
XPress W the COMAND controller when the
display/selection window is active.
or
XSelect Presets in the submenu bar by
turning cVd the COMAND controller and
press W to confirm.
In both cases, the channel presets appear.
The R dot in front of a preset entry
indicates that the currently selected
station is stored under this preset.XSelect a preset by turning cVd the
COMAND controller and press and hold
W until you hear a tone.
or
XPress and hold a number button, e.g. 4,
until you hear a tone.
The channel is stored under the preset.
Storing channels automatically
This function automatically stores channels
with adequate reception. Stations stored
manually in the preset memory will be
overwritten.
XOption 1: press W the COMAND controller
when the display/selection window is
active.XSelect Autostore in the presets by turning
cVd the COMAND controller and press
W to confirm.XOption 2: select Presets in the submenu
by sliding VÆ and turning cVd the
COMAND controller and press W to
confirm.XSelect Autostore and press W to confirm.
In both cases, COMAND searches for
channels that can be received. You will see
a message to this effect. The available
channels are automatically stored in the
preset positions.XTo cancel storing: select Cancel and
press W to confirm.
Selecting a channel from the preset list
XTo call up the channel list: select
Presets by turning cVd the COMAND
controller and press W to confirm.
The channel preset list appears.XTo set a channel: select a preset by
turning cVd the COMAND controller and
press W to confirm.
or
XPress a number key, e.g. 4.216AudioCOMAND
Page 219 of 524

Using the multifunction steering wheelXUse = or ; to select the Audio
menu.
XPress 9 or : briefly.
Displaying information
XSelect Info in the submenu bar by turning
cVd the COMAND controller and press
W to confirm.
Information on the currently received
program is displayed.
XTo return to the SatRadio main display:
slide XVY the COMAND controller.
Displaying service information
If you have any questions or require version
information, you can call the provider's
customer service center at any time.
XSelect Sat. Radio in the submenu bar by
turning cVd the COMAND controller and
press W to confirm.
XSelect Service and press W to confirm.
The provider's details appear.
XTo return to the SatRadio main display:
slide XVY the COMAND controller.
Updating the channel list
When receiving a new channel list, the display
shows the Updating channel... message.
The station last selected is muted until the
update has been completed. Satellite radio
mode is not available during the update
process.
When the update has been completed, the
satellite radio main menu appears. The
station last selected is played.
Sound settings
You will find details on the sound settings in
the "At a glance" section (Y page 133).
Audio CD/DVD and MP3 mode
Important safety notes
GWarning!
COMAND is classified as a Class 1 laser
product. You must not open the casing. If you
open the casing, or if the casing is faulty or
damaged, there is a risk of exposure to
invisible laser radiation. This may damage
your eyes, or those of others.
COMAND does not contain any parts that can
be serviced by the user. For safety reasons,
all maintenance work must be carried out by
qualified aftersales technicians.
GWarning!
Only when the vehicle is stationary should
you:
Rload a disc
Reject a disc
There is a risk of being distracted from the
road and traffic conditions if this is done while
the vehicle is in motion.
Inserting/ejecting CDs/DVDs
DVD changer
The DVD changer has a fixed magazine with
six trays.
Magazine tray status =:
RIndicator lamp off: magazine tray is empty.
RIndicator lamp constantly lit: magazine tray
is loaded.
Audio217COMANDZ
Page 225 of 524

Many audio CDs contain CD text. COMAND
uses the information contained therein to
display the artist, album and track name.
If the audio CD does not contain any CD text
information, COMAND can use the Gracenote
Media Database to identify unknown audio
tracks when breaking in audio CD mode. This
is only possible if the relevant information is
saved in the Gracenote Media Database and
if the "Gracenote Media Database" function
is activated.
If this is the case, COMAND will display the
corresponding data such as artist, album and
track name in the relevant displays and lists.
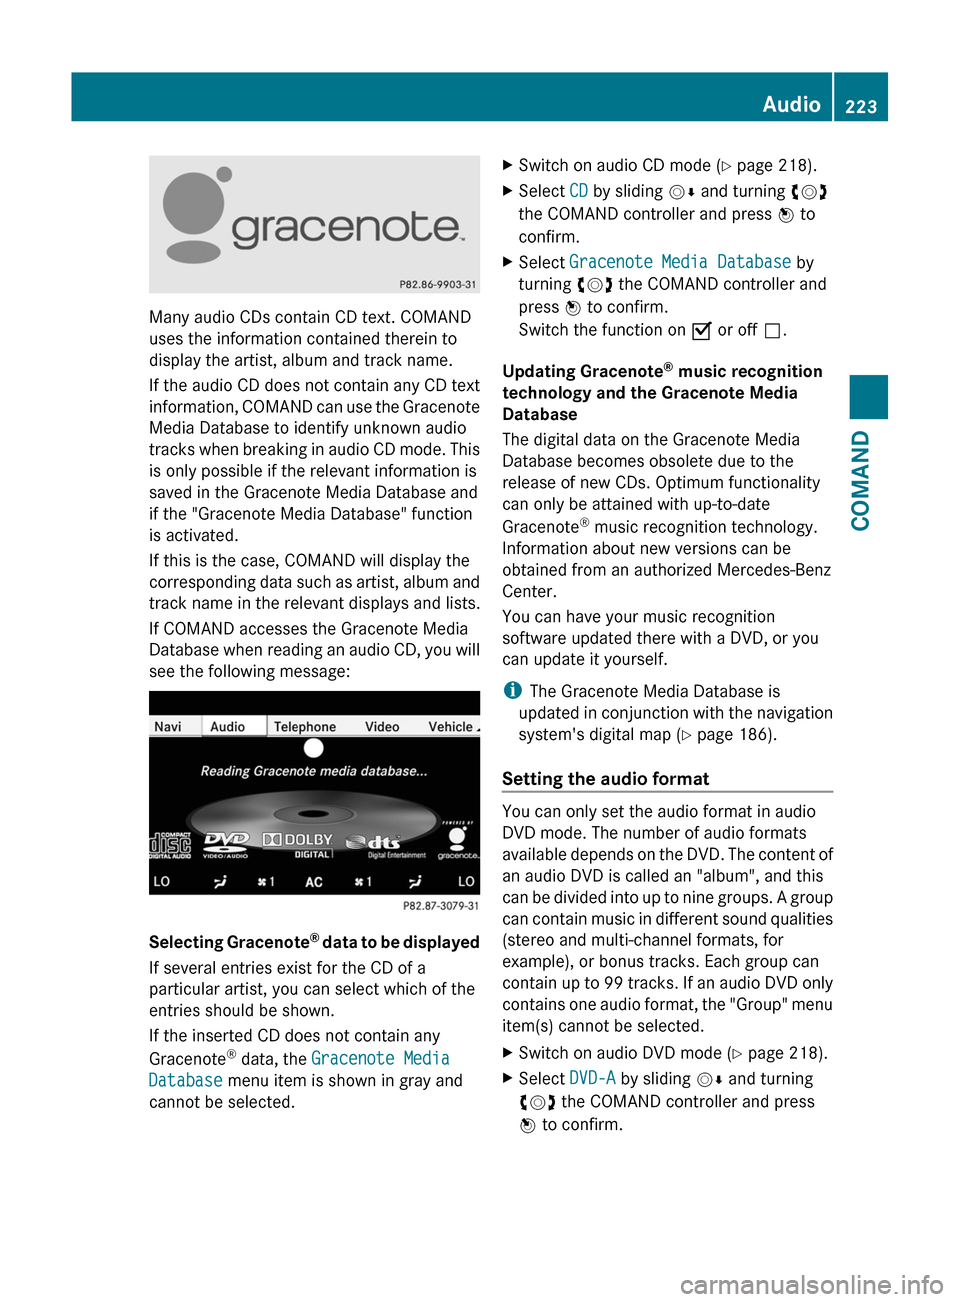
If COMAND accesses the Gracenote Media
Database when reading an audio CD, you will
see the following message:
Selecting Gracenote® data to be displayed
If several entries exist for the CD of a
particular artist, you can select which of the
entries should be shown.
If the inserted CD does not contain any
Gracenote® data, the Gracenote Media
Database menu item is shown in gray and
cannot be selected.
XSwitch on audio CD mode (Y page 218).XSelect CD by sliding VÆ and turning cVd
the COMAND controller and press W to
confirm.
XSelect Gracenote Media Database by
turning cVd the COMAND controller and
press W to confirm.
Switch the function on O or off ª.
Updating Gracenote® music recognition
technology and the Gracenote Media
Database
The digital data on the Gracenote Media
Database becomes obsolete due to the
release of new CDs. Optimum functionality
can only be attained with up-to-date
Gracenote® music recognition technology.
Information about new versions can be
obtained from an authorized Mercedes-Benz
Center.
You can have your music recognition
software updated there with a DVD, or you
can update it yourself.
iThe Gracenote Media Database is
updated in conjunction with the navigation
system's digital map (Y page 186).
Setting the audio format
You can only set the audio format in audio
DVD mode. The number of audio formats
available depends on the DVD. The content of
an audio DVD is called an "album", and this
can be divided into up to nine groups. A group
can contain music in different sound qualities
(stereo and multi-channel formats, for
example), or bonus tracks. Each group can
contain up to 99 tracks. If an audio DVD only
contains one audio format, the "Group" menu
item(s) cannot be selected.
XSwitch on audio DVD mode (Y page 218).XSelect DVD-A by sliding VÆ and turning
cVd the COMAND controller and press
W to confirm.
Audio223COMANDZ
Page 228 of 524

If you insert thicker discs, e.g. those that
contain data on both sides (DVD on one
side and audio data on the other), they
cannot be ejected and can damage the
drive.
Do not use discs with a diameter of 8 cm,
even with an adapter. Only use round discs
with a diameter of 12 cm.
iCOMAND is able to play back audio CDs
in multichannel audio format.
MUSIC REGISTER
General notes
You can store music files in MP3 or WMA
format in the MUSIC REGISTER. The memory
has a capacity of approximately 7 GB.
! Retain the original music files in a secure
location. An error in COMAND might result
in the loss of the music files stored in the
MUSIC REGISTER. Mercedes-Benz is not
liable for any loss of data.
Switching on the MUSIC REGISTER
XSelect Audio in the main function bar by
sliding ZV and turning cVd the COMAND
controller and press W to confirm.
If MUSIC REGISTER was the last mode
selected, it is now switched on.
If another audio source is switched on, you
can now switch on the MUSIC REGISTER in
the audio menu.
XSelect Music Register and press W to
confirm.
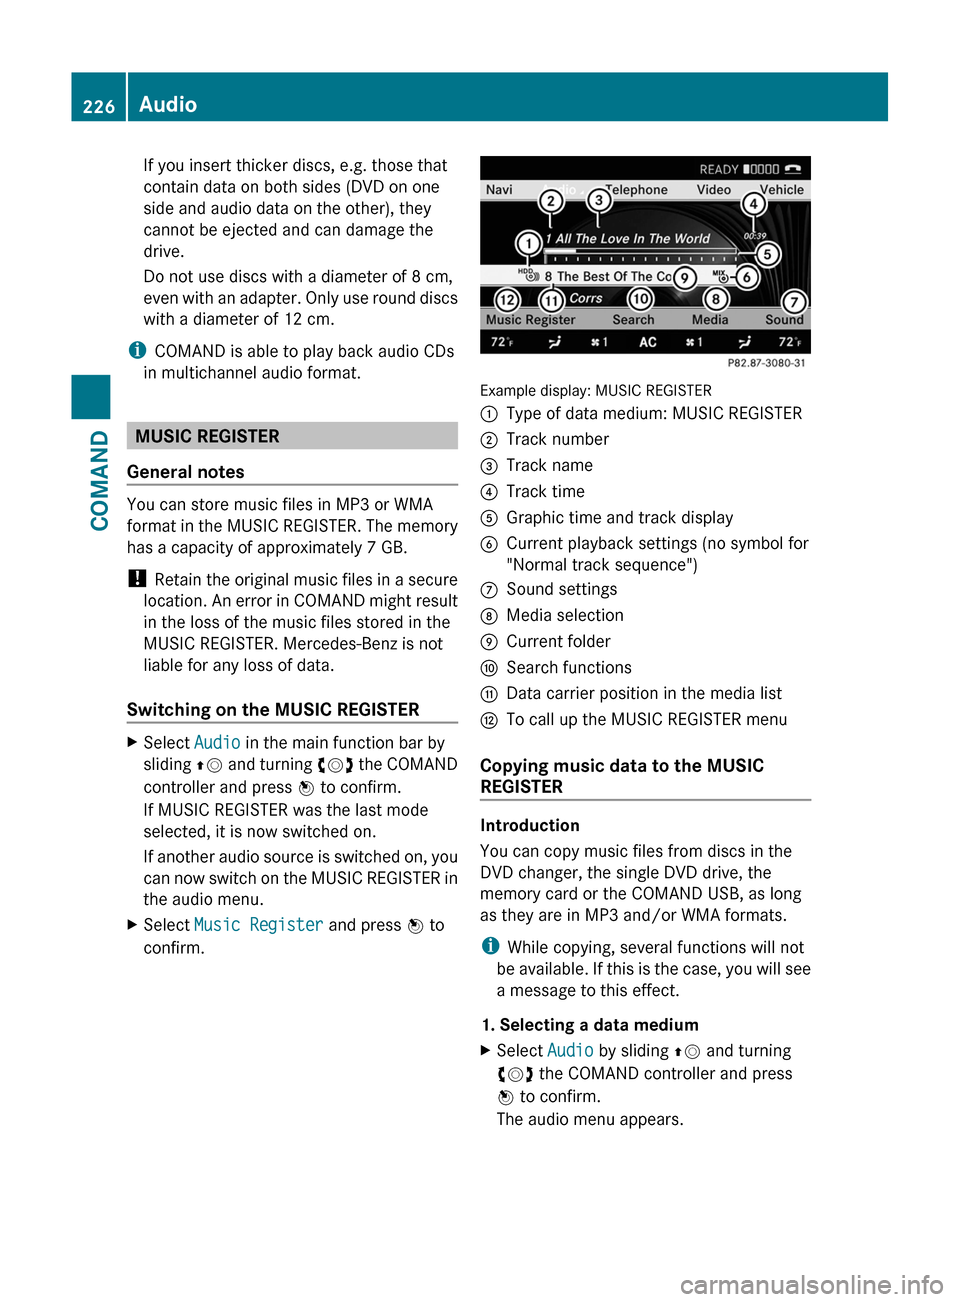
Example display: MUSIC REGISTER
:Type of data medium: MUSIC REGISTER;Track number=Track name?Track timeAGraphic time and track displayBCurrent playback settings (no symbol for
"Normal track sequence")
CSound settingsDMedia selectionECurrent folderFSearch functionsGData carrier position in the media listHTo call up the MUSIC REGISTER menu
Copying music data to the MUSIC
REGISTER
Introduction
You can copy music files from discs in the
DVD changer, the single DVD drive, the
memory card or the COMAND USB, as long
as they are in MP3 and/or WMA formats.
iWhile copying, several functions will not
be available. If this is the case, you will see
a message to this effect.
1. Selecting a data medium
XSelect Audio by sliding ZV and turning
cVd the COMAND controller and press
W to confirm.
The audio menu appears.
226AudioCOMAND
Page 229 of 524

XSelect Music Register and press W to
confirm.
XSelect Copy music files and press W to
confirm.
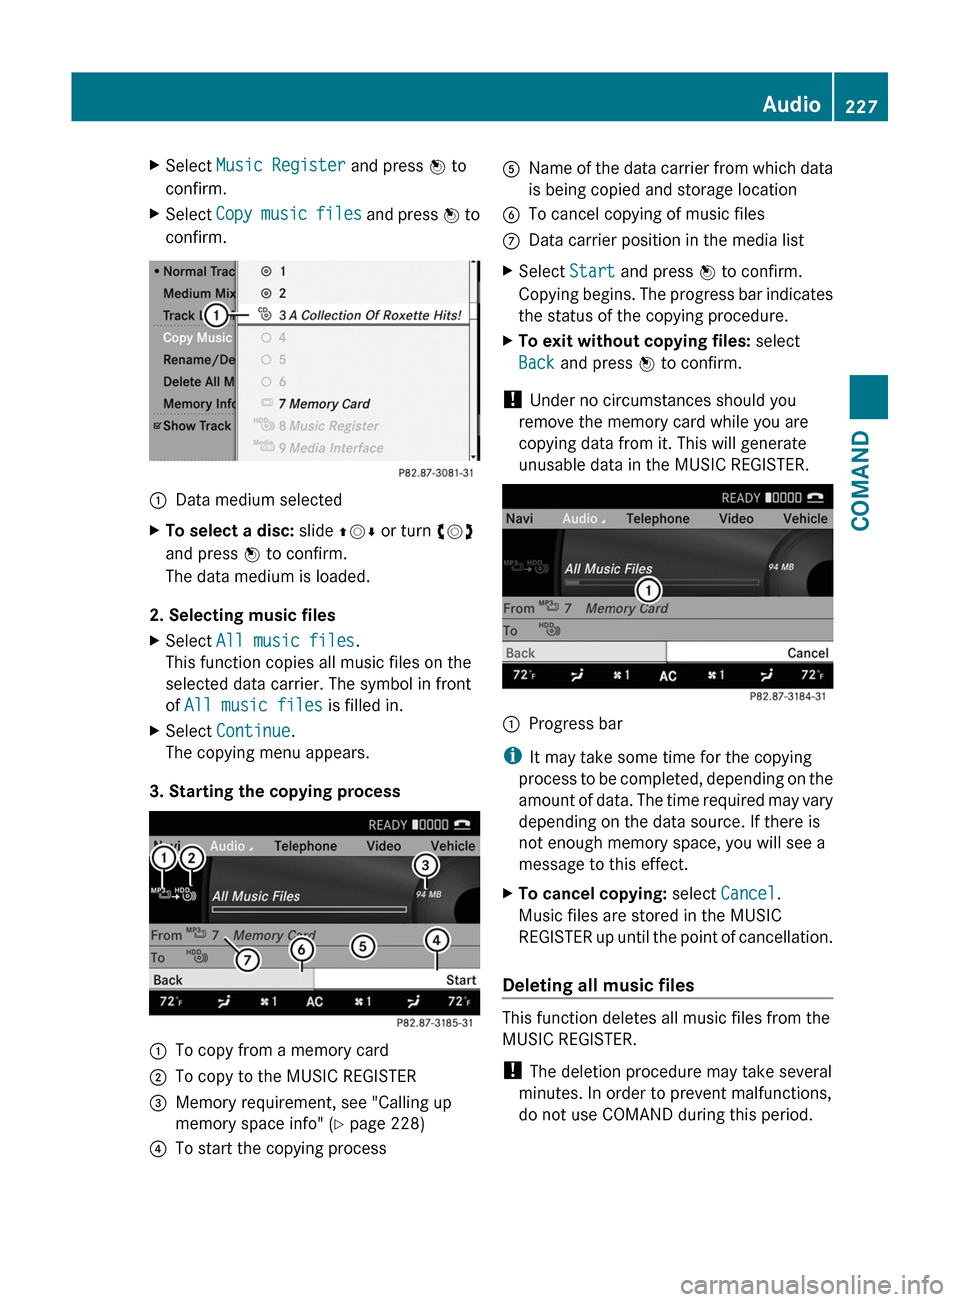
:Data medium selectedXTo select a disc: slide ZVÆ or turn cVd
and press W to confirm.
The data medium is loaded.
2. Selecting music files
XSelect All music files.
This function copies all music files on the
selected data carrier. The symbol in front
of All music files is filled in.
XSelect Continue.
The copying menu appears.
3. Starting the copying process
:To copy from a memory card;To copy to the MUSIC REGISTER=Memory requirement, see "Calling up
memory space info" (Y page 228)
?To start the copying processAName of the data carrier from which data
is being copied and storage location
BTo cancel copying of music filesCData carrier position in the media listXSelect Start and press W to confirm.
Copying begins. The progress bar indicates
the status of the copying procedure.
XTo exit without copying files: select
Back and press W to confirm.
! Under no circumstances should you
remove the memory card while you are
copying data from it. This will generate
unusable data in the MUSIC REGISTER.
:Progress bar
iIt may take some time for the copying
process to be completed, depending on the
amount of data. The time required may vary
depending on the data source. If there is
not enough memory space, you will see a
message to this effect.
XTo cancel copying: select Cancel.
Music files are stored in the MUSIC
REGISTER up until the point of cancellation.
Deleting all music files
This function deletes all music files from the
MUSIC REGISTER.
! The deletion procedure may take several
minutes. In order to prevent malfunctions,
do not use COMAND during this period.
Audio227COMANDZ
Page 230 of 524

XSelect Music Register by sliding VÆ and
turning cVd the COMAND controller and
press W to confirm.
XSelect Delete all music files and
press W to confirm.
A query appears. No is highlighted.
If you select Yes, all music files are deleted.
You see the Please wait... message.
Then, you see the Deletion successful
message.
If you select No, the process will be aborted.
Calling up memory space info
XSelect Music Register by sliding VÆ and
turning cVd the COMAND controller and
press W to confirm.
XSelect Memory information and press
W to confirm.
The following is displayed:
Rstorage capacity
Ravailable memory
Roccupied memory
Rcontent (folders, tracks)
Folder functions
Introduction
You can view the content of the MUSIC
REGISTER, change folder or track names and
delete individual folders or tracks.
Calling up a folder
XSelect Search by sliding VÆ and turning
cVd the COMAND controller and press
W to confirm.
XSelect Folder and press W to confirm.
You see the contents of the current folder.
XTo switch to the superordinate folder:
select the U icon and press W to
confirm.
The display changes to the next folder up.
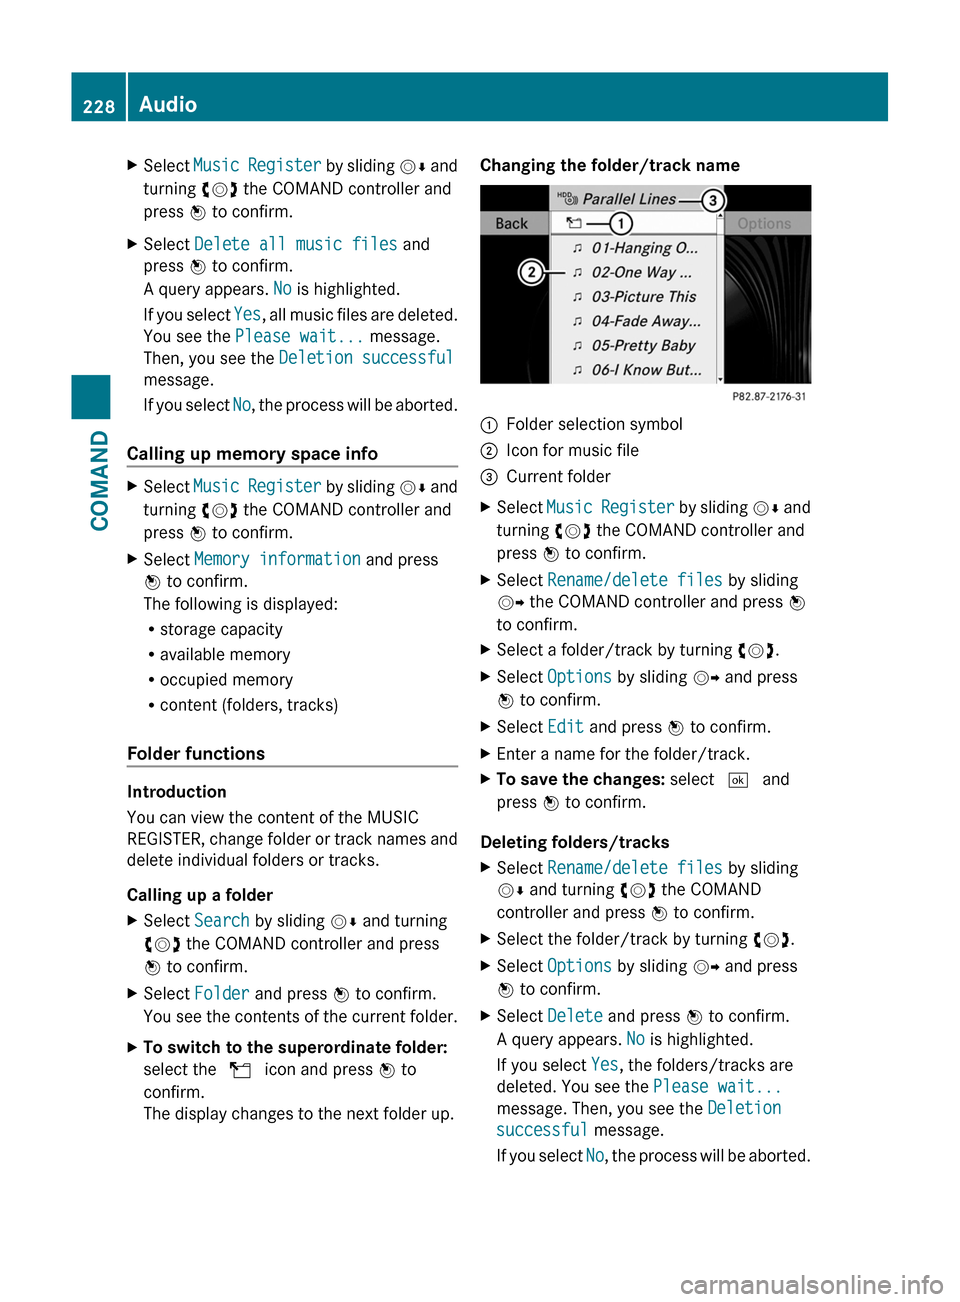
Changing the folder/track name:Folder selection symbol;Icon for music file=Current folderXSelect Music Register by sliding VÆ and
turning cVd the COMAND controller and
press W to confirm.
XSelect Rename/delete files by sliding
VY the COMAND controller and press W
to confirm.
XSelect a folder/track by turning cVd.XSelect Options by sliding VY and press
W to confirm.
XSelect Edit and press W to confirm.XEnter a name for the folder/track.XTo save the changes: select ¬ and
press W to confirm.
Deleting folders/tracks
XSelect Rename/delete files by sliding
VÆ and turning cVd the COMAND
controller and press W to confirm.
XSelect the folder/track by turning cVd.XSelect Options by sliding VY and press
W to confirm.
XSelect Delete and press W to confirm.
A query appears. No is highlighted.
If you select Yes, the folders/tracks are
deleted. You see the Please wait...
message. Then, you see the Deletion
successful message.
If you select No, the process will be aborted.
228AudioCOMAND
Page 232 of 524

Mercedes-Benz USA, LLC does not take
responsibility for any damage to external
devices.
Never connect more than one device at a
time. You will otherwise not be able to play
back from the external device.
:Four-pin socket for ⅛ inch stereo jack,
e.g. for MP3 players (audio and video)
;iPod® plug, to connect an iPod®=USB socket, to connect USB devices?Example of device, iPod®XConnect the external device with suitable
socket :, ; or =.
COMAND activates the device.
If you remove a device, the No device
connected message appears.
iA connected iPod® or MP3 player should
not be simultaneously operated via the
Media Interface and the remote control
(e.g. Bluetooth® remote control), as this
may produce unpredictable results.
iConnecting a fully discharged iPod® or
MP3 player can result in an extended
initialization period.
Error messages appear while the device is
being activated if:
RCOMAND does not support the device
connected.
Rtwo devices are connected.
Rthe connected device consumes too much
power.
Rthe Media Interface connection is faulty.
iWhere necessary, consult an authorized
Mercedes-Benz Center.
Switching on Media Interface mode
General notes
In extreme cases, starting up individual
functions can take up to several minutes –
this depends on the external device and its
content (e.g. video podcasts).
Only use the original programs to populate an
iPod or MP3 player. Otherwise, some or all
functions may not be available.
Option 1
XConnect an external device (Y page 229).
COMAND activates the device. The basic
display then appears if there are playable
files stored on the medium.
or
XSelect Audio in the main function bar by
sliding ZV and turning cVd the COMAND
controller and press W to confirm.
If you had previously selected Media
Interface mode, this will now be activated.
If another audio source is switched on, you
can now switch to Media Interface in the
audio menu.
230AudioCOMAND