2011 MERCEDES-BENZ S-Class Start
[x] Cancel search: StartPage 146 of 524

guides you through the training with spoken
instructions.
XSelect Vehicle in the main function bar by
turning cVd the COMAND controller and
press W to confirm.
XSelect System by turning cVd the
COMAND controller and press W to
confirm.
XSelect Voice Control and press W to
confirm.
XSelect Start new individualization
and press W to confirm.
You see and hear a prompt asking whether
you would like further information.
XSelect Yes or No and press W to confirm.
If you select No, the first part of
individualization begins. You will be asked
whether you would like to train digits or
voice commands.
If you select Yes, you will see and hear
information on the individualization
process. The first part of individualization
then begins automatically.
XTo close the display: press W the
COMAND controller.
You will be asked whether you would like
to train digits or voice commands.
At the end of the first part, a prompt will
appear asking whether you wish to begin the
second part.
XSelect Yes or No and press W to confirm.
If you select No, individualization will be
canceled. The data from the first part is
stored automatically.
If you select Yes, the second part will begin.
Individualization is completed at the end of
the second part. You will see a message to
this effect. The data from the second part is
stored automatically.
Canceling the first or second part of
individualization
XConfirm Cancel by pressing W the
COMAND controller.
A prompt appears asking whether you
really wish to cancel.
XSelect Yes or No and press W to confirm.
If you select Yes, individualization will be
canceled. The data from the part canceled
is not stored.
If you select No, the current part begins
again.
Deleting existing individualization data
XSelect Vehicle by turning cVd the
COMAND controller and press W to
confirm.
XSelect System and press W to confirm.XSelect Voice Control and press W to
confirm.
XSelect Delete individualization and
press W to confirm.
A prompt appears asking whether you
really wish to delete.
144System settingsCOMAND
Page 148 of 524

Searching for Bluetooth® devicesXActivate Bluetooth® (Y page 145).XSelect Vehicle in the main function bar by
turning cVd the COMAND controller and
press W to confirm.
XSelect System by turning cVd the
COMAND controller and press W to
confirm.
XSelect Bluetooth by turning cVd the
COMAND controller and press W to
confirm.
XSelect Search for Bluetooth devices
and press W to confirm.
COMAND searches for Bluetooth® devices
within range. After a short while, the
Bluetooth® device list appears.
Example of display: Bluetooth® device list
:Currently connected # and authorized
device (Y icon)
;Device not within range but previously
authorized (L appears in gray)
=Newly detected device within range but
not yet authorized (no Y icon)
The Bluetooth® device list shows all devices
within range and all previously authorized
devices, whether or not they are in range.
If the Bluetooth® device list is already full, you
will be requested to de-authorize a device
(Y page 147). If COMAND does not detect
your Bluetooth® device, external
authorization may be necessary
(Y page 147).
iWhen subsequently called up again, the
list may no longer show all devices, for
example because a device has been
removed from the vehicle in the meantime.
In this case, start a new search to update
the device list.
Authorizing a Bluetooth® device
(registering)
XIn the Bluetooth® device list, select not yet
authorized device = by turning cVd the
COMAND controller.
XSelect Options by sliding VY the
COMAND controller and press W to
confirm.
XSelect Authorize and press W to confirm.
The passcode is any one to sixteen-digit
number combination which you can
determine yourself. You must enter the same
number combination in COMAND and in the
Bluetooth® device to be authorized (see
mobile phone operating instructions).
iSome mobile phones require a four-digit
(or longer) passcode.
iIf you want to re-authorize a device
following de-authorization (Y page 147),
you can select a different passcode.
146System settingsCOMAND
Page 149 of 524

XTo enter a passcode in COMAND: press
the number keys in sequence.
¬ is highlighted after the first number
has been entered.
or
XSelect the digits one by one by turning
cVd the COMAND controller and press
W to confirm.XTo confirm an entry in COMAND: select
¬ using the COMAND controller and
press W to confirm.XEnter the same passcode into the
Bluetooth ®
device (see the operating
instructions for the respective device).
The device is authorized.
External authorization
If COMAND does not detect your
Bluetooth ®
device, this may be due to
particular security settings on your
Bluetooth ®
device. In this case, check
whether your Bluetooth ®
device can locate
the COMAND system. The Bluetooth ®
device
name of COMAND is "MB Bluetooth".
XIn the Bluetooth ®
device list, select the
desired device by turning cVd the
COMAND controller.XSelect Options by sliding VY the
COMAND controller and press W to
confirm.XSelect External authorization and
press W to confirm.XStart the Bluetooth ®
scan process on the
Bluetooth ®
device (see separate operating
instructions of the respective device).XSelect COMAND ("MB Bluetooth").XWhen prompted, enter the passcode on the
Bluetooth ®
device and then on COMAND.Displaying the details of a Bluetooth ®
deviceXIn the Bluetooth ®
device list, select the
desired device by turning cVd the
COMAND controller.XSelect Options by sliding VY the
COMAND controller and press W to
confirm.XSelect Details and press W to confirm.
The detailed view for this device appears.XTo close the detailed view: turn cVd or
slide XVY the COMAND controller.
De-authorizing (de-registering) a
Bluetooth ®
device
Mercedes-Benz USA, LLC recommends that
you de-authorize devices, e.g. mobile phones,
both in COMAND and on the respective
Bluetooth ®
device itself. Subsequent
authorization may otherwise fail.
XIn the Bluetooth ®
device list, select the
authorized device by turning cVd the
COMAND controller.XSelect Options by sliding VY the
COMAND controller and press W to
confirm.XSelect De-authorize and press W to
confirm.
A prompt appears asking whether you
really wish to revoke authorization for this
device.XSelect Yes or No and press W to confirm.
If you select Yes, the authorization for the
device will be revoked.
If you select No, the process will be aborted.
i
If a Bluetooth ®
device has been de-
authorized and is no longer in range, it will
no longer be shown in the Bluetooth ®
device list after the next search.
System settings147COMANDZ
Page 150 of 524
System language settings
This function allows you to determine the
language for the menu displays and the
navigation announcements. The selected
language affects the characters available for
entry.
If you change the system language, the
language for Voice Control System will be
also be changed. If the selected language is
not supported by Voice Control System,
"English" will be selected.XSelect Vehicle by turning cVd the
COMAND controller and press W to
confirm.XSelect System and press W to confirm.XSelect Language and press W to confirm.
You see the language list. The # dot
indicates the current setting.XSelect the language by turning cVd the
COMAND controller and press W to
confirm.
COMAND loads the selected language and
sets it.
i In Arabic as well as some other countries,
the selection option English (Arabic
map) is available when setting the system
language. This language setting shows the
menus and input data in COMAND in
English and the map in Arabic for certain
countries. The destination is entered in
English.
Reset function
You can reset COMAND to the factory
settings. Amongst other things, this will
delete all personal data (e.g. station presets,
address book entries, entries in the
destination memory and in the list of previous
destinations in the navigation system).
Resetting is recommended before selling or
transferring ownership of your vehicle, for
example.
XSelect Vehicle in the main function bar by
turning cVd the COMAND controller and
press W to confirm.XSelect System by turning cVd the
COMAND controller and press W to
confirm.XSelect Reset and press W to confirm.
A prompt appears asking whether you wish
to reset.XSelect Yes or No and press W to confirm.
If you select No, the process will be aborted.
If you select Yes, another prompt appears
asking whether you really wish to reset.XSelect Yes or No and press W to confirm.
If you select Yes, a message will be shown.
COMAND is reset and restarted.
If you select No, the process will be aborted.
Navigation
Vehicle equipment
i These Operating Instructions describe all
standard and optional equipment available
for your vehicle at the time of purchase.
Please note that your vehicle may not be
equipped with all features described.
Introduction
Important safety notes
GWarning
For safety reasons, only enter a destination
when the vehicle is stationary. When the
vehicle is in motion, a passenger should enter
the destination. Study manual and select
route before driving.
Bear in mind that at a speed of just 30 mph
(approximately 50 km/h), your vehicle is
covering a distance of 44 feet (approximately
14 m) every second.
148NavigationCOMAND
Page 154 of 524
XSelect Destination by turning cVd the
COMAND controller and press W to
confirm.
XSelect Address Entry and press W to
confirm.
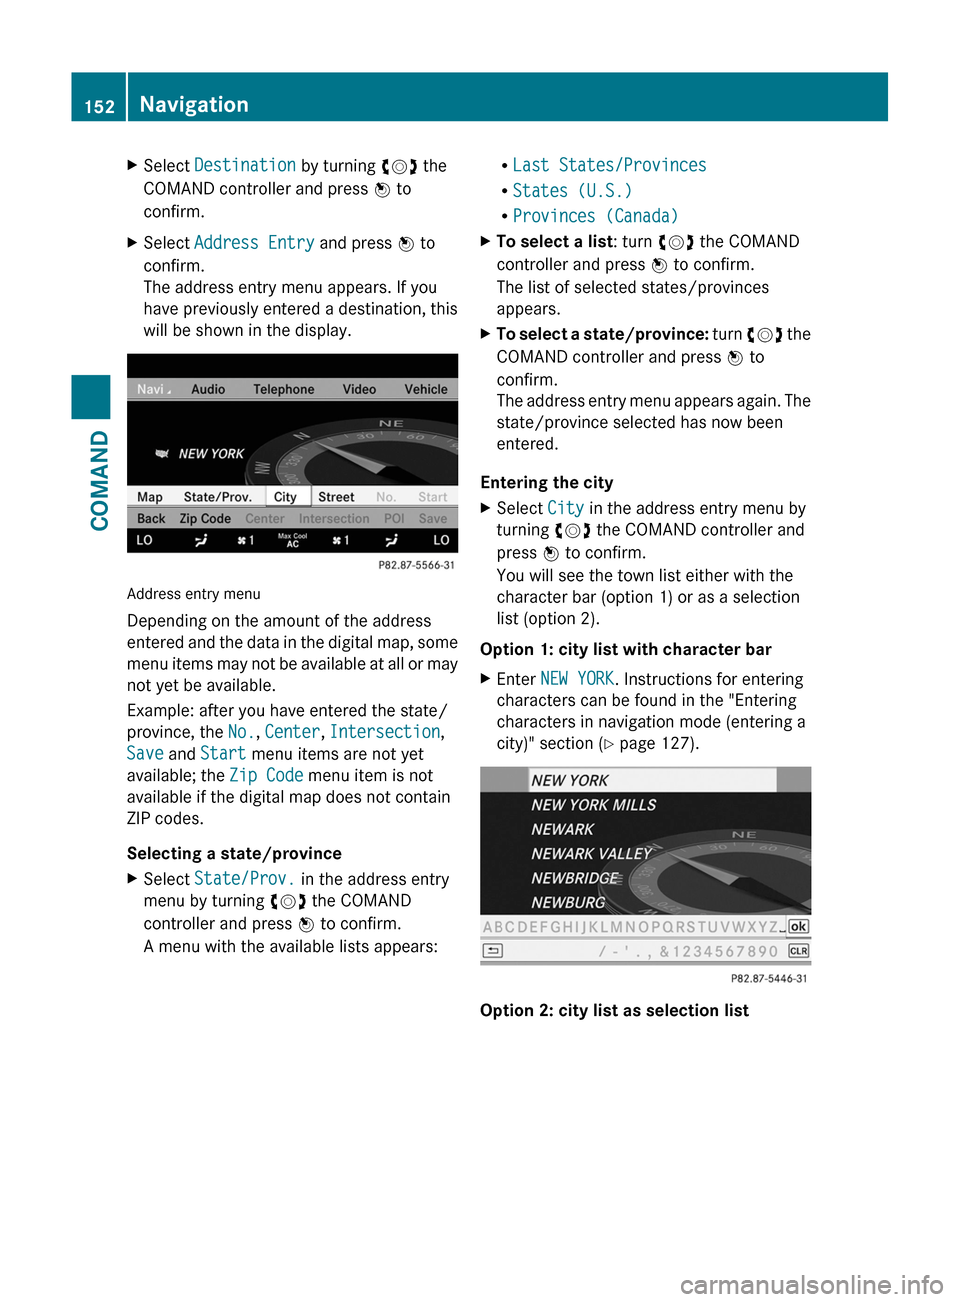
The address entry menu appears. If you
have previously entered a destination, this
will be shown in the display.
Address entry menu
Depending on the amount of the address
entered and the data in the digital map, some
menu items may not be available at all or may
not yet be available.
Example: after you have entered the state/
province, the No., Center, Intersection,
Save and Start menu items are not yet
available; the Zip Code menu item is not
available if the digital map does not contain
ZIP codes.
Selecting a state/province
XSelect State/Prov. in the address entry
menu by turning cVd the COMAND
controller and press W to confirm.
A menu with the available lists appears:
RLast States/Provinces
RStates (U.S.)
RProvinces (Canada)
XTo select a list: turn cVd the COMAND
controller and press W to confirm.
The list of selected states/provinces
appears.
XTo select a state/province: turn cVd the
COMAND controller and press W to
confirm.
The address entry menu appears again. The
state/province selected has now been
entered.
Entering the city
XSelect City in the address entry menu by
turning cVd the COMAND controller and
press W to confirm.
You will see the town list either with the
character bar (option 1) or as a selection
list (option 2).
Option 1: city list with character bar
XEnter NEW YORK. Instructions for entering
characters can be found in the "Entering
characters in navigation mode (entering a
city)" section (Y page 127).
Option 2: city list as selection list
152NavigationCOMAND
Page 156 of 524
XEnter a house number. Instructions for
entering characters using city input as an
example can be found in the "Entering
characters in navigation mode (entering a
city)" section (Y page 127).
XConfirm the entry with W.
The address entry menu reappears. The
house number has now been entered.
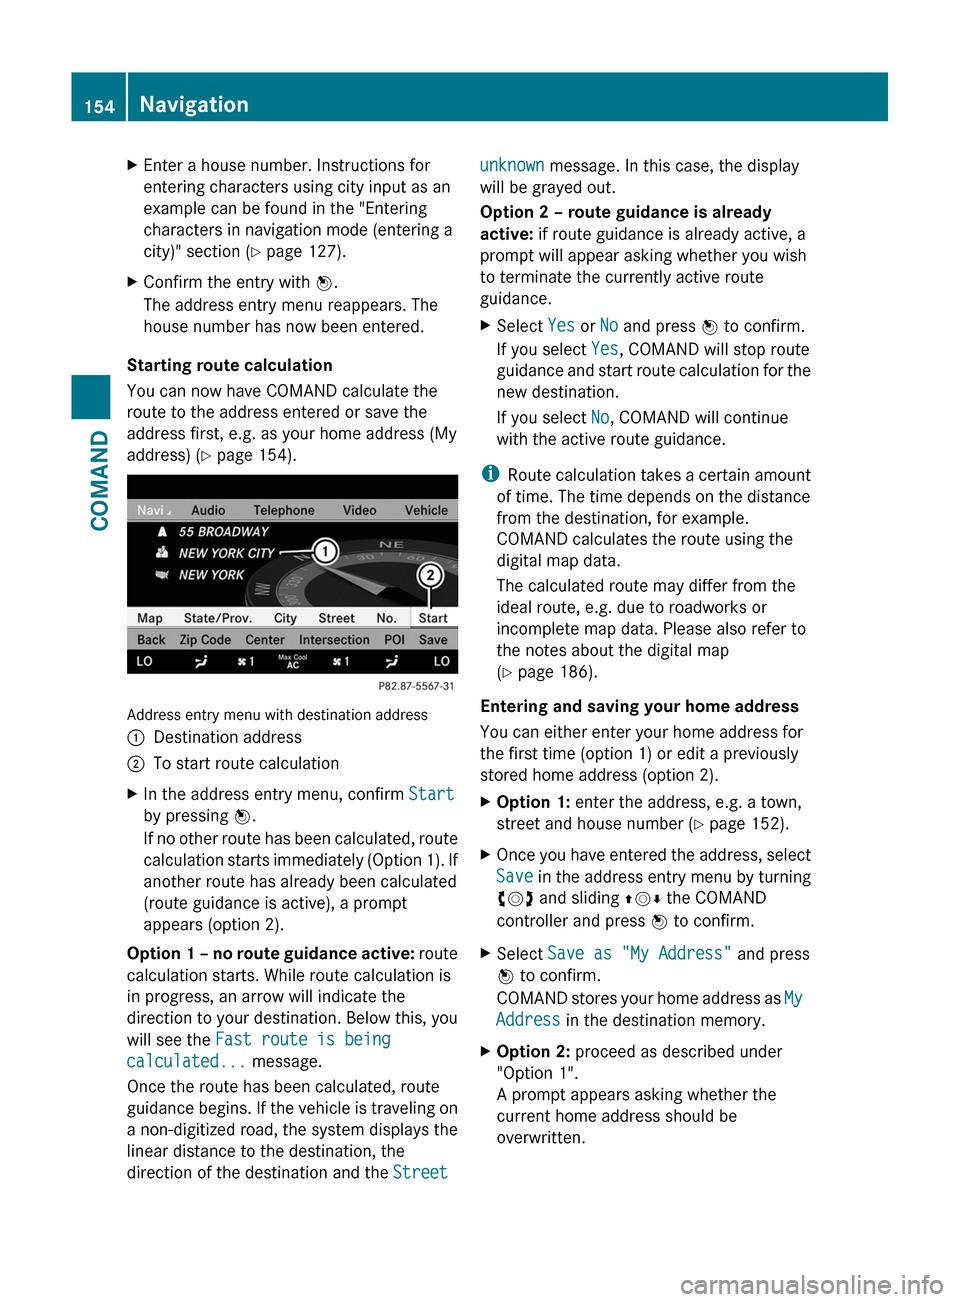
Starting route calculation
You can now have COMAND calculate the
route to the address entered or save the
address first, e.g. as your home address (My
address) (Y page 154).
Address entry menu with destination address
:Destination address;To start route calculationXIn the address entry menu, confirm Start
by pressing W.
If no other route has been calculated, route
calculation starts immediately (Option 1). If
another route has already been calculated
(route guidance is active), a prompt
appears (option 2).
Option 1 – no route guidance active: route
calculation starts. While route calculation is
in progress, an arrow will indicate the
direction to your destination. Below this, you
will see the Fast route is being
calculated... message.
Once the route has been calculated, route
guidance begins. If the vehicle is traveling on
a non-digitized road, the system displays the
linear distance to the destination, the
direction of the destination and the Street
unknown message. In this case, the display
will be grayed out.
Option 2 – route guidance is already
active: if route guidance is already active, a
prompt will appear asking whether you wish
to terminate the currently active route
guidance.
XSelect Yes or No and press W to confirm.
If you select Yes, COMAND will stop route
guidance and start route calculation for the
new destination.
If you select No, COMAND will continue
with the active route guidance.
iRoute calculation takes a certain amount
of time. The time depends on the distance
from the destination, for example.
COMAND calculates the route using the
digital map data.
The calculated route may differ from the
ideal route, e.g. due to roadworks or
incomplete map data. Please also refer to
the notes about the digital map
(Y page 186).
Entering and saving your home address
You can either enter your home address for
the first time (option 1) or edit a previously
stored home address (option 2).
XOption 1: enter the address, e.g. a town,
street and house number (Y page 152).
XOnce you have entered the address, select
Save in the address entry menu by turning
cVd and sliding ZVÆ the COMAND
controller and press W to confirm.
XSelect Save as "My Address" and press
W to confirm.
COMAND stores your home address as My
Address in the destination memory.
XOption 2: proceed as described under
"Option 1".
A prompt appears asking whether the
current home address should be
overwritten.
154NavigationCOMAND
Page 157 of 524
XSelect Yes and press W to confirm.
If you select Yes, the Save Successful.
message appears.
Entering a ZIP code
Entering a ZIP code will delete a previously
entered city.
XSelect Zip Code in the address entry menu
by turning cVd and sliding ZVÆ the
COMAND controller and press W to
confirm.
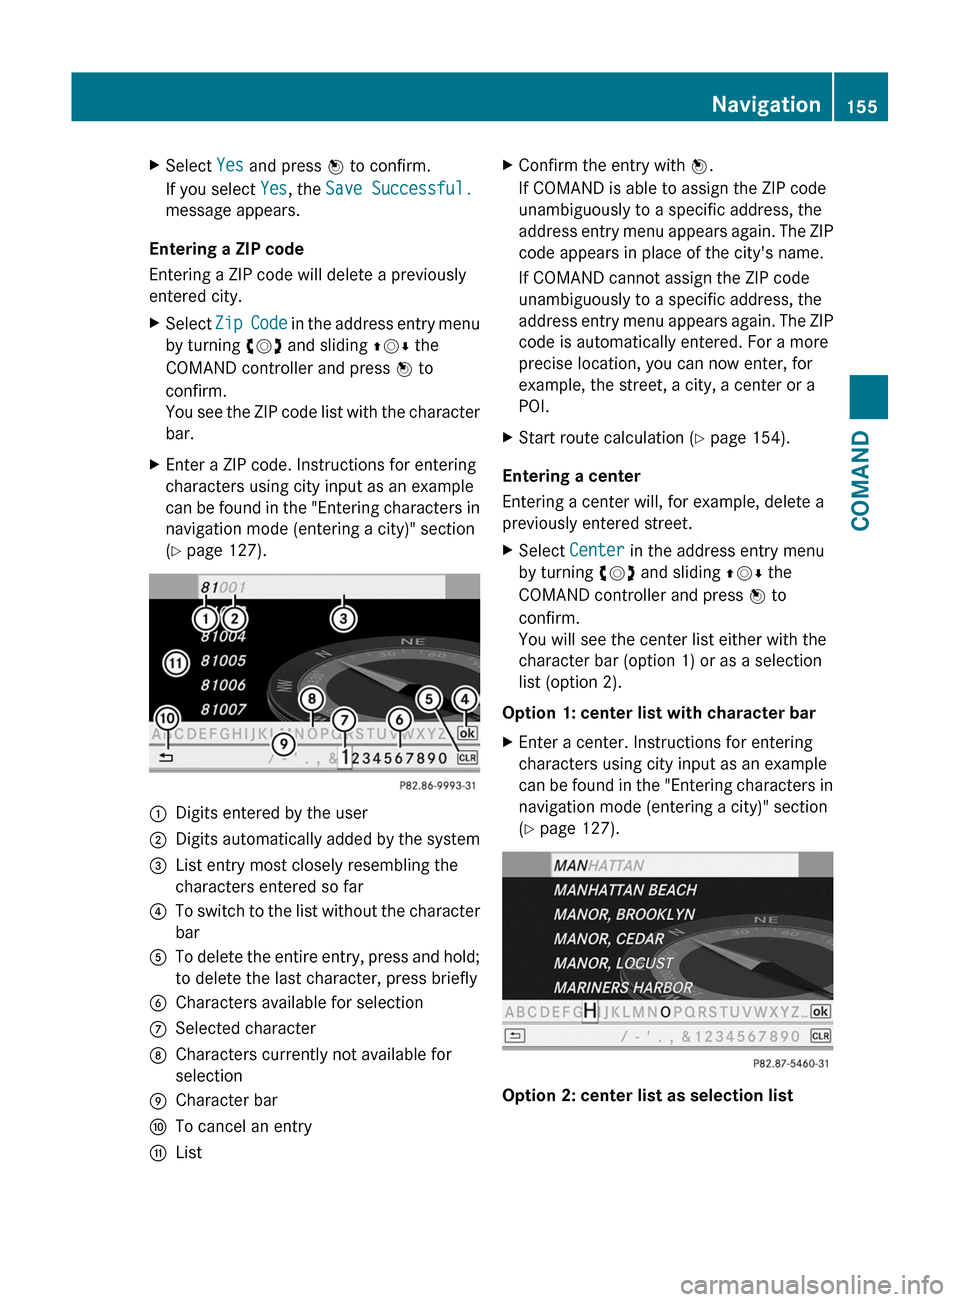
You see the ZIP code list with the character
bar.
XEnter a ZIP code. Instructions for entering
characters using city input as an example
can be found in the "Entering characters in
navigation mode (entering a city)" section
(Y page 127).
:Digits entered by the user;Digits automatically added by the system=List entry most closely resembling the
characters entered so far
?To switch to the list without the character
bar
ATo delete the entire entry, press and hold;
to delete the last character, press briefly
BCharacters available for selectionCSelected characterDCharacters currently not available for
selection
ECharacter barFTo cancel an entryGListXConfirm the entry with W.
If COMAND is able to assign the ZIP code
unambiguously to a specific address, the
address entry menu appears again. The ZIP
code appears in place of the city's name.
If COMAND cannot assign the ZIP code
unambiguously to a specific address, the
address entry menu appears again. The ZIP
code is automatically entered. For a more
precise location, you can now enter, for
example, the street, a city, a center or a
POI.
XStart route calculation (Y page 154).
Entering a center
Entering a center will, for example, delete a
previously entered street.
XSelect Center in the address entry menu
by turning cVd and sliding ZVÆ the
COMAND controller and press W to
confirm.
You will see the center list either with the
character bar (option 1) or as a selection
list (option 2).
Option 1: center list with character bar
XEnter a center. Instructions for entering
characters using city input as an example
can be found in the "Entering characters in
navigation mode (entering a city)" section
(Y page 127).
Option 2: center list as selection list
Navigation155COMANDZ
Page 158 of 524
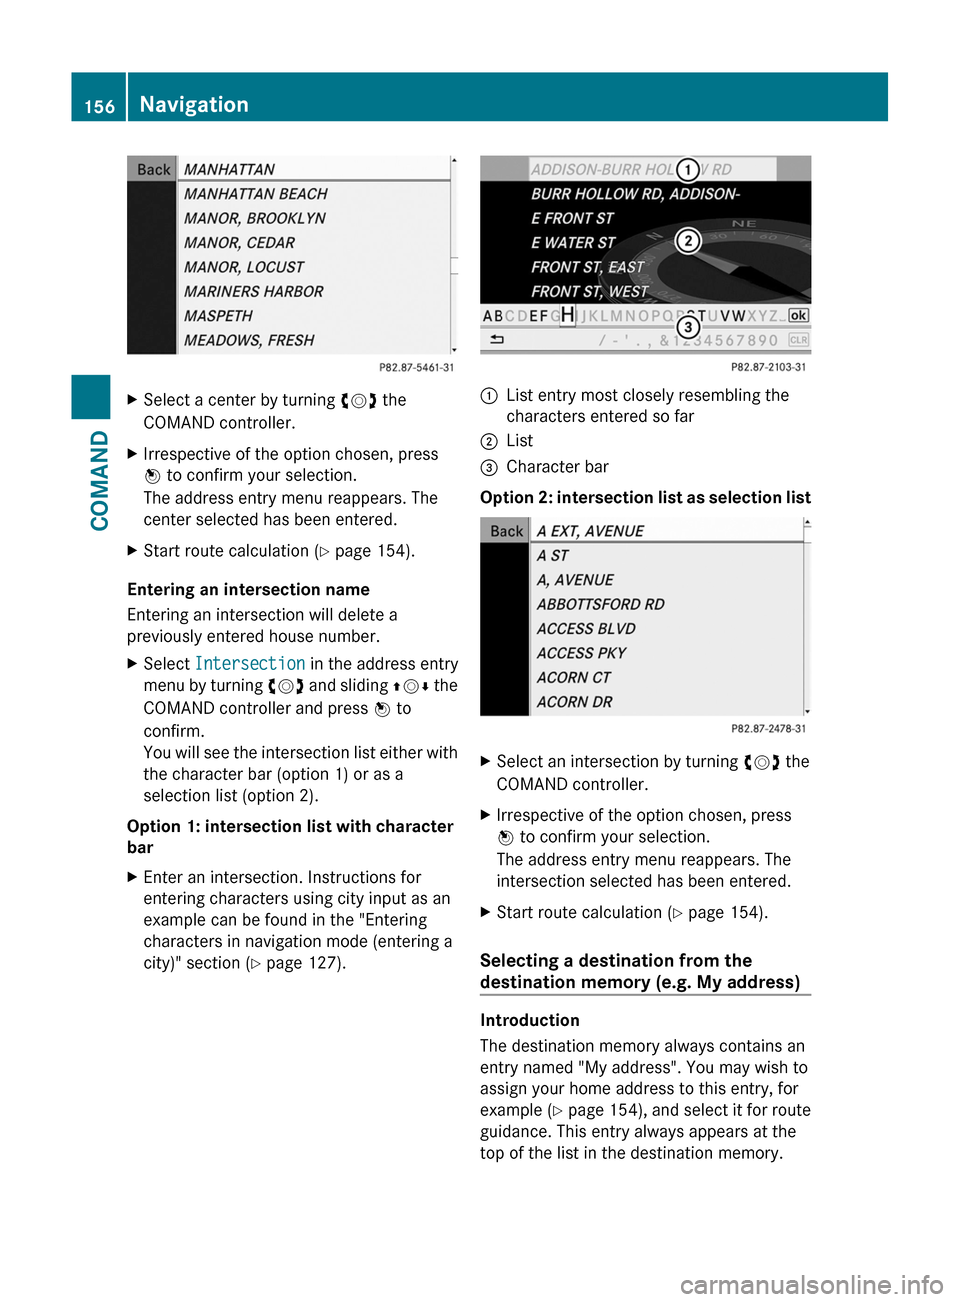
XSelect a center by turning cVd the
COMAND controller.
XIrrespective of the option chosen, press
W to confirm your selection.
The address entry menu reappears. The
center selected has been entered.
XStart route calculation (Y page 154).
Entering an intersection name
Entering an intersection will delete a
previously entered house number.
XSelect Intersection in the address entry
menu by turning cVd and sliding ZVÆ the
COMAND controller and press W to
confirm.
You will see the intersection list either with
the character bar (option 1) or as a
selection list (option 2).
Option 1: intersection list with character
bar
XEnter an intersection. Instructions for
entering characters using city input as an
example can be found in the "Entering
characters in navigation mode (entering a
city)" section (Y page 127).
:List entry most closely resembling the
characters entered so far
;List=Character bar
Option 2: intersection list as selection list
XSelect an intersection by turning cVd the
COMAND controller.
XIrrespective of the option chosen, press
W to confirm your selection.
The address entry menu reappears. The
intersection selected has been entered.
XStart route calculation (Y page 154).
Selecting a destination from the
destination memory (e.g. My address)
Introduction
The destination memory always contains an
entry named "My address". You may wish to
assign your home address to this entry, for
example (Y page 154), and select it for route
guidance. This entry always appears at the
top of the list in the destination memory.
156NavigationCOMAND