2011 MERCEDES-BENZ S-Class door lock
[x] Cancel search: door lockPage 262 of 524

XTo set the interior/exterior lighting
delayed switch-off time: select Vehicle
in the main function bar by sliding XVY and
turning cVd the COMAND controller and
press W to confirm.
The main area is active.
XSelect the Interior lighting delayed
switch-off/Exterior lighting
delayed switch-off menu by sliding
XVY or turning cVd the COMAND
controller.
The interior/exterior lighting delayed
switch-off time menu appears. The current
setting is indicated by a # dot.
XSelect Setting by sliding ZVÆ or turning
cVd the COMAND controller.
The selected setting is indicated by a #
dot.
Setting the ambient light
You can make the following settings:
RSOLAR (yellow interior lighting)
RNEUTRAL (white interior lighting)
RPOLAR (blue interior lighting)
RBrightness of the interior lighting on a
scale of 0 (off) to 5 (bright)
XTo set the ambient lighting: select
Vehicle in the main function bar by sliding
XVY and turning cVd the COMAND
controller and press W to confirm.
The main area is active.
XSelect the Ambient lighting menu by
sliding XVY or turning cVd the COMAND
controller.
The ambient lighting menu appears. The
current setting is indicated by a # dot.
XSelect Setting by sliding ZVÆ or turning
cVd the COMAND controller.
The selected setting is indicated by a #
dot.
Switching locator lighting on/off
If you switch on the locator lighting, the
following come on in the dark after you have
unlocked the vehicle using the remote
control:
Rthe side lamps
Rthe tail lamps
Rthe license plate lamp
Rthe front fog lamps
Rthe entry lamps in the exterior mirror
The locator lighting switches off again when
you open the driver’s door. If you do not open
the driver’s door, the locator lighting switches
off automatically after 40 seconds.
260VehicleCOMAND
Page 274 of 524

Vehicle equipment
iThis manual describes all the standard
and optional equipment of your vehicle
which was available at the time of
purchase. Country-specific differences are
possible. Bear in mind that your vehicle
may not feature all functions described
here. This also refers to safety-related
systems and functions.
Exterior lighting
Important safety notes
For reasons of safety, Mercedes-Benz
recommends that you drive with the lights
switched on even during the daytime. In some
countries, operation of the headlamps varies
due to legal requirements and self-imposed
obligations.
Notes on driving abroad
Convert to symmetrical low beam when
driving abroad: switch the headlamps to
symmetrical low beam in countries in which
traffic drives on the opposite side of the road
from the country where the vehicle is
registered. This prevents oncoming traffic
from being dazzled. Symmetrical lights do not
illuminate as large an area of the edge of the
road.
Have the headlamps converted at a qualified
specialist workshop, e.g. an authorized
Mercedes-Benz Center, as close to the border
as possible before driving in these countries.
Convert to asymmetrical low beam after
returning: have the headlamps converted
back to asymmetrical low beam at a qualified
specialist workshop, e.g. an authorized
Mercedes-Benz Center, as soon as possible
after crossing the border when returning.
Light switch
Operation
1WLeft-hand standing lamps2XRight-hand standing lamps3$Lights off/daytime running lamps4cAutomatic headlamp mode/daytime
running lamps
5TSide lamps, license plate and
instrument lighting
6LLow-beam/high-beam headlamps7NFog lamps148RRear fog lamps
The turn signals, high-beam headlamps and
the high-beam flasher are operated using the
combination switch (Y page 274).
! Switch off the parking lamps and standing
lamps when you leave the vehicle. This
prevents the battery from discharging.
The exterior lighting (except the side lamps/
standing lamps) switches off automatically if
you:
Rremove the key from the ignition lock
Ropen the driver's door with the key in
position 0
If you hear a warning tone when you leave the
vehicle, the lights may still be switched on.
XTurn the light switch to $ or c.
or
XIf the rear fog lamp is switched on: press
the light switch in to the stop.14Only vehicles with Bi-Xenon headlamps without Intelligent Light System* are equipped with front fog lamps.272Exterior lightingLights and windshield wipers* optional
Page 280 of 524

Switch the reading lamp off=Interior lighting
Interior lighting control
Important notes
In order to prevent the vehicle's battery from
discharging, the interior lighting functions are
automatically deactivated after some time
except for when the key is in position 2 in the
ignition lock.
Automatic interior lighting control
XTo switch on/off: press the | button.
The OFF indicator lamp shows whether the
automatic interior lighting control is
deactivated (indicator lamp on) or
activated (indicator lamp off).
The interior lighting automatically switches
on if you:
R unlock the vehicle
R open a door
R remove the key from the ignition lock
The interior light is activated for a short while
when the key is removed from the ignition
lock. You can activate this delayed switch-off
using COMAND ( Y page 259).
Manual interior lighting control
XTo switch the front interior lighting on/
off: press the c button.XTo switch the rear interior lighting on/
off: press the u button.XTo switch the reading lamps on/off:
press the p button.Changing bulbs
Important safety notes
Xenon bulbs
If your vehicle is equipped with Xenon bulbs,
you can recognize this by the following: the
cone of light from the Xenon bulbs moves
from the top to the bottom and back again
when you start the engine. For this to be
observed, the lights must be switched on
before starting the engine.
GWarning
Xenon bulbs carry a high voltage. You could
get an electric shock and be seriously or even
fatally injured if you touch the electric
contacts on Xenon bulbs. Therefore, never
remove the cover from Xenon bulbs.
Do not change Xenon bulbs yourself, but have
them replaced at a qualified specialist
workshop which has the necessary specialist
knowledge and tools to carry out the work
required.
Mercedes-Benz recommends that you use an
authorized Mercedes-Benz Center for this
purpose. In particular, work relevant to safety
or on safety-related systems must be carried
out at a qualified specialist workshop.
Bulbs and lamps are an important aspect of
vehicle safety. You must therefore make sure
that these function correctly at all times.
Have the headlamp setting checked regularly.
Other bulbs
GWarning!
Bulbs and lamps can be very hot. You should
therefore allow them to cool down before you
change them. Otherwise, you could be burned
if you touch them.
Keep bulbs out of the reach of children.
Otherwise, they could damage the bulbs, for
example, and injure themselves.
278Changing bulbsLights and windshield wipers
Page 284 of 524

Never fold a windshield wiper arm without
a wiper blade back onto the windshield.
Hold the windshield wiper arm firmly when
you change the wiper blade. If you release
the windshield wiper arm without a wiper
blade and it falls onto the windshield, the
windshield can be damaged by the force of
the impact.
Mercedes-Benz recommends that you have
the wiper blades replaced by a qualified
specialist workshop, e.g. at an authorized
Mercedes-Benz Center.
! Always position the windshield wiper
arms vertically before folding them away
from the windshield. By doing so, you will
avoid damage to the hood.
Replacing the windshield wiper blades
Moving the wiper arms to a vertical
position
Vehicles without KEYLESS-GO
XTurn the key to position 1 or 2 in the ignition
lock.
XSet the windshield wipers to
position ° on the combination switch.
XWhen the wiper arms have reached a
vertical position, turn the key to position
0 and remove it from the ignition lock.
Vehicles with KEYLESS-GO
XSwitch off the engine.XTake your foot off the brake pedal.XSet the windshield wipers to
position ° on the combination switch.
XPress the Start/Stop button repeatedly
until the windshield wipers start.
XWhen the wiper arms have reached a
vertical position, press the Start/Stop
button.
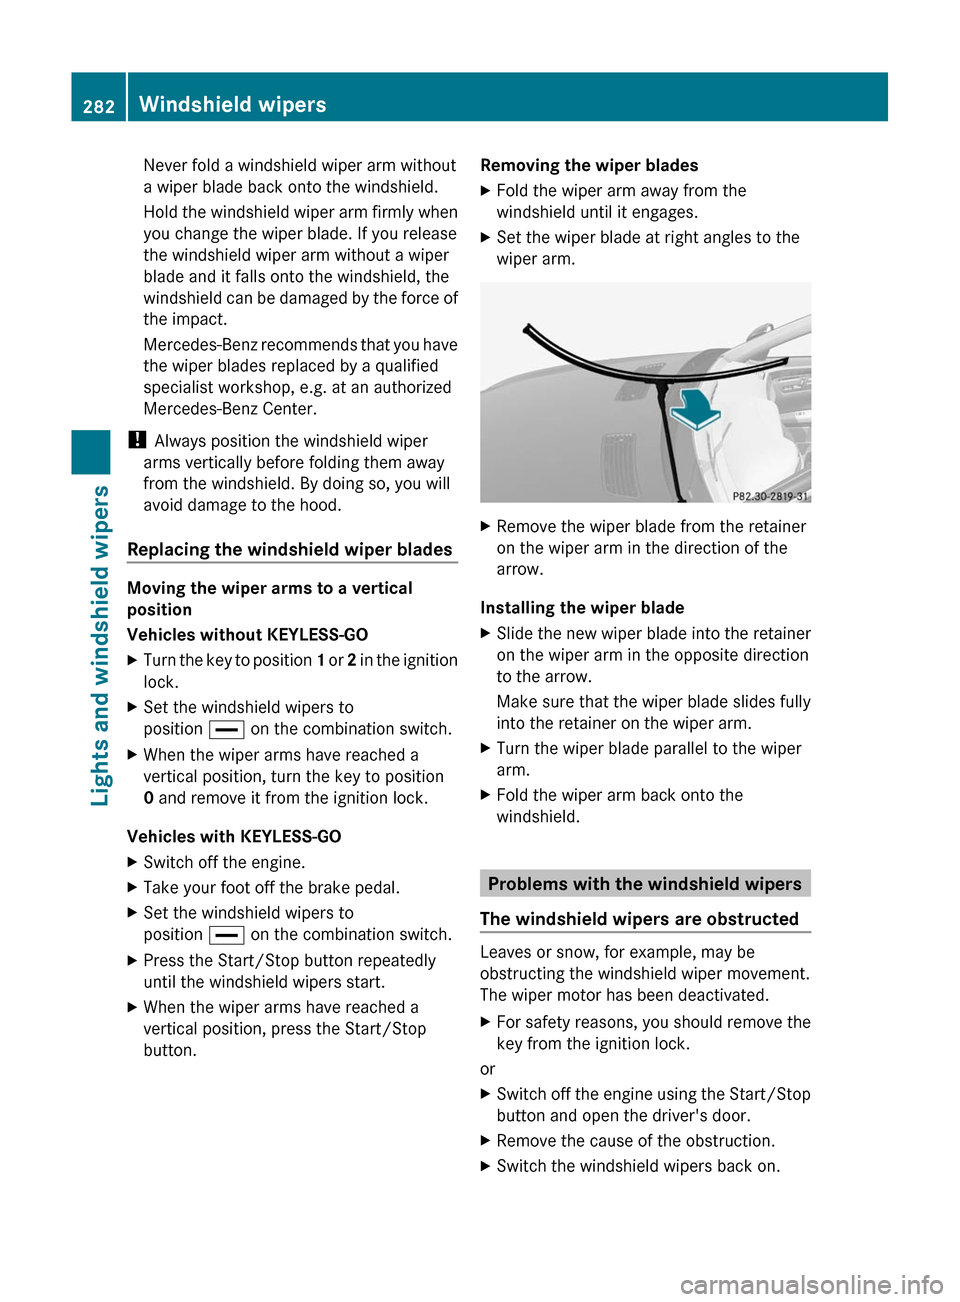
Removing the wiper bladesXFold the wiper arm away from the
windshield until it engages.
XSet the wiper blade at right angles to the
wiper arm.
XRemove the wiper blade from the retainer
on the wiper arm in the direction of the
arrow.
Installing the wiper blade
XSlide the new wiper blade into the retainer
on the wiper arm in the opposite direction
to the arrow.
Make sure that the wiper blade slides fully
into the retainer on the wiper arm.
XTurn the wiper blade parallel to the wiper
arm.
XFold the wiper arm back onto the
windshield.
Problems with the windshield wipers
The windshield wipers are obstructed
Leaves or snow, for example, may be
obstructing the windshield wiper movement.
The wiper motor has been deactivated.
XFor safety reasons, you should remove the
key from the ignition lock.
or
XSwitch off the engine using the Start/Stop
button and open the driver's door.
XRemove the cause of the obstruction.XSwitch the windshield wipers back on.282Windshield wipersLights and windshield wipers
Page 302 of 524

the case if you are not depressing the brake
pedal.
If you depress the brake pedal and press the
Start/Stop button, the engine starts
immediately.
The Start/Stop button can be removed from
the ignition lock. Then you can insert the
SmartKey in the ignition lock.
i You do not have to remove the Start/Stop
button from the ignition lock when you
leave the vehicle. However, you should
always take the SmartKey with you when
leaving the vehicle. The vehicle can be
started with the Start/Stop button and the
electrical equipment can be operated while
the SmartKey is in the vehicle.:Start/Stop button;Ignition lockXInsert Start/Stop button : into ignition
lock ;.
i
When you insert Start/Stop button :
into ignition lock ;, the system requires a
detection time of two seconds before you
can use Start/Stop button :.
XShift the transmission to position P.XDo not press the brake pedal.
Start/Stop button
=USA only?Canada onlyXPosition 0: if Start/Stop button : has not
yet been pressed, this corresponds to the
SmartKey being removed from the ignition.XPosition 1: press Start/Stop button :.
You can now activate the windshield
wipers, for example.
i If you then open the driver's door when in
this position, the power supply is
deactivated.
XPosition 2 (ignition): press Start/Stop
button : twice.
i
If you press Start/Stop button : once
when in this position and the driver's door
is open, the power supply is deactivated
again.
As soon as the ignition is switched on, all the
indicator lamps in the instrument cluster light
up. The indicator lamps of the high-beam
headlamps or the turn signal lamps only light
up if the high-beam headlamps or the turn
signal lamps are switched on. If an indicator
lamp does not light up when the ignition is
switched on, check it and replace it if
necessary. If an indicator lamp does not go
out after the engine is started or if it lights up
while the vehicle is in motion, see
( Y page 413).
300DrivingDriving and parking
Page 304 of 524

XRelease the brake pedal.XCarefully depress the accelerator pedal.
The electric parking brake (Y page 317) is
automatically released.
The red F indicator lamp (USA only) or
the red ! indicator lamp (Canada only)
in the instrument cluster goes out.
iThe vehicle locks centrally once you have
pulled away. The locking knobs in the doors
drop down.
You can open the doors from the inside at
any time.
You can also deactivate the automatic
locking feature .
iUpshifts take place at higher engine
speeds after a cold start. This helps the
catalytic converter to reach its operating
temperature more quickly.
Hill start assist
Hill start assist helps you when pulling away
forwards or in reverse on an uphill gradient.
It holds the vehicle for a short time after you
have removed your foot from the brake pedal.
This gives you enough time to move your foot
from the brake pedal to the accelerator pedal
and depress it before the vehicle begins to
roll.
GWarning
Never leave the vehicle when it is held by hill
start assist. After approximately one second,
hill start assist will no longer brake your
vehicle and it could roll away.
XTake your foot off the brake pedal.
iOnce you have taken your foot off the
brake pedal, the vehicle is held for around
one second.
XPull away.
Hill start assist will not function if:
Ryou are pulling away on a level road or a
downhill gradient.
Rthe transmission is in position N.
Rthe electric parking brake is applied.
RESP® is malfunctioning.
ECO start/stop function
General notes
The ECO start/stop function is only available
for the S 63 AMG.
The ECO start/stop function is only available
in drive program C.
The ECO start/stop function switches the
engine off automatically when the vehicle
stops moving.
The engine starts automatically when you pull
away again. The ECO start/stop function
thereby helps you to reduce the fuel
consumption and emissions of your vehicle.
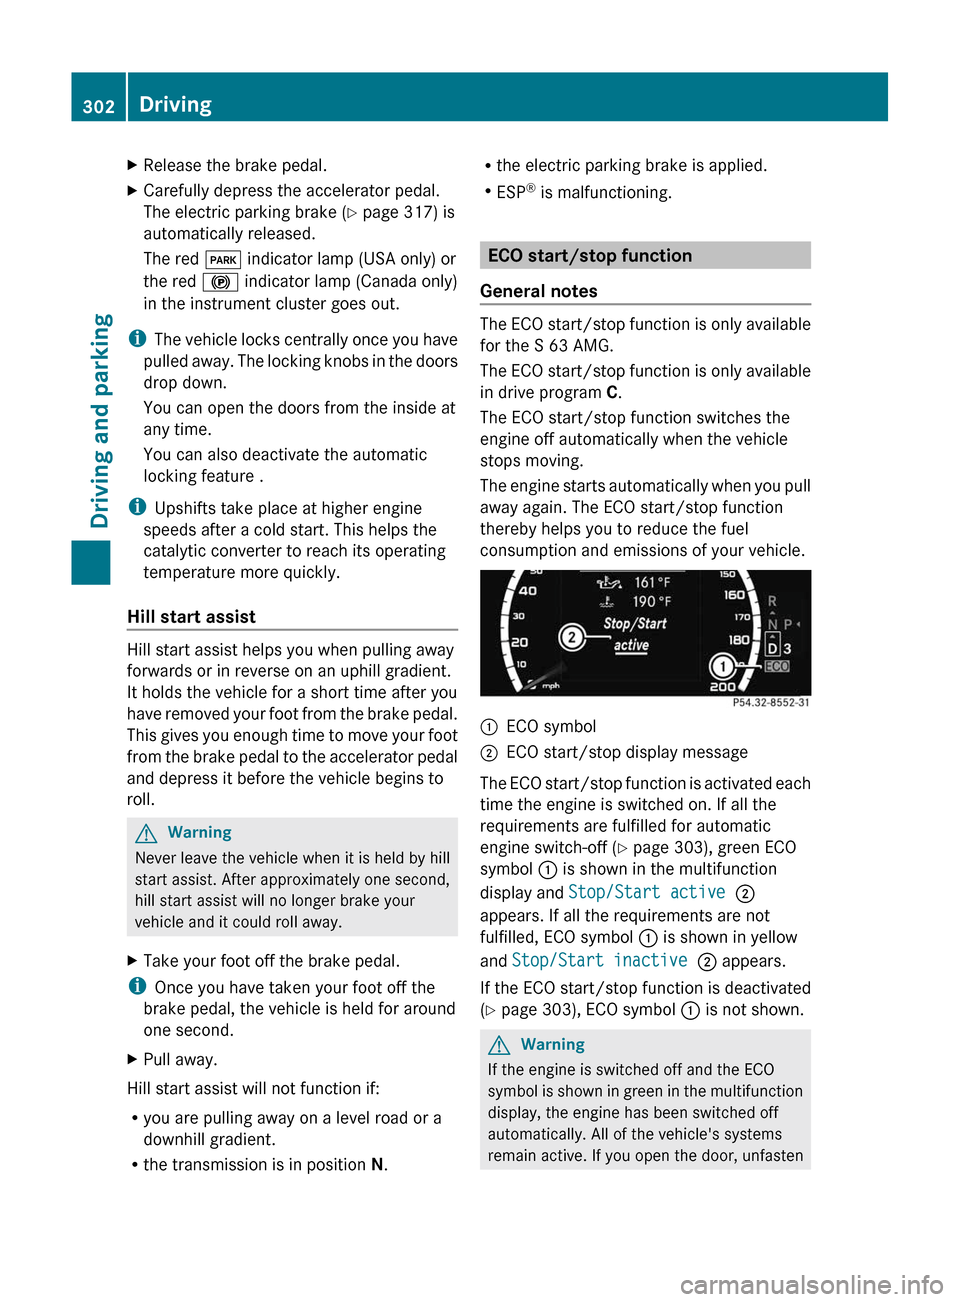
:ECO symbol;ECO start/stop display message
The ECO start/stop function is activated each
time the engine is switched on. If all the
requirements are fulfilled for automatic
engine switch-off (Y page 303), green ECO
symbol : is shown in the multifunction
display and Stop/Start active ;
appears. If all the requirements are not
fulfilled, ECO symbol : is shown in yellow
and Stop/Start inactive ; appears.
If the ECO start/stop function is deactivated
(Y page 303), ECO symbol : is not shown.
GWarning
If the engine is switched off and the ECO
symbol is shown in green in the multifunction
display, the engine has been switched off
automatically. All of the vehicle's systems
remain active. If you open the door, unfasten
302DrivingDriving and parking
Page 307 of 524

Problems with the engineProblemPossible causes/consequences and M SolutionsThe engine does not
start. The starter motor
can be heard.R There is a malfunction in the engine electronics.
R There is a malfunction in the fuel supply.XTurn the SmartKey back to position 0 in the ignition lock before
the next attempt to start with the SmartKey.XBefore the next starting attempt with KEYLESS-GO: shut all open
vehicle doors so that the signals from the SmartKey may be
better received.
or
XPull the Start/Stop button out of the ignition.XUse the SmartKey to start the engine, (Y page 301) as external
radio signals cause KEYLESS-GO to malfunction. Avoid
excessively long and frequent attempts to start the engine as
these will drain the battery.
If the engine does not start after several attempts:
XConsult a qualified specialist workshop.The engine does not
start. You cannot hear
the starter motor.The on-board voltage is too low because the starter battery is too
weak or discharged.XJump-start the vehicle ( Y page 471).
If the engine does not start despite attempts to jump-start it:
XConsult a qualified specialist workshop.The starter motor was exposed to a thermal load that was too high.XAllow the starter motor to cool down for approximately two
minutes.XTry to start the engine again.
If the engine still does not start:
XConsult a qualified specialist workshop.Driving305Driving and parkingZ
Page 309 of 524

NNeutralDDrive
iThe DIRECT SELECT lever always returns
to its original position. The current
transmission position P, R , N or D appears
in the transmission position display
( Y page 308) in the multifunction display.
Engaging park position P
XPush the DIRECT SELECT lever in the
direction of the arrow P.
i
The automatic transmission shifts
automatically into park position P if you
open the driver's door when the vehicle is
stationary or at very low speed and the
transmission is in position D or R.
! If the engine speed is too high or the
vehicle is moving, do not shift the
automatic transmission directly from D to
R , from R to D or directly to P. The
automatic transmission could otherwise be
damaged.
Engaging reverse gear R
! Only shift the automatic transmission to
R when the vehicle is stationary.
i The ECO start/stop function is not
available when reverse gear is engaged.
For further information on the ECO start/
stop function ( Y page 302).
XWhen the vehicle is stationary, depress the
brake pedal.XPush the DIRECT SELECT lever up past the
first point of resistance.
Neutral N with ECO start/stop function
activated
The ECO start/stop function switches the
engine off automatically when the vehicle is
stationary if the vehicle is braked to a
standstill with neutral N engaged and the
brake depressed.
For further information on the ECO start/stop
function ( Y page 302).
Shifting to neutral NXWhen the vehicle is stationary, depress the
brake pedal.XPush the DIRECT SELECT lever up or down
to the first point of resistance.
When the engine is switched off, the
automatic transmission shifts to N
automatically.
Remaining in neutral N
If you wish to keep the automatic
transmission in neutral N, e.g. to wash the
vehicle in a car wash with a towing device,
observe the following:
GWarning!
When leaving the SmartKey in the starter
switch, do not leave children unattended in
the vehicle. It is possible for children to switch
on the ignition which could result in
unsupervised use of vehicle equipment.
Unsupervised use of vehicle equipment could
result in an accident and/or serious personal
injury.
Using the SmartKey:
R make sure the ignition is switched on.
R when the vehicle is stationary, depress the
brake pedal and keep it depressed.
R shift to neutral N.
R release the brake pedal.
R if applied, release the electric parking
brake.
R switch off the ignition and leave the
SmartKey in the ignition lock.
Using KEYLESS-GO:
R make sure the ignition is switched on.
R when the vehicle is stationary, depress the
brake pedal and keep it depressed.
R shift to park position P.
R release the brake pedal.
Automatic transmission307Driving and parkingZ