2011 MERCEDES-BENZ S-Class speed
[x] Cancel search: speedPage 175 of 524

Icon for real-time traffic reportsIconDescriptionTraffic reports in the map displayWarning (red)N/ACaution (yellow)N/ATraffic jam on the
route (slow moving
traffic)
Appears when approaching a traffic jam (average
speed between 25 – 45 mph) if route guidance is
active and the route passes through the area
affected by the traffic jam.
This icon may appear in conjunction with yellow
vehicle icons.
Traffic jam on the
route
Appears when approaching a traffic jam (average
speed between 5 and 20 mph) if route guidance is
active and the route passes through the area
affected by the traffic jam.
This icon may appear in conjunction with red
vehicle icons.
Blocked section on
route
Appears at the beginning of a blocked section if
route guidance is active and the route passes
through the blocked area.
The XXXX icons can appear in conjunction with this
icon.
Yellow line
with arrows
IncidentsPossible traffic blocks (e.g. roadwork)
Appears on the side of the road affected (arrows
indicate direction of traffic flow)
Green line
with arrows
Unimpeded traffic
flow
No traffic blocks
Appears only on the side of the road with
unimpeded traffic flow (arrows indicate the
direction of traffic flow)
Traffic jam on route
(stop-and-go) (yellow
vehicle)
High volume of traffic, average speed
40 – 72 km/h (25 – 45 mph). In order to indicate
the volume of traffic, more than one symbol may
appear.
Traffic jam on route
(stop-and-go) (yellow
vehicle)
Very high volume of traffic, average speed
8 – 32 km/h (5 – 20 mph).
XXXXBlocked route sectionUnusable section of road. In order to indicate the
length of the blocked section, more than one
symbol may appear.
Navigation173COMANDZ
Page 177 of 524
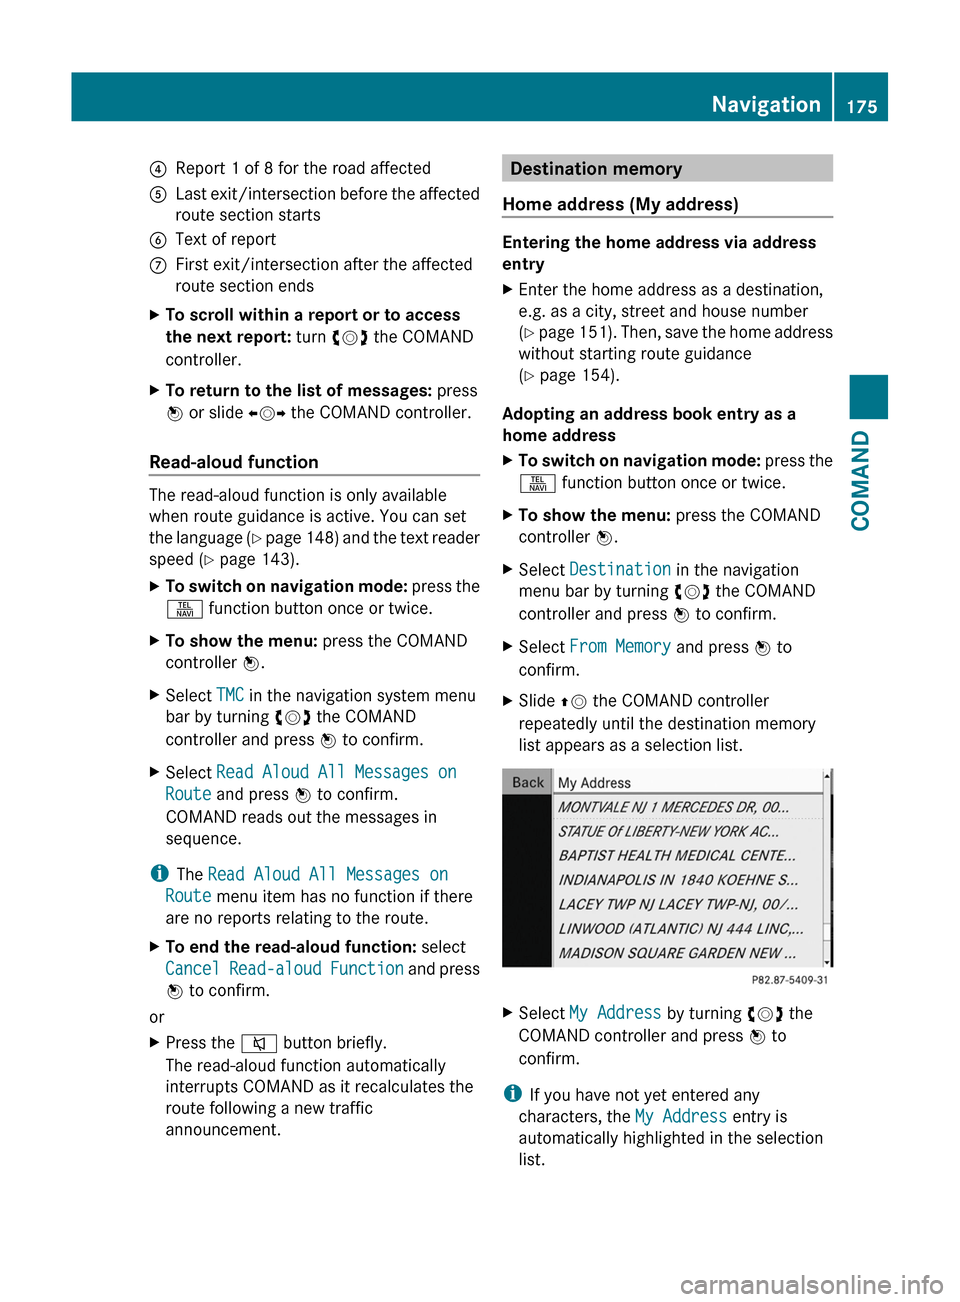
4Report 1 of 8 for the road affected5Last exit/intersection before the affected
route section starts
6Text of reportCFirst exit/intersection after the affected
route section ends
XTo scroll within a report or to access
the next report: turn cVd the COMAND
controller.
XTo return to the list of messages: press
W or slide XVY the COMAND controller.
Read-aloud function
The read-aloud function is only available
when route guidance is active. You can set
the language (Y page 148) and the text reader
speed (Y page 143).
XTo switch on navigation mode: press the
S function button once or twice.
XTo show the menu: press the COMAND
controller W.
XSelect TMC in the navigation system menu
bar by turning cVd the COMAND
controller and press W to confirm.
XSelect Read Aloud All Messages on
Route and press W to confirm.
COMAND reads out the messages in
sequence.
iThe Read Aloud All Messages on
Route menu item has no function if there
are no reports relating to the route.
XTo end the read-aloud function: select
Cancel Read-aloud Function and press
W to confirm.
or
XPress the 8 button briefly.
The read-aloud function automatically
interrupts COMAND as it recalculates the
route following a new traffic
announcement.
Destination memory
Home address (My address)
Entering the home address via address
entry
XEnter the home address as a destination,
e.g. as a city, street and house number
(Y page 151). Then, save the home address
without starting route guidance
(Y page 154).
Adopting an address book entry as a
home address
XTo switch on navigation mode: press the
S function button once or twice.
XTo show the menu: press the COMAND
controller W.
XSelect Destination in the navigation
menu bar by turning cVd the COMAND
controller and press W to confirm.
XSelect From Memory and press W to
confirm.
XSlide ZV the COMAND controller
repeatedly until the destination memory
list appears as a selection list.
XSelect My Address by turning cVd the
COMAND controller and press W to
confirm.
iIf you have not yet entered any
characters, the My Address entry is
automatically highlighted in the selection
list.
Navigation175COMANDZ
Page 186 of 524
Data for the representation of buildings is
not available for all cities.
XTo show the menu: press the COMAND
controller W.
XSelect Navi in the main function bar by
sliding ZV and turning cVd the COMAND
controller and press W to confirm.
XSelect City (3D) and press W to confirm.
Depending on the previous state, switch
the option on O or off ª.
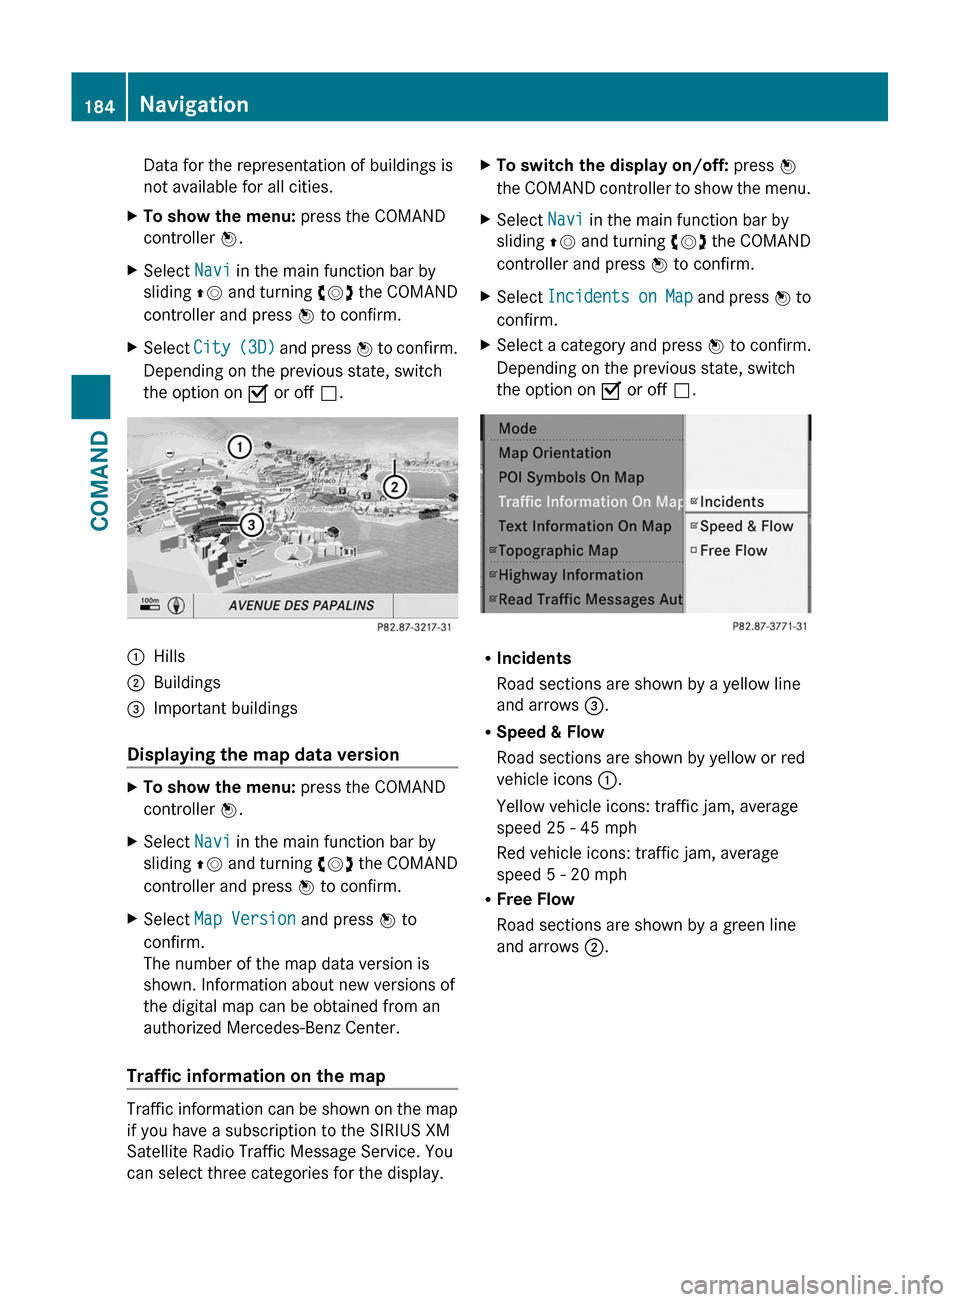
:Hills;Buildings=Important buildings
Displaying the map data version
XTo show the menu: press the COMAND
controller W.
XSelect Navi in the main function bar by
sliding ZV and turning cVd the COMAND
controller and press W to confirm.
XSelect Map Version and press W to
confirm.
The number of the map data version is
shown. Information about new versions of
the digital map can be obtained from an
authorized Mercedes-Benz Center.
Traffic information on the map
Traffic information can be shown on the map
if you have a subscription to the SIRIUS XM
Satellite Radio Traffic Message Service. You
can select three categories for the display.
XTo switch the display on/off: press W
the COMAND controller to show the menu.
XSelect Navi in the main function bar by
sliding ZV and turning cVd the COMAND
controller and press W to confirm.
XSelect Incidents on Map and press W to
confirm.
XSelect a category and press W to confirm.
Depending on the previous state, switch
the option on O or off ª.
RIncidents
Road sections are shown by a yellow line
and arrows =.
RSpeed & Flow
Road sections are shown by yellow or red
vehicle icons :.
Yellow vehicle icons: traffic jam, average
speed 25 - 45 mph
Red vehicle icons: traffic jam, average
speed 5 - 20 mph
RFree Flow
Road sections are shown by a green line
and arrows ;.
184NavigationCOMAND
Page 187 of 524
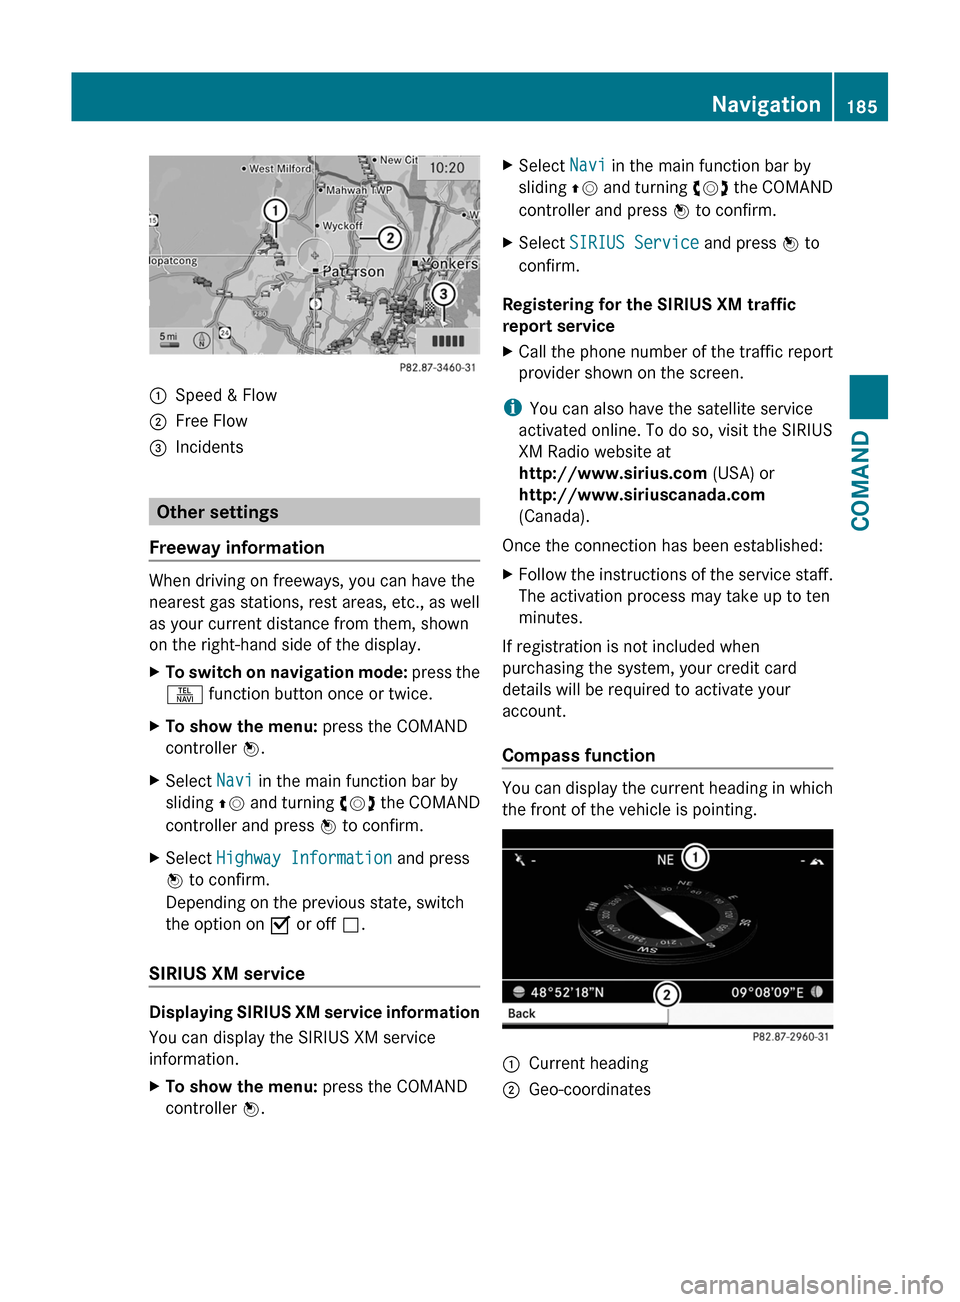
:Speed & Flow;Free Flow=Incidents
Other settings
Freeway information
When driving on freeways, you can have the
nearest gas stations, rest areas, etc., as well
as your current distance from them, shown
on the right-hand side of the display.
XTo switch on navigation mode: press the
S function button once or twice.
XTo show the menu: press the COMAND
controller W.
XSelect Navi in the main function bar by
sliding ZV and turning cVd the COMAND
controller and press W to confirm.
XSelect Highway Information and press
W to confirm.
Depending on the previous state, switch
the option on O or off ª.
SIRIUS XM service
Displaying SIRIUS XM service information
You can display the SIRIUS XM service
information.
XTo show the menu: press the COMAND
controller W.
XSelect Navi in the main function bar by
sliding ZV and turning cVd the COMAND
controller and press W to confirm.
XSelect SIRIUS Service and press W to
confirm.
Registering for the SIRIUS XM traffic
report service
XCall the phone number of the traffic report
provider shown on the screen.
iYou can also have the satellite service
activated online. To do so, visit the SIRIUS
XM Radio website at
http://www.sirius.com (USA) or
http://www.siriuscanada.com
(Canada).
Once the connection has been established:
XFollow the instructions of the service staff.
The activation process may take up to ten
minutes.
If registration is not included when
purchasing the system, your credit card
details will be required to activate your
account.
Compass function
You can display the current heading in which
the front of the vehicle is pointing.
:Current heading;Geo-coordinatesNavigation185COMANDZ
Page 188 of 524

You can view the current direction of travel,
the current height and the coordinates of the
current vehicle position in the compass view.XTo switch on navigation mode: press the
S function button once or twice.XTo show the menu: press the COMAND
controller W.XSelect Position in the navigation menu by
sliding VÆ and turning cVd the COMAND
controller and press W to confirm.XSelect Compass and press W to confirm.XTo exit the display: confirm Back by
pressing W or press the % button.
Installing new map software
The digital data generated by the map
software becomes outdated in the same way
as conventional road maps. Optimal route
guidance can only be provided by the
navigation system in conjunction with the
most up-to-date map software. Information
about new map software versions can be
obtained from an authorized Mercedes-Benz
Center.
You can install new map software yourself
using one or more DVDs, depending on the
size.
The installation process can take between 10
and 120 minutes depending on the size of the
map software. If radio mode is selected
before you start the installation process, you
can still adjust the volume. It is also still
possible to operate the automatic climate
control and cancel the process on COMAND.
Other functions are not operational. If
possible, carry out the installation process
when the vehicle is stationary. This takes less
time, since the DVD read speed is higher
when the vehicle is stationary than when it is
in motion. If the starter battery is not
sufficiently charged, COMAND may end the
process automatically in order to preserve
the battery. Therefore, keep the engine
running during the installation process.
GWarning
Never leave the engine running in enclosed
spaces. The exhaust gases contain toxic
carbon monoxide. Breathing in exhaust fumes
is a health hazard and can lead to
unconsciousness or death.
Displaying information about the
currently used map version
XTo switch on navigation mode: press the
S function button once or twice.XTo show the menu: press the COMAND
controller W.XSelect Navi in the main function bar by
sliding VÆ and turning cVd the COMAND
controller and press W to confirm.XSelect Map Version and press W to
confirm.
Notes on handling DVDs
R Only touch the edges of DVDs.
R Handle DVDs carefully to avoid read errors.
R Avoid scratching DVDs or getting
fingerprints or dust on them.
R Use a conventional cleaning cloth to clean
DVDs. Never wipe in a circle, but instead in
straight lines from the inside to the outside.
R Place DVDs back in their cases after use.
R Do not expose DVDs to heat or direct
sunlight.
Map software copy protection
Map software for COMAND is subject to a fee.
Map software can only be used on one vehicle
with an activation code and is not
transferable. The six-digit activation code is
available at your authorized Mercedes-Benz
Center. Contact your authorized Mercedes-
Benz Center if you lose the activation code or
if COMAND does not accept the code that you
received.
Your vehicle is delivered from the factory with
map software. Depending on the country,
map software for your region is either pre-
installed (Europe/USA) or the map software
186NavigationCOMAND
Page 193 of 524

Telephone
Vehicle equipment
i These Operating Instructions describe all
standard and optional equipment available
for your vehicle at the time of purchase.
Please note that your vehicle may not be
equipped with all features described.
General information
Introduction
The telephone function, in conjunction with a
Bluetooth ®
-capable mobile phone, offers
Bluetooth ®
interface telephony.
Using theBluetooth ®
interface and a suitable
mobile phone, you can receive vCards.
For more information on suitable mobile
phones and on connecting a Bluetooth ®
-
capable mobile phone to COMAND, visit
http://www.mbusa-mobile.com or call
the Mercedes-Benz Customer Assistance
Center under
1-800-FOR-MERCedes(1-800-367-6372)
(US) or Customer Relations under
1-800-387-0100 (Canada).
Important safety notes
GWarning
A driver's attention to the road must always
be his/her primary focus when driving. For
your safety and the safety of others, we
recommend that you pull over to a safe
location and stop before placing or taking a
telephone call. If you choose to use the mobile
phone while driving, please use the handsfree
device and only use the mobile phone when
weather, road, and traffic conditions permit.
Some jurisdictions prohibit the driver from
using a cellular mobile phone while driving a
vehicle.
Bear in mind that at a speed of just 30 mph
(approximately 50 km/h), your vehicle is
covering a distance of 44 feet (approximately
14 m) every second.GWarning
You and others may damage your health due
to excessive electromagnetic radiation. By
using an external antenna, the possible health
risks of electromagnetic fields, which are
under discussion among the scientific
community, should be largely prevented.
Calls disconnected while the vehicle is
in motion
A call may be disconnected if:
R there is insufficient network coverage in
certain areas.
R you move from one transmitter/receiver
area (cell) into another and no channels are
free.
R you use a SIM card which is not compatible
with the network available.
R when using a mobile phone with
"Twincard", the second SIM card is
registered on the network at the same time.
Operating options
You can operate the telephone by using:
R the = and ; button or the 9 button
on COMAND
R the 6 or ~ button and the number
keypad on COMAND
R using the 6 or ~ button on the
multifunction steering wheel
R voice commands via the Voice Control
System
Unless stated otherwise, the descriptions and
illustrations in this section refer to COMAND.
Function restrictions
You will not yet be able to use the telephone
in the following situations:
R when the mobile phone is not yet
connected to a network The telephone
Telephone191COMANDZ
Page 205 of 524
Displaying contact detailsXSelect Options by sliding VÆ and turning
cVd the COMAND controller and press
W to confirm.
XSelect Details and press W to confirm.
The detailed view appears.
XTo return to the list: select List by sliding
XVY the COMAND controller and press
W to confirm.
Creating new contacts/changing
contacts
Automatically imported contacts cannot be
edited. These have to be copied to the
COMAND address book first by saving.
iIn certain countries, these functions are
not available from speeds above
approximately 3 mph (5 km/h). As soon as
the speed falls below approximately 2 mph
(3 km/h), the function is available again.
iYou can enter address data directly into
the address book. If you store telephone
numbers in the phone book, these are
saved in the address book. If you store a
navigation destination, COMAND creates
an address book entry which includes the
complete navigable address data.
iAutomatically imported contacts cannot
be edited. They have to be saved first, to be
copied to the COMAND address book.
XCall up the contact (Y page 201)13.XSelect Options by sliding VÆ and turning
cVd the COMAND controller and press
W to confirm.
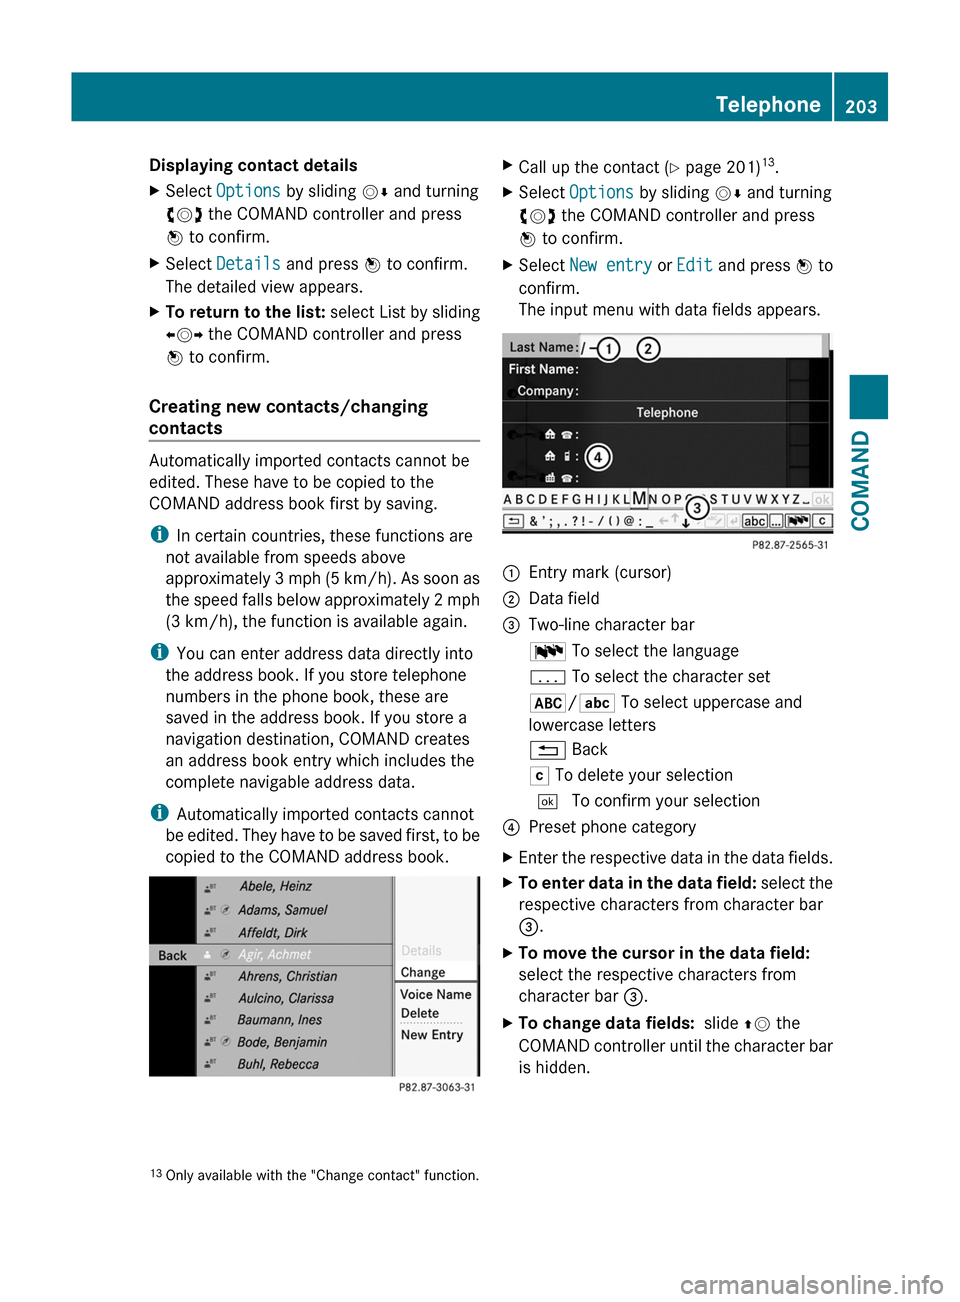
XSelect New entry or Edit and press W to
confirm.
The input menu with data fields appears.
:Entry mark (cursor);Data field=Two-line character barB To select the languagep To select the character set*/E To select uppercase and
lowercase letters
% BackF To delete your selection¬ To confirm your selection?Preset phone categoryXEnter the respective data in the data fields.XTo enter data in the data field: select the
respective characters from character bar
=.
XTo move the cursor in the data field:
select the respective characters from
character bar =.
XTo change data fields: slide ZV the
COMAND controller until the character bar
is hidden.
13Only available with the "Change contact" function.Telephone203COMANDZ
Page 237 of 524
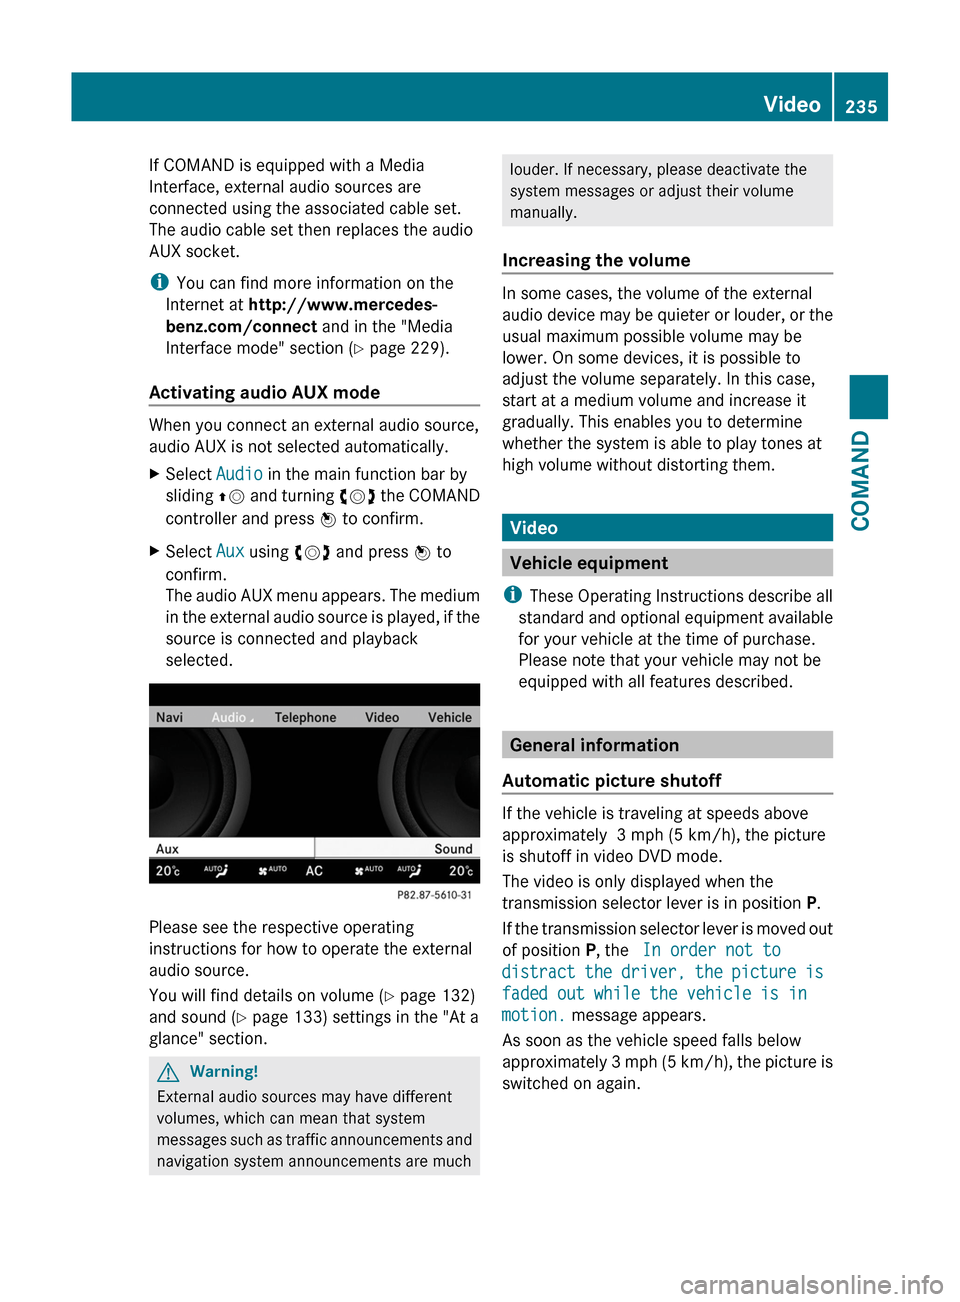
If COMAND is equipped with a Media
Interface, external audio sources are
connected using the associated cable set.
The audio cable set then replaces the audio
AUX socket.
iYou can find more information on the
Internet at http://www.mercedes-
benz.com/connect and in the "Media
Interface mode" section (Y page 229).
Activating audio AUX mode
When you connect an external audio source,
audio AUX is not selected automatically.
XSelect Audio in the main function bar by
sliding ZV and turning cVd the COMAND
controller and press W to confirm.
XSelect Aux using cVd and press W to
confirm.
The audio AUX menu appears. The medium
in the external audio source is played, if the
source is connected and playback
selected.
Please see the respective operating
instructions for how to operate the external
audio source.
You will find details on volume (Y page 132)
and sound (Y page 133) settings in the "At a
glance" section.
GWarning!
External audio sources may have different
volumes, which can mean that system
messages such as traffic announcements and
navigation system announcements are much
louder. If necessary, please deactivate the
system messages or adjust their volume
manually.
Increasing the volume
In some cases, the volume of the external
audio device may be quieter or louder, or the
usual maximum possible volume may be
lower. On some devices, it is possible to
adjust the volume separately. In this case,
start at a medium volume and increase it
gradually. This enables you to determine
whether the system is able to play tones at
high volume without distorting them.
Video
Vehicle equipment
iThese Operating Instructions describe all
standard and optional equipment available
for your vehicle at the time of purchase.
Please note that your vehicle may not be
equipped with all features described.
General information
Automatic picture shutoff
If the vehicle is traveling at speeds above
approximately 3 mph (5 km/h), the picture
is shutoff in video DVD mode.
The video is only displayed when the
transmission selector lever is in position P.
If the transmission selector lever is moved out
of position P, the In order not to
distract the driver, the picture is
faded out while the vehicle is in
motion. message appears.
As soon as the vehicle speed falls below
approximately 3 mph (5 km/h), the picture is
switched on again.
Video235COMANDZ