2011 MERCEDES-BENZ S-Class speed
[x] Cancel search: speedPage 85 of 524
Unlocking and opening the doors
from the inside
You can open a door from inside the vehicle
even if it has been locked, unless the child-
proof locks have been activated (Y page 65).
Open the door only when the traffic
conditions permit.
If the vehicle has been opened with the
SmartKey or KEYLESS-GO key, opening from
inside triggers the anti-theft alarm system.
Switch off the alarm (Y page 73).
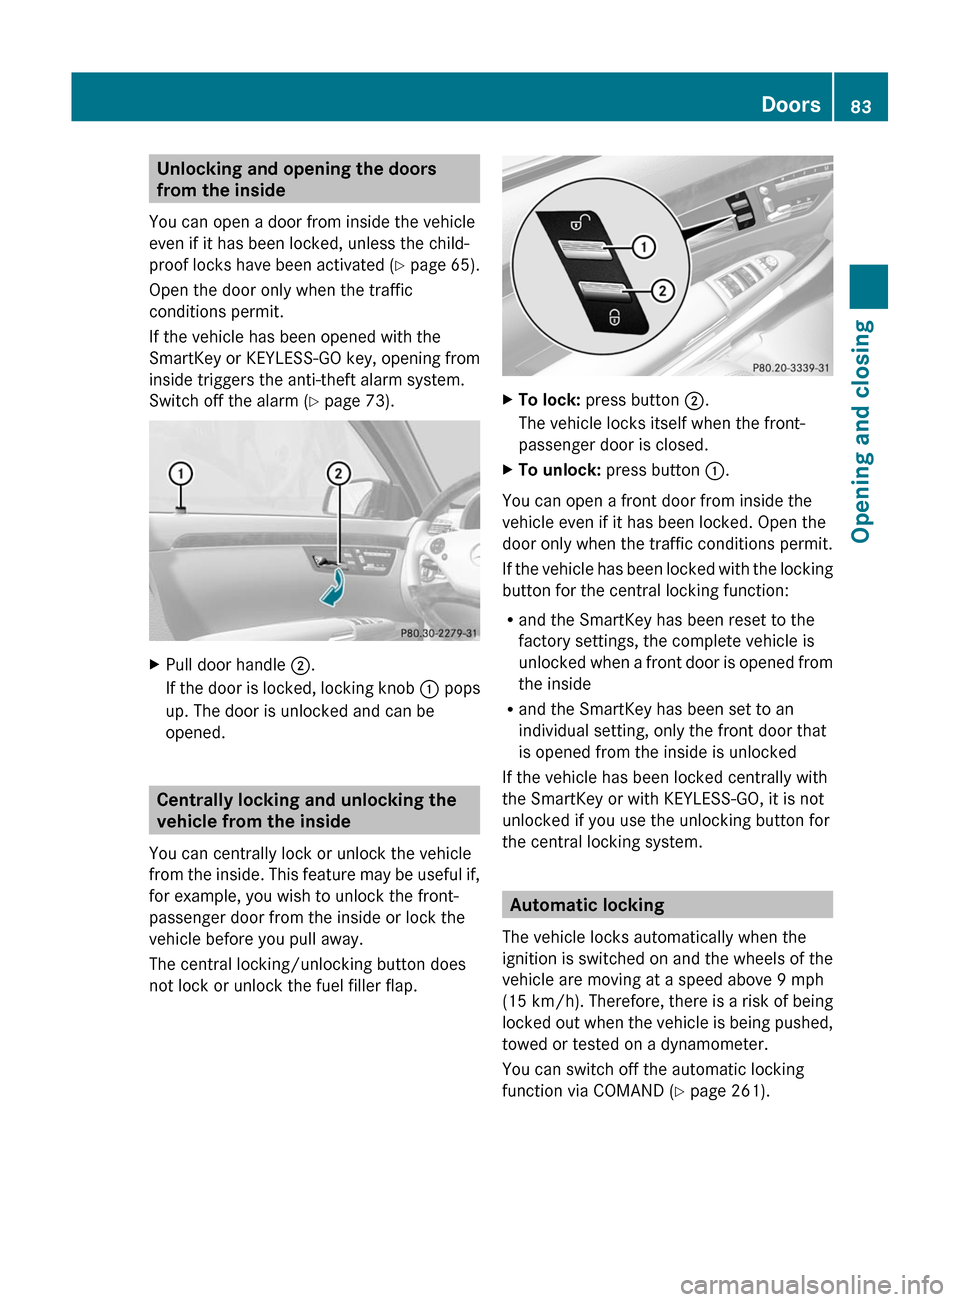
XPull door handle ;.
If the door is locked, locking knob : pops
up. The door is unlocked and can be
opened.
Centrally locking and unlocking the
vehicle from the inside
You can centrally lock or unlock the vehicle
from the inside. This feature may be useful if,
for example, you wish to unlock the front-
passenger door from the inside or lock the
vehicle before you pull away.
The central locking/unlocking button does
not lock or unlock the fuel filler flap.
XTo lock: press button ;.
The vehicle locks itself when the front-
passenger door is closed.
XTo unlock: press button :.
You can open a front door from inside the
vehicle even if it has been locked. Open the
door only when the traffic conditions permit.
If the vehicle has been locked with the locking
button for the central locking function:
Rand the SmartKey has been reset to the
factory settings, the complete vehicle is
unlocked when a front door is opened from
the inside
Rand the SmartKey has been set to an
individual setting, only the front door that
is opened from the inside is unlocked
If the vehicle has been locked centrally with
the SmartKey or with KEYLESS-GO, it is not
unlocked if you use the unlocking button for
the central locking system.
Automatic locking
The vehicle locks automatically when the
ignition is switched on and the wheels of the
vehicle are moving at a speed above 9 mph
(15 km/h). Therefore, there is a risk of being
locked out when the vehicle is being pushed,
towed or tested on a dynamometer.
You can switch off the automatic locking
function via COMAND (Y page 261).
Doors83Opening and closingZ
Page 113 of 524
The mirrors do not go into anti-glare mode if
reverse gear is engaged or the interior lighting
is switched on.
Parking position for the exterior
mirror on the front-passenger side
Setting and storing the parking position
You can position the front-passenger side
exterior mirror in such a way that you can see
the rear wheel on that side as soon as you
engage reverse gear. You can store this
position.
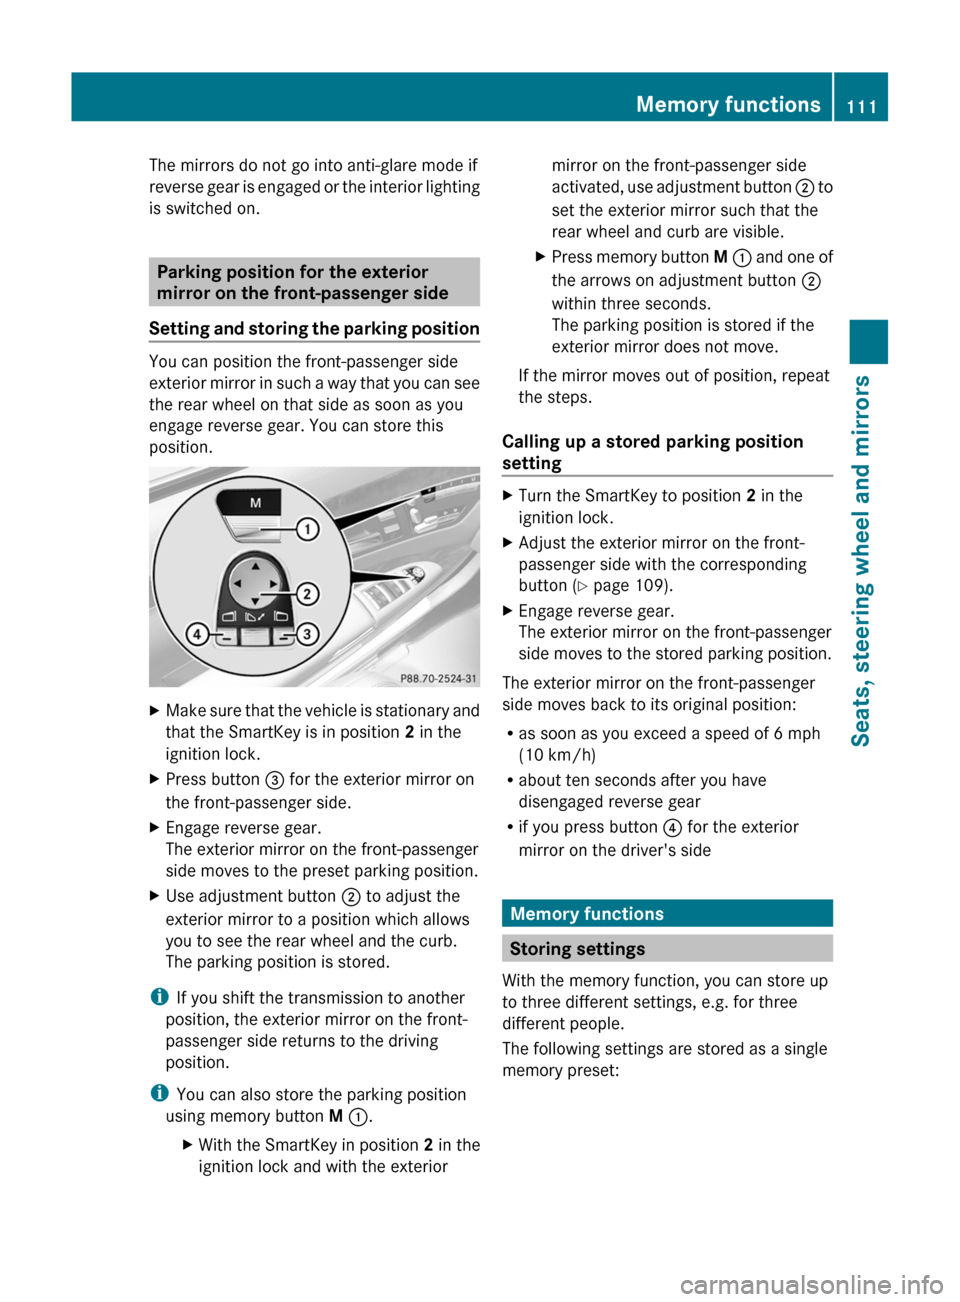
XMake sure that the vehicle is stationary and
that the SmartKey is in position 2 in the
ignition lock.
XPress button = for the exterior mirror on
the front-passenger side.
XEngage reverse gear.
The exterior mirror on the front-passenger
side moves to the preset parking position.
XUse adjustment button ; to adjust the
exterior mirror to a position which allows
you to see the rear wheel and the curb.
The parking position is stored.
iIf you shift the transmission to another
position, the exterior mirror on the front-
passenger side returns to the driving
position.
iYou can also store the parking position
using memory button M :.
XWith the SmartKey in position 2 in the
ignition lock and with the exterior
mirror on the front-passenger side
activated, use adjustment button ; to
set the exterior mirror such that the
rear wheel and curb are visible.
XPress memory button M : and one of
the arrows on adjustment button ;
within three seconds.
The parking position is stored if the
exterior mirror does not move.
If the mirror moves out of position, repeat
the steps.
Calling up a stored parking position
setting
XTurn the SmartKey to position 2 in the
ignition lock.
XAdjust the exterior mirror on the front-
passenger side with the corresponding
button (Y page 109).
XEngage reverse gear.
The exterior mirror on the front-passenger
side moves to the stored parking position.
The exterior mirror on the front-passenger
side moves back to its original position:
Ras soon as you exceed a speed of 6 mph
(10 km/h)
Rabout ten seconds after you have
disengaged reverse gear
Rif you press button ? for the exterior
mirror on the driver's side
Memory functions
Storing settings
With the memory function, you can store up
to three different settings, e.g. for three
different people.
The following settings are stored as a single
memory preset:
Memory functions111Seats, steering wheel and mirrorsZ
Page 116 of 524

Vehicle equipment
i This manual describes all the standard
and optional equipment of your vehicle
which was available at the time of
purchase. Country-specific differences are
possible. Bear in mind that your vehicle
may not feature all functions described
here. This also refers to safety-related
systems and functions.
Introduction
Operating safety
General notes
GRisk of accident and injury
Vehicles with HYBRID: ensure that you read
the "HYBRID" supplement. You may otherwise
fail to recognize dangers.
GWarning
Any alterations of electronic components or
software can cause malfunctions.
Radio, satellite radio, amplifier, DVD changer,
navigation module, telephone and Voice
Control systems are interconnected.
Therefore, if one of the components is not
operational, or has not been removed/
replaced properly, the function of other
components could be impaired.
Such conditions might seriously impair the
operating safety of your vehicle.
We recommend to have any service work on
electronic components carried out by an
authorized Mercedes-Benz Center.
GWarning
In order to avoid distraction which could lead
to an accident, the driver should enter system
settings while the vehicle is at a standstill, and
operate the system only when permitted by
road, weather and traffic conditions.
Bear in mind that at a speed of just 30 mph
(approximately 50 km/h), your car covers a
distance of 44 feet (approximately 14 m) every
second.
COMAND supplies you with information to
help you select your route more easily and
guide you conveniently and safely to your
destination. For safety reasons, we
encourage the driver to stop the vehicle in a
safe place before answering or placing a call,
or consulting the COMAND screen to read
navigational maps, instructions, or
downloaded information.GWarning
While the navigation system provides
directional assistance, the driver must remain
focused on safe driving behavior, especially
attention to traffic and street signs, and
should utilize the system’s audio cues while
driving.
The navigation system does not supply any
information on stop signs, yield signs, traffic
regulations or traffic safety rules. Their
observance always remains in the driver’s
personal responsibility. DVD maps do not
cover all areas nor all routes within an area.
This device complies with Part 15 of the FCC
Rules. Both of the following conditions must
be fulfilled to be approved for use:
(1) This device may not cause harmful
interference, and(2) This device must accept all external
interference, including interference that may
cause undesired operating problems.GWarning
Change or modification not expressly
approved by the party responsible for
compliance could void the user's authority to
operate this equipment.
! Note: This equipment has been tested
and found to comply with the limits for a
Class A digital device, pursuant to Part 15
of the FCC Rules. These limits are designed
to provide reasonable protection against
harmful interference when the equipment
114IntroductionCOMAND
Page 122 of 524

NaviAudioTelephoneVideoVehicleModeFM/AM radioVideo DVDECOMap orientationSatRadioAUXMulticontour
seat/lumbar
settingsPoint of interest
symbols on the mapDiscVideo offRear window
blindRoad signs on the
mapMemory cardEASY-ENTRY/
EXIT systemText information on
mapMUSIC
REGISTERExterior
lighting
delayed
switch-off timeO Speed Limit AssistMedia
InterfaceInterior
lighting
delayed
switch-offO Topographical
mapUSBAmbient
lightingO City viewRearO Automatic
mirror fold-in
functionO Freeway
informationAUXO Locator
lightingO Audio fadeoutAudio offO Automatic
lockingSIRIUS serviceO Interior
motion sensorMap versionO Tow-away
protectionO Trunk lid
opening height
restrictionSPLITVIEW
SPLITVIEW allows the driver and front
passenger to use separate COMAND
functions at the same time. Depending on the
viewing angle of the display (from the driver's
seat or from the front passenger seat), you
will see two different displays.
For example, the "Navi" function can be
viewed from the driver's side while the video120At a glanceCOMAND
Page 145 of 524

XSelect Time zone and press W to confirm.
A list of time zones appears. The # dot
indicates the current setting.
XSelect the time zone and press W to
confirm.
XTo switch automatic changeover on/
off: select Automatic summer/winter
time changeover or Automatic summer/
winter time changeover by turning
cVd the COMAND controller and press
W to confirm.
The # dot indicates the current setting.
Read-aloud settings
Setting the text reader speed
XSelect Vehicle by turning cVd the
COMAND controller and press W to
confirm.
XSelect System and press W to confirm.XSelect Text reader and press W to
confirm.
XSelect Set text reader speed and press
W to confirm.
A list appears. The # dot indicates the
current setting.
XSelect a setting by turning cVd the
COMAND controller and press W to
confirm.
Voice Control System settings
Opening/closing the help window
The help window shows you additional
information during individualization and voice
control operation.
XSelect Vehicle in the main function bar by
turning cVd the COMAND controller and
press W to confirm.
XSelect System by turning cVd the
COMAND controller and press W to
confirm.
XSelect Voice Control by turning cVd the
COMAND controller and press W to
confirm.
XSelect Help window and press W to
confirm.
You have switched the help window on
O or off ª.
Individualization
Introduction
Using individualization, you can fine tune the
Voice Control System to your own voice and
thus improve voice recognition. This means
that other users' voices will not be recognized
as easily and, therefore, this function can be
switched off.
Individualization comprises two parts and
takes approximately five minutes. It consists
of training the system to recognize a certain
number of digit sequences and voice
commands.
Starting new individualization
Individualization can only be started when the
vehicle is stationary. Before starting, switch
off all devices or functions which could
interfere, such as the radio or the navigation
system. After starting the session, the system
System settings143COMANDZ
Page 150 of 524
System language settings
This function allows you to determine the
language for the menu displays and the
navigation announcements. The selected
language affects the characters available for
entry.
If you change the system language, the
language for Voice Control System will be
also be changed. If the selected language is
not supported by Voice Control System,
"English" will be selected.XSelect Vehicle by turning cVd the
COMAND controller and press W to
confirm.XSelect System and press W to confirm.XSelect Language and press W to confirm.
You see the language list. The # dot
indicates the current setting.XSelect the language by turning cVd the
COMAND controller and press W to
confirm.
COMAND loads the selected language and
sets it.
i In Arabic as well as some other countries,
the selection option English (Arabic
map) is available when setting the system
language. This language setting shows the
menus and input data in COMAND in
English and the map in Arabic for certain
countries. The destination is entered in
English.
Reset function
You can reset COMAND to the factory
settings. Amongst other things, this will
delete all personal data (e.g. station presets,
address book entries, entries in the
destination memory and in the list of previous
destinations in the navigation system).
Resetting is recommended before selling or
transferring ownership of your vehicle, for
example.
XSelect Vehicle in the main function bar by
turning cVd the COMAND controller and
press W to confirm.XSelect System by turning cVd the
COMAND controller and press W to
confirm.XSelect Reset and press W to confirm.
A prompt appears asking whether you wish
to reset.XSelect Yes or No and press W to confirm.
If you select No, the process will be aborted.
If you select Yes, another prompt appears
asking whether you really wish to reset.XSelect Yes or No and press W to confirm.
If you select Yes, a message will be shown.
COMAND is reset and restarted.
If you select No, the process will be aborted.
Navigation
Vehicle equipment
i These Operating Instructions describe all
standard and optional equipment available
for your vehicle at the time of purchase.
Please note that your vehicle may not be
equipped with all features described.
Introduction
Important safety notes
GWarning
For safety reasons, only enter a destination
when the vehicle is stationary. When the
vehicle is in motion, a passenger should enter
the destination. Study manual and select
route before driving.
Bear in mind that at a speed of just 30 mph
(approximately 50 km/h), your vehicle is
covering a distance of 44 feet (approximately
14 m) every second.
148NavigationCOMAND
Page 151 of 524
COMAND calculates the route to the
destination without taking account of the
following:
R Traffic lights
R Stop and right-of-way-signs
R Lane merging
R Parking or stopping prohibited areas
R Other road and traffic rules and regulations
R Narrow bridgesGWarning
COMAND may give incorrect navigation
commands if the data in the digital map does
not correspond with the actual road/traffic
situation. Digital maps do not cover all areas
nor all routes within an area. For example, if
the traffic routing has been changed or the
direction of a one-way road has been
reversed.
For this reason, you must always observe
applicable road and traffic rules and
regulations during your journey. Road and
traffic rules and regulations always have
priority over the navigation commands
generated by the system.
GWarning
Navigation announcements are intended to
direct you while driving without diverting your
attention from the road and driving.
Please always use this feature instead of
consulting the map display for directions.
Looking at the icons or map display can
distract you from traffic conditions and
driving, and increase the risk of an accident.
General information
Operational readiness of the navigation
system
The navigation system must determine the
position of the vehicle before first use or
whenever operational status is restored.
Therefore, you may have to drive for a while
before precise route guidance is possible.
GPS reception
Among other things, correct functioning of
the navigation system depends on GPS
reception. In certain situations, GPS
reception may be impaired, there may be
interference or there may be no reception at
all, e.g. in tunnels or parking garages.
Input restriction
On vehicles for certain countries, there is a
restriction on entering data.
The restriction is active at vehicle speeds
above approximately 3 mph (5 km/h). The
restriction is deactivated as soon as the
speed falls below 2 mph (3 km/h).
When the restriction is active, certain entries
cannot be made. This will be indicated by the
fact that certain menu items are grayed out
and cannot be selected.
The following entries are not possible, for
example:
R entering the destination city and street
R entering a destination via the map
R entering in the vicinity of a city or via a
name search
R editing entries
R direct entry using the number keypad
Other entries are still possible, such as
entering points of interest in the vicinity of the
destination or current position.
Switching on navigation modeXPress the S function button once or
twice.
or
XSelect Navi in the main function bar by
sliding ZV and turning cVd the COMAND
controller and press W to confirm.
In both cases, you will see the map either
with or without the menu shown.Navigation149COMANDZ
Page 167 of 524
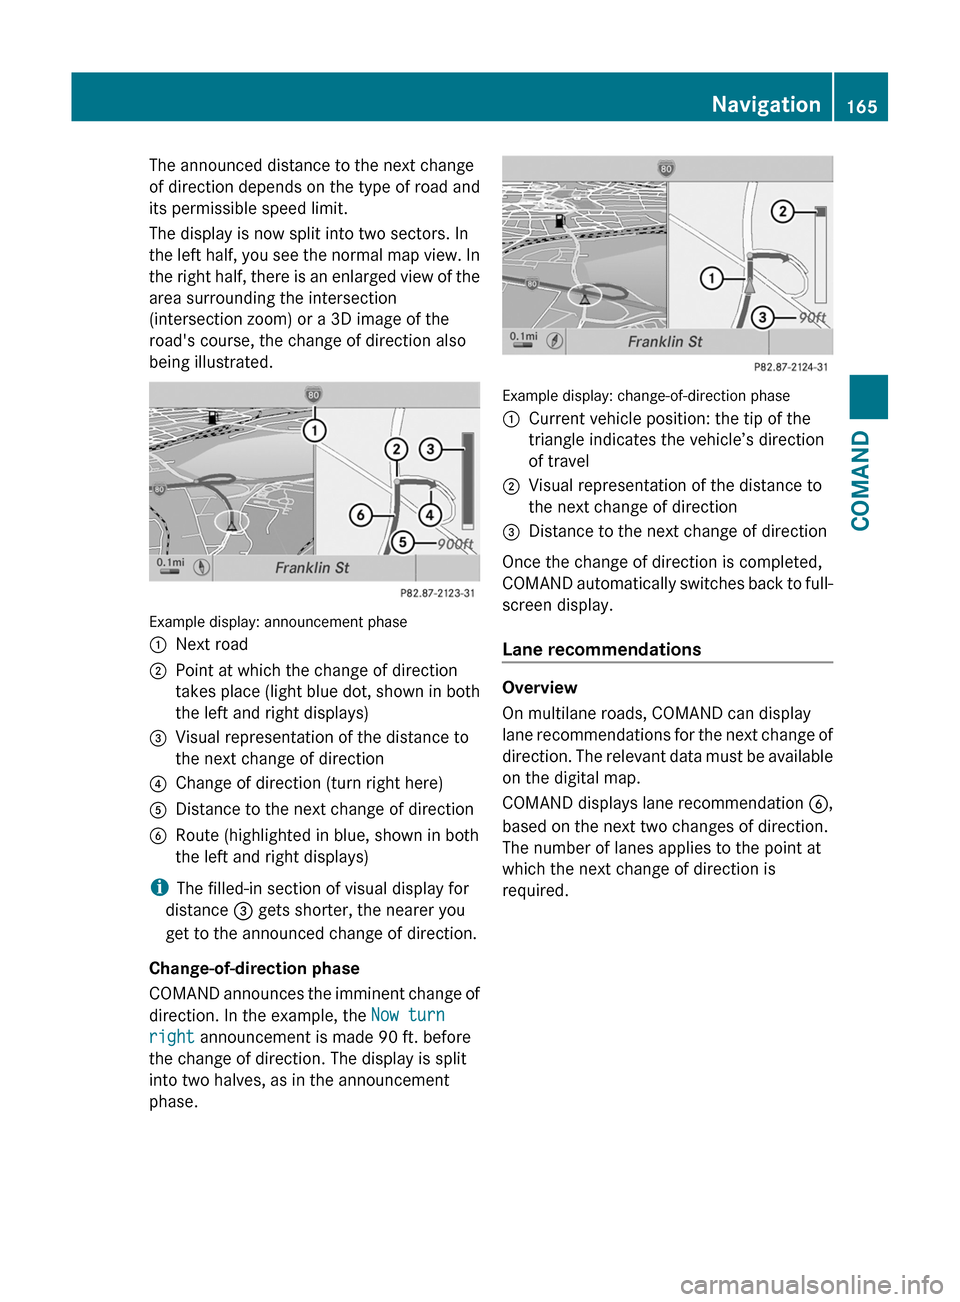
The announced distance to the next change
of direction depends on the type of road and
its permissible speed limit.
The display is now split into two sectors. In
the left half, you see the normal map view. In
the right half, there is an enlarged view of the
area surrounding the intersection
(intersection zoom) or a 3D image of the
road's course, the change of direction also
being illustrated.
Example display: announcement phase
:Next road;Point at which the change of direction
takes place (light blue dot, shown in both
the left and right displays)
=Visual representation of the distance to
the next change of direction
?Change of direction (turn right here)ADistance to the next change of directionBRoute (highlighted in blue, shown in both
the left and right displays)
iThe filled-in section of visual display for
distance = gets shorter, the nearer you
get to the announced change of direction.
Change-of-direction phase
COMAND announces the imminent change of
direction. In the example, the Now turn
right announcement is made 90 ft. before
the change of direction. The display is split
into two halves, as in the announcement
phase.
Example display: change-of-direction phase
:Current vehicle position: the tip of the
triangle indicates the vehicle’s direction
of travel
;Visual representation of the distance to
the next change of direction
=Distance to the next change of direction
Once the change of direction is completed,
COMAND automatically switches back to full-
screen display.
Lane recommendations
Overview
On multilane roads, COMAND can display
lane recommendations for the next change of
direction. The relevant data must be available
on the digital map.
COMAND displays lane recommendation B,
based on the next two changes of direction.
The number of lanes applies to the point at
which the next change of direction is
required.
Navigation165COMANDZ