2011 MERCEDES-BENZ S-Class Rear mirror
[x] Cancel search: Rear mirrorPage 430 of 524
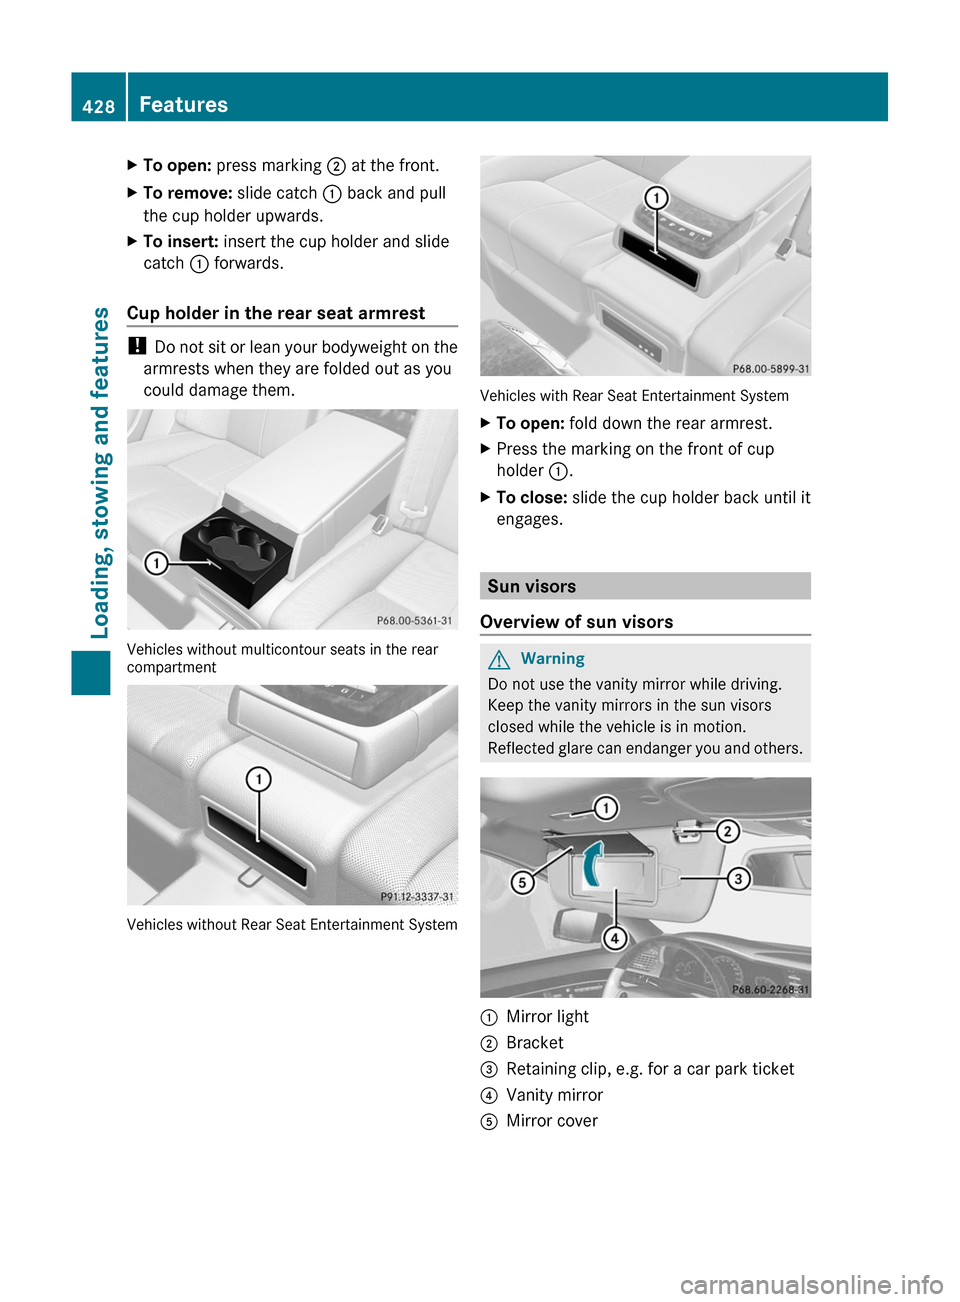
XTo open: press marking ; at the front.XTo remove: slide catch : back and pull
the cup holder upwards.
XTo insert: insert the cup holder and slide
catch : forwards.
Cup holder in the rear seat armrest
! Do not sit or lean your bodyweight on the
armrests when they are folded out as you
could damage them.
Vehicles without multicontour seats in the rearcompartment
Vehicles without Rear Seat Entertainment System
Vehicles with Rear Seat Entertainment System
XTo open: fold down the rear armrest.XPress the marking on the front of cup
holder :.
XTo close: slide the cup holder back until it
engages.
Sun visors
Overview of sun visors
GWarning
Do not use the vanity mirror while driving.
Keep the vanity mirrors in the sun visors
closed while the vehicle is in motion.
Reflected glare can endanger you and others.
:Mirror light;Bracket=Retaining clip, e.g. for a car park ticket?Vanity mirrorAMirror cover428FeaturesLoading, stowing and features
Page 431 of 524
Vanity mirror in the sun visor
Mirror light : only functions if the sun visor
is clipped into retainer ; and mirror cover
A has been folded up.
Glare from the side
XFold down the sun visor.XPull sun visor out of retainer ;.XSwing the sun visor to the side.
Rear window roller sunblind
Important safety information
GWarning
When leaving the vehicle, always remove the
SmartKey from the ignition lock. Always take
the SmartKey with you and lock the vehicle.
Do not leave children unattended in the
vehicle, even if they are secured in a child
restraint system, or with access to an
unlocked vehicle. A child's unsupervised
access to a vehicle could result in an accident
and/or serious personal injury. The children
could:
Rinjure themselves on parts of the vehicle
Rbe seriously or fatally injured through
excessive exposure to extreme heat or cold
Rinjure themselves or cause an accident with
vehicle equipment that can be operated
even if the SmartKey is removed from the
ignition lock or removed from the vehicle,
such as seat adjustment, steering wheel
adjustment, or the memory function
If children open a door, they could injure other
persons or get out of the vehicle and injure
themselves or be injured by following traffic.
Do not expose the child restraint system to
direct sunlight. The child restraint system's
metal parts, for example, could become very
hot, and the child could be burned on these
parts.
GWarning!
When operating the rear window sunshade
make sure there is no danger of anyone being
harmed by the extending or retracting
procedure.
The extending or retracting procedure can be
immediately halted by briefly pressing rear
window sunshade switch. To reverse direction
of movement, press rear window sunshade
switch again.
Extending/retracting from the driver's
seat
! Make sure that the roller sunblind can
move freely. Otherwise, the roller sunblind
or other objects could be damaged.
At temperatures below -4 ‡ (-20 †), the roller
sunblind cannot be operated.
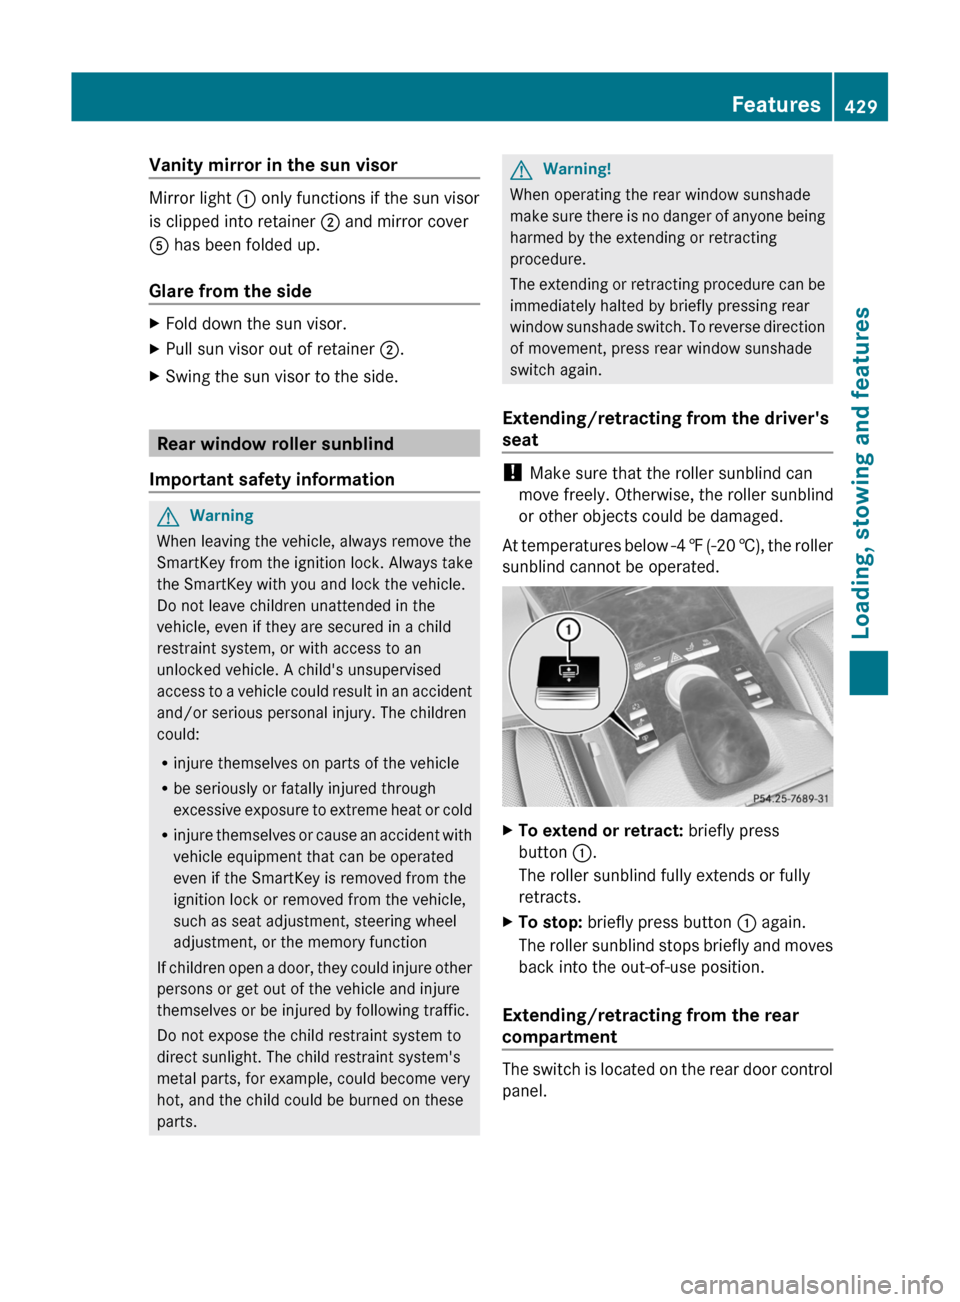
XTo extend or retract: briefly press
button :.
The roller sunblind fully extends or fully
retracts.
XTo stop: briefly press button : again.
The roller sunblind stops briefly and moves
back into the out-of-use position.
Extending/retracting from the rear
compartment
The switch is located on the rear door control
panel.
Features429Loading, stowing and featuresZ
Page 441 of 524
Stolen Vehicle Recovery Services
If your vehicle has been stolen:
XContact the police.
The police will issue an incident report. This
report has a number.XThis number will be forwarded to the
Response Center together with your PIN.
The Response Center will then attempt to
covertly contact the mbrace system. The
Response Center contacts you and the
local law enforcement authority if the
vehicle is located. However, only the law
enforcement authority is informed of the
location of the vehicle.
i If the anti-theft alarm system remains
activated for longer than thirty seconds,
mbrace is automatically connected to the
Customer Assistance Center.
Garage door opener
Important safety notes
The remote control integrated in the rear-view
mirror allows you to operate up to three
different door and gate systems.
i Certain garage door openers are not
compatible with the integrated remote
control. If you experience problems when
programming the integrated remote
control, contact an authorized Mercedes-
Benz Center or call the following service
hotlines:
R USA: Mercedes-Benz Customer
Assistance Center under
1-800-FOR-MERCedes
R Canada: Customer Service under
1-800-387-0100
GWarning
Before programming the integrated remote
control to a garage door opener or gate
operator, make sure people and objects are
out of the way of the device to prevent
potential harm or damage. When
programming a garage door opener, the door
moves up or down. When programming a gate
operator, the gate opens or closes.
Do not use the integrated remote control with
any garage door opener that lacks safety stop
and reverse features as required by U.S.
federal safety standards (this includes any
garage door opener model manufactured
before April 1, 1982). A garage door that
cannot detect an object - signaling the door
to stop and reverse - does not meet current
U.S. federal safety standards.
When programming a garage door opener,
park vehicle outside the garage.
Do not run the engine while programming the
integrated remote control. Inhalation of
exhaust gas is hazardous to your health. All
exhaust gas contains carbon monoxide (CO),
and inhaling it can cause unconsciousness
and possible death. All exhaust gas contains
carbon monoxide (CO), and inhaling it can
cause unconsciousness and possible death.
i USA only:
This device complies with part 15 of the
FCC requirements. Operation is subject to
the following two conditions:
1. The device must not cause harmful
interference.
2. The device must withstand any
interference received, including
interference that may cause undesired
operation.
Unauthorized modification of this device
could void the device's operating permit.
i Canada only:
This device complies with the RSS-210
requirements of Industry Canada.
Operation is subject to the following two
conditions:
1. The device must not cause harmful
interference.
2. The device must withstand any
interference received, includingFeatures439Loading, stowing and featuresZ
Page 442 of 524
interference that may cause undesired
operation.
Unauthorized modification of this device
could void the user's authority to legally
operate the device.
Programming the remote control
Programming
GWarning!
Only press the transmitter button on the
integrated remote control if there are no
persons or objects present within the sweep
of the garage door. People could otherwise be
injured by the movement of the door.
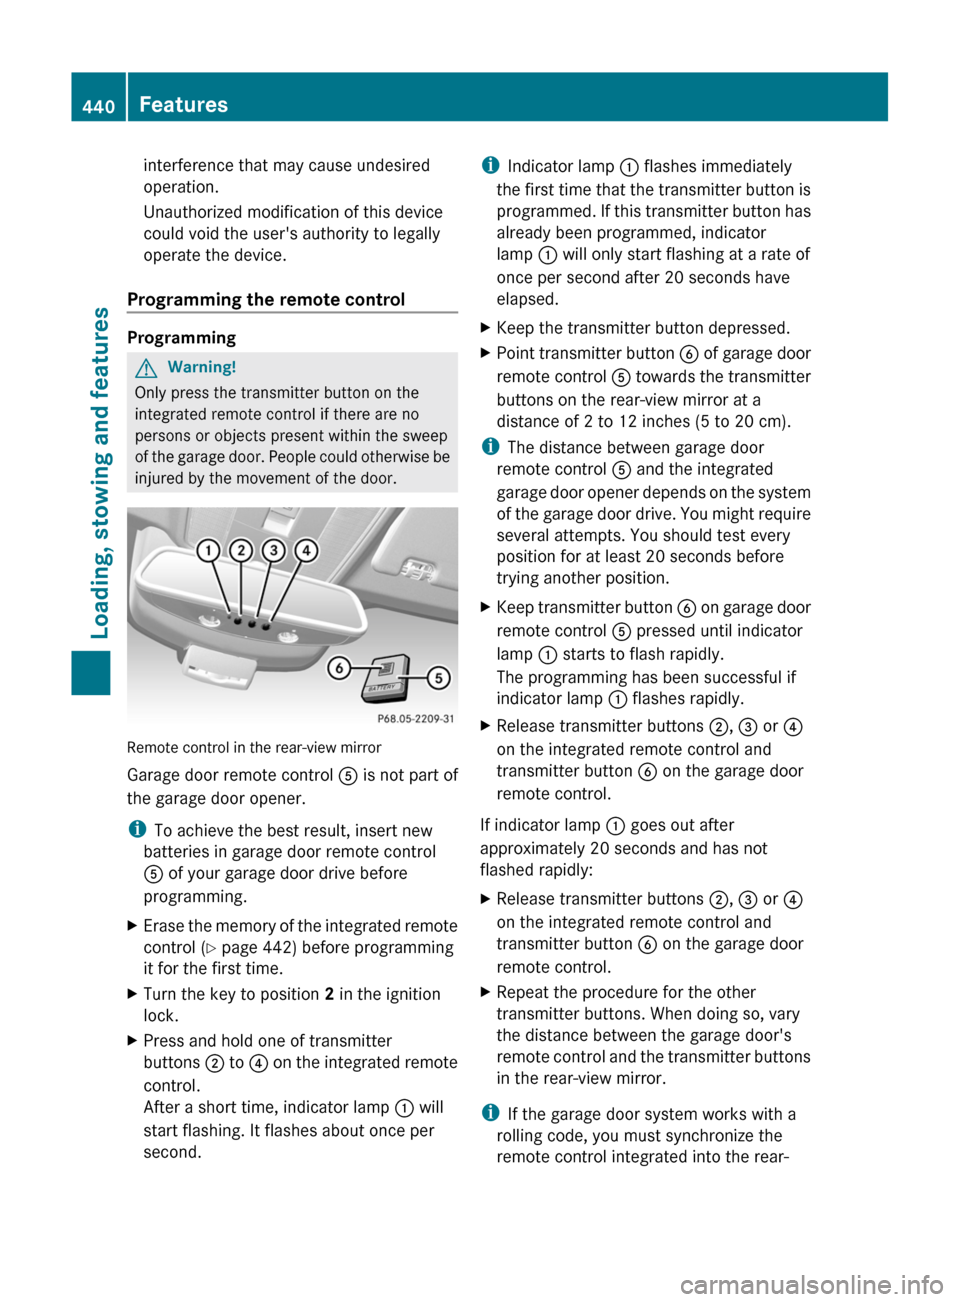
Remote control in the rear-view mirror
Garage door remote control A is not part of
the garage door opener.
iTo achieve the best result, insert new
batteries in garage door remote control
A of your garage door drive before
programming.
XErase the memory of the integrated remote
control (Y page 442) before programming
it for the first time.
XTurn the key to position 2 in the ignition
lock.
XPress and hold one of transmitter
buttons ; to ? on the integrated remote
control.
After a short time, indicator lamp : will
start flashing. It flashes about once per
second.
iIndicator lamp : flashes immediately
the first time that the transmitter button is
programmed. If this transmitter button has
already been programmed, indicator
lamp : will only start flashing at a rate of
once per second after 20 seconds have
elapsed.
XKeep the transmitter button depressed.XPoint transmitter button B of garage door
remote control A towards the transmitter
buttons on the rear-view mirror at a
distance of 2 to 12 inches (5 to 20 cm).
iThe distance between garage door
remote control A and the integrated
garage door opener depends on the system
of the garage door drive. You might require
several attempts. You should test every
position for at least 20 seconds before
trying another position.
XKeep transmitter button B on garage door
remote control A pressed until indicator
lamp : starts to flash rapidly.
The programming has been successful if
indicator lamp : flashes rapidly.
XRelease transmitter buttons ;, = or ?
on the integrated remote control and
transmitter button B on the garage door
remote control.
If indicator lamp : goes out after
approximately 20 seconds and has not
flashed rapidly:
XRelease transmitter buttons ;, = or ?
on the integrated remote control and
transmitter button B on the garage door
remote control.
XRepeat the procedure for the other
transmitter buttons. When doing so, vary
the distance between the garage door's
remote control and the transmitter buttons
in the rear-view mirror.
iIf the garage door system works with a
rolling code, you must synchronize the
remote control integrated into the rear-
440FeaturesLoading, stowing and features
Page 443 of 524
view mirror with the garage door system
receiver after programming.
You will find further information in the
garage door opening system's operating
instructions, e.g. the sections on
"Synchronizing the transmitter" or
"Registering a new transmitter". You can
also call the hotline mentioned above.
Notes on programming the remote
control
Canadian radio frequency laws require a
"break" (or interruption) of the transmission
signals a few seconds after broadcasting.
Therefore, these signals may not last long
enough for the integrated remote control to
recognize the signal during programming.
Comparable with Canadian law, some U.S.
garage door openers also have a built-in
"interruption".
If you live in Canada or have difficulties
programming the garage door opener
(regardless of where you live) when using the
programming steps (see above), proceed as
follows:XPress transmitter button ( ;, = or ?) and
hold it down during the following steps until
the setup has been completed
successfully.XAt the same time, press transmitter button
B of the garage door remote control for
two seconds, then release it for two
seconds, then press it again for two
seconds.XRepeat this sequence on transmitter
button B of the garage door remote
control until the frequency signal has been
saved.XIf the setup procedure is successful,
indicator lamp : flashes once slowly and
goes out after a few seconds.XContinue with the other programming
steps (see above).Problems when programming
If you have problems when programming the
integrated remote control, please note the
following:
R Check the transmitter frequency of garage
door remote control A (which can usually
be found on the rear of the remote control).
The integrated remote control is
compatible with devices that operate at
frequencies between 280 and 390 MHz.
R Replace the batteries in garage door
remote control A. This increases the
likelihood of garage door remote
control A sending a strong and precise
signal to the integrated remote control on
the rear-view mirror.
R When programming, hold garage door
remote control A at varying distances and
angles from the transmitter button which
you are programming. Try different angles
at a distance of 2 to 12 inches (5 to 30 cm)
or the same angle at different distances.
R If there is another garage door remote
control for the same device, perform the
programming steps again using the remote
control. Before performing these steps,
make sure that new batteries have been
installed in the garage door remote control.
R Align the antenna cable of the garage door
opener unit. This can improve signal
reception/transmission.
Opening or closing the garage door
Once programmed, the integrated remote
control will assume the function of the garage
door system's remote control. Please also
read the operating instructions for the garage
door system.
XTurn the SmartKey to position 2 in the
ignition lock.XPress transmitter button ;, = or ? in the
overhead control panel that you have
programmed to operate the garage door.
Garage door system with fixed code:
indicator lamp : lights up continuously.Features441Loading, stowing and featuresZ
Page 518 of 524

1.34 fl oz (40 ml) MB SummerFit to 1 gal
(4.0 l) of water.XAt temperatures below freezing: add 1
part MB SummerFit to 100 parts washer
fluid, e.g. 1.34 fl oz (40 ml) MB SummerFit
to 1 gal (4.0 l) of water.
Vehicle data
Vehicle data, S 550 CGI
BlueEFFICIENCY
The data quoted here refers specifically to a
vehicle with standard equipment. Contact an
authorized Mercedes-Benz Center for the
data for all vehicle variants and trim levels.
Vehicle dimensions, S 550 BlueEFFICIENCYVehicle length206.5 in (5246 mm)Vehicle width
including exterior
mirrors83.5 in (2120 mm)Vehicle height58.2 in (1479 mm)Wheelbase124.6 in (3165 mm)Front track63.0 in (1600 mm)Rear track63.3 in (1606 mm)Ground clearance5.2 in (131 mm)Turning circle40.0 ft (12.2 m)Vehicle weight, S 550 BlueEFFICIENCYMaximum roof
loadMaximum 220 lb
(100 kg)Maximum trunk
loadMaximum 220 lb
(100 kg)Vehicle data, S 550 CGI 4MATIC
BlueEFFICIENCY
The data quoted here refers specifically to a
vehicle with standard equipment. Contact an
authorized Mercedes-Benz Center for the
data for all vehicle variants and trim levels.Vehicle dimensions, S 550 4MATIC BlueEFFICIENCYVehicle length206.5 in (5246 mm)Vehicle width
including exterior
mirrors83.5 in (2120 mm)Vehicle height58.2 in (1479 mm)Wheelbase124.6 in (3165 mm)Front track63.0 in (1600 mm)Rear track63.3 in (1606 mm)Ground clearance5.2 in (126 mm)Turning circle40.0 ft (12.2 m)Vehicle weight, S 550 4MATIC BlueEFFICIENCYMaximum roof
loadMaximum 220 lb
(100 kg)Maximum trunk
loadMaximum 220 lb
(100 kg)
Vehicle data, S 600
The data quoted here refers specifically to a
vehicle with standard equipment. Contact an
authorized Mercedes-Benz Center for the
data for all vehicle variants and trim levels.
Vehicle dimensions, S 600Vehicle length206.5 in (5246 mm)Vehicle width
including exterior
mirrors83.5 in (2120 mm)516Vehicle dataTechnical data
Page 519 of 524

Vehicle dimensions, S 600Vehicle height58.2 in (1479 mm)Wheelbase124.6 in (3165 mm)Front track63.0 in (1600 mm)Rear track63.3 in (1606 mm)Ground clearance5.2 in (133 mm)Turning circle40.0 ft (12.2 m)Vehicle weight, S 600Maximum roof
loadMaximum 220 lb
(100 kg)Maximum trunk
loadMaximum 220 lb
(100 kg)
Vehicle data, S 63 AMG
The data quoted here refers specifically to a
vehicle with standard equipment. Contact an
authorized Mercedes-Benz Center for the
data for all vehicle variants and trim levels.
Vehicle dimensions, S 63 AMGVehicle length206.8 in (5252 mm)Vehicle width
including exterior
mirrors83.5 in (2120 mm)Vehicle height58.7 in (1490 mm)Wheelbase124.6 in (3165 mm)Front track63.0 in (1600 mm)Rear track63.3 in (1606 mm)Ground clearance5.4 in (136 mm)Turning circle40.1 ft (12.22 m)Vehicle weight, S 63 AMGMaximum roof
loadMaximum 220 lb
(100 kg)Maximum trunk
loadMaximum 220 lb
(100 kg)
Vehicle data, S 65 AMG
The data quoted here refers specifically to a
vehicle with standard equipment. Contact an
authorized Mercedes-Benz Center for the
data for all vehicle variants and trim levels.
Vehicle dimensions, S 65 AMGVehicle length206.8 in (5252 mm)Vehicle width
including exterior
mirrors83.5 in (2120 mm)Vehicle height58.7 in (1490 mm)Wheelbase124.6 in (3165 mm)Front track63.0 in (1600 mm)Rear track63.3 in (1606 mm)Ground clearance5.4 in (136 mm)Turning circle40.1 ft (12.22 m)Vehicle weight, S 65 AMGMaximum roof
loadMaximum 220 lb
(100 kg)Maximum trunk
loadMaximum 220 lb
(100 kg)Vehicle data517Technical dataZ