2011 MERCEDES-BENZ S-Class warning lights
[x] Cancel search: warning lightsPage 277 of 524

High-beam headlampsXTo switch on the high-beam headlamps:
turn the key in the ignition lock to position
2 or start the engine.
XTurn the light switch to L.XPress the combination switch beyond the
pressure point in the direction of
arrow :.
The K indicator lamp in the instrument
cluster lights up.
XTo switch off the high-beam
headlamps: move the combination switch
back to its normal position.
The K indicator lamp in the instrument
cluster goes out.
Adaptive Highbeam Assist
GWarning!
The Adaptive Highbeam Assist is only an aid
intended to support you while driving. The
driver is and remains responsible for proper
vehicle lighting in accordance with the
prevailing light, sight and traffic conditions.
The system may be impaired or unavailable
when
Rvisibility is poor, e.g. due to snow, rain, fog,
or heavy spray
Rthe optical sensor area of the windshield is
dirty, fogged up, or covered by a sticker for
example
The system cannot recognize the following
road users:
RRoad users without a lighting system of
their own, e.g. pedestrians
RRoad users with dim lighting of their own,
e.g. cyclists
RRoad users whose lighting is obstructed,
e.g. road users behind a guardrail
RIn some seldom cases, even road users with
a lighting system of their own may be
recognized too late or not at all.
The automatic high-beam headlamps will then
not be deactivated or it will be activated in
spite of preceding or oncoming road users.
This could endanger you and/or others and
cause an accident. Always pay close attention
to the traffic situation and switch off the high
beam manually if necessary.
You can use this function to set the
headlamps to change between low beam and
high beam automatically. The system
recognizes vehicles with their lights on, either
approaching from the opposite direction or
traveling in front of your vehicle, and
consequently switches the headlamps from
high beam to low beam.
The system automatically adapts the low-
beam headlamp range depending on the
distance to the other vehicle. Once the
system no longer detects any other vehicles,
it reactivates the high-beam headlamps.
The system's optical sensor is located behind
the windshield near the overhead control
panel.
XTo activate: activate the Adaptive
Highbeam Assist function using the on-
board computer (Y page 377).
XTurn the light switch to c.Exterior lighting275Lights and windshield wipersZ
Page 278 of 524

XPress the combination switch beyond the
pressure point in the direction of arrow :
(Y page 274).
When the low-beam headlamps are
switched on, the _ indicator lamp in the
instrument cluster lights up.
If you are driving at speeds above
approximately 28 mph (45 km/h):
the headlamp range is set automatically
depending on the distance between the
vehicle and other road users.
If you are driving at speeds above
approximately 35 mph (55 km/h) and no
other road users are detected:
the high-beam headlamps are switched on
automatically. The K indicator lamp in
the instrument cluster also lights up.
If you are driving at speeds below
approximately 30 mph (45 km/h) or other
road users are detected or the roads are
illuminated sufficiently:
the high-beam headlamps are switched off
automatically. The K indicator lamp in
the instrument cluster goes out. The _
indicator lamp in the instrument cluster
stays on.
XTo deactivate: move the combination
switch back to its normal position.
The _ indicator lamp in the instrument
cluster goes out.
High-beam flasher
XTo switch on: turn the key in the ignition
lock to position 1 or 2 or start the engine.
XPull the combination switch briefly in the
direction of arrow =.Hazard warning lamps
The hazard warning lamps automatically
switch on if:
Ran air bag is deployed.
Rthe vehicle decelerates rapidly from a
speed of more than 45 mph (70 km/h) and
comes to a standstill.
XTo switch on the hazard warning lamps:
press button :.
All turn signals flash. If you now switch on
a turn signal using the combination switch,
only the turn signal lamp on the
corresponding side of the vehicle will flash.
XTo switch off the hazard warning
lamps: press button :.
The hazard warning lamp switches off
automatically after full brake application if the
vehicle then reaches a speed of above 6 mph
(10 km/h).
iThe hazard warning lamps still operate if
the ignition is switched off.
Headlamp cleaning system
The headlamps are cleaned automatically if
the "Wipe with washer fluid" function is
operated ten times while the lights are on and
the engine is running (Y page 281). When you
switch off the ignition, the automatic
headlamp cleaning system is reset and
counting is resumed from 0.
276Exterior lightingLights and windshield wipers
Page 280 of 524

Switch the reading lamp off=Interior lighting
Interior lighting control
Important notes
In order to prevent the vehicle's battery from
discharging, the interior lighting functions are
automatically deactivated after some time
except for when the key is in position 2 in the
ignition lock.
Automatic interior lighting control
XTo switch on/off: press the | button.
The OFF indicator lamp shows whether the
automatic interior lighting control is
deactivated (indicator lamp on) or
activated (indicator lamp off).
The interior lighting automatically switches
on if you:
R unlock the vehicle
R open a door
R remove the key from the ignition lock
The interior light is activated for a short while
when the key is removed from the ignition
lock. You can activate this delayed switch-off
using COMAND ( Y page 259).
Manual interior lighting control
XTo switch the front interior lighting on/
off: press the c button.XTo switch the rear interior lighting on/
off: press the u button.XTo switch the reading lamps on/off:
press the p button.Changing bulbs
Important safety notes
Xenon bulbs
If your vehicle is equipped with Xenon bulbs,
you can recognize this by the following: the
cone of light from the Xenon bulbs moves
from the top to the bottom and back again
when you start the engine. For this to be
observed, the lights must be switched on
before starting the engine.
GWarning
Xenon bulbs carry a high voltage. You could
get an electric shock and be seriously or even
fatally injured if you touch the electric
contacts on Xenon bulbs. Therefore, never
remove the cover from Xenon bulbs.
Do not change Xenon bulbs yourself, but have
them replaced at a qualified specialist
workshop which has the necessary specialist
knowledge and tools to carry out the work
required.
Mercedes-Benz recommends that you use an
authorized Mercedes-Benz Center for this
purpose. In particular, work relevant to safety
or on safety-related systems must be carried
out at a qualified specialist workshop.
Bulbs and lamps are an important aspect of
vehicle safety. You must therefore make sure
that these function correctly at all times.
Have the headlamp setting checked regularly.
Other bulbs
GWarning!
Bulbs and lamps can be very hot. You should
therefore allow them to cool down before you
change them. Otherwise, you could be burned
if you touch them.
Keep bulbs out of the reach of children.
Otherwise, they could damage the bulbs, for
example, and injure themselves.
278Changing bulbsLights and windshield wipers
Page 283 of 524

Windshield wipers
Switching the windshield wipers on/
off
GWarning!
Wiper blades are components that are subject
to wear and tear. Replace the wiper blades
twice a year, preferably in the spring and fall.
Otherwise the windshield will not be wiped
properly. As a result, you may not be able to
observe surrounding traffic conditions and
could cause an accident.
! Do not operate the windshield wipers
when the windshield is dry, as this could
damage the wiper blades. Moreover, dust
that has collected on the windshield can
scratch the glass if wiping takes place when
the windshield is dry.
! If the windshield wipers leave smears on
the windscreen after the vehicle has been
washed in an automatic car wash, wax or
other residues may be the reason for this.
Clean the windshield using washer fluid
after washing the vehicle in an automatic
car wash.
Combination switch
1$ Windshield wipers off2Ä Intermittent wipe, low173Å Intermittent wipe, high184° Continuous wipe, slow5¯ Continuous wipe, fastBí Single wipe/ î to wipe the
windshield using washer fluid
XSwitch the ignition on.XTurn the combination switch to the
corresponding position.
! Intermittent wiping with rain sensor: due
to optical influences and the windshield
becoming dirty in dry weather conditions,
the windshield wipers may be activated
inadvertently. This could then damage the
windshield wiper blades or scratch the
windshield.
For this reason, you should always switch
off the windshield wipers in dry weather.
In the Ä or Å position, the appropriate
wiping frequency is automatically set
according to the intensity of the rain. In
the Å position, the rain sensor is more
sensitive than in the Ä position, causing
the windshield wipers to wipe more
frequently.
Replacing the wiper blades
Important safety notes
GWarning
For safety reasons, switch off the windshield
wipers and remove the key from the ignition
lock before changing the wiper blades
(vehicles with KEYLESS-GO: make sure that
the on-board electronics are in state 0).
Otherwise, the wiper motor could be switched
on suddenly and cause injury.
! To avoid damaging the wiper blades,
make sure that you touch only the wiper
arm of the wiper.
! Never open the hood if a windshield wiper
arm has been folded away from the
windshield.
17Rain sensor set to low sensitivity.18Rain sensor set to high sensitivity.
Windshield wipers281Lights and windshield wipersZ
Page 290 of 524
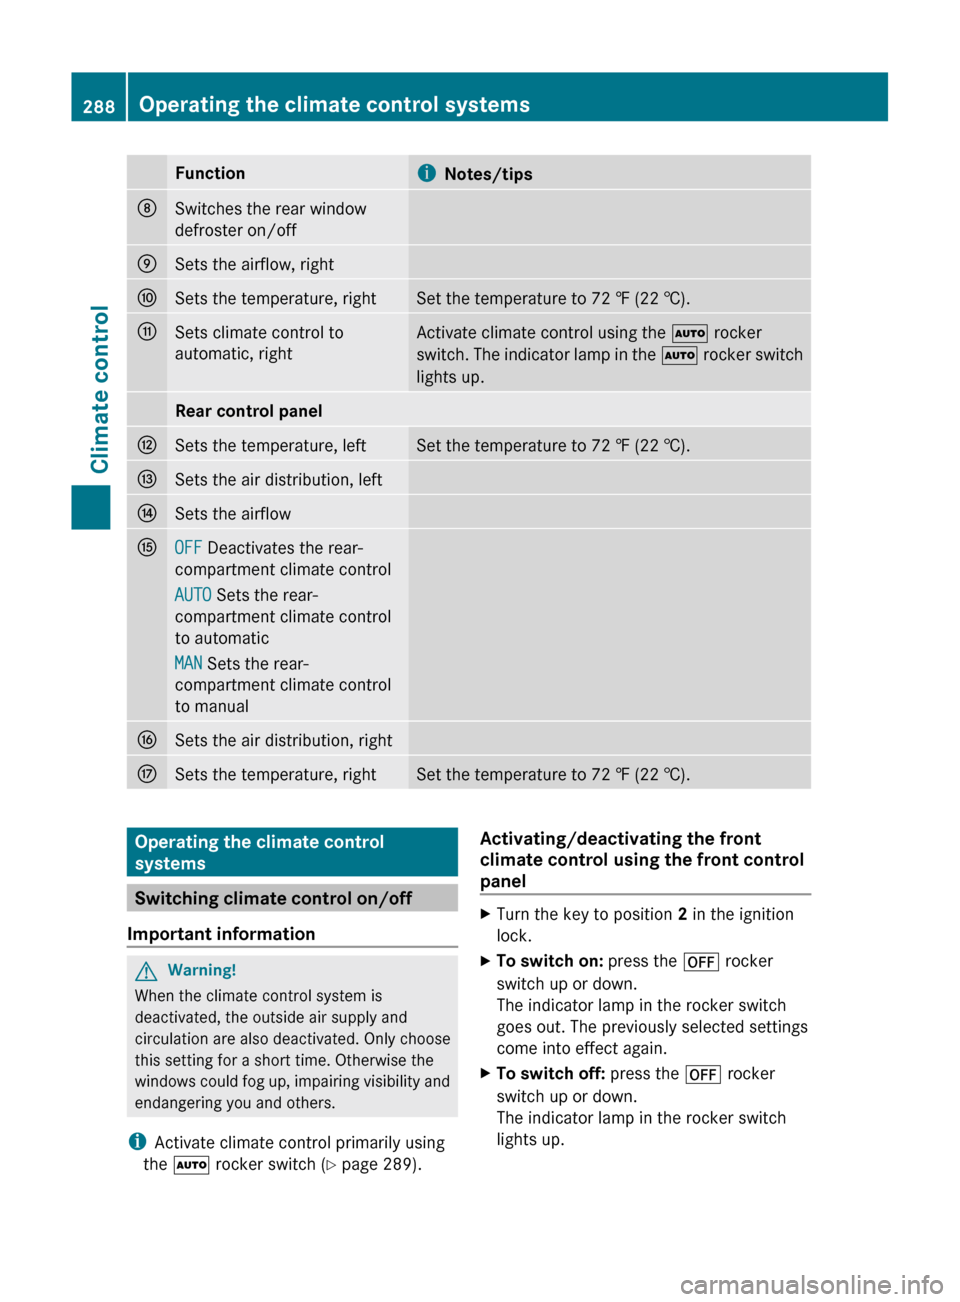
FunctioniNotes/tipsDSwitches the rear window
defroster on/offESets the airflow, rightFSets the temperature, rightSet the temperature to 72 ‡ (22 †).GSets climate control to
automatic, rightActivate climate control using the à rocker
switch. The indicator lamp in the à rocker switch
lights up.Rear control panelHSets the temperature, leftSet the temperature to 72 ‡ (22 †).ISets the air distribution, leftJSets the airflowKOFF Deactivates the rear-
compartment climate control
AUTO Sets the rear-
compartment climate control
to automatic
MAN Sets the rear-
compartment climate control
to manualLSets the air distribution, rightMSets the temperature, rightSet the temperature to 72 ‡ (22 †).Operating the climate control
systems
Switching climate control on/off
Important information
GWarning!
When the climate control system is
deactivated, the outside air supply and
circulation are also deactivated. Only choose
this setting for a short time. Otherwise the
windows could fog up, impairing visibility and
endangering you and others.
i Activate climate control primarily using
the à rocker switch ( Y page 289).
Activating/deactivating the front
climate control using the front control
panelXTurn the key to position 2 in the ignition
lock.XTo switch on: press the ^ rocker
switch up or down.
The indicator lamp in the rocker switch
goes out. The previously selected settings
come into effect again.XTo switch off: press the ^ rocker
switch up or down.
The indicator lamp in the rocker switch
lights up.288Operating the climate control systemsClimate control
Page 291 of 524

Activating/deactivating the rear-
compartment climate control using the
front control panelXTurn the key to position 2 in the ignition
lock.XActivate the Y rear compartment
function via COMAND ( Y page 265).
The rear-compartment climate control can
be controlled via the front control panel
using the Y rear compartment function.XTo switch on: press the ^ rocker
switch up or down.
The indicator lamp in the rocker switch
goes out. The previously selected settings
come into effect again.XTo switch off: press the ^ rocker
switch up or down.
The indicator lamp in the rocker switch
lights up.
Activating/deactivating the rear-
compartment climate control using the
rear control panel
XTurn the key to position 2 in the ignition
lock.XTo activate: press rocker switch
K (Y page 287) up or down and select
AUTO .
or
XPress rocker switch K (Y page 287) up or
down and select MAN.XTo deactivate: press rocker switch
K (Y page 287) up or down and select
OFF .
Activating/deactivating cooling with
air dehumidification
Important information
The cooling with air dehumidification function
is only available when the engine is running.
The air inside the vehicle is cooled and
dehumidified according to the temperature
selected.GWarning
If you switch off the cooling function, the
vehicle will not be cooled when weather
conditions are warm. The windows can fog up
more quickly. Window fogging may impair
visibility and endanger you and others.
Condensation may drip from the underside of
the vehicle when the automatic climate
control is in cooling mode. This is normal and
not a sign that there is a malfunction.
You can activate or deactivate the "cooling
with air dehumidification" function via
COMAND ( Y page 263).
i The cooling with air dehumidification
function uses refrigerant R134a. This
coolant does not contain
chlorofluorocarbons, and therefore does
not damage the ozone layer.
Problems with the "cooling with air
dehumidification" function
If you can no longer switch on the cooling with
air dehumidification function via COMAND,
the cooling with air dehumidification function
is switched off due to a malfunction.
XConsult a qualified specialist workshop.
Setting climate control to automatic
GWarning
If you switch off the cooling function, the
vehicle will not be cooled when weather
conditions are warm. The windows can fog up
more quickly. Window fogging may impair
visibility and endanger you and others.
In automatic mode, the set temperature is
maintained automatically at a constant level.
The system automatically regulates the
temperature of the dispensed air, the airflow
and the air distribution.
Operating the climate control systems289Climate controlZ
Page 295 of 524

This is the quickest way to cool the vehicle
interior when the sliding sunroof and the side
windows are closed.
Defrosting the windows
Windows fogged up on the inside
XActivate the "cooling with air
dehumidification" function via COMAND
( Y page 263).XActivate automatic mode Ã.XIf the windows continue to fog up, activate
the defrosting function ( Y page 292).
i
You should only select this setting until
the windshield is clear again.
Windows fogged up on the outside
XActivate the windshield wipers.XActivate automatic climate control.
i You should only select this setting until
the windshield is clear again.
Rear window defroster
Activating/deactivating
GWarning
Any accumulation of snow and ice should be
removed from the rear window before driving.
Visibility could otherwise be impaired,
endangering you and others.
The rear window heating has a high current
draw. You should therefore switch it off as
soon as the window is clear as it only switches
off automatically after several minutes.
If the battery voltage is too low, the rear
window heating may switch off.
XTurn the SmartKey to position 2 in the
ignition lock.XPress the ¤ rocker switch up or down.
The indicator lamp in the ¤ rocker
switch lights up or goes out.Problems with the rear window heating
The rear window heating has deactivated
itself prematurely or cannot be activated.
XSwitch off any consumers that are not
required, e.g. reading lamps or interior
lighting.
When the battery is sufficiently charged,
the rear window heating is activated again
automatically.
Activating/deactivating air-
recirculation mode
You can deactivate the flow of fresh air if
unpleasant odors are entering the vehicle
from outside. The air already inside the
vehicle will then be recirculated.
GWarning
Fogged windows impair visibility,
endangering you and others. If the windows
begin to fog on the inside, switching off the
air recirculation mode immediately should
clear interior window fogging. If interior
window fogging persists, make sure the air
conditioning is activated, or press the ¬
button.
XTurn the SmartKey to position 2 in the
ignition lock.XTo activate: press the g rocker switch
up or down.
The indicator lamp in the g rocker
switch lights up.
i Air-recirculation mode is activated
automatically at high outside
temperatures. The indicator lamp in the
g rocker switch is not lit when
automatic air-recirculation mode is
activated.
Outside air is added after about 30
minutes.
Operating the climate control systems293Climate controlZ
Page 296 of 524

X To deactivate: press the g rocker
switch up or down.
The indicator lamp in the g rocker
switch goes out.
i Air-recirculation mode switches off
automatically:
R after approximately five minutes if
outside temperatures are under about
41 ‡ (5 †)
R after approximately five minutes if
cooling with air dehumidification is
deactivated
R after approximately 30 minutes if outside
temperatures are over about
41 ‡ (5 †)
Switching the residual heat on/off
It is possible to make use of the residual heat
of the engine to continue heating the
stationary vehicle for up to 30 minutes after
the engine has been switched off. The heating
time depends on the temperature that has
been set.
i The blower will run at a low speed
regardless of the airflow setting.
i If you activate the "residual heat" function
at high temperatures, only the ventilation
will be activated. The blower runs at
medium speed.
XTurn the key to position 0 in the ignition
lock or remove it.XTo switch on: press the Ì rocker
switch up or down.
The indicator lamp in the Ì rocker
switch lights up.XTo switch off: press the Ì rocker
switch up or down.
The indicator lamp in the Ì rocker
switch goes out.i Residual heat is deactivated
automatically:
R after about 30 minutes
R when the ignition is switched on
R if the battery voltage drops
R if the coolant temperature is too low
Setting the air vents
Important safety notes
GWarning
When operating the climate control, the air
that enters the passenger compartment
through the air vents can be very hot or very
cold (depending on the set temperature). This
could cause burns or frostbite to unprotected
skin in the immediate area of the air vents.
Always keep sufficient distance between
unprotected parts of the body and the air
vents. If necessary, use the air distribution
adjustment to direct the air to air vents in the
vehicle interior that are not in the immediate
area of unprotected skin.
In order to ensure the direct flow of fresh air
through the air vents into the vehicle interior,
please observe the following notes:
R keep the air inlet grille on the hood free of
blockages, such as ice, snow or leaves
R never cover the vents or air inlet and outlet
grilles in the vehicle interior.
i For virtually draft-free ventilation, adjust
the sliders of the air vents to the center
position.
294Setting the air ventsClimate control