2011 MERCEDES-BENZ S-Class ESP
[x] Cancel search: ESPPage 422 of 524

inside of the fuel filler flap of your vehicle, if there is one). If your vehicle has tires which are a
different size to those on the tire and load data label or those specified in the tire pressure table,
if there is one, you should determine the correct tire pressure for these tires.
As an added safety feature, your vehicle has been equipped with a tire pressure monitor (TPMS).
An indicator lamp lights up if one or more of your tires are significantly underinflated. Accordingly,
when the low tire pressure indicator lamp lights up, you should stop and check your tires as soon
as possible, and inflate them to the proper pressure. Driving on a significantly underinflated tire
causes the tire to overheat and can lead to tire failure.
An excessively low tire pressure also increases fuel consumption, reduces the service life of the
tires and may impair the driving and braking characteristics of the vehicle. Please note that the
TPMS is not a substitute for proper tire maintenance and it is the driver's responsibility to maintain
correct tire pressure, even if underinflation has not reached the level at which the low tire
pressure indicator lamp of the TPMS lights up.
USA only:
Your vehicle has also been equipped with a TPMS malfunction indicator to indicate when the
system is not operating properly. The TPMS malfunction indicator is combined with the low tire
pressure indicator lamp. When the system detects a malfunction, the indicator lamp will flash
for approximately one minute and then remain illuminated. This sequence will continue upon
subsequent vehicle start-ups as long as the malfunction exists. When the malfunction indicator
is lit, the system may not be able to detect or signal low tire pressure as intended.
TPMS malfunctions may occur for a variety of reasons, including the installation of incompatible
replacement or alternate tires or wheels on the vehicle that prevent the TPMS from functioning
properly. Always check the TPMS malfunction indicator after replacing one or more tires or wheels
on your vehicle to ensure that the replacement or alternate tires and wheels allow the TPMS to
continue to function properly.420Warning and indicator lamps in the instrument clusterOn-board computer and displays
Page 429 of 524

Take into consideration that when the roof
rack is loaded, the handling characteristics
are different from those when operating the
vehicle without the roof rack loaded.
! Mercedes-Benz recommends that you
only use roof carriers that have been tested
and approved for Mercedes-Benz vehicles.
This helps to prevent damage to the
vehicle.
Position the load on the roof carrier in such
a way that the vehicle will not sustain
damage even when it is in motion.
Depending on the vehicle equipment,
ensure that when the roof carrier is
installed you can:
Rraise the sliding sunroof fully
Ropen the panorama roof with power tilt/
sliding panel fully
Ropen the trunk lid fully
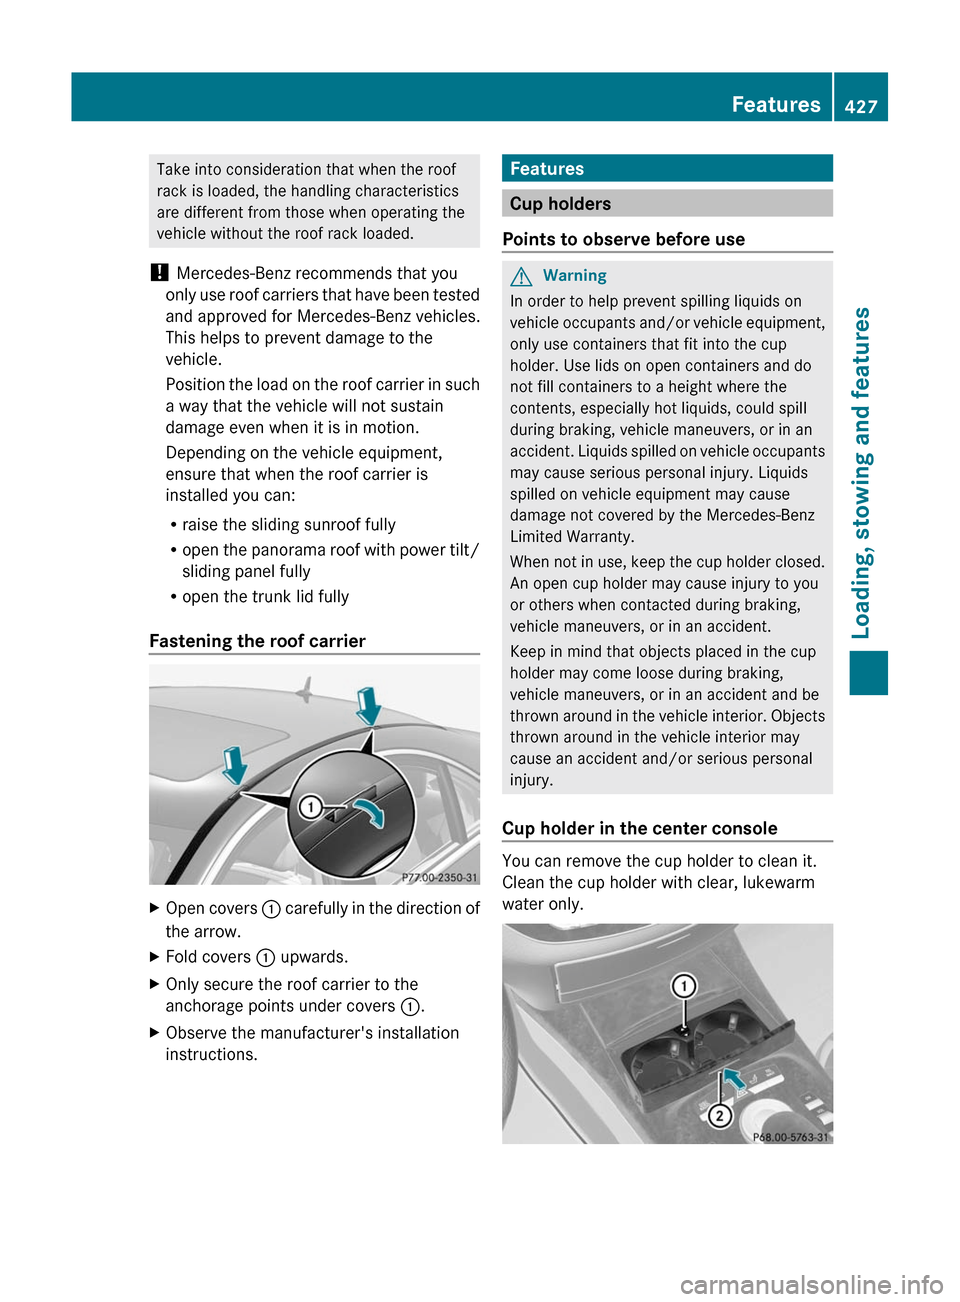
Fastening the roof carrier
XOpen covers : carefully in the direction of
the arrow.
XFold covers : upwards.XOnly secure the roof carrier to the
anchorage points under covers :.
XObserve the manufacturer's installation
instructions.Features
Cup holders
Points to observe before use
GWarning
In order to help prevent spilling liquids on
vehicle occupants and/or vehicle equipment,
only use containers that fit into the cup
holder. Use lids on open containers and do
not fill containers to a height where the
contents, especially hot liquids, could spill
during braking, vehicle maneuvers, or in an
accident. Liquids spilled on vehicle occupants
may cause serious personal injury. Liquids
spilled on vehicle equipment may cause
damage not covered by the Mercedes-Benz
Limited Warranty.
When not in use, keep the cup holder closed.
An open cup holder may cause injury to you
or others when contacted during braking,
vehicle maneuvers, or in an accident.
Keep in mind that objects placed in the cup
holder may come loose during braking,
vehicle maneuvers, or in an accident and be
thrown around in the vehicle interior. Objects
thrown around in the vehicle interior may
cause an accident and/or serious personal
injury.
Cup holder in the center console
You can remove the cup holder to clean it.
Clean the cup holder with clear, lukewarm
water only.
Features427Loading, stowing and featuresZ
Page 434 of 524

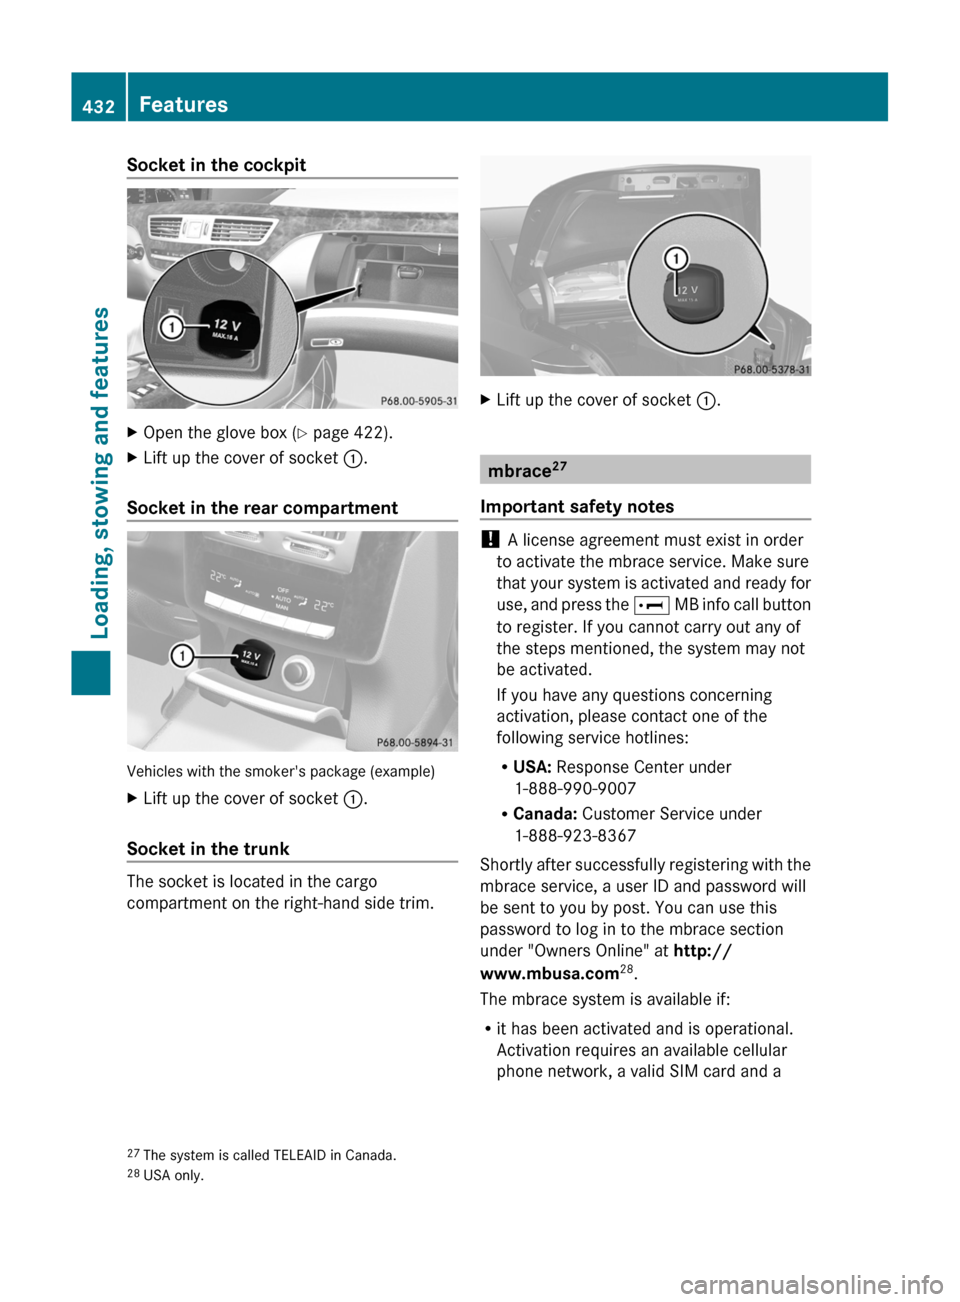
Socket in the cockpitXOpen the glove box (Y page 422).XLift up the cover of socket :.
Socket in the rear compartment
Vehicles with the smoker's package (example)
XLift up the cover of socket :.
Socket in the trunk
The socket is located in the cargo
compartment on the right-hand side trim.
XLift up the cover of socket :.
mbrace27
Important safety notes
! A license agreement must exist in order
to activate the mbrace service. Make sure
that your system is activated and ready for
use, and press the E MB info call button
to register. If you cannot carry out any of
the steps mentioned, the system may not
be activated.
If you have any questions concerning
activation, please contact one of the
following service hotlines:
RUSA: Response Center under
1-888-990-9007
RCanada: Customer Service under
1-888-923-8367
Shortly after successfully registering with the
mbrace service, a user ID and password will
be sent to you by post. You can use this
password to log in to the mbrace section
under "Owners Online" at http://
www.mbusa.com28.
The mbrace system is available if:
Rit has been activated and is operational.
Activation requires an available cellular
phone network, a valid SIM card and a
27The system is called TELEAID in Canada.28USA only.
432FeaturesLoading, stowing and features
Page 435 of 524

service subscription to a surveillance
service provider.
R the battery is sufficiently charged.
R the corresponding cellular phone network
is available for transmitting data to the
customer center.
i Determining the location of the vehicle on
a map is only possible if there is sufficient
GPS reception and the vehicle position can
be forwarded to the customer center.
The mbrace system
The mbrace system provides three different
services:
R automatic and manual emergency call
R Roadside Assistance call
R MB info call
To control the volume during an mbrace call,
proceed as follows:
XPress the W or X button on the
multifunction steering wheel.
or
XUse the H volume controller of
COMAND ( Y page 117).
You can find information and a description of
all available features under "Owners Online"
at http://www.mbusa.com 29
System self-test
After you have switched on the ignition, the
system carries out a self-diagnosis.
GWarning
A malfunction in the system has been
detected if any or all of the following
conditions occur:
R The indicator lamp in the SOS button does
not come on during the system self-test.
R The indicator lamp in Roadside Assistance
button º does not come on during the
system self-test.
R The indicator lamp in Information button
E does not come on during the system
self-test.
R The indicator lamp in the SOS button,
Roadside Assistance button º, or
Information button E remains
illuminated constantly in red after the
system self-test.
R The message Tele Aid Inoperative or
Tele Aid Not Activated appears in the
multifunction display after the system self-
test.
If a malfunction is indicated as outlined above,
the system may not operate as expected. In
case of an emergency, help will have to be
summoned by other means.
Have the system checked at the nearest
authorized Mercedes-Benz Center or contact
the following service hotlines:
R USA: Response Center under the number
1-888-990-9007
R Canada: Customer Service under
1-888-923-8367
Emergency call
Important safety notes
! A license agreement must exist in order
to activate the mbrace service. Make sure
that your system is activated and ready for
use, and press the E MB info call button
to register. If you cannot carry out any of
the steps mentioned, the system may not
be activated.
If you have any questions concerning
activation, please contact one of the
following service hotlines:
R USA: Response Center under
1-888-990-9007
R Canada: Customer Service under
1-888-923-8367
29 USA only.Features433Loading, stowing and featuresZ
Page 436 of 524

An emergency call is dialed automatically if
an air bag or Emergency Tensioning Device is
triggered.
iAn automatically dialed mbrace
emergency call cannot be canceled.
An emergency call can also be dialed
manually.
Once the emergency call is in progress, the
indicator lamp in the SOS button flashes. The
Connecting Call message appears in the
multifunction display.
The COMAND display shows Emergency
Call Activated and the audio system is
muted.
Once a connection has been established, the
Call Connected message appears in the
multifunction display.
The COMAND display shows the Emergency
Call Activated message.
All important information on the emergency
is compiled, for example:
Rcurrent location of the vehicle (as
determined by the GPS system)
Rvehicle model
Rvehicle color
Rvehicle identification number
iIf the Emergency Call Activated
message appears in the COMAND display,
you cannot use other COMAND functions.
You can continue to operate climate
control via the automatic climate control
functions (Y page 287).
A voice connection between the Response
Center and the occupants of the vehicle will
be established automatically soon after the
emergency call has been initiated. If the
vehicle occupants are able to respond, the
Response Center will attempt to obtain more
detailed information on the emergency.
iIf no vehicle occupant answers, an
ambulance is immediately sent to the
vehicle.
GWarning
If the indicator lamp in the SOS button is
flashing continuously and there was no voice
connection to the Response Center
established, then the mbrace system could
not initiate an emergency call (e.g. the
relevant cellular phone network is not
available).
The message Call Failed appears in the
multifunction display for approximately
10 seconds.
Should this occur, assistance must be
summoned by other means.
iDuring the emergency call, the telephone
is switched off automatically. The
telephone must be switched back on for
further use.
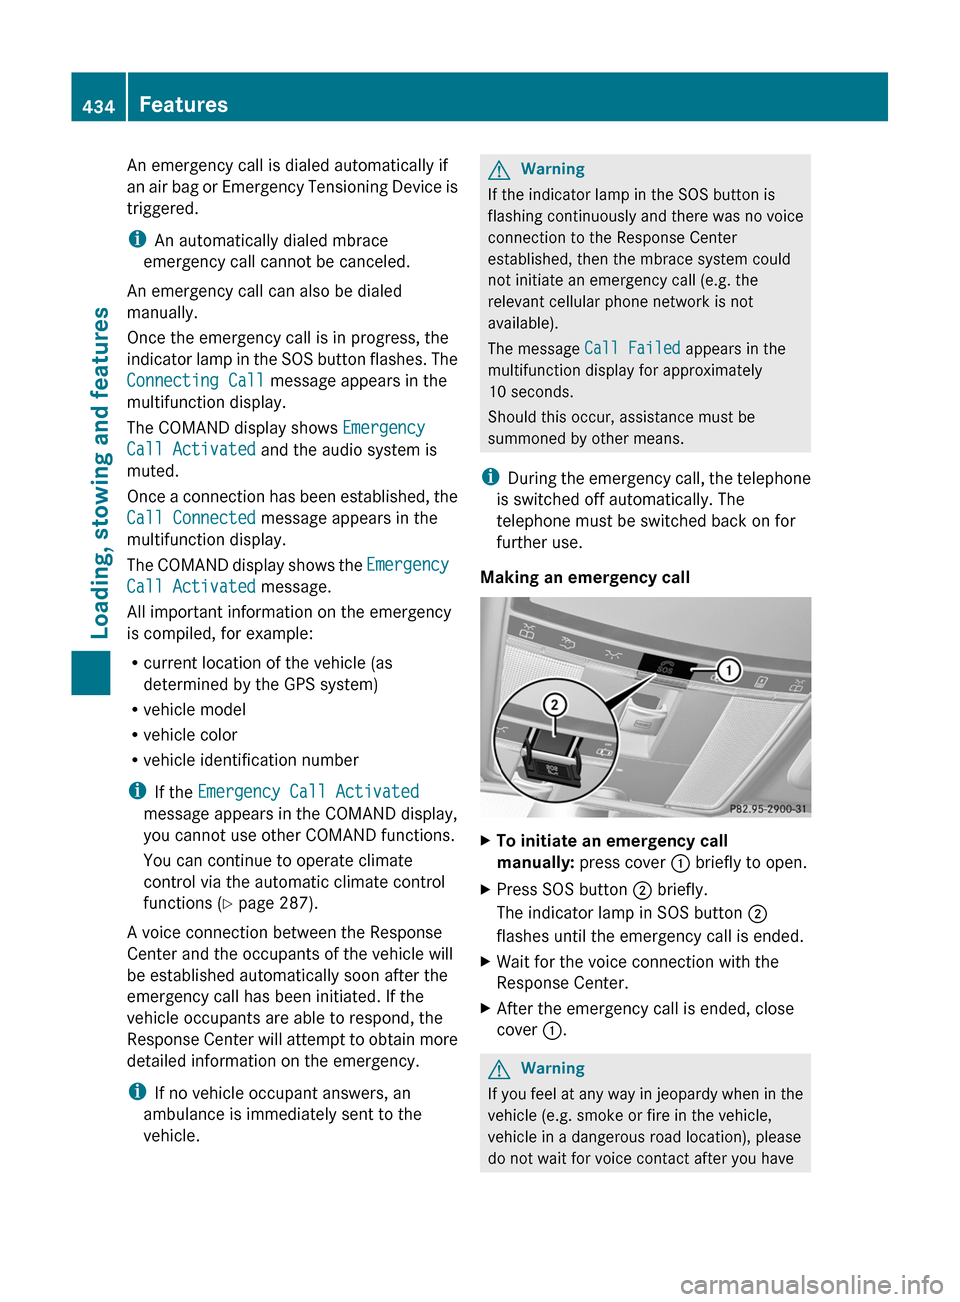
Making an emergency call
XTo initiate an emergency call
manually: press cover : briefly to open.
XPress SOS button ; briefly.
The indicator lamp in SOS button ;
flashes until the emergency call is ended.
XWait for the voice connection with the
Response Center.
XAfter the emergency call is ended, close
cover :.
GWarning
If you feel at any way in jeopardy when in the
vehicle (e.g. smoke or fire in the vehicle,
vehicle in a dangerous road location), please
do not wait for voice contact after you have
434FeaturesLoading, stowing and features
Page 437 of 524

pressed the SOS button. Carefully leave the
vehicle and move to a safe location. The
Response Center will automatically contact
local emergency officials with the vehicle's
approximate location if they receive an
automatic SOS signal and cannot make voice
contact with the vehicle occupants.
Roadside Assistance call buttonXOpen the stowage compartment under the
armrest ( Y page 423).XPress and hold Roadside Assistance
button : for more than two seconds.
A call to a Mercedes-Benz Roadside
Assistance Representative is initiated. The
indicator lamp in Roadside Assistance
button : flashes while the call is active.
The Connecting Call message appears in
the COMAND display and COMAND is
muted.
If a connection can be established, the Call
Connected message appears in the
COMAND display.
If a mobile phone network is available and
there is sufficient GPS reception, the mbrace
system transmits data to the Response
Center, for example:
R current location of the vehicle
R vehicle identification number
R vehicle model
R vehicle color
i The COMAND display shows that an
mbrace call is active. You can switch to the
navigation menu by pressing the
S button on COMAND during the call.
Spoken commands are not available.
A voice connection is established between
the Mercedes-Benz Roadside Assistance
Representative and the vehicle occupants.XDescribe the type of assistance needed.
The Mercedes-Benz Roadside Assistance
Representative either sends a qualified
Mercedes-Benz technician or organizes for
your vehicle to be transported to the nearest
authorized Mercedes-Benz Center. You may
be charged for services such as repair work
and/or towing. Further details are available
in your mbrace manual.
i If the indicator lamp in MB info call
button : flashes continuously and it was
not possible to establish a voice
connection to the Response Center, then
the mbrace system has failed to initiate a
Roadside Assistance call (e.g. the
corresponding cellular phone network is
not available). The Call Failed message
appears in the multifunction display.
The COMAND display shows the Call
could not be connected! message.
Press W to confirm the message.
XTo end a call: press the ~ button on the
multifunction steering wheel.
or
XPress the corresponding button for ending
a phone call on the COMAND telephone
keypad.
i Sign and Drive services 30
: you are not
charged for services such as jump-starting,
providing a few gallons of fuel for a fuel tank
that has been run dry or changing a flat tire
with the vehicle's own spare tire.
30 USA only.Features435Loading, stowing and featuresZ
Page 438 of 524

MB Info call buttonXThe stowage compartment under the
armrest ( Y page 423).XPress and hold MB info call button : for
more than two seconds.
A call to the Response Center is initiated.
MB info call button indicator lamp :
flashes while the connection is being
established. The Connecting Call
message appears in the multifunction
display. The COMAND display shows the
Information Call Activated message.
The audio system or COMAND is muted.
If a connection can be established, the Call
Connected message appears in the
multifunction display.
The COMAND display shows the
Information Call Activated message.
If a mobile phone network is available and
there is sufficient GPS reception, the mbrace
system transmits data to the Response
Center, for example:
R current location of the vehicle
R vehicle identification number
R vehicle model
R vehicle color
i The COMAND display shows that an
mbrace call is active. You can switch to the
navigation menu by pressing the S
button on COMAND during the call. Spoken
commands are not available.
A voice connection between the Response
Center and the vehicle occupants is
established. You can obtain information on
how to operate your vehicle's systems, on the
location of the nearest authorized Mercedes-
Benz Center, and on further products and
services offered by Mercedes-Benz USA.
Further details on the mbrace system can be
found under http://www.mbusa.com 31
.
Log in under "Owners Online".
i If the indicator lamp in MB info call
button : flashes continuously and no
voice connection to the Response Center
has been established, then the mbrace
system has failed to initiate an MB info call
(e.g. the corresponding mobile phone
network is not available). The Call
Failed message appears in the
multifunction display.
The COMAND display shows the Call
could not be connected! message.
Press W to confirm the message.XTo end a call: press the ~ button on the
multifunction steering wheel.
or
XPress the corresponding button for ending
a phone call on the COMAND telephone
keypad.
Call priority
An emergency call can still be initiated even
if a service call is currently active, e.g. a
Roadside Assistance call or an MB info call.
In this case, an emergency call will take
priority and override all other active calls.
The indicator lamp of the respective button
flashes until the call is ended. An emergency
call can only be terminated by the Response
Center. All other calls can be ended by
pressing the ~ button on the
multifunction steering wheel or the
corresponding button for ending a telephone
call on the COMAND telephone keypad.
31 USA only.436FeaturesLoading, stowing and features
Page 439 of 524

Downloading destinations in COMAND
iThe components and operating principles
of COMAND can be found on
( Y page 116).
Destination Download gives you access to a
database with over 10 million points of
interest (POIs) which can be downloaded to
the navigation system of your vehicle. If you
know the destination, you can download the
address or obtain the location of points of
interest (POIs) or important destinations in
the surrounding area.
You are prompted to confirm route guidance
to the entered address.
XUsing the COMAND controller XVY (slide)
and cVd (turn) to select Yes and confirm
by pressing W.
The system calculates the route and
subsequently starts the route guidance with
the address entered.
i If you select No, the address can be stored
in the address book.
i The Destination Download function is
available if the corresponding cellular
phone network is available and data
transfer is possible.
Search & Send
Points to observe before use
i To use Search & Send, your vehicle must
be equipped with mbrace and a navigation
system. You must also have an mbrace
service subscription.
"Search & Send" is a destination entry
service. A destination which is determined by
Google Maps ®
or Yahoo Local Maps ®
can be
forwarded directly to your vehicle's
navigation system using TELEAID.
Specifying and sending the destination
address
i Information about specific commands
such as address entry or sending an
address can be found on (either of) the
website(s). Each website works differently
and is subject to change.XGo to either http://
www.maps.google.com or http://
www.maps.yahoo.com and enter a
destination address in the entry field.XPress the relevant button on the website to
send the destination address to the e-mail
address of your mbrace account.XWhen the "Send" dialog window appears:
In the relevant field, enter the e-mail
address which you specified when
activating your mbrace account.XClick on "Send".
Calling up destination addresses
XPress the MB info call button to load the
destination address to your vehicle's
navigation system.
A display message appears, asking
whether navigation should be started.XSelect Yes.
The navigation start screen appears.XSelect Start.
Route guidance is started.
or
XSelect No.
The address is saved to the destination
memory for future use ( Y page 175).
i
If you have sent more than one
destination address, you have to make an
info call to load each individual address.
i Destination addresses are loaded in the
same order as the order in which they were
sent. If you own multiple Mercedes-Benz
vehicles with mbrace and activated mbrace
accounts:
Each destination address sent can be
accessed by every vehicle which is
connected with the relevant e-mail
address.
Features437Loading, stowing and featuresZ