2011 MERCEDES-BENZ S-Class remote control
[x] Cancel search: remote controlPage 126 of 524

ECOMAND: e.g. to select a station from
presets, select a track, enter directly,
enter a phone number. Rear Seat
Entertainment System: to select a
track, enter directlyFTo leave the menu (back)XPoint the remote control at the
corresponding screen and execute the
functions by pressing the corresponding
button.
i The remote control's function may be
restricted depending on the angle at which
it is pointed at the respective screen.
Selecting the screen for the remote
control
XTurn thumbwheel = until the desired
display is highlighted in the window.
Switching the screen on/off (Rear Seat
Entertainment System only)
If the key is in position 0 or 1 in the ignition
lock (see vehicle Operator's Manual), or the
key is not inserted, the screens in the rear will
switch off after 30 minutes. Before the
screens switch off, they show a message to
this effect.
You can switch the screens back on,
However, this will discharge the starter
battery.
XPoint the remote control at the rear-
compartment screen which has been
selected for remote operation.XPress button : on the remote control.
The respective rear screen switches on or
off.
i You can only switch the screens on using
the remote control if the ignition is
switched on.
Switching button lighting on/offXPress button ; on the remote control.
Depending on the previous status, the
button lighting is switched on or off.
i If you do not use the remote control for
about 15 seconds, the button lighting
switches off automatically.
Mute
XPress button B on the remote control.
The sound is switched on/off.
Adjusting the volume
This function is available for COMAND and for
the Rear Seat Entertainment System in
conjunction with corded headphones.
XPress one of buttons C on the remote
control.
The volume of the currently selected audio
or video source changes.
For COMAND, you can also adjust the
volume for phone calls and navigation
announcements.
Selecting a menu/menu item and
confirming your selection
XSelect a menu/menu item using the
=;9: buttons and press
the 9 button to confirm.124At a glanceCOMAND
Page 127 of 524

Functions of the E and F button
You can use the remote control to execute the same functions as the COMAND control panel.
ModeFunctionAudio modeSelecting a station using the station search function (Y page 209)Selecting a track by skipping to a track (Y page 221)Fast forward/rewind (Y page 222)Video modeSelecting a scene or chapter (video DVD mode) (Y page 239)Fast forward/rewind (video DVD mode) (Y page 238)
Functions of the number pad
You can use the remote control to execute the same functions as the COMAND control panel.
ModeFunctionAudio modeSelecting channels via the channel presets (Y page 209)Setting stations by entering the frequency manually (Y page 209)Storing channels manually (Y page 210)Selecting a track (Y page 221)Selecting a data medium via the media list (Y page 221)Telephone modeTelephone number entry (Y page 197)Character entryEntering characters (direct entry) (Y page 128)Operating COMAND
Selecting a main function
Initial situation
You want to change from the telephone menu
to the vehicle settings, for example.
XSlide ZV the COMAND controller and
switch to the main function bar.
XSelect Vehicle in the main function bar by
turning cVd the COMAND controller and
press W to confirm.
The "Vehicle" menu appears.
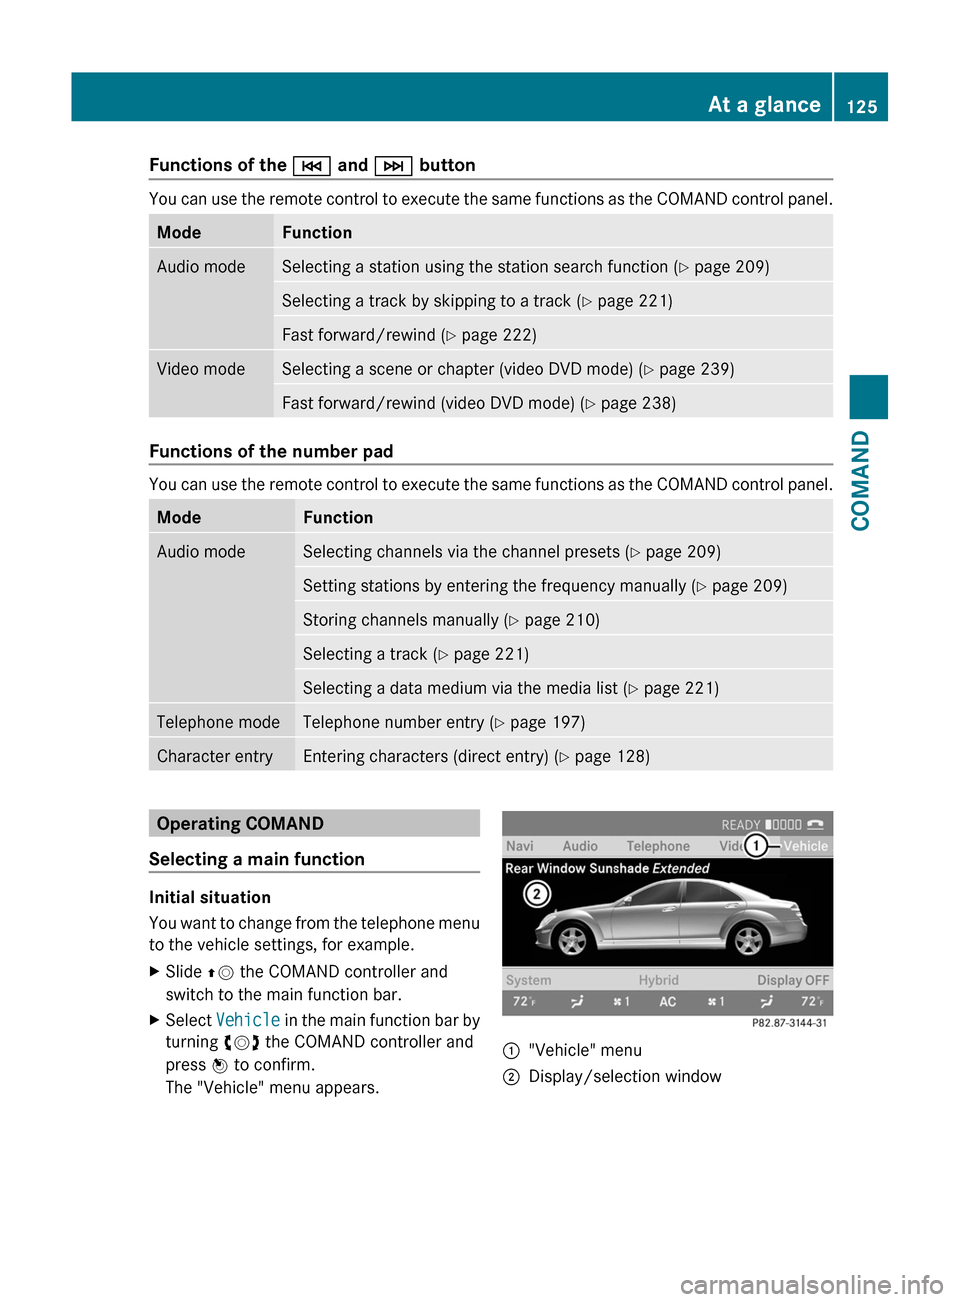
:"Vehicle" menu;Display/selection windowAt a glance125COMANDZ
Page 138 of 524

dts™
MLP™
Selecting settings for the Bang & Olufsen
sound system
Calling up the selection menu
XSelect Sound.XHighlight Bang&Olufsen.XPress W.
A selection menu appears.
A # dot in front of an entry indicates the
current setting.
Selecting the setting for True Image™
XTurn cVd or slide ZVÆ and highlight
reference or 3D sound.
XPress W.
Selecting sound mode
XSelect Sound Mode in the selection menu.XTurn cVd or slide ZVÆ and highlight left,
all or right.
XPress W.XTo exit the menu: press the % back
button beside the COMAND controller.
or
XSlide XVY.
iPlease bear the following in mind:
You will achieve the best sound results on
your Bang & Olufsen sound system by
playing high-quality audio DVDs and CDs.
MP3 tracks should have a bit rate of at least
224 kbit/s.
When playing using an iPod®, the bit rate
should also be at least 224 kbit/s.
For optimum playback quality:
XDeactivate the EQ setting on the
iPod®.
Surround-sound playback does not
function for mono signal sources, such as
the medium wave range (MW) in radio
mode.
On some stereo recordings, the sound
characteristics may differ from
conventional stereo playback.
Rear Seat Entertainment System
Components
Overview
The Rear Seat Entertainment System*
comprises:
Rtwo screens for the rear behind the front-
seat head restraints
Rthe remote control
Ra CD/DVD drive
RAUX jacks on both screens (display AUX)
and on the CD/DVD drive (drive AUX)
Rtwo sets of cordless headphones
136At a glanceCOMAND
Page 140 of 524

Remote control
Overview
:To switch the screen on/off;To switch button lighting on/off=To select the screen for remote control
operation (COMAND, SPLITVIEW, L
REAR and REAR R can be selected)
?To select a menu or menu itemATo confirm a selection or settingBTo switch sound on/off (for corded
headphones)
CTo adjust the volume (for corded
headphones)
DTo skip, fast-forward/fast-rewindETo select a track, to enter directlyFTo leave the menu (back)Selecting the screen for the remote
control
You can use the remote control to operate
one of the two rear screens at a time. To do
so, you must switch the remote control to the
desired screen.
XTo select the left-hand screen: turn
thumbwheel = until "L REAR" is
highlighted in the window.
XTo select the right-hand screen: turn
thumbwheel = until "REAR R" is
highlighted in the window.
Switching the screen on/off
If the key in the ignition lock is in position 0
or 1 or if the key is not in the ignition lock, the
rear screens will switch off after 30 minutes.
Before the screens switch off, they show a
message to this effect.
You can switch the screens back on,
However, this will discharge the starter
battery.
XPoint the remote control at the rear-
compartment screen which has been
selected for remote operation.
XPress button : on the remote control.
The respective rear screen switches on or
off.
iYou can only switch the screens on using
the remote control if the ignition is
switched on.
Switching button lighting on/off
XPress button ; on the remote control.
Depending on the previous status, the
button lighting is switched on or off.
iIf you do not use the remote control for
about 15 seconds, the button lighting
switches off automatically.
Switching the sound on/off (corded
headphones only)
XPress button B on the remote control.
The sound is switched on/off.
138At a glanceCOMAND
Page 142 of 524

Cordless headphones
Overview
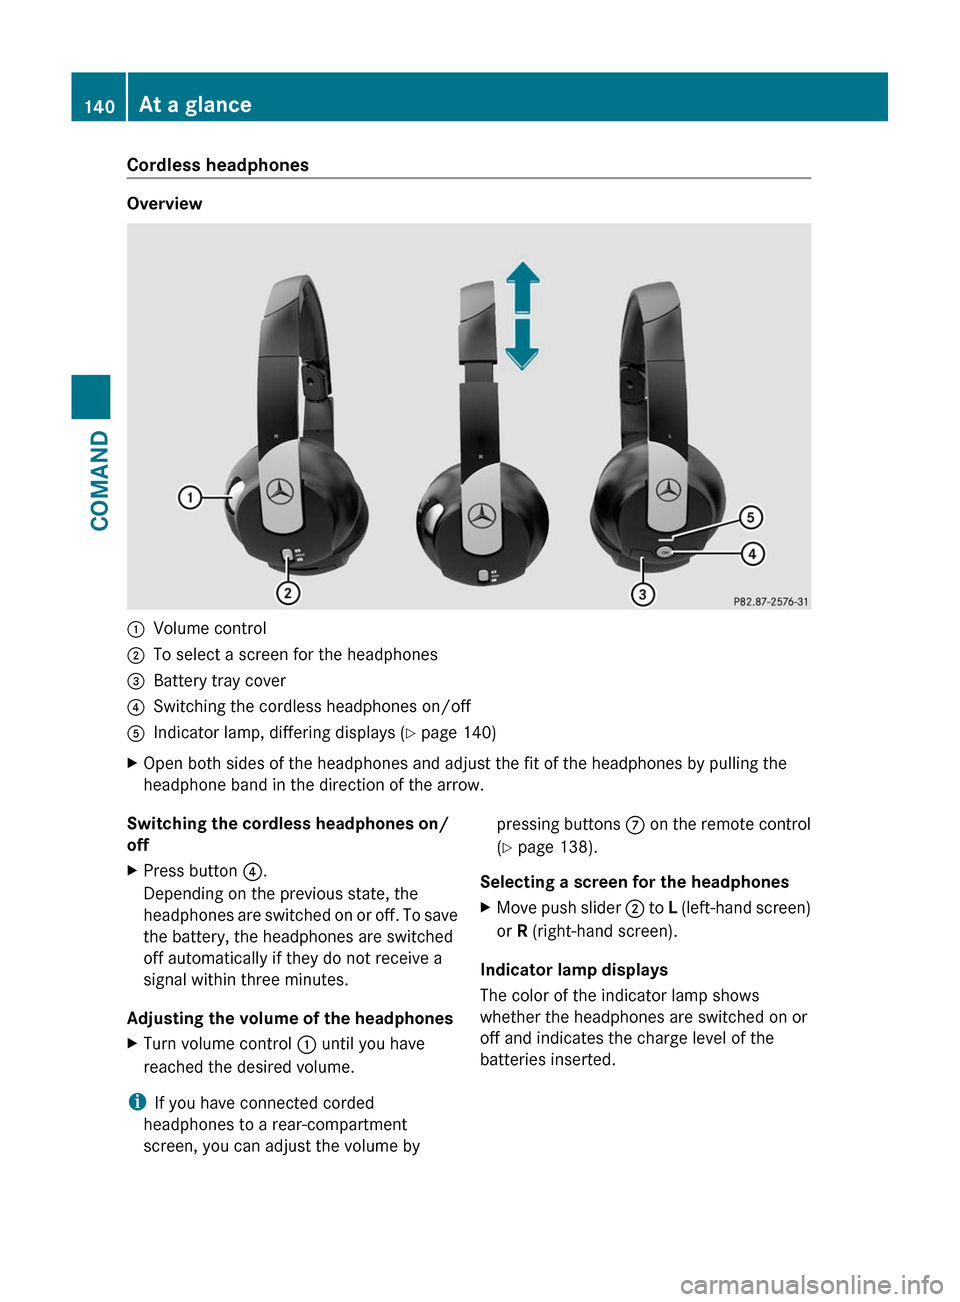
:Volume control;To select a screen for the headphones=Battery tray cover?Switching the cordless headphones on/offAIndicator lamp, differing displays (Y page 140)XOpen both sides of the headphones and adjust the fit of the headphones by pulling the
headphone band in the direction of the arrow.Switching the cordless headphones on/
offXPress button ?.
Depending on the previous state, the
headphones are switched on or off. To save
the battery, the headphones are switched
off automatically if they do not receive a
signal within three minutes.
Adjusting the volume of the headphones
XTurn volume control : until you have
reached the desired volume.
i If you have connected corded
headphones to a rear-compartment
screen, you can adjust the volume by
pressing buttons C on the remote control
( Y page 138).
Selecting a screen for the headphonesXMove push slider ; to L (left-hand screen)
or R (right-hand screen).
Indicator lamp displays
The color of the indicator lamp shows
whether the headphones are switched on or
off and indicates the charge level of the
batteries inserted.
140At a glanceCOMAND
Page 143 of 524

DisplayStatusGreenThe headphones are switched
on and the batteries are fully
charged.RedThe headphones are switched
on and the batteries are
almost discharged.No display
(dark)The headphones are switched
off, or the batteries are
empty, incorrectly inserted or
not inserted.
Connecting additional headphones
You can connect an additional set of corded
headphones to each rear-compartment
screen ( Y page 137).
Changing batteries
Batteries are required for the remote control
and for the two sets of cordless headphones.
For changing batteries: ( Y page 243)
System settings
Vehicle equipment
i These Operating Instructions describe all
standard and optional equipment available
for your vehicle at the time of purchase.
Please note that your vehicle may not be
equipped with all features described.
Display settings
Switching the display on/off
XSelect Vehicle by turning cVd the
COMAND controller and press W to
confirm.XSelect Display off by turning cVd the
COMAND controller and press W to
confirm.XTo switch on the display: press W or
cVd turn the COMAND controller.
Display design
Your COMAND display features optimized
designs for operation during daytime and
night-time hours. You can customize the
design to suit your personal preferences by
manually selecting day or night design or opt
for an automatic setting.
XSelect Vehicle by turning cVd the
COMAND controller and press W to
confirm.XSelect System by turning cVd the
COMAND controller and press W to
confirm.XSelect Display and press W to confirm.XSelect Day design , Night design or
Automatic by turning cVd the COMAND
controller and press W to confirm.
The # icon indicates the current setting.DesignExplanationDay designThe display is set
permanently to day
design.Night designThe display is set
permanently to night
design.AutomaticThe display design
changes depending on
the brightness around
the vehicle.
i In the Automatic setting, COMAND
evaluates the readings from the automatic
vehicle light sensor and switches between
the display designs automatically.
System settings141COMANDZ
Page 202 of 524

:Active party;Party on hold=To interconnect parties by creating a
conference connection
XTo interconnect parties by creating a
conference connection: select
Conference= by turning cVd the
COMAND controller and press W to
confirm.
Sending DTMF tones
This function is not supported by all mobile
phones.
Answering machines or other devices can be
controlled by DTMF tones, e.g. for remote
query functions.
:To transmit individual characters using
the character bar
;To transmit a phone book entry as a
character string
XIf you would like to listen to the messages
on your answering machine, for example,
select the corresponding number.
XTo transmit individual characters: once
a connection has been established to the
answer phone, select the desired
characters in the character bar and press
W to confirm.
or
XPress the corresponding button on the
telephone keypad.
Every character selected will be
transmitted immediately.
XTo send a phone book entry as a DTMF
sequence: select Name by turning cVd the
COMAND controller and press W to
confirm.
XSelect the desired phone book entry and
press W to confirm.
The entry is sent as a DTMF character
string.
XTo switch back to the call display: select
B.
iYou can also send DTMF tones using
Voice Control System (see the separate
operating instructions).
Using the phone book and address
book
The COMAND phone book is an extract of
those entries from the address book which
contain at least one telephone number.
The address book organizes and stores
entries which are entered from different
sources (mobile phone, SD memory card,
Bluetooth® import, COMAND phone book,
navigation). You can use these entries for
making telephone calls, for navigation and for
writing text messages.
Importing contacts automatically
If a mobile phone is connected with COMAND
via the Bluetooth® interface, the contacts
(phone book entries) of the corresponding
mobile phone are automatically imported into
the phone book in COMAND.
200TelephoneCOMAND
Page 232 of 524

Mercedes-Benz USA, LLC does not take
responsibility for any damage to external
devices.
Never connect more than one device at a
time. You will otherwise not be able to play
back from the external device.
:Four-pin socket for ⅛ inch stereo jack,
e.g. for MP3 players (audio and video)
;iPod® plug, to connect an iPod®=USB socket, to connect USB devices?Example of device, iPod®XConnect the external device with suitable
socket :, ; or =.
COMAND activates the device.
If you remove a device, the No device
connected message appears.
iA connected iPod® or MP3 player should
not be simultaneously operated via the
Media Interface and the remote control
(e.g. Bluetooth® remote control), as this
may produce unpredictable results.
iConnecting a fully discharged iPod® or
MP3 player can result in an extended
initialization period.
Error messages appear while the device is
being activated if:
RCOMAND does not support the device
connected.
Rtwo devices are connected.
Rthe connected device consumes too much
power.
Rthe Media Interface connection is faulty.
iWhere necessary, consult an authorized
Mercedes-Benz Center.
Switching on Media Interface mode
General notes
In extreme cases, starting up individual
functions can take up to several minutes –
this depends on the external device and its
content (e.g. video podcasts).
Only use the original programs to populate an
iPod or MP3 player. Otherwise, some or all
functions may not be available.
Option 1
XConnect an external device (Y page 229).
COMAND activates the device. The basic
display then appears if there are playable
files stored on the medium.
or
XSelect Audio in the main function bar by
sliding ZV and turning cVd the COMAND
controller and press W to confirm.
If you had previously selected Media
Interface mode, this will now be activated.
If another audio source is switched on, you
can now switch to Media Interface in the
audio menu.
230AudioCOMAND