2011 MERCEDES-BENZ S-Class mechanic
[x] Cancel search: mechanicPage 15 of 524

Low-beam headlamps ....................273
Rear fog lamp ................................ 274
Switching the Adaptive Highbeam
Assist on/off (on-board
computer) ...................................... 377
Switching the daytime driving
lights on/off (on-board computer) . 377
Light sensor (display message) ....... 397
List as selection list Calling up ....................................... 129
Loading guidelines ............................ 422
Locator lighting Adjusting (COMAND) .....................260
Locking
Automatic ........................................ 83
Emergency locking ........................... 84
From inside the vehicle (central
locking button) ................................. 83
Setting to automatic (COMAND) ....261
Locking verification signal (on-
board computer) ............................... 378
Logic 7 ®
see harman/kardon ®
Logic 7 ®
Surround Sound system
Low-beam headlamp (display
message) ............................................ 394
Luggage net ....................................... 425
Lumbar support ................................. 106
see Lumbar support
Lumbar supports (COMAND) ............ 266
M
Main-beam headlamps (display
message) ............................................ 395
Malfunction message see Display messages
Malfunctions relevant to safety
Reporting ......................................... 27
Manual drive program ...................... 311
Map Arrival time/distance to
destination ..................................... 182
Calling up ....................................... 157
City model ..................................... 183
Map display ................................... 181
Moving ................................... 158, 180
Showing geo-coordinates ..............183
Showing road names .....................183
Topographic map ........................... 183
Map display (also see navigation)
Traffic reports ................................ 172
Map information ................................ 182
Map orientation ................................. 181
Map scale Adjusting ....................................... 179
Massage function (PULSE) ............... 269
Matte finish (cleaning
instructions) ...................................... 455
mbrace Automatic retrieval of vehicle data
(service due date) ..........................438
Call priority .................................... 436
Display message ............................ 383
Downloading destinations
(COMAND) ..................................... 437
Emergency call .............................. 433
Important safety notes ..................432
Locating a stolen vehicle ...............439
MB info call button ........................436
Remote vehicle locking ..................438
Roadside Assistance button ..........435
Self-test ......................................... 433
System .......................................... 433
Vehicle remote unlocking ..............438
Mechanical key
Function/notes ................................ 79
Media Interface
Active partition .............................. 234
Basic menu .................................... 231
Connection options .......................229
iPod ®
............................................. 229
Metadata ....................................... 232
Mode ............................................. 229
MP3 player .................................... 229
Selecting categories ......................232
Selecting folders ............................ 232
Selecting music files ......................231
Selecting playlists ..........................232
Switching to ................................... 230
USB mass storage device ..............229
Media list ........................................... 221
Memory function ............................... 111Index13
Page 75 of 524

In order to maintain an appropriate distance
from the vehicle in front and thus prevent a
collision, you must apply the brakes yourself.
At speeds up to approximately
40 mph (70 km/h), PRE-SAFE ®
Brake may
also detect stationary obstacles, for example
stopped or parked vehicles.GWarning!
If you do not receive visual or acoustic
warning signals, the PRE-SAFE ®
Brake may
R not have recognized the collision risk
R have been deactivated
R be malfunctioning
Apply the brakes yourself to avoid a collision.
XTo activate/deactivate: activate or
deactivate PRE-SAFE ®
Brake in the on-
board computer ( Y page 376).
After activation, the Ä symbol is
displayed on the left in the instrument
cluster.
For PRE-SAFE ®
Brake to assist you when
driving, the radar sensor system must be
switched on and operational.
PRE-SAFE ®
Brake does not always detect
complex traffic situations properly. You can
terminate the braking action of PRE-SAFE ®
Brake in a non-critical driving situation at any
time if:
R an acoustic and visual warning occurs.
R the vehicle brakes.
To stop the braking action, you can either
depress the accelerator pedal further,
activate kickdown or release the brake pedal.
The braking action of PRE-SAFE ®
Brake is
ended automatically if:
R you maneuver to avoid the obstacle.
R your speed drops below approximately
9 mph (15 km/h).
R there is no longer an obstacle detected in
front of your vehicle.
R there is no longer any danger of a collision.
Following a collision or collision-related
damage to the front end of the vehicle, have
the configuration and operation of the radar
sensors checked. Choose a qualified
specialist workshop which has the necessary
specialist knowledge and tools for the work
required. Mercedes-Benz recommends that
you use an authorized Mercedes-Benz Center
for this purpose.
Anti-theft systems
Immobilizer
The immobilizer prevents your vehicle from
being started without the correct key.
When leaving the vehicle, always take the
SmartKey with you and lock the vehicle. The
engine can be started by anyone with a valid
key that is left inside the vehicle.
XTo activate with the SmartKey: remove
the SmartKey from the ignition lock.XTo activate with KEYLESS-GO: switch the
ignition off and open the driver's door.XTo deactivate: switch on the ignition.
i
The immobilizer is always deactivated
when you start the engine.
ATA (Anti-Theft Alarm system)
A visual and audible alarm is triggered if the
alarm system is armed and you open:
R a door
R the vehicle with the mechanical key
R the trunk lid
R the hood
The alarm is not switched off, even if you
close the open door that has triggered it, for
example.
Anti-theft systems73SafetyZ
Page 78 of 524

Vehicle equipment
i This manual describes all the standard
and optional equipment of your vehicle
which was available at the time of
purchase. Country-specific differences are
possible. Bear in mind that your vehicle
may not feature all functions described
here. This also refers to safety-related
systems and functions.
SmartKey
Important safety notes
GWarning!
When leaving the vehicle, always remove the
SmartKey from the starter switch. Always
take the SmartKey with you and lock the
vehicle. Do not leave children unattended in
the vehicle, even if they are secured in a child
restraint system, or with access to an
unlocked vehicle. A child's unsupervised
access to a vehicle could result in an accident
and/or serious personal injury. The children
could
R injure themselves on parts of the vehicle
R be seriously or fatally injured through
excessive exposure to extreme heat or cold
R injure themselves or cause an accident with
vehicle equipment that can be operated
even if the SmartKey is removed from the
starter switch or removed from the vehicle,
such as seat adjustment, steering wheel
adjustment, or the memory function
If children open a door, they could injure other
persons or get out of the vehicle and injure
themselves or be injured by following traffic.
Do not expose the child restraint system to
direct sunlight. The child restraint system's
metal parts, for example, could become very
hot, and the child could be burned by these
parts.
GWarning
Do not carry heavy or hard objects in the
passenger compartment unless they are
firmly secured in place.
Unsecured or improperly positioned cargo
increases a child's risk of injury in the event
of:
R strong braking maneuvers
R sudden changes of direction
R an accident
General information
If you cannot open or lock the vehicle with the
SmartKey, either the battery in the SmartKey
is empty, the SmartKey is faulty, or the starter
battery is discharged.
XCheck the battery in the SmartKey and
replace it if necessary ( Y page 80).XUnlock the driver's door with the
mechanical key ( Y page 84).XLock the vehicle ( Y page 84).XHave the starter battery and battery
contacts checked by an authorized
Mercedes-Benz Center.
If the SmartKey is faulty, contact Roadside
Assistance or an authorized Mercedes-Benz
Center.
SmartKey functions
General notes
i USA only:
This device complies with Part 15 of the
FCC regulations. Operation is subject to
the following conditions:
1. This device must not cause any harmful
interference, and
2. This device must be able to
accommodate interference that is
received, including interference which
could cause unwanted functions.
76SmartKeyOpening and closing
Page 81 of 524

X To unlock the vehicle: pull the door
handle.XTo lock the vehicle: touch sensor
surface :.
If you pull on the handle of the trunk lid, only
the trunk of the vehicle is unlocked.
Changing the settings of the locking
system
You can change the setting of the locking
system in such a way that only the driver's
door and the fuel filler flap are unlocked. This
is useful if you frequently travel on your own.
XTo change the setting: press and hold
down the % and & buttons
simultaneously for approximately six
seconds until the battery check lamp
( Y page 80) flashes twice.
The SmartKey now functions as follows:
XTo unlock the driver's door: press the
% button once.XTo unlock centrally: press the %
button twice.XTo lock centrally: press the & button.
The KEYLESS-GO function is changed as
follows:
XTo unlock the driver's door : pull the door
handle on the driver's door.XTo unlock centrally: pull the door handle
on the front-passenger door or on the rear
doors.XTo lock centrally: touch sensor
surface : on one of the door handles.
Restoring the factory settings
XPress the % and & buttons
simultaneously for approximately six
seconds until the battery check lamp
flashes twice.Mechanical key
General notes
If you use the mechanical key to unlock and
open the driver's door or the trunk lid, the
anti-theft alarm system will be triggered
( Y page 73).
There are several ways to turn off the alarm:
XPress the % or & button on the
SmartKey.
or
XInsert the SmartKey into the ignition lock.
or
XPress the Start/Stop button in the ignition
lock. The SmartKey must be in the vehicle.
or
XLock or unlock the vehicle using KEYLESS-
GO. The SmartKey must be outside the
vehicle.
Removing the mechanical key
XPush release catch : in the direction of
the arrow and at the same time, remove
mechanical key ; from the SmartKey.
SmartKey battery
Important safety notes
It is advisable to have batteries replaced at a
qualified specialist workshop, e.g. at an
authorized Mercedes-Benz Center.
SmartKey79Opening and closingZ
Page 82 of 524

GWarning
Batteries contain toxic and caustic
substances. For this reason, keep batteries
out of the reach of children.
If a battery has been swallowed, seek medical
help immediately.
GWarning
The SmartKey batteries contain perchlorate
material, which may require special handling
and regard for the environment. Observe
government disposal guidelines. California
residents, see www.dtsc.ca.gov/
HazardousWaste/Perchlorate/
index.cfm .
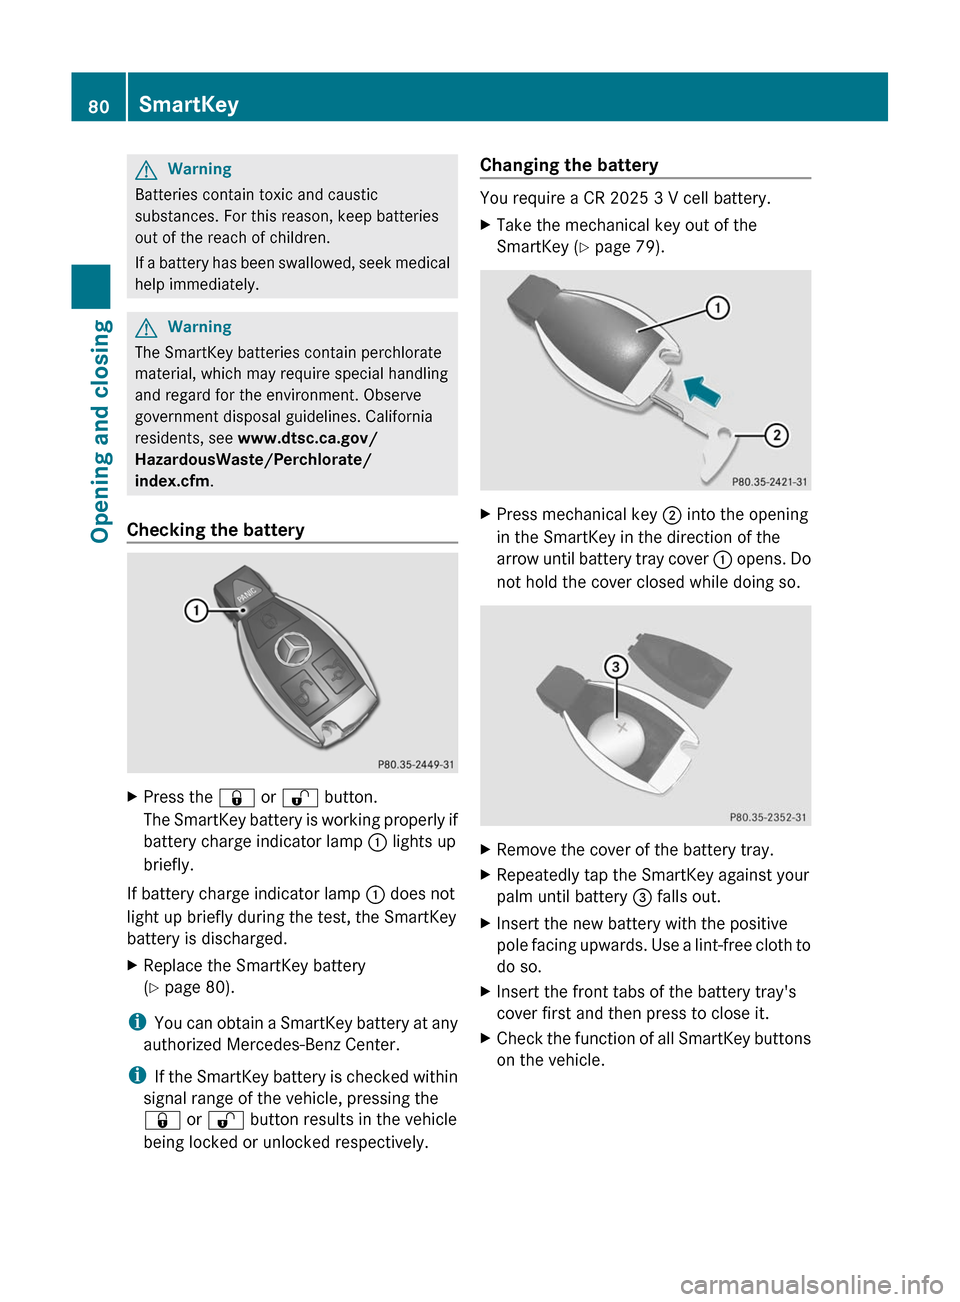
Checking the battery
XPress the & or % button.
The SmartKey battery is working properly if
battery charge indicator lamp : lights up
briefly.
If battery charge indicator lamp : does not
light up briefly during the test, the SmartKey
battery is discharged.
XReplace the SmartKey battery
( Y page 80).
i
You can obtain a SmartKey battery at any
authorized Mercedes-Benz Center.
i If the SmartKey battery is checked within
signal range of the vehicle, pressing the
& or % button results in the vehicle
being locked or unlocked respectively.
Changing the battery
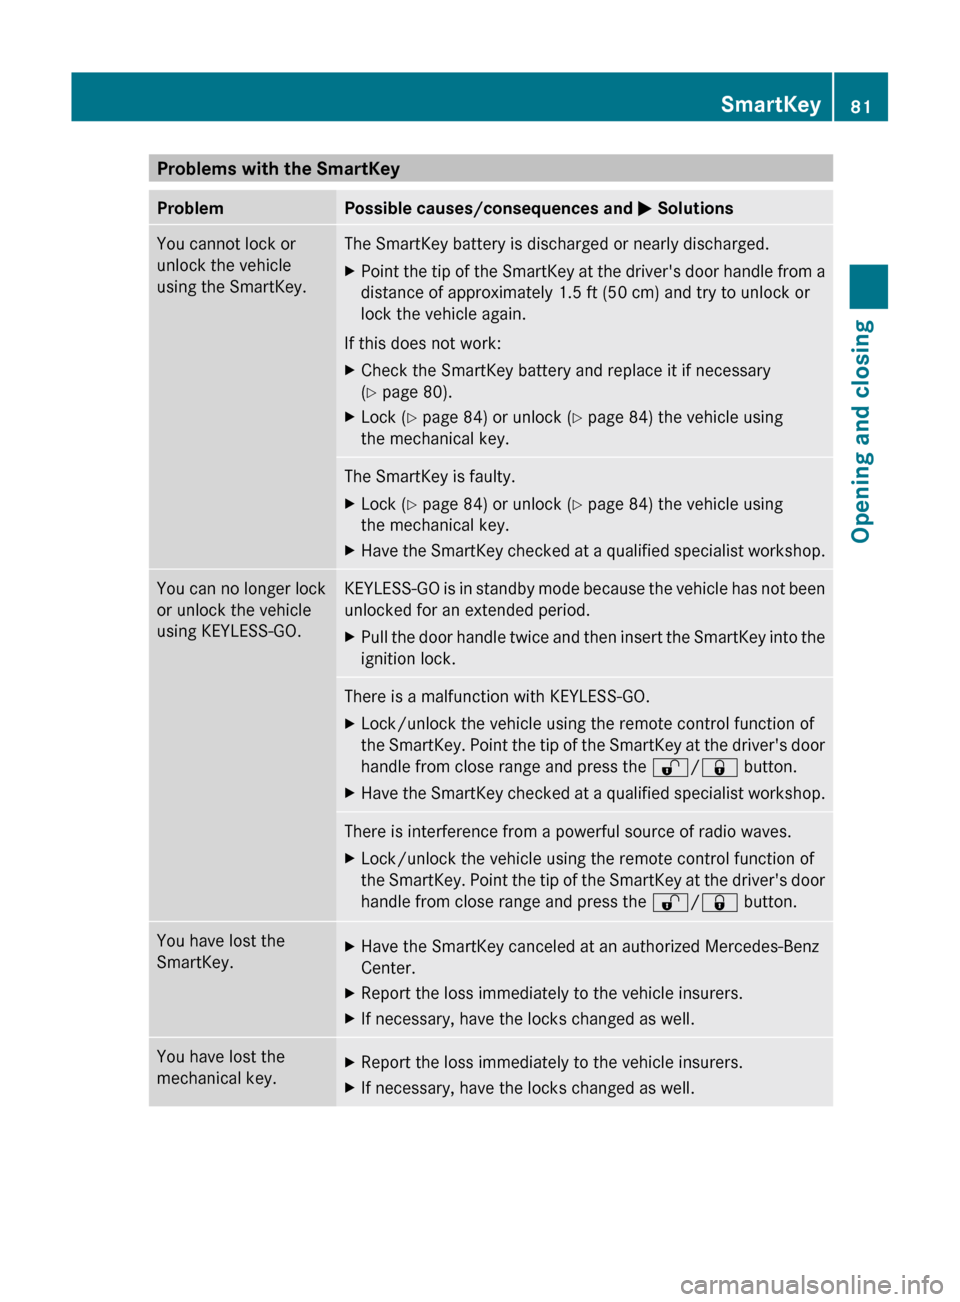
You require a CR 2025 3 V cell battery.
XTake the mechanical key out of the
SmartKey ( Y page 79).XPress mechanical key ; into the opening
in the SmartKey in the direction of the
arrow until battery tray cover : opens. Do
not hold the cover closed while doing so.XRemove the cover of the battery tray.XRepeatedly tap the SmartKey against your
palm until battery = falls out.XInsert the new battery with the positive
pole facing upwards. Use a lint-free cloth to
do so.XInsert the front tabs of the battery tray's
cover first and then press to close it.XCheck the function of all SmartKey buttons
on the vehicle.80SmartKeyOpening and closing
Page 83 of 524

Problems with the SmartKeyProblemPossible causes/consequences and M SolutionsYou cannot lock or
unlock the vehicle
using the SmartKey.The SmartKey battery is discharged or nearly discharged.XPoint the tip of the SmartKey at the driver's door handle from a
distance of approximately 1.5 ft (50 cm) and try to unlock or
lock the vehicle again.
If this does not work:
XCheck the SmartKey battery and replace it if necessary
( Y page 80).XLock ( Y page 84) or unlock ( Y page 84) the vehicle using
the mechanical key.The SmartKey is faulty.XLock ( Y page 84) or unlock ( Y page 84) the vehicle using
the mechanical key.XHave the SmartKey checked at a qualified specialist workshop.You can no longer lock
or unlock the vehicle
using KEYLESS-GO.KEYLESS-GO is in standby mode because the vehicle has not been
unlocked for an extended period.XPull the door handle twice and then insert the SmartKey into the
ignition lock.There is a malfunction with KEYLESS-GO.XLock/unlock the vehicle using the remote control function of
the SmartKey. Point the tip of the SmartKey at the driver's door
handle from close range and press the %/& button.XHave the SmartKey checked at a qualified specialist workshop.There is interference from a powerful source of radio waves.XLock/unlock the vehicle using the remote control function of
the SmartKey. Point the tip of the SmartKey at the driver's door
handle from close range and press the %/& button.You have lost the
SmartKey.XHave the SmartKey canceled at an authorized Mercedes-Benz
Center.XReport the loss immediately to the vehicle insurers.XIf necessary, have the locks changed as well.You have lost the
mechanical key.XReport the loss immediately to the vehicle insurers.XIf necessary, have the locks changed as well.SmartKey81Opening and closingZ
Page 86 of 524

Power closing feature
The power closing feature pulls the doors and
trunk lid into their locks automatically even if
they are only partly closed.
GWarning
To prevent possible personal injury, always
keep hands and fingers away from the door or
trunk opening when closing a door or the
trunk lid. Be especially careful when small
children are around.
If danger threatens, pull the inside or outside
door handle, or pull the trunk lid handle.
To prevent personal injury, never activate the
closing assist mechanism by tampering with
the door or trunk lid latch.
GWarning
Only drive with the doors closed. Otherwise,
one or more of the doors could open while the
vehicle is in motion, putting you and/or
others at risk.
GWarning
Make sure the trunk lid is closed when the
engine is running and while driving. Among
other dangers, deadly carbon monoxide (CO)
gases may enter the vehicle interior resulting
in unconsciousness and death.
XPower closing feature (doors): push the
door past the first detent position of the
lock.
The power closing feature will pull the door
fully closed.
XPower closing feature (trunk lid): lightly
push the trunk lid closed.
The power closing feature will pull the trunk
lid fully closed.
Unlocking the driver's door
(mechanical key)
If the vehicle can no longer be unlocked
centrally with the SmartKey or KEYLESS-GO:
XTake the mechanical key out of the
SmartKey (Y page 79).
XInsert the mechanical key into the lock of
the driver's door as far as it will go.
XFirmly turn the mechanical key counter-
clockwise as far as it will go to position
1 and hold it in this position.
XPull the door handle quickly.
The locking knob pops up.
The door is unlocked.
XTurn the mechanical key back and remove
it.
XPull the door handle again.
Locking the vehicle
If the vehicle can no longer be locked
centrally with the SmartKey or KEYLESS-GO:
If the SmartKey is faulty, you can lock the
doors and the trunk by taking the following
steps. If the central locking in the vehicle is
malfunctioning, you cannot lock the trunk.
XPress down the locking knobs on the open
rear doors.
XClose the rear doors.XOpen the front-passenger door.XClose the driver's door and the trunk lid.XPress down the locking knob of the driver's
door inside the vehicle.
XPress down the locking knob of the open
front-passenger door.
84DoorsOpening and closing
Page 87 of 524

iMake sure that you have the SmartKey on
your person and that it has not been left in
the vehicle.XClose the front-passenger door.XMake sure that the doors and the trunk are
locked.
i If you lock the vehicle as described above,
the fuel filler flap is not locked. The anti-
theft alarm system is not primed.
Trunk
Important safety notes
Do not leave the SmartKey in the trunk. You
could otherwise lock yourself out.
GWarning
When leaving the vehicle, always remove the
SmartKey from the ignition lock. Always take
the SmartKey with you and lock the vehicle.
Do not leave children unsupervised in the
vehicle, even if they are secured in a child
restraint system, and do not give them access
to an unlocked vehicle. A child's unsupervised
access to a vehicle could result in an accident
and/or serious personal injury. They could:
R injure themselves on vehicle parts
R be seriously or fatally injured by extreme
heat or cold
R injure themselves or have an accident with
vehicle equipment that may still be in
operation even after the SmartKey has
been removed from the ignition, such as the
seat adjustment, steering wheel
adjustment or memory function.
If children open a door, they could cause
severe or even fatal injury to other persons; if
they get out of the vehicle, they could injure
themselves when doing so or be seriously or
even fatally injured by any passing traffic.
Do not expose the child restraint system to
direct sunlight. The child restraint system's
metal parts, for example, could become very
hot, and a child could be burned on these
parts.GWarning!
Do not carry heavy or hard objects in the
passenger compartment or trunk unless they
are firmly secured in place.
Unsecured or improperly positioned cargo
increases a child's risk of injury in the event
of
R strong braking maneuvers
R sudden changes of direction
R an accident
GWarning
Make sure the trunk lid is closed when the
engine is running and while driving. Among
other dangers, deadly carbon monoxide (CO)
gases may enter the vehicle interior resulting
in unconsciousness and death.
! The trunk lid swings upwards when
opened. Therefore, make sure that there is
sufficient clearance above the trunk lid.
You can limit the opening angle of the trunk
lid. This could be useful, for example, if there
is insufficient space above the trunk lid. You
can switch the trunk lid opening height
restriction function on or off via COMAND
( Y page 261).
For the trunk lid to be opened fully, there must
be a minimum clearance from floor to ceiling
of 5.90 ft (1.80 m).
The trunk lid can be:
R opened and closed manually from outside
R opened and closed automatically from
outside
R opened and closed automatically from
inside
R locked separately
R unlocked with the mechanical key
R opened using the emergency release
button inside the trunk
Trunk85Opening and closingZ