2011 MERCEDES-BENZ S-Class multifunction
[x] Cancel search: multifunctionPage 123 of 524

DVD function can be viewed from the front
passenger side.
Use the SPLITVIEW remote control to operate
COMAND from the front passenger side.
Points to remember:
RYour vehicle may be equipped with
SPLITVIEW. The use of SPLITVIEW is
currently not permitted in the following
states: AL, CO, IL, LA, MA, MD, NH, PA, VA,
VT, WA, WI, and WV as well as in the
Canadian provinces Manitoba,
Newfoundland, New Brunswick, and Prince
Edward Island. The driver is responsible for
complying with ALL regional laws. If your
vehicle is registered in a state or province
where SPLITVIEW is not permitted, this
function must be deactivated. Please
consult an authorized Mercedes-Benz
center to verify if the use of SPLITVIEW is
permitted in your state/province.
RThe SPLITVIEW remote control can be used
to adjust the volume of the front-passenger
side headphones. Before putting on the
headphones, make certain that the volume
has not been set too high.
RYou can only use media from the driver's
and front-passenger sides separately if the
media are from different sources. Example:
on the driver's side, an audio CD is being
played on the DVD changer. This means
that on the front-passenger side, the DVD
changer cannot be used to play a different
medium, for instance a video DVD.
However, other media can be used at the
same time on the front-passenger side,
including radio, memory card, MUSIC
REGISTER, Media Interface, USB or AUX.
RIf you use the same medium on both sides,
you can both carry out the respective
settings.
RThere must be clear line of sight between
the headphones and the display so that
COMAND can optimally transmit music and
speech via the infrared signal on the front-
passenger's headphones. For this reason,
please also observe that the headphones
have left and right sides, and use them
correctly.
RUsing SPLITVIEW you can only use
entertainment functions separately, such
as audio and video functions.
RThe multifunction steering wheel can only
used for functions which relate to the
driver's side.
Switching SPLITVIEW on/off
XTo switch on SPLITVIEW: select
Vehicle from the main function bar by
turning cVd the COMAND controller and
press W to confirm.
The "Vehicle" menu appears.
XSelect SPLITVIEW on.
SPLITVIEW symbol : appears in the
display, and display ; switches to
SPLITVIEW off.
XTo switch off SPLITVIEW: select
Vehicle from the main function bar by
turning cVd the COMAND controller and
press W to confirm.
The "Vehicle" menu appears.
XSelect SPLITVIEW off.
Display ; switches to SPLITVIEW on.
iIf COMAND has already been switched
on, you can also use the remote control to
switch SPLITVIEW on and off
(Y page 123).
The SPLITVIEW screen remains on for
approximately 30 minutes after the key has
been turned to position 0 in the ignition lock.
After this time or after the key has been
At a glance121COMANDZ
Page 124 of 524

removed, the settings on the front-passenger
side are saved for approximately 30 minutes
longer. After this period, reactivation on the
front-passenger side means that the settings
from the driver's side will be used.
Cordless headphones for the front
passenger
There are different cordless headphones for
the front passenger and the rear
compartment.
The cordless headphones for the front
passenger can be identified by SPLITVIEW
symbol : on the headband.
The cordless headphones for the front
passenger cannot be used in the rear
compartment. Equally, the headphones for
the rear compartment cannot be used by the
front passenger.
Swiveling the COMAND display and
setting the brightness
! Do not place any objects in front of or
behind the COMAND display and/or do not
secure any objects to the COMAND
display. Movement could otherwise be
prevented when folding the display in/out.
You can swivel the COMAND display7. The
buttons are located beside the COMAND
display.
Swiveling:To swivel the display to the left;To swivel the display to the right
Setting the brightness
:Brightness of the instrument cluster
lighting
;Brightness of the COMAND display
Brighter or dimmer:
XTurn control : or ; clockwise or counter-
clockwise.
iIf Night View Assist Plus is activated, only
the brightness of the multifunction display
is adjusted with control :.
Display design
When the default settings are selected, the
display automatically switches between day
design and night design.
You can change these settings using
COMAND (Y page 141).
7Not with SPLITVIEW.122At a glanceCOMAND
Page 133 of 524

Option 1XSelect 4 or 5 in the character bar and
press W to confirm.
The input menu shows the data field
selected.
:Cursor in next data field;To store an entry=4 and 5 icons to select a data field
Option 2
XSlide ZV the COMAND controller
repeatedly until the character bar
disappears.
XSelect the data field by sliding ZVÆ and
press W to confirm.
Storing an entry
XSelect ¬ in the character bar by turning
cVd the COMAND controller and press
W to confirm.
The entry is stored in the address book.
Further functions available in the
character bar
XTo switch the character bar to upper/
lower-case characters: select * or
E and press W to confirm.
XTo switch the character set: select
p and press W to confirm.
The character set switches between
upper/lower-case letters and digits.
XTo change the language of the
character bar: select B and press W
to confirm.
XSelect the language by turning cVd the
COMAND controller and press W to
confirm.
XTo reposition the cursor within the data
field: select 2 or 3 and press W to
confirm.
:Cursor (repositioned);2 and 3 icon to reposition the cursorXDelete the character/entry (Y page 129).
Basic functions of COMAND
Switching COMAND on/off
XPress the u function button on the
center console.
iIf you switch off COMAND, playback of
the current audio or video source will also
be switched off. You cannot switch off
COMAND while making a call via COMAND.
You can also make phone calls using the
buttons on the multifunction steering
wheel when COMAND is switched off
(Y page 365).
At a glance131COMANDZ
Page 134 of 524

Mute
Switching audio and video sources on/off
XPress the 8 button on the multifunction
steering wheel.
The sound from the respective audio or
video source is switched on or muted.
iWhen the sound is off, the system
displays the , symbol in the status line.
When you change the audio or video
source, or adjust the volume, the sound
automatically switches on again.
iEven if the sound is switched off, you will
still hear traffic and navigation system
announcements.
Switching off Traffic program and
navigation announcements completely
XTraffic program: press and hold the
8 button until the . display
disappears from the status bar of the
display.
A confirmation tone sounds.
XNavigation announcements: during an
announcement, press the 8 button on
the multifunction steering wheel.
Switching Traffic program and navigation
announcements on again
XTraffic program: press and hold down the
8 button until the . display in the
status bar appears.
A confirmation tone sounds.
XNavigation announcements: press the
8 button again.
iThe navigation announcements are
activated again if you switch COMAND off
and on again or start a new route guidance.
Adjusting the volume
Adjusting the volume for the audio or
video source
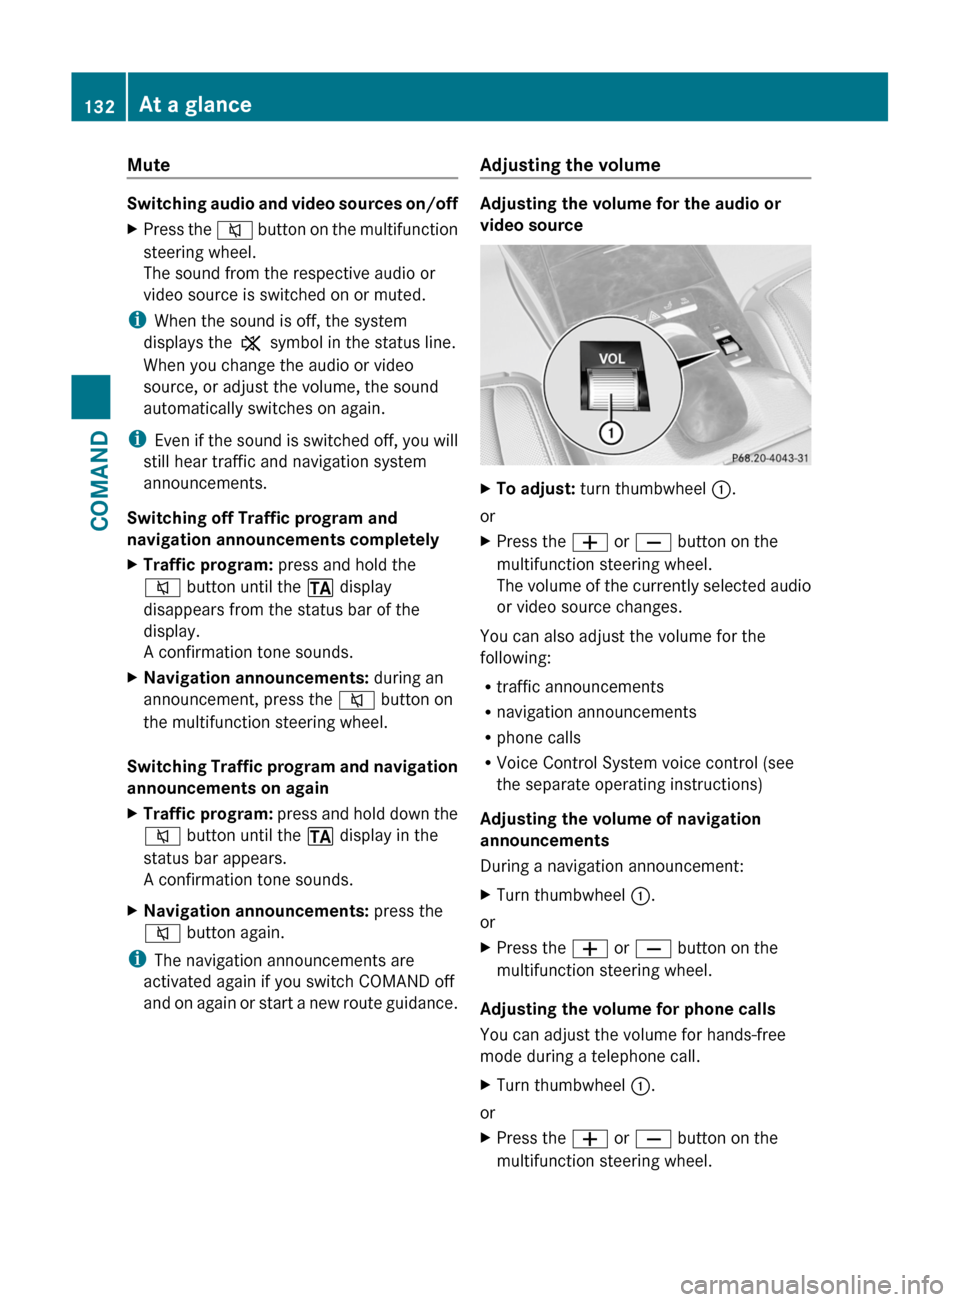
XTo adjust: turn thumbwheel :.
or
XPress the W or X button on the
multifunction steering wheel.
The volume of the currently selected audio
or video source changes.
You can also adjust the volume for the
following:
Rtraffic announcements
Rnavigation announcements
Rphone calls
RVoice Control System voice control (see
the separate operating instructions)
Adjusting the volume of navigation
announcements
During a navigation announcement:
XTurn thumbwheel :.
or
XPress the W or X button on the
multifunction steering wheel.
Adjusting the volume for phone calls
You can adjust the volume for hands-free
mode during a telephone call.
XTurn thumbwheel :.
or
XPress the W or X button on the
multifunction steering wheel.
132At a glanceCOMAND
Page 168 of 524

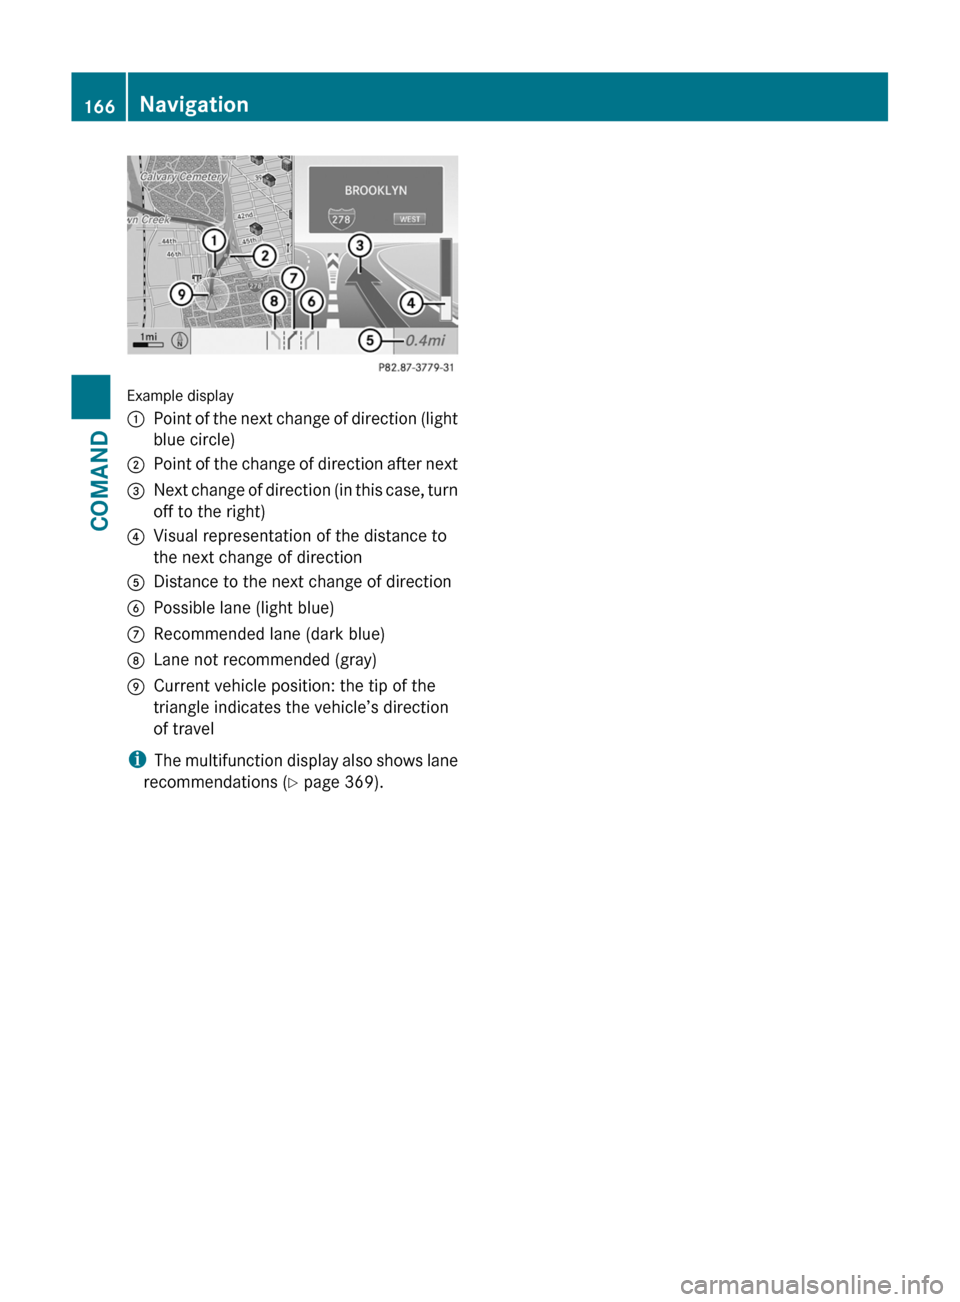
Example display
:Point of the next change of direction (light
blue circle)
;Point of the change of direction after next=Next change of direction (in this case, turn
off to the right)
?Visual representation of the distance to
the next change of direction
ADistance to the next change of directionBPossible lane (light blue)CRecommended lane (dark blue)DLane not recommended (gray)ECurrent vehicle position: the tip of the
triangle indicates the vehicle’s direction
of travel
iThe multifunction display also shows lane
recommendations (Y page 369).
166NavigationCOMAND
Page 169 of 524

Display and description of lane recommendations
The colors used in the lane recommendation display vary depending on whether day or night
design is switched on.
LaneDay designNight designRecommended lane C
In this lane, you will be able to complete the
next two changes of direction without
changing lanes.
Dark blueLight bluePossible lane B
In this lane, you will only be able to complete
the next change of direction without
changing lanes.
Light blueDark blueLane not recommended D
In this lane, you will not be able to complete
the next change of direction without
changing lanes.
GrayGrayCar pool lanes
COMAND shows car pool lanes.
Car pool lanes can only be used under certain
conditions. Please observe the relevant legal
requirements.
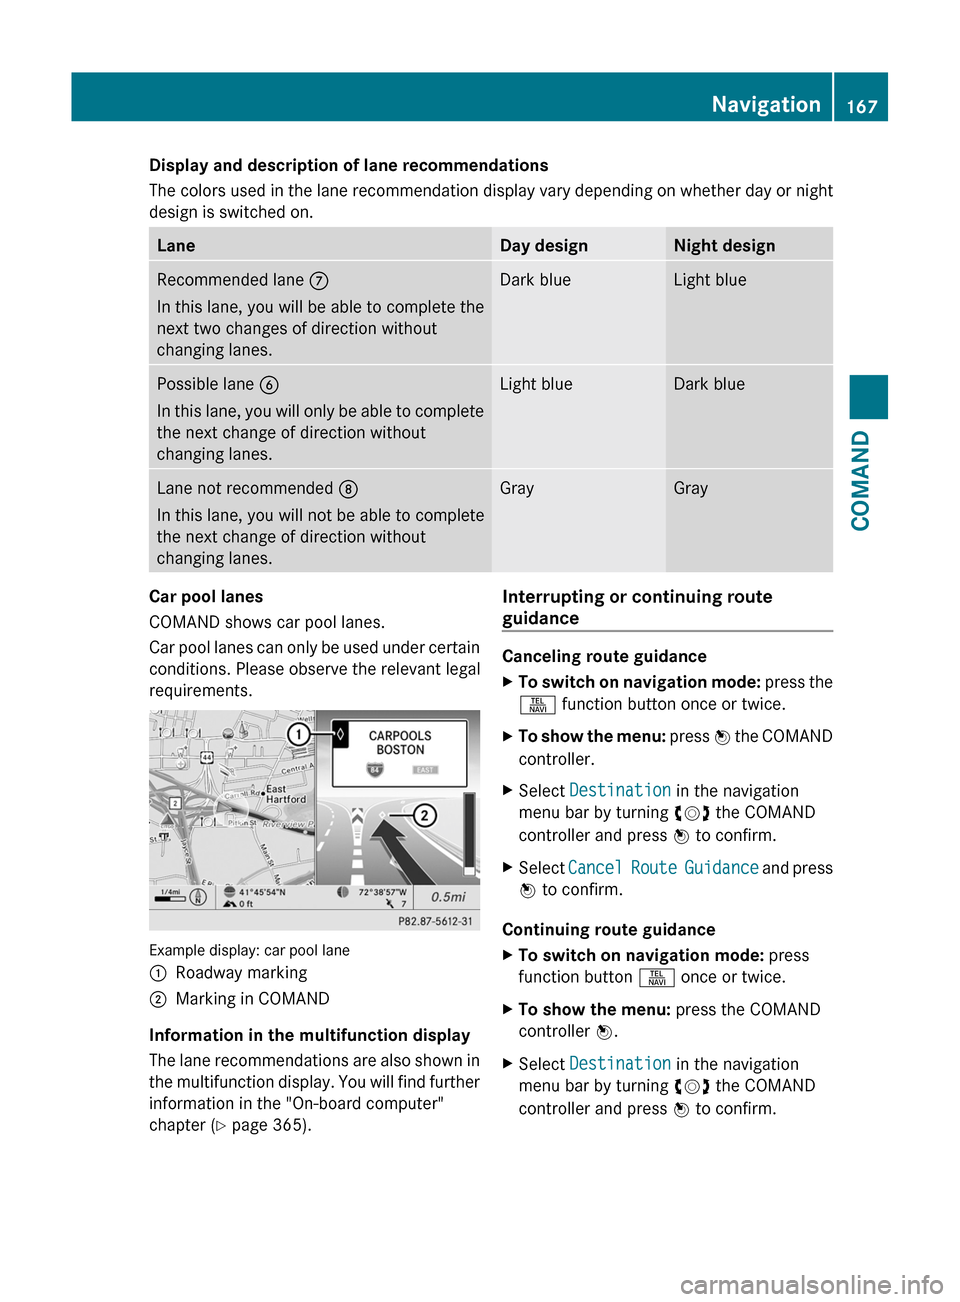
Example display: car pool lane
:Roadway marking;Marking in COMAND
Information in the multifunction display
The lane recommendations are also shown in
the multifunction display. You will find further
information in the "On-board computer"
chapter (Y page 365).
Interrupting or continuing route
guidance
Canceling route guidance
XTo switch on navigation mode: press the
S function button once or twice.
XTo show the menu: press W the COMAND
controller.
XSelect Destination in the navigation
menu bar by turning cVd the COMAND
controller and press W to confirm.
XSelect Cancel Route Guidance and press
W to confirm.
Continuing route guidance
XTo switch on navigation mode: press
function button S once or twice.
XTo show the menu: press the COMAND
controller W.
XSelect Destination in the navigation
menu bar by turning cVd the COMAND
controller and press W to confirm.
Navigation167COMANDZ
Page 193 of 524

Telephone
Vehicle equipment
i These Operating Instructions describe all
standard and optional equipment available
for your vehicle at the time of purchase.
Please note that your vehicle may not be
equipped with all features described.
General information
Introduction
The telephone function, in conjunction with a
Bluetooth ®
-capable mobile phone, offers
Bluetooth ®
interface telephony.
Using theBluetooth ®
interface and a suitable
mobile phone, you can receive vCards.
For more information on suitable mobile
phones and on connecting a Bluetooth ®
-
capable mobile phone to COMAND, visit
http://www.mbusa-mobile.com or call
the Mercedes-Benz Customer Assistance
Center under
1-800-FOR-MERCedes(1-800-367-6372)
(US) or Customer Relations under
1-800-387-0100 (Canada).
Important safety notes
GWarning
A driver's attention to the road must always
be his/her primary focus when driving. For
your safety and the safety of others, we
recommend that you pull over to a safe
location and stop before placing or taking a
telephone call. If you choose to use the mobile
phone while driving, please use the handsfree
device and only use the mobile phone when
weather, road, and traffic conditions permit.
Some jurisdictions prohibit the driver from
using a cellular mobile phone while driving a
vehicle.
Bear in mind that at a speed of just 30 mph
(approximately 50 km/h), your vehicle is
covering a distance of 44 feet (approximately
14 m) every second.GWarning
You and others may damage your health due
to excessive electromagnetic radiation. By
using an external antenna, the possible health
risks of electromagnetic fields, which are
under discussion among the scientific
community, should be largely prevented.
Calls disconnected while the vehicle is
in motion
A call may be disconnected if:
R there is insufficient network coverage in
certain areas.
R you move from one transmitter/receiver
area (cell) into another and no channels are
free.
R you use a SIM card which is not compatible
with the network available.
R when using a mobile phone with
"Twincard", the second SIM card is
registered on the network at the same time.
Operating options
You can operate the telephone by using:
R the = and ; button or the 9 button
on COMAND
R the 6 or ~ button and the number
keypad on COMAND
R using the 6 or ~ button on the
multifunction steering wheel
R voice commands via the Voice Control
System
Unless stated otherwise, the descriptions and
illustrations in this section refer to COMAND.
Function restrictions
You will not yet be able to use the telephone
in the following situations:
R when the mobile phone is not yet
connected to a network The telephone
Telephone191COMANDZ
Page 199 of 524

Using the telephone
Incoming call
Rejecting or accepting a call
When there is an incoming call, you see a
corresponding window in the display.
XTo reject: select Reject by turning cVd
the COMAND controller and press W to
confirm.
or
XPress the ~ button on the telephone
keypad or on the multifunction steering
wheel.
XTo accept: confirm Accept by pressing
W.
or
XPress the 6 button on the telephone
keypad or on the multifunction steering
wheel.
Once you have accepted the call, you can use
hands-free mode. The call volume can be
adjusted (Y page 132). For more information,
see the "Functions during a single call
connection" section (Y page 198).
The display shows the phone number or the
name and phone number (if the entry is stored
in the address book) or shows the Unknown
(phone number withheld) message.
iYou can also accept a call as described
above when COMAND is showing the
display of a different main application. The
display switches to the telephone display
after you accept the call. After the call is
finished, you see the display of the previous
main application again.
Making a call
Entering a telephone number using the
telephone keypad
XCall up the telephone basic menu
(Y page 196).
XEnter the digits using the telephone
keypad.
XTo make a call: press the 6 button on
the telephone keypad or on the
multifunction steering wheel.
Entering a telephone number using the
telephone basic menu
XCall up the telephone basic menu
(Y page 196).
XSelect the digits one by one by turning
cVd and sliding ZVÆ the COMAND
controller and press W to confirm.
XTo connect a call: select ° in the
character bar and press W to confirm.
or
XPress the 6 button on the telephone
keypad or on the multifunction steering
wheel.
Redialing
XCall up the telephone basic menu
(Y page 196).
XPress the 6 button on the telephone
keypad.
or
XSelect SEND from the telephone basic menu
and press W to confirm.
In both cases, the calls dialed list appears.
The most recently dialed number is at the
top.
Telephone197COMANDZ