2011 MERCEDES-BENZ S-Class Ad blue
[x] Cancel search: Ad bluePage 136 of 524

Surround sound
General notes
If your vehicle is equipped with the harman/
kardon® Logic 7® surround sound system,
you can set the optimum surround sound for
every passenger.
The harman/kardon® Logic 7® surround
sound system is available for the following
operating modes:
Rradio (FM only)
Rsatellite radio
Raudio CD
Raudio DVD (MLP, dts, PCM and Dolby
Digital audio formats)
RMP3 (including SD memory card)
RBluetooth® audio mode
RMedia Interface
Rvideo DVD (PCM, dts and Dolby Digital
audio formats)
RAUX
Because many DVDs contain both stereo and
multi-channel audio formats, it may be
necessary to set the audio format
(Y page 223).
iThe Logic7® On function enables
playback of, e.g. stereo recordings with a
surround sound experience for every
passenger. It enables optimum playback of
music and films on CD, audio DVD or video
DVD with multichannel audio formats, such
as MLP, dts or Dolby Digital. The resulting
audio experience reflects that intended by
the sound engineer during the original
recording.
iIf you select LOGIC7® Off, the sound
system plays the tracks as stored on the
medium. Due to the design of the
passenger compartment, an optimum
audio experience cannot be guaranteed for
all passengers.
iDiscs which support the audio formats
mentioned have the following logos:
Dolby Digital
dts
MLP
Switching surround sound on/off
Example: switching on surround sound for
radio mode
XPress the R function button.
The radio display appears. You will hear the
last station played on the last waveband
set.
134At a glanceCOMAND
Page 147 of 524

XSelect Yes or No and press W to confirm.
If you select No, the process will be aborted.
If you select Yes, the individualization is
deleted. You will see a message to this
effect.
Bluetooth® settings
General information about Bluetooth®
Bluetooth® technology is the standard for
short-range wireless data transmission of up
to approximately 10 meters. Bluetooth®
allows, for example, the exchange of vCards.
Bluetooth® is a registered trademark of
Bluetooth Special Interest Group (SIG) Inc.
Requirements for a Bluetooth®
connection
You can connect mobile phones and
notebooks with COMAND.
To do so, the following conditions need to be
met:
RBluetooth®-capable devices, e.g. mobile
phones, must comply with a certain profile
in order to be connected to COMAND.
Every Bluetooth® device has its own
specific Bluetooth® name.
RBluetooth® must be activated in COMAND
and on the respective Bluetooth® device;
see the separate operating instructions.
Rthe Bluetooth® device must be "visible" to
COMAND in order for COMAND to find and
display it. For the setting procedures,
please see the operating instructions for
the Bluetooth® device.
iOnce a mobile phone has been
connected, reception and transmission
volume may change.
Activating/deactivating Bluetooth®
XSelect Vehicle in the main function bar by
turning cVd the COMAND controller and
press W to confirm.
XSelect System by turning cVd the
COMAND controller and press W to
confirm.
XSelect Bluetooth by turning cVd the
COMAND controller and press W to
confirm.
XSelect Bluetooth activated and press
W to confirm.
This switches Bluetooth® on O or off ª.
Connecting Bluetooth® devices
General information
Before using your Bluetooth® device with
COMAND for the first time, you will need to
connect it.
Connecting is comprised of:
Rsearching for a Bluetooth® device and
Rsubsequently authorizing it
iYou can connect up to ten devices to
COMAND.
For more information on suitable mobile
phones and on connecting a Bluetooth®-
capable mobile phone to COMAND, visit
http://www.mbusa-mobile.com or call
the Mercedes-Benz Customer Assistance
Center at
1-800-FOR-MERCedes(1-800-367-6372)
(US) or Customer Service at
1-800-387-0100 (Canada).
System settings145COMANDZ
Page 148 of 524

Searching for Bluetooth® devicesXActivate Bluetooth® (Y page 145).XSelect Vehicle in the main function bar by
turning cVd the COMAND controller and
press W to confirm.
XSelect System by turning cVd the
COMAND controller and press W to
confirm.
XSelect Bluetooth by turning cVd the
COMAND controller and press W to
confirm.
XSelect Search for Bluetooth devices
and press W to confirm.
COMAND searches for Bluetooth® devices
within range. After a short while, the
Bluetooth® device list appears.
Example of display: Bluetooth® device list
:Currently connected # and authorized
device (Y icon)
;Device not within range but previously
authorized (L appears in gray)
=Newly detected device within range but
not yet authorized (no Y icon)
The Bluetooth® device list shows all devices
within range and all previously authorized
devices, whether or not they are in range.
If the Bluetooth® device list is already full, you
will be requested to de-authorize a device
(Y page 147). If COMAND does not detect
your Bluetooth® device, external
authorization may be necessary
(Y page 147).
iWhen subsequently called up again, the
list may no longer show all devices, for
example because a device has been
removed from the vehicle in the meantime.
In this case, start a new search to update
the device list.
Authorizing a Bluetooth® device
(registering)
XIn the Bluetooth® device list, select not yet
authorized device = by turning cVd the
COMAND controller.
XSelect Options by sliding VY the
COMAND controller and press W to
confirm.
XSelect Authorize and press W to confirm.
The passcode is any one to sixteen-digit
number combination which you can
determine yourself. You must enter the same
number combination in COMAND and in the
Bluetooth® device to be authorized (see
mobile phone operating instructions).
iSome mobile phones require a four-digit
(or longer) passcode.
iIf you want to re-authorize a device
following de-authorization (Y page 147),
you can select a different passcode.
146System settingsCOMAND
Page 149 of 524

XTo enter a passcode in COMAND: press
the number keys in sequence.
¬ is highlighted after the first number
has been entered.
or
XSelect the digits one by one by turning
cVd the COMAND controller and press
W to confirm.XTo confirm an entry in COMAND: select
¬ using the COMAND controller and
press W to confirm.XEnter the same passcode into the
Bluetooth ®
device (see the operating
instructions for the respective device).
The device is authorized.
External authorization
If COMAND does not detect your
Bluetooth ®
device, this may be due to
particular security settings on your
Bluetooth ®
device. In this case, check
whether your Bluetooth ®
device can locate
the COMAND system. The Bluetooth ®
device
name of COMAND is "MB Bluetooth".
XIn the Bluetooth ®
device list, select the
desired device by turning cVd the
COMAND controller.XSelect Options by sliding VY the
COMAND controller and press W to
confirm.XSelect External authorization and
press W to confirm.XStart the Bluetooth ®
scan process on the
Bluetooth ®
device (see separate operating
instructions of the respective device).XSelect COMAND ("MB Bluetooth").XWhen prompted, enter the passcode on the
Bluetooth ®
device and then on COMAND.Displaying the details of a Bluetooth ®
deviceXIn the Bluetooth ®
device list, select the
desired device by turning cVd the
COMAND controller.XSelect Options by sliding VY the
COMAND controller and press W to
confirm.XSelect Details and press W to confirm.
The detailed view for this device appears.XTo close the detailed view: turn cVd or
slide XVY the COMAND controller.
De-authorizing (de-registering) a
Bluetooth ®
device
Mercedes-Benz USA, LLC recommends that
you de-authorize devices, e.g. mobile phones,
both in COMAND and on the respective
Bluetooth ®
device itself. Subsequent
authorization may otherwise fail.
XIn the Bluetooth ®
device list, select the
authorized device by turning cVd the
COMAND controller.XSelect Options by sliding VY the
COMAND controller and press W to
confirm.XSelect De-authorize and press W to
confirm.
A prompt appears asking whether you
really wish to revoke authorization for this
device.XSelect Yes or No and press W to confirm.
If you select Yes, the authorization for the
device will be revoked.
If you select No, the process will be aborted.
i
If a Bluetooth ®
device has been de-
authorized and is no longer in range, it will
no longer be shown in the Bluetooth ®
device list after the next search.
System settings147COMANDZ
Page 167 of 524

The announced distance to the next change
of direction depends on the type of road and
its permissible speed limit.
The display is now split into two sectors. In
the left half, you see the normal map view. In
the right half, there is an enlarged view of the
area surrounding the intersection
(intersection zoom) or a 3D image of the
road's course, the change of direction also
being illustrated.
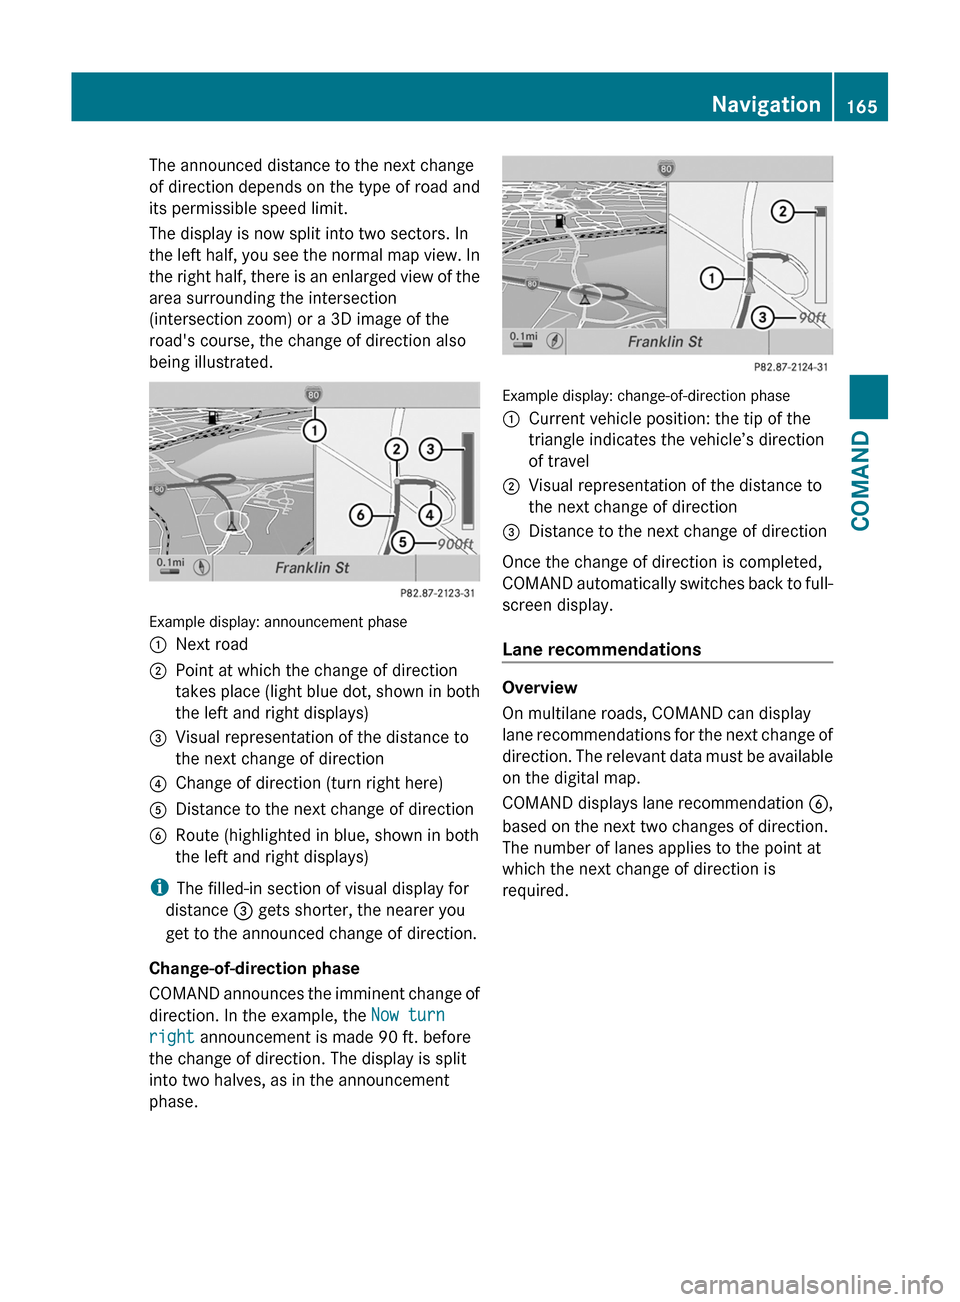
Example display: announcement phase
:Next road;Point at which the change of direction
takes place (light blue dot, shown in both
the left and right displays)
=Visual representation of the distance to
the next change of direction
?Change of direction (turn right here)ADistance to the next change of directionBRoute (highlighted in blue, shown in both
the left and right displays)
iThe filled-in section of visual display for
distance = gets shorter, the nearer you
get to the announced change of direction.
Change-of-direction phase
COMAND announces the imminent change of
direction. In the example, the Now turn
right announcement is made 90 ft. before
the change of direction. The display is split
into two halves, as in the announcement
phase.
Example display: change-of-direction phase
:Current vehicle position: the tip of the
triangle indicates the vehicle’s direction
of travel
;Visual representation of the distance to
the next change of direction
=Distance to the next change of direction
Once the change of direction is completed,
COMAND automatically switches back to full-
screen display.
Lane recommendations
Overview
On multilane roads, COMAND can display
lane recommendations for the next change of
direction. The relevant data must be available
on the digital map.
COMAND displays lane recommendation B,
based on the next two changes of direction.
The number of lanes applies to the point at
which the next change of direction is
required.
Navigation165COMANDZ
Page 168 of 524

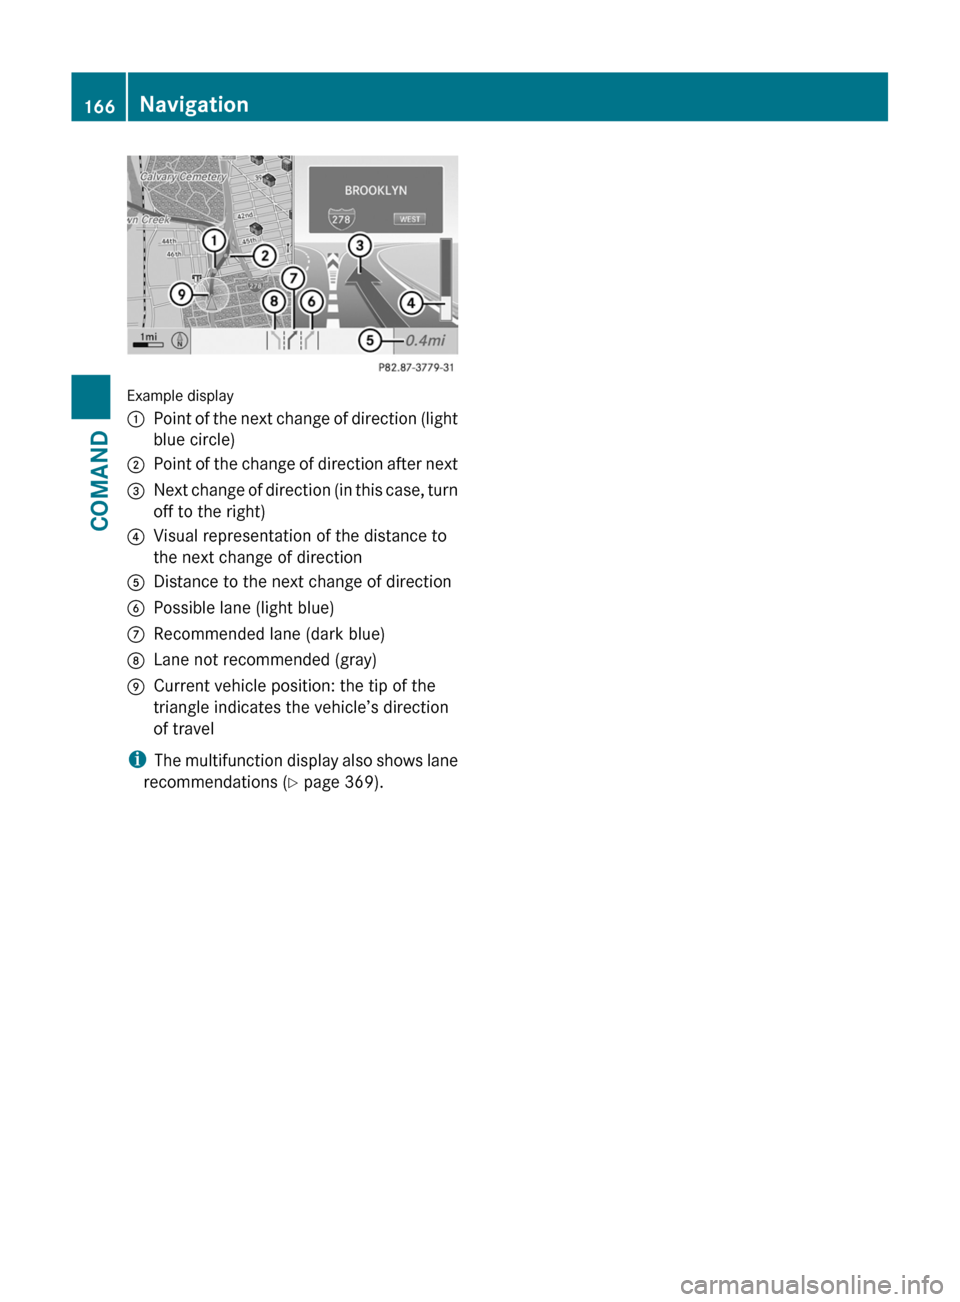
Example display
:Point of the next change of direction (light
blue circle)
;Point of the change of direction after next=Next change of direction (in this case, turn
off to the right)
?Visual representation of the distance to
the next change of direction
ADistance to the next change of directionBPossible lane (light blue)CRecommended lane (dark blue)DLane not recommended (gray)ECurrent vehicle position: the tip of the
triangle indicates the vehicle’s direction
of travel
iThe multifunction display also shows lane
recommendations (Y page 369).
166NavigationCOMAND
Page 169 of 524

Display and description of lane recommendations
The colors used in the lane recommendation display vary depending on whether day or night
design is switched on.
LaneDay designNight designRecommended lane C
In this lane, you will be able to complete the
next two changes of direction without
changing lanes.
Dark blueLight bluePossible lane B
In this lane, you will only be able to complete
the next change of direction without
changing lanes.
Light blueDark blueLane not recommended D
In this lane, you will not be able to complete
the next change of direction without
changing lanes.
GrayGrayCar pool lanes
COMAND shows car pool lanes.
Car pool lanes can only be used under certain
conditions. Please observe the relevant legal
requirements.
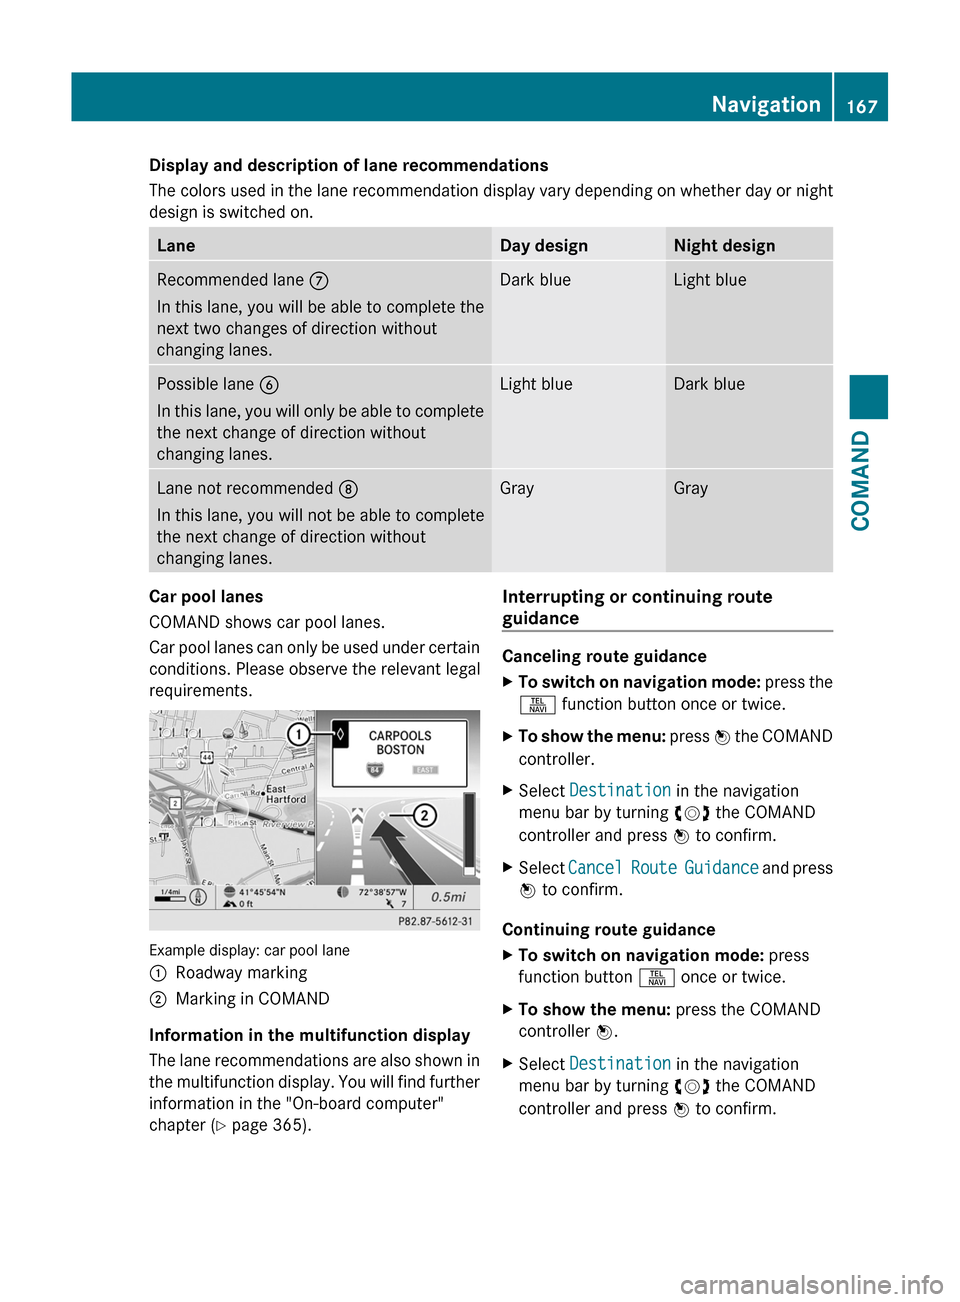
Example display: car pool lane
:Roadway marking;Marking in COMAND
Information in the multifunction display
The lane recommendations are also shown in
the multifunction display. You will find further
information in the "On-board computer"
chapter (Y page 365).
Interrupting or continuing route
guidance
Canceling route guidance
XTo switch on navigation mode: press the
S function button once or twice.
XTo show the menu: press W the COMAND
controller.
XSelect Destination in the navigation
menu bar by turning cVd the COMAND
controller and press W to confirm.
XSelect Cancel Route Guidance and press
W to confirm.
Continuing route guidance
XTo switch on navigation mode: press
function button S once or twice.
XTo show the menu: press the COMAND
controller W.
XSelect Destination in the navigation
menu bar by turning cVd the COMAND
controller and press W to confirm.
Navigation167COMANDZ
Page 171 of 524

XSelect Route in the navigation menu bar by
turning cVd the COMAND controller and
press W to confirm.
XSelect Detour and press W to confirm.XTo block a section of the route: select
More or Less repeatedly and confirm using
the W button until the desired section has
been selected.
iThe length of the blockable route section
is predetermined by the digital map. The
menu items are available accordingly.
XTo start route calculation: select Start
and press W to confirm.
XTo delete the blocked section: select
Delete while the message is shown and
press W to confirm.
COMAND calculates the route without the
block.
Selecting an alternative route
With the "Alternative route" function, routes
other than the original one can be calculated.
XTo switch on navigation mode: press the
S function button once or twice.
XTo show the menu: press W the COMAND
controller.
XSelect Route in the navigation menu bar by
turning cVd the COMAND controller and
press W to confirm.
XSelect Alternative Route and press W
to confirm.
You see the selected route. The display now
shows a split-screen view. On the left-hand
side, one or more alternative routes are
shown from start to destination. The
current route is highlighted dark blue; other
alternative routes appear light blue.
:Distance, estimated time of arrival and
estimated remaining driving time
;Display of events on the route=Display of selected route settingXTo select the next or previous
alternative route: select Next or
Previous and press W to confirm.
The possible alternative routes are shown
in this order: Current Route, Fast
Route, Eco Route, Short Route and
Alternative Route.
XTo select the original route: select Back
as often as necessary and press W to
confirm.
XTo start route guidance using the
selected alternative route: select Start
and press W to confirm.
COMAND accepts the alternative route.
Displaying destination information
Requirement: you have entered a destination
(Y page 151) and possibly an intermediate
stop (Y page 158).
XTo switch on navigation mode: press the
S function button once or twice.
XTo show the menu: press W the COMAND
controller.
XSelect Info in the navigation menu bar by
turning cVd the COMAND controller and
press W to confirm.
Destination information is displayed.
Navigation169COMANDZ