2011 MERCEDES-BENZ M-CLASS SUV display
[x] Cancel search: displayPage 95 of 389

Usefu
linfor mati on
i This Owner's Manual describes all models
and all standard and optional equipment
available to your vehicle at the time of pub-
lication of the Owner's Manual. Country-
specific deviation sare possible .Please
not ethat your vehicle ma ynot be equipped
with all featur es described. This also
applies to safety-releva ntsystems and
functions.
i Please read the information on qualified
specialist workshops (Y page 24).Correct driver'
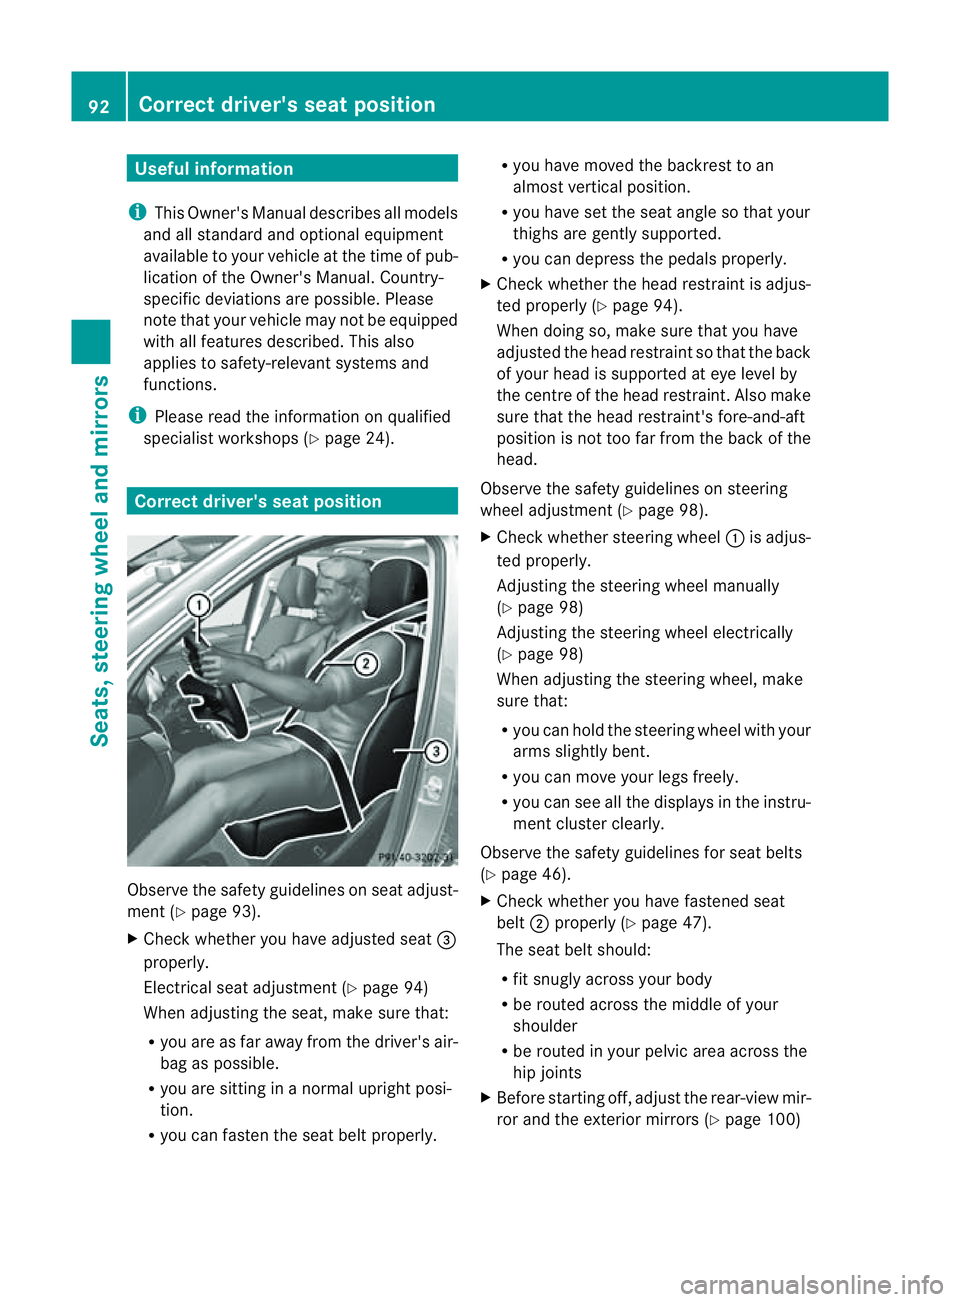
sseatp osition Observ
ethe safety guideli neso nseat adjust-
men t(Ypage 93).
X Chec kwhether you hav eadjusted seat =
properly.
Electrical seat adjustment (Y page 94)
When adjusting the seat, mak esure that:
R you are as far away from the driver' sair-
bag as possible.
R you are sitting in anormal upright posi-
tion.
R you can fasten the seat belt properly. R
you have moved the backrest to an
almost vertical position.
R you have set the seat angle so that your
thighs ar egently supported.
R you can depress the pedals properly.
X Check whether the head restraint is adjus-
ted properly (Y page 94).
When doing so, mak esure that you have
adjusted the head restraint so that the back
of your head is supported at eye level by
the centre of the head restraint .Also make
sure that the head restraint's fore-and-aft
position is not too far from the bac kofthe
head.
Observ ethe safety guidelines on steering
wheel adjustment (Y page 98).
X Chec kwhether steering wheel :is adjus-
ted properly.
Adjusti ngthe steering whee lmanually
(Y page 98)
Adjustin gthe steering wheel electrically
(Y page 98)
When adjustin gthe steering wheel, make
sur ethat:
R you can hold the steering wheel with your
arms slightl ybent.
R you can mov eyour legs freely.
R you can see all the displays in the instru-
men tcluster clearly.
Observe the safety guidelines for seat belts
(Y page 46).
X Check whether you have fastened seat
belt ;properly (Y page 47).
The seat belt should:
R fit snugly across your body
R be routed across the middle of your
shoulder
R be routed in your pelvic area across the
hip joints
X Befor estartin goff, adjus tthe rear-vie wmir-
ror and the exterior mirrors (Y page 100)92
Correct driver's seat positionSeats, steerin
gwhee land mirrors
Page 126 of 389

Control panel for THERMOTRONIC automatic clima
tecontrol (3-zone) :
Setsthe tem perature, left (Y page 126)
; Demists th ewindscree n(Ypage 127)
= Activates/deactivate sthe resi dual heat function (Y page 129)
? Activates/deactivate scooling with ai rdehumidi fication (Y page124)
A Switches the rea rwindow heatin gon/off (Y page128)
B Sets the tempera ture,right (Y page 126)
C Activates/deactivates the ZONE function (Y page 127)
D Switches climate control on/off (Y page 124)
E Setsthe air distribution (Y page 126)
F Increase sthe airflo w(Ypage 12 7)
G Reduces the airflow (Y page 127)
H Display
I Adjusts the climate control settings (AI RFLOW) (Y page 125)
J Activates/dea ctivates air-recirculation mode (Y page 128)
K Setsclimate control to automatic (Y page 125)
Rea rcontrol panel
L Increases the airflow (Y page 127)
M Setsthe temperatur e(Ypage 12 6)
N Sets the rear-compartment climate control to auto matic (Y page 125)
O Direct sthe airflo wthrough the rea rair vents (Y page 126)
P Direct sthe airflo wthrough the footwell vents (Y page 126) Overview of clim
atec ontrol systems
123Climate control Z
Page 130 of 389

air vents. The side air ven
ts canonly be
closed whe nthe con trols on the side air
vent sare turne ddownwards.
X Tur nthe key to position 2in the ignition
lock.
X Front control panel: press the_but-
ton repeatedly until the desired symbol
appears in the display.
X Rea rcontrol panel: press theMand/
or O button. Setting the airflow
X Turn the key to position 2in the ignition
lock.
X To increase: press theKbutton.
X To reduce: press theIbutton.
i You can use THERMOTRONIC automatic
climate control to set the airflow in the rear
compartmen tseparately. Switching the ZONE function on/off
X To switc hon:press the ábutton.
The indicator lam pintheá button lights
up.
THERMATI Cautomatic climate control: the
temperature setting for the driver' sside is
not adopted for the front-passenger side.
The temperature of the front-passenger
side is adopted for the rear compar tment.
THERMOTRONI Cautomatic climate con-
trol: the temperature setting for the driver's
side is not adopte dfor the front-passenger
side and the rea rcompartmen t.
When the button sorcontrols for tempera-
ture, airflow or air distribution ar eactivated,
the tempe rature setting for the driver's side
is not adopted for the othe rclimate control
zones. X
To switch off: press theábutton.
The indicator lamp in the ábutton goes
out.
The temperature setting for the driver's
side is adopted for the front-passenger side
and the rear compar tment. Demisting the windscreen
You can use this fun ction to defrost the wind-
screen or to demist the inside of the wind-
screen and the side windows.
i You should only select the demisting
function until the windscreen is clear again.
X Turn the key to position 2in the ignition
lock.
X To activate: press the¬button.
The indicator lamp in the ¬button lights
up.
The climat econtrol system switche stothe
followin gfunctions:
R cooling with air dehumidification on 10
R high airflow 11
R high temperature 11
R air distribution to the windscreen and
fron tside windows
R air-recirculation mode off
X To switch off: press the¬button.
The indicator lamp in the ¬button goes
out. The previously selected settings come
int oe ffect again .The cooli ngwith air dehu-
midification function remain son. Air-recir-
culation mode remain sdeactiva ted.
or
X Press the Ãbutton.
The indicator lamp in the ¬button goes
out. Airflow and air distribution are set to
automatic mode.
or
10 Only with engine run ning.
11 Depending on the outside temperature. Ope
rating th eclimate control system
127Climate control Z
Page 134 of 389

Switching th
eauxiliary heating/venti-
lation on/off using the centre console
button Th
ec olour softhe indicator lamps on the but-
ton hav ethe followin gmeanings:
Blue Auxiliar yventilation switched on
Red Auxiliar yheatin gswitched on
Yellow Departur etime preselected
(Y page 250)
Switching on auxiliary heating/ventila-
tion
X Press button :.
The red or blue indicator lamp in but-
ton :lights up.
Switching off auxiliary heating/ventila-
tion
X Press button :.
The red or blue indicator lamp in but-
ton :goes out.
Switching the auxiliar yheating/venti-
lation on/off using the remote control Your vehicle comes with one remote control.
You may use two additional remote controls
for your vehicle. For further information, con-
sult aqualified specialist workshop, e.g. a
Mercedes-Benz Service Centre. The remote control has
amaximum range of
approximately 300 metres. This range is
reduced by:
R sources of radio interference
R solid objects between the remote control
and the vehicle
R the remote control being in an unfavoura-
ble position in relation to the vehicle
R transmittin gfrom an enclose dspace
i The optimu mrange can be achieved if you
hold the remote control vertically, pointing
upwards when you press one of the but-
tons.
i Abattery symbol appears in th edisplay
when th ebatter yint he remote control is
low. Re placethe remote control battery
(Y page 132). Auxiliar
yheating remot econtrol
: Display
; . To check th estatus/set the depa r-
tur etime
= ^ To switch off th eauxiliar yheating/
ventilation
? u To switch on th eauxiliar yheating/
ventilation
A , To check th estatus/set the depa r-
tur etime
Switching on auxiliary heating/ventila-
tion
X Press the ubutton.
ON is shown in th
eremot econtrol di splay. Operatin
gthe clima tecontrol system
131Climatecontr ol Z
Page 135 of 389

Switching of
fauxiliary heating/ventila-
tion
X Press the ^button.
OFF is show
ninthe remote con troldisplay.
Checking the status of the auxiliary heat-
ing/ventilation
X Press the ,or. button.
The following messages can appea rinthe
display: Display Meaning
The auxiliary heating/
ven tilation is switched
off. The auxiliary ventilation
is switched on. The num-
ber in the displa yshows
the remaining tim e(in
minutes) for the auxiliary
ventilation. The auxiliary heating is
switched on. The number
in the displa yshows the
remaining tim e(in
minutes) for the auxiliary
heating. Ad
eparture tim ehas
been activated. The
departure time appears
in the display. Ad
eparture tim ehas
been activated. The aux-
iliary ventilation is cur-
rently selected. The
departure time appears
in the display. Ad
eparture tim ehas
been activated. The aux-
iliary heating is currently
selected. The departure
time appears in the dis-
play. Setting
adeparture time
X Press the ,or. button repeatedly
until the time to be changed appears in the
display.
X Press the uand^ button ssimulta-
neously.
The Îsymbol in the remot econtrol dis-
play flashes.
X Press the ,or. button to set the
desire ddeparture time.
i The longer you press the ,or.
button ,the faster the tim echange s.
X Pres sthe u and^ button ssimulta-
neously.
The new departur etime is stored.
Activating the set departure time
X Press the ,or. button repeatedly
until the desired departur etime appears in
the display.
X Press the ubutton.
The Ísymbol and the departur etime
appear in the display.
Deactivating aset departure time
X Press the ,or. button.
The status of the auxiliary heating is shown
in the display.
X Press the .button.
The first departure time stored appears in
the display.
X Press the ^button.
The display message OFF appears in the
display.
Replacing the remote control battery G
WARNING
Batteries contain poisonous substances.
Swallowing/ingestin gbatteries can result in
serious personal injur yordeath.
Alway skeep batteries away from children .If
ab atter yiss wallowed, seek immediat emed-
ical attention. 132
Operating th
eclimate control systemClimate control
Page 137 of 389

Problems wit
hthe auxiliary heating/ventilation Display messages Possible causes/consequences and
M Solutions
$
FAIL Th
es ignal transmission between the transmitter and the vehicle
is faulty.
X Change your position in relation to the vehicle, movin gcloser if
necessary.
X Make another attempt to switch the auxiliary heating on or off
using the remote control. FAIL
© This display message will only appear if you attempt to activate
the auxiliary heating.
There is not enough fuel in the fuel tank ,orthe auxiliary heating
is faulty.
X Refuel at the nearest filling station.
X Make another attemp ttos witch on the auxiliary heating using
the remote control.
X Have the auxiliary heating checked at aqualified specialist
workshop. FAIL This display messag
emay appear if you attempt to activate the
auxiliary heating or during astatus query.
If the auxiliary heating doe snot switc honorh as switched off while
running, this has occurred due to one of the following reasons:
R the auxiliary heating was started more than twice when the
engine was switched off.
R the starter battery is not sufficiently charged.
R there is too little fuel in the fuel tank.
R the auxiliary heating is faulty.
If the auxiliary heating was switched on more than twice:
X Switch on the engine and let it run for more than 10 seconds.
X Make another attempt to switch on the auxiliary heating using
the remote control.
If the starter battery is not sufficiently charged:
X Charge the starter battery.
X Make another attempt to switch on the auxiliary heating using
the remote control.
If there is not enough fuel:
X Refuel at the nearest filling station.
X Make another attempt to switch on the auxiliary heating using
the remote control. 134
Operating the climate control systemClimate control
Page 145 of 389

X
Take your foot off the brake pedal.
i Onc eyou have taken your foot off the
brake pedal, the vehicle is held for around
one second.
X Pull away.
Hill star tassist will not func tion if:
R you ar epulling away on alevel road or a
downhill gradient.
R the transmission is in position N.
R the electric parking brak eisapplied.
R ESP ®
is malfunc tioning. ECO sta
rt/stop function
General notes The ECO start/stop func
tion switches the
engin eoff automatically if th evehicle stops
moving.
The engine star tsautomatically when you pull
away again. The ECO start/stop function
thereby helps you to reduce the fuel con-
sumption and emissions of your vehicle.
The ECO start/stop function is activated each
time the engine is switched on. The system is
operational when ECO symbol ¤is shown
in the multifunc tion display.
If the ECO star t/stop func tion is deactivated
(Y page 143), ECO symbol ¤is not
shown. G
WARNING
If the ECO symbol appears in the multifunc-
tion displa ywhen the engin eisswitched off,
the engine was switched off automatically.
However, all vehicle systems remain active. If
you open the door, unfasten your seat belt or
remove your foot from the brake pedal, the
engine will automatically start .The vehicle
ma ybegin moving. There is arisk of accident.
To prevent the vehicle from accidentally pull-
ing away, do not release the brake pedal until
you want to drive on. Do not leave the vehicle until you have
switched off the ignition and secured the vehi-
cle to prevent it from rolling away.
! Always switch the ignition off and take the
key with you when leaving the vehicle.
Automa tice ngine switch-off The ECO start/stop function switches the
engin
eoff automatically in certain situations.
To do this ,the vehicle must brake to astand-
still and the brakes must remain depressed
with the transmission in position Dor N.
The engine is only switched off if:
R the vehicle is at astandstill.
R the outside temperature is withi nthe range
that is suitable for the system.
R the engin eisatnormal operatin gtemper-
ature.
R the set temperature for the vehicle interior
has been reached.
R the batter yissufficiently charged.
R the system detects that the windscreen is
not misted up when the air-conditioning
system is switched on.
R the bonnet is closed.
R the driver' sdoor is closed and the seat belt
is fastened.
i If you shift the transmission from Rto D,
the ECO start/stop func tion is available
again onc ethe ¤ ECO symbol reap-
pear sint he multifunction display.
i The engin ecan be switched off automat-
ically amaximum of three times in succes-
sion. The automatic engine switch-off is
then available again after the ¤ECO
symbol appears in the multifunction dis-
play.
i You can still activate the HOLD function
when the vehicle is stationary, even if the
engine has been switched off automati-
cally. It is then not necessary to continue
applying the brakes during the automatic
stop phase .When you depress the accel- 142
DrivingDriving and parking
Page 146 of 389

erator pedal, the engin
estart sautomati-
cally and the brakin geffect of th eHOLD
function is deactivated. Depress the accel-
erator pedal carefully ,asthe engin emust
be started first.
Automatic engin estart The engi
neis started automatically if:
R you depress the accelerator pedal.
R you release the brakes when in transmis-
sion position Dor N,w hen the HOL Dfunc-
tion is not active.
R the ECO start/stop function is deactivated
by pressing the ECO button.
R the vehicle start storoll.
R the driver's seat belt is removed or the driv-
er' sd oor is opened.
R you shift the transmission to position R.
R you switc htodrive program M.
R yo us witch to an off-road program.
R the brake system requires this.
R the system detect smoistur eont he wind-
screen when the air-conditionin gsystem is
switched on.
R the battery' scharge status is too low.
R the bonnet is opened.
R the temperature in the vehicle interior devi-
ates from the set range.
i Shif ting the transmissio ntoposition P
does not star tthe engine.
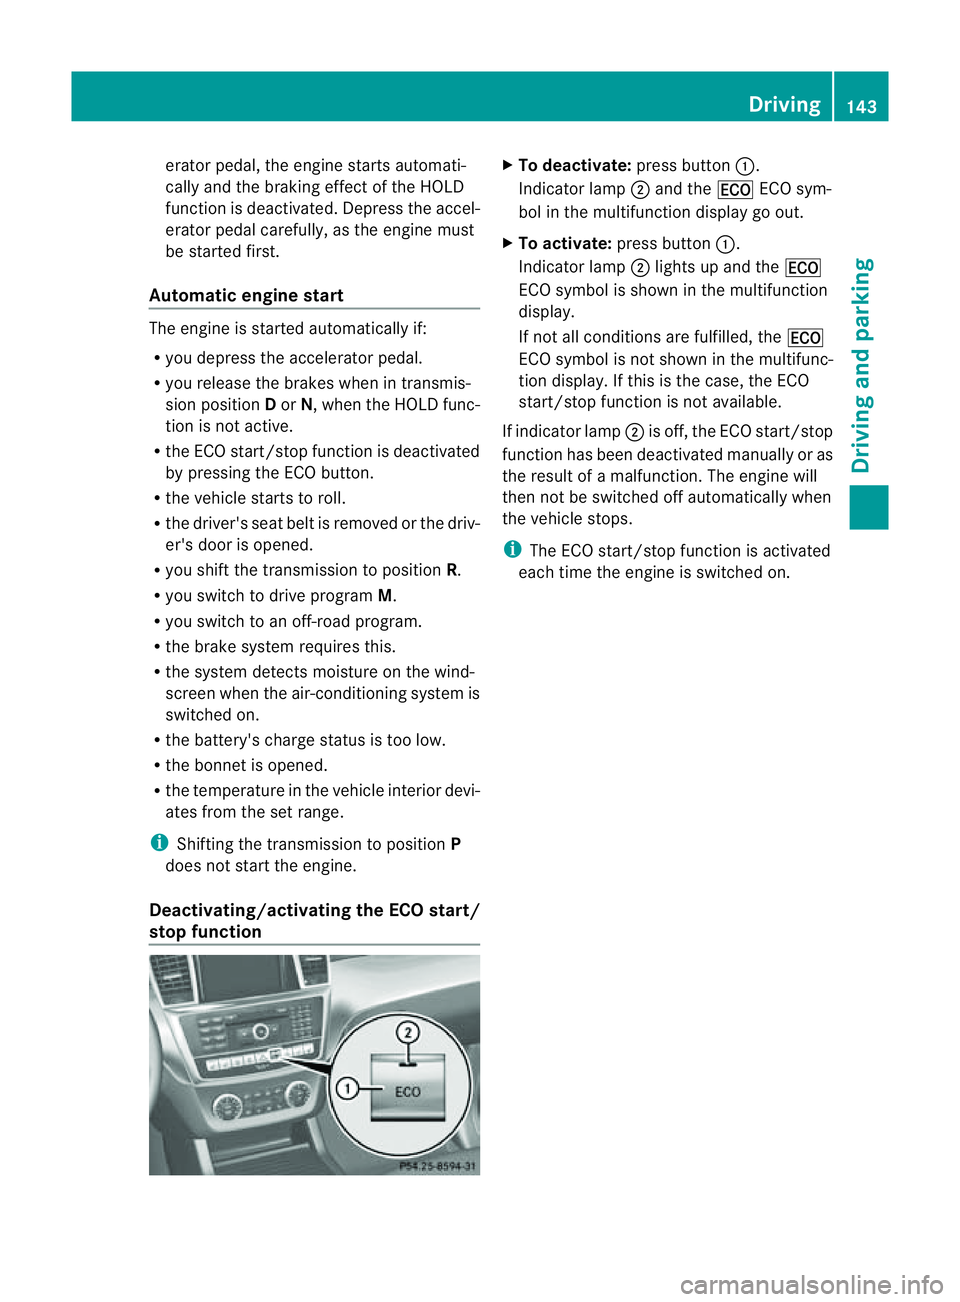
Deactiva ting/activa ting th eECO start/
stop function X
To deactivate: press button:.
Indicator lamp ;and the ¤ECO sym-
bol in the multifunction display go out.
X To activate: press button :.
Indicator lamp ;lights up and the ¤
ECO symbol is shown in the multifunction
display.
If not all conditions are fulfilled, the ¤
ECO symbol is not shown in the multifunc-
tion display. If this is the case, the ECO
start/stop function is not available.
If indicator lamp ;is off, the ECO start/stop
function has been deactivated manually or as
the result of amalfunction. The engine will
then not be switched off automatically when
the vehicle stops.
i The ECO start/stop function is activated
each time the engine is switched on. Driving
143Drivingand parking Z