2011 MERCEDES-BENZ M-CLASS SUV reset
[x] Cancel search: resetPage 92 of 389

X
Kee pswitch 2pulled for an additional
second.
X Make sure that the panorama sliding sun-
roof (Y page 87) and the rolle rsunblinds
(Y page 88 )can be fully opened again.
X If this is no tthe case ,repeat the steps
above again.
! If the panorama sliding sunroof and the
roller sunblin dcannot be fully opened or
closed after resetting, contact aqualified
specialist workshop. Problems with the slidin
gsunroof
Your vehicl emay be fitted with asliding sun-
roof or apanorama sliding sunroof. In the fol-
lowing section, the term "sliding sunroof"
refers to both types of sliding sunroof.
Problem: the sunroof cannot be closed
and you cannot see the cause. G
WARNING
You could be severely or even fatally injured
when closing the sliding sunroof with
increased closing force or if the anti-entrap-
ment feature is deactivated. Make sure that
nobody can become trapped when closing the
sliding sunroof.
If the sliding sunroof is obstructed during
closing and reopens again slightly:
X Immediately after the sliding sunroof
blocks, pull the 2switch in the over-
head control panel down to the point of
resistance and hold it until the sliding sun-
roof is closed.
The sliding sunroof is closed with increased
force.
If the sliding sunroof is obstructed again dur-
ing closing and reopens again slightly:
X Immediately after the sliding sunroof
blocks, pull the 2switch in the over-
head control panel down to the point of resistance and hold it until the sliding sun-
roof is closed.
The sliding sunroof is closed without the
anti-entrapment feature. Sliding sunroof
89Openingand closing Z
Page 104 of 389

X
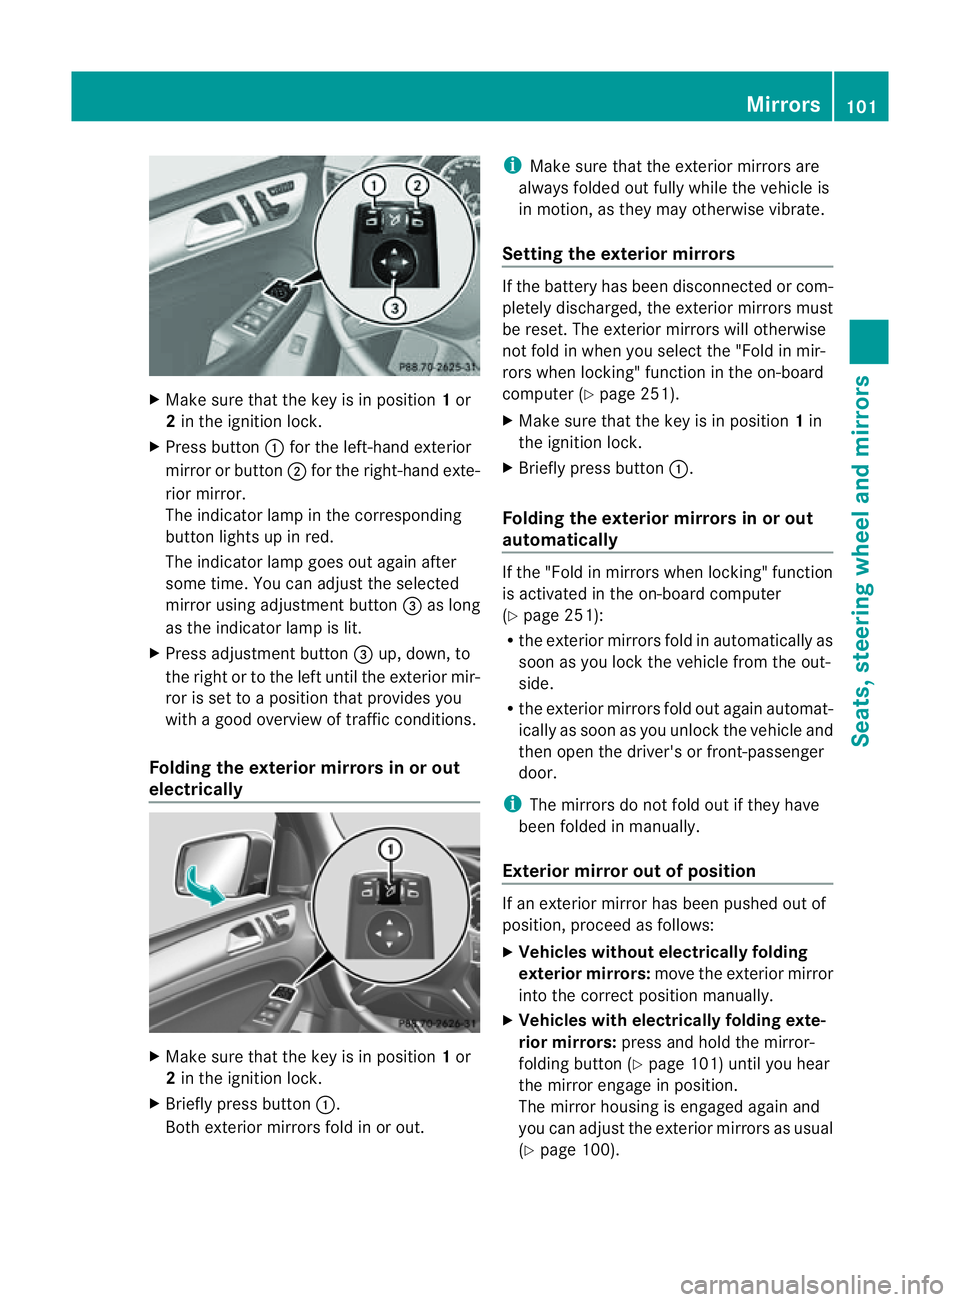
Make sur ethat the key is in position 1or
2 in the ignition lock.
X Press button :for the left-hand exterior
mirror or button ;for the right-hand exte-
rior mirror.
The indicator lam pint he corresponding
button lights up in red.
The indicator lam pgoes out again after
some time. You can adjust the selected
mirror using adjustment button =as long
as the indicator lam pislit.
X Press adjustment button =up, down, to
the right or to the left until the exterior mir-
ror is set to aposition that provides you
with agood overview of traffic conditions.
Folding th eexterior mir rors in or out
electrically X
Make sure that the key is in position 1or
2 in the ignitio nlock.
X Briefl ypres sbutton :.
Both exterior mirrors fold in or out. i
Make sure that the exterior mirrors are
always folded out fully while the vehicle is
in motion, as they may otherwis evibrate.
Setting the exterior mirrors If the battery has been disconnected or com-
pletely discharged, the exterior mirrors must
be reset. The exterior mirrors will otherwise
not fold in when you select the "Fold in mir-
rors when locking" func tion in the on-board
computer (Y page 251).
X Make sure that the key is in position 1in
the ignition lock.
X Briefl ypres sbutton :.
Folding the exterior mirrors in or out
automatically If the "Fold in mirrors when locking" function
is activated in the on-board computer
(Y page 251):
R the exterior mirrors fold in automatically as
soo nasyou lock the vehicle from the out-
side.
R the exterior mirror sfold out again automat-
ically as soon as you unloc kthe vehicle and
then open the driver's or front-passenger
door.
i The mirrors do not fol dout if they have
been folded in manually.
Exterior mirror out of position If an exterior mirror has been pushed out of
position, proceed as follows:
X Vehicles without electrically folding
exterior mirrors: move the exterior mirror
into the correct position manually.
X Vehicles with electrically folding exte-
rior mirrors: press and hold the mirror-
folding button (Y page 101)until you hear
the mirror engage in position.
The mirror housing is engaged agai nand
you can adjus tthe exterior mirrors as usual
(Y page 100). Mir
rors
101Seats ,steeri ngwheel and mirrors Z
Page 105 of 389

Automati
canti-dazzle mirrors G
WA
RNING
If inciden tlight fro mheadlamps is prevented
from striking the sensor in the rear-view mir-
ror ,for instance, by luggage piled too high in
the vehicle, the mirror's automatic anti-dazzle
fun ction will not operate.
Incident light could then blind you. This may
distrac tyou from the traffic condition sand,
as aresult, you may cause an accident.
The rear-view mirror and the exterior mirror
on the driver' sside automatically go into anti-
dazzle mode if the ignition is switched on and
inciden tlight from headlamps strikes the sen-
sor in the rear-view mirror.
The mirror sdonot go int oanti-dazzle mode if
reverse gea risengaged or if the interior light-
ing is switched on. Parking position for the exterior mir-
ror on the front-passenge rside
Setting and storing the parking position You can position the front-passenger side
exterior mirror in such away that you can see
the rear wheel on that side as soon as you
engage revers egear. You can stor ethis posi-
tion. X
Make sur ethat the vehicle is stationary and
that the key is in position 2in the ignition
lock.
X Engage revers egear.
The exterior mirror on the front-passenger
side moves to the preset parkin gposition.
X Use adjustment button =to adjust the
exterior mirror to aposition that allows you
to see the rea rwheel and the kerb.
The parkin gposition is stored.
i If you shift the transmission to anot her
po sition ,the exterior mirror on the front-
passenger side retur nsto the driving posi-
tion.
i You can also store the parking position
using memory button M?.
X Make sure that the key is in position
2in the ignitio nlock.
X With the exterior mirror on the front-
passenger side activa ted, use adjust-
ment button =to adjust the exterior
mirror to aposition which allows you
to see the rea rwheel and the kerb.
X Press memory button M? and one of
the arrow sonadjustment button =
within three seconds.
The parkin gposition is stored if the
exterior mirror does not move.
If the mirror moves out of position ,repeat
the steps.
Calling up astore dparkin gposition set-
ting X
Turn the key to position 2in the ignition
lock.
X Adjus tthe exterior mirror on the front-
passenger side with the correspondin gbut-
ton (Y page 100).
X Engage reverse gear.
The exterior mirror on the front-passenger
side moves to the stored parking position. 102
MirrorsSeats, steerin
gwhee land mirrors
Page 106 of 389

The exterior mirror on the front-passenger
side moves back to its original position:
R
as soon as you exceed aspeed of
15 km/h
R about ten seconds after you have disen-
gaged reverse gear
R if you press button :for the exterior mir-
ror on the driver' sside Memory function
Storing settings
With the memor yfunction, you can store up
to three different settings, e.g. for three dif-
ferent people.
The following settings are stored as asingle
memor ypreset:
R positio nofthe seat, backrest and head
rest raint
R driver's side: steerin gwheel position
R driver's side: position of the exterior mir-
ror sont he driver's and front-passenger
sides G
WARNING
The memory func tion can still be used when
the key has been removed. For this reason,
children should never be left unsupervised in
the vehicle. They coul dotherwis ebecome
trapped when adjusting the seat or the steer-
ing wheel. G
WARNING
Only use the memory function on the driver's
side when the vehicle is stationary .Other-
wise ,you coul dbedistracted from the traf fic
conditions by the steering wheel and seat
moving of their own accord ,and as aresult
cause an accident. X
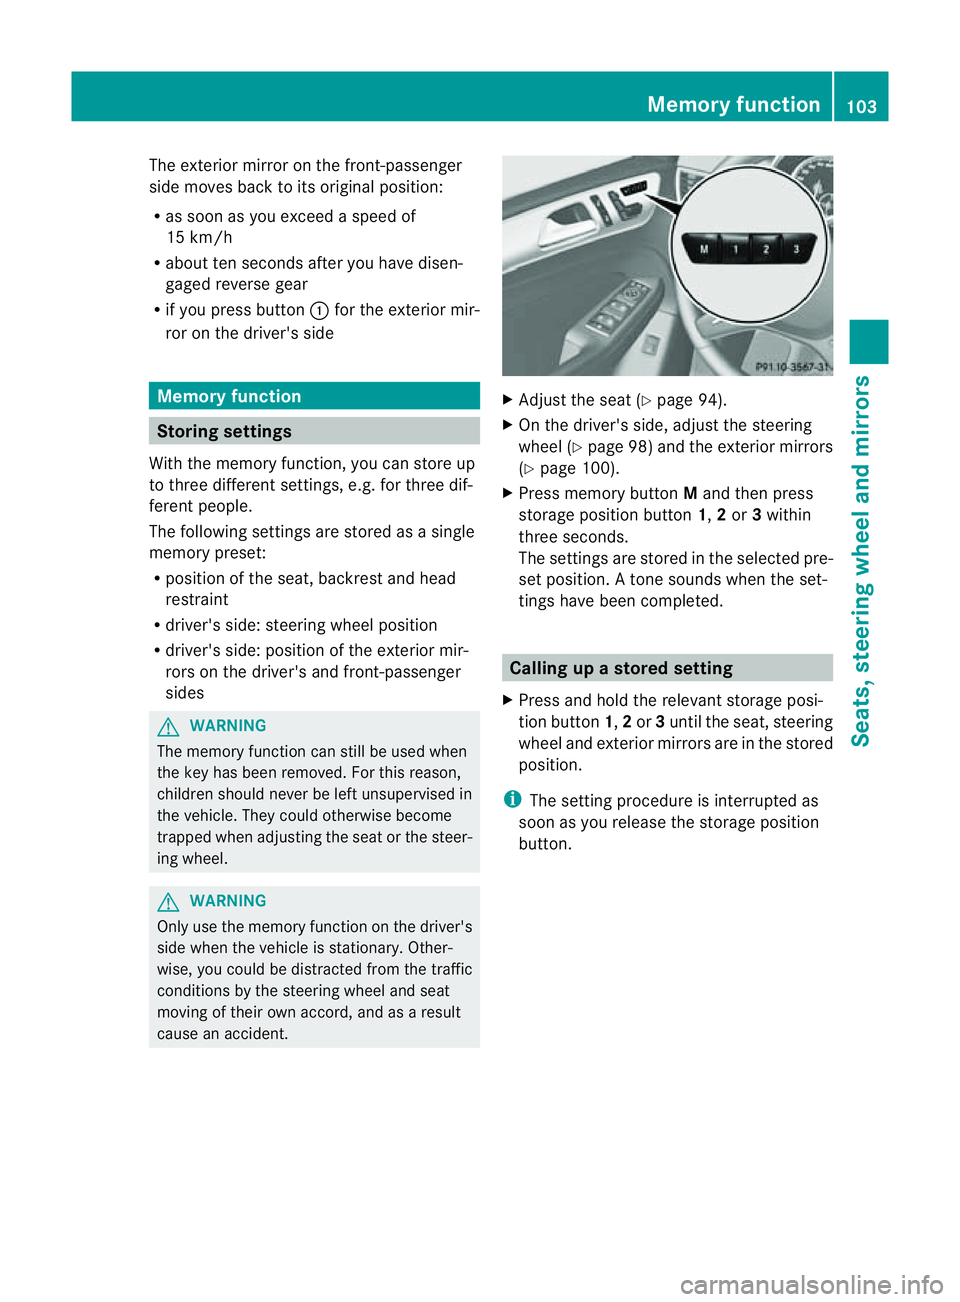
Adjust the seat (Y page 94).
X On the driver' sside, adjust the steering
wheel (Y page 98) and the exterior mirrors
(Y page 100).
X Press memor ybutton Mand then press
storage position button 1,2or 3within
three seconds.
The settings are stored in the selected pre-
set position. Atone sounds when the set-
tings have been completed. Calling up
astore dsetting
X Pres sand hol dthe rele vant storage posi-
tion button 1,2or 3until the seat ,steering
wheel and exterio rmirror sare in th estored
position.
i The settin gprocedure is interrup tedas
soon as you release the storage position
but ton. Memory function
103Seats,steering wheeland mirrors Z
Page 111 of 389

it, the previous rear foglam
psettings are
restored.
Adjusting th eheadlam prang e(halog en
headlamps) Th
eh eadlamp range control allow syou to
adjust the con eoflight from the headlamps
to sui tthe vehicle load. Headlam
prange control
g Driver' sseat and front-passenger seat
occupied
1 Driver's seat, front-passenger seat and
rear seats occupied
2 Driver's seat, front-passenger seat and
rear seats occupied and maximu mper-
missible rear axle load utilised when the
vehicle is laden
3 Driver's seat occupied and maximu mper-
missible rear axle load utilised when the
vehicle is laden
X Start the engine.
X Turn headlamp range control to the posi-
tion which corresponds to the load in your
vehicle.
Headla mpcleaning system The headlamps are cleaned automatically if
the "Wipe with washer fluid" fun
ction is oper-
ated ten times while the lights are on and the
engin eisrunning (Y page 116). When you
switc hoff th eignition, the automa tich ead-
lam pcleaning system is reset and counting is
resumed from 0. Combination switch
Tu rn signals :
Main-beam headlamps
; Turnsignal, right
= Headlamp flasher
? Turn signal, left
X To indicate briefly: press the combination
switch briefly to the pressure point in the
direction of arrow ;or?.
The corresponding turn signal flashes three
times.
X To indicate: press the combination switch
beyond the pressure point in the direction
of arrow ;or?.
Main-beam headlamps X
To switch on the main-bea mhead-
lamps: turn the key in the ignition lock to
position 2or start the engine.
X Turn the light switch to LorÃ.
X Press the combination switch beyond the
pressure point in the direction of
arrow :.
In the Ãposition, the main-beam head-
lamps are only switched on when it is dark
and the engine is running. 108
Exterio
rlightingLights and windscreen wipers
Page 178 of 389

G
WARNING
DISTRONIC PLUS canno ttake account of road
and traffic conditions. If DISTRONI Cdoes not
recognise or no longer recognises the vehicle
in front, do not activate DISTRONIC or, if it is
alr eady active, deactivate it. This is especially
the case:
R befor ecorners
R on filter lanes
R when changing to alane with faster moving
traffic
R in comple xdriving situations or where lanes
are diverte d,e.g. at roadworks on amotor-
way
DISTRONIC PLU Sotherwise maintains the
current spe ed setbyyou or accelerates up to
the set speed.
DISTRONIC PLU Scannot take account of
weather conditions. Deactivate, or do not
activate, DISTRONI CPLUS:
R if th eroads are slippery, snow-covered or
icy .The wheels coul dlose their grip when
brakin goraccelerating .The vehicle could
star ttos kid.
R if the sensors are dirty or there is poo rvis-
ibility, e.g. due to snow, rain or fog. Dis-
tance control may be impaired.
Always pay attention to traffic conditions
even when DISTRONIC PLU Sisactivate d.
Otherwise, you ma yfail to recognise dangers
in time, caus eanaccident and injure yourself
and others. G
WARNING
DISTRONIC PLUS brake syourvehicle up to a
maximu mof4m /s2
depending on its speed.
This corresponds to approximately 40% of
your vehicle's maximum braking power. You
must als oapply the brakes yourself if this
braking power is not sufficient.
If DISTRONI CPLUS detects arisk of collision
with avehicle in front, an intermit tent warning
tone sounds. In addition, the ·distance
warning lamp in the instrument cluste rlights
up. Brak etoavoidac ollision. G
WAR
NING
The vehicle can be braked when DISTRONIC
PLUS is activated. For this reason, deactivate
DISTRONIC PLUS if the vehicle is to be set in
motion by othe rmeans (e.g. in acar wash or
by towing).
The radar senso rsystem is automatically
deactivated near radio teles cope facilities
(Y page 38 0).
If you want DISTRONIC PLUS to assist you,
the radar sensor syste mmust be activated
(Y page 249 )and operational.
General notes DISTRONIC PLUS regulates the speed and
automati cally helps you maintain the dis-
tanc etot he vehicle detected in front. It
brakes automatically in orde rtoavoid
exceedi ngthe set speed.
On long and stee pdownhil lgradients, espe-
ciall yifthe vehicle is laden or towing atrailer,
yo um ust select shift range 1,2or 3in good
time. By doing so, you will make use of the
braking effec tofthe engine. This relieves the
load on the brake system and prevents the
brakes from overheating and wearing too
quickly.
If DI STRONIC PLUS detects aslower-moving
vehicle in front ,your vehicle is braked in order
to maintain the preset distance to the vehicle
in front.
If ther eisnov ehicle in front ,DISTRONIC
PLUS operate sinthe sam eway as cruise
control in the spee drange between
30 km/h and 200 km/h. If avehicle is driving
in fron tofyou, DI STRONIC operates in the
speed range betwee n0km/h and
200 km/h.
Do not us eDISTRONIC PLUS on roa dswith
steep gradients. Driving systems
175Drivingand parking Z
Page 206 of 389

ATTENTIO
NASSIST asse sses your level of
fatigue or lapses in conc entrati on by taki ng
the following criteri aintoa ccount:
R your personal drivin gstyle, e.g. steering
characteristics
R drivin gconditions, e.g. time, drivin gtime
The functionalit yofATTENTION ASSIST is
restricted, and warnings may be delaye dor
not occur at all:
R if the road condition is poor, e.g. if the sur-
fac eisu neven or if there are potholes
R if there is astron gside wind
R if you hav eadopt edasport ydrivin gstyle
wit hh igh corn eringspeeds or hig hrates of
acceleration
R if you are predominantly drivin gslower
than 80 km/h or faste rtha n1 80 km/h
R if you are currently using COM ANDO nline
or makin gatelephon ecall wit hit
R if th etime has been set incorrectly
R in active drivin gsituations, suc haswhen
you chang elanes or chang eyour speed
Warning an ddispla ymessages in the
multifunction display X
Activa teATTENTION ASSIST using the on-
board computer (Y page 245).
Symbol :appear sinthe mu ltifunction
display.
If ATTENTION ASSIST is active ,you will be
war nednos oonerthan 20 minutes after your
journey has begun .You will then hear an
intermittent warnin gtone twice, and the
Attentio nAssist: Drowsiness detec‐ ted message appe
arsint he multifunction
display. X
If necessary, tak eabreak.
X Press the aor% buttontoc onfirm
the message.
On long journeys, tak eregular break singood
tim etoa llow yourself to rest properly. If you
do not take abrea kand ATTENT IONA SSIST
still detects typica lindicators of fatigue or
increasing lapses in concentration, you will be
warned agai nafter 15 minutes at th eearliest.
ATTENTION ASSIST is reset and starts
assessing your tiredness again when you con-
tinue your journey if:
R you switch off the engine.
R you take off your seat belt and open the
driver' sdoor, e.g. for achange of driver sor
to take abreak. Speed Limit Assist
Important safety notes Speed Limit Assist show
syou detec teds peed
limit sint he multifunction display. Dat afrom
th en avigation system is also used for this
purpose. The displ ayappears if atraffi csign
indicatin gaspeed limit or the end of aspeed
limit is detected. If Speed Limit Assist does
not detect any traffic signs, the speed limit
from the digital road map is taken and shown
in the display.
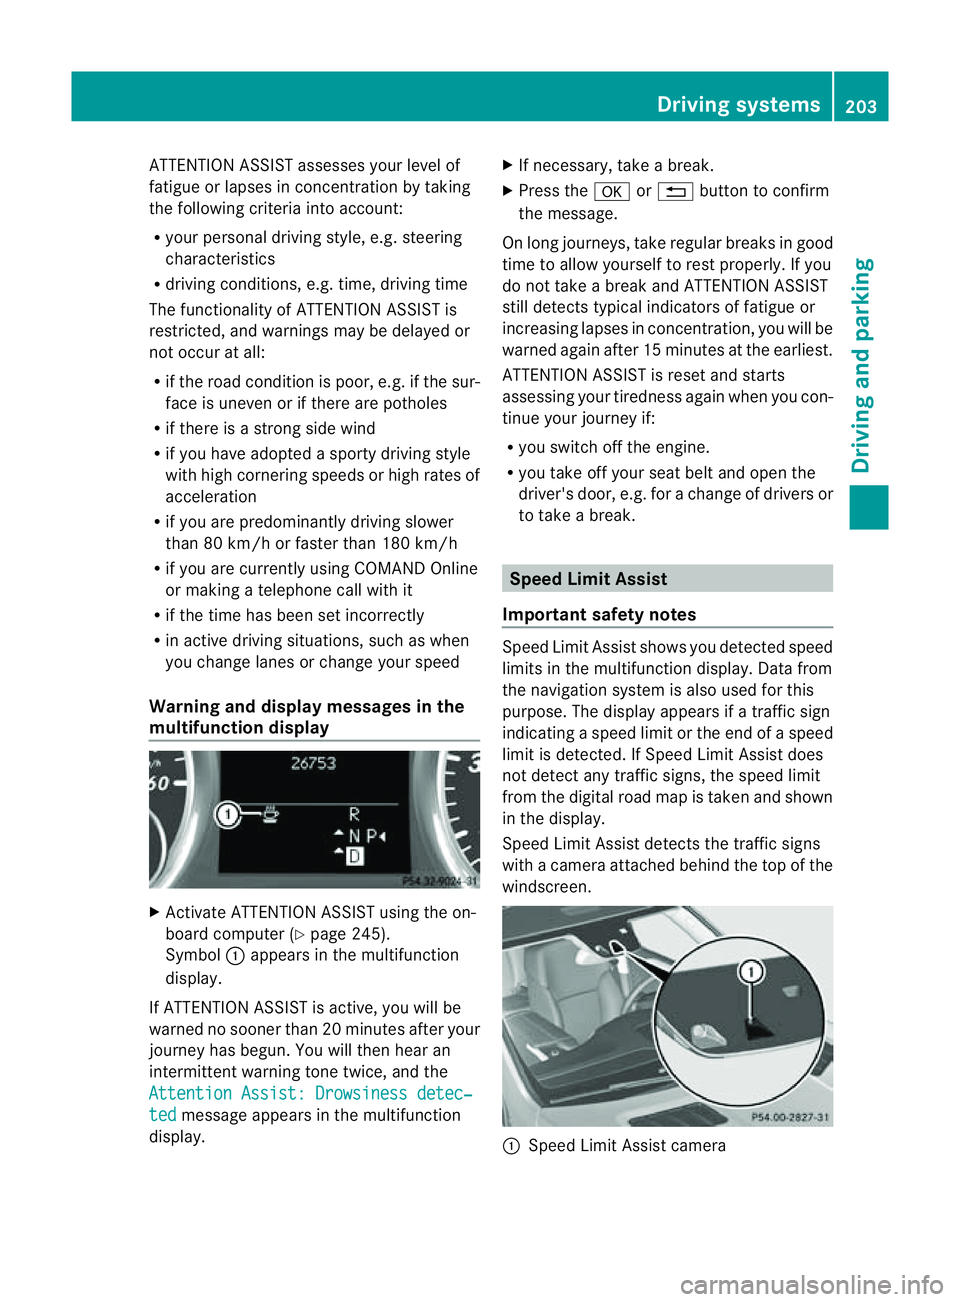
Speed Limit Assist detect sthe traffic signs
with acamera attached behind the top of the
windscreen. :
Speed Limit Assis tcamera Driving systems
203Drivingand parking Z
Page 242 of 389

The
Audio ,
Navi and
Tel menus differ slightly in vehicles with an audio system and vehicles
with COMAN DOnline. The example sgiven in this Owner' sManual apply to vehicles equipped
with COMAND Online. Trip menu
Standard display X
Press and hold the %button on the
steering wheel until the Trip menu with
total distance recorder :and trip
meter ;is shown.
Trip computer "From start" or "From
reset" The values in the
From start submenu are
calculated from the start of ajourney, whilst
the values in the From reset submenu are
calculated from the last tim ethe submenu
was reset (Y page 240).
X Press the =or; button on the steer-
ing wheel to selec tthe Trip menu.
X Press 9or: to select From start or
From reset .
Tri
pc omputer "From star t"(example)
: Distance
; Time
= Average speed
? Average fuel consumption The
From start trip computer is reset auto-
matically when:
R the ignition has been switched off for more
than four hours.
R 999 hours have been exceeded.
R 999 9kilometres have been exceeded.
The From reset trip computer is reset if the
trip exceeds 999 9hour sor9 9,999 kilome-
tres.
Displaying the rang eand cur rent fuel
consumption X
Press the =or; button on the steer-
ing wheel to select the Trip menu.
X Press the 9or: button to select
curren tfuel consumption and approximate
range. :
Approximate range
; Current fuel consumption
Approximate range :is calculated accord-
ing to curren tdriving style and th eamount of
fue lint he tank. If ther eisonlyasmal lamount
of fue lleft in the fuel tank ,the display shows
av ehicle being refuelled Cinstead of
range :.
Digital speedometer X
Press the =or; button on the steer-
ing whee ltoselect the Trip menu.
X Press the 9or: button to select the
digital speedometer. Menus and submenus
239On-boardcomputer and displays Z