2011 MERCEDES-BENZ M-CLASS SUV warning light
[x] Cancel search: warning lightPage 323 of 389

X
Lower th ebonnet and let it fal lfrom a
heig ht of approx imately 20 cm.
X Check that the bonnet has engaged prop-
erly.
If the bonnet can be raised slightly, it is not
properly engaged. Open it again and close
it with alittle more force. Radiator
i Vehicles with diesel engine: do not
cover the radiator .Don ot use thermal
mats, insec tprotectio ncover sora nything
similar. Doing so can cause the Onboard
Diagnosti csSystem to display inaccurate
values .Some of these values ar elegally
required and must be cor rect. Engine oil
Notes on the oil level Depending on driving style, the vehicle con-
sume samaximum of 0.8 loil per 100 0km.
Th eo il consumption may be higher than this
when the vehicle is new or if you frequently
drive at high engin espeeds.
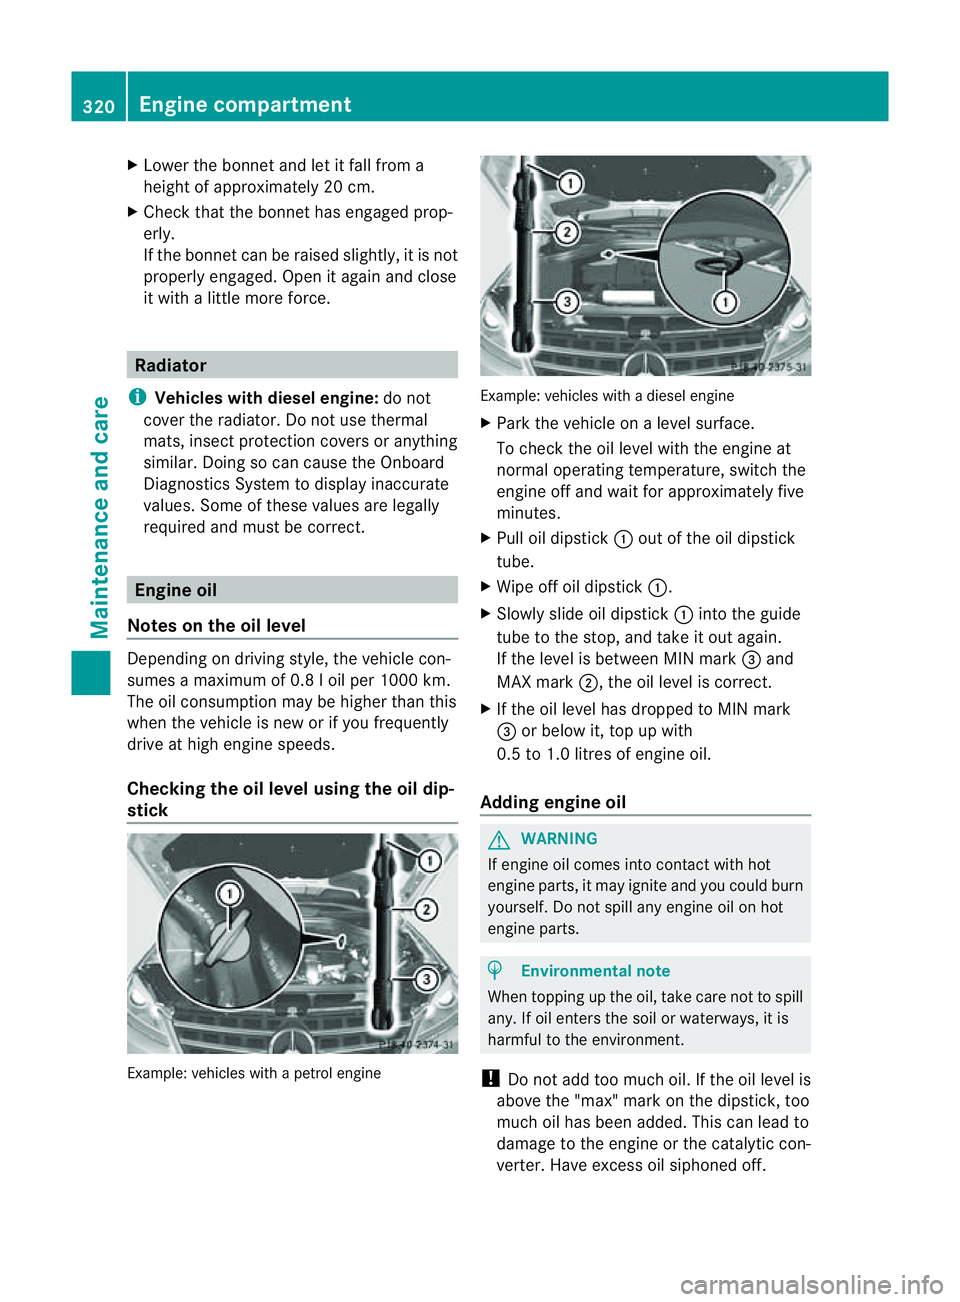
Checking the oil level using the oil dip-
stick Example: vehicles with
apetro lengine Example: vehicle
swithadiesel engine
X Park the vehicle on alevel surface.
To chec kthe oil level with the engin eat
normal operating temperature, switch the
engine off and wait for approximately five
minutes.
X Pull oil dipstick :out of the oil dipstick
tube.
X Wip eoff oi ldipstick :.
X Slowly slide oil dipstick :into the guide
tube to the stop, and take it out again.
If the level is between MIN mark =and
MAX mark ;,the oil level is correc t.
X If th eoil level has dropped to MIN mark
= or below it, top up with
0.5 to 1.0 litres of engine oil.
Adding engine oil G
WARNING
If engine oil comes into contact with hot
engine parts, it may ignite and you could burn
yourself .Donot spill any engin eoil on hot
engine parts. H
Environmental note
When topping up the oil, take care not to spill
any. If oil enters the soil or waterways, it is
harmful to the environment.
! Do not add too much oil. If the oil level is
above the "max" mar konthe dipstick ,too
much oil has been added. This can lead to
damage to the engin eorthe catalytic con-
verter .Have excess oil siphoned off. 320
Eng
inecompartmentMaintenance and care
Page 328 of 389

X
Release the electric parking brake.
X Switc hoff the ig nition and leav ethe key in
th ei gnition lock.
! Mak esuret hat:
R the side windows and slidin gsunroo fare
close dcompl etely.
R the blower for the ventilation/heating is
switched off (OFF button is depressed).
R the windscreen wiper switch is at posi-
tion 0.
The vehic lecoul dotherwise be damaged.
After using an automatic car wash, wip eoff
wa xfrom th ewindscreen and the wiper
blades. This wil lprevent smears and red uce
wiping noises cause dbyresidue on the wind-
screen.
Washing by hand In some countries, washing by hand is only
allowed at speciall
yequipped washing bays.
Observe the lega lrequirements for each indi-
vidual country.
X Do not use hot water and do not wash the
vehic lein direct sunlight.
X Use asoft sponge to clean.
X Use amild cleaning agent, such as acar
shampoo approved by Mercedes-Benz.
X Thoroughly hos edown the vehicle with a
gentle jet of water.
X Do not point the water jet directly towards
the air inlet.
X Use plenty of water and rinse out the
sponge frequently.
X Rinse the vehicle with clean water and dry
thoroughly with achamois.
X Do not let the cleanin gagent dry on the
paintwork.
When using the vehicle in winter, remove all
traces of roa dsalt deposits carefully and as
soon as possible. High-pressure cleanin
gequipment G
WARNING
Do not use high-pressure cleaners with circu-
lar-jet nozzles (dirt grinders) to clean your
vehicle, in particular the tyres. You could oth-
erwis edamage the tyres and cause an acci-
dent.
! Always maintain adistance of at least
30 cm between the vehicle and the high-
pressure cleaner nozzle. Information about
the correct distance is available from the
equipment manufacturer.
Move the high-pressure cleaner nozzle
around when cleaning your vehicle.
Do not aim directly at any of the following:
R tyres
R door gaps, roof gaps, joint setc.
R electrical components
R battery
R connectors
R lights
R seals
R trim elements
R ventilatio nslots
Damaged seals or electrical components
can lead to leaks or failures.
Cleanin gthe whee ls !
Do not use acidic whee lcleaning products
to remov ebrake dust .This could damage
wheel bolts and brake components.
! Do not par kupthe vehicle for an extended
period straight after cleanin git, particularly
after having cleaned the wheels with wheel
cleaner. Wheel cleaners could cause
increased corrosio nofthe brake discs and
brake pads/linings. For this reason, you
should drive for afew minutes after clean-
ing. Brakin gheats the brak ediscs and the
brake pads/linings, thus drying them. The
vehicle can then be parked up. Care
325Maintenance andcare Z
Page 329 of 389

Cleaning th
epaintwork Scra
tches, corrosiv edeposits ,area saffected
by corrosion and damage ca used by inade-
quate care canno talways be completely
repaired. In such cases, visit aqualified spe-
cialist workshop, e.g. aMercedes-Benz
Servic eCentre.
X Remov eimpurities immediately, where
possible, whilst avoiding rubbing to ohard.
X Soak insect remain swith insec tremover
and rinse off the treated area safterwards.
X Soa kbird droppings with water and rinse
off the treated areas afterwards.
X Remove coolant, brak efluid, tree resin,
oils, fuels and greases by rubbin ggently
with acloths oaked in petroleum ether or
lighter fluid.
X Use tar rem overtor emove tar stains.
X Use silicone rem overtor emove wax.
! Do not affix:
R stickers
R films
R magnetic plates or simila ritems
to painted surfaces. You could otherwise
damage the paintwork.
Car eand treatment of matt paintwo rkIf
your vehicle has aclear mat tfinish, observe
the followin ginstructions in order to avoid
damage to the paintwork due to incorrect
care.
These notes also appl ytolight alloy wheels
with aclear mat tfinish.
! Neve rpolish the vehicle or the light alloy
wheels. Polishing makes the paintwork
shiny. !
The following ma ycause the paint to
become shiny and thus reduce the matt
effect:
R Vigorous rubbing with unsuitable mate-
rials.
R Frequent use of car washes.
R Washing the vehicle in direct sunlight.
! Never use paint cleaner, buffing or pol-
ishing products, or glos spreserver, e.g.
wax .These product sare onl ysuitable for
high-glos ssurfaces. Thei ruse on vehicles
wit hm att finish leads to considerable sur-
face damage (shiny, spotted areas).
Always have paintwork repairs performed
at aq ualified specialist workshop, e.g. a
Mercedes-Benz Servic eCentre.
! Do not use wash programs with ahot wax
treatment under any circumstances.
i The vehicle should preferably be washed
by hand using asoft sponge, car shampoo
and plent yofwater.
i Use only insect remover and car shampoo
from the range of recommended and
approved Mercedes-Benz care products.
Cleaning the windows G
WARNING
Switch off the windscreen wipers and remove
the key from the ignition lock before cleaning
the windscreen or the wiper blades. On vehi-
cles with KEYLESS-GO, press the Start/Stop
button repeatedly until all indicator lamps in
the instrument cluster have gone off. The
windscreen wipers could otherwise move and
injure you.
X Clean the inside and outside of the win-
dows with adamp cloth and acleaning
agent that is recom mended and approved
by Mercedes-Benz.
! Do not use dry cloths, abrasive products,
solvents or cleaning agents containing sol-
vent stoc lean the inside of the windows. 326
CareMaintenance and care
Page 330 of 389

Do not touch the insides of the windows
with hard objects
,e.g.ani ce scraper or
ring .There is otherwise arisk of damaging
the windows.
! Clean the water drainage channels of the
windscreen and the rear window at regular
intervals. Deposits such as leaves, petals
and pollen may under certain circumstan-
ces prevent water from drainin gaway .This
can lead to corrosion damage and damage
to electronic components.
Cleaning th ewiper blades G
WARNING
Switch off the windscreen wipers and remove
the key from the ignition lock befor ecleaning
the windscreen or the wiper blades. On vehi-
cles with KEYLESS-GO, press the Star t/Stop
butto nrepeatedly unti lall indicator lamps in
the instrumen tcluster have gone off. The
windscreen wipers could otherwise move and
injur eyou.
! Do not pull on the wiper blade. Otherwise,
the wiper blade could be damaged.
! Do not clean wiper blades too often and
do not rub them too hard. Otherwise, the
graphit ecoatin gcould be damaged. This
coul dcause wiper noise.
X Fold the wiper arms away from the wind-
screen.
X Clea nthe wiper blades carefully usin ga
damp cloth.
X Fold the windscreen wipers back again
befor eswitching on the ignition.
! Hold the wiper arm securely when folding
back. The windscreen could be damaged if
the wiper arm hits against it suddenly.
Cleanin gthe exterio rlighting X
Clean the plastic lenses of the exterior
lighting using awet sponge and amild
cleaning agent, e.g. Mercedes-Ben zcar
shampoo or cleanin gcloths. !
Only use cleanin gagents or cleaning
cloth sthat ar esuitable for plastic lenses.
Unsuitable cleanin gagents or cleaning
cloth scoul dscratch or damag ethe plastic
lenses of th eexteri or lighting.
Clea ningthe sensors X
Clean sensors :of th edriving systems
with water, car shampoo and asoftc loth.
! If you clean the sensor swithahigh-pres-
sure cleaner, mak esure that you keep a
distanc eofatl east 30 cm between the
vehicle and the high-pressure cleaner noz-
zle. Information about the correc tdistance
is available from the equipment manufac-
turer.
Cleaning th ereversing camera Care
327Maintenance andcare Z
Page 342 of 389

the whee
lthat is diagona llyo pposite the
wheel you wish to change. Securing the vehicle on slight downhil
lgradients
X On downhill gradients: place chocks or
othe rsuitabl eitems in front of the wheels
of the front and rear axle.
Raisin gthe vehicle G
WARNING
Th ejack is intended only for lifting the vehicle
briefly for wheel changes.
The vehicle must be placed on stands if you
intend to work under it.
Make sure that the jack is placed on afirm,
non-slip, level surface. Do not use wooden
blocks or similar objects as ajack underlay.
The vehicle could otherwise slip off the jack
and seriousl yinjure you.
Do not start the engine at any time whil ethe
wheel is being changed.
Do not lie unde rthe vehicle when it is being
supported by the jack. If you do not raise the
vehicle as described, it coul dslip off the jack
(e.g. if the engine is started or adoor or the
tailgate is opened or closed) and seriously
injure you. G
WARNING
If you fai ltoposition the jac kcorrectly, the
vehicle may:
R slip off the jack
R injure you or others
R be damaged. Therefore, mak
esure that the jack is posi-
tioned correctly in the respective jacking
points. Before positioning the jack, remove
any dirt that may have collected in the jacking
points. Pleas enote that you must position the
jac kint he openin gofthe jackin gpoint. X
Usin gwheel wrench :,loosen the bolts on
the wheel you wish to change by about one
full turn. Do not unscrew th ebolts com-
pletely.
The jacking points are locate djustb ehind the
fron twheel arches and just in front of the rear
wheel arches (arrows). X
Take the ratchet ring spanner out of the
vehicle tool kit and plac eitont he hexagon
nut of the jac ksothat the letters AUFare
visible. Flat ty
re
339Breakd ownassistance Z
Page 363 of 389

G
WARNING
Shoul dthe tyr epressure dro prepeatedly:
R check the tyr efor foreign bodies.
R check whether the wheel is losing air or the
valve is leaking.
R make sure that only avalve cap approved
by Mercedes-Benz is fitted on the tyre
valve.
Tyre pressures that are too low have anega-
tiv ee ffect on vehicl esafety, which could lead
you to cause an accident.
If possible, only correc ttyre pressures when
the tyres are cold.
The tyres are cold:
R if the vehicl ehas been parked wit hthe tyres
out of direc tsunlight for at least three
hours and
R if the vehicle has not been driven further
than 1. 6km
Depe nding on the ambient temperature, the
speed you are drivin gatand the load on the
tyres, the tyre temperature and thus the tyre
pressure may chang ebyapproximately
10 kPa (0. 1bar/1 .5psi) per 10 †. Take this
int oa ccount whe nchecking the pressur eof
warm tyres and only correc titifitist oo low
for the curren toperating conditions.
Drivin gwith tyre pressure that is too high or
too low can:
R shorten the servic elife of the tyres
R cause increased tyre damage
R have anegativ eeffect on handling charac-
teristics and thus th edriving safet y(e.g. by
causin gaquaplaning)
i The tyr epressure values given for low
load sare minimum values which offe ryou
good rid ecomfort characteristics.
However, you can also use the values given
for higher loads. These ar epermissible and
will not adversely affect the running of the
vehicle. H
Environmenta
lnote
Check the tyre pressure regularly, at least
every 14 days.
You will find information on tyre pressures for
the vehicle's factory-mounted tyres on the
plates described here. Tyr
epressure loss warning system
Important safety notes Whil
ethe vehicle is in motion, the tyr epres-
sure loss warning system monitors th eset
tyr ep ressure using th erotational speed of
the wheels. This enables the system to detect
significant pressure loss in atyre. If the speed
of rotation of awheel changes as aresult of
al oss of pressure, acorrespondin gwarning
message will appea rinthe multifunction dis-
play. G
WARNING
The tyr epressure loss warning system does
not warn you of an incorrectly se ttyre pres-
sure. The table on the insid eofthe fuel filler
fla pw ill help you decide whether the tyre
pressures should be corrected.
The tyre pressure loss warnin gsystem does
not replace the need to regularly check your
vehicle's tyre pressures, since an even loss of
pressure on several tyres at the same time
cannot be detecte dbythe tyr epressure loss
warning system.
Th et yre pressure monitor is not able to warn
you of asudden loss of pressure, e.g. if the
tyre is penetrated by aforeign objec t.
In the event of asudden loss of pressure, bring
the vehicle to ahalt by braking carefully. Do
not make any sudden steering movements
when doing so.
The function of the tyre pressure loss warning
system is limited or delayed if:
R snow chains are fitted to your vehicle's
tyres.
R road conditions are wintry. 360
Tyr
epressureWheels and tyres
Page 365 of 389

tyre is penetrated by
aforeign object .Inthe
event of asudden loss of pressure, bring the
vehicl etoah altbyb rakingcarefully. Do not
make any sudden steering movements when
doing so.
Informatio nontyre pressures is displayed in
the multifunction display. After afew minutes
of driv ing, the curren ttyre pressure of each
tyre is sho wn inthe multifunction display.
i Thet yre pressure values indicated by the
on-board computer may differ from those
measured at afilling station with apressure
gauge. Th etyre pressures shown by the on-
board computer refer to thos emeasured at
sea level. At high altitudes, the tyr epres-
sure values indicated by apressure gauge
are higher than thos eshown by the on-
boar dcomputer .Inthis case ,donot reduce
the tyr epressures.
i Theo peration of the tyr epressure moni-
to rc an be affected by interference from
radio transmitting equipment (e.g. radio
headphones ,two-way radios) that may be
being operated in or near the vehicle.
Checking tyr epressure electronically X
Make sure that the key is in position 2
(Y page 139) in the ignitio nlock.
X Press the =or; button on the steer-
ing wheel to select the Serv. menu.
X Press the 9or: button to select
Tyre pressure .
X Press the abutton.
The curren ttyre pressure for each wheel
will be displayed in the multifunction dis-
play.
If the vehicle has been parked for longe rthan
20 minutes, the Tyre pressures will be
displaye
dafter afew minutes of driving message appe
ars.
After ateach-in period, the tyr epressure
monito rautomatically recognise snew
wheels or new sensors. As long as aclear
allocation of the tyre pressure values to the individual wheels is not possible
,the Tyre pressure monito
ractive displa
ymes-
sage is shown instead of the tyr epressure
display. Th etyre pressures are already being
monitored.
i Ifas pare wheel/emergenc yspare wheel
is fitted, the system may continue to show
the tyr epressure of th ewheel that has
been removed for afew minutes. If this
occurs, note that the value displayed for
the position where the spare wheel/emer-
gency spare wheel is fitted is not the same
as the spare wheel/emergenc yspare
wheel's current tyr epressure.
Tyre pressure monito rwarning mes-
sages If the tyre pressure monitor detects
asignifi-
cant pressure loss on one or more tyres, a
warnin gmessage is shown in the multifunc-
tion display. Awarning ton ealso sounds and
th et yrep ressure warning lamp ligh tsup in
the instrumen tcluster.
Eac htyret hat is affected by asignificant loss
of pressure is highlighted in th epressure dis-
play.
If the Please correc ttyrep ressure messag
eappear sinthe multifunctio ndis-
play:
X Chec kthe tyr epressure on all fou rwheels
and correc titifn ecessary.
i If the wheel positions on the vehicle are
inter changed, the tyre pressures may be
displ ayed for th ewrong positions for a
short time .This is rectified after afew
minutes of driving, and the tyr epressures
are displayed for th ecorrect positions.
Restarting th etyre pressure monitor When yo
urestar tthe tyr epressure monitor,
all existing warning message sare deleted and
th ew arning lamps go out. The monitor uses
the currently set tyre pressures as the refer-
ence values for monitoring. In most cases, the
tyre pressure monitor will automatically 362
Tyr
epressureWheels and tyres
Page 369 of 389

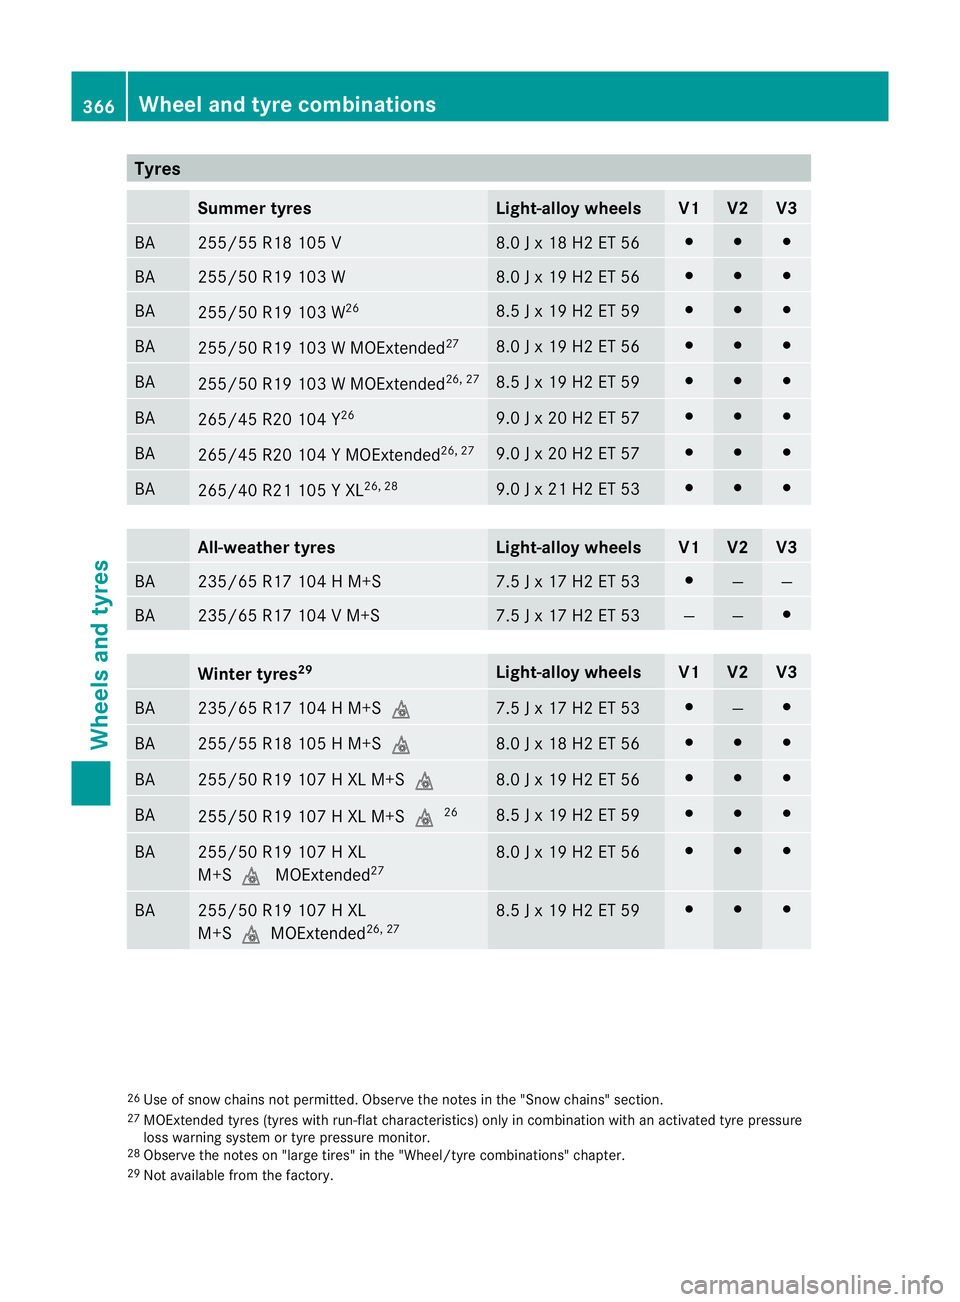
Tyres
Summe
rtyres Light
-alloy wheels V1 V2 V3
BA 255/55
R181 05 V 8.
0Jx18H2ET56 # # #
BA 255/50 R1
9103 W 8.0
Jx19H2ET56 # # #
BA
255/50 R1
9103 W 26 8.5
Jx19H2ET59 # # #
BA
255/50 R1
9103 WM OExtended 27 8.
0Jx 19 H2 ET 56 # # #
BA
255/50
R19 103 WMOExtended 26
,27 8.5
Jx19H2ET59 # # #
BA
265/45 R2
0104 Y 26 9.0
Jx20H2ET57 # # #
BA
265/45 R2
0104 YM OExtended 26
,27 9.0
Jx20H2ET57 # # #
BA
265/40 R2
1105 YXL 26, 28 9.0
Jx21H2ET53 # # #
All-weather tyres Light-alloy wheels V1 V2 V3
BA 235/65 R17 104
HM+S 7.5
Jx17H2ET53 #
— —
BA 235/65 R1
7104 VM +S 7.5
Jx17H2ET53 — — #
Winter tyres
29 Light-alloy wheels V1 V2 V3
BA 235/65 R1
7104 HM +Si 7.5
Jx17H2ET53 #
— #
BA 255/55 R1
8105 HM +Si 8.0
Jx18H2ET56 # # #
BA 255/50 R1
9107 HXLM +Si 8.0
Jx19H2ET56 # # #
BA
255/50 R1
9107 HXLM +Si 26 8.5
Jx19H2ET59 # # #
BA 255/50 R1
9107 HXL
M+Si MOExtended 27 8.0
Jx19H2ET56 # # #
BA 255/50 R1
9107 HXL
M+Si MOExtended 26
,27 8.5
Jx19H2ET59 # # #
26
Use of sno wchains not permitted. Observe the notes in the "Snow chains" section.
27 MOExtended tyres (tyre swith run-flat charac teristics) onl yincombination with an activa tedt yre pressure
loss warning syste mortyre pressure monitor.
28 Observe the notes on "large tires" in the "Wheel/tyre combinations" chapter.
29 Not available from the factory. 366
Wheel and tyr
ecombinationsWheels and tyres