2011 MERCEDES-BENZ GLK-Class steering
[x] Cancel search: steeringPage 173 of 304

Settings menu
Introduction
In the Settings menu, you have the following
options:
R Changing the instrument cluster settings
R Changing the time/date settings 21
R Changing the lighting settings
R Changing the vehicle settings
R Changing the convenience settings
R Restoring the factory settings
Instrument cluster
Selecting the unit of measurement for
distance
The Display Unit Speed-/Odometer:
function allows you to choose whether
certain displays appear in km/h or mph in the
multifunction display.
The selected unit of measurement for
distance applies to:
R the digital speedometer in the Trip menu
R the odometer and the trip odometer
R the trip computer
R the navigation instructions in the Navi
menu
XPress the = or ; button on the
steering wheel to select the Settings
menu.XPress the : or 9 button to select the
Instr. Cluster submenu.XPress the a button to confirm.XPress the : or 9 button to select the
Display Unit Speed-/Odometer.
function.
You will see the selected setting: km or
miles .XPress the a button to save the setting.
Selecting the permanent display function
The Permanent Display: function allows
you to choose whether the multifunction
display always shows the outside
temperature or the speed in km/h (USA) or
mph (Canada).
XPress the = or ; button on the
steering wheel to select the Settings
menu.XPress the : or 9 button to select the
Instr. Cluster submenu.XPress the a button to confirm.XPress : or 9 to select the
Permanent Display: function.
You will see the selected setting Outside
Temperature or Speedometer [km/h]: .XPress the a button to save the setting.
Time/date
This submenu is only available on vehicles
with Audio 20. To set the time and date on
vehicles with COMAND, see the separate
operating instructions.
In the Time/date submenu, you can set the
time and date.
XPress the = or ; button on the
steering wheel to select the Settings
menu.XPress the : or 9 button to select the
Time/date submenu.XPress the a button to confirm.XPress the : or 9 button to select
Time: or Date: .
The current time or date set is displayed.XPress a to change the setting.21
This function is not available in vehicles with COMAND.Menus and submenus171On-board computer and displaysBA 204.9 USA, CA Edition A 2011; 1; 6, en-USd2mwentsVersion: 3.0.3.62010-06-15T08:58:39+02:00 - Seite 171Z
Page 174 of 304
XPress the = or ; button to select the
display you want to change: hour, minute,
day, month, year.XPress the : or 9 button to set the
selected display.XPress the a button to store the entry.
Lights
Switching the daytime running lamps on/
off
This function is not available in Canada.
If you have activated the Daytime Running
Lights: function and the light switch is in the
c position the daytime running lamps are
switched on automatically when the engine is
running.
In the dark, the following also light up:
R the low-beam headlamps
R the parking lamps
R the tail lamps
R the license plate lamp
R the side marker lamps
XPress the = or ; button on the
steering wheel to select the Settings
menu.XPress the : or 9 button to select the
Lights submenu.XPress the a button to confirm.XPress the : or 9 button to select the
Daytime Running Lights: function.
You will see the selected setting: Enabled
or Disabled .XPress the a button to save the setting.
Activating/deactivating surround
lighting and exterior lighting delayed
switch-off
If you switch on the Locator Lighting:
function and the light switch is set to c,
R
the exterior lighting switches on when it is
dark after unlocking the vehicle with the
SmartKey.
The exterior lighting switches off when you
open the driver’s door.
R the exterior lighting remains on for 15
seconds when it is dark after closing the
doors.
If the engine is switched off and then none
of the doors are opened, or if an open door
is not closed, the exterior lighting goes out
after 60 seconds.
If you activate the Locator Lighting:
function, the following light up:
R the parking lamps
R the tail lamps
R the fog lamps 22
R the low-beam headlamps 23
R the license plate lamp
R the side marker lampsXPress the = or ; button on the
steering wheel to select the Settings
menu.XPress the : or 9 button to select the
Lights submenu.XPress the a button to confirm.XPress the : or 9 button to select the
Locator Lighting: function.
You will see the selected setting: Enabled
or Disabled .XPress the a button to save the setting.
To deactivate the delayed shut-off
temporarily:
XBefore leaving the vehicle, turn the
SmartKey to position 0 in the ignition lock.XTurn the SmartKey to position 2 in the
ignition lock and back to position 0.
The delayed shut-off is deactivated.
The delayed shut-off is reactivated the next
time you start the engine.
22 Only for vehicles with front fog lamps.
23 Only for vehicles without front fog lamps.172Menus and submenusOn-board computer and displays
BA 204.9 USA, CA Edition A 2011; 1; 6, en-USd2mwentsVersion: 3.0.3.62010-06-15T08:58:39+02:00 - Seite 172
Page 175 of 304
Activating/deactivating the interior
lighting delayed switch-off
If the Interior Lighting Delay: function
is activated and you pull the SmartKey out of
the ignition lock, the interior lighting remains
on for around 10 seconds. XPress the = or ; button on the
steering wheel to select the Settings
menu.XPress the : or 9 button to select the
Lights submenu.XPress the a button to confirm.XPress the : or 9 button to select the
Interior Lighting Delay: function.
You will see the selected setting: Enabled
or Disabled .XPress the a button to save the setting.
Vehicle
Activating/deactivating the automatic
locking feature
If you select the Automatic Door Lock:
function, the vehicle is centrally locked above
a speed of around 9 mph (15 km/h).
i Further information on the automatic
locking feature ( Y page 76).
XPress the = or ; button on the
steering wheel to select the Settings
menu.XPress the : or 9 button to select the
Vehicle submenu.XPress the a button to confirm.XPress the : or 9 button to select the
Automatic Door Lock: function.
You will see the selected setting: Enabled
or Disabled .XPress the a button to save the setting.
Activating/deactivating the acoustic
locking confirmation
If you switch on the Acoustic Lock
Feedback: function, an acoustic signal
sounds when you lock or unlock the vehicle.
When unlocking, the signal sounds once.
When locking, it sounds three times.XPress the = or ; button on the
steering wheel to select the Settings
menu.XPress the : or 9 button to select the
Vehicle submenu.XPress the a button to confirm.XPress the : or 9 button to select the
Acoustic Lock Feedback: function.
You will see the selected setting: Enabled
or Disabled .XPress the a button to save the setting.
Convenience
Activating/deactivating the EASY-
ENTRY/EXIT feature
You can use the Easy Entry/Exit: function
to activate or deactivate the easy-entry/exit
feature ( Y page 96).
GWarning!
You must make sure no one can become
trapped or injured by the moving steering
wheel when the easy-entry/exit feature is
activated.
To stop steering wheel movement, move
steering wheel adjustment lever or press one
of the memory position buttons.
Do not leave children unattended in the
vehicle, or with access to an unlocked vehicle.
Children could open the driver's door and
unintentionally activate the easy-entry/exit
feature, which could result in an accident
and/or serious personal injury.
XPress the = or ; button on the
steering wheel to select the Settings
menu.XPress the : or 9 button to select the
Convenience submenu.XPress the a button to confirm.Menus and submenus173On-board computer and displaysBA 204.9 USA, CA Edition A 2011; 1; 6, en-USd2mwentsVersion: 3.0.3.62010-06-15T08:58:39+02:00 - Seite 173Z
Page 176 of 304
XPress the : or 9 button to select the
Easy Entry/Exit: feature.
You will see the selected setting: Enabled
or Disabled .XPress the a button to save the setting.
Switching the fold in mirrors when
locking function on/off
This function is only available in Canada.
If you switch on the Fold Mirrors In when
Locking: function, the exterior mirrors fold
in when you lock the vehicle. When you
unlock the vehicle and then open the driver's
or front-passenger door, the exterior mirrors
fold out again.
If you have switched the function on and you
fold the exterior mirrors in using the button
on the door (Y page 98), they will not fold out
automatically. The exterior mirrors can then
only be folded out using the button on the
door.
XPress the = or ; button on the
steering wheel to select the Settings
menu.XPress the : or 9 button to select the
Convenience submenu.XPress the a button to confirm.XPress the : or 9 button to select the
Fold Mirrors in when Locking:
function.
You will see the selected setting: Enabled
or Disabled .XPress the a button to save the setting.
Resetting to factory settings
For safety reasons, the Daytime Running
Lights: function in the Light submenu is
only reset if the vehicle is stationary.
XPress the = or ; button on the
steering wheel to select the Settings
menu.XPress the : or 9 button to select the
Factory Setting submenu.XPress the a button to confirm.
The Reset All Settings? message
appears.XPress the : or 9 button to select
No or Yes .XPress the a button to confirm the
selection.
If you have selected Yes, the multifunction
display shows a confirmation message.174Menus and submenusOn-board computer and displays
BA 204.9 USA, CA Edition A 2011; 1; 6, en-USd2mwentsVersion: 3.0.3.62010-06-15T08:58:39+02:00 - Seite 174
Page 177 of 304
Display messages
Hiding display messages
GWarning
All categories of messages contain important information which should be taken note of and,
where a malfunction is indicated, addressed as soon as possible at an authorized Mercedes-Benz
Center.
Failure to repair the condition noted may cause damage not covered by the Mercedes-Benz
Limited Warranty, or result in property damage or personal injury.
Display messages appear in the multifunction display.
XPress the a or % button on the steering wheel to hide the display message.
The display message is cleared.
The multifunction display shows high-priority display messages in red.
You cannot hide display messages of the highest priority. The multifunction display shows
these messages continuously until the causes for the messages have been remedied.
Certain display messages are accompanied by an audible warning tone or a continuous tone.
Please respond in accordance with the display messages and follow the additional notes in
this Operator's Manual.
Message memory
You can read the display messages in the message memory.
XPress = or ; on the steering wheel to select the Service menu.
If there are display messages, the multifunction display shows 2 messages, for example.XPress the 9 or : button to select the entry, e.g. 2 messages.XConfirm with a.XPress the 9 or : button to scroll through the display messages.
When the ignition is switched off, all display messages are deleted apart from some high-
priority display messages. Once the causes of the high-priority display messages have been
rectified, the corresponding display messages are also deleted.
Display messages175On-board computer and displaysBA 204.9 USA, CA Edition A 2011; 1; 6, en-USd2mwentsVersion: 3.0.3.62010-06-15T08:58:39+02:00 - Seite 175Z
Page 178 of 304

Safety systemsDisplay messagesPossible causes/consequences and M Solutions÷
Inoperative See
Operator's ManualGRisk of accident
ESP ®
(Electronic Stability Program), BAS (Brake Assist), hill start
assist and trailer stabilization are not available due to a
malfunction. In addition, the ä and å warning lamps light
up in the instrument cluster.
The brake system continues to function normally, but without the
functions listed above.
XDrive on carefully.XVisit a qualified specialist workshop.÷
ESC Currently
Unavailable See
Operator's ManualGRisk of accident
ESP ®
, BAS, hill start assist and ESP ®
trailer stabilization are
temporarily unavailable. In addition, the ä and å warning
lamps light up in the instrument cluster.
The self-diagnosis function might not be complete, for example.
The brake system continues to function normally, but without the
functions listed above.
XCarefully drive a suitable distance making slight steering
movements at a speed above 12 mph (20 km/h).
If the display message disappears, the functions mentioned
above are available again.
If the display message continues to be displayed:
XDrive on carefully.XVisit a qualified specialist workshop.GRisk of accident
ESP ®
, BAS, hill start assist and ESP ®
trailer stabilization are
temporarily unavailable. In addition, the ä and å warning
lamps light up in the instrument cluster.
The on-board voltage may be insufficient, for example.
The brake system continues to function normally, but without the
functions listed above.
XDrive on carefully.
If the display message disappears, the functions mentioned
above are available again.
If the display message continues to be displayed:
XVisit a qualified specialist workshop.176Display messagesOn-board computer and displays
BA 204.9 USA, CA Edition A 2011; 1; 6, en-USd2mwentsVersion: 3.0.3.62010-06-15T08:58:39+02:00 - Seite 176
Page 183 of 304
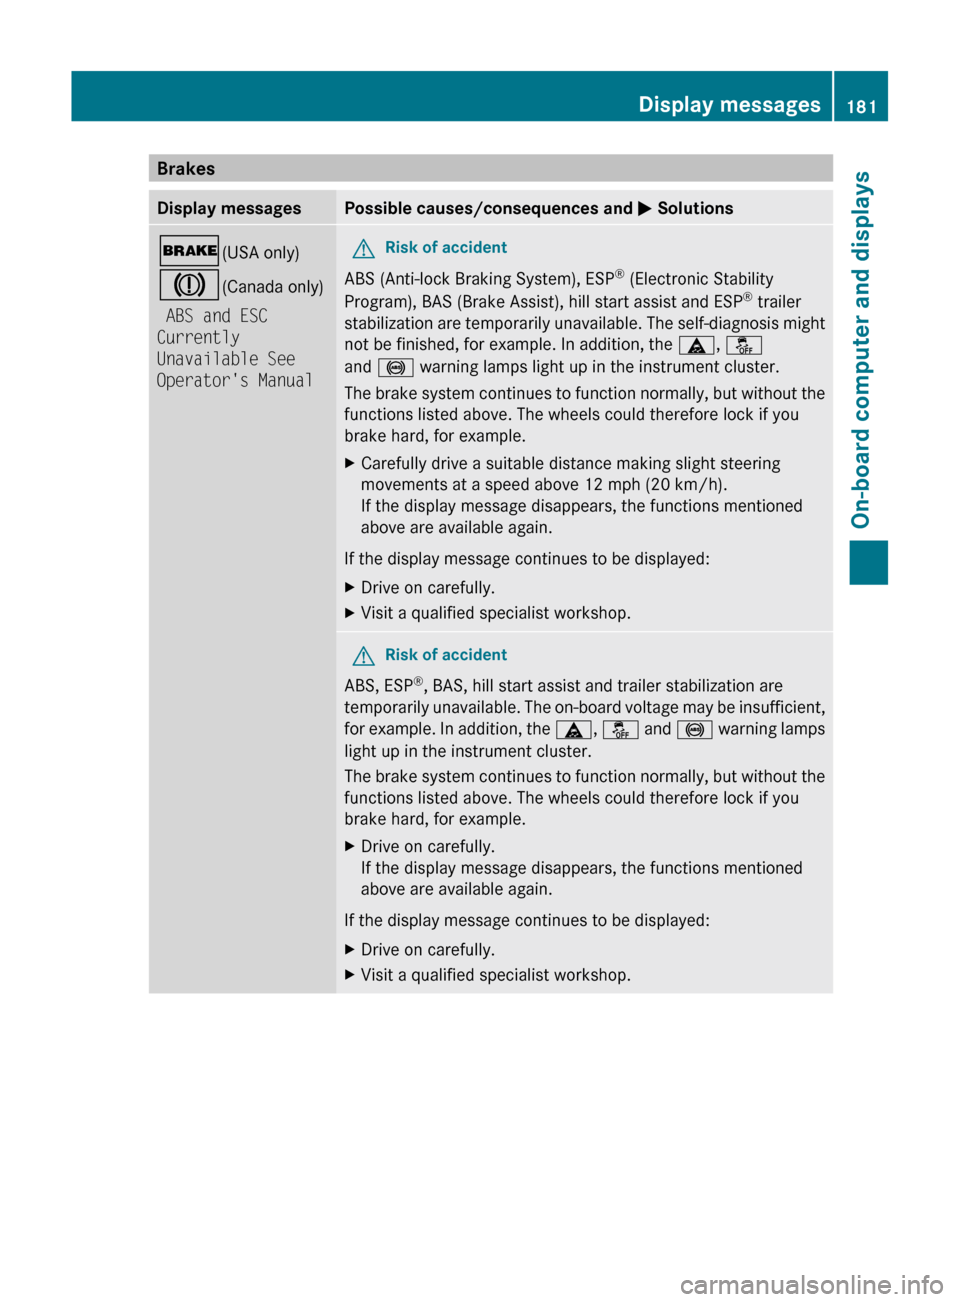
BrakesDisplay messagesPossible causes/consequences and M Solutions$ (USA only)
J (Canada only)
ABS and ESC
Currently
Unavailable See
Operator's ManualGRisk of accident
ABS (Anti-lock Braking System), ESP ®
(Electronic Stability
Program), BAS (Brake Assist), hill start assist and ESP ®
trailer
stabilization are temporarily unavailable. The self-diagnosis might
not be finished, for example. In addition, the ä, å
and ! warning lamps light up in the instrument cluster.
The brake system continues to function normally, but without the
functions listed above. The wheels could therefore lock if you
brake hard, for example.
XCarefully drive a suitable distance making slight steering
movements at a speed above 12 mph (20 km/h).
If the display message disappears, the functions mentioned
above are available again.
If the display message continues to be displayed:
XDrive on carefully.XVisit a qualified specialist workshop.GRisk of accident
ABS, ESP ®
, BAS, hill start assist and trailer stabilization are
temporarily unavailable. The on-board voltage may be insufficient,
for example. In addition, the ä, å and ! warning lamps
light up in the instrument cluster.
The brake system continues to function normally, but without the
functions listed above. The wheels could therefore lock if you
brake hard, for example.
XDrive on carefully.
If the display message disappears, the functions mentioned
above are available again.
If the display message continues to be displayed:
XDrive on carefully.XVisit a qualified specialist workshop.Display messages181On-board computer and displaysBA 204.9 USA, CA Edition A 2011; 1; 6, en-USd2mwentsVersion: 3.0.3.62010-06-15T08:58:39+02:00 - Seite 181Z
Page 192 of 304

Do not overinflate tires. Overinflated tires can adversely affect handling and ride comfort, wear
unevenly, increase stopping distance, and result in sudden deflation (blowout) because they are
more likely to become punctured or damaged by road debris, potholes etc.Display messagesPossible causes/consequences and M SolutionsCheck
Tire Pressure SoonGRisk of accident
The tire pressure loss warning system has detected a significant
loss in pressure.
A warning tone also sounds.
XStop the vehicle without making any sudden steering or braking
maneuvers. Pay attention to the traffic conditions as you do so.XCheck the tires and, if necessary, change the wheel
( Y page 280).XCheck the tire pressures and, if necessary, set to the correct
tire pressure.XRestart the tire pressure loss warning system when the tire
pressure is correct ( Y page 269).Check Tire Pressure
Then Restart Run
Flat IndicatorA display message from the tire pressure loss warning system was
shown and the system has not been restarted since.XSet the correct tire pressure in all four tires.XRestart the tire pressure loss warning system ( Y page 269).Run Flat Indicator
InoperativeThe tire pressure loss warning system is faulty.XVisit a qualified specialist workshop.Tire pressures
will be displayed
after driving a
few minutesThe tire pressure monitor is measuring the tire pressure.XDrive on.
The tire pressures appear in the multifunction display after you
have been driving for a few minutes.Tire Press. Monitor
InoperativeThe TPMS is faulty.XVisit a qualified specialist workshop.Tire Pressure
Monitor
Inoperative No
Wheel SensorsThe wheels mounted do not have a suitable tire pressure sensor.
The tire pressure monitor is deactivated.XMount wheels with suitable tire pressure sensors.
The TPMS is activated automatically after driving for a few
minutes.190Display messagesOn-board computer and displays
BA 204.9 USA, CA Edition A 2011; 1; 6, en-USd2mwentsVersion: 3.0.3.62010-06-15T08:58:39+02:00 - Seite 190