2011 MERCEDES-BENZ GL warning light
[x] Cancel search: warning lightPage 162 of 376
the label on the gasoline pump, ask the gas
station staff.
You can find further information under
"Fuel" ( Y page 366), by consulting an
authorized Mercedes-Benz Center or
visiting http://www.mbusa.com (USA
only).
Diesel
Fuel grade
! Only refuel with ULTRA-LOW SULFUR
DIESEL FUEL (ULSD, 15 ppm SULFUR
MAXIMUM). Using other diesel fuels could
result in increased wear and damage to the
engine and/or exhaust system.
Never refuel with marine diesel or heating
oil.
Do not mix these fuels with diesel fuels and
do not use any special additives, as this
may result in damage.
! When refueling using a fuel can, use a
filter or use a clean cloth as a filter.
Otherwise, particles from the fuel can may
block the fuel lines and/or the diesel
injection system.
i Refuel only with ULTRA-LOW SULFUR
DIESEL FUEL (ULSD, 15 ppm SULFUR
MAXIMUM).
Usually you will find information about the
fuel grade on the pump. If you cannot find
the label on the gasoline pump, ask the gas
station staff.
You can find further information under
"Fuel" ( Y page 366), by consulting an
authorized Mercedes-Benz Center or by
visiting http://www.mbusa.com (USA
only).
Low outside temperatures
! Do not use gasoline to refuel vehicles with
a diesel engine. Never mix diesel with
gasoline or kerosene, as this may result in
damage to the engine or fuel system.
Diesel fuel with improved cold flow properties
is available during the winter months. Further
information on fuel properties can be
obtained from oil companies, e.g. at filling
stations.
Refueling
Fuel filler flap
The fuel filler flap is unlocked or locked
automatically when you open or close the
vehicle with the SmartKey or using KEYLESS-
GO.
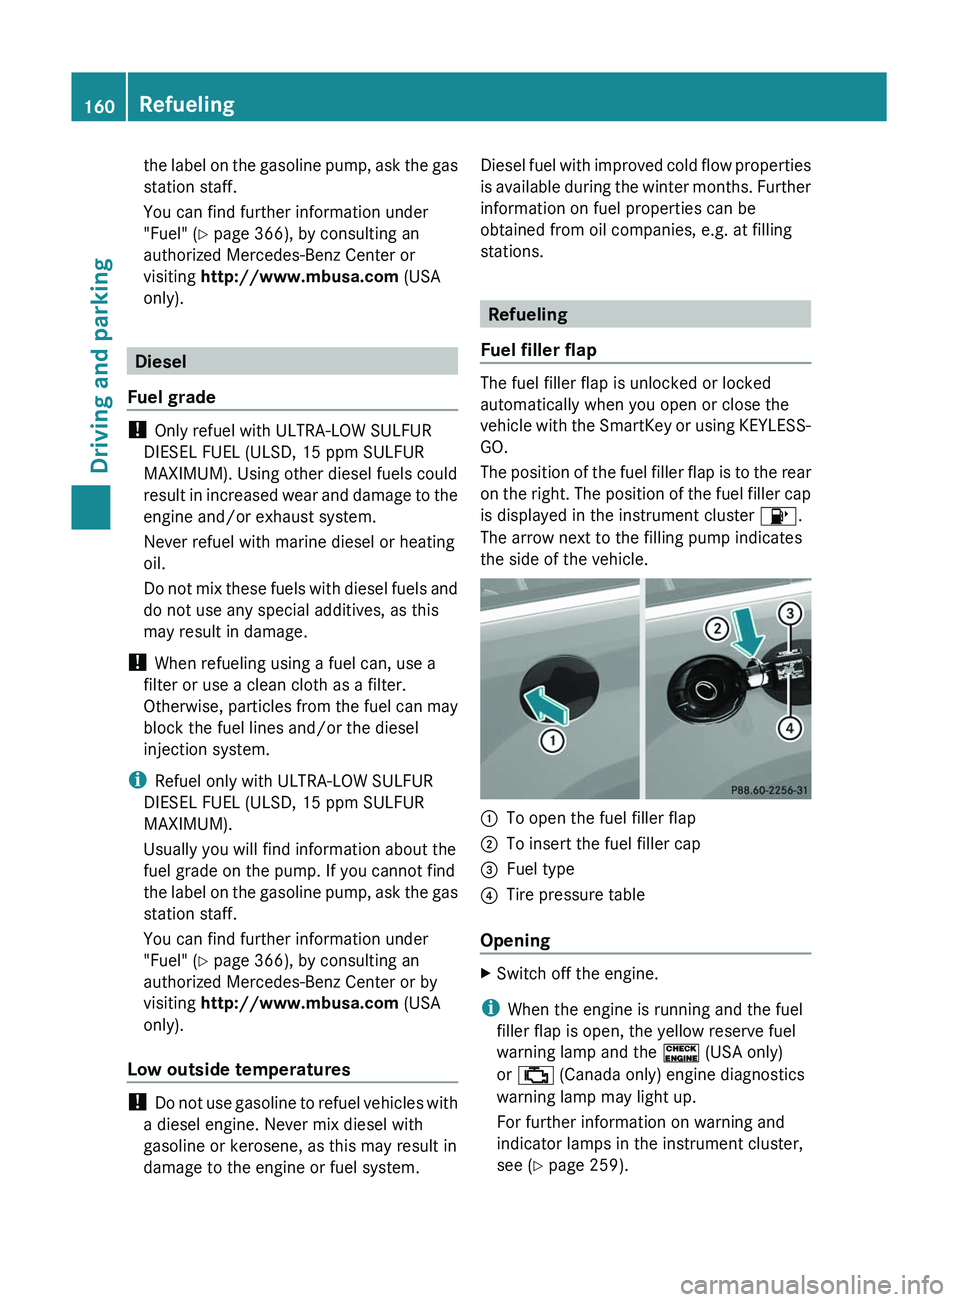
The position of the fuel filler flap is to the rear
on the right. The position of the fuel filler cap
is displayed in the instrument cluster 8.
The arrow next to the filling pump indicates
the side of the vehicle.
:To open the fuel filler flap;To insert the fuel filler cap=Fuel type?Tire pressure table
Opening
XSwitch off the engine.
i When the engine is running and the fuel
filler flap is open, the yellow reserve fuel
warning lamp and the ! (USA only)
or ; (Canada only) engine diagnostics
warning lamp may light up.
For further information on warning and
indicator lamps in the instrument cluster,
see ( Y page 259).
160RefuelingDriving and parking
BA 164.8 USA, CA Edition B 2011; 1; 2, en-USd2sboikeVersion: 3.0.3.52010-04-21T15:08:44+02:00 - Seite 160
Page 163 of 376
XRemove the SmartKey from the ignition
lock.
KEYLESS-GO: the driver's door is open.
This returns the ignition to position 0,
which corresponds to the SmartKey being
removed. The driver's door can be closed
again.XPress the fuel filler flap in the direction of
arrow :.
The fuel filler flap opens slightly.XOpen the fuel filler flap.XTurn the fuel filler cap counter-clockwise
and remove it.XInsert the fuel filler cap into the holder
bracket on the inside of filler flap ;.XCompletely insert the filler neck of the fuel
pump nozzle into the tank and refuel.XOnly fill the tank until the pump nozzle
switches off.
! Overfilling the fuel tank could damage the
fuel system.
Closing
XReplace the fuel filler cap and turn it
clockwise. The fuel filler cap audibly
engages.
i Close the fuel filler flap before locking the
vehicle. A locking pin otherwise prevents
the fuel filler flap from closing after the
vehicle has been locked.
XClose the fuel filler flap.
Emergency fuel filler flap release
GWarning!
Avoid contact with the vehicle walls as they
may contain sharp edges. Otherwise, you
could injure yourself while releasing the fuel
filler flap.
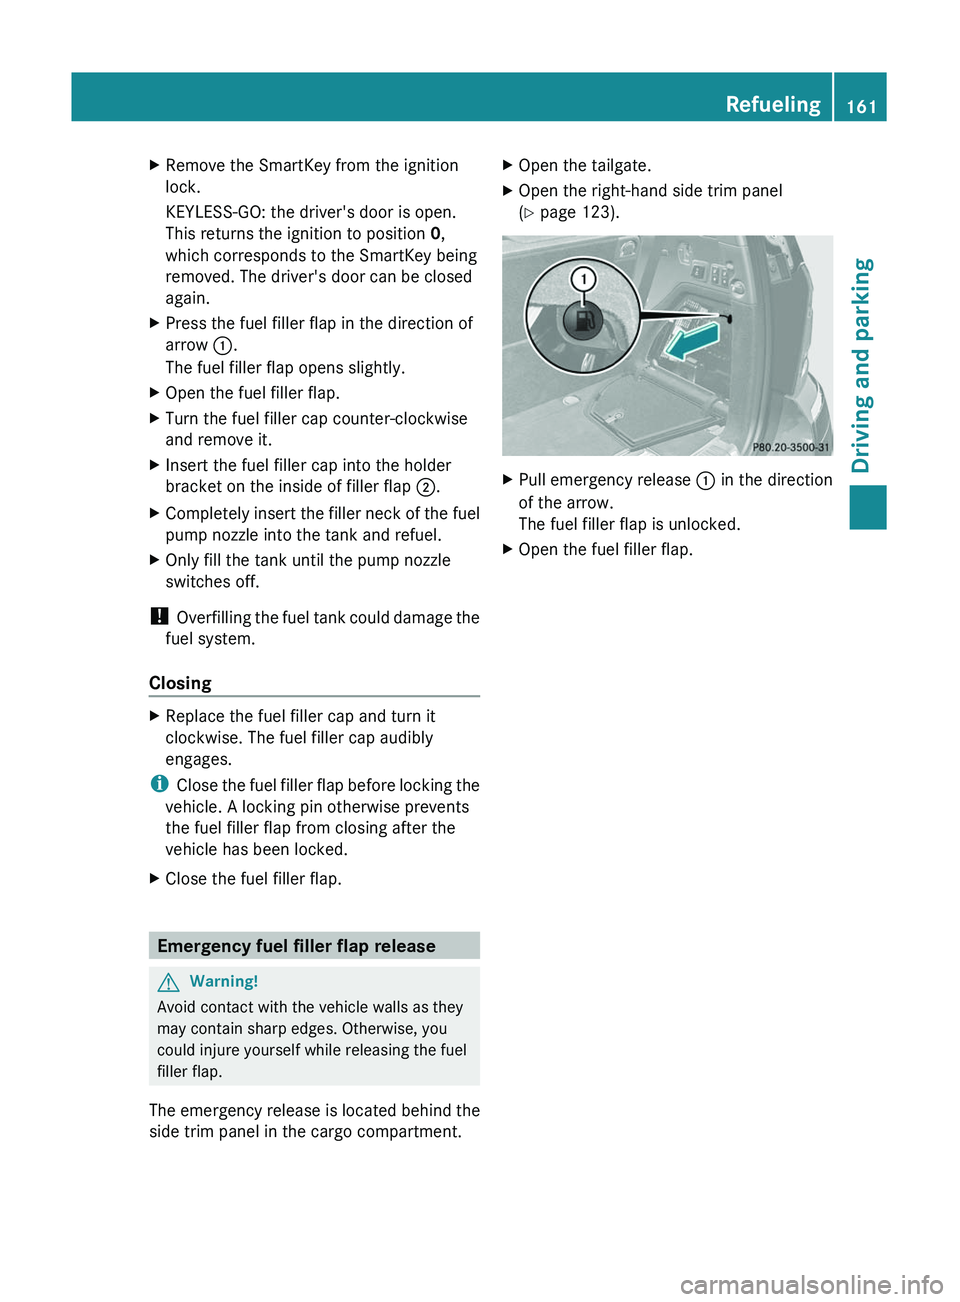
The emergency release is located behind the
side trim panel in the cargo compartment.
XOpen the tailgate.XOpen the right-hand side trim panel
( Y page 123).XPull emergency release : in the direction
of the arrow.
The fuel filler flap is unlocked.XOpen the fuel filler flap.Refueling161Driving and parkingBA 164.8 USA, CA Edition B 2011; 1; 2, en-USd2sboikeVersion: 3.0.3.52010-04-21T15:08:44+02:00 - Seite 161Z
Page 168 of 376
Using KEYLESS-GOXPress the Start/Stop button (Y page 147).
When the driver's door is closed, the Start/
Stop button is in position 1. When the
driver's door is opened, the Start/Stop
button moves to position 0. This
corresponds to removing the SmartKey.XApply the parking brake firmly.
i If you turn off the engine with the Start/
Stop button and open a front door, the
automatic transmission switches to P
automatically.
i The engine can be turned off while the
vehicle is in motion by pressing and holding
the Start/Stop button for three seconds.
If you have started the engine with the Start/
Stop button and it cannot be switched off as
described:
Xremove the Start/Stop button from the
ignition lock.Xinsert the SmartKey into the ignition lock.
The engine stops. The ignition lock is in
position 0.
Parking brake
GWarning
Engaging the parking brake while the vehicle
is in motion can cause the rear wheels to lock
up. You could lose control of the vehicle and
cause an accident. In addition, the vehicle's
brake lights do not light up when the parking
brake is engaged.
GWarning!
When leaving the vehicle, always remove the
SmartKey from the starter switch, take it with
you, and lock the vehicle. Do not leave
children unattended in the vehicle, or with
access to an unlocked vehicle. Children could
release the parking brake and/or shift the
automatic transmission out of park position
P , either of which could result in an accident
and/or serious personal injury.
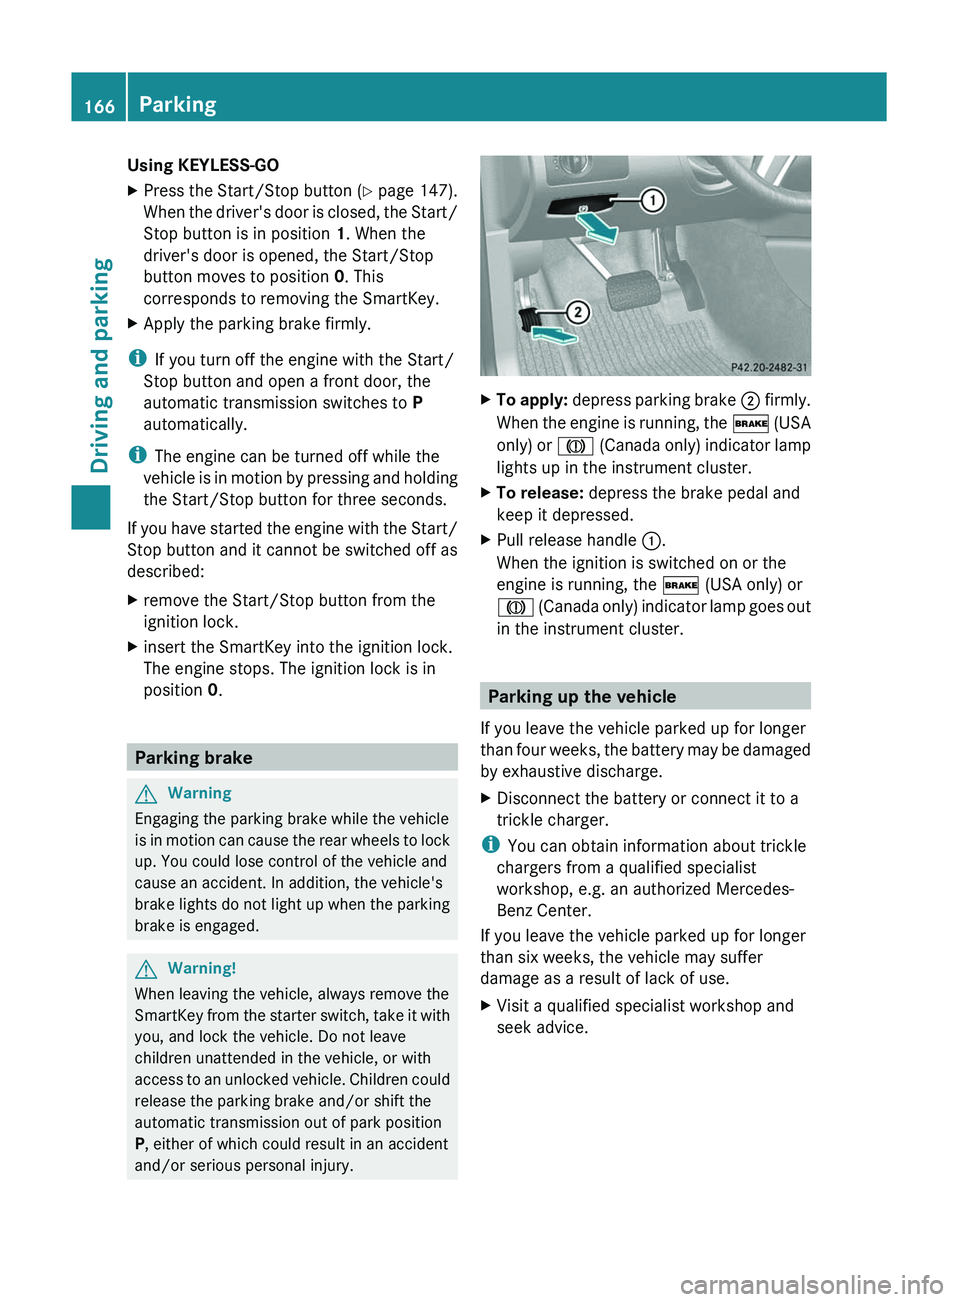
XTo apply: depress parking brake ; firmly.
When the engine is running, the $ (USA
only) or J (Canada only) indicator lamp
lights up in the instrument cluster.XTo release: depress the brake pedal and
keep it depressed.XPull release handle :.
When the ignition is switched on or the
engine is running, the $ (USA only) or
J (Canada only) indicator lamp goes out
in the instrument cluster.
Parking up the vehicle
If you leave the vehicle parked up for longer
than four weeks, the battery may be damaged
by exhaustive discharge.
XDisconnect the battery or connect it to a
trickle charger.
i You can obtain information about trickle
chargers from a qualified specialist
workshop, e.g. an authorized Mercedes-
Benz Center.
If you leave the vehicle parked up for longer
than six weeks, the vehicle may suffer
damage as a result of lack of use.
XVisit a qualified specialist workshop and
seek advice.166ParkingDriving and parking
BA 164.8 USA, CA Edition B 2011; 1; 2, en-USd2sboikeVersion: 3.0.3.52010-04-21T15:08:44+02:00 - Seite 166
Page 171 of 376
Heavy and light loadsGWarning
Depressing the brake pedal constantly results
in excessive and premature wear to the brake
pads.
It may also cause the brakes to overheat,
seriously impairing their effectiveness. It may
then not be possible to stop the vehicle in
sufficient time to avoid an accident.
If the brakes have been subjected to a heavy
cargo, do not stop the vehicle immediately,
but drive on for a short while. This allows the
airflow to cool the brakes more quickly.
Wet roads
GWarning
After driving in heavy rain for some time
without applying the brakes or through water
deep enough to wet brake components, the
first braking action may be somewhat
reduced. You have to depress the brake pedal
more firmly. Maintain a safe distance from
vehicles in front.
After driving on a wet road or having the
vehicle washed, brake firmly while paying
attention to the traffic conditions. This will
warm up the brake discs, thereby drying them
more quickly and protecting them against
corrosion.
Limited braking performance on salt
treated roads
GWarning
The layer of salt on the brake discs and the
brake pads/linings may cause a delay in the
braking effect, resulting in a significantly
longer braking distance, which could lead to
an accident.
To avoid this danger, you should:
R occasionally brake carefully, without
putting other road users at risk, when you
are driving on salted roads. This helps to
remove any salt that may have started to
build up on the brake discs and the brake
pads/linings.
R maintain a greater distance to the vehicle
ahead and drive with particular care.
R carefully apply the brakes at the end of a
trip and immediately after commencing a
new trip, so that salt residues are removed
from the brake discs.
Maintenance of the brakes
! If the brake warning lamp lights up in the
instrument cluster and you hear a warning
tone, even though the parking brake has
been released, the brake fluid level may be
too low. Observe additional warning
messages in the multifunction display.
The brake fluid level may be too low due to
brake pad wear or leaking brake lines.
Have the brake system checked
immediately. This work should be carried
out at an authorized Mercedes-Benz
Center.
All checks and maintenance work on the
brake system must be carried out at a
qualified specialist workshop. Contact an
authorized Mercedes-Benz Center.
Only install brake pads and use brake fluid
recommended by Mercedes-Benz.
GWarning
If other than recommended brake pads are
installed, or other than recommended brake
fluid is used, the braking properties of the
vehicle can be degraded to an extent that safe
braking is substantially impaired. This could
result in an accident.
! A function or performance test may only
be carried out on a two-axle dynamometer.
If you are planning to have the vehicle
tested on such a dynamometer, contact an
authorized Mercedes-Benz Center to
obtain further information first. Otherwise,
the drive train or the brake system may
suffer damage.
Driving tips169Driving and parkingBA 164.8 USA, CA Edition B 2011; 1; 2, en-USd2sboikeVersion: 3.0.3.52010-04-21T15:08:44+02:00 - Seite 169Z
Page 172 of 376
! As the ESP ®
system operates
automatically, the engine and the ignition
must be switched off (SmartKey in position
0 or 1 in the ignition lock or Start/Stop
button in position 0 or 1) while the parking
brake is being tested on a brake
dynamometer (maximum 10 seconds).
Braking maneuvers triggered automatically
by ESP ®
may seriously damage the brake
system.
If your brake system is only subjected to
moderate loads, you should regularly test
your brake system's function by forcefully
depressing the brake pedal when driving at
high speed. This also improves the brake
pads' friction.GWarning
Make sure that you do not endanger other
road users when you apply the brakes.
You can find a description of Brake Assist
(BAS) on ( Y page 66).
Parking brake
If you drive on wet roads or dirt-covered
surfaces, road salt and/or dirt could get into
the parking brake.
In order to prevent corrosion and a reduction
in the braking power of the parking brake,
observe the following:
R gently depress the parking brake from time
to time before beginning the journey.
R drive approximately 110 yd (100 m)
without exceeding a speed of 12 mph
(20 km/h).
GWarning!
While performing this procedure please
assure that the vehicle is stopped before
applying the parking brake. Otherwise the
rear wheels could lock up. You could lose
control of the vehicle and cause an accident.
In addition, the vehicle’s brake lights do not
light up when the parking brake is engaged.
Make sure not to endanger any other road
users when you engage the parking brake.
Driving on wet roads
Hydroplaning
If water has accumulated to a certain depth
on the road surface, there is a danger of
hydroplaning occurring, even if:
R you drive at low speeds
R the tires have adequate tread depth
For this reason, in the event of heavy rain or
in conditions in which hydroplaning can occur
you must drive in the following manner:
R Lower your speed
R Avoid ruts
R Brake carefully
Driving on flooded roads
! Do not drive through flooded areas.
Check the depth of any water before driving
through it. Drive slowly through standing
water. Otherwise, water may enter the
vehicle interior or the engine compartment.
This can damage the electronic
components in the engine or the automatic
transmission. Water can also be drawn in
by the engine's air suction nozzles and this
can cause engine damage.
i Set the raised vehicle level before driving
through standing water.
170Driving tipsDriving and parking
BA 164.8 USA, CA Edition B 2011; 1; 2, en-USd2sboikeVersion: 3.0.3.52010-04-21T15:08:44+02:00 - Seite 170
Page 175 of 376

Slippery road surfacesGWarning
If the vehicle becomes stuck in snow, make
sure snow is kept clear of the exhaust pipe
and from around the vehicle with the engine
running. Otherwise, deadly carbon monoxide
(CO) gases may enter vehicle interior
resulting in unconsciousness and death.
To assure sufficient fresh air ventilation, open
a window slightly on the side of the vehicle
not facing the wind.
GWarning!
The outside temperature indicator is not
designed to serve as an ice-warning device
and is therefore unsuitable for that purpose.
Indicated temperatures just above the
freezing point do not guarantee that the road
surface is free of ice. The road may still be icy,
especially in wooded areas or on bridges.
GWarning!
On slippery road surfaces, never downshift in
order to obtain braking action. This could
result in drive wheel slip and reduced vehicle
control. Your vehicle’s ABS will not prevent
this type of control loss.
Do not engage the transfer case in position
LOW when driving on ice or packed snow. At
speeds below 18 mph (30 km/h) vehicle
steering is adversely affected by the Off-road
ABS.
You should drive particularly carefully on
slippery road surfaces. Avoid sudden
acceleration, steering and braking
maneuvers. Do not use cruise control.
If the vehicle threatens to skid or cannot be
stopped when moving at low speed:
XShift the transmission to position N.
i
For more information on driving with
snow chains, see ( Y page 172).
GWarning
Make sure that you do not endanger other
road users when you apply the brakes.
Driving off-road
Important safety notes
GWarning!
Grains of sand, particles of dirt and other
abrasive materials can enter the brake
system. This can lead to excessive wear and
unpredictable braking efficiency.
After the brakes have been exposed to dirty
conditions, have them checked and cleaned
at a qualified specialist workshop, e.g. an
authorized Mercedes-Benz Center.
Otherwise, there is a risk that braking power
may be insufficient in the event of an
emergency, or that the braking effect may be
unpredictable.
GWarning!
Do not load items on the crossbars. It may
cause instability during some maneuvers
which could result in an accident.
Drive slowly in unknown terrain. This will
make it easier to recognize unexpected
obstacles and avoid damage to the vehicle.
To help avoid the vehicle rolling over, never
turn it around on steep inclines. If the vehicle
cannot complete the attempted climb, back it
down in reverse gear.
Do not drive along the side of a slope. The
vehicle might otherwise rollover. If in doing so
the vehicle begins to show a tendency to roll,
immediately steer into a line of gravity
(straight up or downhill).
Never let the vehicle roll backwards in idle.
You may lose control of the vehicle if you use
only the service brake. For information on
driving downhill, see “Driving downhill”.
Driving tips173Driving and parkingBA 164.8 USA, CA Edition B 2011; 1; 2, en-USd2sboikeVersion: 3.0.3.52010-04-21T15:08:44+02:00 - Seite 173Z
Page 177 of 376
Check list before driving off-roadXEngine oil level: check the engine oil and
top it up if necessary.
The oil supply can only be guaranteed on
steep slopes if the engine oil level is
sufficient.
! If the engine oil warning lamp lights up
while the vehicle is in motion, stop the
vehicle in a safe place as soon as possible.
Check the engine oil level. The engine oil
warning lamp warning must not be ignored.
Continuing the journey while the symbol is
displayed could lead to engine damage.
XWheel-changing tool kit: check that the
jack is working and make sure you have the
wheelbrace, a robust tow cable and a
folding spade in the vehicle.XWheels and tires: check the tire tread
depth and tire pressure. A table with the
recommended tire pressures can be found
on the B-pillar on the driver's side of your
vehicle.XCheck for damage and remove any foreign
objects, e.g. small stones, from the
wheels/tires.XReplace any missing valve caps.XReplace dented or damaged wheels.XWheels: dented or deformed wheels could
result in a loss of tire pressure and damage
the tire bead. Therefore, check the wheels
before driving off-road and replace them if
necessary.
Check list after driving off-road
GWarning
If you feel a sudden significant vibration or
ride disturbance, or you suspect that possible
damage to your vehicle has occurred, you
should turn on the hazard warning flashers,
carefully slow down, and drive with caution to
an area which is a safe distance from the road.
Inspect the tires and the vehicle underbody
for possible damage. If the vehicle appears
unsafe, have the vehicle towed to the nearest
authorized Mercedes-Benz Center or tire
dealer for repairs.
Driving over rough terrain places greater
demands on your vehicle than driving on
normal roads. After driving off-road, check
the vehicle. This allows you to detect damage
promptly and reduce the risk of an accident
to yourself and other road users.XDeactivate the off-road drive program
( Y page 204) or the LOW RANGE off-road
gear ( Y page 157).XDeactivate DSR ( Y page 203).XSet the differential lock setting to AUTO on
the selector wheel ( Y page 207).XLower the vehicle level again to a level
suitable to the road conditions, e.g. to the
highway/high-speed level.XClean the headlamps and rear lights and
check for damage.XClean the front and rear license plates.XClean the wheels/tires, wheel arch and the
underbody with a water jet. Check for
damage and remove any foreign objects.XAfter the trip, examine without fail the
entire undercarriage, wheels, tires, brakes,
bodywork structure, steering, chassis and
exhaust system for damage.XCheck whether twigs or other parts of
plants have become trapped. These
increase the risk of fire and can damage
fuel pipes, brake hoses or the rubber
bellows of the axle joints and propeller
shafts.XAfter driving for extended periods across
sand, mud, gravel, water or in similarly dirty
conditions, have the brake discs, wheels,
brake pads/linings and axle joints checked
and cleaned.XIf you detect strong vibrations after off-road
travel, check for foreign objects in the
wheels and drive train and remove them ifDriving tips175Driving and parkingBA 164.8 USA, CA Edition B 2011; 1; 2, en-USd2sboikeVersion: 3.0.3.52010-04-21T15:08:44+02:00 - Seite 175Z
Page 180 of 376
GWarning!
Never turn the vehicle around on steep inclines. The vehicle might roll over. If the vehicle cannot
complete the attempted climb, back it down in reverse gear.
i Hill start assist will aid you when pulling away on a hill.
For more information, see "Hill start assist" ( Y page 150).
Maximum gradient climbing ability
On good road surfaces, the maximum
gradient climbing capability of your vehicle is
100%, which corresponds to an approach/
departure angle of 45°. Note that the
vehicle's gradient-climbing capability
depends on the off-road conditions.
Accelerate carefully and make sure that the
wheels do not spin when driving on steep
terrain.
i If the load on the front axle is reduced
when pulling away on a steep uphill slope,
the front wheels have a tendency to spin.
4ETS recognizes this and brakes the
wheels accordingly. The rear wheel torque
is increased and it is easier to pull away.
i Vehicles with an Advanced Off-road
package have a differential lock for the
transfer case and a differential lock for the
rear axle to improve vehicle traction.
Hilltops
When driving up an uphill gradient, slightly
reduce pressure on the accelerator
immediately before reaching the brow of the
hill. Make use of the vehicle's own impetus to
travel over the brow.
This style of driving prevents:
R the vehicle from lifting off the ground on the
brow of a hill
R loss of traction
R the vehicle from traveling too quickly down
the other side
Driving downhill
R Drive slowly.
R Do not drive at an angle down steep
inclines. Steer into the line of fall and drive
with the front wheels aligned straight.
Otherwise, the vehicle could slip sideways,
tip and rollover.
R Before tackling steep downhill gradients,
select shift range 1.
R Activate DSR. If this is not sufficient, brake
gently. When doing so, make sure that the
vehicle is facing in the direction of the line
of fall.
R Check that the brakes are working normally
after a long downhill stretch.
i The special off-road ABS setting enables
the front wheels to be locked accurately,
briefly and repeatedly, causing them to dig
into the loose ground. Note that when the
front wheels are fully braked, they slide
easily over the ground surface and
therefore steering is impaired.
Driving abroad
An extensive Mercedes-Benz Service network
is also available in other countries. The
Service Hotline's current telephone numbers
for use when you are abroad are to be found
in the "Service24h" section of the Service
Booklet.
178Driving tipsDriving and parking
BA 164.8 USA, CA Edition B 2011; 1; 2, en-USd2sboikeVersion: 3.0.3.52010-04-21T15:08:44+02:00 - Seite 178