2011 MERCEDES-BENZ GL warning light
[x] Cancel search: warning lightPage 187 of 376
Storing the current speed or calling up
the last speed storedGWarning
The set speed stored in memory should only
be set again if prevailing road conditions and
legal speed limits permit. Possible
acceleration or deceleration differences
arising from returning to the preset speed
could cause an accident and/or serious injury
to you and others.
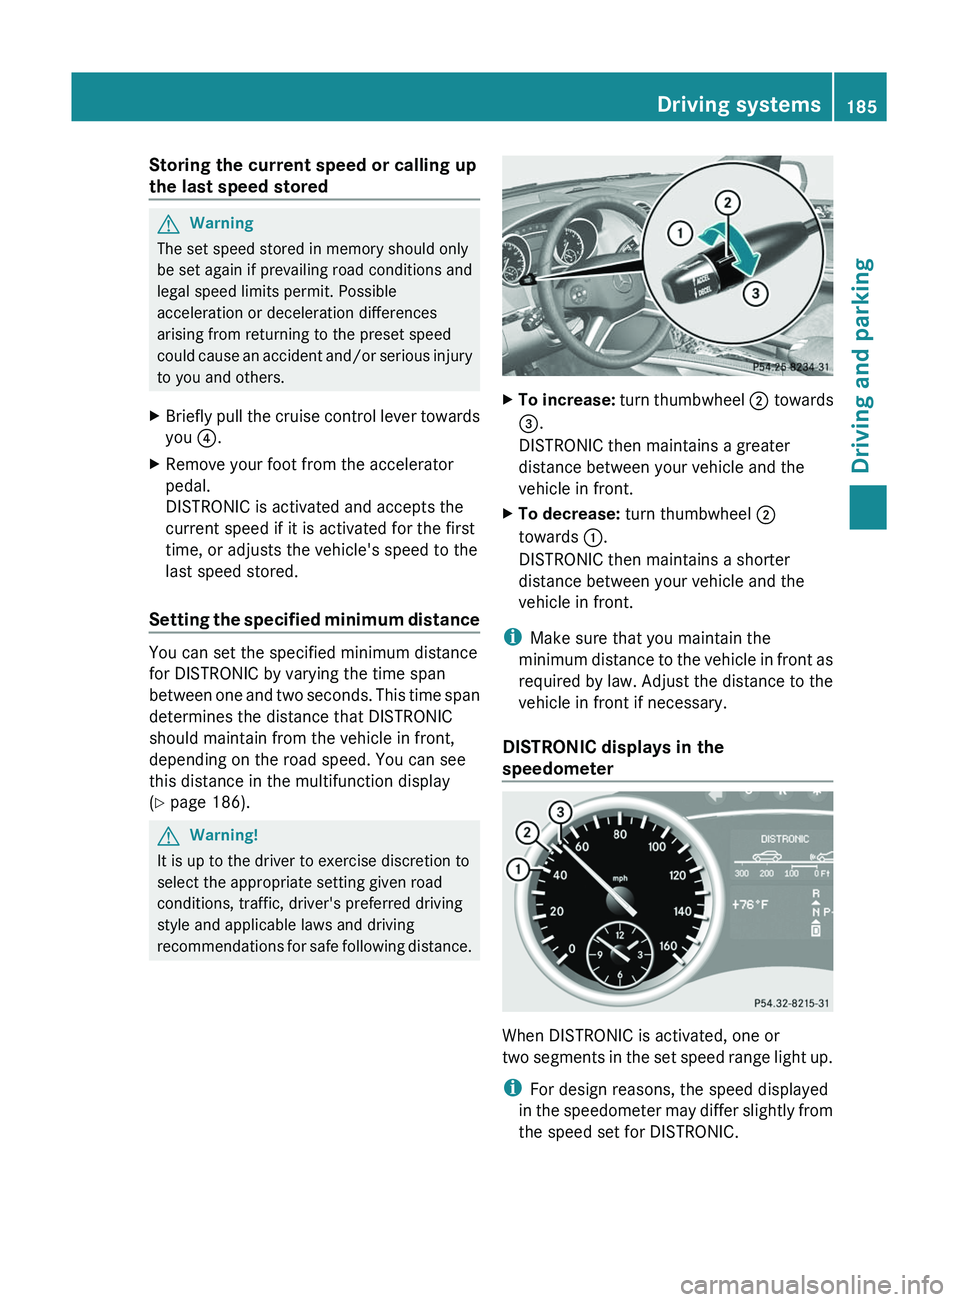
XBriefly pull the cruise control lever towards
you ?.XRemove your foot from the accelerator
pedal.
DISTRONIC is activated and accepts the
current speed if it is activated for the first
time, or adjusts the vehicle's speed to the
last speed stored.
Setting the specified minimum distance
You can set the specified minimum distance
for DISTRONIC by varying the time span
between one and two seconds. This time span
determines the distance that DISTRONIC
should maintain from the vehicle in front,
depending on the road speed. You can see
this distance in the multifunction display
( Y page 186).
GWarning!
It is up to the driver to exercise discretion to
select the appropriate setting given road
conditions, traffic, driver's preferred driving
style and applicable laws and driving
recommendations for safe following distance.
XTo increase: turn thumbwheel ; towards
= .
DISTRONIC then maintains a greater
distance between your vehicle and the
vehicle in front.XTo decrease: turn thumbwheel ;
towards :.
DISTRONIC then maintains a shorter
distance between your vehicle and the
vehicle in front.
i Make sure that you maintain the
minimum distance to the vehicle in front as
required by law. Adjust the distance to the
vehicle in front if necessary.
DISTRONIC displays in the
speedometer
When DISTRONIC is activated, one or
two segments in the set speed range light up.
i For design reasons, the speed displayed
in the speedometer may differ slightly from
the speed set for DISTRONIC.
Driving systems185Driving and parkingBA 164.8 USA, CA Edition B 2011; 1; 2, en-USd2sboikeVersion: 3.0.3.52010-04-21T15:08:44+02:00 - Seite 185Z
Page 188 of 376
If DISTRONIC detects a vehicle in front,
segments ; between the speed of the
vehicle in front : and stored speed = light
up.GWarning!
An intermittent warning sounds and the
distance warning lamp · in the instrument
cluster is illuminated if the Distronic system
calculates that the distance to the vehicle
ahead and your vehicle’s current speed
indicate that the Distronic will not be capable
of slowing the vehicle sufficiently to maintain
the preset following distance, which creates
a danger of a collision.
Immediately brake the vehicle to increase
your distance to the preceding vehicle. The
warning sound is intended as a final caution
in which you should intercede with your own
braking inputs to avoid a potentially
dangerous situation. Do not wait for the
operation of the warning signal to intercede
with your own braking. This will result in
potentially dangerous emergency braking
which will not always result in an impact being
avoided.
Tailgating increases the risk of an accident.
GWarning
DISTRONIC brakes your vehicle with a
maximum deceleration of 13 ft/s 2
(4 m/s 2
).
This corresponds to approximately 40% of
your vehicle's maximum possible braking
power.
You must apply the brakes yourself to avoid a
collision. DISTRONIC brakes the vehicle to
restore the set distance to the vehicle in front
or to restore the set speed. In this case, the
brake pedal is depressed automatically,
which can be seen by a movement of the
brake pedal.
Always keep the driver's footwell clear,
including the area under the brake pedal.
Objects in this area may impair pedal
movement and cause the DISTRONIC braking
function to malfunction.
Do not place your foot under the brake pedal
– your foot could become caught.
DISTRONIC displays in the
multifunction displayXPress the V or U button to select the
DISTRONIC menu (Y page 217).
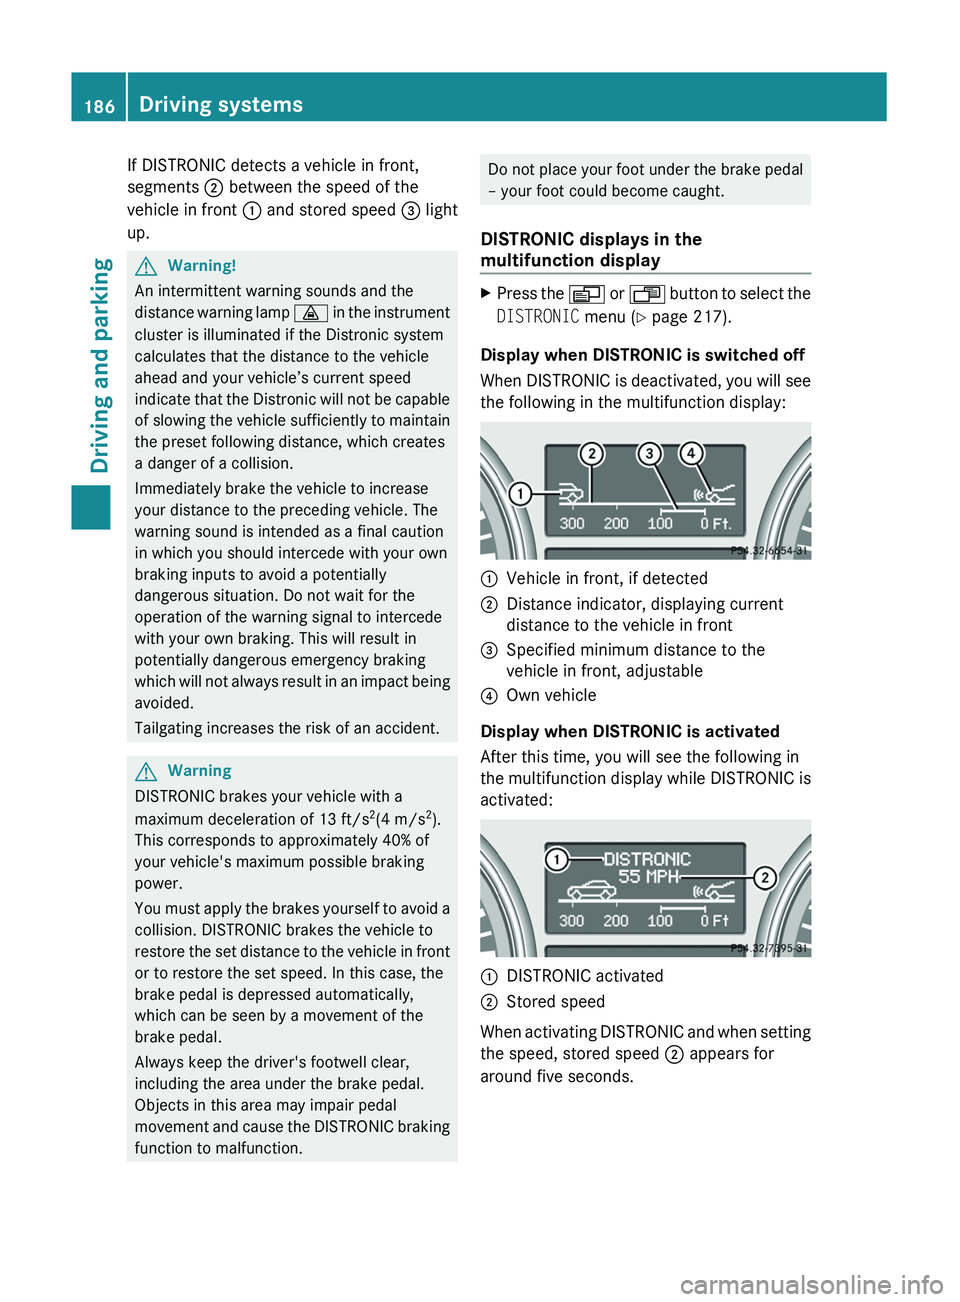
Display when DISTRONIC is switched off
When DISTRONIC is deactivated, you will see
the following in the multifunction display:
:Vehicle in front, if detected;Distance indicator, displaying current
distance to the vehicle in front=Specified minimum distance to the
vehicle in front, adjustable?Own vehicle
Display when DISTRONIC is activated
After this time, you will see the following in
the multifunction display while DISTRONIC is
activated:
:DISTRONIC activated;Stored speed
When activating DISTRONIC and when setting
the speed, stored speed ; appears for
around five seconds.
186Driving systemsDriving and parking
BA 164.8 USA, CA Edition B 2011; 1; 2, en-USd2sboikeVersion: 3.0.3.52010-04-21T15:08:44+02:00 - Seite 186
Page 191 of 376
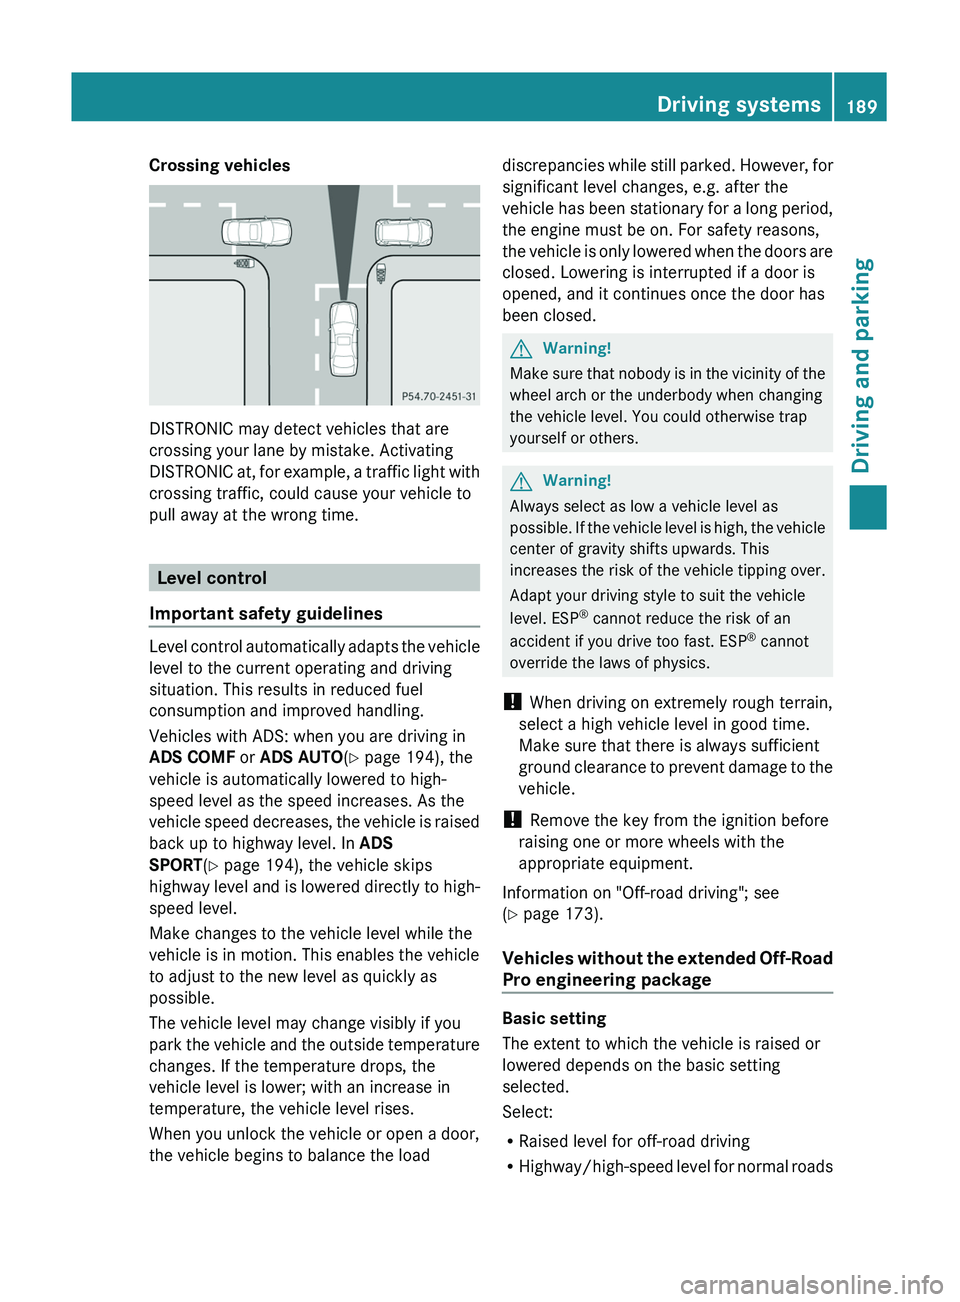
Crossing vehicles
DISTRONIC may detect vehicles that are
crossing your lane by mistake. Activating
DISTRONIC at, for example, a traffic light with
crossing traffic, could cause your vehicle to
pull away at the wrong time.
Level control
Important safety guidelines
Level control automatically adapts the vehicle
level to the current operating and driving
situation. This results in reduced fuel
consumption and improved handling.
Vehicles with ADS: when you are driving in
ADS COMF or ADS AUTO(Y page 194), the
vehicle is automatically lowered to high-
speed level as the speed increases. As the
vehicle speed decreases, the vehicle is raised
back up to highway level. In ADS
SPORT(Y page 194), the vehicle skips
highway level and is lowered directly to high-
speed level.
Make changes to the vehicle level while the
vehicle is in motion. This enables the vehicle
to adjust to the new level as quickly as
possible.
The vehicle level may change visibly if you
park the vehicle and the outside temperature
changes. If the temperature drops, the
vehicle level is lower; with an increase in
temperature, the vehicle level rises.
When you unlock the vehicle or open a door,
the vehicle begins to balance the load
discrepancies while still parked. However, for
significant level changes, e.g. after the
vehicle has been stationary for a long period,
the engine must be on. For safety reasons,
the vehicle is only lowered when the doors are
closed. Lowering is interrupted if a door is
opened, and it continues once the door has
been closed.
GWarning!
Make sure that nobody is in the vicinity of the
wheel arch or the underbody when changing
the vehicle level. You could otherwise trap
yourself or others.
GWarning!
Always select as low a vehicle level as
possible. If the vehicle level is high, the vehicle
center of gravity shifts upwards. This
increases the risk of the vehicle tipping over.
Adapt your driving style to suit the vehicle
level. ESP® cannot reduce the risk of an
accident if you drive too fast. ESP® cannot
override the laws of physics.
! When driving on extremely rough terrain,
select a high vehicle level in good time.
Make sure that there is always sufficient
ground clearance to prevent damage to the
vehicle.
! Remove the key from the ignition before
raising one or more wheels with the
appropriate equipment.
Information on "Off-road driving"; see
(Y page 173).
Vehicles without the extended Off-Road
Pro engineering package
Basic setting
The extent to which the vehicle is raised or
lowered depends on the basic setting
selected.
Select:
RRaised level for off-road driving
RHighway/high-speed level for normal roads
Driving systems189Driving and parkingBA 164.8 USA, CA Edition B 2011; 1; 2, en-USd2sboikeVersion: 3.0.3.52010-04-21T15:08:44+02:00 - Seite 189Z
Page 198 of 376
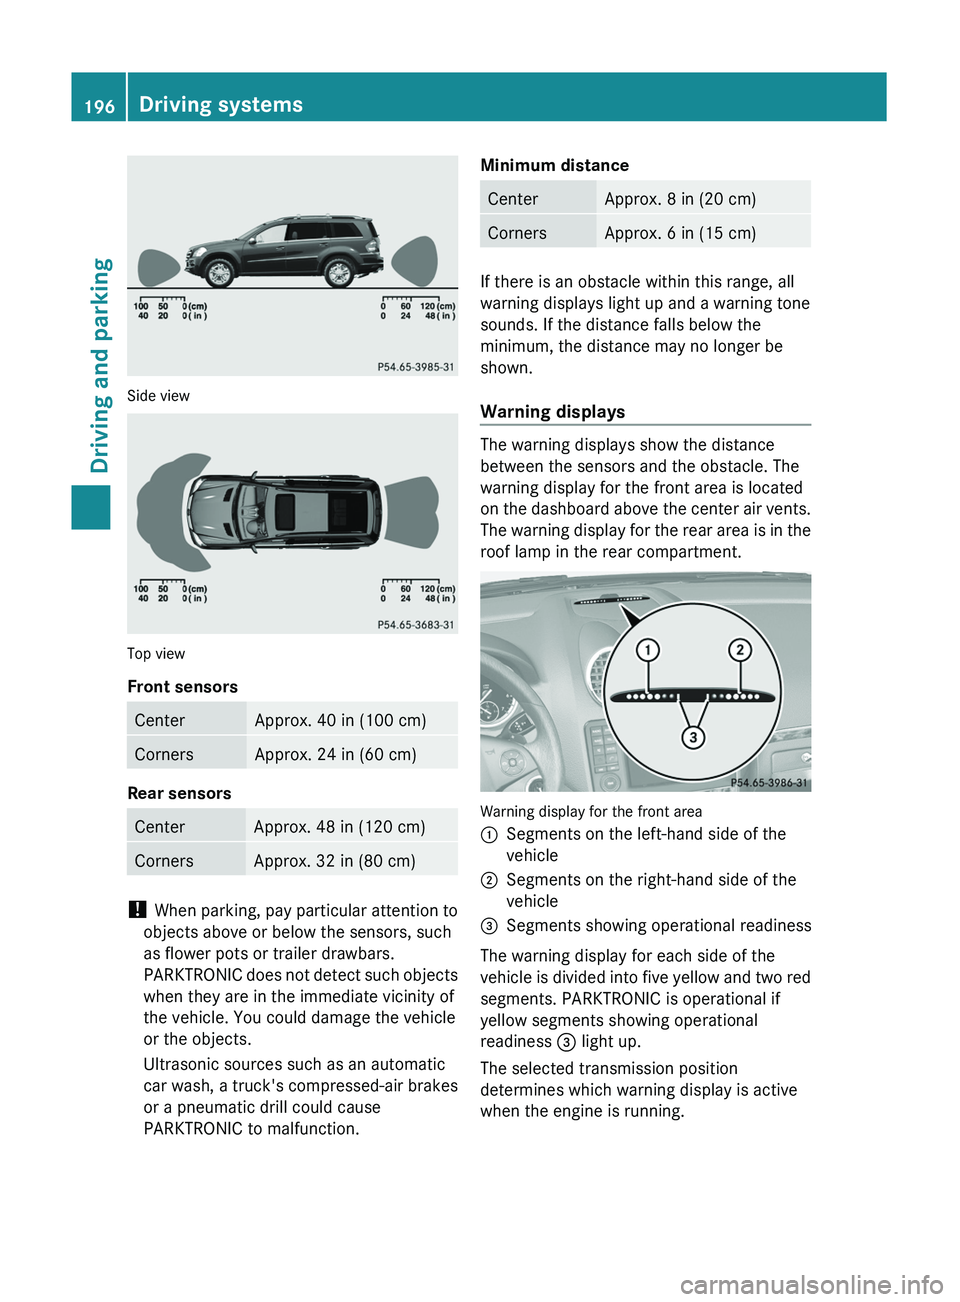
Side view
Top view
Front sensors
CenterApprox. 40 in (100 cm)CornersApprox. 24 in (60 cm)
Rear sensors
CenterApprox. 48 in (120 cm)CornersApprox. 32 in (80 cm)
! When parking, pay particular attention to
objects above or below the sensors, such
as flower pots or trailer drawbars.
PARKTRONIC does not detect such objects
when they are in the immediate vicinity of
the vehicle. You could damage the vehicle
or the objects.
Ultrasonic sources such as an automatic
car wash, a truck's compressed-air brakes
or a pneumatic drill could cause
PARKTRONIC to malfunction.
Minimum distanceCenterApprox. 8 in (20 cm)CornersApprox. 6 in (15 cm)
If there is an obstacle within this range, all
warning displays light up and a warning tone
sounds. If the distance falls below the
minimum, the distance may no longer be
shown.
Warning displays
The warning displays show the distance
between the sensors and the obstacle. The
warning display for the front area is located
on the dashboard above the center air vents.
The warning display for the rear area is in the
roof lamp in the rear compartment.
Warning display for the front area
:Segments on the left-hand side of the
vehicle;Segments on the right-hand side of the
vehicle=Segments showing operational readiness
The warning display for each side of the
vehicle is divided into five yellow and two red
segments. PARKTRONIC is operational if
yellow segments showing operational
readiness = light up.
The selected transmission position
determines which warning display is active
when the engine is running.
196Driving systemsDriving and parking
BA 164.8 USA, CA Edition B 2011; 1; 2, en-USd2sboikeVersion: 3.0.3.52010-04-21T15:08:44+02:00 - Seite 196
Page 199 of 376
Transmission
positionWarning displayDFront area activatedR or NRear and front areas
activatedPNo areas activated
One or more segments light up as the vehicle
approaches an obstacle, depending on the
vehicle's distance from the obstacle.
From the:
R sixth segment onwards, you will hear an
intermittent warning tone for
approximately two seconds.
R seventh segment onwards, you will hear a
warning tone for approximately two
seconds. This indicates that you have now
reached the minimum distance.
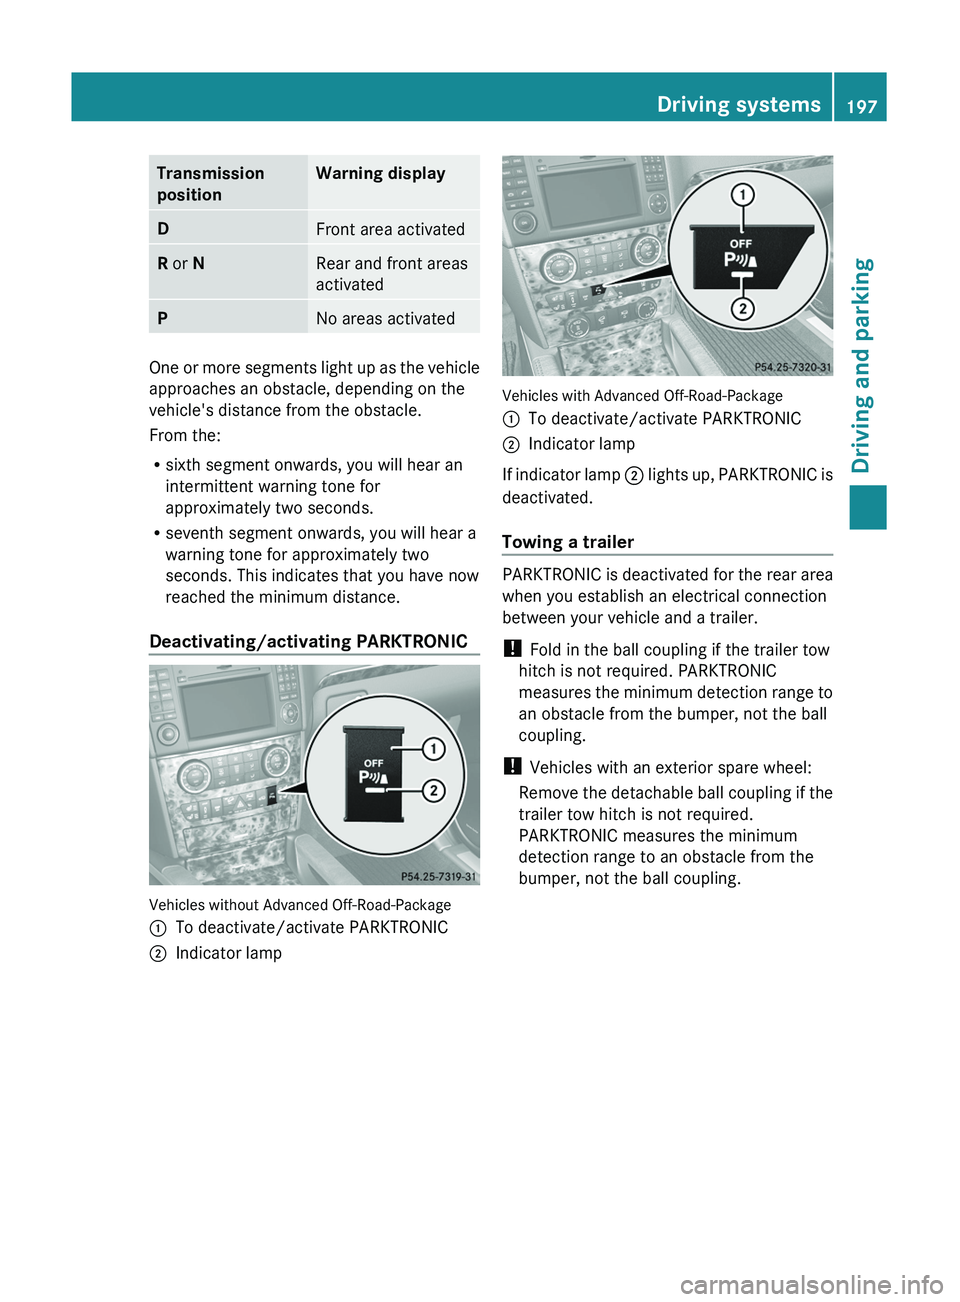
Deactivating/activating PARKTRONIC
Vehicles without Advanced Off-Road-Package
:To deactivate/activate PARKTRONIC;Indicator lamp
Vehicles with Advanced Off-Road-Package
:To deactivate/activate PARKTRONIC;Indicator lamp
If indicator lamp ; lights up, PARKTRONIC is
deactivated.
Towing a trailer
PARKTRONIC is deactivated for the rear area
when you establish an electrical connection
between your vehicle and a trailer.
! Fold in the ball coupling if the trailer tow
hitch is not required. PARKTRONIC
measures the minimum detection range to
an obstacle from the bumper, not the ball
coupling.
! Vehicles with an exterior spare wheel:
Remove the detachable ball coupling if the
trailer tow hitch is not required.
PARKTRONIC measures the minimum
detection range to an obstacle from the
bumper, not the ball coupling.
Driving systems197Driving and parkingBA 164.8 USA, CA Edition B 2011; 1; 2, en-USd2sboikeVersion: 3.0.3.52010-04-21T15:08:44+02:00 - Seite 197Z
Page 200 of 376
Problems with PARKTRONICProblemPossible causes/consequences and M SolutionsOnly the red segments
in the PARKTRONIC
warning displays are lit.
You also hear a warning
tone for approximately
two seconds.
PARKTRONIC is
deactivated after
approximately
20 seconds and the
indicator lamp in the
PARKTRONIC button
lights up.PARKTRONIC has malfunctioned and has switched off.XIf problems persist, have PARKTRONIC checked at a qualified
specialist workshop.Only the red segments
in the PARKTRONIC
warning displays are lit.
PARKTRONIC is
deactivated after
approximately 20
seconds.The PARKTRONIC sensors are dirty or there is interference.XClean the PARKTRONIC sensors ( Y page 303).XSwitch the ignition back on.The problem may be caused by an external source of radio or
ultrasound waves.XSee if PARKTRONIC functions in a different location.Rear view camera
Important safety guidelines
The rear view camera is an optical parking aid.
It shows the area behind your vehicle in the
COMAND APS display.
GWarning!
Make sure no persons or animals are in or
near the area in which you are parking/
maneuvering. Otherwise, they could be
injured.
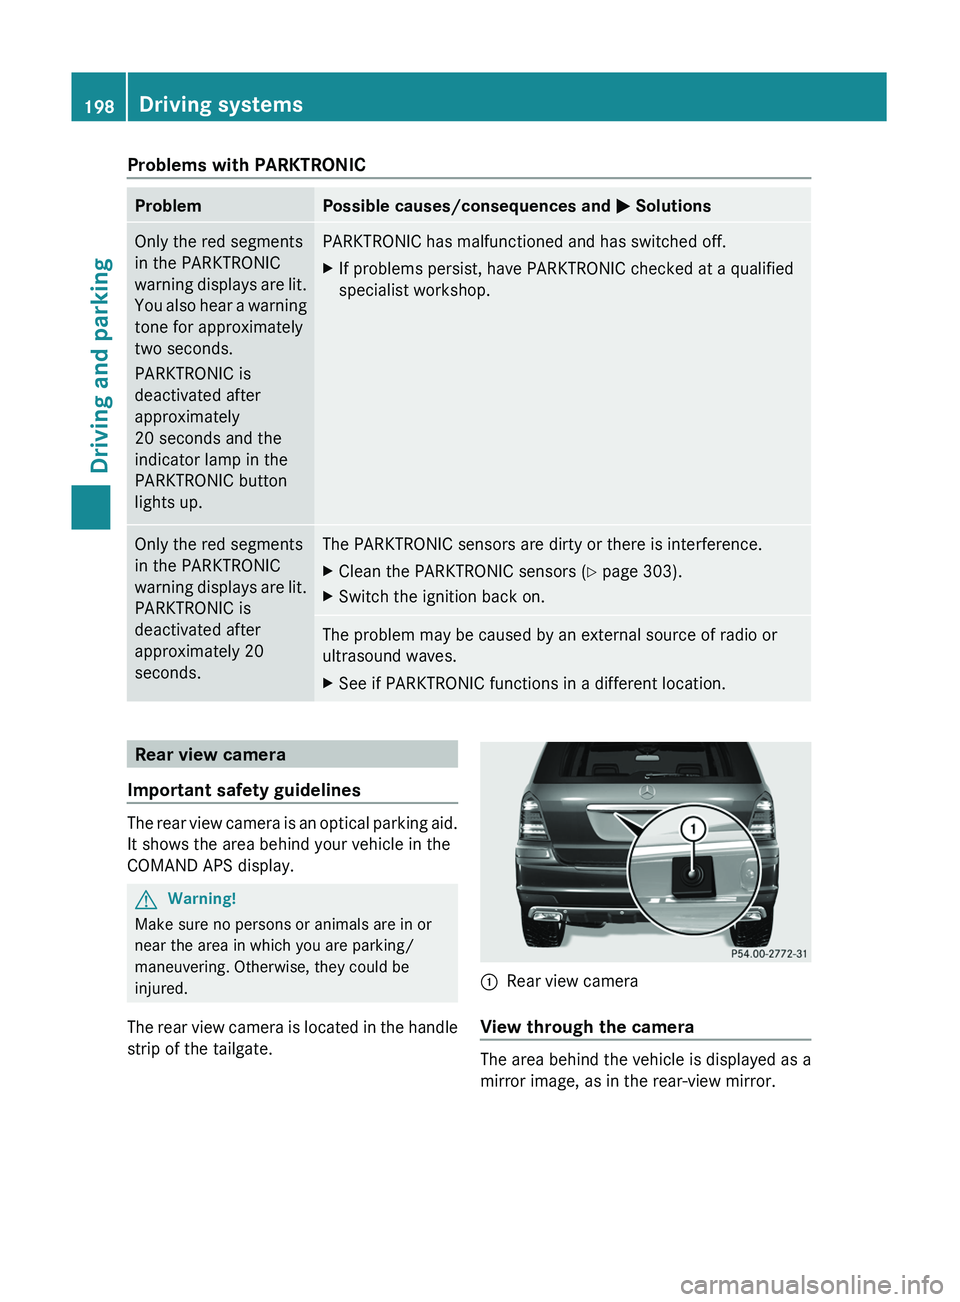
The rear view camera is located in the handle
strip of the tailgate.
:Rear view camera
View through the camera
The area behind the vehicle is displayed as a
mirror image, as in the rear-view mirror.
198Driving systemsDriving and parking
BA 164.8 USA, CA Edition B 2011; 1; 2, en-USd2sboikeVersion: 3.0.3.52010-04-21T15:08:44+02:00 - Seite 198
Page 201 of 376
GWarning!
The rear view camera is only an aid and may
display obstacles
R from a distorted perspective
R inaccurately
R may not display obstacles at all
The rear view camera does not relieve you of
the responsibility to be cautious. Take care
and pay careful attention. The rear view
camera may not show objects which are
R very close to the rear bumper
R under the rear bumper
R above the tailgate handle
You are responsible for safety at all times and
must continue to pay attention to the
immediate surroundings when parking and
maneuvering. This includes the area behind,
in front of, and beside the vehicle. Otherwise
you could endanger yourself and/or others.
GWarning!
The rear view camera either will not function
or will not function to its full capability if
R the tailgate is open
R it is raining very hard, snowing or foggy
R it is night or you are parking/maneuvering
your vehicle in an area where it is very dark
R the camera is exposed to a very bright white
light
R the immediate surroundings are
illuminated with fluorescent light (the
display may flicker)
R there is a sudden change in temperature,
e.g. if you drive into a heated garage from
the cold (lens condensation)
R the camera lens is dirty or covered
R the rear of your vehicle is damaged
In this case, have the position and setting
of the camera checked by a qualified
specialist workshop. Mercedes-Benz
recommends that you contact a Mercedes-
Benz Center for this purpose.
Do not use the rear view camera in these
situations. Otherwise you could injure
yourself or others and/or damage property
including your vehicle while parking/
maneuvering.
Activating the rear view cameraXMake sure that the key is in position 2 in
the ignition lock.XMake sure that the "rear view camera"
function is selected in COMAND APS; see
the separate operating instructions for
COMAND APS.XEngage reverse gear.
The area behind the vehicle is shown in the
COMAND APS display with guide lines.
Guide lines in the COMAND APS display
GWarning!
Use of rear view camera can be dangerous if
you are color-blind or have impaired color
vision.
Only use rear view camera if you can see and
distinguish all colored guidelines shown by
rear view camera on the COMAND system
display.
GWarning
Please note that objects that do not touch the
ground may appear to be further away than
they actually are, for example:
R the bumper of a vehicle parked behind you
R the trailer drawbar
R the ball coupling of a trailer tow hitch
R the rear end of a truck
R a slanted post
In such cases, you should not use the guide
lines to judge the distance. You may misjudge
the distance, which increases the risk of
impacting the objects.
Even if the object you approach is directly on
the ground, do not approach the object any
closer than the red guide line.
Driving systems199Driving and parkingBA 164.8 USA, CA Edition B 2011; 1; 2, en-USd2sboikeVersion: 3.0.3.52010-04-21T15:08:44+02:00 - Seite 199Z
Page 203 of 376
GWarning
Blind Spot Assist monitors certain areas in the
immediate vicinity of your vehicle. Vehicles
that approach and drive past at high speeds
are not detected. There is no display and no
warning.
If the lanes are very wide, it may not be
possible to monitor the complete width of the
neighboring lane. For this reason, vehicles in
the next lane may not be detected, especially
if they are driving in a staggered formation.
This may be the case if vehicles are driving at
that edge of their lane which is furthest away
from your vehicle.
Always pay attention to traffic conditions and
your surroundings. Otherwise, you may fail to
recognize dangers in time, cause an accident
and injure yourself and others.
If the lanes are narrow, the system may be
unable to distinguish the neighboring lane
from the one beyond it. For this reason, the
system may indicate vehicles in the farther
lane, especially if the vehicles are driving in a
staggered formation in different lanes. In
particular, this may be the case if the vehicles
are driving at that edge of their lane which is
nearest your vehicle.
Due to the nature of the system:
R warnings may be issued unnecessarily
when driving close to crash barriers or
similar solid lane borders.
R the warning may be interrupted when
traveling next to long vehicles for extended
periods.
The two sensors for Blind Spot Assist are
integrated into the sides of the rear bumper.
Make sure that the bumper is free of dirt, ice
or slush around the sensors. For example, the
radar sensors must not be covered by bicycle
racks or overhanging loads. In the event of a
severe impact or damage to the bumpers,
have the function of the radar sensors
checked at a qualified specialist workshop,
e.g. an authorized Mercedes-Benz Center.
Blind Spot Assist may otherwise not work
properly.
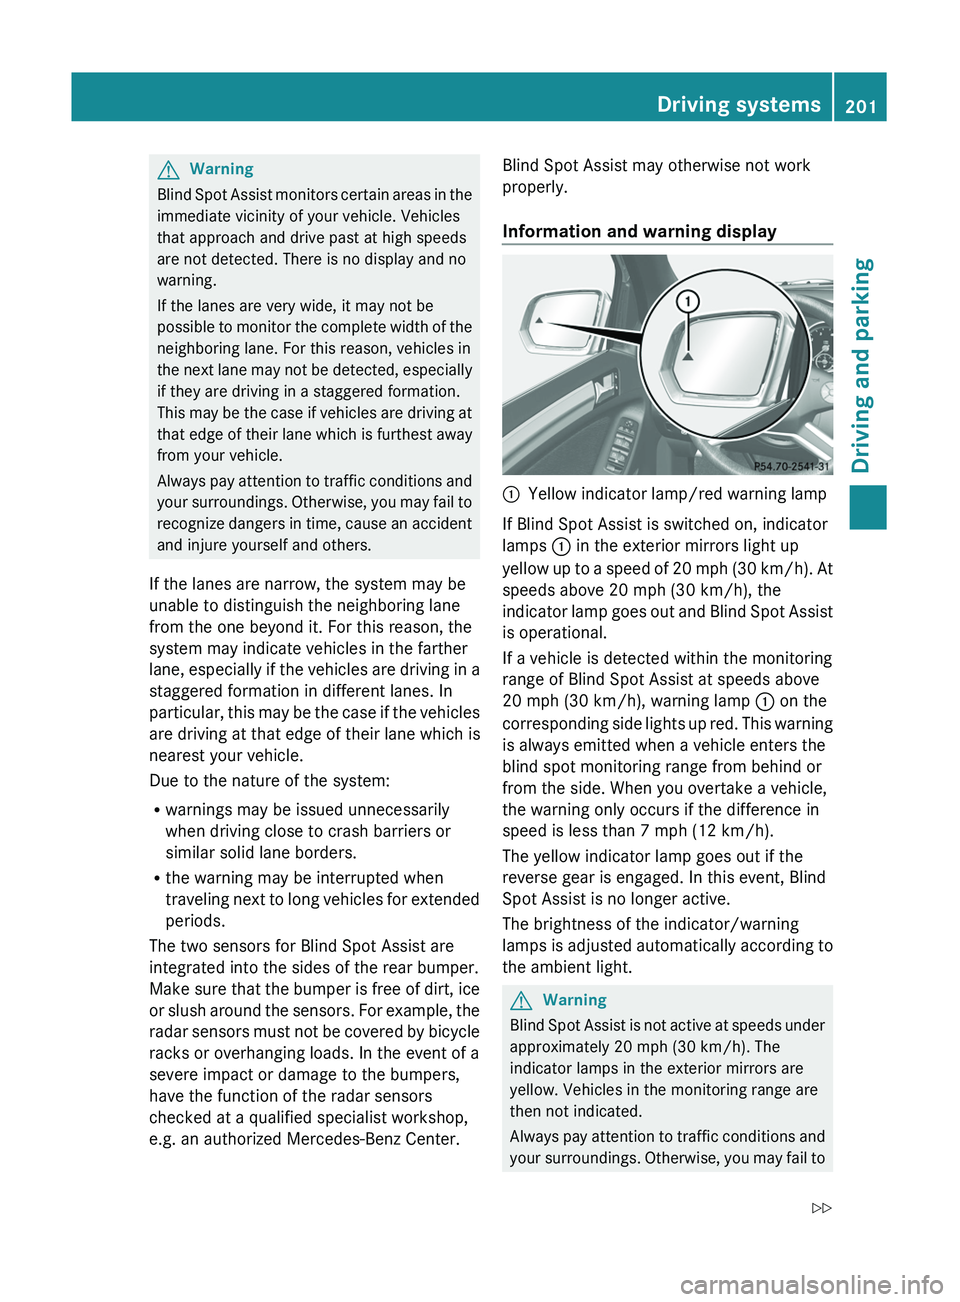
Information and warning display:Yellow indicator lamp/red warning lamp
If Blind Spot Assist is switched on, indicator
lamps : in the exterior mirrors light up
yellow up to a speed of 20 mph (30 km/h). At
speeds above 20 mph (30 km/h), the
indicator lamp goes out and Blind Spot Assist
is operational.
If a vehicle is detected within the monitoring
range of Blind Spot Assist at speeds above
20 mph (30 km/h), warning lamp : on the
corresponding side lights up red. This warning
is always emitted when a vehicle enters the
blind spot monitoring range from behind or
from the side. When you overtake a vehicle,
the warning only occurs if the difference in
speed is less than 7 mph (12 km/h).
The yellow indicator lamp goes out if the
reverse gear is engaged. In this event, Blind
Spot Assist is no longer active.
The brightness of the indicator/warning
lamps is adjusted automatically according to
the ambient light.
GWarning
Blind Spot Assist is not active at speeds under
approximately 20 mph (30 km/h). The
indicator lamps in the exterior mirrors are
yellow. Vehicles in the monitoring range are
then not indicated.
Always pay attention to traffic conditions and
your surroundings. Otherwise, you may fail to
Driving systems201Driving and parkingBA 164.8 USA, CA Edition B 2011; 1; 2, en-USd2sboikeVersion: 3.0.3.52010-04-21T15:08:44+02:00 - Seite 201Z