2011 MERCEDES-BENZ GL hood open
[x] Cancel search: hood openPage 11 of 376

Storing settings (memory
function) ........................................ 110
Storing the parking position ..........109
Exterior view ........................................ 26
F
Filling capacity see Technical data
First-aid kit ......................................... 309
Flat tire Changing a wheel/mounting the
spare wheel ................................... 316
MOExtended run-flat system .........321
Preparing the vehicle .....................311
Raising the vehicle .........................318
TIREFIT kit ...................................... 312
Floormat ............................................. 291
Front fog lamp (display
message) ............................................ 239
Fuel Additives ........................................ 367
Notes ............................................. 366
Premium-grade unleaded gasoline . 366
Refueling ........................................ 159
Specifications ................................ 366
Troubleshooting ............................. 162
Fuel consumption
Current (on-board computer) .........227
Notes ............................................. 167
Fuel filler cap (display message) ..... 243
Fuel filler flap Emergency release ........................161
Opening/closing ............................ 160
Fuel filter (display message) ............ 243
Fuel level Calling up the range (on-board
computer) ...................................... 227
Fuses
Dashboard fuse box .......................330
Engine emergency stop .................331
Fuse allocation chart .....................330
Fuse box in the cargo
compartment ................................. 331
Fuse box in the engine
compartment ................................. 330
Notes ............................................. 329
G
Garage door opener Clearing the memory .....................291
Notes ............................................. 288
Opening/closing the garage door ..291
Programming the remote control ...289
Gear or selector lever (cleaning
guidelines) ......................................... 304
Genuine Mercedes-Benz parts ......... 362
Genuine wood trim and trim strips
(cleaning instructions) ...................... 304
Glove box ........................................... 265
GTW (Gross Trailer Weight)
(definition) ......................................... 355
H
Headlamp cleaning system .............. 117
Adding washer fluid .......................297
Notes ............................................. 370
Headlamp delayed switch-off
see Delayed switch-off, exterior lighting
Headlamp mode (daytime driving)
see Daytime running lamps
Headlamps
Cleaning ......................................... 302
Misting up ...................................... 118
Setting ........................................... 124
Head restraint
Adjusting (electrically) .....................97
Head restraints
Adjusting (manually) ........................97
Adjusting (rear) ................................ 98
Installing/removing (rear) ................99
Luxury .............................................. 97
see NECK-PRO head restraints
Heating
see Climate control
High beam flasher ............................. 117
Hill start assist .................................. 150
Hood Closing ........................................... 295
Opening ......................................... 294
Hydroplaning ..................................... 170
Index9BA 164.8 USA, CA Edition B 2011; 1; 2, en-USd2sboikeVersion: 3.0.3.52010-04-21T15:08:44+02:00 - Seite 9
Page 28 of 376
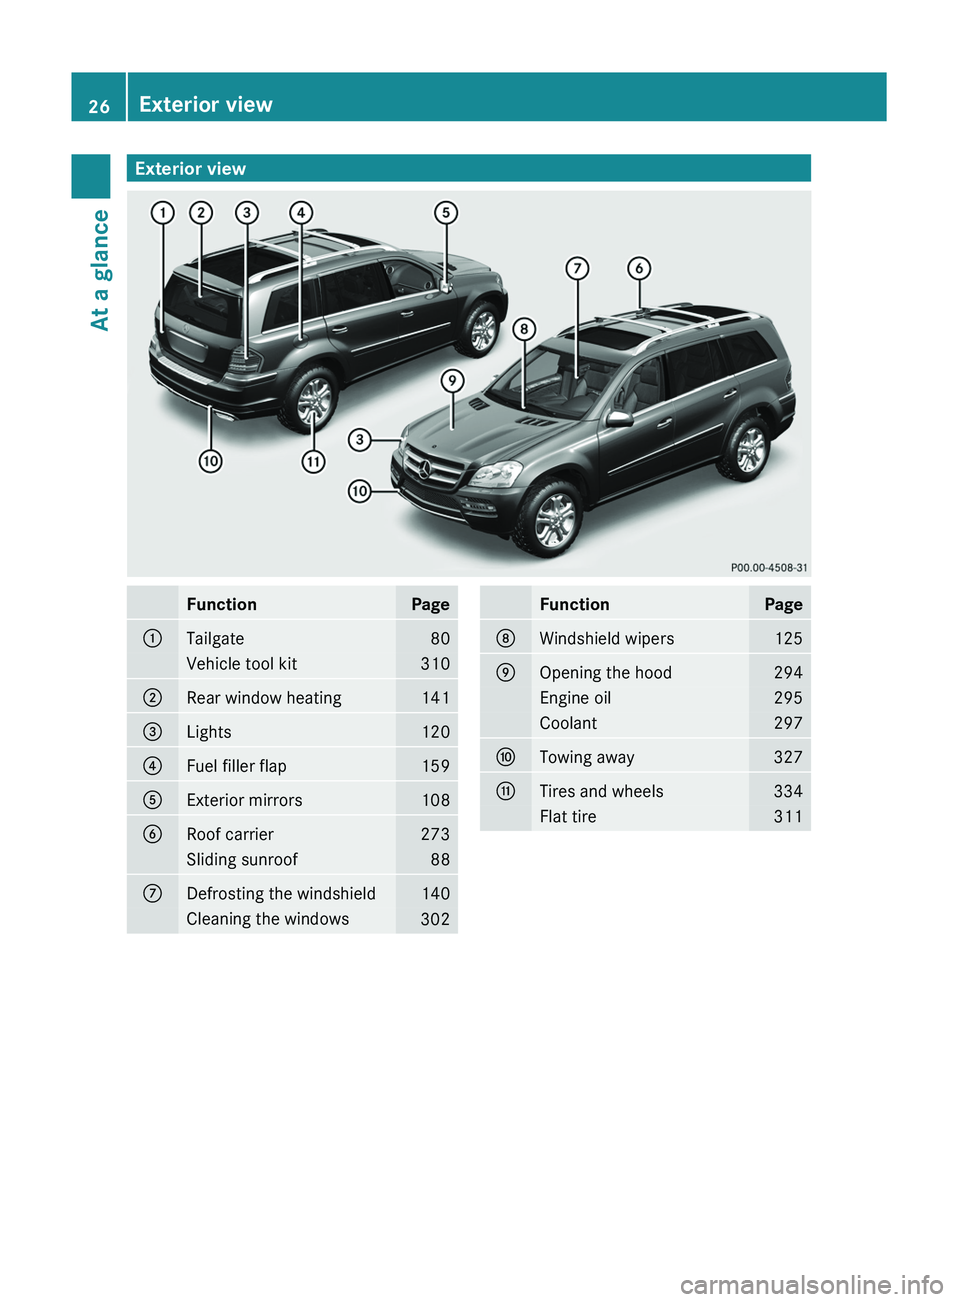
Exterior viewFunctionPage:Tailgate80Vehicle tool kit310;Rear window heating141=Lights120?Fuel filler flap159AExterior mirrors108BRoof carrier273Sliding sunroof88CDefrosting the windshield140Cleaning the windows302FunctionPageDWindshield wipers125EOpening the hood294Engine oil295Coolant297FTowing away327GTires and wheels334Flat tire31126Exterior viewAt a glance
BA 164.8 USA, CA Edition B 2011; 1; 2, en-USd2sboikeVersion: 3.0.3.52010-04-21T15:08:44+02:00 - Seite 26
Page 29 of 376

CockpitFunctionPage:Combination switch117;Cruise control lever179=Instrument cluster28?HornASteering wheel paddle
shifters
155
BDIRECT SELECT lever152CPARKTRONIC warning
display
195
DOverhead control panel33EOperates the automatic
climate control system
130
FunctionPageFIgnition lock147Start/Stop button147GAdjusts the steering wheel
manually
105
HOn-board diagnostic socketIOpens the hood294JParking brake165KReleases the parking brake165LLight switch114MAdjusts the steering wheel
electrically
105
Steering wheel heating106Cockpit27At a glanceBA 164.8 USA, CA Edition B 2011; 1; 2, en-USd2sboikeVersion: 3.0.3.52010-04-21T15:08:44+02:00 - Seite 27
Page 71 of 376
EBD monitors and controls the brake
pressure on the rear wheels to improve
driving stability while braking.GWarning!
If the EBD malfunctions, the brake system will
still function with full brake boost. However,
the rear wheels could lock up during
emergency braking situations, for example.
You could lose control of the vehicle and
cause an accident.
Adapt your driving style to the changed
driving characteristics.
Distance warning function (vehicles
with DISTRONIC)
This function warns you from a speed of
approximately 20 mph (30 km/h), if:
R for a period of several seconds, the
distance to the vehicle in front is too short
for the speed at which you are traveling.
The · distance warning lamp in the
instrument cluster will light up.
R you are approaching the vehicle in front
rapidly. An intermittent warning tone will
then sound and the · distance warning
lamp in the instrument cluster will light up.
You must apply the brakes yourself in order
to maintain the appropriate distance to the
vehicle in front and prevent a collision.
GWarning!
If the distance warning lamp · in the
instrument cluster comes on while driving
and/or an intermittent warning sounds,
immediate attention on the part of the driver
is required. As required by the traffic
situation, apply the brakes and navigate
around a possible obstacle. However, do not
drive by relying on the distance warning
function, as this will result in an emergency
braking application. This will not always
enable you to avoid a collision, especially
when traveling on varying road surface
conditions and with varying driver reaction.
Complex driving situations are not always
fully recognized by the distance warning
function. This could result in wrong or missing
distance warnings.XTo activate/deactivate: activate or
deactivate the distance warning function in
the on-board computer ( Y page 226).
After activation, the Ä symbol is
displayed in the lower multifunction
display.
Anti-theft systems
Immobilizer
The immobilizer prevents your vehicle from
being started without the correct SmartKey.
When leaving the vehicle, always take the
SmartKey with you and lock the vehicle. The
engine can be started by anyone with a valid
SmartKey that is left inside the vehicle.
XTo activate with the SmartKey: remove
the SmartKey from the ignition lock.XTo activate with KEYLESS-GO: switch the
ignition off and open the driver's door.XTo deactivate: switch on the ignition.
i
The immobilizer is always deactivated
when you start the engine.
In the event that the engine cannot be
started when the starter battery is fully
charged, the immobilizer may be faulty.
Contact an authorized Mercedes-Benz
Center or call 1-800-FOR-MERCedes (in
USA) or 1-800-387-0100 (in Canada).
ATA (Anti-Theft Alarm system)
A visual and audible alarm is triggered if the
alarm system is armed and you open:
R a door
R the vehicle with the mechanical key
R the tailgate
R the hood
Anti-theft systems69SafetyBA 164.8 USA, CA Edition B 2011; 1; 2, en-USd2sboikeVersion: 3.0.3.52010-04-21T15:08:44+02:00 - Seite 69Z
Page 123 of 376
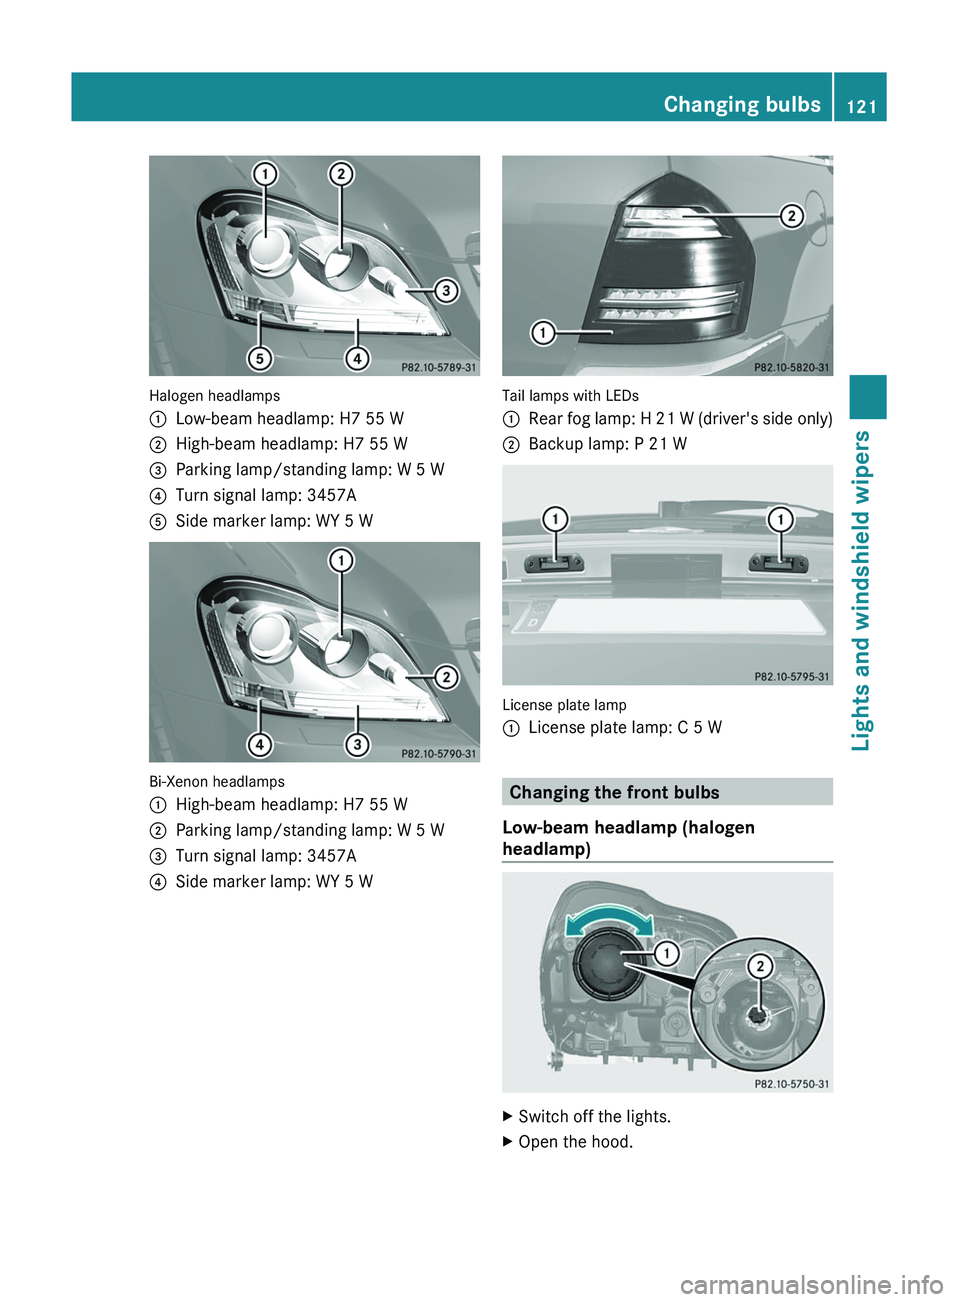
Halogen headlamps
:Low-beam headlamp: H7 55 W;High-beam headlamp: H7 55 W=Parking lamp/standing lamp: W 5 W?Turn signal lamp: 3457AASide marker lamp: WY 5 W
Bi-Xenon headlamps
:High-beam headlamp: H7 55 W;Parking lamp/standing lamp: W 5 W=Turn signal lamp: 3457A?Side marker lamp: WY 5 W
Tail lamps with LEDs
:Rear fog lamp: H 21 W (driver's side only);Backup lamp: P 21 W
License plate lamp
:License plate lamp: C 5 W
Changing the front bulbs
Low-beam headlamp (halogen
headlamp)
XSwitch off the lights.XOpen the hood.Changing bulbs121Lights and windshield wipersBA 164.8 USA, CA Edition B 2011; 1; 2, en-USd2sboikeVersion: 3.0.3.52010-04-21T15:08:44+02:00 - Seite 121Z
Page 124 of 376
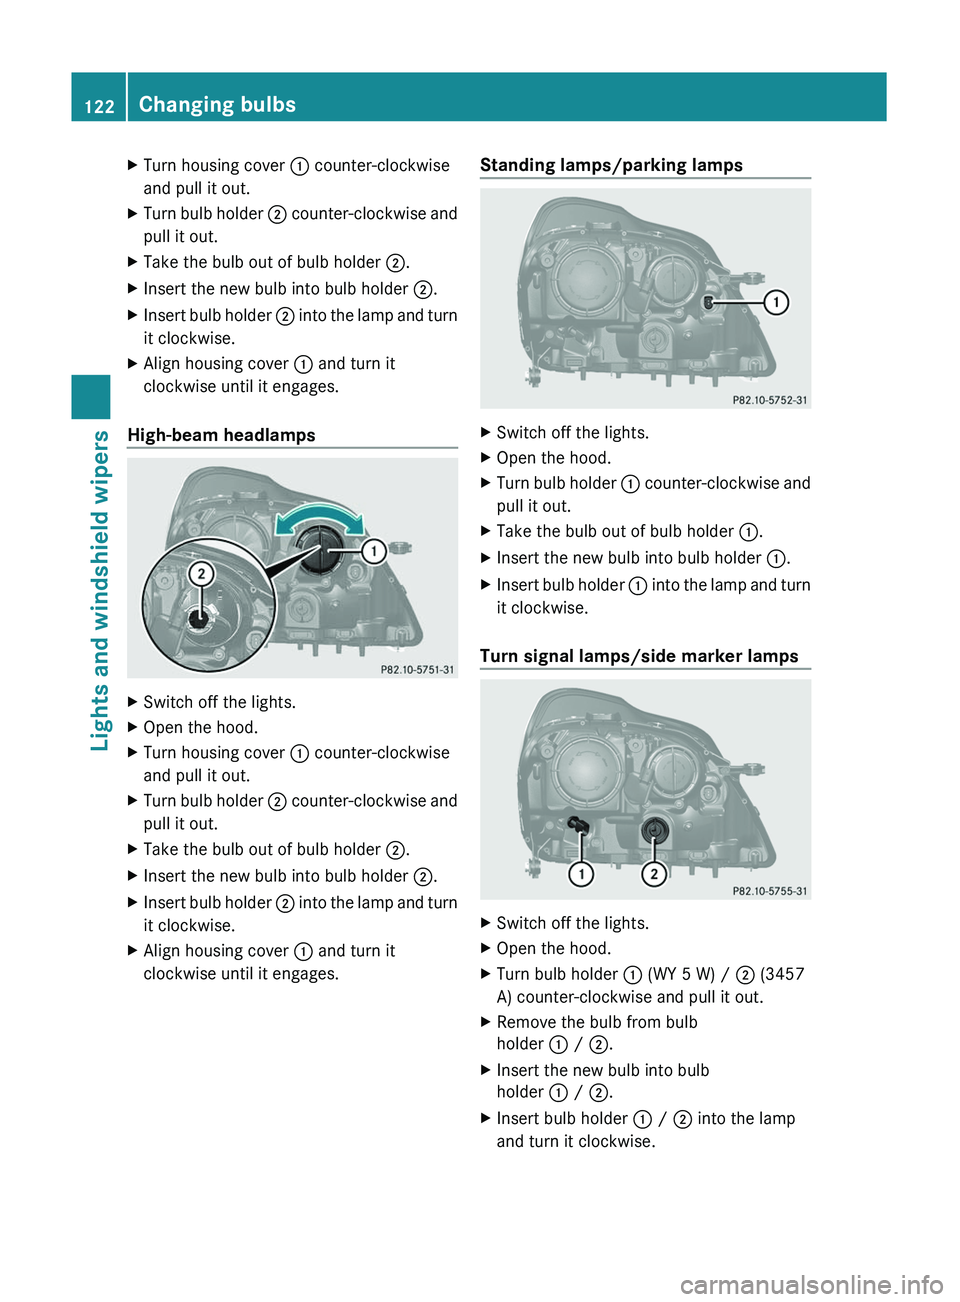
XTurn housing cover : counter-clockwise
and pull it out.XTurn bulb holder ; counter-clockwise and
pull it out.XTake the bulb out of bulb holder ;.XInsert the new bulb into bulb holder ;.XInsert bulb holder ; into the lamp and turn
it clockwise.XAlign housing cover : and turn it
clockwise until it engages.
High-beam headlamps
XSwitch off the lights.XOpen the hood.XTurn housing cover : counter-clockwise
and pull it out.XTurn bulb holder ; counter-clockwise and
pull it out.XTake the bulb out of bulb holder ;.XInsert the new bulb into bulb holder ;.XInsert bulb holder ; into the lamp and turn
it clockwise.XAlign housing cover : and turn it
clockwise until it engages.Standing lamps/parking lampsXSwitch off the lights.XOpen the hood.XTurn bulb holder : counter-clockwise and
pull it out.XTake the bulb out of bulb holder :.XInsert the new bulb into bulb holder :.XInsert bulb holder : into the lamp and turn
it clockwise.
Turn signal lamps/side marker lamps
XSwitch off the lights.XOpen the hood.XTurn bulb holder : (WY 5 W) / ; (3457
A) counter-clockwise and pull it out.XRemove the bulb from bulb
holder : / ; .XInsert the new bulb into bulb
holder : / ; .XInsert bulb holder : / ; into the lamp
and turn it clockwise.122Changing bulbsLights and windshield wipers
BA 164.8 USA, CA Edition B 2011; 1; 2, en-USd2sboikeVersion: 3.0.3.52010-04-21T15:08:44+02:00 - Seite 122
Page 126 of 376
XInsert the bulb holder and turn it clockwise.XClose the side trim panel (Y page 123).
License plate lamp
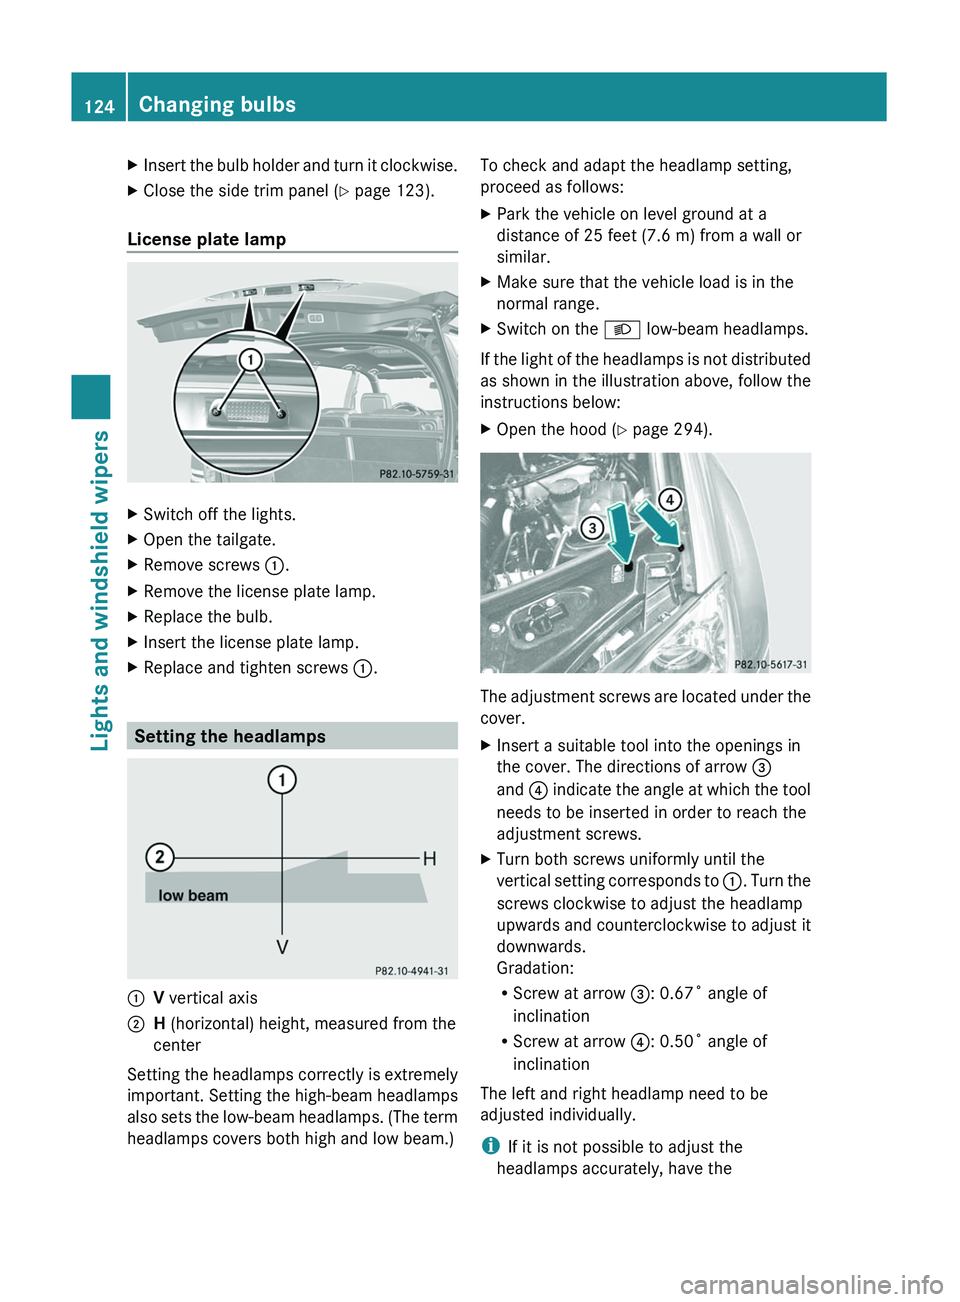
XSwitch off the lights.XOpen the tailgate.XRemove screws :.XRemove the license plate lamp.XReplace the bulb.XInsert the license plate lamp.XReplace and tighten screws :.
Setting the headlamps
:V vertical axis;H (horizontal) height, measured from the
center
Setting the headlamps correctly is extremely
important. Setting the high-beam headlamps
also sets the low-beam headlamps. (The term
headlamps covers both high and low beam.)
To check and adapt the headlamp setting,
proceed as follows:
XPark the vehicle on level ground at a
distance of 25 feet (7.6 m) from a wall or
similar.
XMake sure that the vehicle load is in the
normal range.
XSwitch on the L low-beam headlamps.
If the light of the headlamps is not distributed
as shown in the illustration above, follow the
instructions below:
XOpen the hood (Y page 294).
The adjustment screws are located under the
cover.
XInsert a suitable tool into the openings in
the cover. The directions of arrow =
and ? indicate the angle at which the tool
needs to be inserted in order to reach the
adjustment screws.
XTurn both screws uniformly until the
vertical setting corresponds to :. Turn the
screws clockwise to adjust the headlamp
upwards and counterclockwise to adjust it
downwards.
Gradation:
RScrew at arrow =: 0.67˚ angle of
inclination
RScrew at arrow ?: 0.50˚ angle of
inclination
The left and right headlamp need to be
adjusted individually.
iIf it is not possible to adjust the
headlamps accurately, have the
124Changing bulbsLights and windshield wipers
BA 164.8 USA, CA Edition B 2011; 1; 2, en-USd2sboikeVersion: 3.0.3.52010-04-21T15:08:44+02:00 - Seite 124
Page 128 of 376
prevents a person from being splashed
inadvertently when getting into or out of the
vehicle.
Intermittent wiping continues when all doors
are closed and
R you shift the automatic transmission to
drive position D or reverse gear R
or
R you change the wipe setting on the
combination switch.
i To prevent smearing on the windshield or
noise when wiping, wipe the windshield
occasionally with washer fluid.
Switching the rear window wiper on/
off
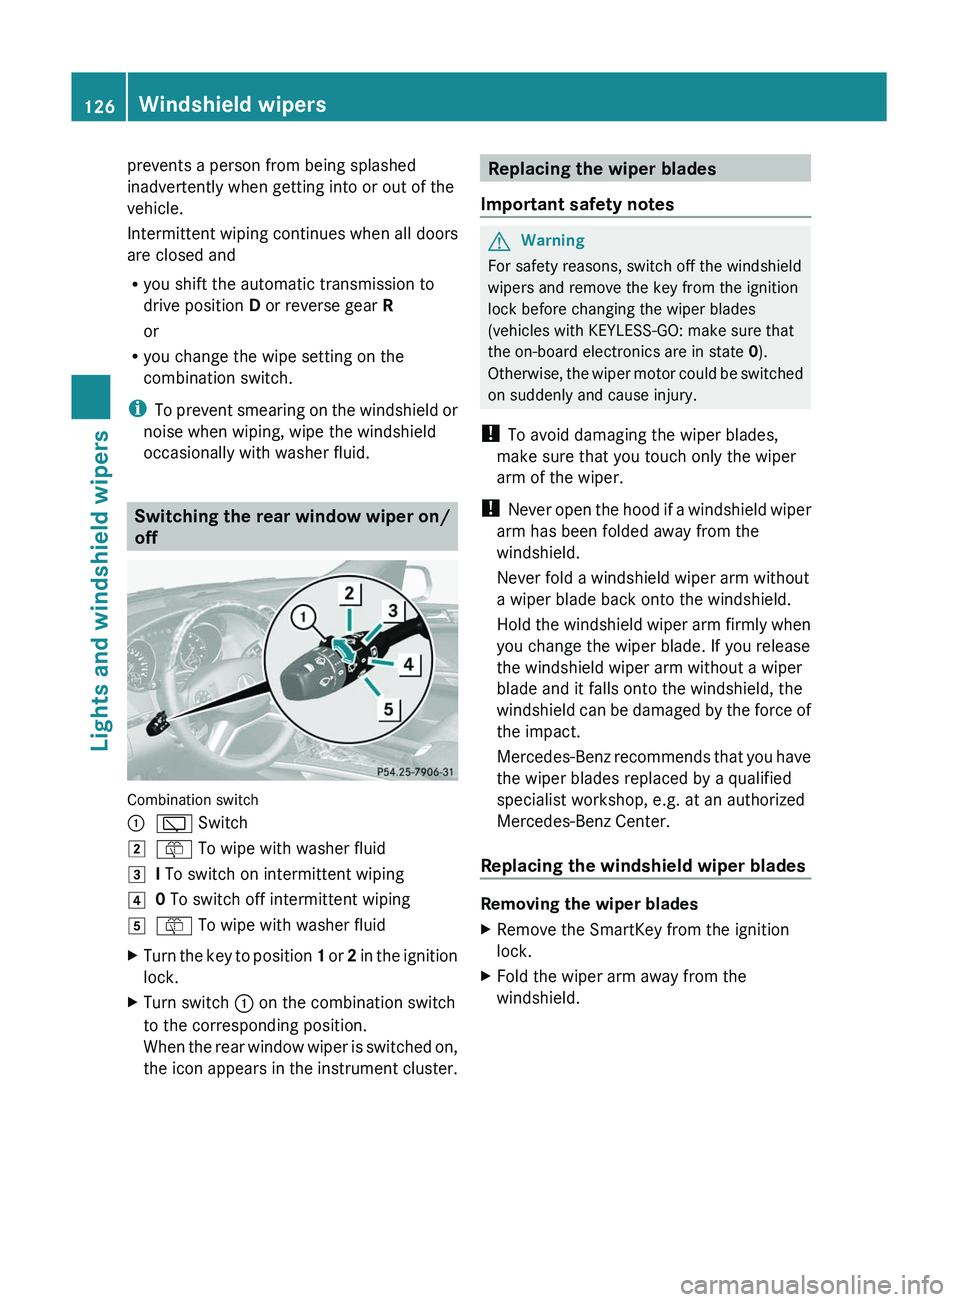
Combination switch
:è Switch2ô To wipe with washer fluid3I To switch on intermittent wiping40 To switch off intermittent wiping5ô To wipe with washer fluidXTurn the key to position 1 or 2 in the ignition
lock.XTurn switch : on the combination switch
to the corresponding position.
When the rear window wiper is switched on,
the icon appears in the instrument cluster.Replacing the wiper blades
Important safety notesGWarning
For safety reasons, switch off the windshield
wipers and remove the key from the ignition
lock before changing the wiper blades
(vehicles with KEYLESS-GO: make sure that
the on-board electronics are in state 0).
Otherwise, the wiper motor could be switched
on suddenly and cause injury.
! To avoid damaging the wiper blades,
make sure that you touch only the wiper
arm of the wiper.
! Never open the hood if a windshield wiper
arm has been folded away from the
windshield.
Never fold a windshield wiper arm without
a wiper blade back onto the windshield.
Hold the windshield wiper arm firmly when
you change the wiper blade. If you release
the windshield wiper arm without a wiper
blade and it falls onto the windshield, the
windshield can be damaged by the force of
the impact.
Mercedes-Benz recommends that you have
the wiper blades replaced by a qualified
specialist workshop, e.g. at an authorized
Mercedes-Benz Center.
Replacing the windshield wiper blades
Removing the wiper blades
XRemove the SmartKey from the ignition
lock.XFold the wiper arm away from the
windshield.126Windshield wipersLights and windshield wipers
BA 164.8 USA, CA Edition B 2011; 1; 2, en-USd2sboikeVersion: 3.0.3.52010-04-21T15:08:44+02:00 - Seite 126