2011 MERCEDES-BENZ GL display
[x] Cancel search: displayPage 157 of 376
Driving tips
Kickdown
Use kickdown for maximum acceleration.
XVehicles for USA: fully depress the
accelerator pedal.
The transmission shifts to a lower gear
depending on the engine speed.XVehicles for Canada: depress the
accelerator pedal beyond the pressure
point.
The transmission shifts to a lower gear
depending on the engine speed.
Rocking the vehicle free
Rocking the vehicle free by repeatedly
shifting back and forth between transmission
positions D and R can help to free a vehicle
that has become stuck in mud or snow. The
engine management system of the vehicle
limits shifting back and forth between
transmission positions D and R to a maximum
speed of 5 mph (9 km/h). To shift back and
forth between transmission positions D and
R , move the selector lever up and down
beyond the pressure point.
Working on the vehicle
GWarning
When working on the vehicle, engage the
parking brake and shift the automatic
transmission into park position P. Otherwise
the vehicle could roll away which could result
in an accident and/or serious personal injury.
Trailer towing
XWhen towing a trailer and driving downhill,
shift to a lower gear if the automatic
transmission constantly shifts between
two gears.XEngaging a lower gear and reducing the
speed reduces the risk of the engine
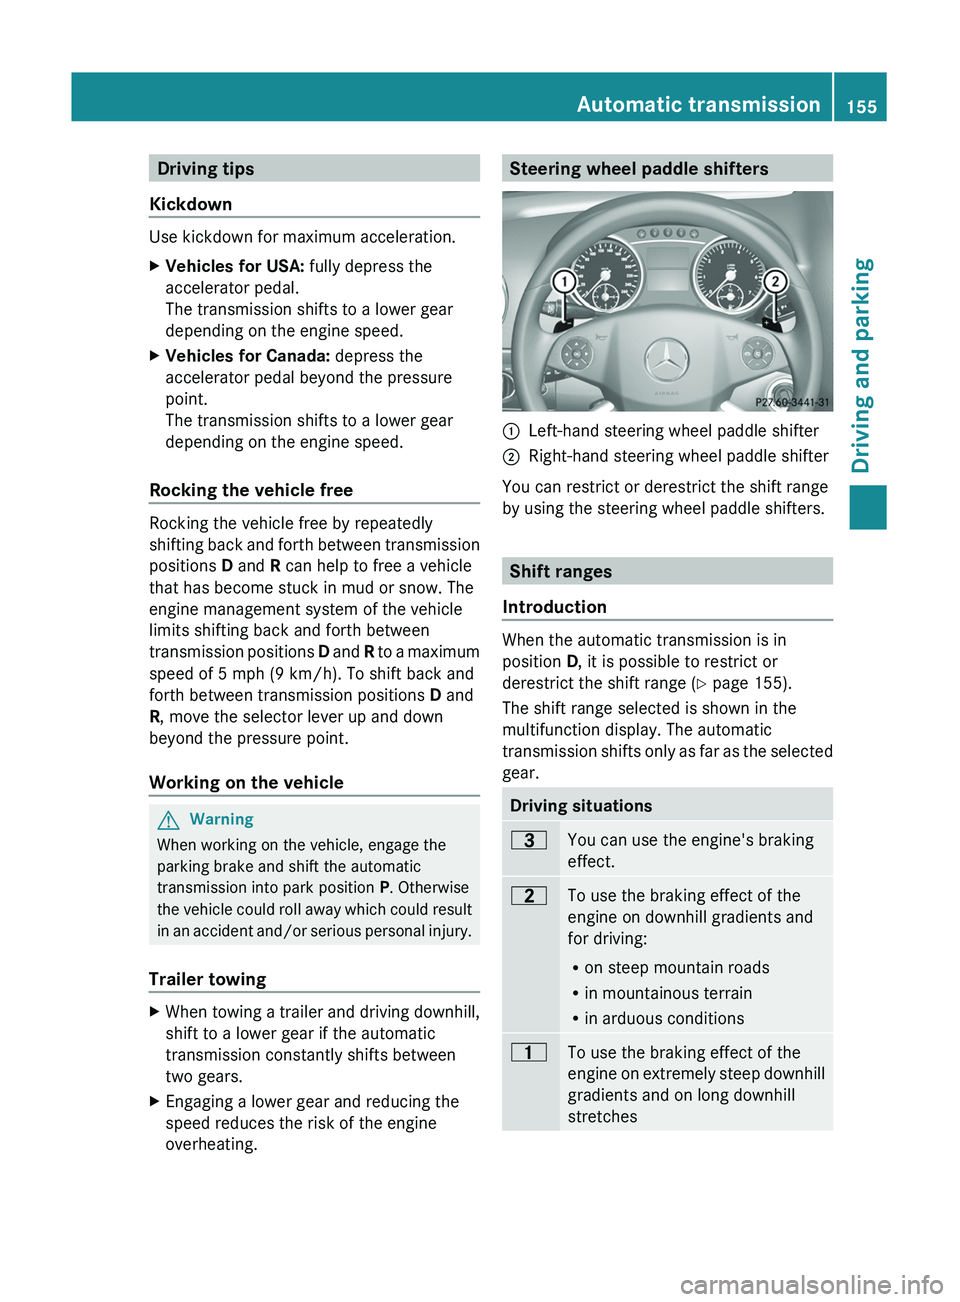
overheating.Steering wheel paddle shifters:Left-hand steering wheel paddle shifter;Right-hand steering wheel paddle shifter
You can restrict or derestrict the shift range
by using the steering wheel paddle shifters.
Shift ranges
Introduction
When the automatic transmission is in
position D, it is possible to restrict or
derestrict the shift range ( Y page 155).
The shift range selected is shown in the
multifunction display. The automatic
transmission shifts only as far as the selected
gear.
Driving situations=You can use the engine's braking
effect.5To use the braking effect of the
engine on downhill gradients and
for driving:
R on steep mountain roads
R in mountainous terrain
R in arduous conditions4To use the braking effect of the
engine on extremely steep downhill
gradients and on long downhill
stretchesAutomatic transmission155Driving and parkingBA 164.8 USA, CA Edition B 2011; 1; 2, en-USd2sboikeVersion: 3.0.3.52010-04-21T15:08:44+02:00 - Seite 155Z
Page 158 of 376
Restricting the shift rangeXPull the left-hand steering wheel paddle
shifter.
The shift range is restricted.
i In order to prevent the engine from
overrevving, the automatic transmission
does not shift down when the engine speed
is too high.
i If the maximum engine speed for the shift
range is reached and you continue to
accelerate, the automatic transmission
shifts up in order to prevent the engine
from overrevving, even if the shift range is
restricted.
Derestricting the shift range
XPull the right-hand steering wheel paddle
shifter.
The shift range is derestricted.
Clearing the shift range restriction
XPull and hold the right-hand steering wheel
paddle shifter until D is shown again in the
multifunction display.
The automatic transmission shifts from the
current shift range directly to D.
Selecting the ideal shift range
XPull the left-hand steering wheel paddle
shifter and hold it in position.
The automatic transmission shifts to the
gear which allows ideal acceleration and
deceleration. To do this, the automatic
transmission shifts down one or more
gears.156Automatic transmissionDriving and parking
BA 164.8 USA, CA Edition B 2011; 1; 2, en-USd2sboikeVersion: 3.0.3.52010-04-21T15:08:44+02:00 - Seite 156
Page 160 of 376
Shift ranges
There are two shift ranges.HIGH
RANGEOn-road position for all
normal driving situations
(LOW RANGE off-road gear
off).LOW
RANGEIn comparison with the
HIGH RANGE on-road
position, the gear ratio
between the engine and
wheels is one-third. Drive
torque is thus
proportionately higher.GWarning!
Always wait until the procedure of shifting
from HIGH RANGE to LOW RANGE – and from
LOW RANGE to HIGH RANGE – has been
entirely completed. During this procedure do
not turn off the engine or shift the automatic
transmission into another gear.
If you do not wait until the shifting procedure
has been entirely completed then it might not
be correctly performed. The transfer case
might be in neutral, thus interrupting the
transfer of power between the engine and the
drive axle.
The vehicle is then freely movable, even if a
gear has been selected, and could
unintentionally be set into motion –
particularly on up – or downhill grades. This
could lead to an accident and cause injury to
yourself and others.
Please observe related messages appearing
in the multifunction display.
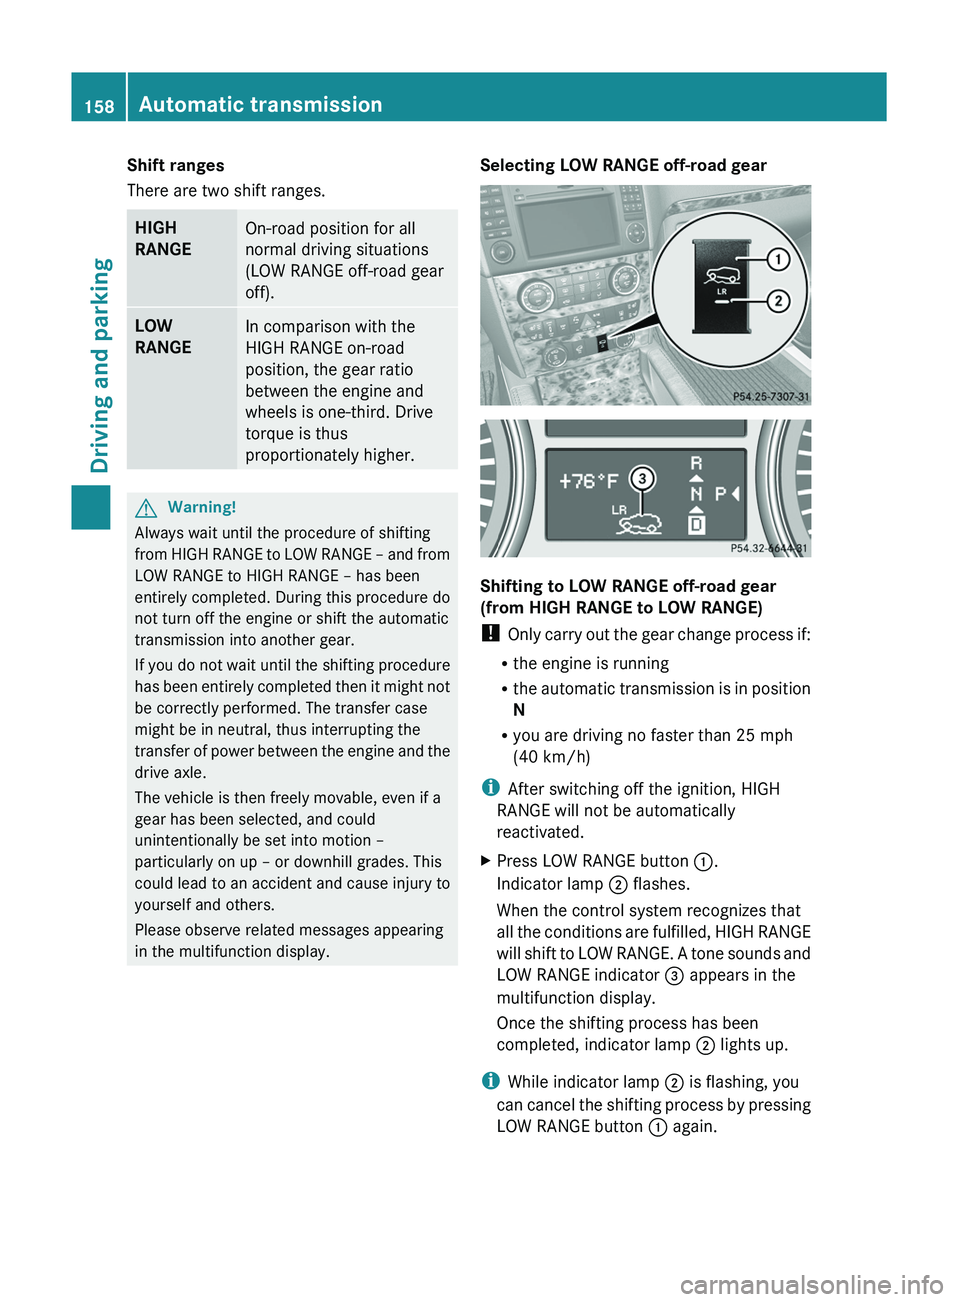
Selecting LOW RANGE off-road gear
Shifting to LOW RANGE off-road gear
(from HIGH RANGE to LOW RANGE)
! Only carry out the gear change process if:
R the engine is running
R the automatic transmission is in position
N
R you are driving no faster than 25 mph
(40 km/h)
i After switching off the ignition, HIGH
RANGE will not be automatically
reactivated.
XPress LOW RANGE button :.
Indicator lamp ; flashes.
When the control system recognizes that
all the conditions are fulfilled, HIGH RANGE
will shift to LOW RANGE. A tone sounds and
LOW RANGE indicator = appears in the
multifunction display.
Once the shifting process has been
completed, indicator lamp ; lights up.
i
While indicator lamp ; is flashing, you
can cancel the shifting process by pressing
LOW RANGE button : again.
158Automatic transmissionDriving and parking
BA 164.8 USA, CA Edition B 2011; 1; 2, en-USd2sboikeVersion: 3.0.3.52010-04-21T15:08:44+02:00 - Seite 158
Page 161 of 376
Shifting out of LOW RANGE off-road gear
(from LOW RANGE to HIGH RANGE)
! Only carry out the gear change process if:
R the engine is running
R the automatic transmission is in position
N
R you are driving no faster than 43 mph
(70 km/h)
i After switching off the ignition, HIGH
RANGE will not be automatically
reactivated.XPress LOW RANGE button :.
Indicator lamp ; flashes.
When the control system recognizes that
all the conditions are fulfilled, LOW RANGE
will shift to HIGH RANGE. A tone sounds
and indicator lamp ; and LOW RANGE
indicator = in the multifunction display go
out.
i While indicator lamp ; is flashing, you
can cancel the shifting process by pressing
LOW RANGE button : again.
For information about messages in the
multifunction display, see ( Y page 245).
Refueling
Important safety notes
GWarning!
Gasoline and diesel fuels are highly flammable
and poisonous. They burn violently and can
cause serious injury.
Never allow sparks, flames or smoking
materials near gasoline or diesel fuel!
Turn off the engine before refueling.
Whenever you are around gasoline or diesel
fuel, avoid inhaling fumes and any skin or
clothing contact. Extinguish all smoking
materials.
Direct skin contact with fuels and the
inhalation of fuel vapors are damaging your
health.
GWarning
Overfilling of the fuel tank may create
pressure in the system which could cause a
gas discharge. This could cause the gasoline
to spray back out when removing the fuel
pump nozzle, which could cause personal
injury.
GWarning!
Do not fill diesel tanks with gasoline. Do not
mix diesel fuel with gasoline. Otherwise the
fuel system and engine could be damaged. In
addition, the vehicle could catch fire.
! Do not use gasoline to refuel vehicles with
a diesel engine. Do not use diesel to refuel
vehicles with a gasoline engine. Even small
amounts of the wrong fuel result in damage
to the fuel system and engine.
! Do not start the engine if you accidentally
refuel with the wrong fuel. Otherwise, the
fuel could enter the fuel lines. This would
require draining of the fuel tank and fuel
lines. Notify a qualified specialist workshop
and have the fuel tank and fuel lines
drained completely.
Gasoline
Fuel grade
! You should only refuel with unleaded
premium-grade gasoline as this avoids
damaging the catalytic converter.
If engine running problems are apparent,
have the cause checked immediately and
repaired. Excess unburned fuel can
otherwise enter the catalytic converter,
leading to overheating and possibly
causing a fire.
i Only refuel with unleaded premium-grade
gasoline with a specified minimum octane
number of 91 (average value of 96 RON/
86 MON).
Usually you will find information about the
fuel grade on the pump. If you cannot find
Refueling159Driving and parkingBA 164.8 USA, CA Edition B 2011; 1; 2, en-USd2sboikeVersion: 3.0.3.52010-04-21T15:08:44+02:00 - Seite 159Z
Page 162 of 376
the label on the gasoline pump, ask the gas
station staff.
You can find further information under
"Fuel" ( Y page 366), by consulting an
authorized Mercedes-Benz Center or
visiting http://www.mbusa.com (USA
only).
Diesel
Fuel grade
! Only refuel with ULTRA-LOW SULFUR
DIESEL FUEL (ULSD, 15 ppm SULFUR
MAXIMUM). Using other diesel fuels could
result in increased wear and damage to the
engine and/or exhaust system.
Never refuel with marine diesel or heating
oil.
Do not mix these fuels with diesel fuels and
do not use any special additives, as this
may result in damage.
! When refueling using a fuel can, use a
filter or use a clean cloth as a filter.
Otherwise, particles from the fuel can may
block the fuel lines and/or the diesel
injection system.
i Refuel only with ULTRA-LOW SULFUR
DIESEL FUEL (ULSD, 15 ppm SULFUR
MAXIMUM).
Usually you will find information about the
fuel grade on the pump. If you cannot find
the label on the gasoline pump, ask the gas
station staff.
You can find further information under
"Fuel" ( Y page 366), by consulting an
authorized Mercedes-Benz Center or by
visiting http://www.mbusa.com (USA
only).
Low outside temperatures
! Do not use gasoline to refuel vehicles with
a diesel engine. Never mix diesel with
gasoline or kerosene, as this may result in
damage to the engine or fuel system.
Diesel fuel with improved cold flow properties
is available during the winter months. Further
information on fuel properties can be
obtained from oil companies, e.g. at filling
stations.
Refueling
Fuel filler flap
The fuel filler flap is unlocked or locked
automatically when you open or close the
vehicle with the SmartKey or using KEYLESS-
GO.
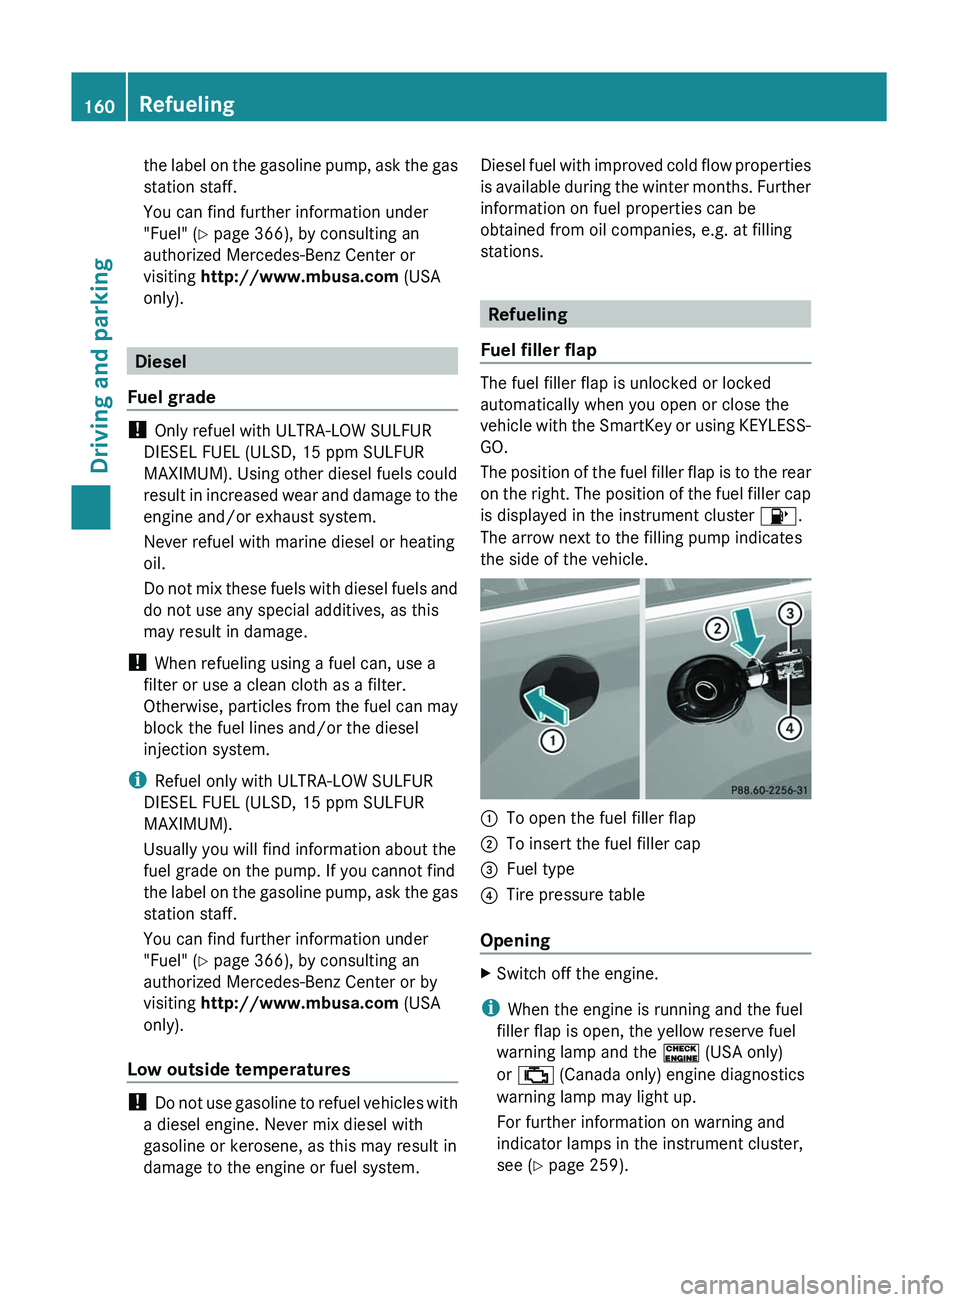
The position of the fuel filler flap is to the rear
on the right. The position of the fuel filler cap
is displayed in the instrument cluster 8.
The arrow next to the filling pump indicates
the side of the vehicle.
:To open the fuel filler flap;To insert the fuel filler cap=Fuel type?Tire pressure table
Opening
XSwitch off the engine.
i When the engine is running and the fuel
filler flap is open, the yellow reserve fuel
warning lamp and the ! (USA only)
or ; (Canada only) engine diagnostics
warning lamp may light up.
For further information on warning and
indicator lamps in the instrument cluster,
see ( Y page 259).
160RefuelingDriving and parking
BA 164.8 USA, CA Edition B 2011; 1; 2, en-USd2sboikeVersion: 3.0.3.52010-04-21T15:08:44+02:00 - Seite 160
Page 165 of 376
AdBlue®
Important notes on use
BlueTEC exhaust gas aftertreatment 24
must
be operated with AdBlue ®
reducing agent in
order to function properly. Adding AdBlue ®
is
one of the tasks performed during
maintenance. Under normal operating
conditions, a tank of AdBlue ®
lasts until the
next service due date.
When the AdBlue ®
supply has almost run out,
the Check Additive – See Operator's
Manual message is shown in the
multifunction display.
When the AdBlue ®
supply sinks to a minimum
level, the Remaining Starts: 20 message
is shown in the multifunction display.
i When the Remaining Starts: 20
message is shown in the multifunction
display, you can start the engine 20 more
times. If AdBlue ®
is not topped up, it is then
not possible to start the engine again. Top
up the AdBlue ®
tank with approximately
1 gallon (3.8 l) of AdBlue ®
or have the
AdBlue ®
tank refilled at a qualified
specialist workshop, e.g. an authorized
Mercedes-Benz Center.
Use the special AdBlue ®
refill bottle when
adding between maintenance intervals. For
more information, please contact an
authorized Mercedes-Benz Center or
Roadside Assistance if applicable
( Y page 20).
Further information about BlueTEC exhaust
gas aftertreatment and AdBlue ®
is available
at any authorized Mercedes-Benz Center.
Adding AdBlue ®GWarning!
Make sure
R AdBlue ®
does not come into contact with
skin, eyes, or clothing
R to keep AdBlue ®
out of the reach of children
If you and/or others have come into contact
with AdBlue ®
:
R If AdBlue ®
has gotten into contact with
eyes, flush with plenty of water immediately
and seek medical help.
R Clean affected skin immediately with plenty
of water.
R If AdBlue ®
was swallowed, rinse mouth
immediately with plenty of water and drink
plenty of water. Consult a physician.
GWarning!
When opening the filler cap of the AdBlue ®
tank ammonia gas vapors may escape. Refill
AdBlue ®
in a well ventilated area only.
Ammonia gas vapors have a pungent odor and
are particularly irritating for your skin,
mucous membranes, and eyes. Inhaling
ammonia gas vapors will cause burning eyes,
nose, and throat, as well as coughing and
watering eyes.
! Only use AdBlue ®
that complies with
ISO 22241. Do not add any special
additives to AdBlue ®
and do not thin
AdBlue ®
with water. This could destroy the
BlueTEC exhaust gas aftertreatment.
! Rinse surfaces that have come into
contact with AdBlue ®
immediately with
water or remove AdBlue ®
using a damp
cloth and cold water. If the AdBlue ®
has
already crystallized, use a sponge and cold
water to clean it. AdBlue ®
residues
crystallize after time and contaminate the
affected surfaces.
24 Only on BlueTEC vehicles.Refueling163Driving and parkingBA 164.8 USA, CA Edition B 2011; 1; 2, en-USd2sboikeVersion: 3.0.3.52010-04-21T15:08:44+02:00 - Seite 163Z
Page 167 of 376
XInsert AdBlue®
cap : as shown and turn
it clockwise as far as it will go.XFold the load compartment floor down.XClose the tailgate.XDrive at a speed above 10 mph (16 km/h).
The Check Additive – See
Operator's Manual disappears after
approximately one minute.
i If the Check Additive – See
Operator's Manual is still displayed in
the multifunction display, top up with
another bottle of AdBlue ®
.
i Then, have the AdBlue ®
supply checked
and filled completely if necessary.
Mercedes-Benz recommends that you use
a qualified specialist workshop such as an
authorized Mercedes-Benz Center for this
purpose.
Parking
Important safety notes
GWarning!
Do not park this vehicle in areas where
combustible materials such as grass, hay or
leaves can come into contact with the hot
exhaust system. These materials could be
ignited and cause a vehicle fire.
Vehicle movement may result in serious
personal injury or damage to the vehicle or
vehicle drivetrain. Therefore, always do the
following before turning off the engine and
leaving the vehicle:
R Keep right foot on the brake pedal.
R Engage the parking brake.
R Shift the automatic transmission into park
position P.
R Slowly release the brake pedal.
R When parked on an incline, always turn the
front wheels towards the road curb.
R Turn the SmartKey in the starter switch to
position 0 and remove the SmartKey from
the starter switch, or press the KEYLESS-
GO start/stop button.
R Take the SmartKey with you and lock the
vehicle when leaving.
Switching off the engine
Important safety instructions
GWarning
Do not turn off the engine before the vehicle
has come to a complete stop. With the engine
not running, there is no power assistance for
the brake and steering systems. In this case,
it is important to keep in mind that a
considerably higher degree of effort is
necessary to brake and steer the vehicle.
i If you cannot turn off the engine as
described here, see "Emergency engine
shut down" ( Y page 331).
Vehicles with automatic transmission
GWarning!
Keep in mind that turning off the engine alone
only will shift the automatic transmission into
neutral position N automatically.
Always shift the automatic transmission into
park position P before turning off the engine.
Otherwise the vehicle could roll away which
could result in an accident and/or serious
personal injury.
XShift the transmission to position P.
Using the SmartKey
XTurn the SmartKey to position 0 in the
ignition lock and remove it.
The immobilizer is activated.XApply the parking brake firmly.
i If you turn off the engine with the
SmartKey and then remove it from the
ignition lock or open a front door, the
automatic transmission switches to P
automatically.
Parking165Driving and parkingBA 164.8 USA, CA Edition B 2011; 1; 2, en-USd2sboikeVersion: 3.0.3.52010-04-21T15:08:44+02:00 - Seite 165Z
Page 171 of 376
Heavy and light loadsGWarning
Depressing the brake pedal constantly results
in excessive and premature wear to the brake
pads.
It may also cause the brakes to overheat,
seriously impairing their effectiveness. It may
then not be possible to stop the vehicle in
sufficient time to avoid an accident.
If the brakes have been subjected to a heavy
cargo, do not stop the vehicle immediately,
but drive on for a short while. This allows the
airflow to cool the brakes more quickly.
Wet roads
GWarning
After driving in heavy rain for some time
without applying the brakes or through water
deep enough to wet brake components, the
first braking action may be somewhat
reduced. You have to depress the brake pedal
more firmly. Maintain a safe distance from
vehicles in front.
After driving on a wet road or having the
vehicle washed, brake firmly while paying
attention to the traffic conditions. This will
warm up the brake discs, thereby drying them
more quickly and protecting them against
corrosion.
Limited braking performance on salt
treated roads
GWarning
The layer of salt on the brake discs and the
brake pads/linings may cause a delay in the
braking effect, resulting in a significantly
longer braking distance, which could lead to
an accident.
To avoid this danger, you should:
R occasionally brake carefully, without
putting other road users at risk, when you
are driving on salted roads. This helps to
remove any salt that may have started to
build up on the brake discs and the brake
pads/linings.
R maintain a greater distance to the vehicle
ahead and drive with particular care.
R carefully apply the brakes at the end of a
trip and immediately after commencing a
new trip, so that salt residues are removed
from the brake discs.
Maintenance of the brakes
! If the brake warning lamp lights up in the
instrument cluster and you hear a warning
tone, even though the parking brake has
been released, the brake fluid level may be
too low. Observe additional warning
messages in the multifunction display.
The brake fluid level may be too low due to
brake pad wear or leaking brake lines.
Have the brake system checked
immediately. This work should be carried
out at an authorized Mercedes-Benz
Center.
All checks and maintenance work on the
brake system must be carried out at a
qualified specialist workshop. Contact an
authorized Mercedes-Benz Center.
Only install brake pads and use brake fluid
recommended by Mercedes-Benz.
GWarning
If other than recommended brake pads are
installed, or other than recommended brake
fluid is used, the braking properties of the
vehicle can be degraded to an extent that safe
braking is substantially impaired. This could
result in an accident.
! A function or performance test may only
be carried out on a two-axle dynamometer.
If you are planning to have the vehicle
tested on such a dynamometer, contact an
authorized Mercedes-Benz Center to
obtain further information first. Otherwise,
the drive train or the brake system may
suffer damage.
Driving tips169Driving and parkingBA 164.8 USA, CA Edition B 2011; 1; 2, en-USd2sboikeVersion: 3.0.3.52010-04-21T15:08:44+02:00 - Seite 169Z