2011 MERCEDES-BENZ GL display
[x] Cancel search: displayPage 137 of 376
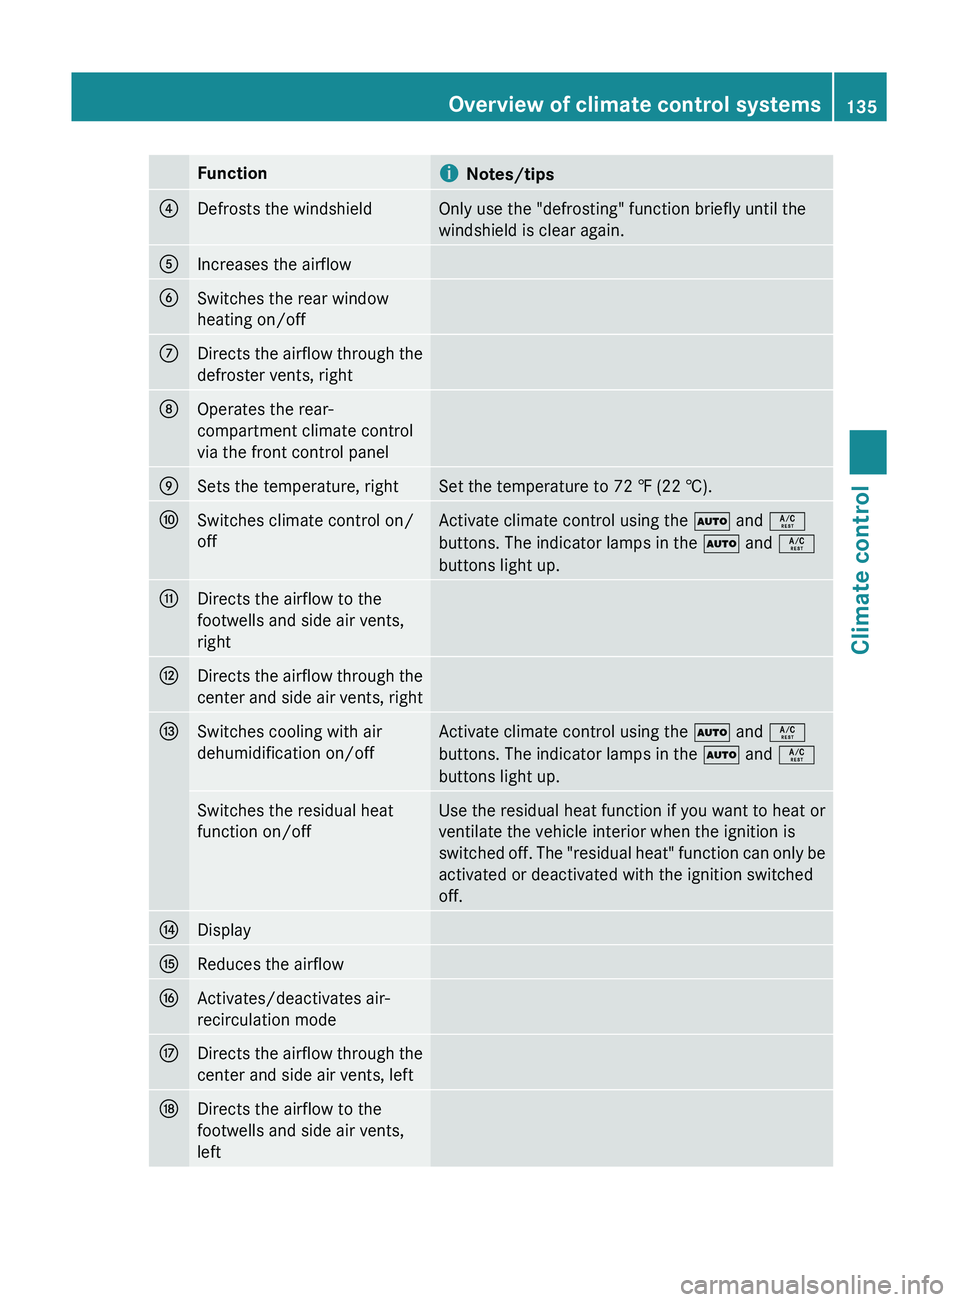
FunctioniNotes/tips?Defrosts the windshieldOnly use the "defrosting" function briefly until the
windshield is clear again.AIncreases the airflowBSwitches the rear window
heating on/offCDirects the airflow through the
defroster vents, rightDOperates the rear-
compartment climate control
via the front control panelESets the temperature, rightSet the temperature to 72 ‡ (22 †).FSwitches climate control on/
offActivate climate control using the à and Á
buttons. The indicator lamps in the à and Á
buttons light up.GDirects the airflow to the
footwells and side air vents,
rightHDirects the airflow through the
center and side air vents, rightISwitches cooling with air
dehumidification on/offActivate climate control using the à and Á
buttons. The indicator lamps in the à and Á
buttons light up.Switches the residual heat
function on/offUse the residual heat function if you want to heat or
ventilate the vehicle interior when the ignition is
switched off. The "residual heat" function can only be
activated or deactivated with the ignition switched
off.JDisplayKReduces the airflowLActivates/deactivates air-
recirculation modeMDirects the airflow through the
center and side air vents, leftNDirects the airflow to the
footwells and side air vents,
leftOverview of climate control systems135Climate controlBA 164.8 USA, CA Edition B 2011; 1; 2, en-USd2sboikeVersion: 3.0.3.52010-04-21T15:08:44+02:00 - Seite 135Z
Page 139 of 376

Activating/deactivating the rear-
compartment climate control using the
front control panel (dual-zone
automatic climate control)XTurn the key to position 2 in the ignition
lock.XTo activate/deactivate: press the ±
button ( Y page 131).
The indicator lamp in the ± button lights
up or goes out.
Activating/deactivating the rear-
compartment climate control using the
front control panel (multi-zone
automatic climate control)
For USA only:
XTurn the key to position 2 in the ignition
lock.XTo activate/deactivate: press the ±
button ( Y page 132).
The indicator lamp in the ± button lights
up or goes out.
For Canada only:
XTurn the key to position 2 in the ignition
lock.XTo activate: press the Y button
( Y page 132).
ON and MODE are shown in the multi-zone
automatic climate control display behind
the Y symbol. The MODE display goes
out after three seconds. The display
switches back to the standard display.XTo deactivate: press the Y button
( Y page 132).
MODE is shown in the display behind the
Y symbol.XPress the ^ button ( Y page 132).
OFF is shown in the display behind the
Y symbol.Activating/deactivating the rear-
compartment climate control using the
rear control panel (multi-zone
automatic climate control) XTurn the key to position 2 in the ignition
lock.XActivate multi-zone automatic climate
control with the front control panel.XTo activate: press the à button.
The indicator lamp in the à button lights
up.XTo deactivate: press the ^ button.
The indicator lamp in the ^ button lights
up.
Switching cooling with air
dehumidification on/off
Important information
The cooling with air dehumidification function
is only available when the engine is running.
The air inside the vehicle is cooled and
dehumidified according to the temperature
selected.
GWarning
If you switch off the cooling function, the
vehicle will not be cooled when weather
conditions are warm. The windows can fog up
more quickly. Window fogging may impair
visibility and endanger you and others.
Condensation may drip from the underside of
the vehicle when automatic climate control is
in cooling mode. This is normal and not a sign
that there is a malfunction.
i The cooling with air dehumidification
function uses refrigerant R134a. This
coolant does not contain
chlorofluorocarbons, and therefore does
not damage the ozone layer.
Operating the control systems137Climate controlBA 164.8 USA, CA Edition B 2011; 1; 2, en-USd2sboikeVersion: 3.0.3.52010-04-21T15:08:44+02:00 - Seite 137Z
Page 141 of 376
set. Automatic air distribution remains
activated.
or
XPress one of the M or O buttons.
Automatic air distribution is deactivated.
Air distribution is controlled according to
the position set. Automatic airflow remains
activated.
Setting the temperature
Dual-zone automatic climate control
Different temperatures can be set for the
driver's and front-passenger sides.
XTurn the SmartKey to position 2 in the
ignition lock.XTo increase/reduce: turn controls : and
C clockwise or counter-clockwise
( Y page 131).
Only change the temperature setting in
small increments. Start at 72 ‡ (22 †).
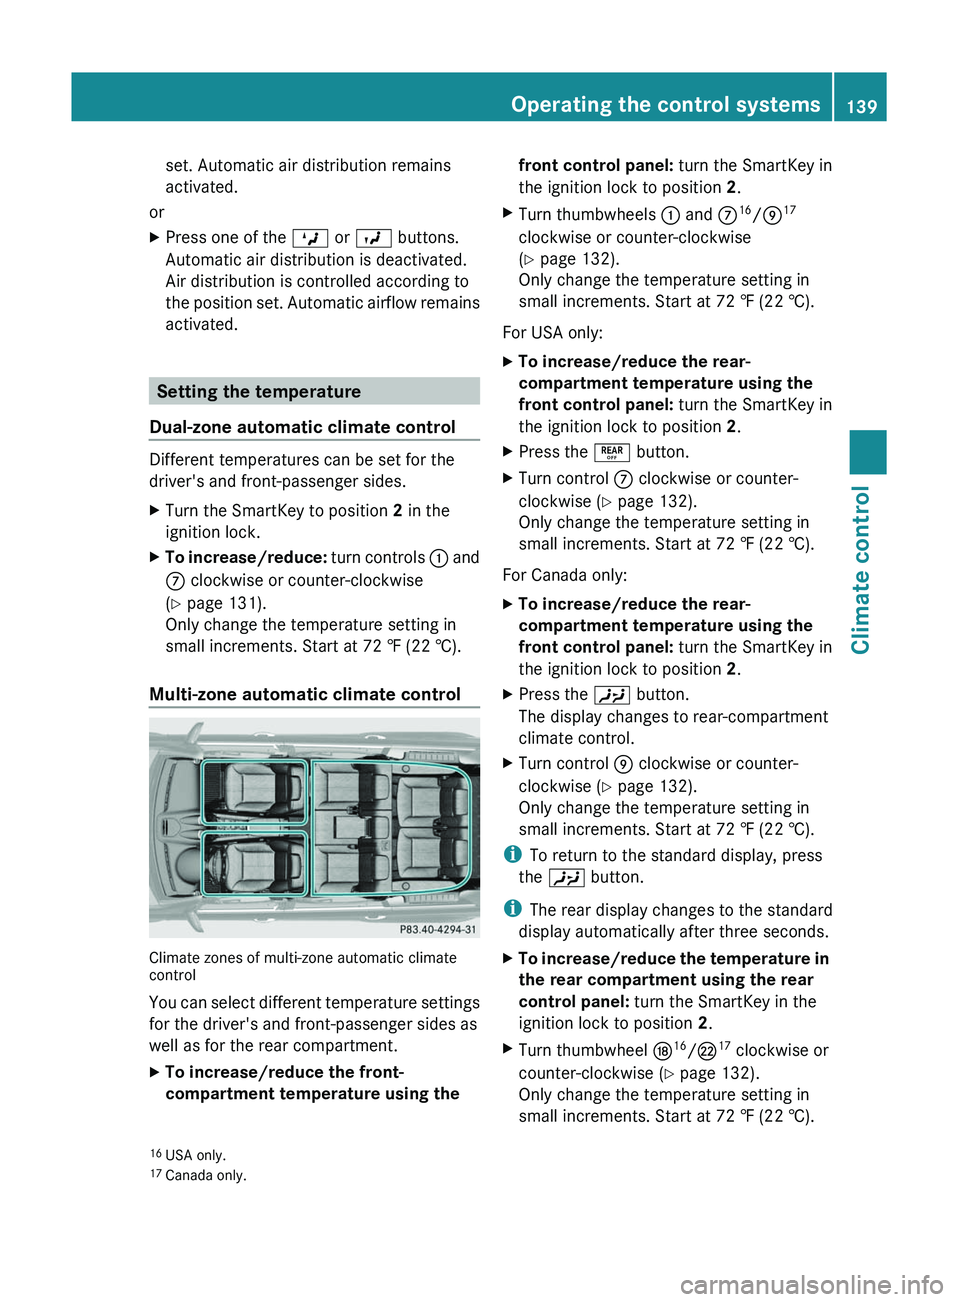
Multi-zone automatic climate control
Climate zones of multi-zone automatic climate
control
You can select different temperature settings
for the driver's and front-passenger sides as
well as for the rear compartment.
XTo increase/reduce the front-
compartment temperature using the front control panel: turn the SmartKey in
the ignition lock to position 2.XTurn thumbwheels : and C16
/E 17
clockwise or counter-clockwise
( Y page 132).
Only change the temperature setting in
small increments. Start at 72 ‡ (22 †).
For USA only:
XTo increase/reduce the rear-
compartment temperature using the
front control panel: turn the SmartKey in
the ignition lock to position 2.XPress the ± button.XTurn control C clockwise or counter-
clockwise ( Y page 132).
Only change the temperature setting in
small increments. Start at 72 ‡ (22 †).
For Canada only:
XTo increase/reduce the rear-
compartment temperature using the
front control panel: turn the SmartKey in
the ignition lock to position 2.XPress the Y button.
The display changes to rear-compartment
climate control.XTurn control E clockwise or counter-
clockwise ( Y page 132).
Only change the temperature setting in
small increments. Start at 72 ‡ (22 †).
i To return to the standard display, press
the Y button.
i The rear display changes to the standard
display automatically after three seconds.
XTo increase/reduce the temperature in
the rear compartment using the rear
control panel: turn the SmartKey in the
ignition lock to position 2.XTurn thumbwheel N16
/R 17
clockwise or
counter-clockwise ( Y page 132).
Only change the temperature setting in
small increments. Start at 72 ‡ (22 †).16 USA only.
17 Canada only.Operating the control systems139Climate controlBA 164.8 USA, CA Edition B 2011; 1; 2, en-USd2sboikeVersion: 3.0.3.52010-04-21T15:08:44+02:00 - Seite 139Z
Page 148 of 376
Vehicle equipment
i This manual describes all the standard
and optional equipment of your vehicle
which was available at the time of
purchase. Country-specific differences are
possible. Bear in mind that your vehicle
may not feature all functions described
here. This also refers to safety-related
systems and functions.
Notes on breaking-in a new vehicle
The first 1000 miles (1500 km)
The more you look after the engine when it is
new, the happier you will be with its
performance in the future.
R Drive at varying vehicle speeds and engine
speeds for the first 1000 miles (1500 km)
for this reason.
R Avoid overstraining the vehicle during this
period, e.g. driving at full throttle.
R Change gear in good time, at the latest
when the tachometer needle is ⅔ of the
way to the red area in the tachometer
display.
R Do not manually shift to a lower gear to
brake the vehicle.
R If possible, do not depress the accelerator
pedal past the point of resistance
(kickdown).
R Only select shift ranges 3, 2 or 1 when
driving slowly, e.g. in mountainous terrain.
After 1000 miles (1500 km), you can increase
the engine speed gradually and bring the
vehicle up to full speed.
i Also, observe these breaking-in notes
when the vehicle's engine, front-axle
transmission or differential have been
replaced.
i Always observe the respective speed
restrictions.
Driving
Important safety notes
GWarning
Make sure absolutely no objects are
obstructing the pedals' range of movement.
Keep the driver's footwell clear of all
obstacles. If there are any floormats or
carpets in the footwell, make sure the pedals
still have sufficient clearance.
During sudden driving or braking maneuvers
the objects could get caught between the
pedals. You could then no longer brake or
accelerate. This could lead to accidents and
injury.
GWarning
On slippery road surfaces, never downshift in
order to obtain braking action. This could
result in drive wheel slip and reduced vehicle
control. Your vehicle's ABS will not prevent
this type of loss of control.
GWarning
It is dangerous to shift the automatic
transmission out of parking position P or
neutral position N if the engine speed is
higher than idle speed. If your foot is not firmly
on the brake pedal, the vehicle could
accelerate quickly forward or in reverse. You
could lose control of the vehicle and hit
someone or something. Only shift into gear
when the engine is idling normally and when
your right foot is firmly on the brake pedal.
! Warm up the engine quickly. Do not use
the engine's full performance until it has
reached operating temperature.
Only shift the automatic transmission to
the desired drive position when the vehicle
is stationary.
Where possible, avoid spinning the drive
wheels when pulling away on slippery
roads. You could otherwise damage the
drive train.
146DrivingDriving and parking
BA 164.8 USA, CA Edition B 2011; 1; 2, en-USd2sboikeVersion: 3.0.3.52010-04-21T15:08:44+02:00 - Seite 146
Page 150 of 376
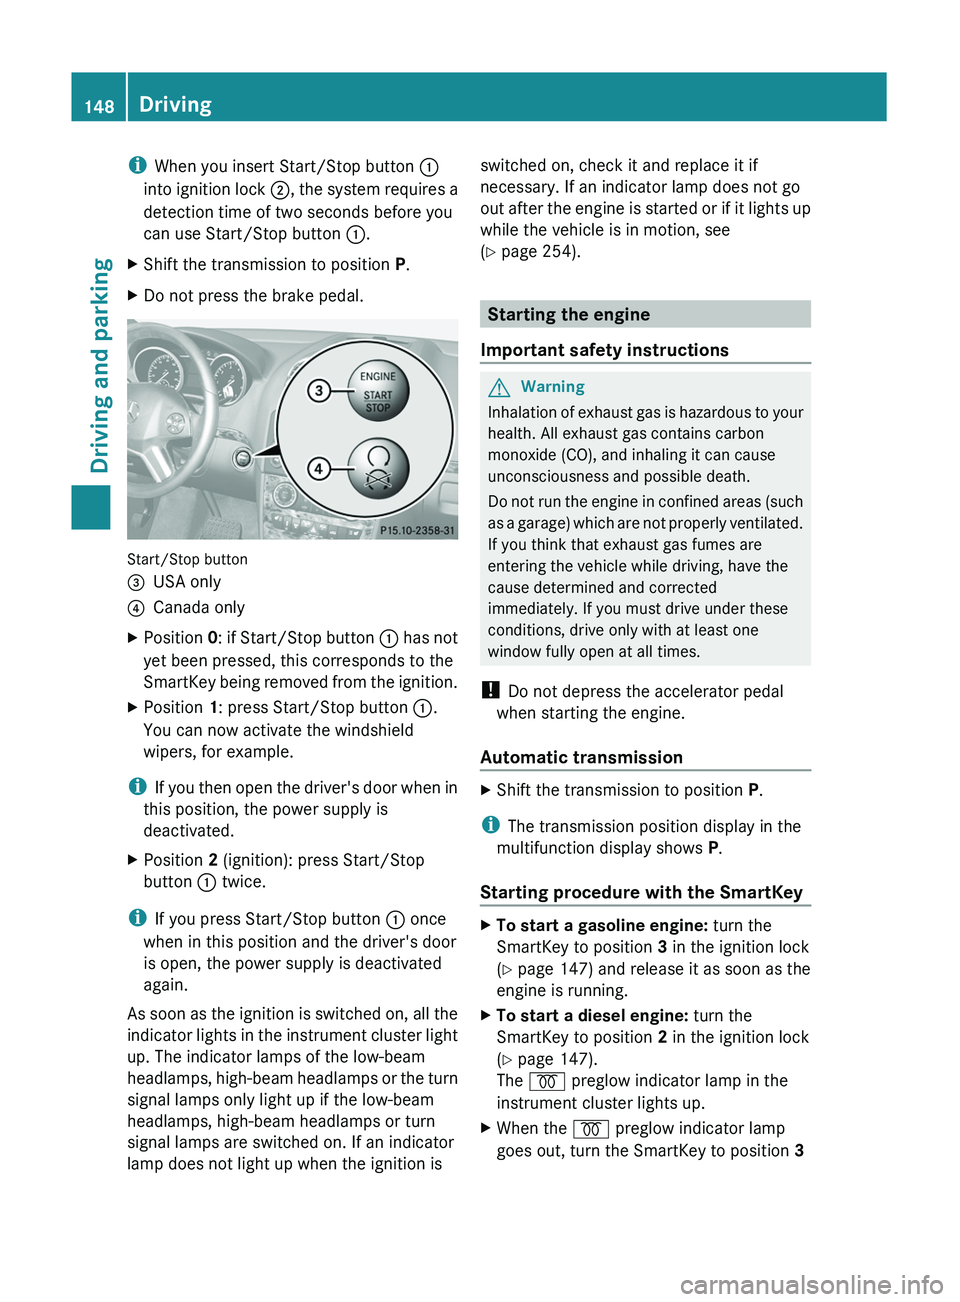
iWhen you insert Start/Stop button :
into ignition lock ;, the system requires a
detection time of two seconds before you
can use Start/Stop button :.XShift the transmission to position P.XDo not press the brake pedal.
Start/Stop button
=USA only?Canada onlyXPosition 0: if Start/Stop button : has not
yet been pressed, this corresponds to the
SmartKey being removed from the ignition.XPosition 1: press Start/Stop button :.
You can now activate the windshield
wipers, for example.
i If you then open the driver's door when in
this position, the power supply is
deactivated.
XPosition 2 (ignition): press Start/Stop
button : twice.
i
If you press Start/Stop button : once
when in this position and the driver's door
is open, the power supply is deactivated
again.
As soon as the ignition is switched on, all the
indicator lights in the instrument cluster light
up. The indicator lamps of the low-beam
headlamps, high-beam headlamps or the turn
signal lamps only light up if the low-beam
headlamps, high-beam headlamps or turn
signal lamps are switched on. If an indicator
lamp does not light up when the ignition is
switched on, check it and replace it if
necessary. If an indicator lamp does not go
out after the engine is started or if it lights up
while the vehicle is in motion, see
( Y page 254).
Starting the engine
Important safety instructions
GWarning
Inhalation of exhaust gas is hazardous to your
health. All exhaust gas contains carbon
monoxide (CO), and inhaling it can cause
unconsciousness and possible death.
Do not run the engine in confined areas (such
as a garage) which are not properly ventilated.
If you think that exhaust gas fumes are
entering the vehicle while driving, have the
cause determined and corrected
immediately. If you must drive under these
conditions, drive only with at least one
window fully open at all times.
! Do not depress the accelerator pedal
when starting the engine.
Automatic transmission
XShift the transmission to position P.
i
The transmission position display in the
multifunction display shows P.
Starting procedure with the SmartKey
XTo start a gasoline engine: turn the
SmartKey to position 3 in the ignition lock
( Y page 147) and release it as soon as the
engine is running.XTo start a diesel engine: turn the
SmartKey to position 2 in the ignition lock
( Y page 147).
The % preglow indicator lamp in the
instrument cluster lights up.XWhen the % preglow indicator lamp
goes out, turn the SmartKey to position 3 148DrivingDriving and parking
BA 164.8 USA, CA Edition B 2011; 1; 2, en-USd2sboikeVersion: 3.0.3.52010-04-21T15:08:44+02:00 - Seite 148
Page 154 of 376
ProblemPossible causes/consequences and M SolutionsVehicles with a
gasoline engine:
The engine is not
running smoothly and
is misfiring.There is a malfunction in the engine electronics or a mechanical
component of the engine management system.XOnly depress the accelerator pedal slightly.XHave the cause rectified immediately at a qualified specialist
workshop.
Otherwise, non-combusted fuel may get into the catalytic
converter and damage it.The coolant
temperature gauge
shows a value above
248 ‡(120 †).The coolant level is too low. The coolant is too hot and the engine
is no longer being cooled sufficiently.XStop as soon as possible and allow the engine and the coolant
to cool down.XCheck the coolant level ( Y page 297). Observe the warning
notes as you do so and add coolant if necessary.Automatic transmission
Important safety notes
GWarning
It is dangerous to shift the automatic
transmission out of parking position P or
neutral position N if the engine speed is
higher than idle speed. If your foot is not firmly
on the brake pedal, the vehicle could
accelerate quickly forward or in reverse. You
could lose control of the vehicle and hit
someone or something. Only shift into gear
when the engine is idling normally and when
your right foot is firmly on the brake pedal.
GWarning!
Keep in mind that turning off the engine alone
only will shift the automatic transmission into
neutral position N automatically.
Always shift the automatic transmission into
park position P before turning off the engine.
Otherwise the vehicle could roll away which
could result in an accident and/or serious
personal injury.
DIRECT SELECT lever
Overview of transmission positions
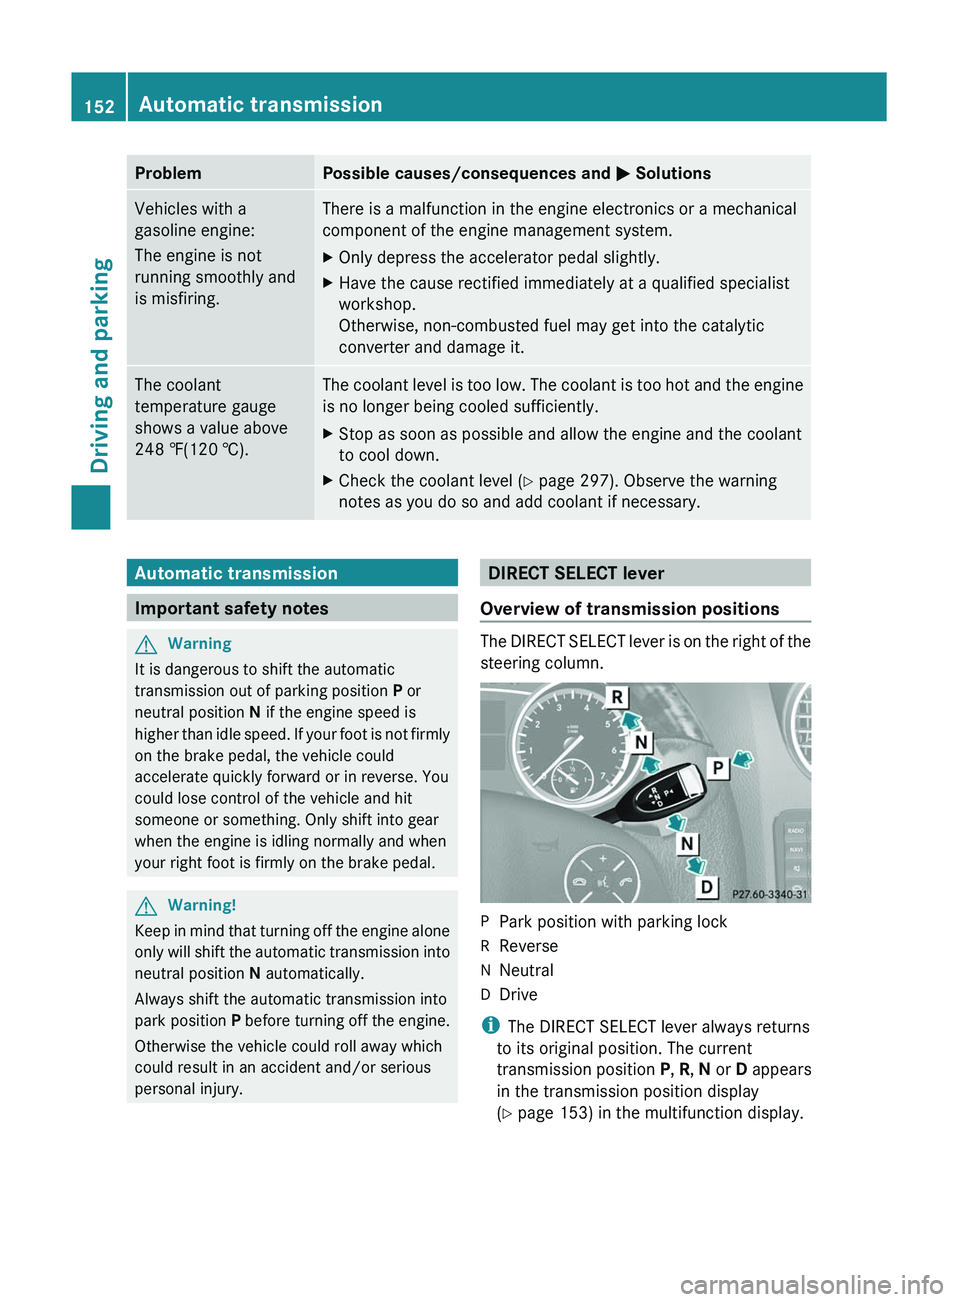
The DIRECT SELECT lever is on the right of the
steering column.
PPark position with parking lockRReverseNNeutralDDrive
i The DIRECT SELECT lever always returns
to its original position. The current
transmission position P, R , N or D appears
in the transmission position display
( Y page 153) in the multifunction display.
152Automatic transmissionDriving and parking
BA 164.8 USA, CA Edition B 2011; 1; 2, en-USd2sboikeVersion: 3.0.3.52010-04-21T15:08:44+02:00 - Seite 152
Page 155 of 376
Engaging park position PXPush the DIRECT SELECT lever in the
direction of the arrow P.
i
Vehicles with a production date as of 18
January 2010: if you open the driver's door
when the vehicle is stationary or if the
speed is very low, the automatic
transmission shifts to park position P
automatically.
! If the engine speed is too high or the
vehicle is moving, do not shift the
automatic transmission directly from D to
R , from R to D or directly to P. The
automatic transmission could otherwise be
damaged.
Engaging reverse gear R
! Only shift the automatic transmission to
R when the vehicle is stationary.
XPush the DIRECT SELECT lever up past the
first point of resistance.
Shifting to neutral N
XWhen the vehicle is stationary, depress the
brake pedal.XPush the DIRECT SELECT lever up or down
to the first point of resistance.
When the engine is switched off, the
automatic transmission shifts to N
automatically.
Remaining in neutral N
If you wish to keep the automatic
transmission in neutral N, e.g. to wash the
vehicle in a car wash with a towing device,
observe the following:
Using the SmartKey:
R make sure the ignition is switched on.
R when the vehicle is stationary, depress the
brake pedal and keep it depressed.
R shift to neutral N.
R release the brake pedal.
R
if applied, release the parking brake.
R switch off the ignition and leave the
SmartKey in the ignition lock.
Using KEYLESS-GO:
R make sure the ignition is switched on.
R when the vehicle is stationary, depress the
brake pedal and keep it depressed.
R shift to park position P.
R release the brake pedal.
R remove the Start/Stop button from the
ignition lock.
R insert the SmartKey into the ignition lock.
R switch on the ignition.
R depress the brake pedal and keep it
depressed.
R shift to neutral N.
R release the brake pedal.
R if applied, release the parking brake.
R switch off the ignition and leave the
SmartKey in the ignition lock.
Shifting to transmission position DXPush the DIRECT SELECT lever down past
the first point of resistance.
Transmission position display
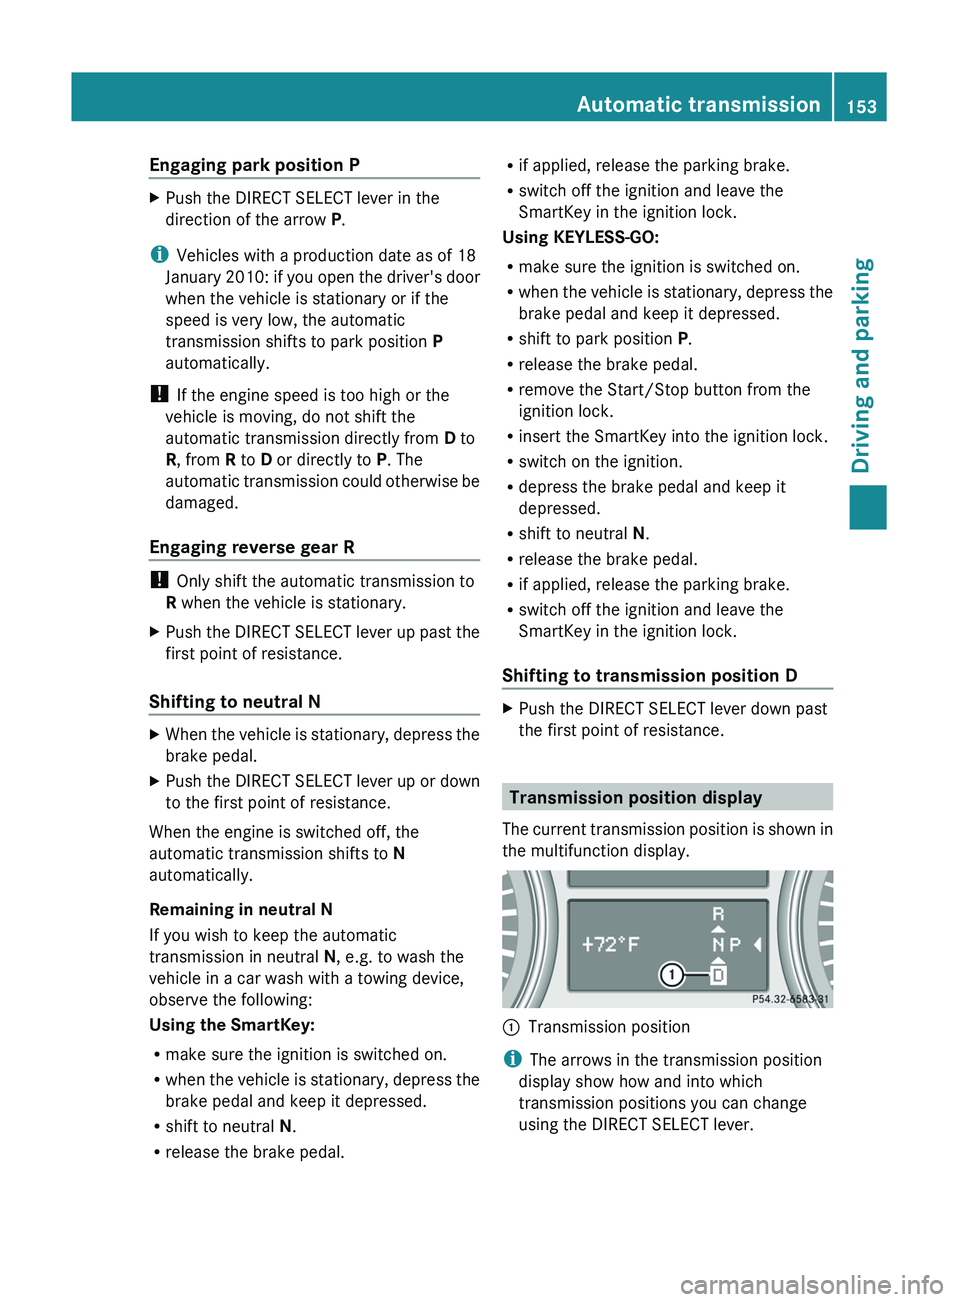
The current transmission position is shown in
the multifunction display.
:Transmission position
i The arrows in the transmission position
display show how and into which
transmission positions you can change
using the DIRECT SELECT lever.
Automatic transmission153Driving and parkingBA 164.8 USA, CA Edition B 2011; 1; 2, en-USd2sboikeVersion: 3.0.3.52010-04-21T15:08:44+02:00 - Seite 153Z
Page 156 of 376
! If the transmission position display in the
multifunction display is not working, you
should pull away carefully to check whether
the desired transmission position is
engaged. Select transmission position D.
Do not restrict the shift range.
Transmission positions
BPark position
Do not shift the transmission into
position P unless the vehicle is
stationary. The parking lock should
not be used as a brake when
parking. In addition to engaging the
parking lock, you must always
apply the parking brake to secure
the vehicle.
In the event of a fault in the vehicle
electronics, the transmission can
be locked in position P.
Have the vehicle electronics
checked immediately at a qualified
specialist workshop, e.g. an
authorized Mercedes-Benz Center.CReverse
Only shift the transmission to R
when the vehicle is stationary.ANeutral
Do not shift the transmission to N
while driving. The transmission
could otherwise be damaged.
No power is transmitted from the
engine to the drive wheels.
Releasing the brakes will allow you
to move the vehicle freely, e.g. to
push it or tow it.
If ESP ®
is deactivated or faulty:
only shift the transmission to
position N if the vehicle is in danger
of skidding, e.g. on icy roads.
! Driving in neutral N can
damage the drive train.7Drive
The automatic transmission
changes gear automatically. All
forward gears are available.
Gearshifting
The automatic transmission shifts to the
individual gears automatically when it is in
transmission position D. This automatic
gearshifting behavior is determined by:
R a shift range restriction, if selected
R the position of the accelerator pedal
R the road speed
154Automatic transmissionDriving and parking
BA 164.8 USA, CA Edition B 2011; 1; 2, en-USd2sboikeVersion: 3.0.3.52010-04-21T15:08:44+02:00 - Seite 154