2011 MERCEDES-BENZ GL display
[x] Cancel search: displayPage 71 of 376
EBD monitors and controls the brake
pressure on the rear wheels to improve
driving stability while braking.GWarning!
If the EBD malfunctions, the brake system will
still function with full brake boost. However,
the rear wheels could lock up during
emergency braking situations, for example.
You could lose control of the vehicle and
cause an accident.
Adapt your driving style to the changed
driving characteristics.
Distance warning function (vehicles
with DISTRONIC)
This function warns you from a speed of
approximately 20 mph (30 km/h), if:
R for a period of several seconds, the
distance to the vehicle in front is too short
for the speed at which you are traveling.
The · distance warning lamp in the
instrument cluster will light up.
R you are approaching the vehicle in front
rapidly. An intermittent warning tone will
then sound and the · distance warning
lamp in the instrument cluster will light up.
You must apply the brakes yourself in order
to maintain the appropriate distance to the
vehicle in front and prevent a collision.
GWarning!
If the distance warning lamp · in the
instrument cluster comes on while driving
and/or an intermittent warning sounds,
immediate attention on the part of the driver
is required. As required by the traffic
situation, apply the brakes and navigate
around a possible obstacle. However, do not
drive by relying on the distance warning
function, as this will result in an emergency
braking application. This will not always
enable you to avoid a collision, especially
when traveling on varying road surface
conditions and with varying driver reaction.
Complex driving situations are not always
fully recognized by the distance warning
function. This could result in wrong or missing
distance warnings.XTo activate/deactivate: activate or
deactivate the distance warning function in
the on-board computer ( Y page 226).
After activation, the Ä symbol is
displayed in the lower multifunction
display.
Anti-theft systems
Immobilizer
The immobilizer prevents your vehicle from
being started without the correct SmartKey.
When leaving the vehicle, always take the
SmartKey with you and lock the vehicle. The
engine can be started by anyone with a valid
SmartKey that is left inside the vehicle.
XTo activate with the SmartKey: remove
the SmartKey from the ignition lock.XTo activate with KEYLESS-GO: switch the
ignition off and open the driver's door.XTo deactivate: switch on the ignition.
i
The immobilizer is always deactivated
when you start the engine.
In the event that the engine cannot be
started when the starter battery is fully
charged, the immobilizer may be faulty.
Contact an authorized Mercedes-Benz
Center or call 1-800-FOR-MERCedes (in
USA) or 1-800-387-0100 (in Canada).
ATA (Anti-Theft Alarm system)
A visual and audible alarm is triggered if the
alarm system is armed and you open:
R a door
R the vehicle with the mechanical key
R the tailgate
R the hood
Anti-theft systems69SafetyBA 164.8 USA, CA Edition B 2011; 1; 2, en-USd2sboikeVersion: 3.0.3.52010-04-21T15:08:44+02:00 - Seite 69Z
Page 76 of 376
Important information about using
KEYLESS-GO
R You can use the KEYLESS-GO key as a
conventional SmartKey.
R You can combine KEYLESS-GO functions
with those of a conventional SmartKey, e.g.
you can open the vehicle with KEYLESS-GO
and close it with the & button.
R Always carry your KEYLESS-GO key on your
person.
R Never store the KEYLESS-GO key together
with:
- electronic devices, such as a mobile
phone or other SmartKey
- metal objects, such as coins or metal foil
Doing so may impair the function of
KEYLESS-GO.
R To open or close the vehicle, the KEYLESS-
GO key should not be more than 3 ft (1 m)
from the door or tailgate.
R If the vehicle is parked for more than
72 hours, the KEYLESS-GO function is
deactivated. Pull an outer door handle and
switch on the ignition to reactivate the
KEYLESS-GO function.
R If the KEYLESS-GO key is removed from the
vehicle, the system may not be able to
recognize the SmartKey anymore. The
vehicle can then no longer be locked or
started with KEYLESS-GO.
R If the KEYLESS-GO key has been removed
from the vehicle, e.g. when another vehicle
occupant with a KEYLESS-GO key leaves
the vehicle:
- when the Start/Stop button is pressed,
or when trying to lock the vehicle using
the locking button on the outside door
handle, the Key Not Detected message
appears in the multifunction display.
- when the engine is running, the red Key
Not Detected message appears in the
multifunction display as you pull away.
Look for the KEYLESS-GO key and place
it somewhere else in the vehicle. Place
the KEYLESS-GO key on the front-
passenger seat, for example, or in your
shirt pocket.
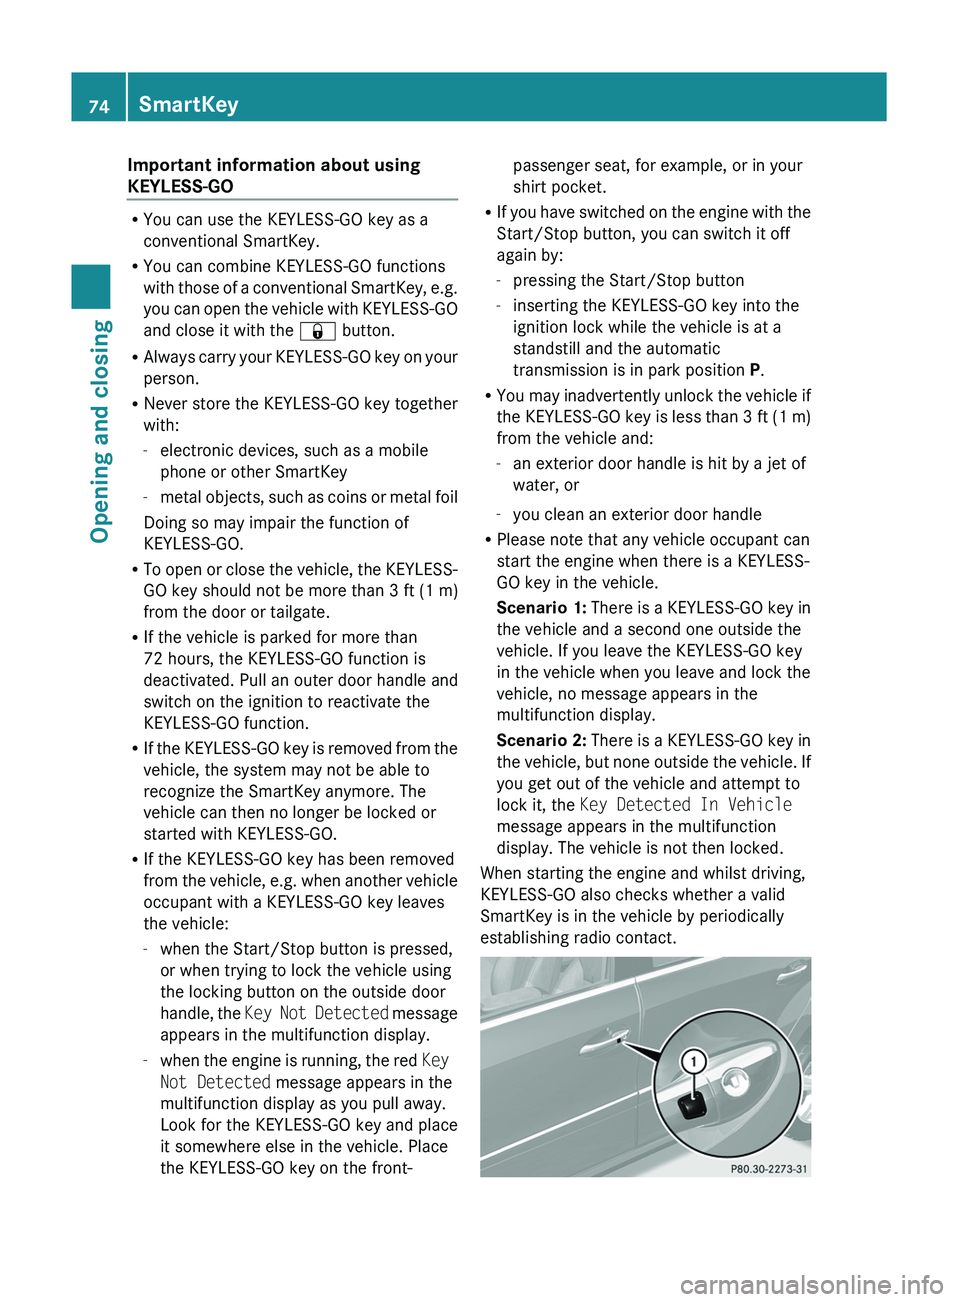
R If you have switched on the engine with the
Start/Stop button, you can switch it off
again by:
- pressing the Start/Stop button
- inserting the KEYLESS-GO key into the
ignition lock while the vehicle is at a
standstill and the automatic
transmission is in park position P.
R You may inadvertently unlock the vehicle if
the KEYLESS-GO key is less than 3 ft (1 m)
from the vehicle and:
- an exterior door handle is hit by a jet of
water, or
- you clean an exterior door handle
R Please note that any vehicle occupant can
start the engine when there is a KEYLESS-
GO key in the vehicle.
Scenario 1: There is a KEYLESS-GO key in
the vehicle and a second one outside the
vehicle. If you leave the KEYLESS-GO key
in the vehicle when you leave and lock the
vehicle, no message appears in the
multifunction display.
Scenario 2: There is a KEYLESS-GO key in
the vehicle, but none outside the vehicle. If
you get out of the vehicle and attempt to
lock it, the Key Detected In Vehicle
message appears in the multifunction
display. The vehicle is not then locked.
When starting the engine and whilst driving,
KEYLESS-GO also checks whether a valid
SmartKey is in the vehicle by periodically
establishing radio contact.74SmartKeyOpening and closing
BA 164.8 USA, CA Edition B 2011; 1; 2, en-USd2sboikeVersion: 3.0.3.52010-04-21T15:08:44+02:00 - Seite 74
Page 96 of 376

Vehicle equipment
i This manual describes all the standard
and optional equipment of your vehicle
which was available at the time of
purchase. Country-specific differences are
possible. Bear in mind that your vehicle
may not feature all functions described
here. This also refers to safety-related
systems and functions.
Correct driver's seat position
Observe the important safety notes on
( Y page 95).
XCheck whether you have adjusted seat =
properly.
Electrical seat adjustment ( Y page 96)
When adjusting the seat, make sure:
R you are as far away from the driver's air
bag as possible.
R you are sitting in a normal upright
position.
R you can fasten the seat belt properly.Ryou have moved the backrest to an
almost vertical position.
R you have set the seat cushion angle so
that your thighs are gently supported.
R you can depress the pedals properly.XCheck whether the head restraint is
adjusted properly ( Y page 97).
When doing so, make sure that you have
adjusted the head restraint so that the back
of your head is supported at eye level by
the center of the head restraint.
Observe the important safety notes on
( Y page 105).
XCheck whether steering wheel : is
adjusted properly.
Adjusting the steering wheel
manually 7
(Y page 106)
Adjusting the steering wheel electrically
( Y page 106)
When adjusting the steering wheel, make
sure:
R you can hold the steering wheel with your
arms slightly bent.
R you can move your legs freely.
R you can see all the displays in the
instrument cluster clearly.
Observe the important safety notes on
( Y page 53).
XCheck whether you have fastened seat
belt ; properly ( Y page 55).
The seat belt should:
R fit snugly across your body
R be routed across the middle of your
shoulder
R be routed in your pelvic area across the
hip jointsXBefore starting off, adjust the rear-view
mirror and the exterior mirrors7 USA only.94Correct driver's seat positionSeats, steering wheel and mirrors
BA 164.8 USA, CA Edition B 2011; 1; 2, en-USd2sboikeVersion: 3.0.3.52010-04-21T15:08:44+02:00 - Seite 94
Page 102 of 376
Adjusting the seats in the second and
third rowGWarning
Never travel in a moving vehicle with the seat
backrest in an excessively reclined position as
this can be dangerous. You could slide under
the seat belt in a collision. If you slide under
it, the seat belt would apply force at the
abdomen or neck. This could cause serious or
fatal injuries. The seat backrest and seat belt
provide the best restraint when the wearer is
in a position that is as upright as possible and
the seat belt is properly positioned on the
body.
Your seat belt must be adjusted so that you
can correctly fasten your seat belt.
Never place hands under the seat or near any
moving parts while a seat is being adjusted.
After adjusting the seat, always ensure that
the seat and the backrest are correctly
engaged. The backrest must be in an upright
position.
Test the stability of the latch by pushing and
pulling the backrest. If the seat and backrest
are not correctly latched, the seat could move
forward and the backrest could fold down.
While braking, changing direction, or in an
accident, you could slide out from under the
seat belt. The child seat would no longer be
correctly supported or correctly positioned
and would no longer carry out its intended
function. This could cause serious or fatal
injuries.
Adjusting the backrest angle (second
row of seats)
GWarning
The seat belt only offers its intended
protection when the seat backrest is in a
nearly vertical position and the occupant is
sitting upright. The seat backrest and seat
belt provide the best restraint when the
wearer is in a position that is as upright as
possible and the seat belt is properly
positioned on the body.
You should therefore adjust the seat backrest
to a position as upright as possible.
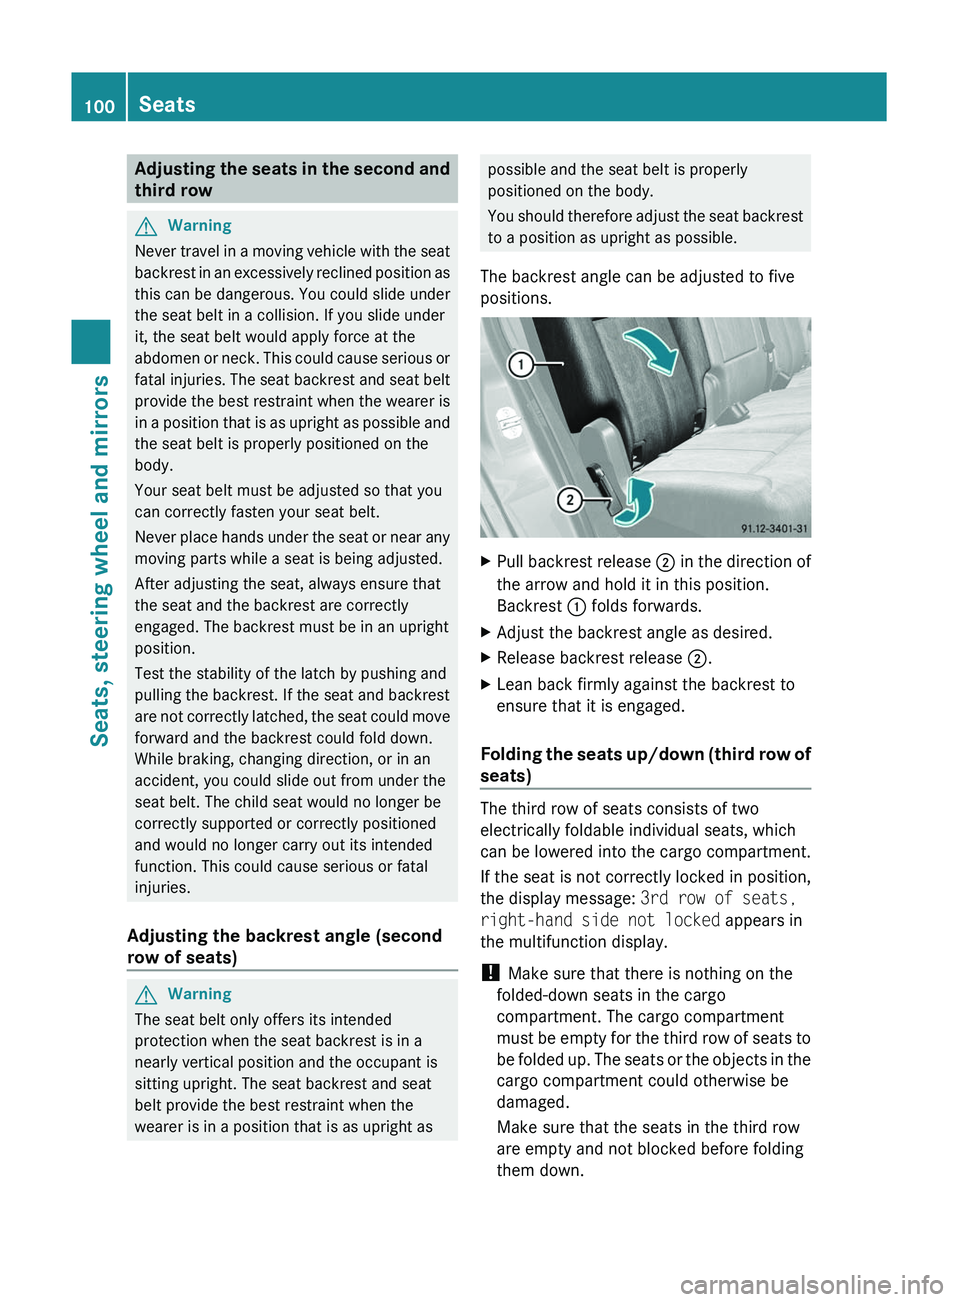
The backrest angle can be adjusted to five
positions.XPull backrest release ; in the direction of
the arrow and hold it in this position.
Backrest : folds forwards.XAdjust the backrest angle as desired.XRelease backrest release ;.XLean back firmly against the backrest to
ensure that it is engaged.
Folding the seats up/down (third row of
seats)
The third row of seats consists of two
electrically foldable individual seats, which
can be lowered into the cargo compartment.
If the seat is not correctly locked in position,
the display message: 3rd row of seats,
right-hand side not locked appears in
the multifunction display.
! Make sure that there is nothing on the
folded-down seats in the cargo
compartment. The cargo compartment
must be empty for the third row of seats to
be folded up. The seats or the objects in the
cargo compartment could otherwise be
damaged.
Make sure that the seats in the third row
are empty and not blocked before folding
them down.
100SeatsSeats, steering wheel and mirrors
BA 164.8 USA, CA Edition B 2011; 1; 2, en-USd2sboikeVersion: 3.0.3.52010-04-21T15:08:44+02:00 - Seite 100
Page 103 of 376
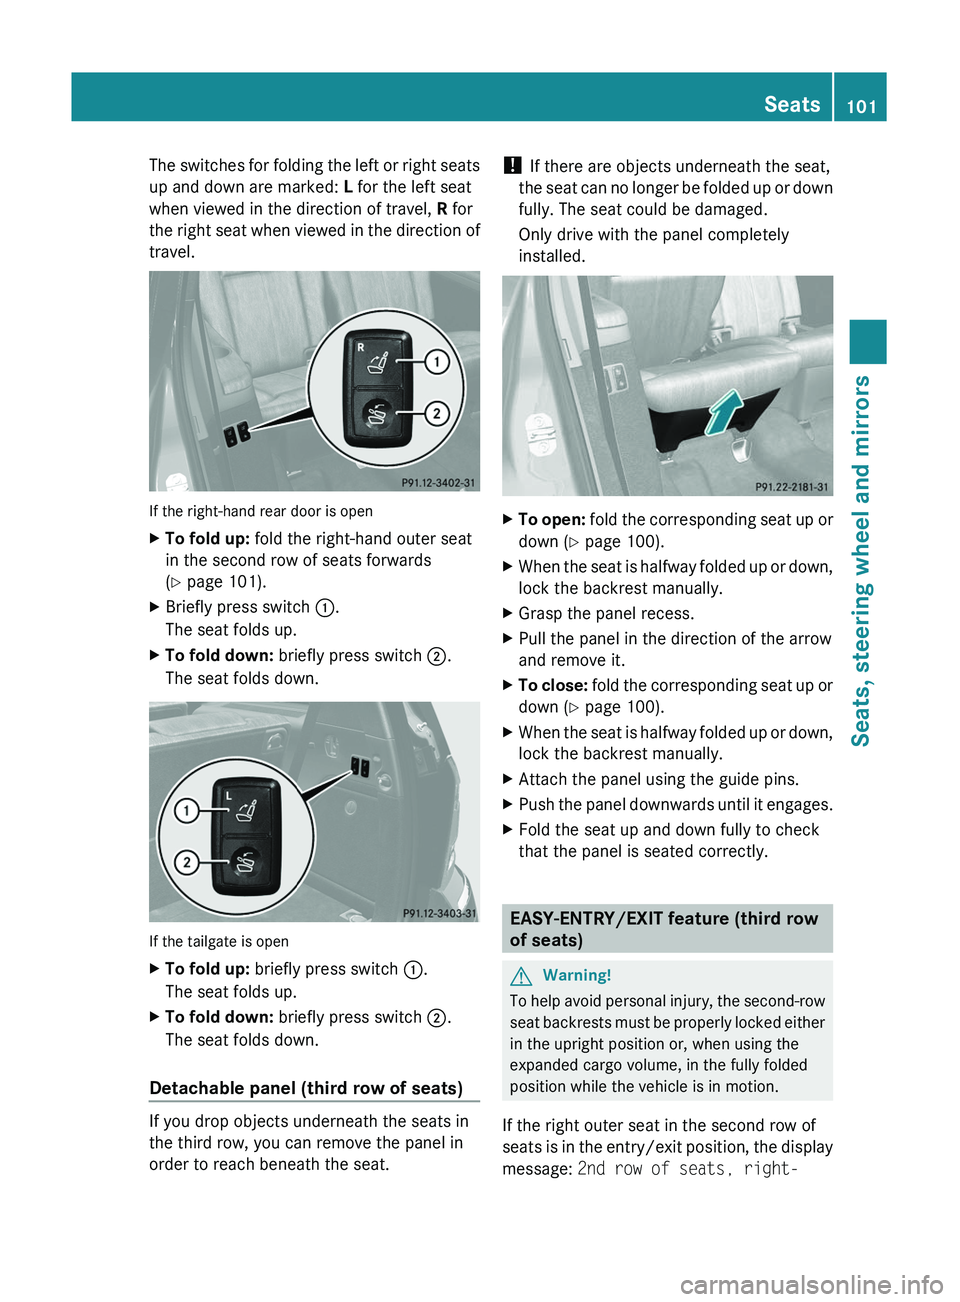
The switches for folding the left or right seats
up and down are marked: L for the left seat
when viewed in the direction of travel, R for
the right seat when viewed in the direction of
travel.
If the right-hand rear door is open
XTo fold up: fold the right-hand outer seat
in the second row of seats forwards
( Y page 101).XBriefly press switch :.
The seat folds up.XTo fold down: briefly press switch ;.
The seat folds down.
If the tailgate is open
XTo fold up: briefly press switch :.
The seat folds up.XTo fold down: briefly press switch ;.
The seat folds down.
Detachable panel (third row of seats)
If you drop objects underneath the seats in
the third row, you can remove the panel in
order to reach beneath the seat.
! If there are objects underneath the seat,
the seat can no longer be folded up or down
fully. The seat could be damaged.
Only drive with the panel completely
installed.XTo open: fold the corresponding seat up or
down ( Y page 100).XWhen the seat is halfway folded up or down,
lock the backrest manually.XGrasp the panel recess.XPull the panel in the direction of the arrow
and remove it.XTo close: fold the corresponding seat up or
down ( Y page 100).XWhen the seat is halfway folded up or down,
lock the backrest manually.XAttach the panel using the guide pins.XPush the panel downwards until it engages.XFold the seat up and down fully to check
that the panel is seated correctly.
EASY-ENTRY/EXIT feature (third row
of seats)
GWarning!
To help avoid personal injury, the second-row
seat backrests must be properly locked either
in the upright position or, when using the
expanded cargo volume, in the fully folded
position while the vehicle is in motion.
If the right outer seat in the second row of
seats is in the entry/exit position, the display
message: 2nd row of seats, right-
Seats101Seats, steering wheel and mirrorsBA 164.8 USA, CA Edition B 2011; 1; 2, en-USd2sboikeVersion: 3.0.3.52010-04-21T15:08:44+02:00 - Seite 101Z
Page 104 of 376
hand side not locked appears in the
multifunction display.
When you fold the seat and backrest back
until they engage, the display message
disappears.
For further information on enlarging the cargo
compartment (folding the second row of
seats forwards), see ( Y page 267), and for
information on folding the seats in the third
row up and down, see ( Y page 100).
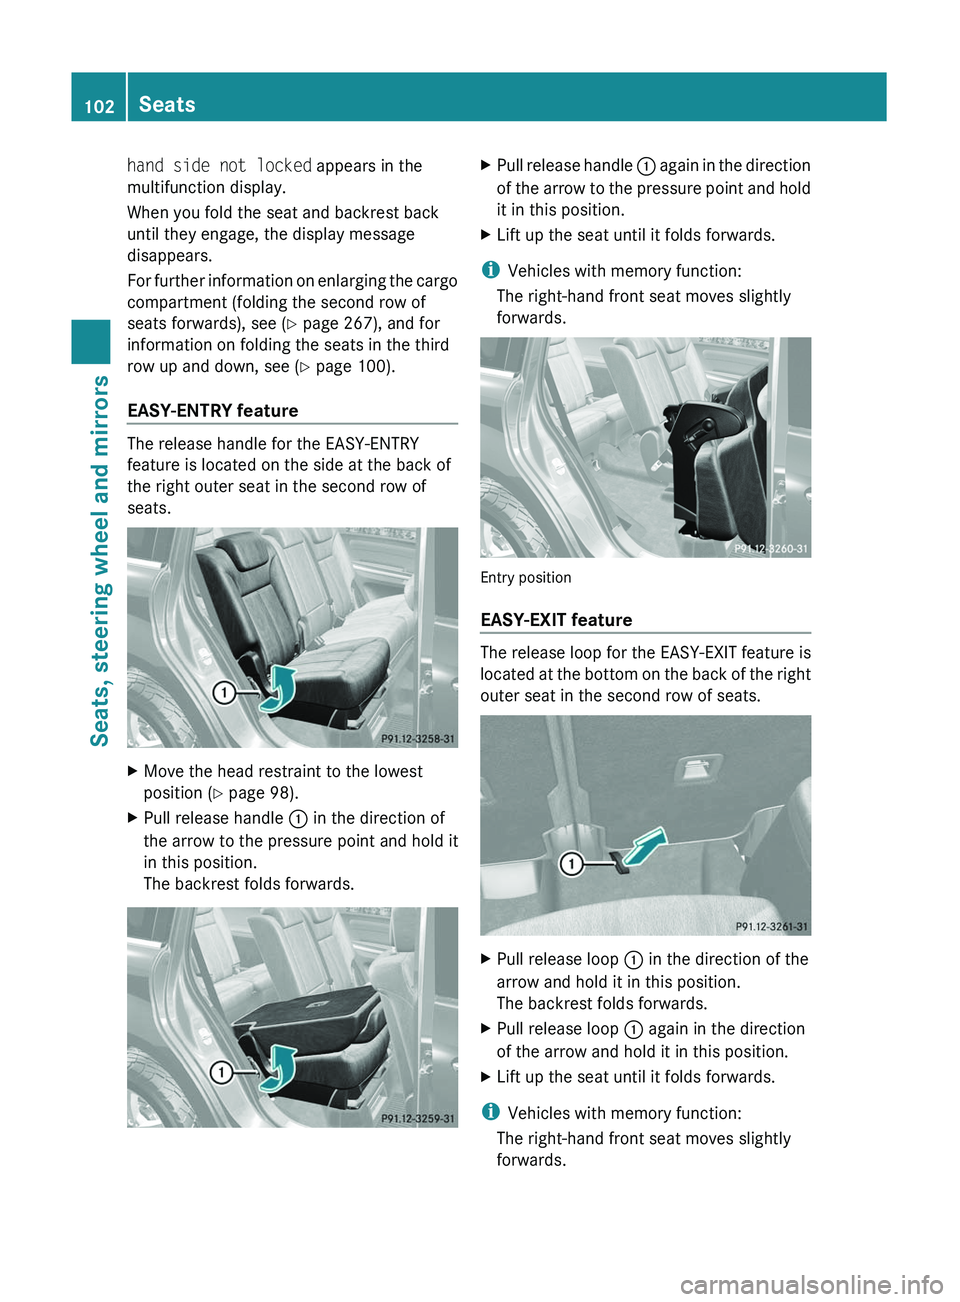
EASY-ENTRY feature
The release handle for the EASY-ENTRY
feature is located on the side at the back of
the right outer seat in the second row of
seats.
XMove the head restraint to the lowest
position ( Y page 98).XPull release handle : in the direction of
the arrow to the pressure point and hold it
in this position.
The backrest folds forwards.XPull release handle : again in the direction
of the arrow to the pressure point and hold
it in this position.XLift up the seat until it folds forwards.
i Vehicles with memory function:
The right-hand front seat moves slightly
forwards.
Entry position
EASY-EXIT feature
The release loop for the EASY-EXIT feature is
located at the bottom on the back of the right
outer seat in the second row of seats.
XPull release loop : in the direction of the
arrow and hold it in this position.
The backrest folds forwards.XPull release loop : again in the direction
of the arrow and hold it in this position.XLift up the seat until it folds forwards.
i Vehicles with memory function:
The right-hand front seat moves slightly
forwards.
102SeatsSeats, steering wheel and mirrors
BA 164.8 USA, CA Edition B 2011; 1; 2, en-USd2sboikeVersion: 3.0.3.52010-04-21T15:08:44+02:00 - Seite 102
Page 133 of 376
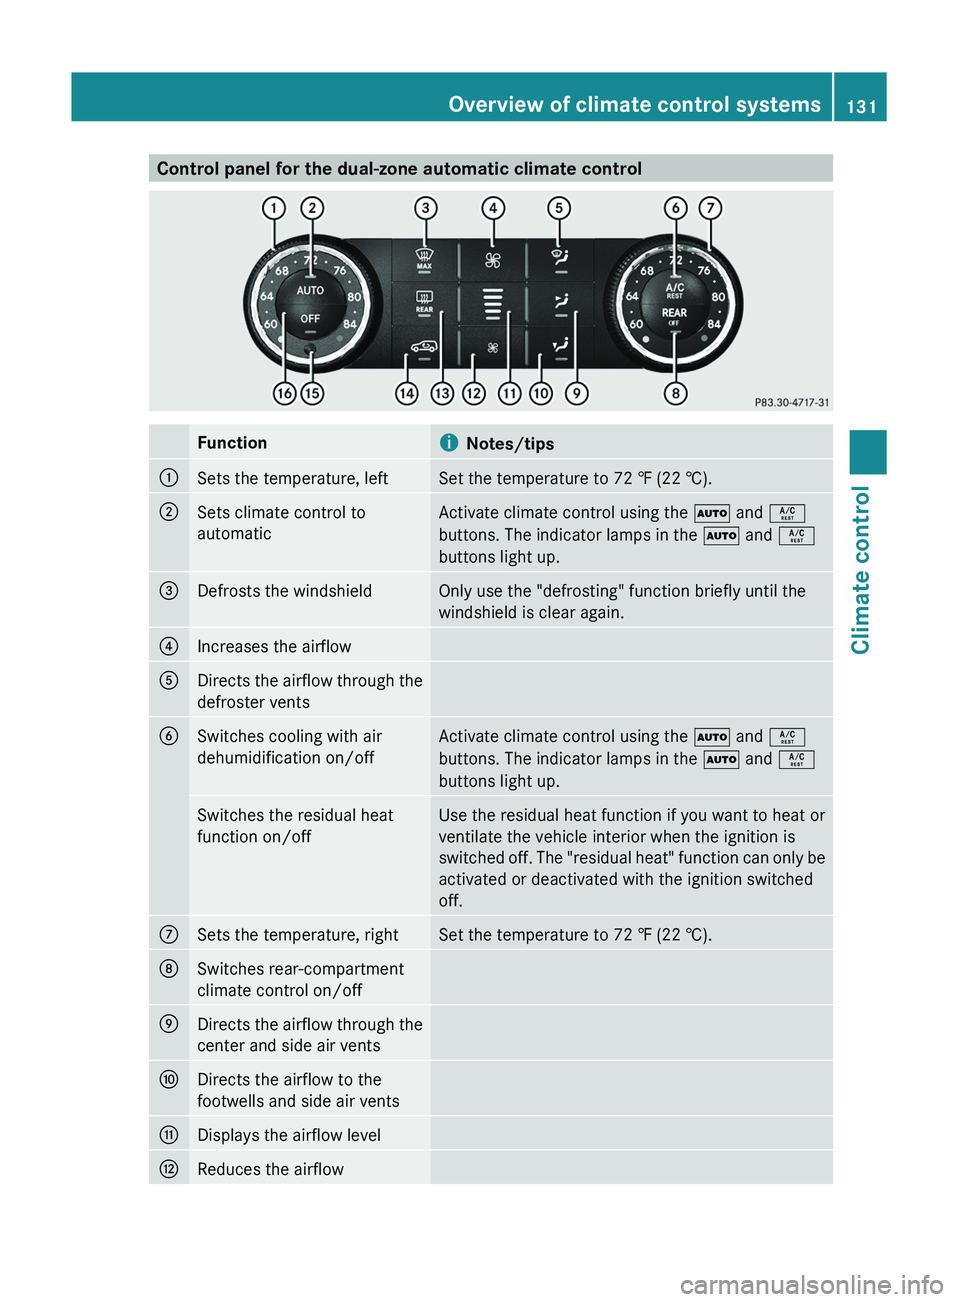
Control panel for the dual-zone automatic climate controlFunctioniNotes/tips:Sets the temperature, leftSet the temperature to 72 ‡ (22 †).;Sets climate control to
automaticActivate climate control using the à and Á
buttons. The indicator lamps in the à and Á
buttons light up.=Defrosts the windshieldOnly use the "defrosting" function briefly until the
windshield is clear again.?Increases the airflowADirects the airflow through the
defroster ventsBSwitches cooling with air
dehumidification on/offActivate climate control using the à and Á
buttons. The indicator lamps in the à and Á
buttons light up.Switches the residual heat
function on/offUse the residual heat function if you want to heat or
ventilate the vehicle interior when the ignition is
switched off. The "residual heat" function can only be
activated or deactivated with the ignition switched
off.CSets the temperature, rightSet the temperature to 72 ‡ (22 †).DSwitches rear-compartment
climate control on/offEDirects the airflow through the
center and side air ventsFDirects the airflow to the
footwells and side air ventsGDisplays the airflow levelHReduces the airflowOverview of climate control systems131Climate controlBA 164.8 USA, CA Edition B 2011; 1; 2, en-USd2sboikeVersion: 3.0.3.52010-04-21T15:08:44+02:00 - Seite 131Z
Page 135 of 376
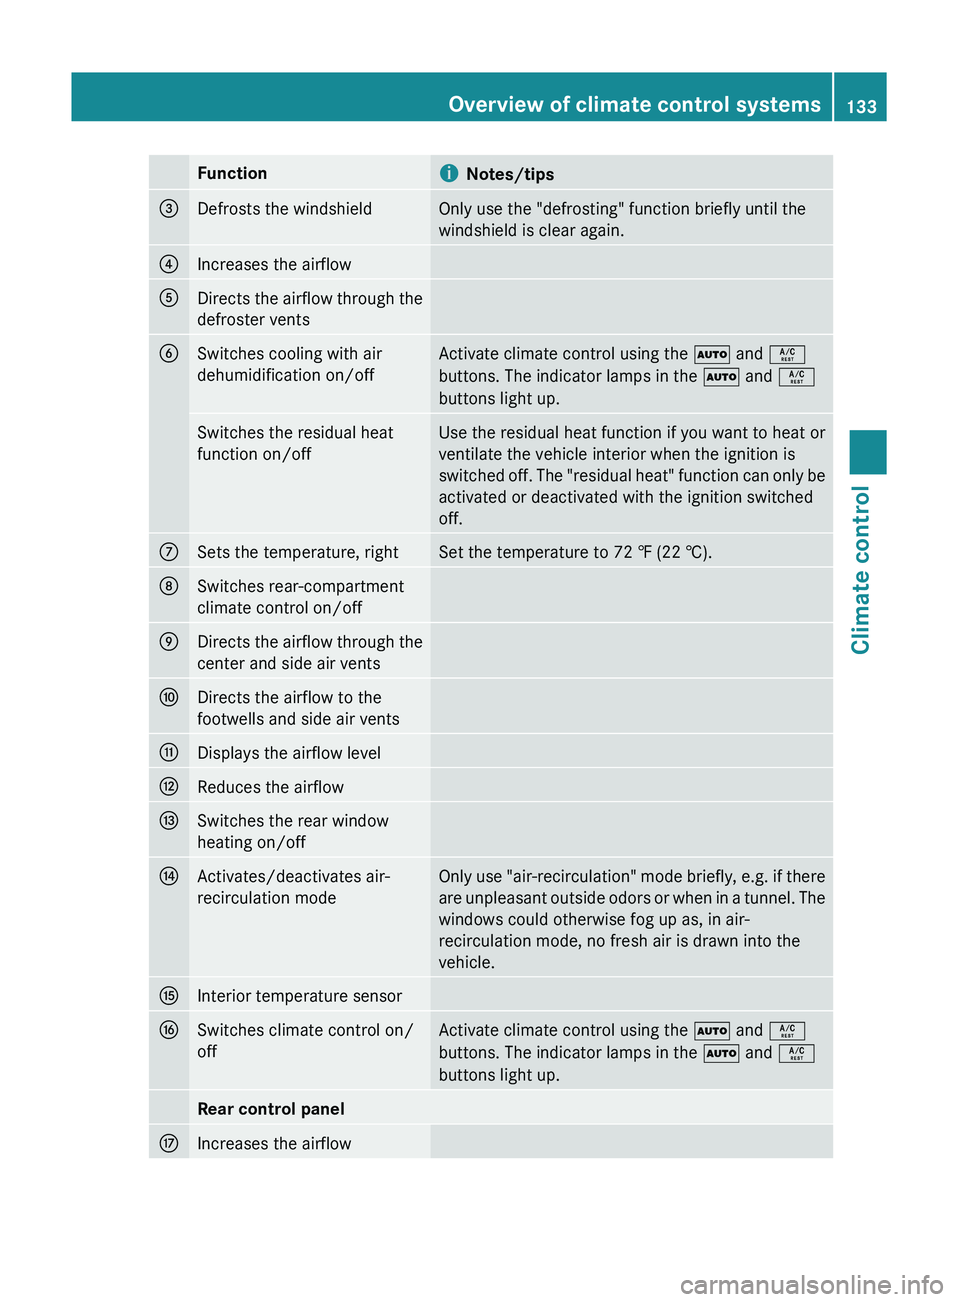
FunctioniNotes/tips=Defrosts the windshieldOnly use the "defrosting" function briefly until the
windshield is clear again.?Increases the airflowADirects the airflow through the
defroster ventsBSwitches cooling with air
dehumidification on/offActivate climate control using the à and Á
buttons. The indicator lamps in the à and Á
buttons light up.Switches the residual heat
function on/offUse the residual heat function if you want to heat or
ventilate the vehicle interior when the ignition is
switched off. The "residual heat" function can only be
activated or deactivated with the ignition switched
off.CSets the temperature, rightSet the temperature to 72 ‡ (22 †).DSwitches rear-compartment
climate control on/offEDirects the airflow through the
center and side air ventsFDirects the airflow to the
footwells and side air ventsGDisplays the airflow levelHReduces the airflowISwitches the rear window
heating on/offJActivates/deactivates air-
recirculation modeOnly use "air-recirculation" mode briefly, e.g. if there
are unpleasant outside odors or when in a tunnel. The
windows could otherwise fog up as, in air-
recirculation mode, no fresh air is drawn into the
vehicle.KInterior temperature sensorLSwitches climate control on/
offActivate climate control using the à and Á
buttons. The indicator lamps in the à and Á
buttons light up.Rear control panelMIncreases the airflowOverview of climate control systems133Climate controlBA 164.8 USA, CA Edition B 2011; 1; 2, en-USd2sboikeVersion: 3.0.3.52010-04-21T15:08:44+02:00 - Seite 133Z