2011 MERCEDES-BENZ GL change wheel
[x] Cancel search: change wheelPage 222 of 376
XTo select the next/previous track:
briefly press the & or * button.XTo select a track from the track list
(rapid scrolling): press and briefly hold the
& or * button.
The current track will not be displayed in
audio AUX mode ( Auxiliary audio mode:
external audio source connected).
Video DVD operation
XSwitch on COMAND APS and select video
DVD (see the separate operating
instructions).XPress V or U on the steering wheel
to select the Audio menu.
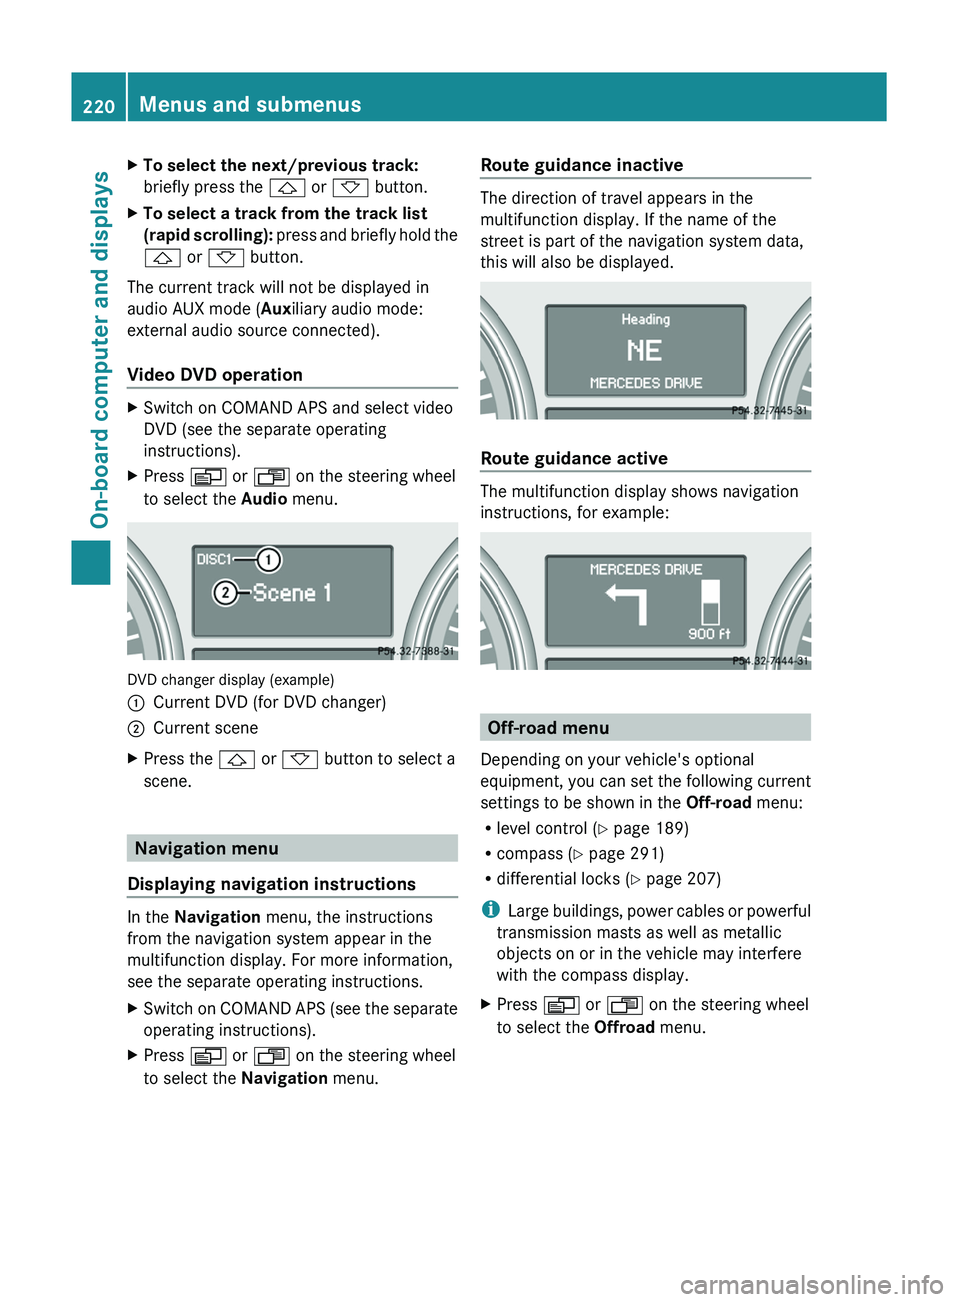
DVD changer display (example)
:Current DVD (for DVD changer);Current sceneXPress the & or * button to select a
scene.
Navigation menu
Displaying navigation instructions
In the Navigation menu, the instructions
from the navigation system appear in the
multifunction display. For more information,
see the separate operating instructions.
XSwitch on COMAND APS (see the separate
operating instructions).XPress V or U on the steering wheel
to select the Navigation menu.Route guidance inactive
The direction of travel appears in the
multifunction display. If the name of the
street is part of the navigation system data,
this will also be displayed.
Route guidance active
The multifunction display shows navigation
instructions, for example:
Off-road menu
Depending on your vehicle's optional
equipment, you can set the following current
settings to be shown in the Off-road menu:
R level control ( Y page 189)
R compass ( Y page 291)
R differential locks ( Y page 207)
i Large buildings, power cables or powerful
transmission masts as well as metallic
objects on or in the vehicle may interfere
with the compass display.
XPress V or U on the steering wheel
to select the Offroad menu.220Menus and submenusOn-board computer and displays
BA 164.8 USA, CA Edition B 2011; 1; 2, en-USd2sboikeVersion: 3.0.3.52010-04-21T15:08:44+02:00 - Seite 220
Page 250 of 376
Currently Unavailable See Operator’s Manual message will be displayed in the
multifunction display and DISTRONIC will be turned off.
Tires
GWarning
Do not drive with a flat tire. A flat tire affects the ability to steer or brake the vehicle. You may
lose control of the vehicle. Continued driving with a flat tire will cause excessive heat build-up
and possibly a fire.
GWarning
Follow recommended tire inflation pressures.
Do not underinflate tires. Underinflated tires wear excessively and/or unevenly, adversely affect
handling and fuel economy, and are more likely to fail from being overheated.
Do not overinflate tires. Overinflated tires can adversely affect handling and ride comfort, wear
unevenly, increase stopping distance, and result in sudden deflation (blowout) because they are
more likely to become punctured or damaged by road debris, potholes etc.
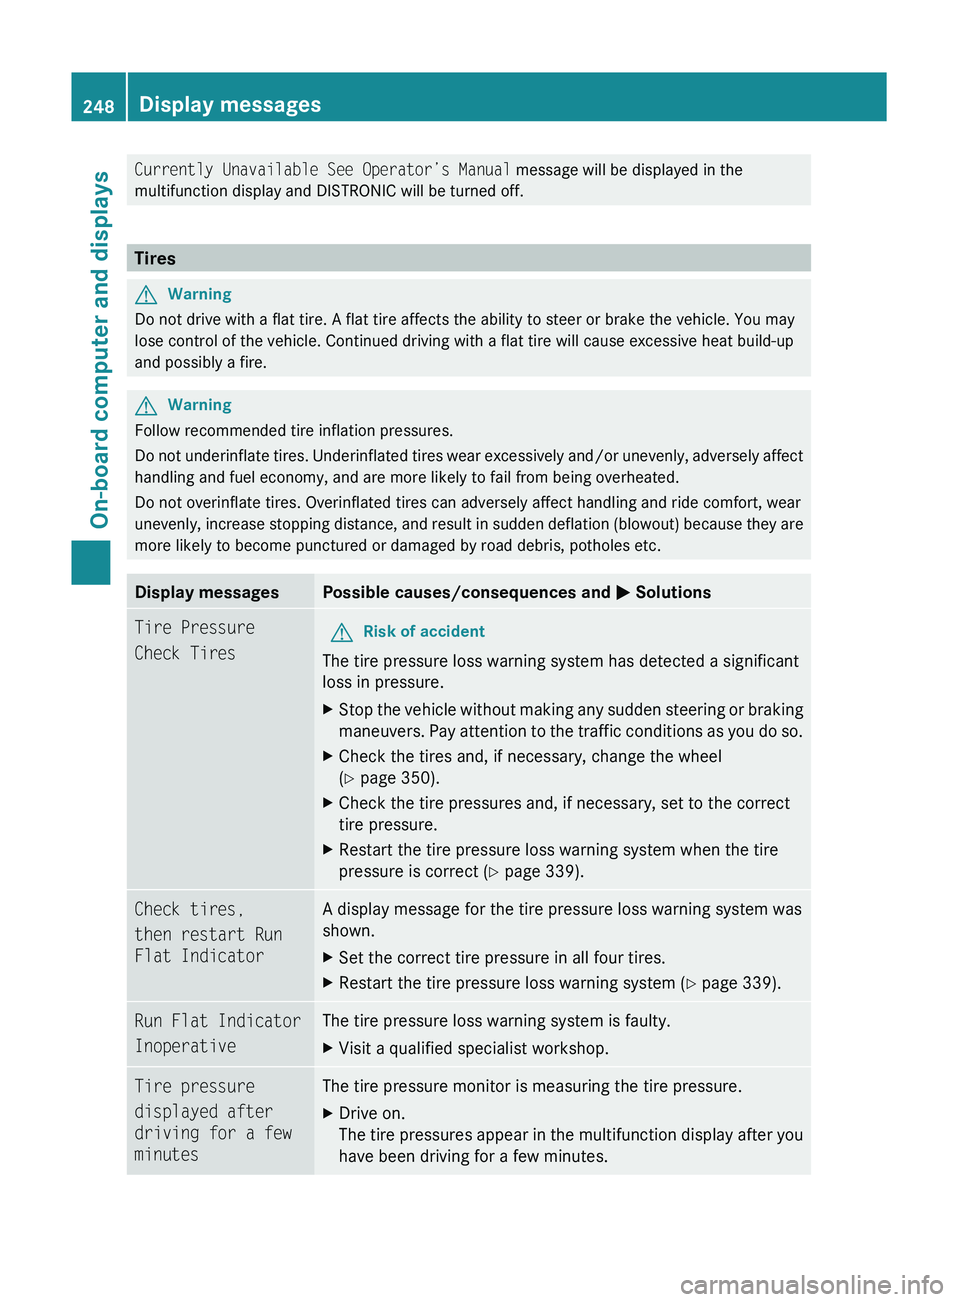
Display messagesPossible causes/consequences and M SolutionsTire Pressure
Check TiresGRisk of accident
The tire pressure loss warning system has detected a significant
loss in pressure.
XStop the vehicle without making any sudden steering or braking
maneuvers. Pay attention to the traffic conditions as you do so.XCheck the tires and, if necessary, change the wheel
( Y page 350).XCheck the tire pressures and, if necessary, set to the correct
tire pressure.XRestart the tire pressure loss warning system when the tire
pressure is correct ( Y page 339).Check tires,
then restart Run
Flat IndicatorA display message for the tire pressure loss warning system was
shown.XSet the correct tire pressure in all four tires.XRestart the tire pressure loss warning system ( Y page 339).Run Flat Indicator
InoperativeThe tire pressure loss warning system is faulty.XVisit a qualified specialist workshop.Tire pressure
displayed after
driving for a few
minutesThe tire pressure monitor is measuring the tire pressure.XDrive on.
The tire pressures appear in the multifunction display after you
have been driving for a few minutes.248Display messagesOn-board computer and displays
BA 164.8 USA, CA Edition B 2011; 1; 2, en-USd2sboikeVersion: 3.0.3.52010-04-21T15:08:44+02:00 - Seite 248
Page 251 of 376
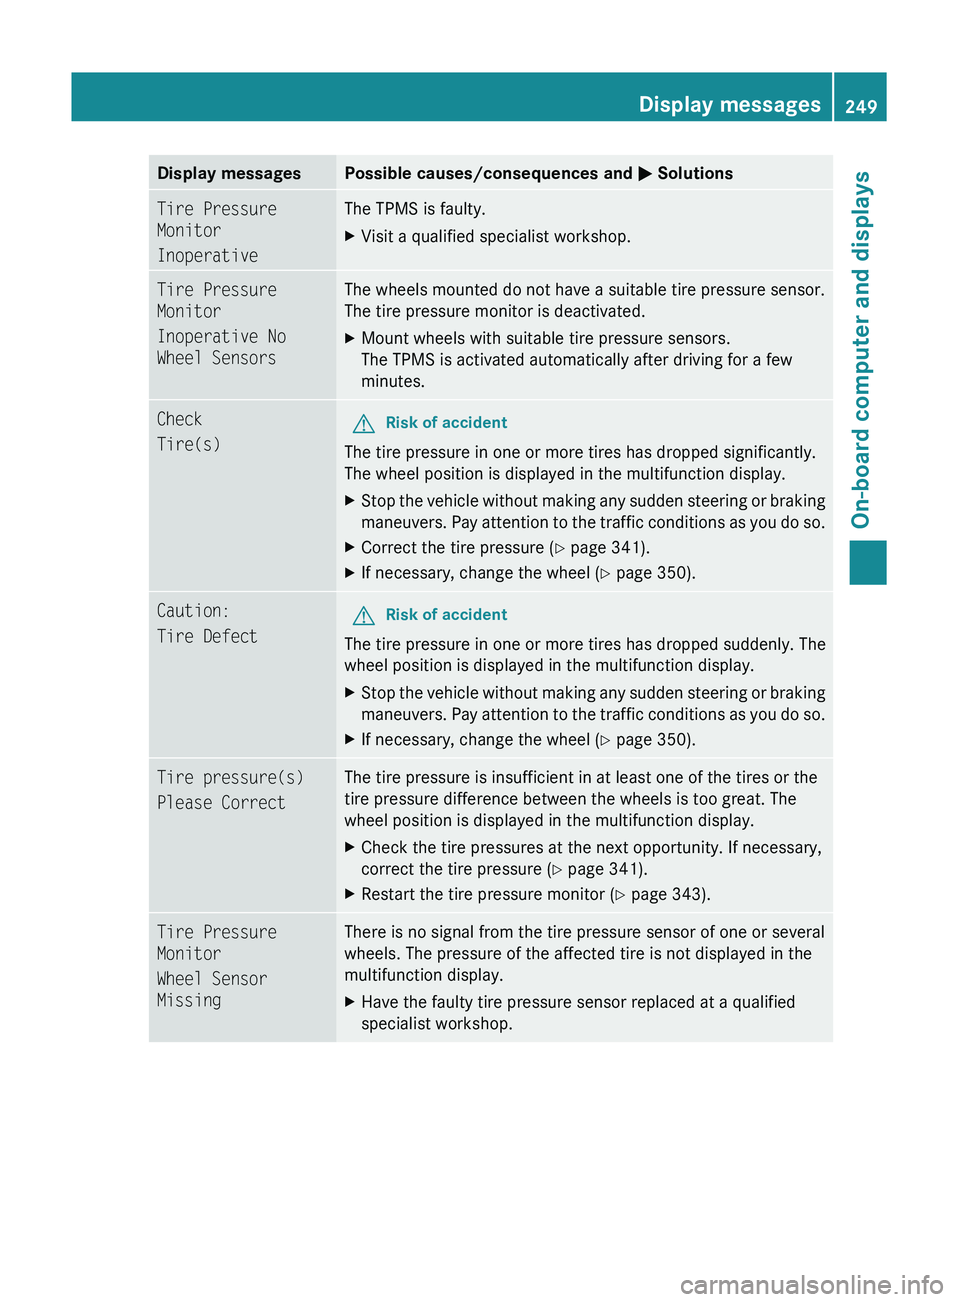
Display messagesPossible causes/consequences and M SolutionsTire Pressure
Monitor
InoperativeThe TPMS is faulty.XVisit a qualified specialist workshop.Tire Pressure
Monitor
Inoperative No
Wheel SensorsThe wheels mounted do not have a suitable tire pressure sensor.
The tire pressure monitor is deactivated.XMount wheels with suitable tire pressure sensors.
The TPMS is activated automatically after driving for a few
minutes.Check
Tire(s)GRisk of accident
The tire pressure in one or more tires has dropped significantly.
The wheel position is displayed in the multifunction display.
XStop the vehicle without making any sudden steering or braking
maneuvers. Pay attention to the traffic conditions as you do so.XCorrect the tire pressure ( Y page 341).XIf necessary, change the wheel ( Y page 350).Caution:
Tire DefectGRisk of accident
The tire pressure in one or more tires has dropped suddenly. The
wheel position is displayed in the multifunction display.
XStop the vehicle without making any sudden steering or braking
maneuvers. Pay attention to the traffic conditions as you do so.XIf necessary, change the wheel ( Y page 350).Tire pressure(s)
Please CorrectThe tire pressure is insufficient in at least one of the tires or the
tire pressure difference between the wheels is too great. The
wheel position is displayed in the multifunction display.XCheck the tire pressures at the next opportunity. If necessary,
correct the tire pressure ( Y page 341).XRestart the tire pressure monitor ( Y page 343).Tire Pressure
Monitor
Wheel Sensor
MissingThere is no signal from the tire pressure sensor of one or several
wheels. The pressure of the affected tire is not displayed in the
multifunction display.XHave the faulty tire pressure sensor replaced at a qualified
specialist workshop.Display messages249On-board computer and displaysBA 164.8 USA, CA Edition B 2011; 1; 2, en-USd2sboikeVersion: 3.0.3.52010-04-21T15:08:44+02:00 - Seite 249Z
Page 252 of 376
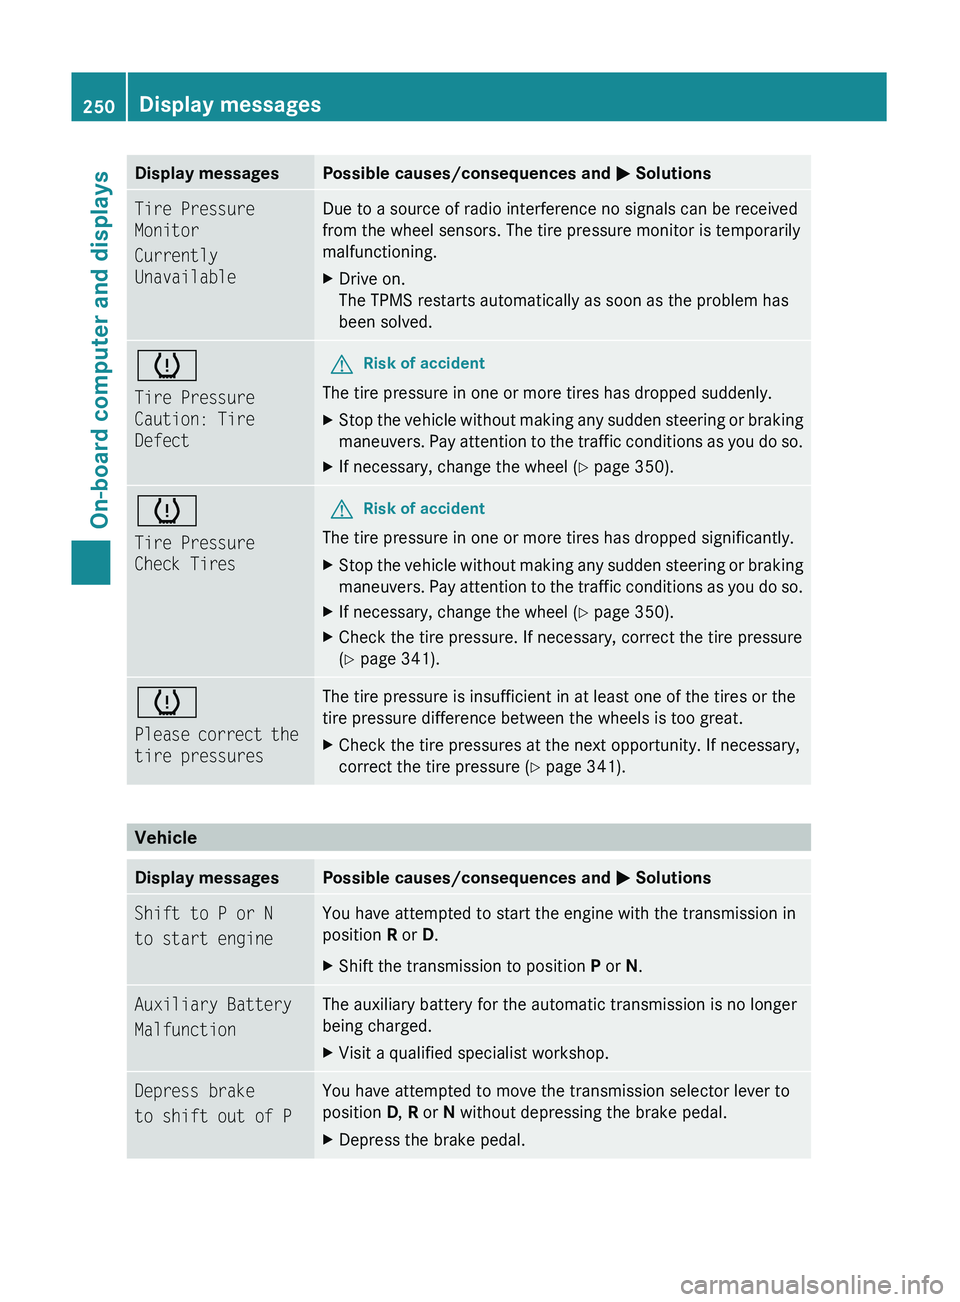
Display messagesPossible causes/consequences and M SolutionsTire Pressure
Monitor
Currently
UnavailableDue to a source of radio interference no signals can be received
from the wheel sensors. The tire pressure monitor is temporarily
malfunctioning.XDrive on.
The TPMS restarts automatically as soon as the problem has
been solved.h
Tire Pressure
Caution: Tire
DefectGRisk of accident
The tire pressure in one or more tires has dropped suddenly.
XStop the vehicle without making any sudden steering or braking
maneuvers. Pay attention to the traffic conditions as you do so.XIf necessary, change the wheel ( Y page 350).h
Tire Pressure
Check TiresGRisk of accident
The tire pressure in one or more tires has dropped significantly.
XStop the vehicle without making any sudden steering or braking
maneuvers. Pay attention to the traffic conditions as you do so.XIf necessary, change the wheel ( Y page 350).XCheck the tire pressure. If necessary, correct the tire pressure
( Y page 341).h
Please correct the
tire pressuresThe tire pressure is insufficient in at least one of the tires or the
tire pressure difference between the wheels is too great.XCheck the tire pressures at the next opportunity. If necessary,
correct the tire pressure ( Y page 341).
Vehicle
Display messagesPossible causes/consequences and M SolutionsShift to P or N
to start engineYou have attempted to start the engine with the transmission in
position R or D. XShift the transmission to position P or N.Auxiliary Battery
MalfunctionThe auxiliary battery for the automatic transmission is no longer
being charged.XVisit a qualified specialist workshop.Depress brake
to shift out of PYou have attempted to move the transmission selector lever to
position D, R or N without depressing the brake pedal.XDepress the brake pedal.250Display messagesOn-board computer and displays
BA 164.8 USA, CA Edition B 2011; 1; 2, en-USd2sboikeVersion: 3.0.3.52010-04-21T15:08:44+02:00 - Seite 250
Page 262 of 376
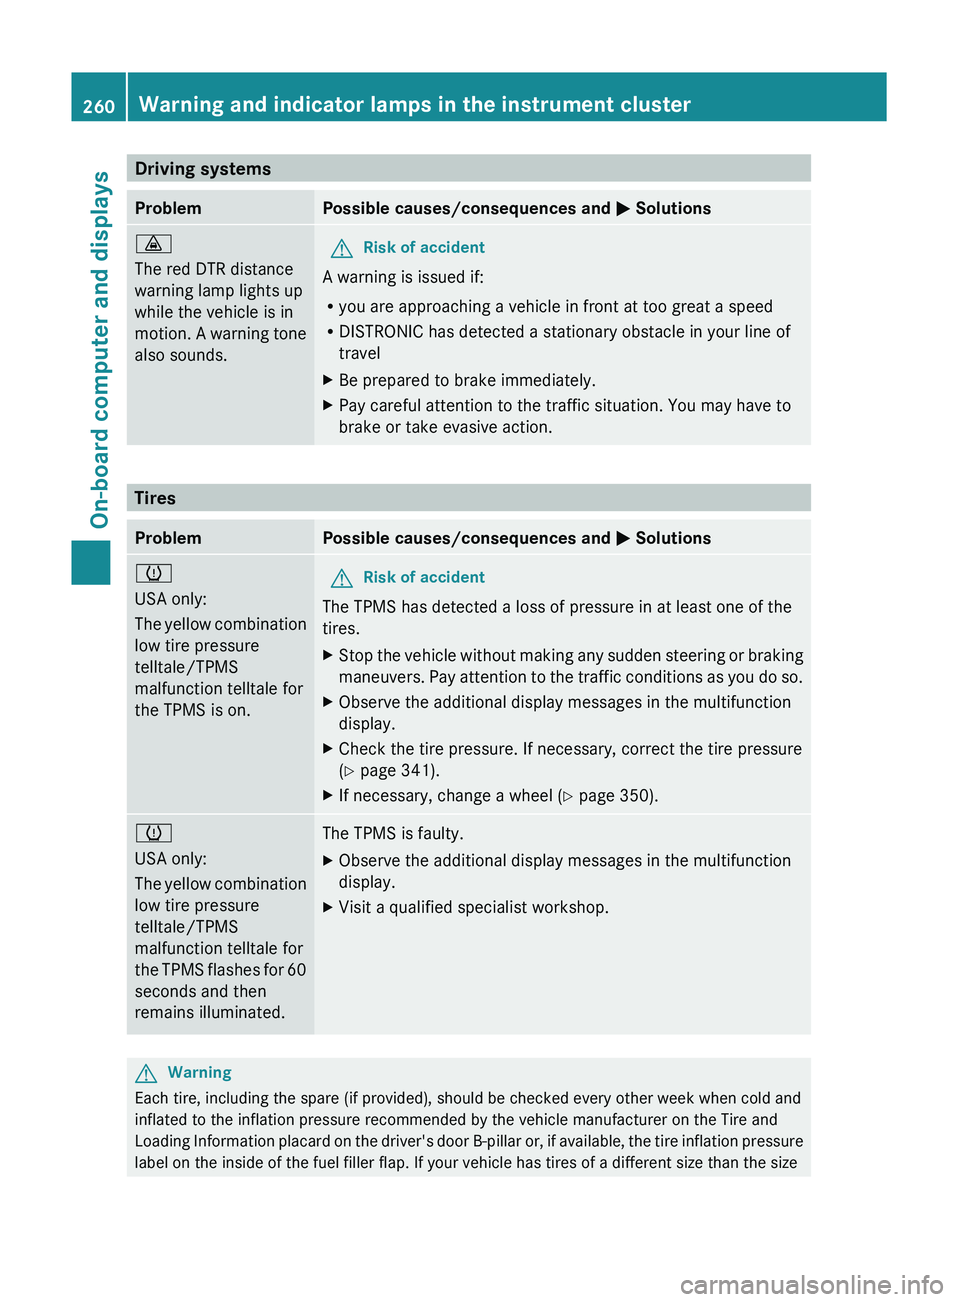
Driving systemsProblemPossible causes/consequences and M Solutions·
The red DTR distance
warning lamp lights up
while the vehicle is in
motion. A warning tone
also sounds.GRisk of accident
A warning is issued if:
R you are approaching a vehicle in front at too great a speed
R DISTRONIC has detected a stationary obstacle in your line of
travel
XBe prepared to brake immediately.XPay careful attention to the traffic situation. You may have to
brake or take evasive action.
Tires
ProblemPossible causes/consequences and M Solutionsh
USA only:
The yellow combination
low tire pressure
telltale/TPMS
malfunction telltale for
the TPMS is on.GRisk of accident
The TPMS has detected a loss of pressure in at least one of the
tires.
XStop the vehicle without making any sudden steering or braking
maneuvers. Pay attention to the traffic conditions as you do so.XObserve the additional display messages in the multifunction
display.XCheck the tire pressure. If necessary, correct the tire pressure
( Y page 341).XIf necessary, change a wheel ( Y page 350).h
USA only:
The yellow combination
low tire pressure
telltale/TPMS
malfunction telltale for
the TPMS flashes for 60
seconds and then
remains illuminated.The TPMS is faulty.XObserve the additional display messages in the multifunction
display.XVisit a qualified specialist workshop.GWarning
Each tire, including the spare (if provided), should be checked every other week when cold and
inflated to the inflation pressure recommended by the vehicle manufacturer on the Tire and
Loading Information placard on the driver's door B-pillar or, if available, the tire inflation pressure
label on the inside of the fuel filler flap. If your vehicle has tires of a different size than the size
260Warning and indicator lamps in the instrument clusterOn-board computer and displays
BA 164.8 USA, CA Edition B 2011; 1; 2, en-USd2sboikeVersion: 3.0.3.52010-04-21T15:08:44+02:00 - Seite 260
Page 306 of 376
Cleaning the plastic trimGWarning!
When cleaning the steering wheel boss and
dashboard, do not use cockpit sprays or
cleaning agents containing solvents. Cleaning
agents containing solvents cause the surface
to become porous, and as a result, plastic
parts may break away and be thrown around
the interior when an air bag is deployed, which
may result in severe injuries.
! Do not affix the following to plastic
surfaces:
R stickers
R films
R scented oil bottles or similar items
You can otherwise damage the plastic.
! Do not allow cosmetics, insect repellent
or sunscreen to come into contact with the
plastic trim. This maintains the high-quality
look of the surfaces.
XWipe the plastic trim with a damp, lint-free
cloth, e.g. a microfiber cloth.XHeavy soiling: use car care and cleaning
products recommended and approved by
Mercedes-Benz.
The surface may change color temporarily.
Wait until the surface is dry again.
Cleaning the steering wheel and gear or
selector lever
XWash thoroughly with a damp cloth or use
a leather care agent that has been
recommended and approved by Mercedes-
Benz.
Cleaning real wood and trim strips
XWipe the wooden trim and trim strips with
a damp, lint-free cloth, e.g. a microfiber
cloth.XHeavy soiling: use car care and cleaning
products recommended and approved by
Mercedes-Benz.! Do not use solvent-based cleaning agents
such as tar remover, wheel cleaners,
polishes or waxes. There is otherwise a risk
of damaging the surface.
! Do not use chrome polish for trim strips.
The trim strips have a chrome look but are
mostly made of anodized aluminum and
can lose their shine if chrome polish is
used. Use a damp, lint-free cloth instead
when cleaning the trim strips.
Chrome polish can be used to remove very
heavy soiling from trim strips which you are
sure are made of chrome. If you are unsure
as to whether a trim strip is chrome-plated
or not, consult an authorized Mercedes-
Benz Center.
Cleaning the seat covers
! Do not use microfiber cloths to clean
genuine leather, artificial leather or
Alcantara ®
covers. If used often, these can
damage the cover.
! Observe the following when cleaning:
R clean genuine leather covers carefully
with a damp cloth and then wipe the
covers down with a dry cloth. Make sure
that the leather does not become
soaked. It may otherwise become rough
and cracked. Only use leather care
agents that have been tested and
approved by Mercedes-Benz. You can
obtain these from a qualified specialist
workshop, e.g. an authorized Mercedes-
Benz Center.
R clean artificial leather covers with a cloth
moistened with a solution containing 1%
detergent (e.g. dish washing liquid).
R clean cloth covers with a microfiber cloth
moistened with a solution containing 1%
detergent (e.g. dish washing liquid). Rub
carefully and always wipe entire seat
sections to avoid leaving visible lines.
Leave the seat to dry afterwards.
304CareMaintenance and care
BA 164.8 USA, CA Edition B 2011; 1; 2, en-USd2sboikeVersion: 3.0.3.52010-04-21T15:08:44+02:00 - Seite 304
Page 312 of 376
Vehicle tool kit
Notes
The vehicle tool kit can be found in the
stowage well under the cargo compartment
floor.
i Vehicles without a spare wheel are not
equipped at the factory with the tools
needed to change a wheel, e.g. a jack or lug
wrench. Some tools for changing a wheel
are specific to the vehicle. To obtain tools
approved for your vehicle, visit a qualified
specialist workshop, e.g. an authorized
Mercedes-Benz Center.
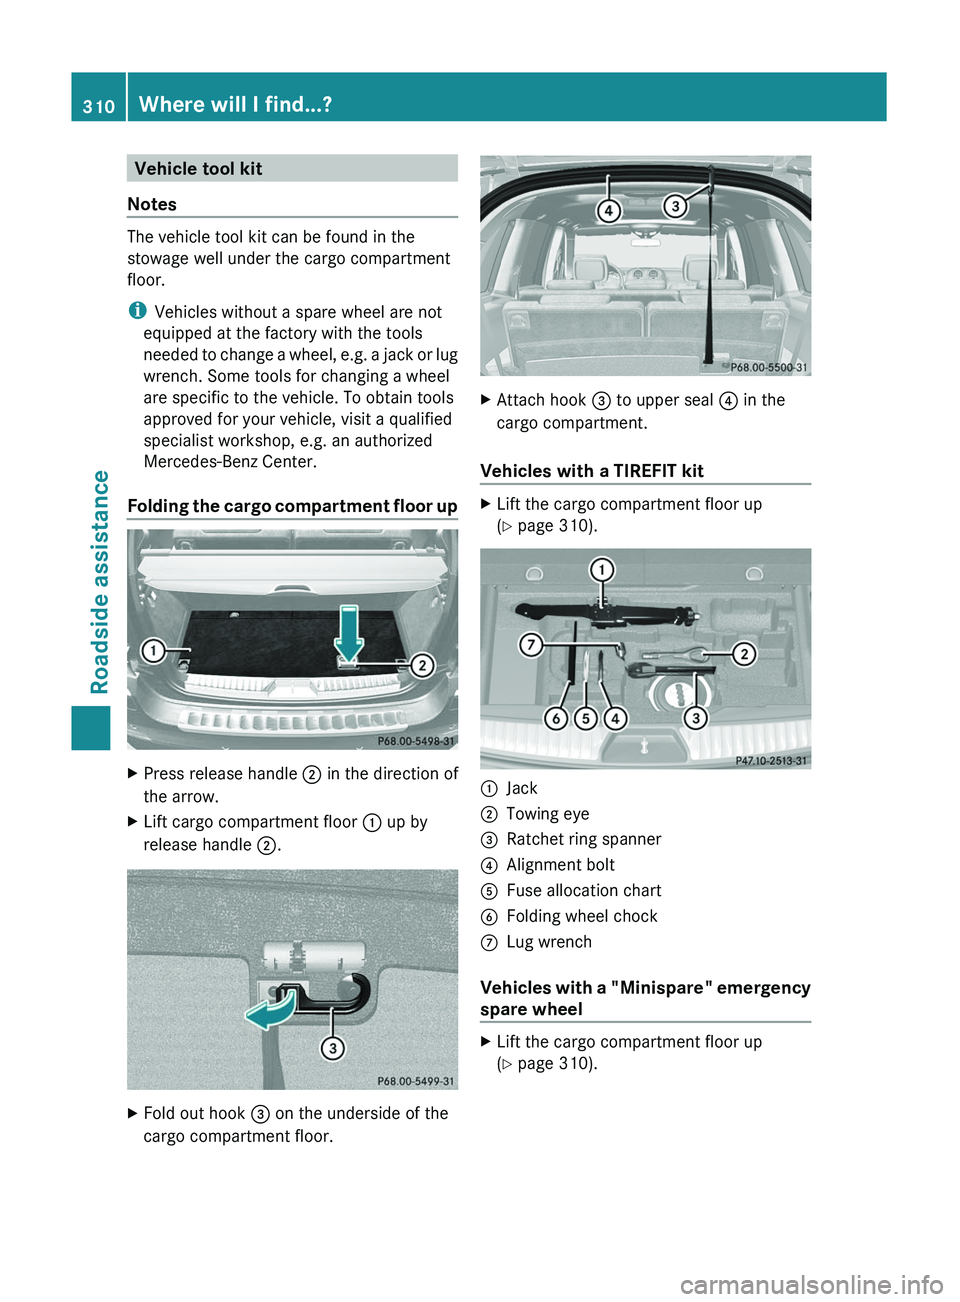
Folding the cargo compartment floor up
XPress release handle ; in the direction of
the arrow.XLift cargo compartment floor : up by
release handle ;.XFold out hook = on the underside of the
cargo compartment floor.XAttach hook = to upper seal ? in the
cargo compartment.
Vehicles with a TIREFIT kit
XLift the cargo compartment floor up
( Y page 310).:Jack;Towing eye=Ratchet ring spanner?Alignment boltAFuse allocation chartBFolding wheel chockCLug wrench
Vehicles with a "Minispare" emergency
spare wheel
XLift the cargo compartment floor up
( Y page 310).310Where will I find...?Roadside assistance
BA 164.8 USA, CA Edition B 2011; 1; 2, en-USd2sboikeVersion: 3.0.3.52010-04-21T15:08:44+02:00 - Seite 310
Page 314 of 376
XVehicles without KEYLESS-GO: remove
the key from the ignition lock.
XVehicles with KEYLESS-GO: open the
driver's door.
The on-board electronics have status 0,
which is the same as the key having been
removed.
XVehicles with KEYLESS-GO: remove the
Start/Stop button from the ignition lock
(Y page 147).
XAll occupants must get out of the vehicle.
Make sure that they are not endangered as
they get out of the vehicle.
XMake sure that no one is near the danger
area whilst a wheel is being changed.
Anyone who is not directly assisting in the
wheel change should, for example, stand
behind the barrier.
XGet out of the vehicle. Pay attention to
traffic conditions when doing so.
XClose the driver's door.
iOnly operate the electric air pump using
the socket in the footwell of the 2nd row of
seats (Y page 281), even if the ignition is
turned off.
An emergency cut-off ensures that the on-
board voltage does not drop too low. If the
on-board voltage is too low, power to the
sockets is automatically cut-off. This
ensures that there is sufficient power to
start the engine.
TIREFIT kit
Using the TIREFIT kit
You can use the TIREFIT kit to seal small
punctures, particularly those in the tire tread.
You can use TIREFIT at outside temperatures
down to -4 ‡ (-20 †).
GWarning
TIREFIT is a limited repair device. TIREFIT
cannot be used for cuts or punctures larger
than approximately 0.16 in (4 mm) and tire
damage caused by driving with extremely low
tire inflation pressure, or on a flat tire, or a
damaged wheel.
Do not drive the vehicle under such
circumstances.
Contact the nearest authorized Mercedes-
Benz Center for assistance or call roadside
assistance.
XDo not remove any foreign objects which
have penetrated the tire, e.g. screws or
nails.
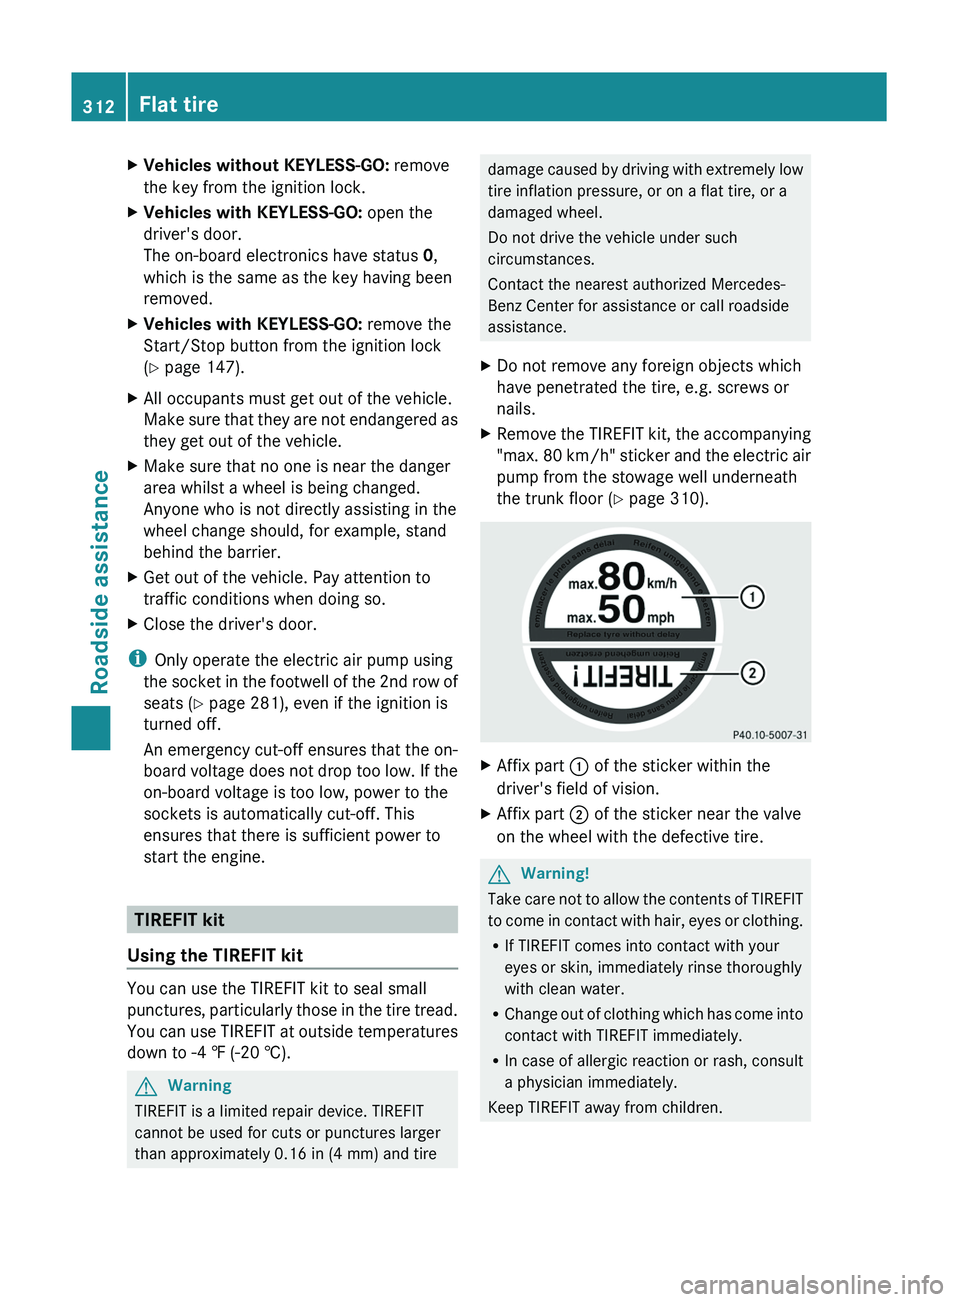
XRemove the TIREFIT kit, the accompanying
"max. 80 km/h" sticker and the electric air
pump from the stowage well underneath
the trunk floor (Y page 310).
XAffix part : of the sticker within the
driver's field of vision.
XAffix part ; of the sticker near the valve
on the wheel with the defective tire.
GWarning!
Take care not to allow the contents of TIREFIT
to come in contact with hair, eyes or clothing.
RIf TIREFIT comes into contact with your
eyes or skin, immediately rinse thoroughly
with clean water.
RChange out of clothing which has come into
contact with TIREFIT immediately.
RIn case of allergic reaction or rash, consult
a physician immediately.
Keep TIREFIT away from children.
312Flat tireRoadside assistance
BA 164.8 USA, CA Edition B 2011; 1; 2, en-USd2sboikeVersion: 3.0.3.52010-04-21T15:08:44+02:00 - Seite 312