2011 MERCEDES-BENZ GL automatic transmission
[x] Cancel search: automatic transmissionPage 159 of 376
Problems with the transmissionProblemPossible causes/consequences and M SolutionsThe acceleration ability
is deteriorating.
The transmission no
longer changes gear.The transmission is in emergency mode.
It is only possible to shift into 2nd gear and reverse gear.XStop the vehicle.XShift the transmission to position P.XSwitch off the engine.XWait at least 10 seconds before restarting the engine.XShift the transmission to position D or R.
If D is selected, the transmission shifts into 2nd gear; if R is
selected, the transmission shifts into reverse gear.XHave the transmission checked at a qualified specialist
workshop immediately.Transfer case
The vehicle has permanent 4-wheel drive
(4MATIC). Power is always transmitted to
both axles.
! Performance tests may only be carried
out on a 2-axle dynamometer. The brake
system or transfer case could otherwise be
damaged. Contact an authorized
Mercedes-Benz Center for a performance
test. Mercedes-Benz recommends that you
use an authorized Mercedes-Benz Center
for this purpose.
! If the parking brake is being tested on a
brake dynamometer, the ignition must be
switched off (SmartKey or Start/Stop
button in position 0 or 1), as ESP ®
will
otherwise automatically intervene. The test
must last a maximum of 10 seconds. The
brake system could otherwise be damaged.
LOW RANGE off-road gear
The LOW RANGE off-road gear is only
available in vehicles with the Off-Road Pro
Engineering package.
Use the LOW RANGE off-road gear:
R when driving off-road
R when fording
R when towing on uphill or downhill gradients
When LOW RANGE is engaged, the engine’s
performance characteristics and the
gearshifting characteristics of the automatic
transmission are adapted for this purpose. In
addition, ABS, ESP ®
and 4ETS specially
adapted to off-road driving will be activated.
Information about driving off-road
( Y page 173).
Information about driving safety systems in
connection with LOW RANGE ( Y page 65).Automatic transmission157Driving and parkingBA 164.8 USA, CA Edition B 2011; 1; 2, en-USd2sboikeVersion: 3.0.3.52010-04-21T15:08:44+02:00 - Seite 157Z
Page 160 of 376
Shift ranges
There are two shift ranges.HIGH
RANGEOn-road position for all
normal driving situations
(LOW RANGE off-road gear
off).LOW
RANGEIn comparison with the
HIGH RANGE on-road
position, the gear ratio
between the engine and
wheels is one-third. Drive
torque is thus
proportionately higher.GWarning!
Always wait until the procedure of shifting
from HIGH RANGE to LOW RANGE – and from
LOW RANGE to HIGH RANGE – has been
entirely completed. During this procedure do
not turn off the engine or shift the automatic
transmission into another gear.
If you do not wait until the shifting procedure
has been entirely completed then it might not
be correctly performed. The transfer case
might be in neutral, thus interrupting the
transfer of power between the engine and the
drive axle.
The vehicle is then freely movable, even if a
gear has been selected, and could
unintentionally be set into motion –
particularly on up – or downhill grades. This
could lead to an accident and cause injury to
yourself and others.
Please observe related messages appearing
in the multifunction display.
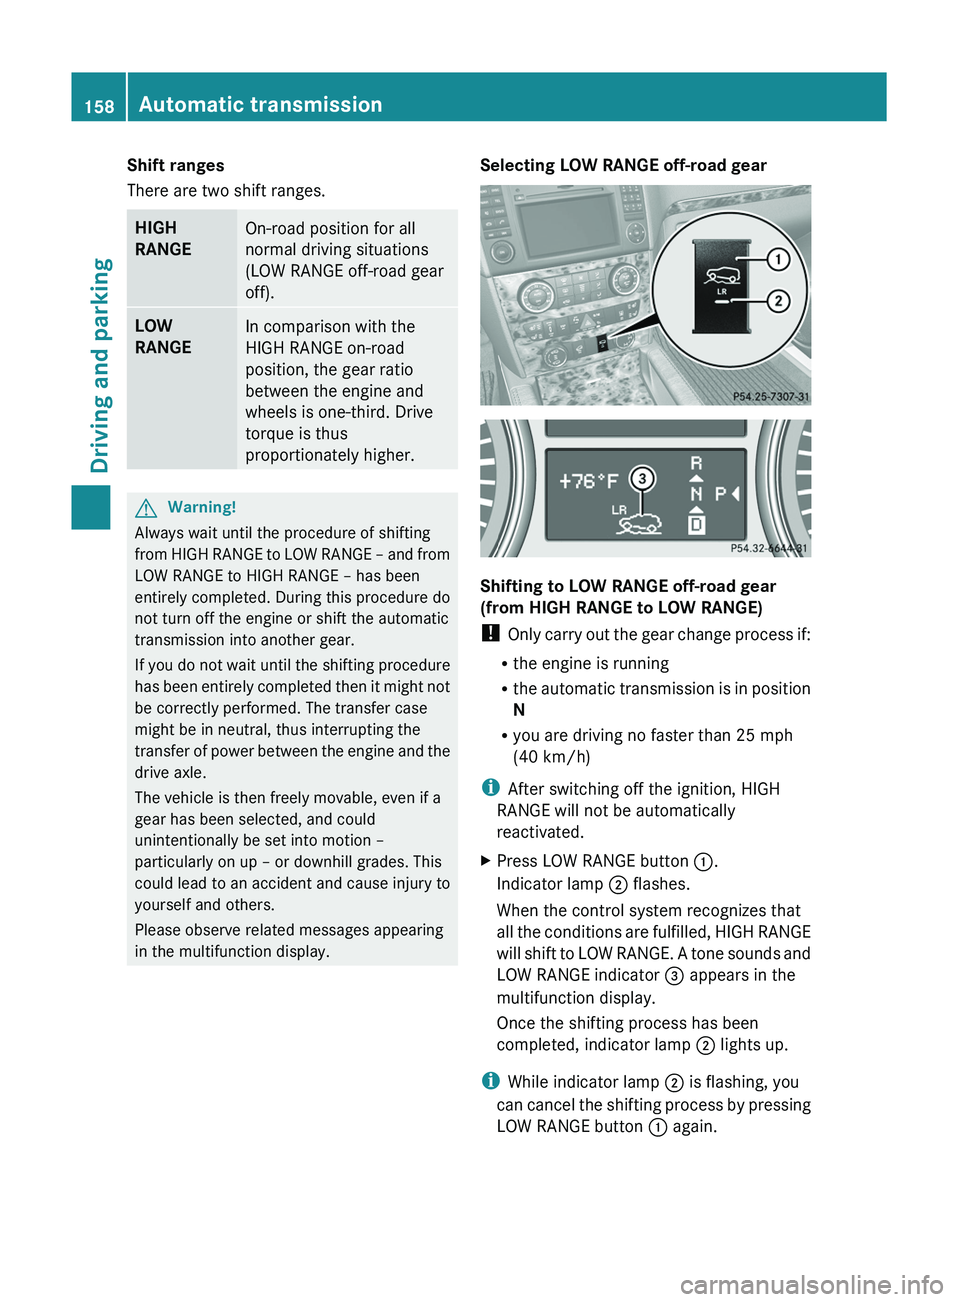
Selecting LOW RANGE off-road gear
Shifting to LOW RANGE off-road gear
(from HIGH RANGE to LOW RANGE)
! Only carry out the gear change process if:
R the engine is running
R the automatic transmission is in position
N
R you are driving no faster than 25 mph
(40 km/h)
i After switching off the ignition, HIGH
RANGE will not be automatically
reactivated.
XPress LOW RANGE button :.
Indicator lamp ; flashes.
When the control system recognizes that
all the conditions are fulfilled, HIGH RANGE
will shift to LOW RANGE. A tone sounds and
LOW RANGE indicator = appears in the
multifunction display.
Once the shifting process has been
completed, indicator lamp ; lights up.
i
While indicator lamp ; is flashing, you
can cancel the shifting process by pressing
LOW RANGE button : again.
158Automatic transmissionDriving and parking
BA 164.8 USA, CA Edition B 2011; 1; 2, en-USd2sboikeVersion: 3.0.3.52010-04-21T15:08:44+02:00 - Seite 158
Page 161 of 376
Shifting out of LOW RANGE off-road gear
(from LOW RANGE to HIGH RANGE)
! Only carry out the gear change process if:
R the engine is running
R the automatic transmission is in position
N
R you are driving no faster than 43 mph
(70 km/h)
i After switching off the ignition, HIGH
RANGE will not be automatically
reactivated.XPress LOW RANGE button :.
Indicator lamp ; flashes.
When the control system recognizes that
all the conditions are fulfilled, LOW RANGE
will shift to HIGH RANGE. A tone sounds
and indicator lamp ; and LOW RANGE
indicator = in the multifunction display go
out.
i While indicator lamp ; is flashing, you
can cancel the shifting process by pressing
LOW RANGE button : again.
For information about messages in the
multifunction display, see ( Y page 245).
Refueling
Important safety notes
GWarning!
Gasoline and diesel fuels are highly flammable
and poisonous. They burn violently and can
cause serious injury.
Never allow sparks, flames or smoking
materials near gasoline or diesel fuel!
Turn off the engine before refueling.
Whenever you are around gasoline or diesel
fuel, avoid inhaling fumes and any skin or
clothing contact. Extinguish all smoking
materials.
Direct skin contact with fuels and the
inhalation of fuel vapors are damaging your
health.
GWarning
Overfilling of the fuel tank may create
pressure in the system which could cause a
gas discharge. This could cause the gasoline
to spray back out when removing the fuel
pump nozzle, which could cause personal
injury.
GWarning!
Do not fill diesel tanks with gasoline. Do not
mix diesel fuel with gasoline. Otherwise the
fuel system and engine could be damaged. In
addition, the vehicle could catch fire.
! Do not use gasoline to refuel vehicles with
a diesel engine. Do not use diesel to refuel
vehicles with a gasoline engine. Even small
amounts of the wrong fuel result in damage
to the fuel system and engine.
! Do not start the engine if you accidentally
refuel with the wrong fuel. Otherwise, the
fuel could enter the fuel lines. This would
require draining of the fuel tank and fuel
lines. Notify a qualified specialist workshop
and have the fuel tank and fuel lines
drained completely.
Gasoline
Fuel grade
! You should only refuel with unleaded
premium-grade gasoline as this avoids
damaging the catalytic converter.
If engine running problems are apparent,
have the cause checked immediately and
repaired. Excess unburned fuel can
otherwise enter the catalytic converter,
leading to overheating and possibly
causing a fire.
i Only refuel with unleaded premium-grade
gasoline with a specified minimum octane
number of 91 (average value of 96 RON/
86 MON).
Usually you will find information about the
fuel grade on the pump. If you cannot find
Refueling159Driving and parkingBA 164.8 USA, CA Edition B 2011; 1; 2, en-USd2sboikeVersion: 3.0.3.52010-04-21T15:08:44+02:00 - Seite 159Z
Page 167 of 376
XInsert AdBlue®
cap : as shown and turn
it clockwise as far as it will go.XFold the load compartment floor down.XClose the tailgate.XDrive at a speed above 10 mph (16 km/h).
The Check Additive – See
Operator's Manual disappears after
approximately one minute.
i If the Check Additive – See
Operator's Manual is still displayed in
the multifunction display, top up with
another bottle of AdBlue ®
.
i Then, have the AdBlue ®
supply checked
and filled completely if necessary.
Mercedes-Benz recommends that you use
a qualified specialist workshop such as an
authorized Mercedes-Benz Center for this
purpose.
Parking
Important safety notes
GWarning!
Do not park this vehicle in areas where
combustible materials such as grass, hay or
leaves can come into contact with the hot
exhaust system. These materials could be
ignited and cause a vehicle fire.
Vehicle movement may result in serious
personal injury or damage to the vehicle or
vehicle drivetrain. Therefore, always do the
following before turning off the engine and
leaving the vehicle:
R Keep right foot on the brake pedal.
R Engage the parking brake.
R Shift the automatic transmission into park
position P.
R Slowly release the brake pedal.
R When parked on an incline, always turn the
front wheels towards the road curb.
R Turn the SmartKey in the starter switch to
position 0 and remove the SmartKey from
the starter switch, or press the KEYLESS-
GO start/stop button.
R Take the SmartKey with you and lock the
vehicle when leaving.
Switching off the engine
Important safety instructions
GWarning
Do not turn off the engine before the vehicle
has come to a complete stop. With the engine
not running, there is no power assistance for
the brake and steering systems. In this case,
it is important to keep in mind that a
considerably higher degree of effort is
necessary to brake and steer the vehicle.
i If you cannot turn off the engine as
described here, see "Emergency engine
shut down" ( Y page 331).
Vehicles with automatic transmission
GWarning!
Keep in mind that turning off the engine alone
only will shift the automatic transmission into
neutral position N automatically.
Always shift the automatic transmission into
park position P before turning off the engine.
Otherwise the vehicle could roll away which
could result in an accident and/or serious
personal injury.
XShift the transmission to position P.
Using the SmartKey
XTurn the SmartKey to position 0 in the
ignition lock and remove it.
The immobilizer is activated.XApply the parking brake firmly.
i If you turn off the engine with the
SmartKey and then remove it from the
ignition lock or open a front door, the
automatic transmission switches to P
automatically.
Parking165Driving and parkingBA 164.8 USA, CA Edition B 2011; 1; 2, en-USd2sboikeVersion: 3.0.3.52010-04-21T15:08:44+02:00 - Seite 165Z
Page 168 of 376
Using KEYLESS-GOXPress the Start/Stop button (Y page 147).
When the driver's door is closed, the Start/
Stop button is in position 1. When the
driver's door is opened, the Start/Stop
button moves to position 0. This
corresponds to removing the SmartKey.XApply the parking brake firmly.
i If you turn off the engine with the Start/
Stop button and open a front door, the
automatic transmission switches to P
automatically.
i The engine can be turned off while the
vehicle is in motion by pressing and holding
the Start/Stop button for three seconds.
If you have started the engine with the Start/
Stop button and it cannot be switched off as
described:
Xremove the Start/Stop button from the
ignition lock.Xinsert the SmartKey into the ignition lock.
The engine stops. The ignition lock is in
position 0.
Parking brake
GWarning
Engaging the parking brake while the vehicle
is in motion can cause the rear wheels to lock
up. You could lose control of the vehicle and
cause an accident. In addition, the vehicle's
brake lights do not light up when the parking
brake is engaged.
GWarning!
When leaving the vehicle, always remove the
SmartKey from the starter switch, take it with
you, and lock the vehicle. Do not leave
children unattended in the vehicle, or with
access to an unlocked vehicle. Children could
release the parking brake and/or shift the
automatic transmission out of park position
P , either of which could result in an accident
and/or serious personal injury.
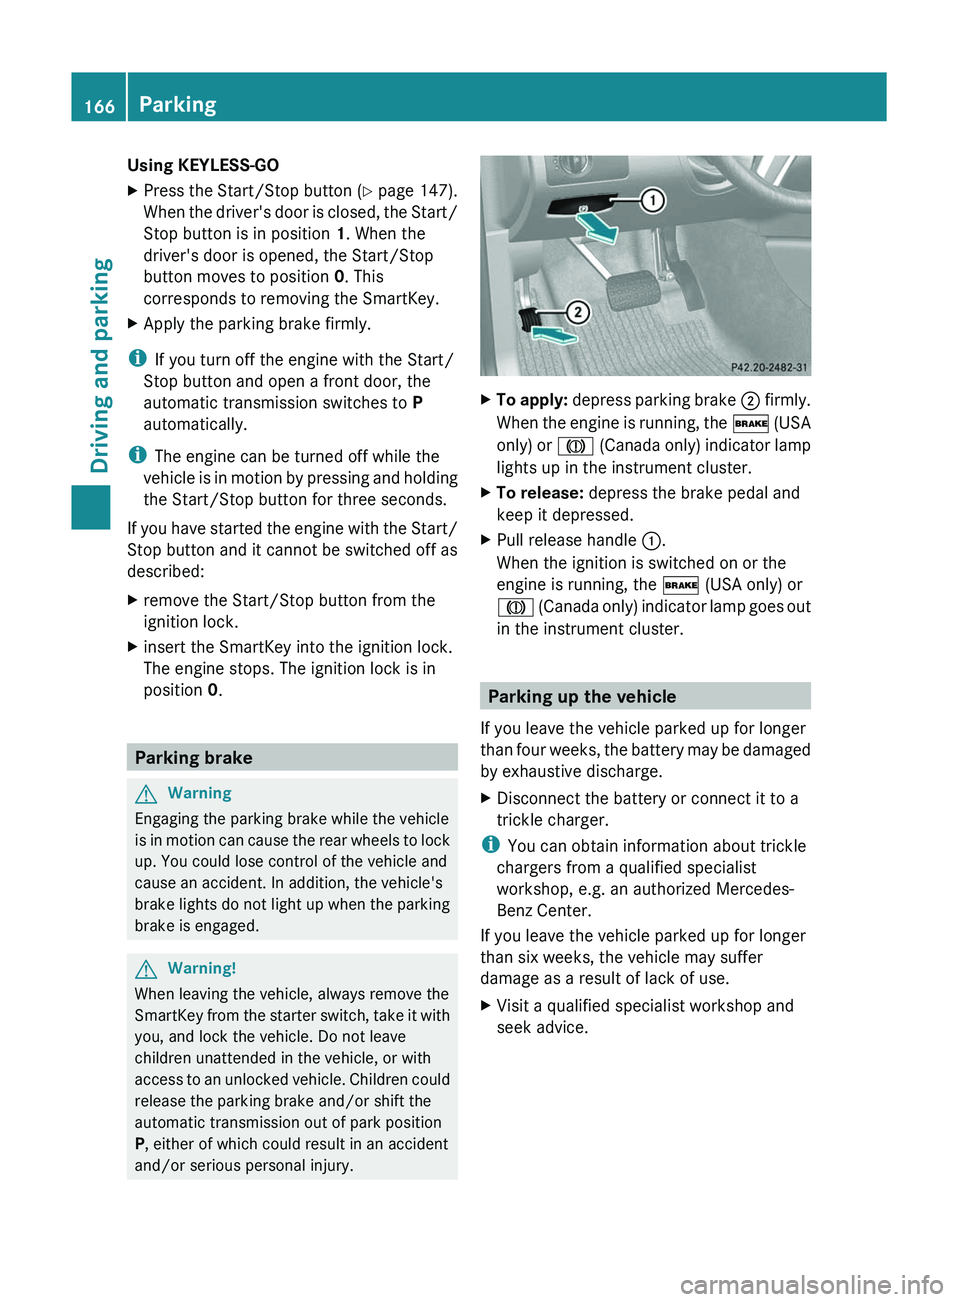
XTo apply: depress parking brake ; firmly.
When the engine is running, the $ (USA
only) or J (Canada only) indicator lamp
lights up in the instrument cluster.XTo release: depress the brake pedal and
keep it depressed.XPull release handle :.
When the ignition is switched on or the
engine is running, the $ (USA only) or
J (Canada only) indicator lamp goes out
in the instrument cluster.
Parking up the vehicle
If you leave the vehicle parked up for longer
than four weeks, the battery may be damaged
by exhaustive discharge.
XDisconnect the battery or connect it to a
trickle charger.
i You can obtain information about trickle
chargers from a qualified specialist
workshop, e.g. an authorized Mercedes-
Benz Center.
If you leave the vehicle parked up for longer
than six weeks, the vehicle may suffer
damage as a result of lack of use.
XVisit a qualified specialist workshop and
seek advice.166ParkingDriving and parking
BA 164.8 USA, CA Edition B 2011; 1; 2, en-USd2sboikeVersion: 3.0.3.52010-04-21T15:08:44+02:00 - Seite 166
Page 172 of 376
! As the ESP ®
system operates
automatically, the engine and the ignition
must be switched off (SmartKey in position
0 or 1 in the ignition lock or Start/Stop
button in position 0 or 1) while the parking
brake is being tested on a brake
dynamometer (maximum 10 seconds).
Braking maneuvers triggered automatically
by ESP ®
may seriously damage the brake
system.
If your brake system is only subjected to
moderate loads, you should regularly test
your brake system's function by forcefully
depressing the brake pedal when driving at
high speed. This also improves the brake
pads' friction.GWarning
Make sure that you do not endanger other
road users when you apply the brakes.
You can find a description of Brake Assist
(BAS) on ( Y page 66).
Parking brake
If you drive on wet roads or dirt-covered
surfaces, road salt and/or dirt could get into
the parking brake.
In order to prevent corrosion and a reduction
in the braking power of the parking brake,
observe the following:
R gently depress the parking brake from time
to time before beginning the journey.
R drive approximately 110 yd (100 m)
without exceeding a speed of 12 mph
(20 km/h).
GWarning!
While performing this procedure please
assure that the vehicle is stopped before
applying the parking brake. Otherwise the
rear wheels could lock up. You could lose
control of the vehicle and cause an accident.
In addition, the vehicle’s brake lights do not
light up when the parking brake is engaged.
Make sure not to endanger any other road
users when you engage the parking brake.
Driving on wet roads
Hydroplaning
If water has accumulated to a certain depth
on the road surface, there is a danger of
hydroplaning occurring, even if:
R you drive at low speeds
R the tires have adequate tread depth
For this reason, in the event of heavy rain or
in conditions in which hydroplaning can occur
you must drive in the following manner:
R Lower your speed
R Avoid ruts
R Brake carefully
Driving on flooded roads
! Do not drive through flooded areas.
Check the depth of any water before driving
through it. Drive slowly through standing
water. Otherwise, water may enter the
vehicle interior or the engine compartment.
This can damage the electronic
components in the engine or the automatic
transmission. Water can also be drawn in
by the engine's air suction nozzles and this
can cause engine damage.
i Set the raised vehicle level before driving
through standing water.
170Driving tipsDriving and parking
BA 164.8 USA, CA Edition B 2011; 1; 2, en-USd2sboikeVersion: 3.0.3.52010-04-21T15:08:44+02:00 - Seite 170
Page 176 of 376
GWarning!
Please be aware that by raising the vehicle
level, the center of gravity also rises.
Therefore, always ensure that the vehicle
level is as low as possible. With higher ride
height the ESP ®
may activate earlier in certain
situations.
GWarning!
Do not reduce the tire inflation pressure
before driving through sand. However, if you
do so, remember to correct the tire inflation
pressure before continuing your trip. Driving
with reduced tire inflation pressure increases
the risk of losing control of the vehicle and
rolling over.
General information
Read this section before driving your vehicle
off-road. Practice by traveling over more
gentle off-road terrain first.
Familiarize yourself with the characteristics
of your vehicle and the gear change process
before driving through difficult terrain.
The following driving systems are specially
adapted to off-road driving:
R off-road drive program (vehicles without
the Off-Road Pro engineering package)
( Y page 204)
R LOW RANGE off-road gear ( Y page 157)
R off-road ABS ( Y page 66)
R off-road 4ETS ( Y page 67)
R off-road ESP ®
(Y page 68)
R hill start assist
R differential locks ( Y page 207)
R DSR (Downhill Speed Regulation)
( Y page 203)
Observe the following notes:
R stop your vehicle and, if necessary, select
the off-road drive program (Y page 204) or
the LOW RANGE off-road gear
( Y page 157) before driving off-road.
R select a vehicle level that is suitable for the
terrain. Make sure there is always sufficient
ground clearance to prevent damage to the
vehicle.
R activate the differential lock if necessary.
R make sure that items of luggage and cargo
are stowed safely and are well secured
( Y page 268).
R always keep the engine running and in gear
when driving on a downhill gradient.
Activate DSR ( Y page 203).
R always keep the doors, tailgate, windows
and the tilt/sliding sunroof closed while the
vehicle is in motion.
R adapt the speed to suit the terrain
conditions. The more uneven, worn or
steeper the terrain is, the slower you should
drive.
R drive slowly and at an even speed through
the water. Ensure that a bow wave does not
form as you drive.
R drive with extreme care on unfamiliar off-
road routes where visibility is poor. For
safety reasons, get out of the vehicle first
and survey the off-road route.
R look out for obstacles, such as rocks, holes,
tree stumps and furrows.
R check the depth of water before fording
rivers and streams.
R do not stop in water and do not switch the
engine off.
R drive quickly on sand to overcome the
rolling resistance. Otherwise, the vehicle
could dig itself into the sand.
R do not jump with the vehicle. This
interrupts the vehicle's traction.
R always keep the engine running and in gear
when driving on slopes.
R do not shift the automatic transmission to
transmission position N.174Driving tipsDriving and parking
BA 164.8 USA, CA Edition B 2011; 1; 2, en-USd2sboikeVersion: 3.0.3.52010-04-21T15:08:44+02:00 - Seite 174
Page 183 of 376
Deactivating cruise control
There are several ways to deactivate cruise
control:
XBriefly press the cruise control lever
forwards =.
or
XBrake.
Cruise control is automatically deactivated if:
R you depress the parking brake.
R you are driving below 20 mph (30 km/h).
R ESP ®
intervenes or you deactivate ESP ®
.
R you shift the transmission to position N
while driving.
If cruise control is deactivated, you will hear
a warning tone. You will see the Cruise
control Off message in the multifunction
display for approximately five seconds.
i The last speed stored is cleared when you
switch off the engine.
DISTRONIC
Important safety notes
DISTRONIC regulates the speed and
automatically helps you maintain the
distance to the vehicle detected in front. It
brakes automatically in order to avoid
exceeding the set speed.
On long and steep downhill gradients,
especially if the vehicle is laden or towing a
trailer, you must select shift range 1, 2 or 3
in good time. By doing so, you will make use
of the braking effect of the engine, which
relieves the load on the brake system and
prevents the brakes from overheating and
wearing too quickly.
If a slower-moving vehicle is detected in front,
DISTRONIC causes your vehicle to brake and
maintain the preset distance to the vehicle in
front.
GWarning!
The Distronic requires familiarity with its
operational characteristics. We strongly
recommend that you review the following
information carefully before operating the
system.
GWarning
When DISTRONIC brakes, the brake pedal is
pulled back (i.e. operated automatically). The
area around the pedal must not be blocked by
obstacles:
R do not place any objects in the footwell.
R ensure that floormats and carpets are fixed
securely. In particular, do not place several
floormats on top of one another.
R do not place your foot under the brake
pedal, as it could become trapped.
Non-compliance could lead you to cause an
accident in which you and/or others could be
seriously injured.
GWarning!
The Distronic is a convenience system. Its
speed adjustment reduction capability is
intended to make cruise control more
effective and usable when traffic speeds vary.
It is not however, intended to, nor does it,
replace the need for extreme care.
The responsibility for the vehicle’s speed,
distance to the preceding vehicle and, most
importantly, brake operation to ensure a safe
stopping distance, always remains with the
driver.
The Distronic cannot take street and traffic
conditions into account. Complex driving
situations are not always fully recognized by
the Distronic. This could result in wrong or
missing distance warnings.
If there is no vehicle in front, DISTRONIC
operates in the same way as cruise control in
the speed range between 20 mph
( 30 km/h) and 120 mph (200 km/h). If there
is a vehicle in front, DISTRONIC operates in
Driving systems181Driving and parkingBA 164.8 USA, CA Edition B 2011; 1; 2, en-USd2sboikeVersion: 3.0.3.52010-04-21T15:08:44+02:00 - Seite 181Z