2011 MERCEDES-BENZ GL automatic transmission
[x] Cancel search: automatic transmissionPage 189 of 376
After approximately five seconds, current
saved speed ; is displayed in the status
indicator in the multifunction display:
R USA only: DTR XXX Miles
R Canada only: DTR XXX km/h
Deactivating DISTRONIC
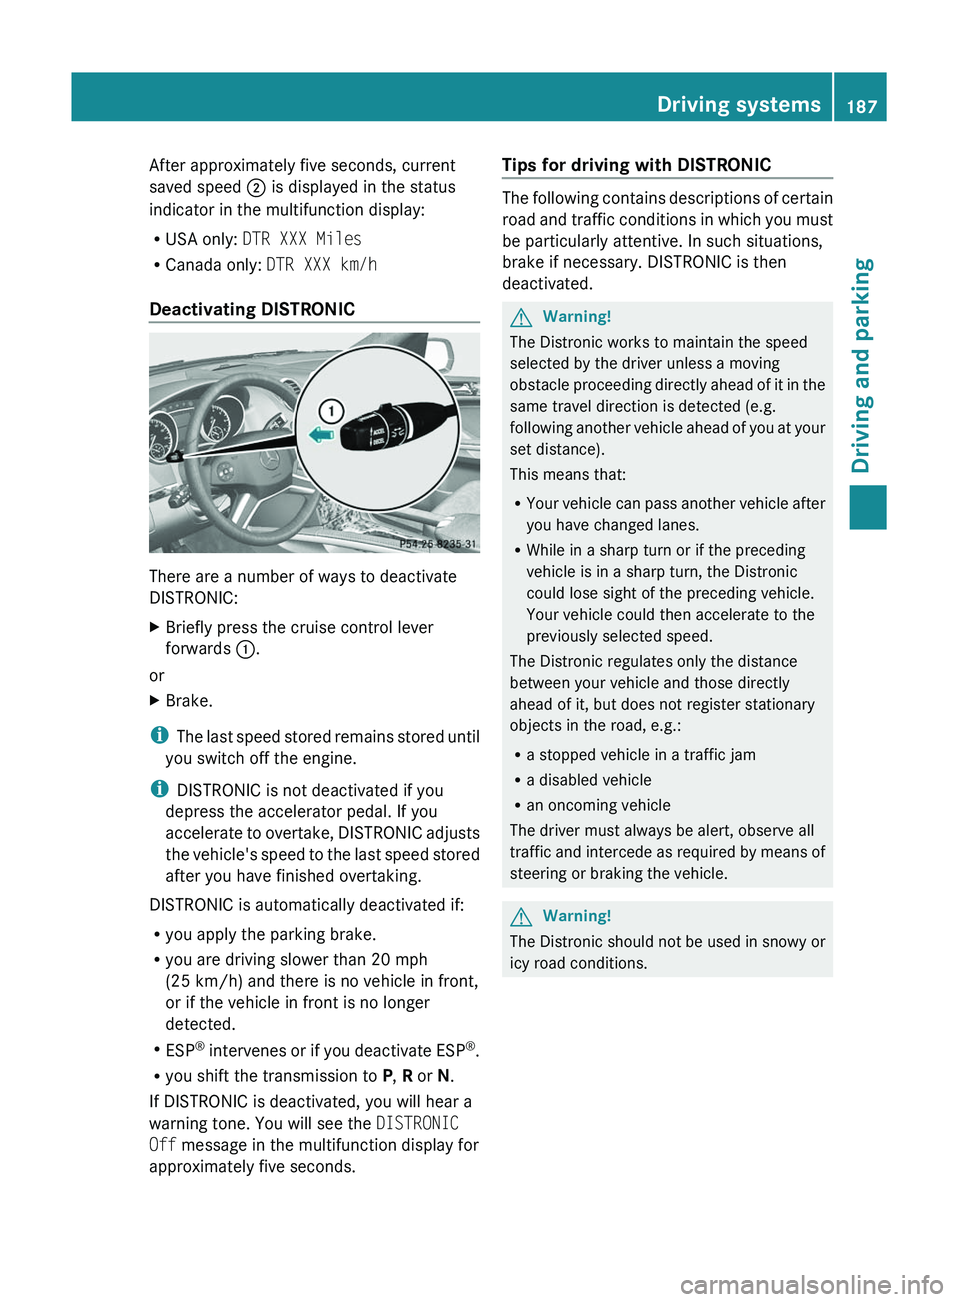
There are a number of ways to deactivate
DISTRONIC:
XBriefly press the cruise control lever
forwards :.
or
XBrake.
i
The last speed stored remains stored until
you switch off the engine.
i DISTRONIC is not deactivated if you
depress the accelerator pedal. If you
accelerate to overtake, DISTRONIC adjusts
the vehicle's speed to the last speed stored
after you have finished overtaking.
DISTRONIC is automatically deactivated if:
R you apply the parking brake.
R you are driving slower than 20 mph
(25 km/h) and there is no vehicle in front,
or if the vehicle in front is no longer
detected.
R ESP ®
intervenes or if you deactivate ESP ®
.
R you shift the transmission to P, R or N.
If DISTRONIC is deactivated, you will hear a
warning tone. You will see the DISTRONIC
Off message in the multifunction display for
approximately five seconds.
Tips for driving with DISTRONIC
The following contains descriptions of certain
road and traffic conditions in which you must
be particularly attentive. In such situations,
brake if necessary. DISTRONIC is then
deactivated.
GWarning!
The Distronic works to maintain the speed
selected by the driver unless a moving
obstacle proceeding directly ahead of it in the
same travel direction is detected (e.g.
following another vehicle ahead of you at your
set distance).
This means that:
R Your vehicle can pass another vehicle after
you have changed lanes.
R While in a sharp turn or if the preceding
vehicle is in a sharp turn, the Distronic
could lose sight of the preceding vehicle.
Your vehicle could then accelerate to the
previously selected speed.
The Distronic regulates only the distance
between your vehicle and those directly
ahead of it, but does not register stationary
objects in the road, e.g.:
R a stopped vehicle in a traffic jam
R a disabled vehicle
R an oncoming vehicle
The driver must always be alert, observe all
traffic and intercede as required by means of
steering or braking the vehicle.
GWarning!
The Distronic should not be used in snowy or
icy road conditions.
Driving systems187Driving and parkingBA 164.8 USA, CA Edition B 2011; 1; 2, en-USd2sboikeVersion: 3.0.3.52010-04-21T15:08:44+02:00 - Seite 187Z
Page 197 of 376
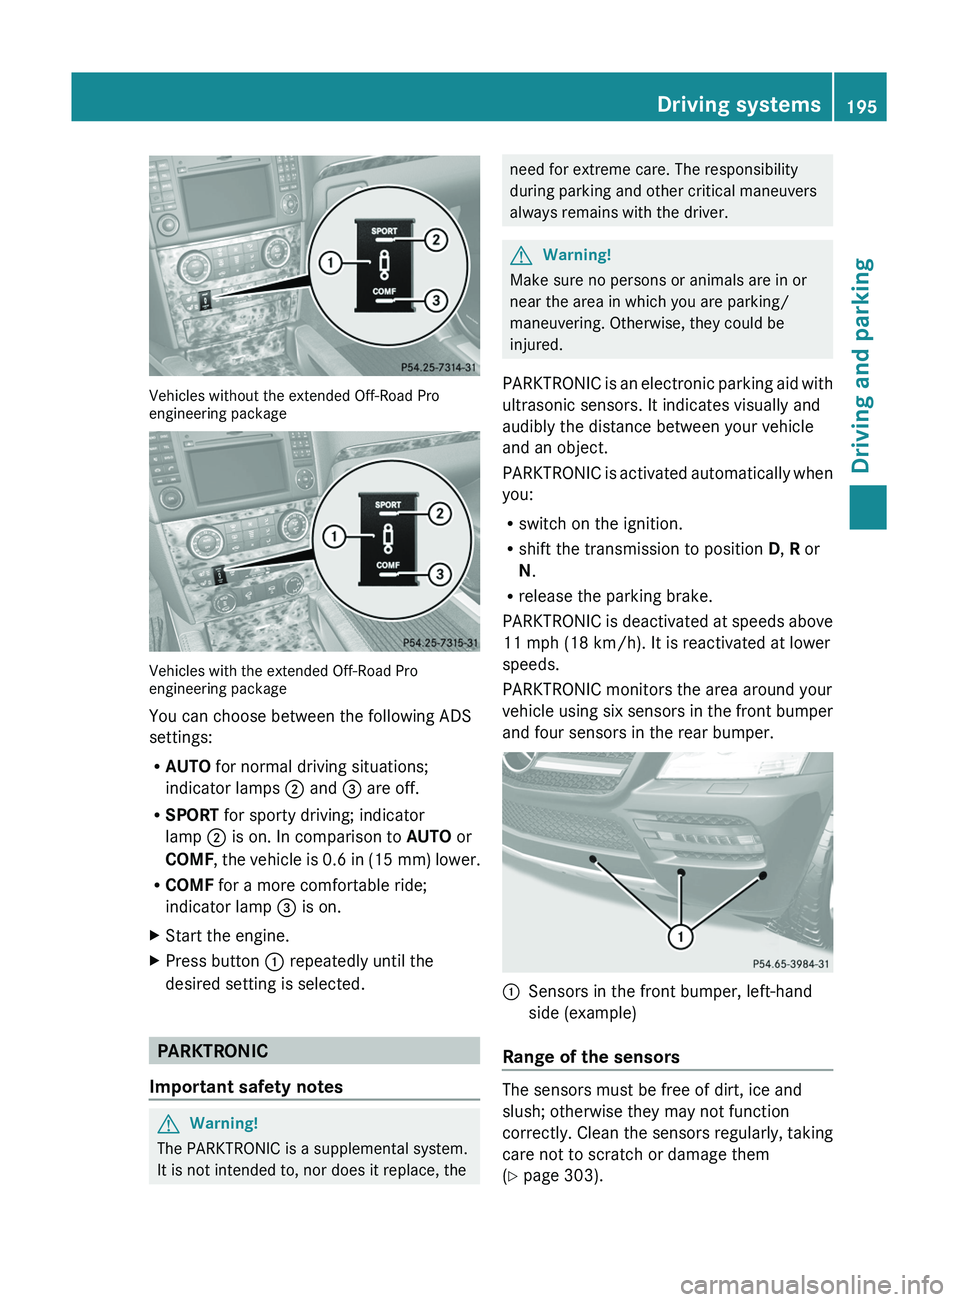
Vehicles without the extended Off-Road Pro
engineering package
Vehicles with the extended Off-Road Pro
engineering package
You can choose between the following ADS
settings:
R AUTO for normal driving situations;
indicator lamps ; and = are off.
R SPORT for sporty driving; indicator
lamp ; is on. In comparison to AUTO or
COMF , the vehicle is 0.6 in (15 mm) lower.
R COMF for a more comfortable ride;
indicator lamp = is on.
XStart the engine.XPress button : repeatedly until the
desired setting is selected.
PARKTRONIC
Important safety notes
GWarning!
The PARKTRONIC is a supplemental system.
It is not intended to, nor does it replace, the
need for extreme care. The responsibility
during parking and other critical maneuvers
always remains with the driver.GWarning!
Make sure no persons or animals are in or
near the area in which you are parking/
maneuvering. Otherwise, they could be
injured.
PARKTRONIC is an electronic parking aid with
ultrasonic sensors. It indicates visually and
audibly the distance between your vehicle
and an object.
PARKTRONIC is activated automatically when
you:
R switch on the ignition.
R shift the transmission to position D, R or
N .
R release the parking brake.
PARKTRONIC is deactivated at speeds above
11 mph (18 km/h). It is reactivated at lower
speeds.
PARKTRONIC monitors the area around your
vehicle using six sensors in the front bumper
and four sensors in the rear bumper.
:Sensors in the front bumper, left-hand
side (example)
Range of the sensors
The sensors must be free of dirt, ice and
slush; otherwise they may not function
correctly. Clean the sensors regularly, taking
care not to scratch or damage them
( Y page 303).
Driving systems195Driving and parkingBA 164.8 USA, CA Edition B 2011; 1; 2, en-USd2sboikeVersion: 3.0.3.52010-04-21T15:08:44+02:00 - Seite 195Z
Page 198 of 376
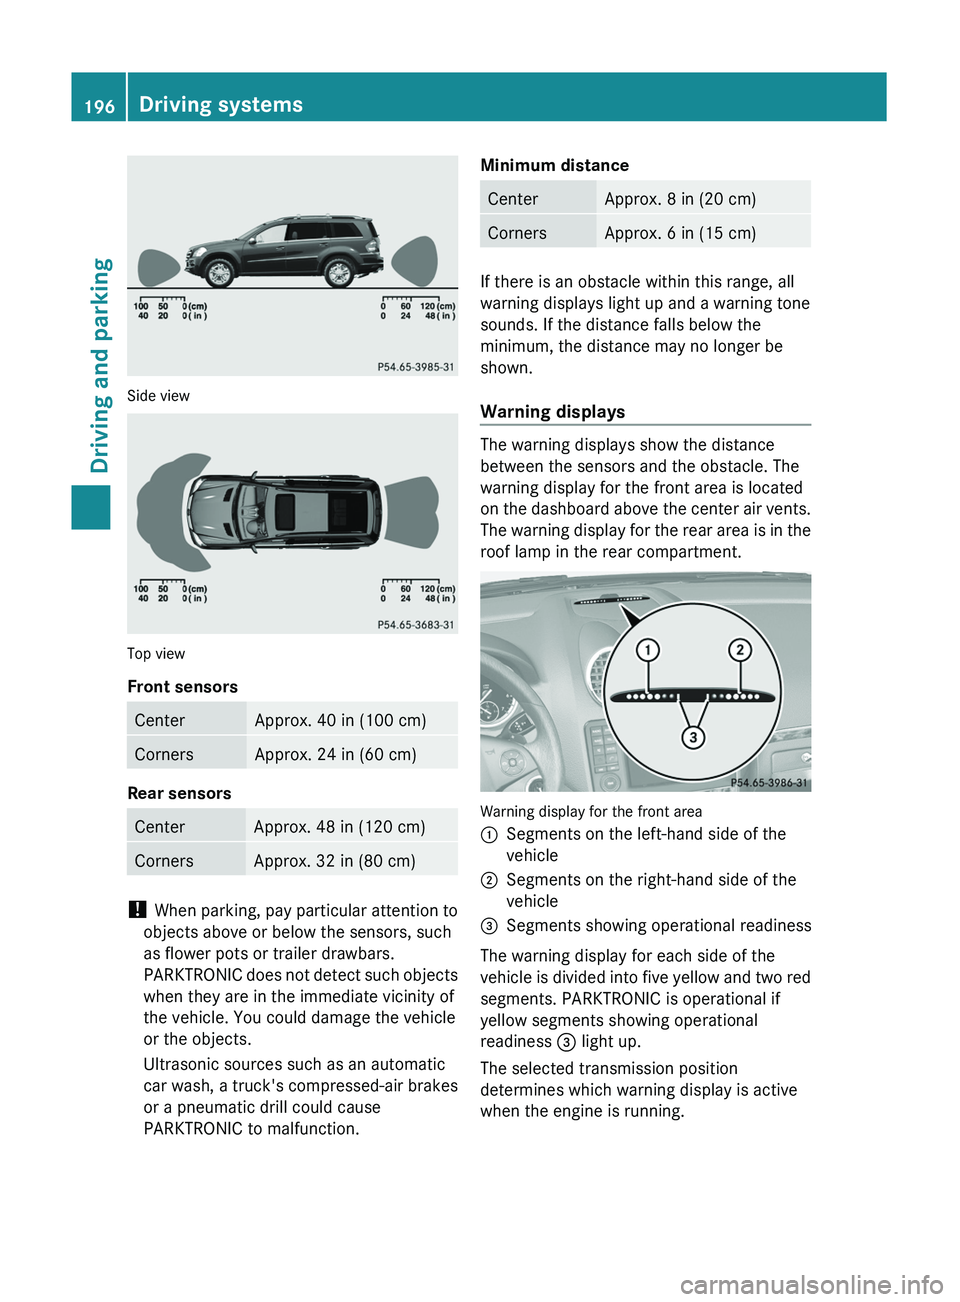
Side view
Top view
Front sensors
CenterApprox. 40 in (100 cm)CornersApprox. 24 in (60 cm)
Rear sensors
CenterApprox. 48 in (120 cm)CornersApprox. 32 in (80 cm)
! When parking, pay particular attention to
objects above or below the sensors, such
as flower pots or trailer drawbars.
PARKTRONIC does not detect such objects
when they are in the immediate vicinity of
the vehicle. You could damage the vehicle
or the objects.
Ultrasonic sources such as an automatic
car wash, a truck's compressed-air brakes
or a pneumatic drill could cause
PARKTRONIC to malfunction.
Minimum distanceCenterApprox. 8 in (20 cm)CornersApprox. 6 in (15 cm)
If there is an obstacle within this range, all
warning displays light up and a warning tone
sounds. If the distance falls below the
minimum, the distance may no longer be
shown.
Warning displays
The warning displays show the distance
between the sensors and the obstacle. The
warning display for the front area is located
on the dashboard above the center air vents.
The warning display for the rear area is in the
roof lamp in the rear compartment.
Warning display for the front area
:Segments on the left-hand side of the
vehicle;Segments on the right-hand side of the
vehicle=Segments showing operational readiness
The warning display for each side of the
vehicle is divided into five yellow and two red
segments. PARKTRONIC is operational if
yellow segments showing operational
readiness = light up.
The selected transmission position
determines which warning display is active
when the engine is running.
196Driving systemsDriving and parking
BA 164.8 USA, CA Edition B 2011; 1; 2, en-USd2sboikeVersion: 3.0.3.52010-04-21T15:08:44+02:00 - Seite 196
Page 205 of 376
dynamometer, please consult an
authorized Mercedes-Benz Center
beforehand. You could otherwise damage
the drive train or the brake system.
Information on "Off-road driving"; see
( Y page 173).
DSR (Downhill Speed Regulation)
Important safety guidelines
DSR is an aid to assist you when driving
downhill. It keeps the speed of travel at the
speed selected on the on-board computer.
The steeper the downhill gradient, the greater
the DSR braking effect on the vehicle. When
driving on flat stretches of road or on an uphill
gradient, the DSR braking effect is minimal or
non-existent.
The speed is set to 4 mph (6 km/h) at the
factory; you can adjust this in the on-board
computer ( Y page 226).
GWarning!
Downhill Speed Regulation (DSR) is a
convenience system designed to assist the
driver during vehicle operation. The system
setting must be appropriate to the
topographical and weather conditions
encountered, which can change quickly. The
driver is responsible for the vehicle speed and
for safe brake operation at all times.
Depending on the programmed speed, actual
vehicle speed and gradient, switching on DSR
while driving can cause the vehicle to slow
down rapidly, and you may hear a sound,
caused by the activation of the vehicle's brake
system through DSR. Sudden and unexpected
deceleration can result in loss of vehicle
control, causing an accident and/or serious
personal injury to you and others. Do not
switch on DSR in a situation where rapid
deceleration could result in a loss of vehicle
control.
DSR controls the set speed when it is active
and the automatic transmission is in the D,
R or N position. You can drive at a higher or
a lower speed than that set on the on-board
computer at any time by accelerating or
braking.GWarning!
If you depress the accelerator pedal with DSR
activated, the vehicle can drive faster than the
programmed set speed. You should therefore
drive downhill with particular caution as it
could lead to an accident and/or serious
injury to you or others. Keep in mind that as
soon as you remove your foot from the
accelerator pedal with DSR switched on, DSR
will start regulating the vehicle's speed
including use of brakes if required. Depending
on the programmed set speed, actual vehicle
speed and gradient, DSR can cause the
vehicle to slow down rapidly. Sudden and
unexpected deceleration can result in loss of
vehicle control, causing an accident and/or
serious personal injury to you and others.
Information on "Off-road driving"; see
( Y page 173).
Activating/deactivating DSR
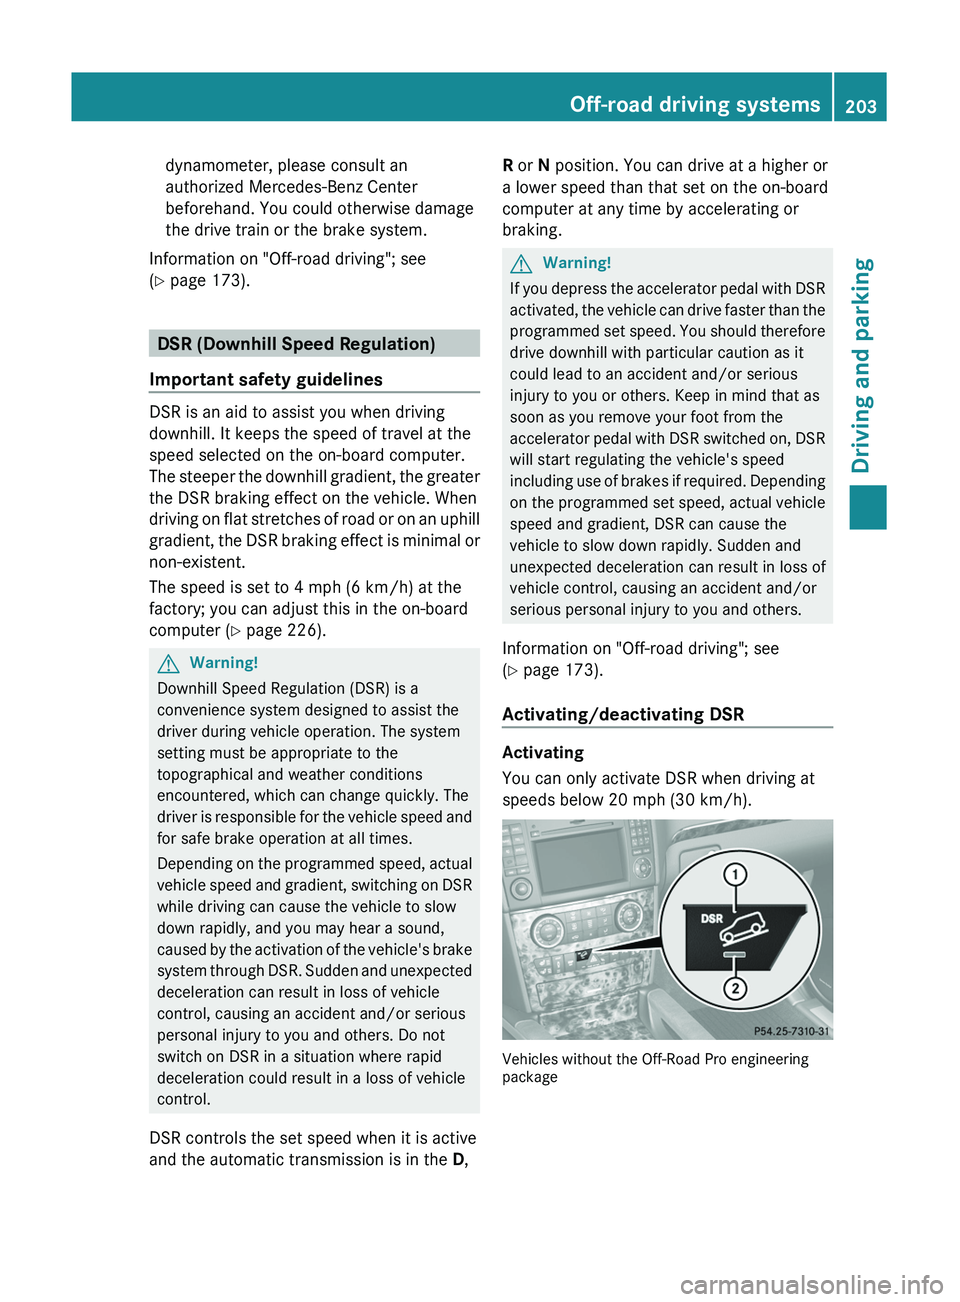
Activating
You can only activate DSR when driving at
speeds below 20 mph (30 km/h).
Vehicles without the Off-Road Pro engineering
package
Off-road driving systems203Driving and parkingBA 164.8 USA, CA Edition B 2011; 1; 2, en-USd2sboikeVersion: 3.0.3.52010-04-21T15:08:44+02:00 - Seite 203Z
Page 206 of 376

Vehicles with the Off-Road Pro engineering
package
XPress button :.
Indicator lamp ; lights up.
The DSR symbol and a message such as the
following appear in the multifunction display:
If the vehicle's speed is too high, the DSR
symbol and the Max. Speed 20 mph
(Canada: 30 km/h) message are shown in the
multifunction display.
Deactivating
XPress button :.
Indicator lamp ; goes out.
The DSR symbol appears in the
multifunction display with the Off
message.
DSR switches off automatically when you
drive at speeds over 21 mph (Canada:
35 km/h). The DSR symbol appears in the
multifunction display with the Off message.
You also hear a warning tone.
Changing the set speed while
the vehicle is in motion
When DSR is switched on, you can change the
set speed to a value between 3 mph and
10 mph (Canada: between 4 km/h and
18 km/h) while the vehicle is in motion.XTo increase or reduce the set speed in
1 mph (Canada: 1 km/h) increments:
briefly press the cruise control lever to the
pressure point, up : for a higher set speed
or down ; for a lower set speed.
The set value appears in the multifunction
display.XTo increase or reduce the set speed in
5 mph (Canada: 10 km/h) increments:
briefly press the cruise control lever past
the pressure point, up : for a higher set
speed or down ; for a lower set speed.
The set value appears in the multifunction
display.
Off-road drive program
i The off-road drive program is only
available on vehicles without the Off-Road
Pro Engineering package.
The off-road drive program assists you when
driving off-road. The engine's performance
characteristics and the gearshifting
characteristics of the automatic transmission
are adapted for this purpose. ABS, ESP ®
and
4ETS programs especially adapted to off-road
driving are also activated.
Do not use the off-road drive program on
roads that are snowy or icy or if your vehicle
has snow chains mounted.
For information on driving off-road, see
( Y page 173).
204Off-road driving systemsDriving and parking
BA 164.8 USA, CA Edition B 2011; 1; 2, en-USd2sboikeVersion: 3.0.3.52010-04-21T15:08:44+02:00 - Seite 204
Page 207 of 376

XTo activate: press off-road button :.
Indicator lamp ; lights up. Off-road
indicator = appears in the multifunction
display.XTo deactivate: press off-road button :.
Indicator lamp ; and off-road indicator
= go out.
LOW RANGE
General notes
The LOW RANGE off-road gear assists you in
driving off-road and when fording. When LOW
RANGE is engaged, the engine’s performance
characteristics and the gearshifting
characteristics of the automatic transmission
are adapted for this purpose. ABS, ESP ®
and
4ETS programs especially adapted to off-road
driving are also activated.
For information on "Off-road driving", see
( Y page 173) . You will find information about
driving safety systems in conjunction with
LOW RANGE in the "Safety" section
( Y page 65).
Shift rangesHIGH RANGERoad position for all
normal driving situationsLOW RANGEOff-road position for
driving off-road and
fording
The gear ratio between the
engine and wheels is only
approximately one third of
that in the HIGH RANGE
road position. The drive
torque is correspondingly
higher as a result.
Do not use LOW RANGE:
R on slippery road
surfaces, e.g. in the case
of slush
R on snow or ice-covered
roads
R if you have mounted
snow chains to your
vehicleGWarning!
Always wait until the procedure of shifting
from HIGH RANGE to LOW RANGE – and from
LOW RANGE to HIGH RANGE – has been
entirely completed. During this procedure do
not turn off the engine or shift the automatic
transmission into another gear.
If you do not wait until the shifting procedure
has been entirely completed then it might not
be correctly performed. The transfer case
might be in neutral, thus interrupting the
transfer of power between the engine and the
drive axle.
The vehicle is then freely movable, even if a
gear has been selected, and could
unintentionally be set into motion –
particularly on up – or downhill grades. This
could lead to an accident and cause injury to
yourself and others.
Please observe related messages appearing
in the multifunction display.
Off-road driving systems205Driving and parkingBA 164.8 USA, CA Edition B 2011; 1; 2, en-USd2sboikeVersion: 3.0.3.52010-04-21T15:08:44+02:00 - Seite 205Z
Page 209 of 376
Differential lock
General notes
i Differential locks are available only in
vehicles with the Off-Road Pro engineering
package.
Your vehicle is equipped with the following:
R A differential lock for the transfer box: this
controls the balance between the front and
rear axles.
R A differential lock for the rear axle: this
controls the balance between the wheels
and the rear axle.
Differential locks improve the vehicle's
traction. 4ETS ( Y page 67)controls the
balance between the wheels on the front axle.
Information on "Off-road driving"; see
( Y page 173).
Information about the differential and
differential locks
When the vehicle is driving around a curve,
the wheels on the outside of the curve have
to cover a greater distance and therefore
have to turn faster than the wheels on the
inside. The differential, a transmission in the
drive train, balances these different rotational
speeds out, making cornering possible.
The disadvantage of a differential: the wheels
with the least grip are driven the hardest.
Example: one wheel on a driven axle is on a
snow-covered surface and therefore has no
traction. This wheel has the most driving
force, since the differential distributes most
of the force to the wheel with the least
resistance. The wheel on the opposite side of
this axle, which is on a solid surface and could
therefore enable traction, does not have any
driving force. 4ETS eliminates this
disadvantage and ensures good steerability
by braking the spinning wheel automatically
and thereby directing more force to the wheel
that is on a solid surface and can provide
traction.
ESP ®
and 4ETS are traction systems that are
ideally suited to road driving and driving on
easily negotiable off-road terrain. The LOW
RANGE off-road gear also improves off-road
capability.
Difficult off-road conditions require additional
measures, such as locking one or more
differentials. Your vehicle has two differential
locks: one (central) differential lock for the
transfer case and one differential lock for the
rear axle. Both differential locks can be
activated using the selector wheel on the
center console. When the (central)
differential for the transfer case is locked, the
speed of the front wheels is the same as the
speed of the rear wheels. When the
differential for the rear axle is locked, both of
the rear wheels turn at the same speed,
independent of their individual torques. Note
that activating the differential locks
significantly reduces the steerability of the
vehicle.
For your safety, the safety of others and to
prevent damage to the vehicle, the
differential locks must not be activated on
paved roads. Note that the differential
function is necessary when driving on paved
roads and that the differentials must never be
locked on paved roads. Otherwise, the
vehicle can no longer be steered. The
differential locks must therefore only be
activated when driving off-road, and then only
if activating the other driving systems (4ETS,
ESP ®
and LOW RANGE off-road gear) is no
longer sufficient.
Engaging the differential locks
! Drive off slowly when the differential
locks are engaged.
Function or performance tests may only be
performed on a 2-axle dynamometer. If you
wish to operate the vehicle on such a
dynamometer, please consult an
authorized Mercedes-Benz Center
beforehand. You could otherwise damage
the drive train or the brake system.
Off-road driving systems207Driving and parkingBA 164.8 USA, CA Edition B 2011; 1; 2, en-USd2sboikeVersion: 3.0.3.52010-04-21T15:08:44+02:00 - Seite 207Z
Page 212 of 376
XMake sure that the automatic transmission
is set to position P.XApply the vehicle's parking brake.XStart the engine.XSelect highway level.XVehicles with the adaptive damping
system: set ADS to AUTO or COMF .XSwitch off the engine.XClose all doors and the tailgate.XCouple up the trailer.XEstablish all electrical connections.
i
Vehicles with the AIRMATIC package:
with a trailer attached, the vehicle will
always remain at highway level. When
coupling up a trailer, please observe the
following:
R if highway level has not been set
manually, the vehicle will automatically
sink to highway level as soon as it
reaches a speed of 5 mph (8 km/h).
R high-speed level is not available.
These restrictions apply to all accessories
powered through a connection to the trailer
power socket of your vehicle, e.g. a bicycle
carrier.
Towing a trailer
There are numerous legal requirements
concerning the towing of a trailer, e.g. speed
restrictions. Make sure that your vehicle/
trailer combination complies with the local
requirements not only in your area of
residence but also at any location to which
you are traveling. The police and local
authorities can provide reliable information.
Please observe the following when towing a
trailer:
R To acquaint yourself with driving with a
trailer and with the resulting changes to
handling, you should practice cornering,
stopping and reversing in a traffic-free
location.
R Before driving, check:
- the trailer coupling
- the safety switch for braked trailers
- the safety chains
- the electrical connections
- the lights
- the wheels
R Adjust the exterior mirrors to provide an
unobstructed view of the rear section of the
trailer.
R If the trailer features electronically
controlled brakes, pull away the vehicle/
trailer combination carefully, manually
brake using the brake controller, and check
the brakes for correct function.
R Secure any objects on the trailer to prevent
the cargo from slipping when the vehicle is
in motion.
R If you couple up a trailer, regularly check
the cargo for secure fastening and make
sure that the trailer lamps and (if
applicable) the trailer brakes are
functioning correctly.
R Bear in mind that the handling will be less
stable when towing a trailer than when
driving without one. Avoid sudden steering
movements.
R The vehicle/trailer combination is heavier,
accelerates more slowly, has a decreased
gradient climbing capability and a longer
braking distance.
It is more susceptible to side winds and
requires more careful steering.
R If possible, avoid abrupt braking. Depress
the brake pedal moderately at first, so that
the trailer can activate its own brakes. Then
increase the pressure on the brake pedal.
R If the automatic transmission continues to
shift back and forth between two gears
when driving up or downhill, restrict the
shift range. Select shift range 4, 3, 2, or 1.
A lower gear and lower speed reduce the
risk of engine failure.210Towing a trailerDriving and parking
BA 164.8 USA, CA Edition B 2011; 1; 2, en-USd2sboikeVersion: 3.0.3.52010-04-21T15:08:44+02:00 - Seite 210