2011 MERCEDES-BENZ GL power steering
[x] Cancel search: power steeringPage 253 of 376
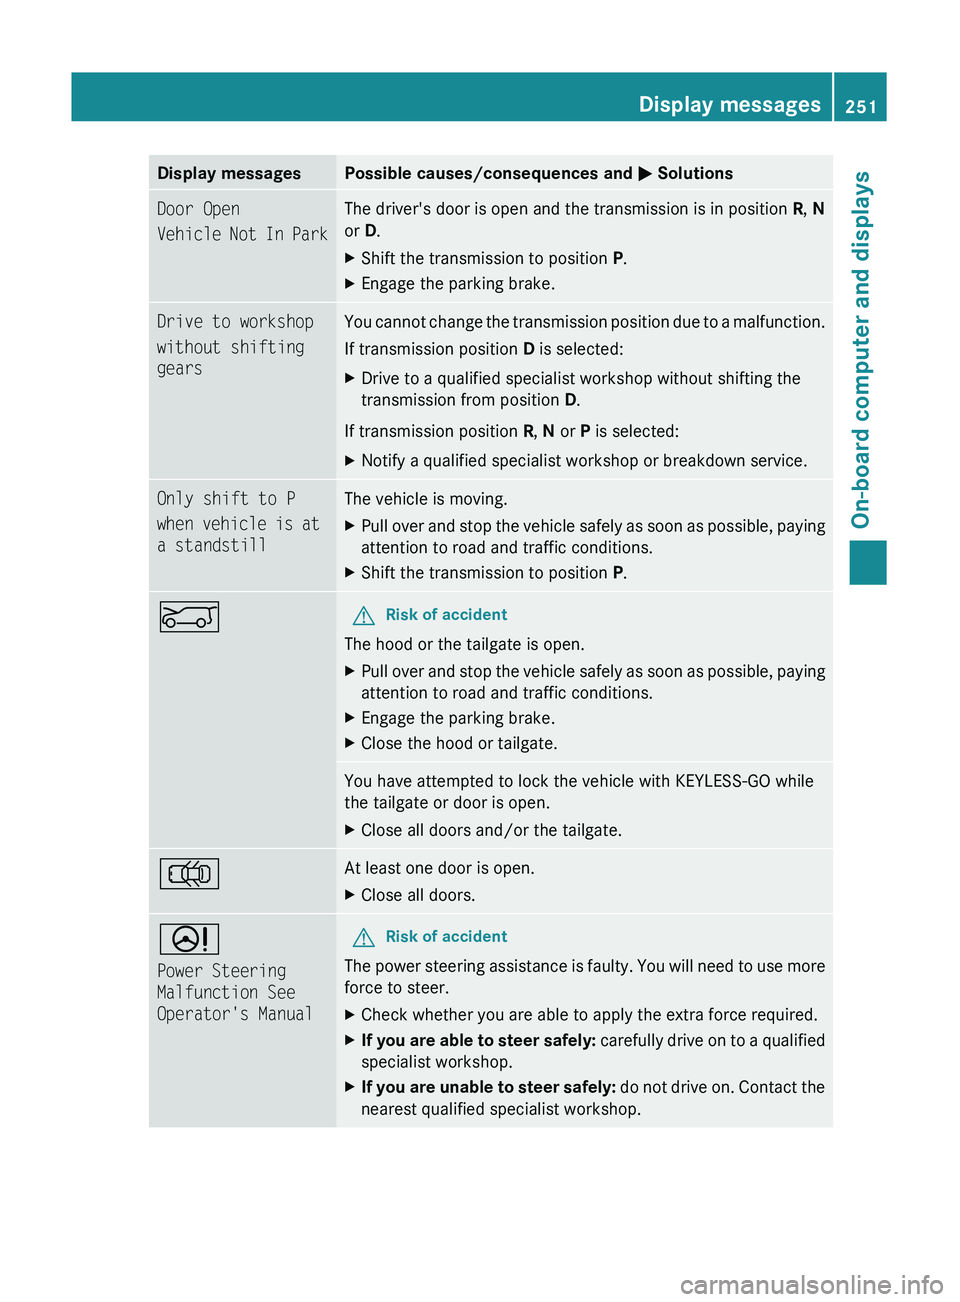
Display messagesPossible causes/consequences and M SolutionsDoor Open
Vehicle Not In ParkThe driver's door is open and the transmission is in position R, N
or D.XShift the transmission to position P.XEngage the parking brake.Drive to workshop
without shifting
gearsYou cannot change the transmission position due to a malfunction.
If transmission position D is selected:XDrive to a qualified specialist workshop without shifting the
transmission from position D.
If transmission position R, N or P is selected:
XNotify a qualified specialist workshop or breakdown service.Only shift to P
when vehicle is at
a standstillThe vehicle is moving.XPull over and stop the vehicle safely as soon as possible, paying
attention to road and traffic conditions.XShift the transmission to position P.EGRisk of accident
The hood or the tailgate is open.
XPull over and stop the vehicle safely as soon as possible, paying
attention to road and traffic conditions.XEngage the parking brake.XClose the hood or tailgate.You have attempted to lock the vehicle with KEYLESS-GO while
the tailgate or door is open.XClose all doors and/or the tailgate.;At least one door is open. XClose all doors.D
Power Steering
Malfunction See
Operator's ManualGRisk of accident
The power steering assistance is faulty. You will need to use more
force to steer.
XCheck whether you are able to apply the extra force required.XIf you are able to steer safely: carefully drive on to a qualified
specialist workshop.XIf you are unable to steer safely: do not drive on. Contact the
nearest qualified specialist workshop.Display messages251On-board computer and displaysBA 164.8 USA, CA Edition B 2011; 1; 2, en-USd2sboikeVersion: 3.0.3.52010-04-21T15:08:44+02:00 - Seite 251Z
Page 285 of 376
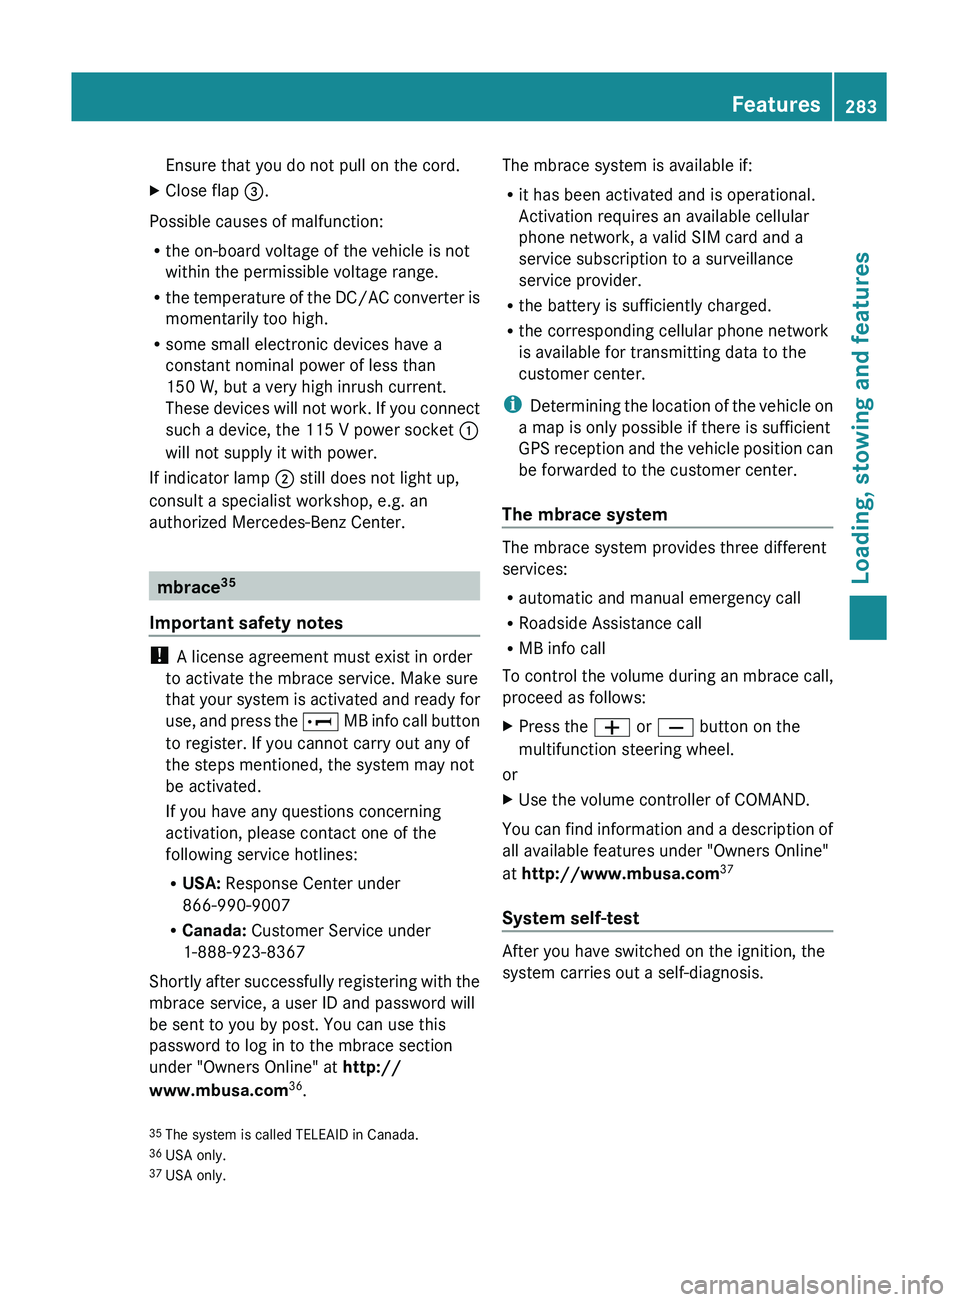
Ensure that you do not pull on the cord.XClose flap =.
Possible causes of malfunction:
R the on-board voltage of the vehicle is not
within the permissible voltage range.
R the temperature of the DC/AC converter is
momentarily too high.
R some small electronic devices have a
constant nominal power of less than
150 W, but a very high inrush current.
These devices will not work. If you connect
such a device, the 115 V power socket :
will not supply it with power.
If indicator lamp ; still does not light up,
consult a specialist workshop, e.g. an
authorized Mercedes-Benz Center.
mbrace 35
Important safety notes
! A license agreement must exist in order
to activate the mbrace service. Make sure
that your system is activated and ready for
use, and press the E MB info call button
to register. If you cannot carry out any of
the steps mentioned, the system may not
be activated.
If you have any questions concerning
activation, please contact one of the
following service hotlines:
R USA: Response Center under
866-990-9007
R Canada: Customer Service under
1-888-923-8367
Shortly after successfully registering with the
mbrace service, a user ID and password will
be sent to you by post. You can use this
password to log in to the mbrace section
under "Owners Online" at http://
www.mbusa.com 36
.
The mbrace system is available if:
R it has been activated and is operational.
Activation requires an available cellular
phone network, a valid SIM card and a
service subscription to a surveillance
service provider.
R the battery is sufficiently charged.
R the corresponding cellular phone network
is available for transmitting data to the
customer center.
i Determining the location of the vehicle on
a map is only possible if there is sufficient
GPS reception and the vehicle position can
be forwarded to the customer center.
The mbrace system
The mbrace system provides three different
services:
R automatic and manual emergency call
R Roadside Assistance call
R MB info call
To control the volume during an mbrace call,
proceed as follows:
XPress the W or X button on the
multifunction steering wheel.
or
XUse the volume controller of COMAND.
You can find information and a description of
all available features under "Owners Online"
at http://www.mbusa.com 37
System self-test
After you have switched on the ignition, the
system carries out a self-diagnosis.
35 The system is called TELEAID in Canada.
36 USA only.
37 USA only.Features283Loading, stowing and featuresBA 164.8 USA, CA Edition B 2011; 1; 2, en-USd2sboikeVersion: 3.0.3.52010-04-21T15:08:44+02:00 - Seite 283Z
Page 329 of 376
Towing and tow-starting
Important safety notes
GWarning
If you tow the vehicle, you must use a rigid
towing bar if:
R the engine will not run.
R there is a malfunction in the brake system.
R there is a malfunction in the power supply
or the vehicle's electrical system.
With the engine not running, there is no power
assistance for the brake and steering
systems. You will then need considerably
more force to steer and to brake and the
brake pedal travel will be longer. If necessary,
depress the brake pedal with maximum force.
Before towing away, make sure that the
steering can be moved and is not locked.
If you tow or tow-start another vehicle, its
weight must not exceed the maximum
permissible gross vehicle weight of your
vehicle.
It is better to have the vehicle transported
than to have it towed.
! You may only tow the vehicle a maximum
distance of 30 miles (50 km). A towing
speed of 30 mph (50 km/h) must not be
exceeded.
For towing distances over 30 miles
(50 km), the vehicle must loaded onto a
transporter.
! Only secure the tow rope or tow bar at the
towing eyes. Otherwise, the vehicle could
be damaged.
! Do not use the towing eye for recovery,
as this could damage the vehicle. If in
doubt, recover the vehicle with a crane.
! Drive slowly and smoothly when towing.
Excessive tractive power could otherwise
damage the vehicles.
! Do not tow with sling-type equipment.
This could damage the vehicle.
! When towing vehicles with KEYLESS-GO,
use the key instead of the Start/Stop
button. Otherwise, the automatic
transmission may shift to position P when
the driver's or front-passenger door are
opened, which could lead to damage to the
transmission.
! Vehicles with differential locks: make
sure that the differential locks are in
automatic mode. When towing, the
differential locks must not be switched on
by hand. This could otherwise damage the
transmission.
! Vehicles with automatic transmission
must not be started by tow-starting. This
could otherwise damage the transmission.
! Vehicles with 4MATIC must not be towed
with the front or rear axle raised. This could
otherwise damage the transmission.
If the vehicle has suffered transmission
damage, have it carried away on a transporter
or trailer.
The automatic transmission must be in
position N when the vehicle is being towed.
Make sure that the battery is connected and
charged. You will otherwise not be able to:
R turn the SmartKey to position 2 in the
ignition lock.
R shift the automatic transmission to
position N.
i Switch off the automatic locking feature
before the vehicle is towed ( Y page 79).
Otherwise, you could lock yourself out of
the vehicle when pushing or towing the
vehicle.
Installing/removing the towing eye
Installing the towing eye
Vehicles with a trailer tow hitch: if possible
secure the towing device on the trailer tow
hitch ( Y page 209).
Towing and tow-starting327Roadside assistanceBA 164.8 USA, CA Edition B 2011; 1; 2, en-USd2sboikeVersion: 3.0.3.52010-04-21T15:08:44+02:00 - Seite 327Z
Page 330 of 376
XRemove the towing eye from the vehicle
tool kit ( Y page 310).GWarning
The exhaust tail pipe may be hot. You could
burn yourself if you touch the tail pipe. Be
particularly careful when removing the rear
cover.
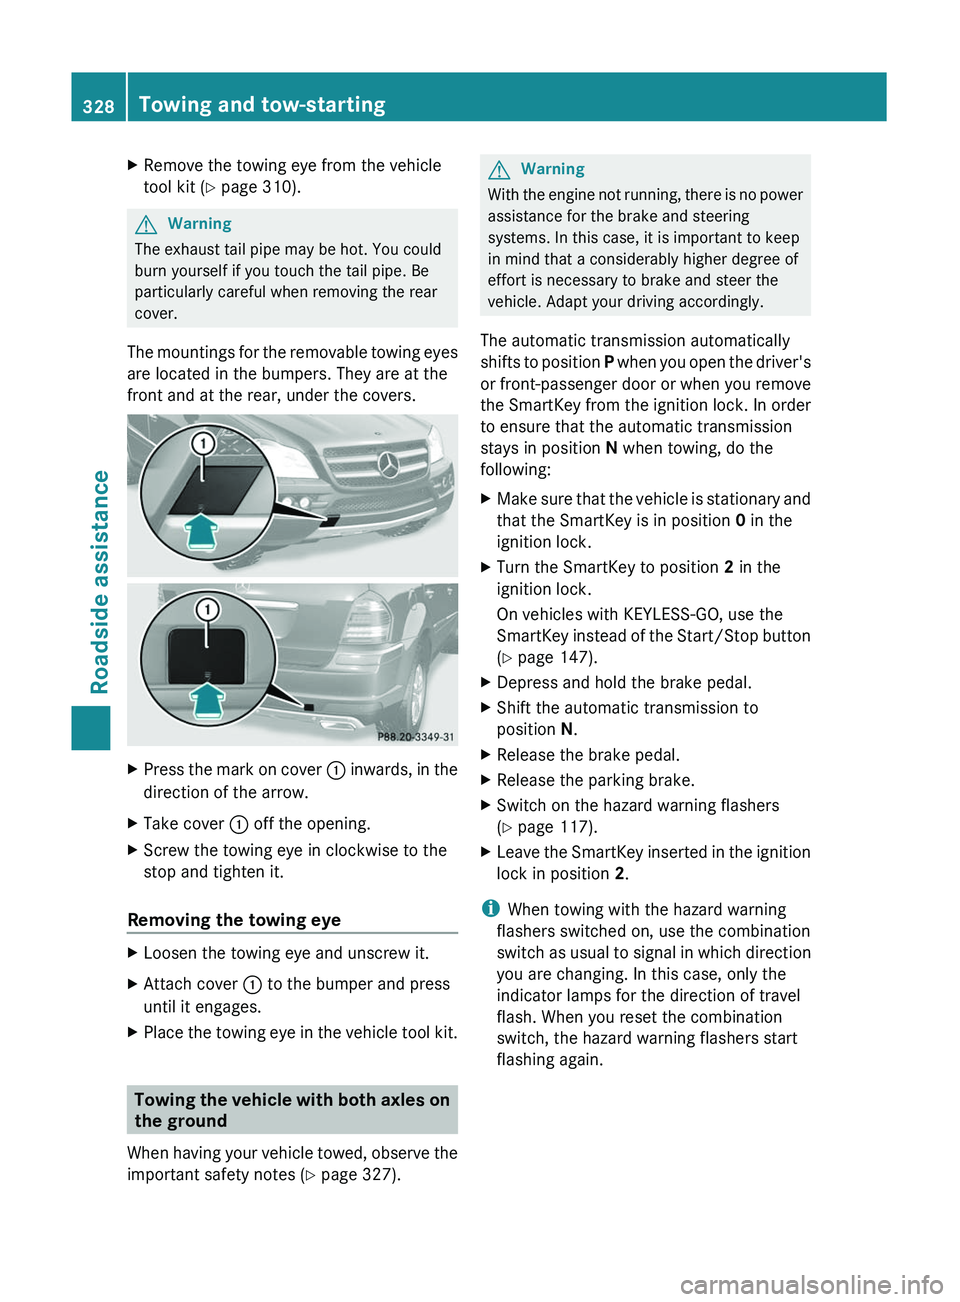
The mountings for the removable towing eyes
are located in the bumpers. They are at the
front and at the rear, under the covers.
XPress the mark on cover : inwards, in the
direction of the arrow.XTake cover : off the opening.XScrew the towing eye in clockwise to the
stop and tighten it.
Removing the towing eye
XLoosen the towing eye and unscrew it.XAttach cover : to the bumper and press
until it engages.XPlace the towing eye in the vehicle tool kit.
Towing the vehicle with both axles on
the ground
When having your vehicle towed, observe the
important safety notes ( Y page 327).
GWarning
With the engine not running, there is no power
assistance for the brake and steering
systems. In this case, it is important to keep
in mind that a considerably higher degree of
effort is necessary to brake and steer the
vehicle. Adapt your driving accordingly.
The automatic transmission automatically
shifts to position P when you open the driver's
or front-passenger door or when you remove
the SmartKey from the ignition lock. In order
to ensure that the automatic transmission
stays in position N when towing, do the
following:
XMake sure that the vehicle is stationary and
that the SmartKey is in position 0 in the
ignition lock.XTurn the SmartKey to position 2 in the
ignition lock.
On vehicles with KEYLESS-GO, use the
SmartKey instead of the Start/Stop button
( Y page 147).XDepress and hold the brake pedal.XShift the automatic transmission to
position N.XRelease the brake pedal.XRelease the parking brake.XSwitch on the hazard warning flashers
( Y page 117).XLeave the SmartKey inserted in the ignition
lock in position 2.
i
When towing with the hazard warning
flashers switched on, use the combination
switch as usual to signal in which direction
you are changing. In this case, only the
indicator lamps for the direction of travel
flash. When you reset the combination
switch, the hazard warning flashers start
flashing again.
328Towing and tow-startingRoadside assistance
BA 164.8 USA, CA Edition B 2011; 1; 2, en-USd2sboikeVersion: 3.0.3.52010-04-21T15:08:44+02:00 - Seite 328
Page 331 of 376
Transporting the vehicle
The towing eyes or trailer tow hitch can be
used to pull the vehicle onto a trailer or
transporter if you wish to transport it.XTurn the SmartKey to position 2 in the
ignition lock.XShift the automatic transmission to
position N.
As soon as the vehicle has been loaded:
XPrevent the vehicle from rolling away by
applying the parking brake.XShift the automatic transmission to
position P.XTurn the SmartKey to position 0 in the
ignition lock and remove the SmartKey.XSecure the vehicle.
! Only lash the vehicle down by the wheels
or wheel rims, not by parts of the vehicle
such as axle or steering components.
Otherwise, the vehicle could be damaged.
Notes on 4MATIC vehicles
! Vehicles with 4MATIC must not be towed
with either the front or the rear axle raised,
as doing so will damage the transmission.
If the vehicle's transmission, front, or rear
axle is damaged, have the vehicle transported
on a truck or trailer.
In the event of damage to the electrical
system
If the battery is defective, the automatic
transmission will be locked in position P. To
shift the automatic transmission to position
N , you must provide power to the vehicle's
electrical system in the same way as when
jump-starting ( Y page 325).
Have the vehicle transported on a transporter
or trailer.
Recovering a vehicle that has become
stuck
! Pull away smoothly, slowly, and in a
straight line when pulling out a vehicle that
has become stuck. Excessive tractive
power could damage the vehicles.
If the drive wheels have become stuck in
loose or muddy ground, pull the vehicle out
with extreme caution, particularly if it is
laden.
Never attempt to recover a stuck vehicle with
a trailer attached.
Pull out the vehicle backwards, if possible
using the tracks it made when it became
stuck.
Fuses
Important safety notes
The fuses in your vehicle serve to close down
faulty circuits. If a fuse blows, all the
components on the circuit and their functions
will fail.
GWarning
Only use fuses approved by Mercedes-Benz
with the specified amperage for the system in
question and do not attempt to repair or
bridge a blown fuse. Using other than
approved fuses or using repaired or bridged
fuses may cause an overload leading to a fire,
and/or cause damage to electrical
components and/or systems. Have the cause
determined and remedied by an authorized
Mercedes-Benz Center.
Blown fuses must be replaced with fuses of
the same rating, which you can recognize by
the color and value. The fuse ratings are listed
in the fuse allocation chart. An authorized
Mercedes-Benz Center will be happy to
advise you.
i If a fuse has blown, visit a breakdown
service or an authorized Mercedes-Benz
Center.
Fuses329Roadside assistanceBA 164.8 USA, CA Edition B 2011; 1; 2, en-USd2sboikeVersion: 3.0.3.52010-04-21T15:08:44+02:00 - Seite 329Z
Page 338 of 376
Depending upon the weather and/or road
surface (conditions), the tire traction varies
widely.
Do not use tires until they are excessively
worn as the tire traction on wet road surfaces
decreases significantly when the tread depth
is less than 1
/ 8 in (3 mm).
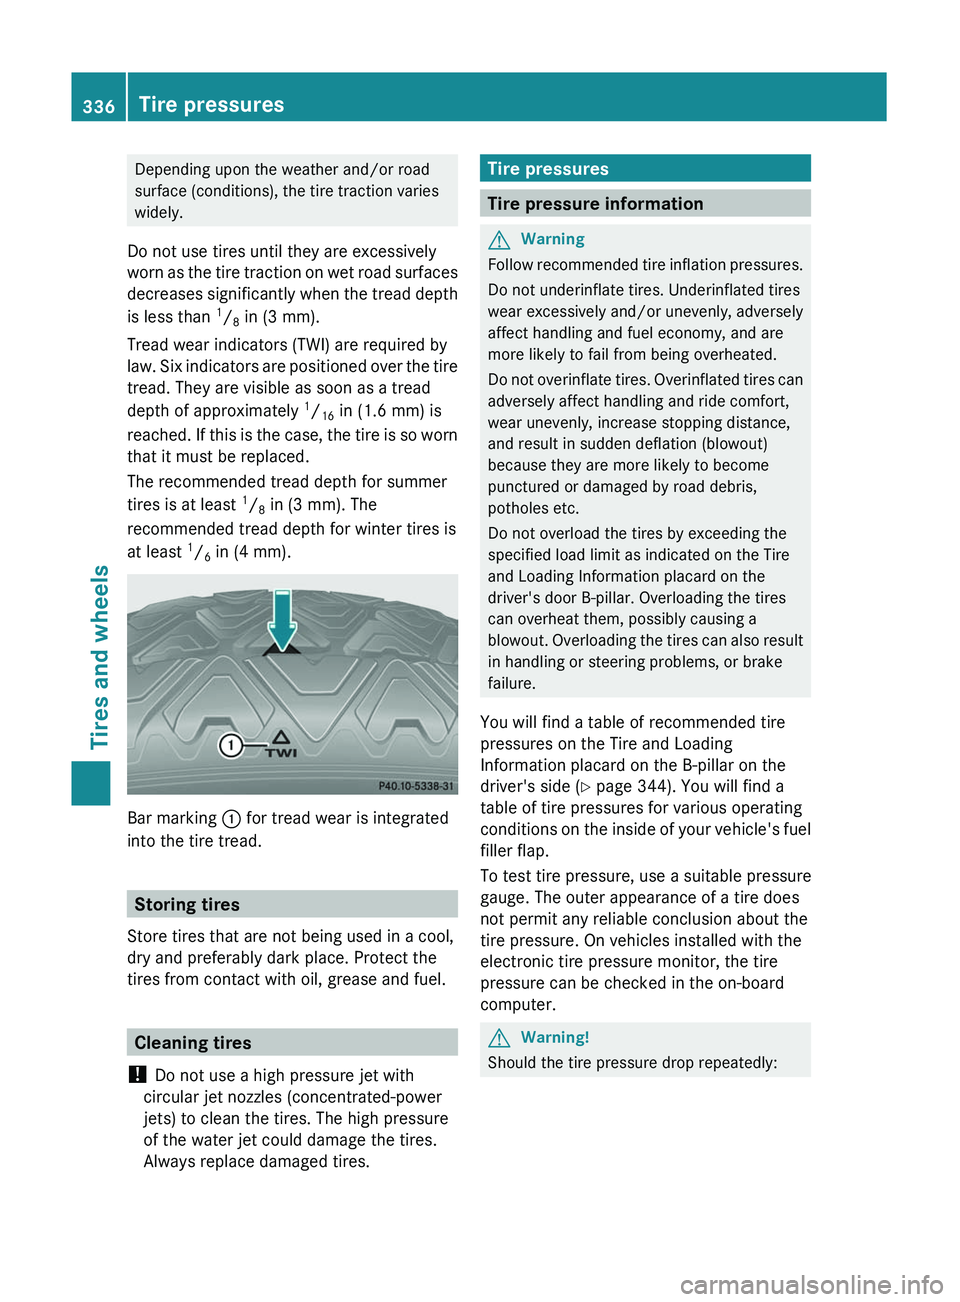
Tread wear indicators (TWI) are required by
law. Six indicators are positioned over the tire
tread. They are visible as soon as a tread
depth of approximately 1
/ 16 in (1.6 mm) is
reached. If this is the case, the tire is so worn
that it must be replaced.
The recommended tread depth for summer
tires is at least 1
/ 8 in (3 mm). The
recommended tread depth for winter tires is
at least 1
/ 6 in (4 mm).
Bar marking
: for tread wear is integrated
into the tire tread.
Storing tires
Store tires that are not being used in a cool,
dry and preferably dark place. Protect the
tires from contact with oil, grease and fuel.
Cleaning tires
! Do not use a high pressure jet with
circular jet nozzles (concentrated-power
jets) to clean the tires. The high pressure
of the water jet could damage the tires.
Always replace damaged tires.
Tire pressures
Tire pressure information
GWarning
Follow recommended tire inflation pressures.
Do not underinflate tires. Underinflated tires
wear excessively and/or unevenly, adversely
affect handling and fuel economy, and are
more likely to fail from being overheated.
Do not overinflate tires. Overinflated tires can
adversely affect handling and ride comfort,
wear unevenly, increase stopping distance,
and result in sudden deflation (blowout)
because they are more likely to become
punctured or damaged by road debris,
potholes etc.
Do not overload the tires by exceeding the
specified load limit as indicated on the Tire
and Loading Information placard on the
driver's door B-pillar. Overloading the tires
can overheat them, possibly causing a
blowout. Overloading the tires can also result
in handling or steering problems, or brake
failure.
You will find a table of recommended tire
pressures on the Tire and Loading
Information placard on the B-pillar on the
driver's side ( Y page 344). You will find a
table of tire pressures for various operating
conditions on the inside of your vehicle's fuel
filler flap.
To test tire pressure, use a suitable pressure
gauge. The outer appearance of a tire does
not permit any reliable conclusion about the
tire pressure. On vehicles installed with the
electronic tire pressure monitor, the tire
pressure can be checked in the on-board
computer.
GWarning!
Should the tire pressure drop repeatedly:
336Tire pressuresTires and wheels
BA 164.8 USA, CA Edition B 2011; 1; 2, en-USd2sboikeVersion: 3.0.3.52010-04-21T15:08:44+02:00 - Seite 336
Page 367 of 376
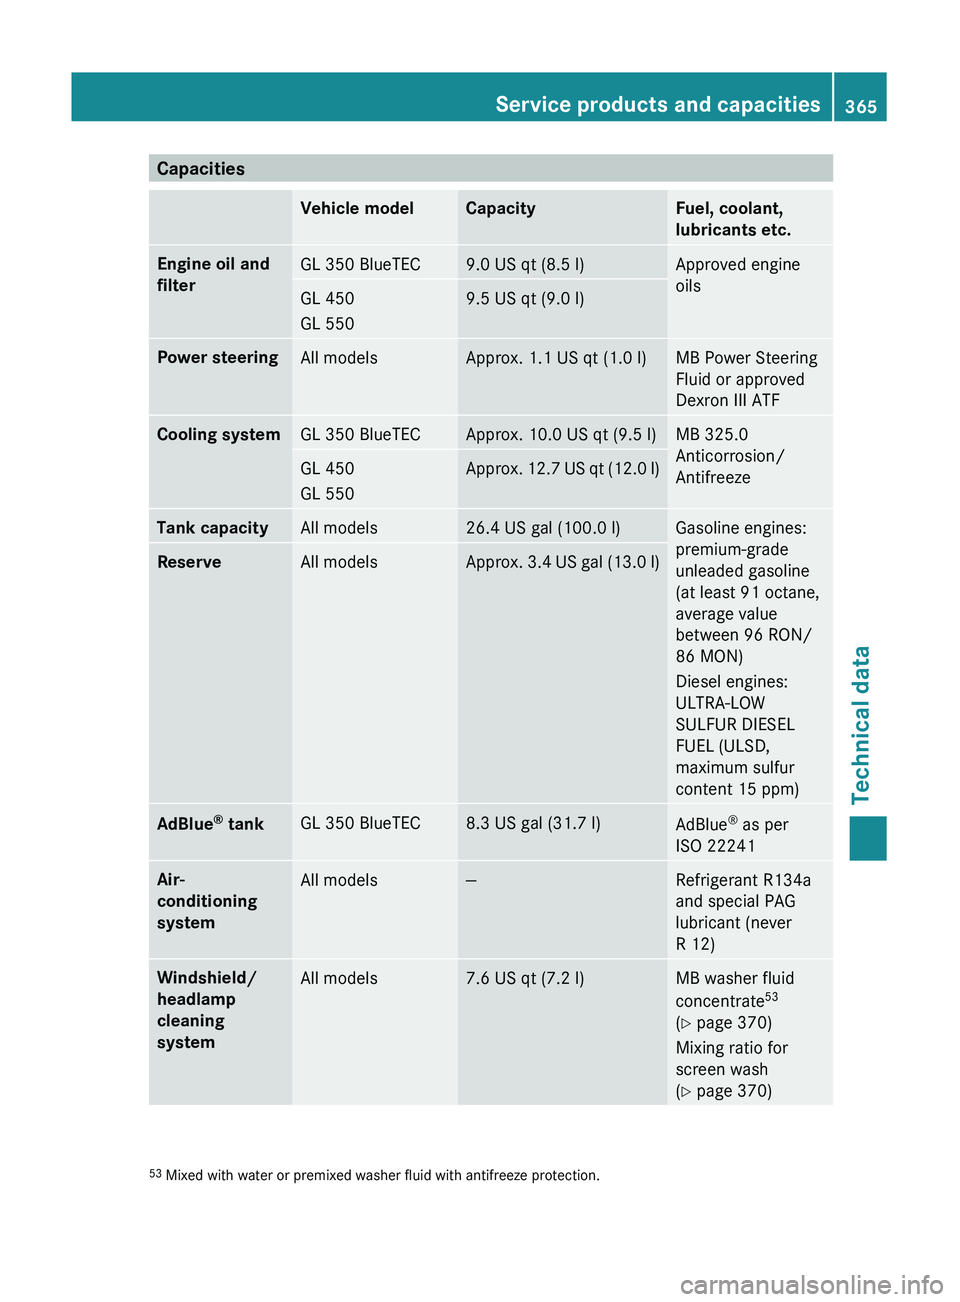
CapacitiesVehicle modelCapacityFuel, coolant,
lubricants etc.Engine oil and
filterGL 350 BlueTEC9.0 US qt (8.5 l)Approved engine
oilsGL 450
GL 5509.5 US qt (9.0 l)Power steeringAll modelsApprox. 1.1 US qt (1.0 l)MB Power Steering
Fluid or approved
Dexron III ATFCooling systemGL 350 BlueTECApprox. 10.0 US qt (9.5 l)MB 325.0
Anticorrosion/
AntifreezeGL 450
GL 550Approx. 12.7 US qt (12.0 l)Tank capacityAll models26.4 US gal (100.0 l)Gasoline engines:
premium-grade
unleaded gasoline
(at least 91 octane,
average value
between 96 RON/
86 MON)
Diesel engines:
ULTRA-LOW
SULFUR DIESEL
FUEL (ULSD,
maximum sulfur
content 15 ppm)ReserveAll modelsApprox. 3.4 US gal (13.0 l)AdBlue ®
tankGL 350 BlueTEC8.3 US gal (31.7 l)AdBlue ®
as per
ISO 22241Air-
conditioning
systemAll models—Refrigerant R134a
and special PAG
lubricant (never
R 12)Windshield/
headlamp
cleaning
systemAll models7.6 US qt (7.2 l)MB washer fluid
concentrate 53
( Y page 370)
Mixing ratio for
screen wash
( Y page 370)53
Mixed with water or premixed washer fluid with antifreeze protection.Service products and capacities365Technical dataBA 164.8 USA, CA Edition B 2011; 1; 2, en-USd2sboikeVersion: 3.0.3.52010-04-21T15:08:44+02:00 - Seite 365Z