2011 MERCEDES-BENZ G-CLASS ECO mode
[x] Cancel search: ECO modePage 7 of 288

Brake fluid (notes) .........................280
Display messages ..........................171
High-performance brake system ....139
Important safety notes ..................137
Maintenance .................................. 138
Parking brake ........................ 135, 139
Warning lamp ................................. 183
Breakdown
see Accident (notes)
Brush guard ....................................... 207
Bulbs Backup lamp .................................. 101
Brake lamp .................................... 100
Cornering light function ...................98
fog lamps ......................................... 98
Overview .......................................... 97
rear fog lamp ................................. 101
Tail lamp ........................................ 100
Turn signal lamp .............................. 99
C
CAC (Customer Assistance Center) .........20
California
Important notice for retail
customers and lessees ....................18
Capacities
see Technical data
Care
Carpets .......................................... 226
Car wash ........................................ 221
Chrome parts ................................. 224
Display ........................................... 224
Gear or selector lever ....................225
Headlamps ..................................... 224
Matte finish ................................... 223
Notes ............................................. 220
Paint .............................................. 222
Plastic trim .................................... 225
Power washer ................................ 222
Rear view camera .......................... 224
Roof lining ...................................... 226
Seat belt ........................................ 226
Seat covers .................................... 225
Sensors ......................................... 224
Steering wheel ............................... 225
Tail pipes ....................................... 224
Trim strips ..................................... 225
Washing by hand ........................... 222
Wheels ........................................... 222
Windows ........................................ 223
Wiper blades .................................. 223
Wooden trim .................................. 225
Cargo compartment enlargement ... 194
Cargo tie down rings ......................... 196
CD player/CD changer Operating (on-board computer) .....161
Center console
Overview .......................................... 29
Central locking
Automatic locking (on-board
computer) ...................................... 165
SmartKey ......................................... 62
Changing bulbs
Headlamps ....................................... 96
Changing gears .................................. 123
Checklist After driving off-road ...................... 143
Before driving off-road ...................143
Checklist (off-road driving) .............. 143
Child-proof locks Rear doors ....................................... 54
Children
In the vehicle ................................... 49
Restraint systems ............................ 50
Child seat
Automatic recognition .....................39
Automatic recognition/air bag
deactivation, self-test ......................41
LATCH-type (ISOFIX ) child seat
anchors ............................................ 52
Special seat belt retractor ...............51
Top Tether ....................................... 53
Troubleshooting ............................... 42
Chrome parts (cleaning
instructions) ...................................... 224
Cigarette lighter ................................ 199
Climate control Activating/deactivating .................108
Activating/deactivating air-
recirculation mode .........................111
Controlling automatically ...............109
Cooling with air dehumidification ..108
Defrosting the windshield ..............110Index5ProCarManuals.com
Page 21 of 288
1-800-387-0100. Thus, if necessary, we can
reach you in a timely fashion.
If you sell your Mercedes, please leave the
entire literature in the vehicle so that it is
available to the next owner.
If you have purchased a used car, please send
us the "Notification of Used Car Purchase" in
the Service and Guarantee Booklet or simply
call the Mercedes-Benz Customer Assistance
Center (USA) at the hotline number
1-800-FOR-MERCedes(1-800-367-6372) or
Customer Service (Canada) at
1-800-387-0100.
Vehicle operation outside the USA
and Canada
When you are abroad with your vehicle,
observe the following points:
R service points or replacement parts may
not be available immediately.
R unleaded fuel for vehicles with a catalytic
converter may not be available. Leaded fuel
may cause damage to the catalytic
converter.
R the fuel may have a considerably lower
Anti-Knock Index. Unsuitable fuel can
cause engine damage.
Some Mercedes-Benz models are available in
Europe through our European Delivery
Program. Please consult an authorized
Mercedes-Benz Center for further
information, or write to one of the following
addresses.
In the USA:
Mercedes-Benz USA, LLC
European Delivery Department
One Mercedes Drive
Montvale, NJ 07645-0350
In Canada:
Mercedes-Benz Canada, Inc.
European Delivery Department
98 Vanderhoof Avenue
Toronto, Ontario M4G 4C9
Sport Utility VehicleGWarning!
This Sport Utility Vehicle is designed for both
on-road and off-road use. It can go places and
perform tasks for which conventional 2-wheel
drive passenger cars are not intended. This
vehicle will handle and maneuver differently
from conventional passenger cars in driving
conditions which may occur on streets,
highways and off-road use.
This vehicle has a higher ground clearance
and a higher center of gravity than many
passenger cars. As with other vehicles of this
type, if you make sharp turns at excessive
speeds or abrupt maneuvers, the vehicle may
roll over or may go out of control and crash.
Utility vehicles have a significantly higher
rollover rate than other types of vehicles.
Failure to operate this vehicle safely may
result in an accident, rollover of the vehicle,
and severe or fatal injury.
Before you start to drive this vehicle, read the
Operator’s Manual. Take time to become
familiar with the driving characteristics of this
vehicle. Be sure you are familiar with all
vehicle controls. Learn how your vehicle
handles on different road surfaces. Do not
attempt sharp turns at excessive speeds or
abrupt maneuvers or other unsafe driving
actions that can cause loss of vehicle control.
When driving off-road or working the vehicle
hard, do not overload it. And, always wear
your seat belts at all times. In a rollover crash,
an unbelted person is significantly more likely
to die than a person wearing a seat belt.
Operating Safety
Important safety notes
GWarning
Work improperly carried out on electronic
components and associated software could
cause them to cease functioning. Because the
vehicle's electronic components are
interconnected, any modifications made may
Introduction19ZProCarManuals.com
Page 89 of 288

Problems with the exterior mirrorsProblemPossible causes/consequences and M SolutionsAn exterior mirror has
been pushed out of
position.XMove the exterior mirror into the correct position manually.Automatic anti-glare mirrorsGWarning!
The auto-dimming function does not react if
incoming light is not aimed directly at sensors
in the interior rear view mirror.
The interior rear view mirror and the exterior
rear view mirror on the driver’s side do not
react, for example, when transporting cargo
which covers the rear window.
Light hitting the mirror(s) at certain angles
(incident light) could blind you. As a result,
you may not be able to observe traffic
conditions and could cause an accident.
The rear-view mirror and the exterior mirror
on the driver's side automatically go into anti-
glare mode if the ignition is switched on and
incident light from headlamps strikes the
sensor in the rear-view mirror.
The mirrors do not go into anti-glare mode if
reverse gear is engaged or the interior lighting
is switched on.
Parking position for the exterior
mirror on the front-passenger side
General notes
To make it easier to park, you can store the
front-passenger side exterior mirror position
in such a way that you can see the rear wheel
on that side as soon as you engage reverse
gear R.
Using the memory buttons on the driver's
side, you can store three parking positions
per key.
Setting and storing the parking position:Adjustment button;Right-hand exterior mirror=Left-hand exterior mirror?Memory buttonXMake sure that the vehicle is stationary and
that the key is in position 1 or 2 in the
ignition lock.XPress button ; for the exterior mirror on
the front-passenger side.XEngage reverse gear R.
The exterior mirror on the front-passenger
side moves to the preset parking position.XUse adjustment button : to adjust the
exterior mirror to a position which allows
you to see the rear wheel and the curb.XPress memory button ? and adjustment
button : within three seconds.
The parking position is stored if the exterior
mirror does not move.
i If the mirror moves out of position, repeat
the steps.
i If you shift the transmission to another
position, the exterior mirror on the front-
Mirrors87Seats, steering wheel and mirrorsZProCarManuals.com
Page 92 of 288
Vehicle equipment
i This manual describes all the standard
and optional equipment of your vehicle
which was available at the time of
purchase. Country-specific differences are
possible. Please note that your vehicle may
not be equipped with all features
described. This also applies to safety-
relevant systems and functions.
Exterior lighting
Important safety notes
For reasons of safety, Mercedes-Benz
recommends that you drive with the lights
switched on even during the daytime. In some
countries, operation of the headlamps varies
due to legal requirements and self-imposed
obligations. In these countries, the daytime
running lamps are automatically switched on
when the engine is started.
Information about driving abroad
Converting to symmetrical low beam
when driving abroad: switch the headlamps
to symmetrical low beam in countries in
which traffic drives on the opposite side of the
road to the country where the vehicle is
registered. This prevents glare to oncoming
traffic. Symmetrical lights do not illuminate
as large an area of the edge of the road.
Have the headlamps converted at a qualified
specialist workshop, e.g. an authorized
Mercedes-Benz Center, as close to the border
as possible before driving in these countries.
Converting to asymmetrical low beam
after returning: have the headlamps
converted back to asymmetrical low beam at
a qualified specialist workshop, e.g. an
authorized Mercedes-Benz Center, as soon as
possible after crossing the border when
returning.
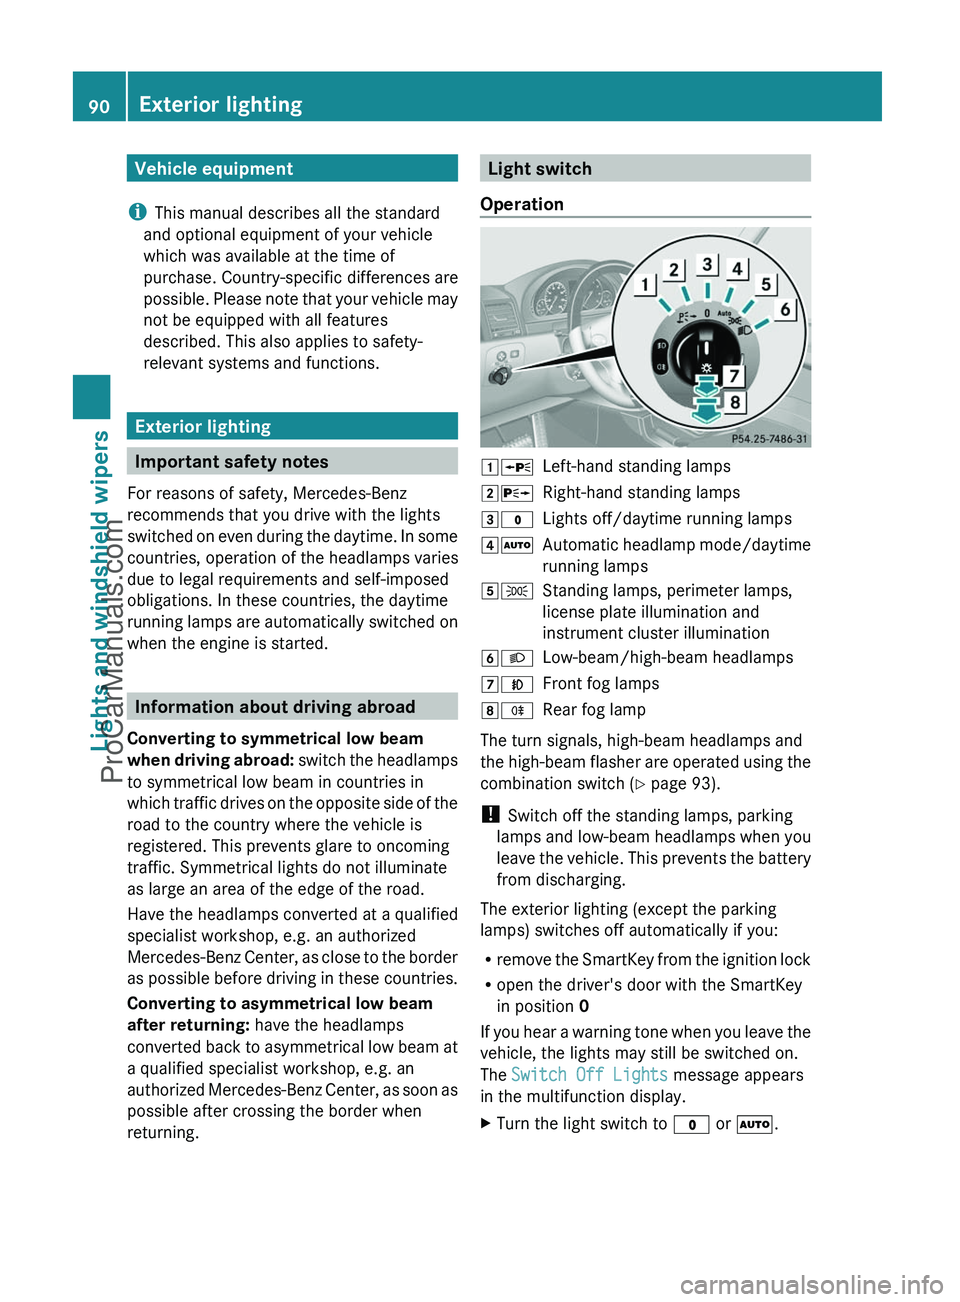
Light switch
Operation1 WLeft-hand standing lamps2XRight-hand standing lamps3$Lights off/daytime running lamps4ÃAutomatic headlamp mode/daytime
running lamps5 TStanding lamps, perimeter lamps,
license plate illumination and
instrument cluster illumination6 LLow-beam/high-beam headlamps7NFront fog lamps8RRear fog lamp
The turn signals, high-beam headlamps and
the high-beam flasher are operated using the
combination switch ( Y page 93).
! Switch off the standing lamps, parking
lamps and low-beam headlamps when you
leave the vehicle. This prevents the battery
from discharging.
The exterior lighting (except the parking
lamps) switches off automatically if you:
R remove the SmartKey from the ignition lock
R open the driver's door with the SmartKey
in position 0
If you hear a warning tone when you leave the
vehicle, the lights may still be switched on.
The Switch Off Lights message appears
in the multifunction display.
XTurn the light switch to $ or à .90Exterior lightingLights and windshield wipers
ProCarManuals.com
Page 109 of 288
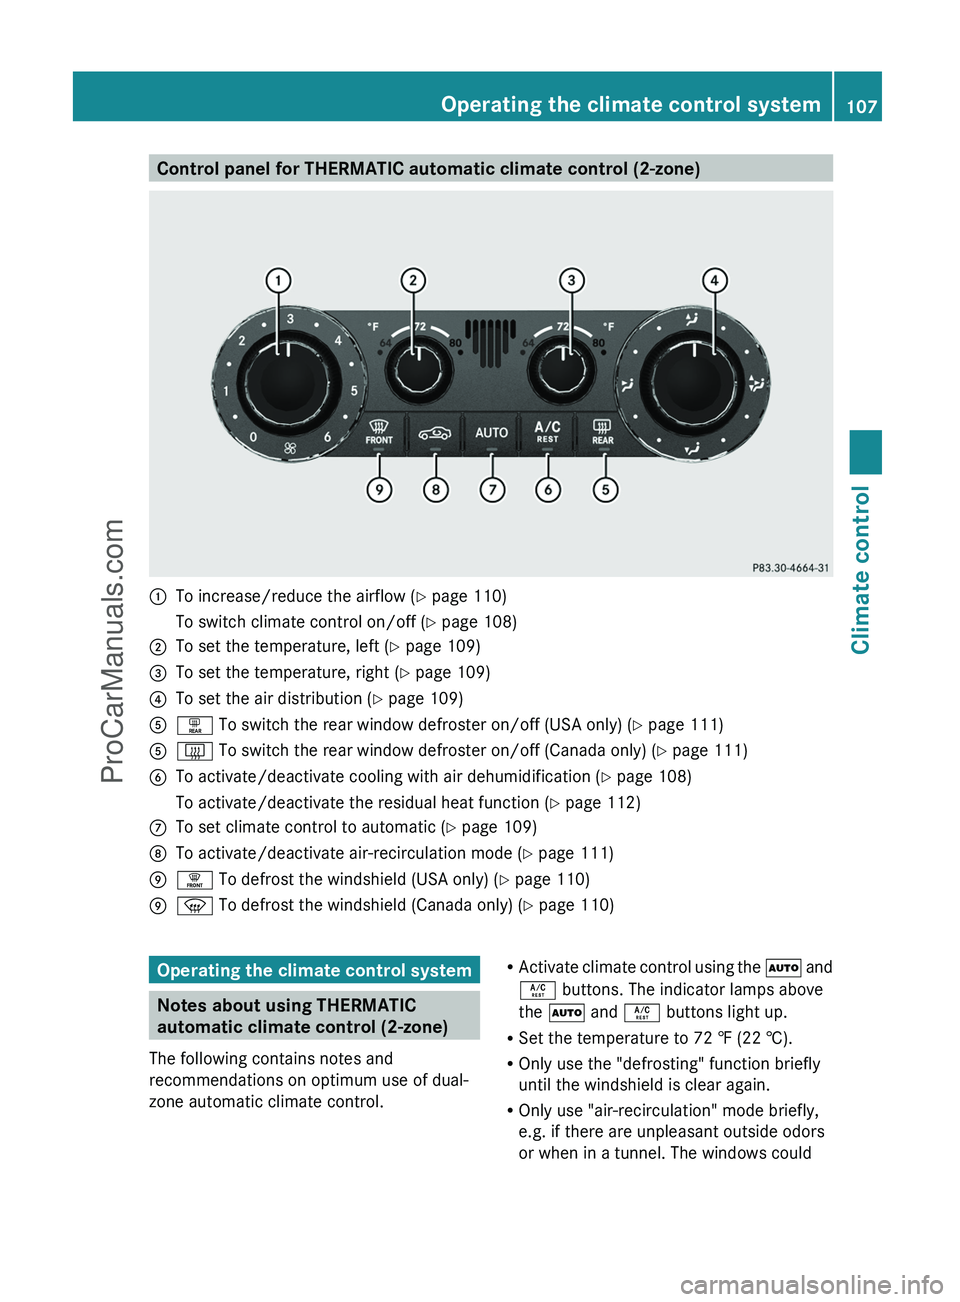
Control panel for THERMATIC automatic climate control (2-zone):To increase/reduce the airflow (Y page 110)To switch climate control on/off ( Y page 108);To set the temperature, left ( Y page 109)=To set the temperature, right ( Y page 109)?To set the air distribution ( Y page 109)Aª To switch the rear window defroster on/off (USA only) ( Y page 111)A£ To switch the rear window defroster on/off (Canada only) ( Y page 111)BTo activate/deactivate cooling with air dehumidification ( Y page 108)To activate/deactivate the residual heat function ( Y page 112)CTo set climate control to automatic ( Y page 109)DTo activate/deactivate air-recirculation mode ( Y page 111)E¥ To defrost the windshield (USA only) ( Y page 110)Ez To defrost the windshield (Canada only) ( Y page 110)Operating the climate control system
Notes about using THERMATIC
automatic climate control (2-zone)
The following contains notes and
recommendations on optimum use of dual-
zone automatic climate control.
R Activate climate control using the à and
Á buttons. The indicator lamps above
the à and Á buttons light up.
R Set the temperature to 72 ‡ (22 †).
R Only use the "defrosting" function briefly
until the windshield is clear again.
R Only use "air-recirculation" mode briefly,
e.g. if there are unpleasant outside odors
or when in a tunnel. The windows couldOperating the climate control system107Climate controlZProCarManuals.com
Page 113 of 288
Otherwise, your vision may be impaired,
which could endanger you or others.
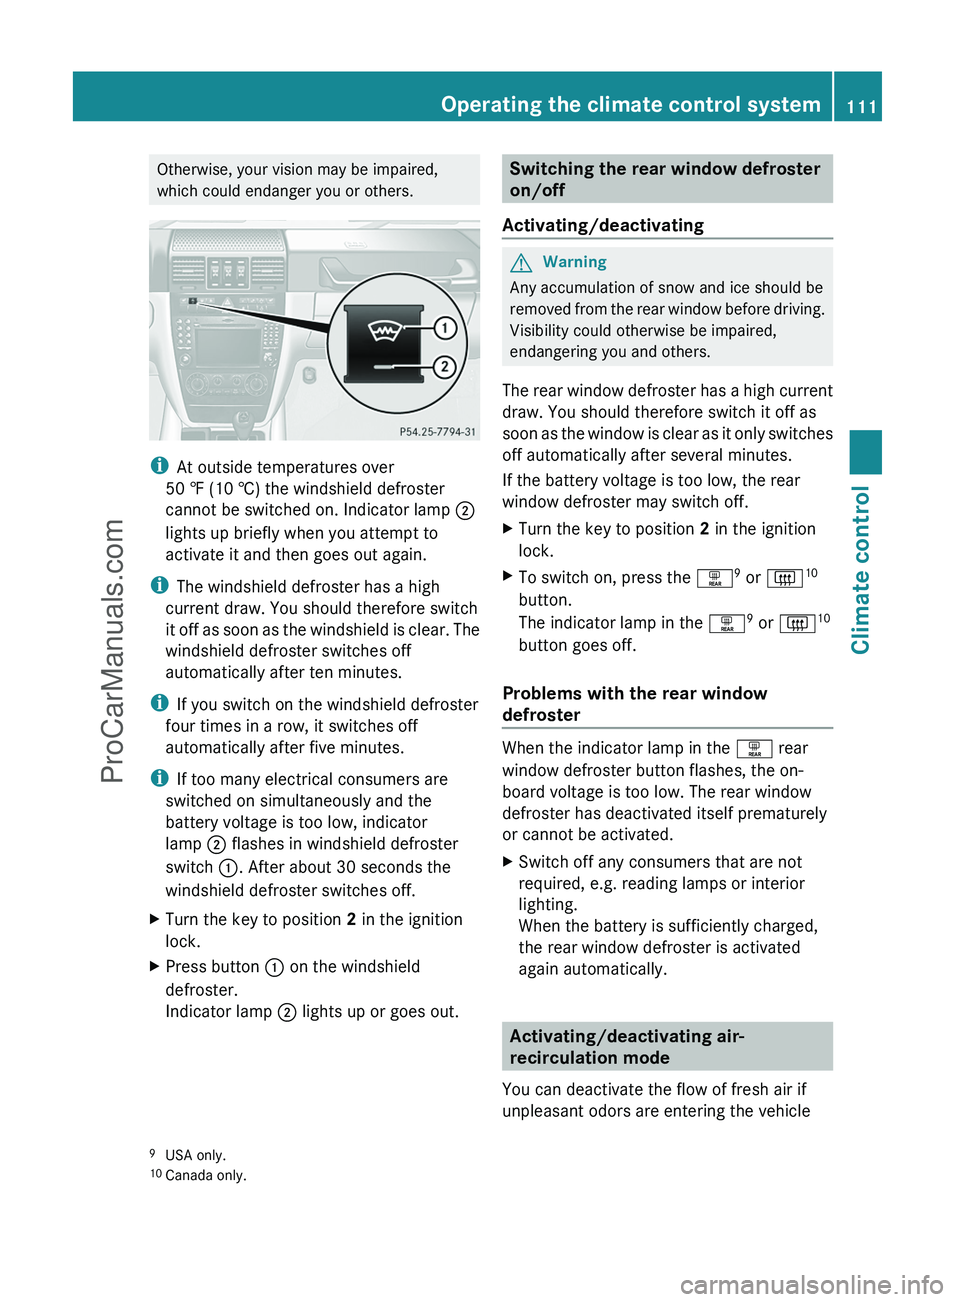
i At outside temperatures over
50 ‡ (10 †) the windshield defroster
cannot be switched on. Indicator lamp ;
lights up briefly when you attempt to
activate it and then goes out again.
i The windshield defroster has a high
current draw. You should therefore switch
it off as soon as the windshield is clear. The
windshield defroster switches off
automatically after ten minutes.
i If you switch on the windshield defroster
four times in a row, it switches off
automatically after five minutes.
i If too many electrical consumers are
switched on simultaneously and the
battery voltage is too low, indicator
lamp ; flashes in windshield defroster
switch :. After about 30 seconds the
windshield defroster switches off.
XTurn the key to position 2 in the ignition
lock.XPress button : on the windshield
defroster.
Indicator lamp ; lights up or goes out.Switching the rear window defroster
on/off
Activating/deactivatingGWarning
Any accumulation of snow and ice should be
removed from the rear window before driving.
Visibility could otherwise be impaired,
endangering you and others.
The rear window defroster has a high current
draw. You should therefore switch it off as
soon as the window is clear as it only switches
off automatically after several minutes.
If the battery voltage is too low, the rear
window defroster may switch off.
XTurn the key to position 2 in the ignition
lock.XTo switch on, press the ª9
or | 10
button.
The indicator lamp in the ª9
or | 10
button goes off.
Problems with the rear window
defroster
When the indicator lamp in the ª rear
window defroster button flashes, the on-
board voltage is too low. The rear window
defroster has deactivated itself prematurely
or cannot be activated.
XSwitch off any consumers that are not
required, e.g. reading lamps or interior
lighting.
When the battery is sufficiently charged,
the rear window defroster is activated
again automatically.
Activating/deactivating air-
recirculation mode
You can deactivate the flow of fresh air if
unpleasant odors are entering the vehicle
9 USA only.
10 Canada only.Operating the climate control system111Climate controlZProCarManuals.com
Page 128 of 288
Problems with the automatic transmissionProblemPossible causes/consequences and M SolutionsThe acceleration ability
is deteriorating.
The transmission no
longer changes gear.The transmission is in emergency mode.
It is only possible to shift into second gear and reverse gear.XStop the vehicle.XShift the transmission to position P.XTurn the SmartKey to position 0 in the ignition lock.XWait at least 10 seconds before restarting the engine.XShift the transmission to position D or R.
If D is selected, the transmission shifts into second gear; if R is
selected, the transmission shifts into reverse gear.XHave the transmission checked at a qualified specialist
workshop, e.g. an authorized Mercedes-Benz Service Center,
immediately.You hear a warning
tone.You have:
R switched off the engine
R opened the driver's door
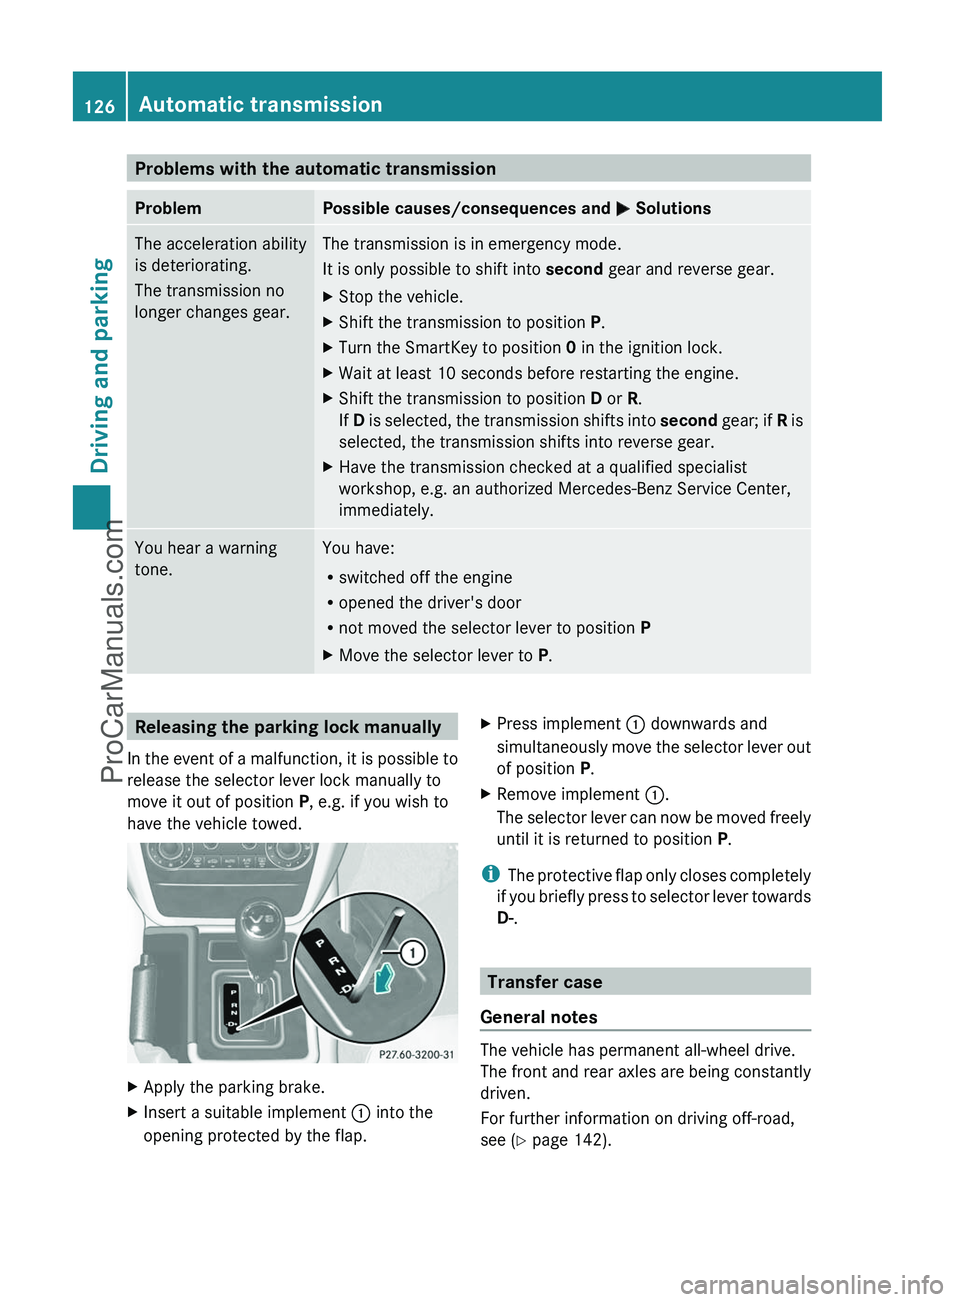
R not moved the selector lever to position PXMove the selector lever to P.Releasing the parking lock manually
In the event of a malfunction, it is possible to
release the selector lever lock manually to
move it out of position P, e.g. if you wish to
have the vehicle towed.XApply the parking brake.XInsert a suitable implement : into the
opening protected by the flap.XPress implement : downwards and
simultaneously move the selector lever out
of position P.XRemove implement :.
The selector lever can now be moved freely
until it is returned to position P.
i
The protective flap only closes completely
if you briefly press to selector lever towards
D- .
Transfer case
General notes
The vehicle has permanent all-wheel drive.
The front and rear axles are being constantly
driven.
For further information on driving off-road,
see ( Y page 142).
126Automatic transmissionDriving and parking
ProCarManuals.com
Page 141 of 288
Braking applications triggered
automatically by ESP ®
may otherwise
seriously damage the brake system.
If your brake system is subject only to
moderate loads, you should test the
functionality of your brakes at regular
intervals by pressing firmly on the brake pedal
at high speeds. This improves the grip of the
brake pads.GWarning
Make sure that you do not endanger other
road users when you apply the brakes.
You can find a description of Brake Assist
(BAS) on ( Y page 56).
High-performance brake system for
AMG vehicles
The high-performance brake system is
installed only on the G 55 AMG.
GWarning
New vehicle brake pads and discs, and
replacement brake pads and discs may take
several hundred miles of driving until they
provide optimum braking efficiency. Until that
time, you may need to use increased brake
pedal pressure while braking. Please be aware
of this and adjust your driving and braking
accordingly during this break-in period.
Excessive high-demand braking will cause
correspondingly high brake wear. Please be
attentive to the brake warning lamp in the
instrument cluster and brake condition
messages in the multifunction display.
Especially for high performance driving, it is
important to maintain and have the brake
system checked regularly.
The high-performance brake system is
designed for heavy loads. This may lead to
noise when braking. This will depend on:
R speed
R braking force
R environmental conditions, such as
temperature and humidity
The wear of individual components of the
brake system, such as the brake pads/linings
or brake discs, depends on the individual
driving style and operating conditions.
For this reason, it is impossible to state a
mileage that will be valid under all
circumstances. An aggressive driving style
will lead to high wear. You can obtain further
information about this from your authorized
Mercedes-Benz Center.
Parking brakeGWarning!
While performing this procedure please
assure that the vehicle is stopped before
applying the parking brake. Otherwise the
rear wheels could lock up. You could lose
control of the vehicle and cause an accident.
In addition, the vehicle’s brake lights do not
light up when the parking brake is engaged.
Make sure not to endanger any other road
users when you engage the parking brake.
To maintain the braking effect of the parking
brake between the service intervals, you can
briefly apply the parking brake while driving.
XDrive about 20 mph (30 km/h) on a dry,
even road.XPull the parking brake upwards with the
release button depressed ( Y page 135),
until the vehicle brakes noticeably.XHold the lever in this position for
approximately ten seconds and then push
it all the way down again.
! Do not drive faster than 25 mph
(40 km/h). Otherwise, you could damage
the brakes.
Driving tips139Driving and parkingZProCarManuals.com