2011 MERCEDES-BENZ G-CLASS warning
[x] Cancel search: warningPage 90 of 288
passenger side returns to the driving
position.
Calling up a stored parking position
settingXWith the key in position 2 in the ignition
lock and the exterior mirror on the front-
passenger side activated, engage reverse
gear.
The exterior mirror on the front-passenger
side moves to the stored parking position.
The exterior mirror on the front-passenger
side moves back to its original position:
R as soon as you exceed a speed of
10 km/h
R about ten seconds after you have
disengaged reverse gear R
R if you press button = for the exterior
mirror on the driver's side
Memory functions
Storing settings
With the memory function, you can store up
to three different settings, e.g. for three
different people.
The following settings are stored as a single
memory preset:
R position of the seat, backrest and head
restraint
R driver's side: steering wheel position
R driver's side: position of the exterior
mirrors on the driver's and front-passenger
sides
GWarning
Do not activate the memory function while
driving. Activating the memory function while
driving could cause the driver to lose control
of the vehicle.
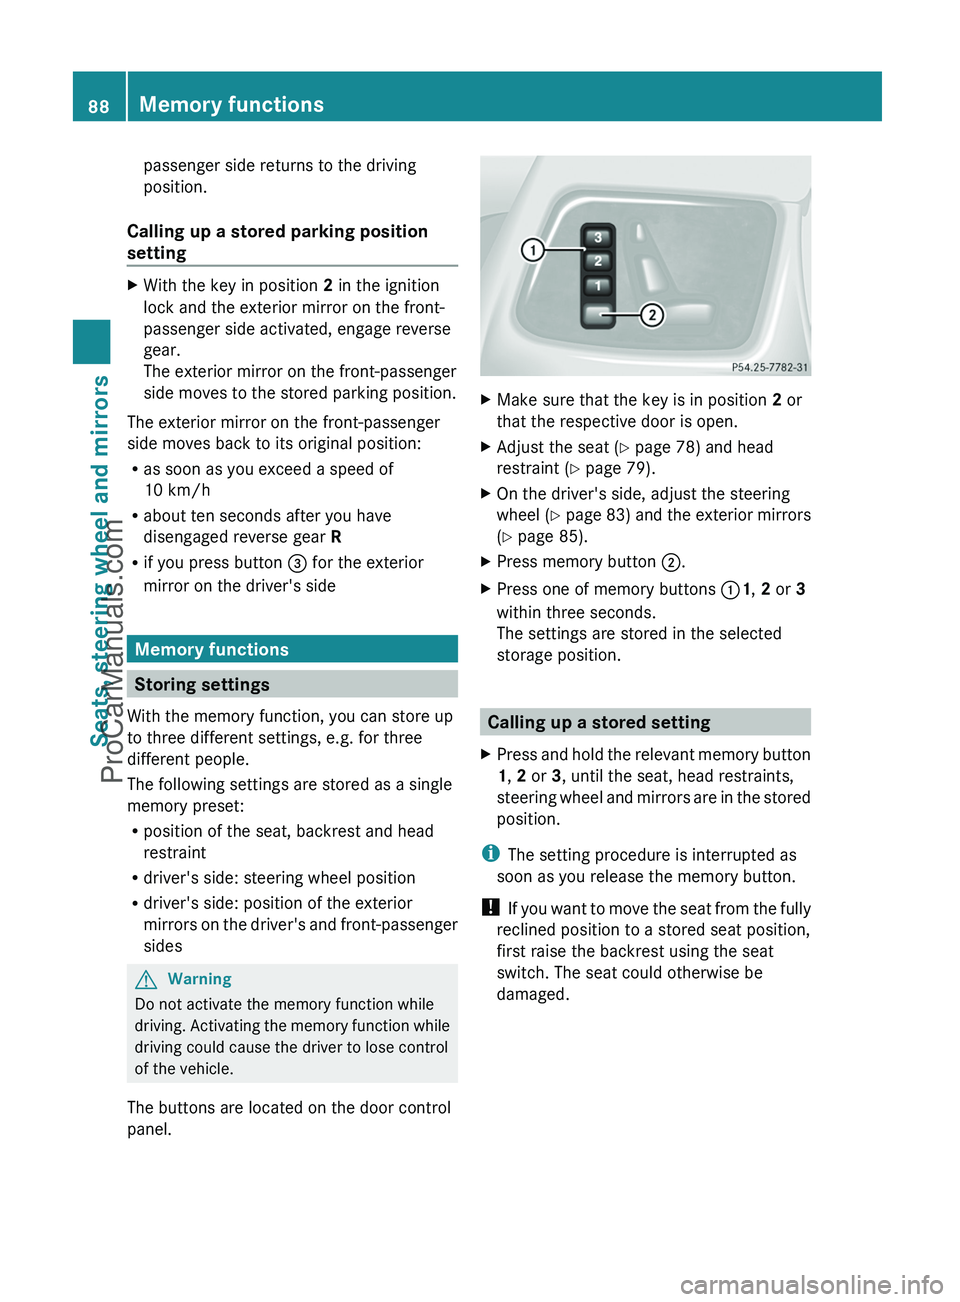
The buttons are located on the door control
panel.
XMake sure that the key is in position 2 or
that the respective door is open.XAdjust the seat ( Y page 78) and head
restraint ( Y page 79).XOn the driver's side, adjust the steering
wheel ( Y page 83) and the exterior mirrors
( Y page 85).XPress memory button ;.XPress one of memory buttons :1, 2 or 3
within three seconds.
The settings are stored in the selected
storage position.
Calling up a stored setting
XPress and hold the relevant memory button
1 , 2 or 3, until the seat, head restraints,
steering wheel and mirrors are in the stored
position.
i The setting procedure is interrupted as
soon as you release the memory button.
! If you want to move the seat from the fully
reclined position to a stored seat position,
first raise the backrest using the seat
switch. The seat could otherwise be
damaged.
88Memory functionsSeats, steering wheel and mirrors
ProCarManuals.com
Page 92 of 288
Vehicle equipment
i This manual describes all the standard
and optional equipment of your vehicle
which was available at the time of
purchase. Country-specific differences are
possible. Please note that your vehicle may
not be equipped with all features
described. This also applies to safety-
relevant systems and functions.
Exterior lighting
Important safety notes
For reasons of safety, Mercedes-Benz
recommends that you drive with the lights
switched on even during the daytime. In some
countries, operation of the headlamps varies
due to legal requirements and self-imposed
obligations. In these countries, the daytime
running lamps are automatically switched on
when the engine is started.
Information about driving abroad
Converting to symmetrical low beam
when driving abroad: switch the headlamps
to symmetrical low beam in countries in
which traffic drives on the opposite side of the
road to the country where the vehicle is
registered. This prevents glare to oncoming
traffic. Symmetrical lights do not illuminate
as large an area of the edge of the road.
Have the headlamps converted at a qualified
specialist workshop, e.g. an authorized
Mercedes-Benz Center, as close to the border
as possible before driving in these countries.
Converting to asymmetrical low beam
after returning: have the headlamps
converted back to asymmetrical low beam at
a qualified specialist workshop, e.g. an
authorized Mercedes-Benz Center, as soon as
possible after crossing the border when
returning.
Light switch
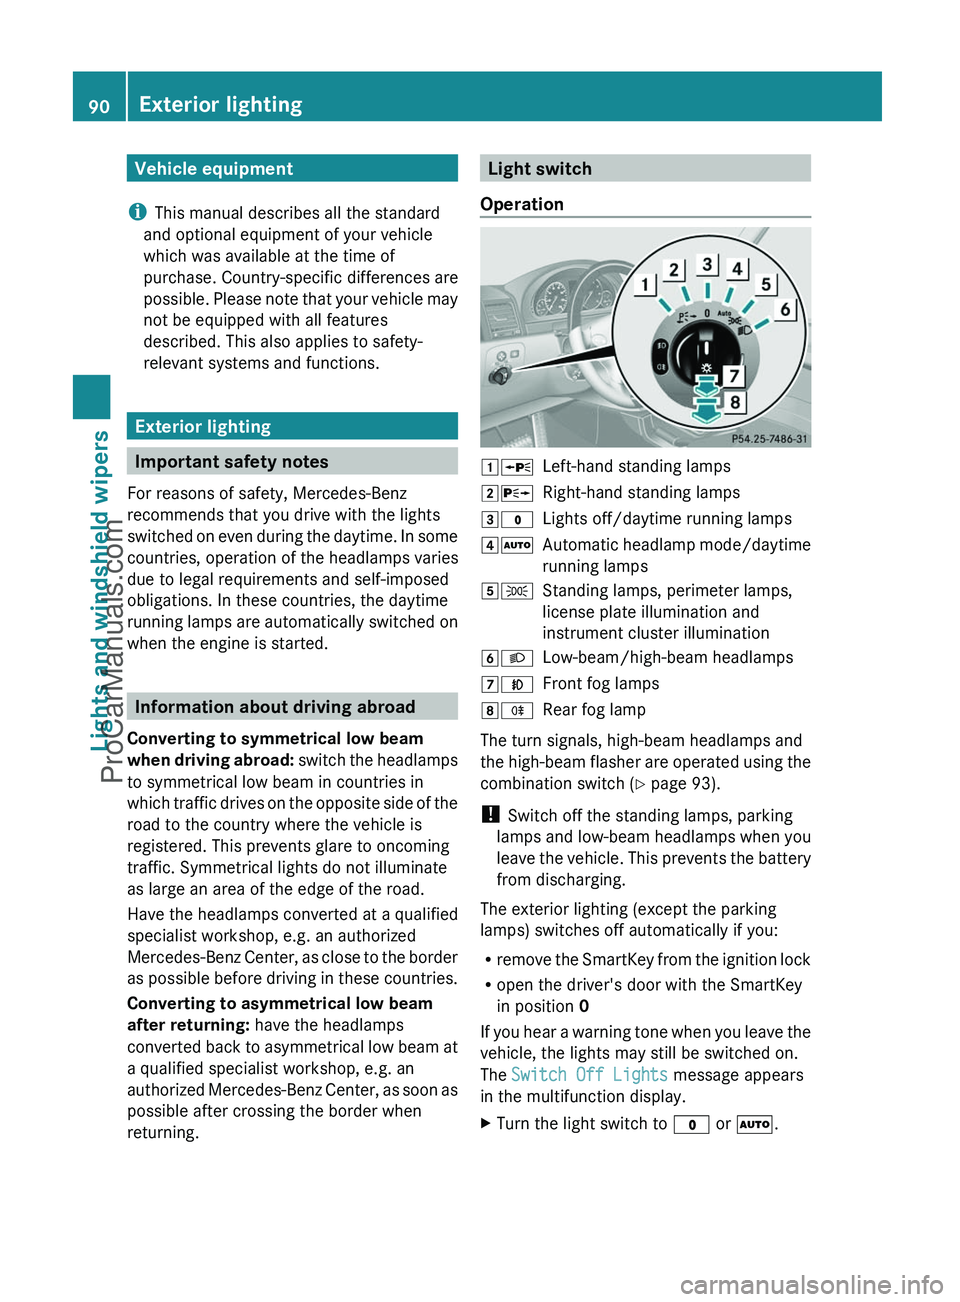
Operation1 WLeft-hand standing lamps2XRight-hand standing lamps3$Lights off/daytime running lamps4ÃAutomatic headlamp mode/daytime
running lamps5 TStanding lamps, perimeter lamps,
license plate illumination and
instrument cluster illumination6 LLow-beam/high-beam headlamps7NFront fog lamps8RRear fog lamp
The turn signals, high-beam headlamps and
the high-beam flasher are operated using the
combination switch ( Y page 93).
! Switch off the standing lamps, parking
lamps and low-beam headlamps when you
leave the vehicle. This prevents the battery
from discharging.
The exterior lighting (except the parking
lamps) switches off automatically if you:
R remove the SmartKey from the ignition lock
R open the driver's door with the SmartKey
in position 0
If you hear a warning tone when you leave the
vehicle, the lights may still be switched on.
The Switch Off Lights message appears
in the multifunction display.
XTurn the light switch to $ or à .90Exterior lightingLights and windshield wipers
ProCarManuals.com
Page 93 of 288
XIf you see the Turn off lights or
remove key message in the multifunction
display, remove the SmartKey from the
ignition lock.
or
XTurn the light switch to $ or à .
Low-beam headlamps
XTo switch on: turn the SmartKey to
position 2 in the ignition lock or start the
engine.XTurn the light switch to L.
The L indicator lamp in the instrument
cluster lights up.XTo switch off: turn the light switch to
$ .
Daytime running lamps
Daytime running lamps in Canada
The "daytime running lamps" function is
required by law in Canada. It cannot therefore
be deactivated.
XTurn the light switch to $ or à .
When the engine is running: depending on
the ambient light, the low-beam headlamps
or the parking lamps are switched on.
When the low-beam headlamps are
switched on, the L indicator lamp in the
instrument cluster lights up.
If the light switch is set to $ or à , you
cannot activate the high-beam headlamps.
However, the high-beam flasher can always
be used. Turn the light switch to L when
driving at night. You can switch on the high-
beam headlamps in this position.
When the engine is running and the vehicle is
stationary: if you move the selector lever from
a driving position to N or P, the low-beam
headlamps go out after three minutes.
When the engine is running: if you turn the
light switch to T, you turn on the parking
lamps and low-beam headlamps.
When the engine is running: if you turn the
light switch to L, the manual settings take
precedence over the daytime running lamps.
Daytime running lamps in the USA
In the USA, the daytime running lamps are
deactivated upon delivery from the factory.XTo switch on: activate the daytime
running lamps function in the on-board
computer ( Y page 164).XTurn the light switch to $ or à .
When the engine is on: the low-beam
headlamps are switched on. The L
indicator lamp in the instrument cluster
lights up.
If the light switch is set to $ or à , you
cannot switch on the high-beam headlamps
in bright conditions. Turn the light switch to
L . You can switch on the high-beam
headlamps in this position.
If the light switch is set to $, Ã or
L , you can switch on the high-beam
headlamps in less bright conditions.
However, the high-beam flasher can always
be used.
Turn the light switch to L when driving at
night.
When the engine is running: if you turn the
light switch to T or L , the manual
settings take precedence over the daytime
running lamps.
Automatic headlamp mode
GWarning
If the exterior lamp switch is set to Ã, the
headlamps will not automatically come on
under foggy conditions.
To minimize risk to you and to others, activate
headlamps by turning exterior lamp switch to
L when traffic and/or ambient lighting
conditions require you to do so.
In low ambient lighting conditions, only switch
from position à to L with the vehicle
at a standstill in a safe location. Switching
Exterior lighting91Lights and windshield wipersZProCarManuals.com
Page 94 of 288
from à to L will briefly switch off the
headlamps. Doing so while driving in low
ambient lighting conditions may result in an
accident.
The automatic headlamp feature is only an aid
to the driver. The driver is responsible for the
operation of the vehicle’s lights at all times.
The parking lamps, low-beam headlamps and
license plate lamp are switched on or off
automatically, depending on the brightness of
the ambient light.XTo switch on: turn the light switch to
à .
SmartKey in position 1 in the ignition lock:
the standing lamps are switched on or off
automatically depending on the brightness
of the ambient light.
When the engine is running: depending on
the ambient light, the parking lamps, the
low-beam headlamps and the license plate
lamp are switched on or off automatically.
When the low-beam headlamps are
switched on, the L indicator lamp in the
instrument cluster lights up.
Canada only: if the light switch is in position
$ or à , you cannot switch on the high-
beam headlamps. However, the high-beam
flasher can always be used. Turn the light
switch to L when driving at night. You can
switch on the high-beam headlamps in this
position.
Front fog lamps and rear fog lamp
Front fog lamps
GWarning
If you suspect that driving conditions will be
foggy, turn the light switch to L before you
start your journey. Your vehicle may
otherwise not be visible and you could
endanger yourself and others.
GWarning
In low ambient lighting or foggy conditions,
only switch from position à to L with
the vehicle at a standstill in a safe location.
Switching from à to L will briefly
switch off the headlamps. Doing so while
driving in low ambient lighting conditions may
result in an accident.
XTo switch on: turn the SmartKey to
position 2 in the ignition lock or start the
engine.XTurn the light switch to L or T . If the
light switch is set to Ã, you cannot
switch on the fog lamps.XPull the light switch out to the first detent.
The green N indicator lamp on the light
switch lights up.XTo switch off: press the light switch in as
far as it will go.
The green N indicator lamp on the light
switch goes out.
Rear fog lamp
XTo switch on: turn the SmartKey to
position 2 in the ignition lock or start the
engine.XTurn the light switch to L or T . When
the light switch is set to Ã, you cannot
switch on the rear fog lamp.XPull the light switch out to the second stop.
The yellow R indicator lamp on the light
switch lights up.XTo switch off: press the light switch in as
far as it will go.
The yellow R indicator lamp on the light
switch goes out.92Exterior lightingLights and windshield wipers
ProCarManuals.com
Page 95 of 288
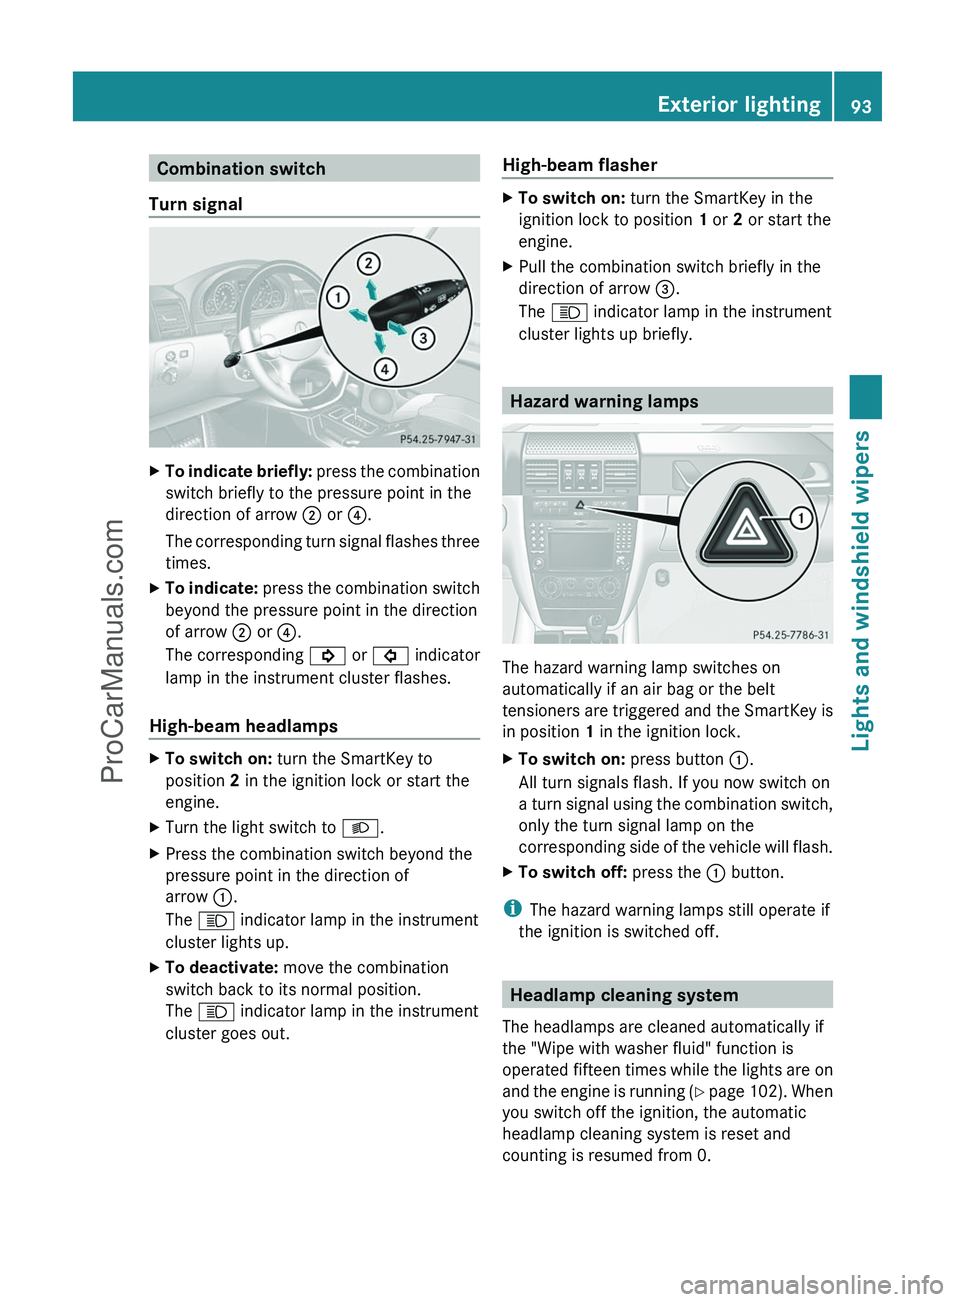
Combination switch
Turn signalXTo indicate briefly: press the combination
switch briefly to the pressure point in the
direction of arrow ; or ?.
The corresponding turn signal flashes three
times.XTo indicate: press the combination switch
beyond the pressure point in the direction
of arrow ; or ?.
The corresponding ! or # indicator
lamp in the instrument cluster flashes.
High-beam headlamps
XTo switch on: turn the SmartKey to
position 2 in the ignition lock or start the
engine.XTurn the light switch to L.XPress the combination switch beyond the
pressure point in the direction of
arrow :.
The K indicator lamp in the instrument
cluster lights up.XTo deactivate: move the combination
switch back to its normal position.
The K indicator lamp in the instrument
cluster goes out.High-beam flasherXTo switch on: turn the SmartKey in the
ignition lock to position 1 or 2 or start the
engine.XPull the combination switch briefly in the
direction of arrow =.
The K indicator lamp in the instrument
cluster lights up briefly.
Hazard warning lamps
The hazard warning lamp switches on
automatically if an air bag or the belt
tensioners are triggered and the SmartKey is
in position 1 in the ignition lock.
XTo switch on: press button :.
All turn signals flash. If you now switch on
a turn signal using the combination switch,
only the turn signal lamp on the
corresponding side of the vehicle will flash.XTo switch off: press the : button.
i
The hazard warning lamps still operate if
the ignition is switched off.
Headlamp cleaning system
The headlamps are cleaned automatically if
the "Wipe with washer fluid" function is
operated fifteen times while the lights are on
and the engine is running (Y page 102). When
you switch off the ignition, the automatic
headlamp cleaning system is reset and
counting is resumed from 0.
Exterior lighting93Lights and windshield wipersZProCarManuals.com
Page 97 of 288
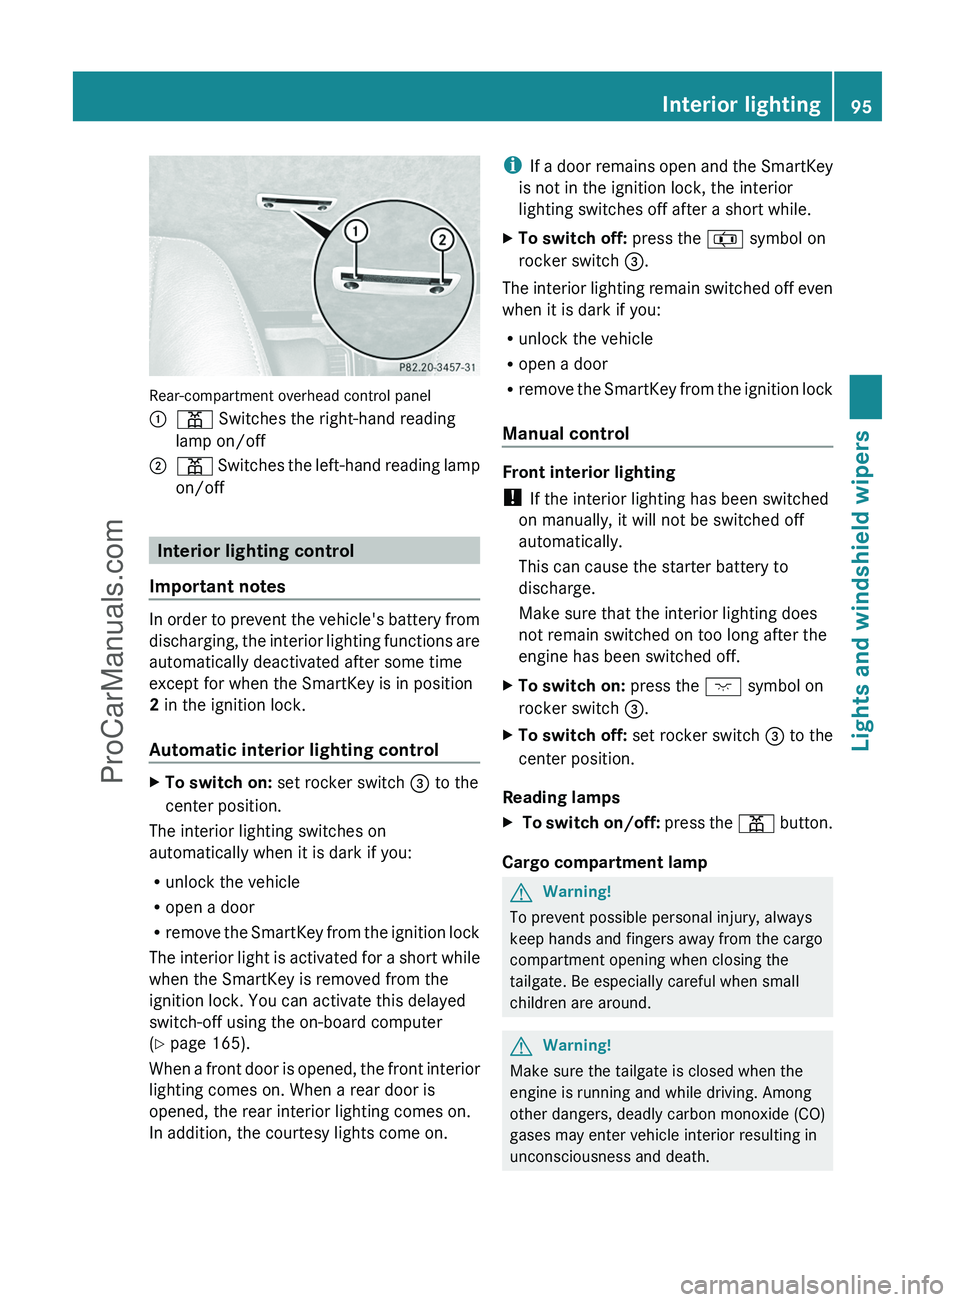
Rear-compartment overhead control panel
:p Switches the right-hand reading
lamp on/off;p Switches the left-hand reading lamp
on/off
Interior lighting control
Important notes
In order to prevent the vehicle's battery from
discharging, the interior lighting functions are
automatically deactivated after some time
except for when the SmartKey is in position
2 in the ignition lock.
Automatic interior lighting control
XTo switch on: set rocker switch = to the
center position.
The interior lighting switches on
automatically when it is dark if you:
R unlock the vehicle
R open a door
R remove the SmartKey from the ignition lock
The interior light is activated for a short while
when the SmartKey is removed from the
ignition lock. You can activate this delayed
switch-off using the on-board computer
( Y page 165).
When a front door is opened, the front interior
lighting comes on. When a rear door is
opened, the rear interior lighting comes on.
In addition, the courtesy lights come on.
i If a door remains open and the SmartKey
is not in the ignition lock, the interior
lighting switches off after a short while.XTo switch off: press the z symbol on
rocker switch =.
The interior lighting remain switched off even
when it is dark if you:
R unlock the vehicle
R open a door
R remove the SmartKey from the ignition lock
Manual control
Front interior lighting
! If the interior lighting has been switched
on manually, it will not be switched off
automatically.
This can cause the starter battery to
discharge.
Make sure that the interior lighting does
not remain switched on too long after the
engine has been switched off.
XTo switch on: press the c symbol on
rocker switch =.XTo switch off: set rocker switch = to the
center position.
Reading lamps
X To switch on/off: press the p button.
Cargo compartment lamp
GWarning!
To prevent possible personal injury, always
keep hands and fingers away from the cargo
compartment opening when closing the
tailgate. Be especially careful when small
children are around.
GWarning!
Make sure the tailgate is closed when the
engine is running and while driving. Among
other dangers, deadly carbon monoxide (CO)
gases may enter vehicle interior resulting in
unconsciousness and death.
Interior lighting95Lights and windshield wipersZProCarManuals.com
Page 98 of 288
! Switch off the cargo compartment lamp if
you wish to leave the rear door open for a
longer period. The battery may otherwise
discharge.XTo switch on/off: press the t button.
i
If you open the rear door, the cargo
compartment lamp comes on. Then, you
cannot switch it off using the t button.
Switch off the cargo compartment lamp if
you wish to leave the rear door open for a
longer period. This prevents the battery
from discharging.
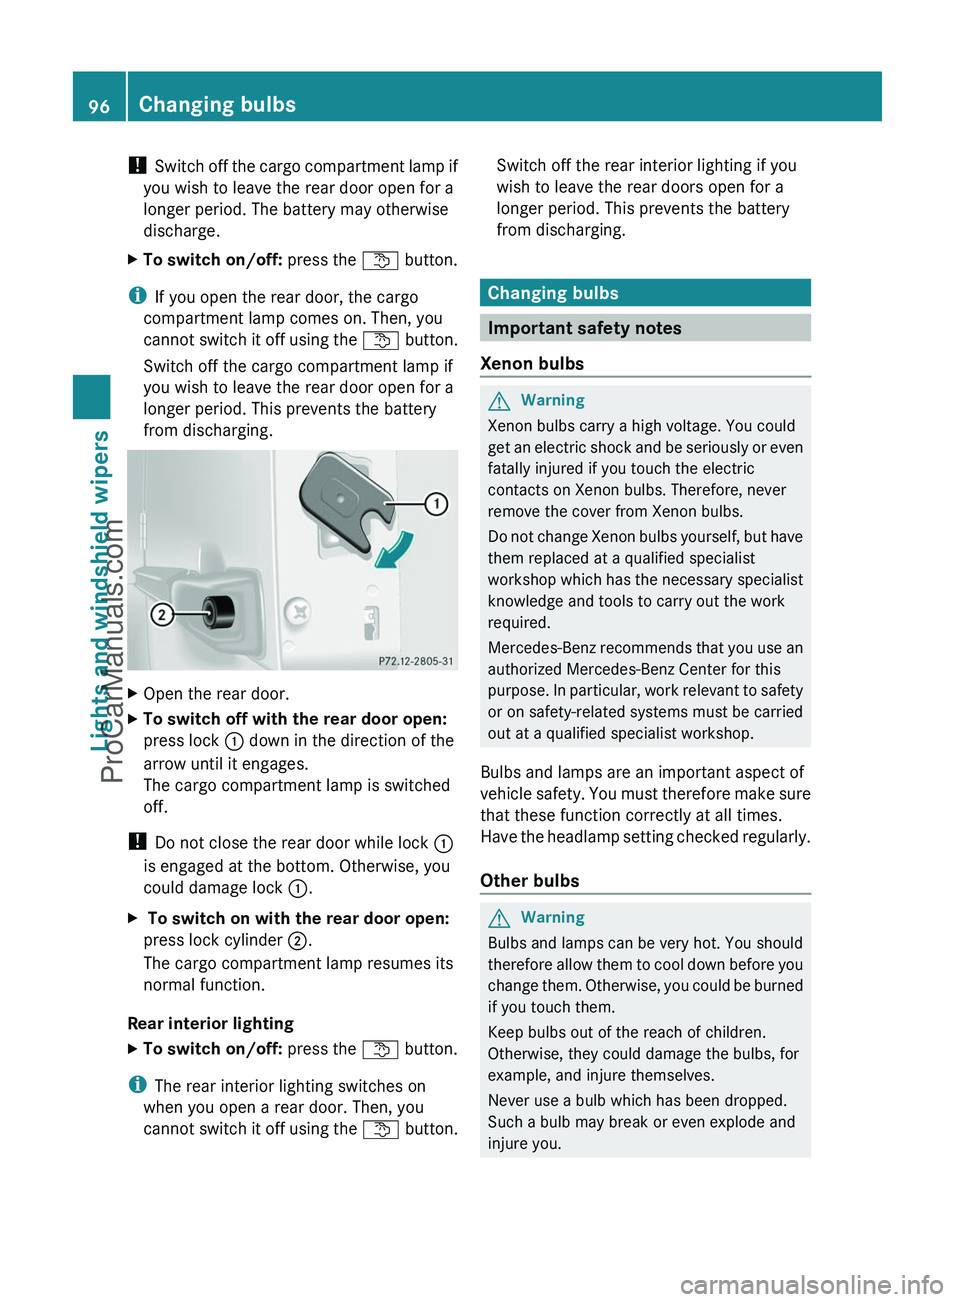
XOpen the rear door.XTo switch off with the rear door open:
press lock : down in the direction of the
arrow until it engages.
The cargo compartment lamp is switched
off.
! Do not close the rear door while lock :
is engaged at the bottom. Otherwise, you
could damage lock :.
X To switch on with the rear door open:
press lock cylinder ;.
The cargo compartment lamp resumes its
normal function.
Rear interior lighting
XTo switch on/off: press the t button.
i
The rear interior lighting switches on
when you open a rear door. Then, you
cannot switch it off using the t button.
Switch off the rear interior lighting if you
wish to leave the rear doors open for a
longer period. This prevents the battery
from discharging.
Changing bulbs
Important safety notes
Xenon bulbs
GWarning
Xenon bulbs carry a high voltage. You could
get an electric shock and be seriously or even
fatally injured if you touch the electric
contacts on Xenon bulbs. Therefore, never
remove the cover from Xenon bulbs.
Do not change Xenon bulbs yourself, but have
them replaced at a qualified specialist
workshop which has the necessary specialist
knowledge and tools to carry out the work
required.
Mercedes-Benz recommends that you use an
authorized Mercedes-Benz Center for this
purpose. In particular, work relevant to safety
or on safety-related systems must be carried
out at a qualified specialist workshop.
Bulbs and lamps are an important aspect of
vehicle safety. You must therefore make sure
that these function correctly at all times.
Have the headlamp setting checked regularly.
Other bulbs
GWarning
Bulbs and lamps can be very hot. You should
therefore allow them to cool down before you
change them. Otherwise, you could be burned
if you touch them.
Keep bulbs out of the reach of children.
Otherwise, they could damage the bulbs, for
example, and injure themselves.
Never use a bulb which has been dropped.
Such a bulb may break or even explode and
injure you.
96Changing bulbsLights and windshield wipers
ProCarManuals.com
Page 103 of 288
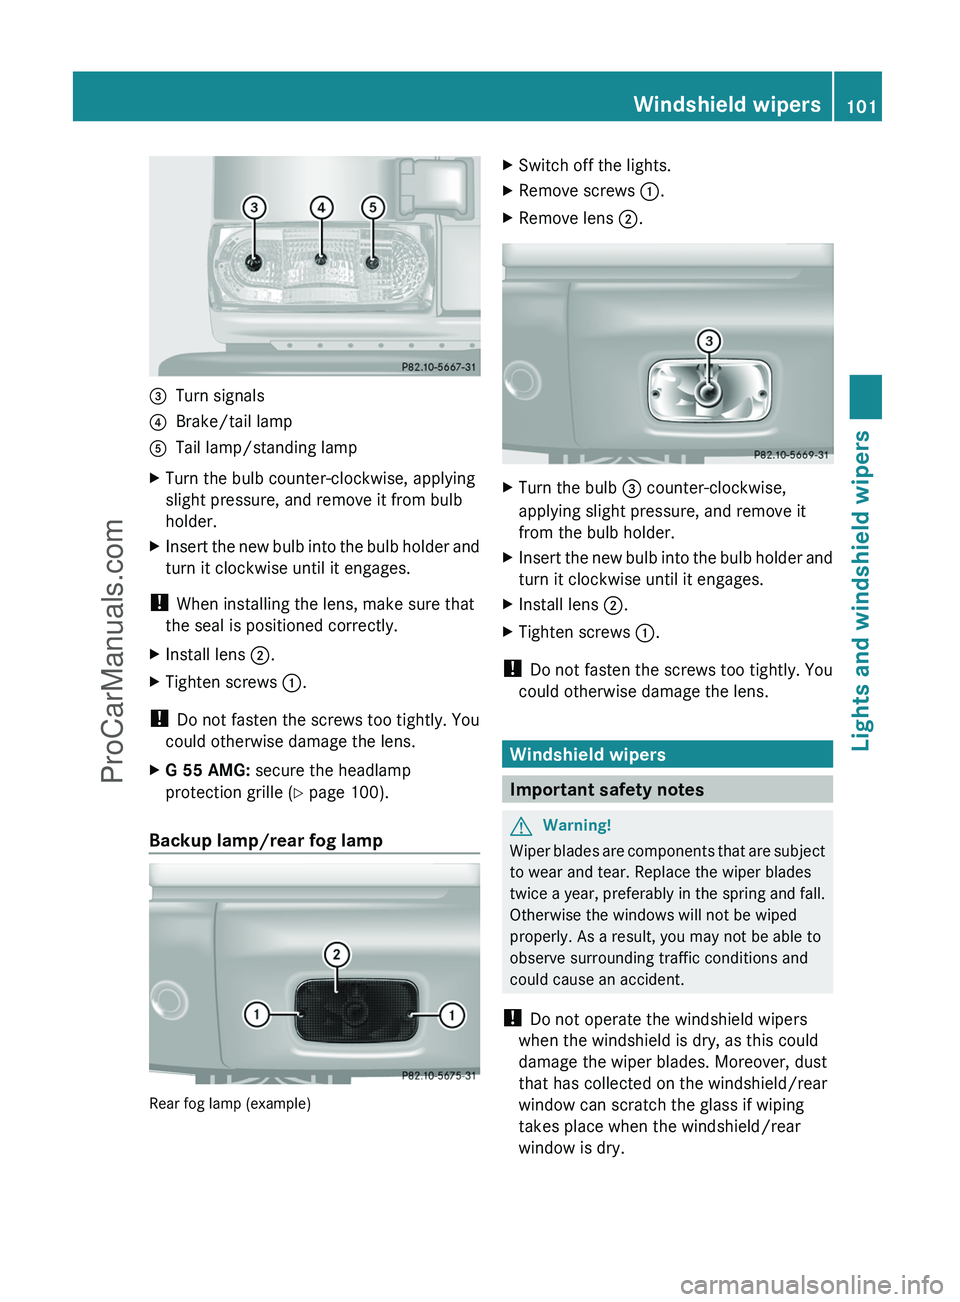
=Turn signals?Brake/tail lampATail lamp/standing lampXTurn the bulb counter-clockwise, applying
slight pressure, and remove it from bulb
holder.XInsert the new bulb into the bulb holder and
turn it clockwise until it engages.
! When installing the lens, make sure that
the seal is positioned correctly.
XInstall lens ;.XTighten screws :.
!
Do not fasten the screws too tightly. You
could otherwise damage the lens.
XG 55 AMG: secure the headlamp
protection grille ( Y page 100).
Backup lamp/rear fog lamp
Rear fog lamp (example)
XSwitch off the lights.XRemove screws :.XRemove lens ;.XTurn the bulb = counter-clockwise,
applying slight pressure, and remove it
from the bulb holder.XInsert the new bulb into the bulb holder and
turn it clockwise until it engages.XInstall lens ;.XTighten screws :.
!
Do not fasten the screws too tightly. You
could otherwise damage the lens.
Windshield wipers
Important safety notes
GWarning!
Wiper blades are components that are subject
to wear and tear. Replace the wiper blades
twice a year, preferably in the spring and fall.
Otherwise the windows will not be wiped
properly. As a result, you may not be able to
observe surrounding traffic conditions and
could cause an accident.
! Do not operate the windshield wipers
when the windshield is dry, as this could
damage the wiper blades. Moreover, dust
that has collected on the windshield/rear
window can scratch the glass if wiping
takes place when the windshield/rear
window is dry.
Windshield wipers101Lights and windshield wipersZProCarManuals.com