2011 MERCEDES-BENZ G-CLASS warning
[x] Cancel search: warningPage 75 of 288
GWarning!
When closing the sliding sunroof, make sure
that there is no danger of anyone being
harmed by the closing procedure.
The opening procedure of the sliding sunroof
can be immediately halted by releasing the
sunroof switch or, if the sunroof switch was
moved past the resistance point and released,
by moving the sunroof switch in any direction.
The closing procedure of the sliding sunroof
can be immediately halted by releasing the
sliding sunroof switch. The closing procedure
of the sliding sunroof can be immediately
reversed by moving the sliding sunroof switch
toward : or ?.
If you are not wearing a seat belt, or are not
wearing it correctly, there is a risk that you
could be thrown through the opening in the
event of the vehicle overturning. An opening
of this kind poses a risk of injury even to
passengers who are wearing their seat belts
correctly, as parts of the body could protrude
from the vehicle interior.
! Only open the sliding sunroof if it is free
of snow and ice. Otherwise, malfunctions
may occur.
Do not allow anything to protrude from the
sliding sunroof. Otherwise, the seals could
be damaged.
! If the sliding sunroof cannot be opened or
closed due to a malfunction, contact a
qualified specialist workshop, e.g. an
authorized Mercedes-Benz Center.
! The weather can change abruptly. It could
start to rain or snow. Make sure that the
sliding sunroof is closed when you leave the
vehicle. The vehicle electronics can be
damaged if water enters the vehicle
interior.
i Resonance noises can occur in addition
to the usual airflow noises when the sliding
sunroof is open. They are caused by minor
pressure fluctuations in the vehicle interior.
Change the position of the sliding sunroof
or open a side window slightly to reduce or
eliminate these noises.
Opening and closing the sliding
sunroof
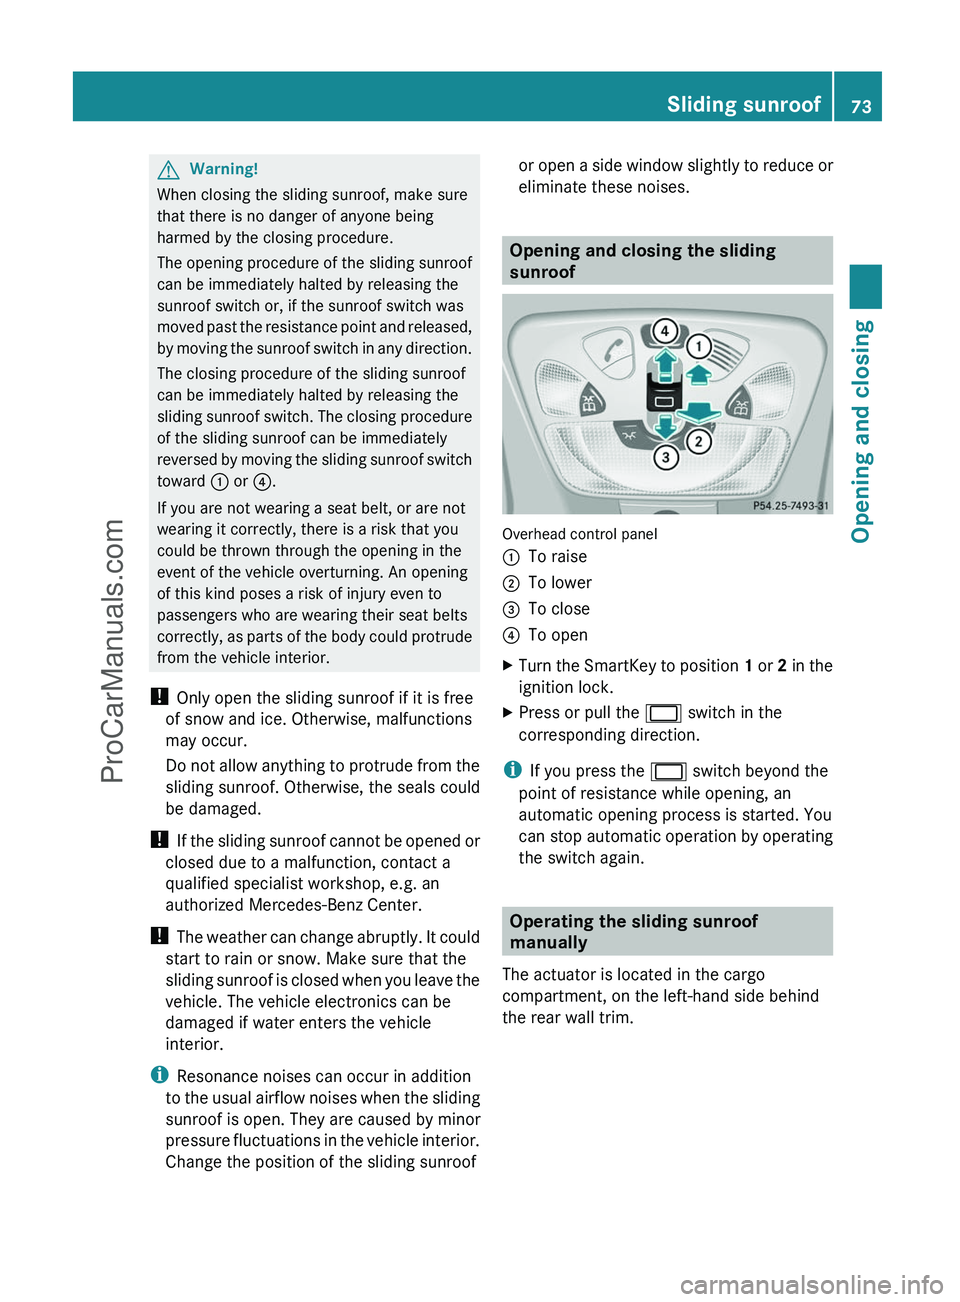
Overhead control panel
:To raise;To lower=To close?To openXTurn the SmartKey to position 1 or 2 in the
ignition lock.XPress or pull the 2 switch in the
corresponding direction.
i If you press the 2 switch beyond the
point of resistance while opening, an
automatic opening process is started. You
can stop automatic operation by operating
the switch again.
Operating the sliding sunroof
manually
The actuator is located in the cargo
compartment, on the left-hand side behind
the rear wall trim.
Sliding sunroof73Opening and closingZProCarManuals.com
Page 79 of 288
Seats
Important safety notes
GWarning
In order to avoid possible loss of vehicle
control, all seat, head restraint, steering
wheel and rear view mirror adjustments, as
well as fastening of seat belts, must be done
before setting the vehicle in motion.
GWarning
Do not adjust the driver's seat while driving.
Adjusting the seat while driving could cause
the driver to lose control of the vehicle.
Never travel in a moving vehicle with the seat
backrest in an excessively reclined position as
this can be dangerous. You could slide under
the seat belt in a collision. If you slide under
it, the seat belt would apply force at the
abdomen or neck. This could cause serious or
fatal injuries. The seat backrest and seat belts
provide the best restraint when the wearer is
in a position that is as upright as possible and
seat belts are properly positioned on the
body.
GWarning
Your seat belt must be adjusted so that you
can correctly fasten your seat belt.
Observe the following points:
R adjust the seat backrest until your arms are
slightly angled when holding the steering
wheel.
R adjust the seat to a comfortable seating
position that still allows you to reach the
accelerator/brake pedal safely. The
position should be as far back as possible
with the driver still able to operate the
controls properly.
R adjust the head restraint so that it is as
close to the head as possible and the center
of the head restraint supports the back of
the head at eye level.
R never place hands under the seat or near
any moving parts while a seat is being
adjusted.
Failure to do so could result in an accident
and/or serious personal injury.GWarning
The electrically adjustable seats can be
operated at any time. Therefore, do not leave
children unattended in the vehicle, or with
access to an unlocked vehicle. A child's
unsupervised access to a vehicle could result
in an accident and/or serious personal injury.
GWarning
According to accident statistics, children are
safer when properly restrained on the rear
seats than on the front-passenger seat. Thus,
we strongly recommend that children be
placed in the rear seat whenever possible.
Regardless of seating position, children 12
years old and under must be seated and
properly secured in an appropriately sized
child restraint system or booster seat
recommended for the size and weight of the
child. For additional information, see the
"Children in the vehicle" section.
A child's risk of serious or fatal injuries is
significantly increased if the child restraints
are not properly secured in the vehicle and/
or the child is not properly secured in the child
restraint.
GWarning
For your protection, drive only with properly
positioned head restraints.
Adjust the head restraint so that it is as close
to the head as possible and the center of the
head restraint supports the back of the head
at eye level. This will reduce the potential for
injury to the head and neck in the event of an
accident or similar situation.
Seats77Seats, steering wheel and mirrorsZProCarManuals.com
Page 81 of 288
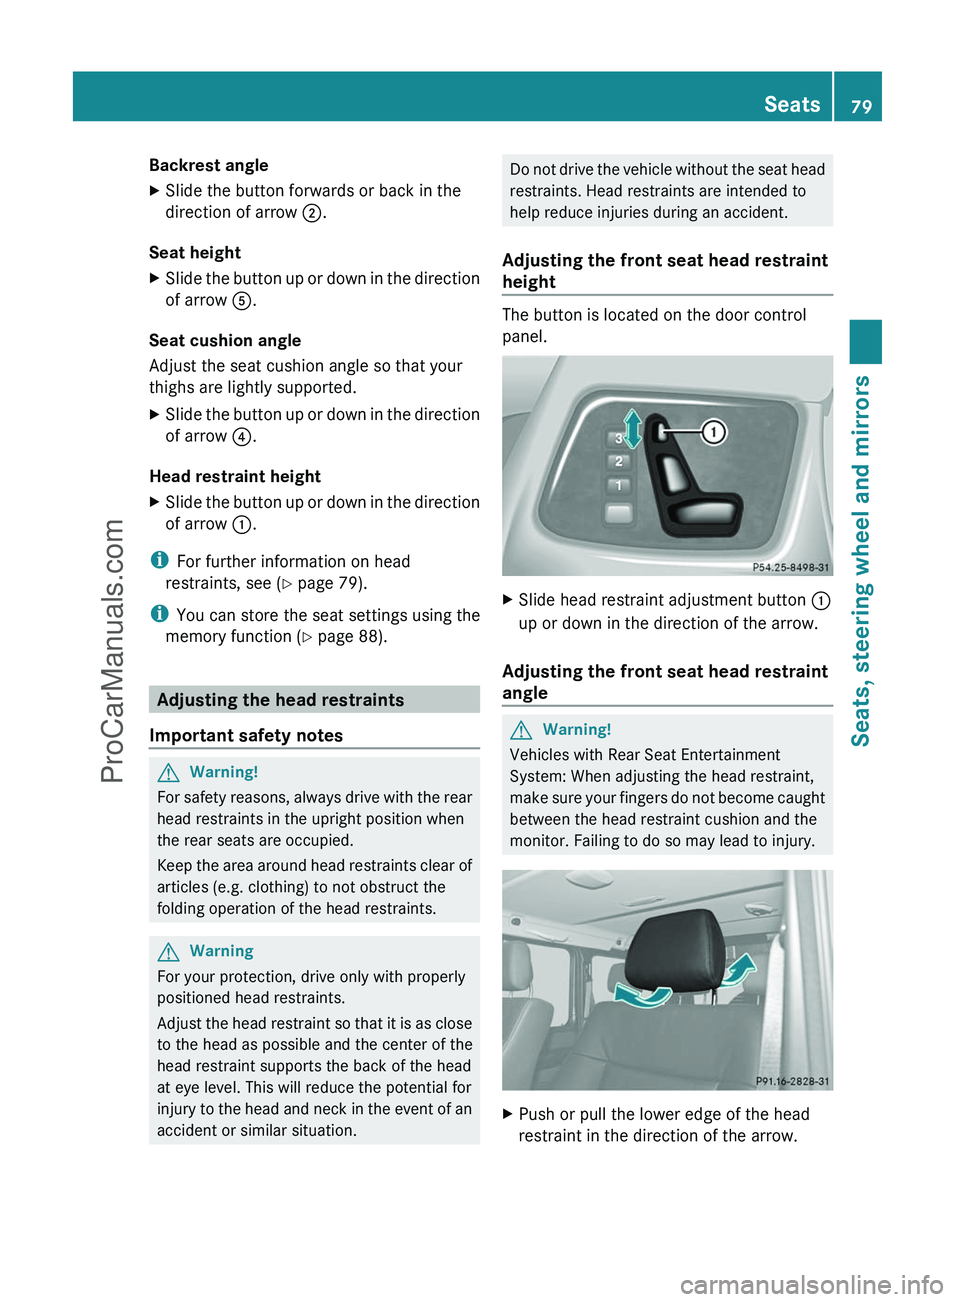
Backrest angleXSlide the button forwards or back in the
direction of arrow ;.
Seat height
XSlide the button up or down in the direction
of arrow A.
Seat cushion angle
Adjust the seat cushion angle so that your
thighs are lightly supported.
XSlide the button up or down in the direction
of arrow ?.
Head restraint height
XSlide the button up or down in the direction
of arrow :.
i
For further information on head
restraints, see ( Y page 79).
i You can store the seat settings using the
memory function ( Y page 88).
Adjusting the head restraints
Important safety notes
GWarning!
For safety reasons, always drive with the rear
head restraints in the upright position when
the rear seats are occupied.
Keep the area around head restraints clear of
articles (e.g. clothing) to not obstruct the
folding operation of the head restraints.
GWarning
For your protection, drive only with properly
positioned head restraints.
Adjust the head restraint so that it is as close
to the head as possible and the center of the
head restraint supports the back of the head
at eye level. This will reduce the potential for
injury to the head and neck in the event of an
accident or similar situation.
Do not drive the vehicle without the seat head
restraints. Head restraints are intended to
help reduce injuries during an accident.
Adjusting the front seat head restraint
height
The button is located on the door control
panel.
XSlide head restraint adjustment button :
up or down in the direction of the arrow.
Adjusting the front seat head restraint
angle
GWarning!
Vehicles with Rear Seat Entertainment
System: When adjusting the head restraint,
make sure your fingers do not become caught
between the head restraint cushion and the
monitor. Failing to do so may lead to injury.
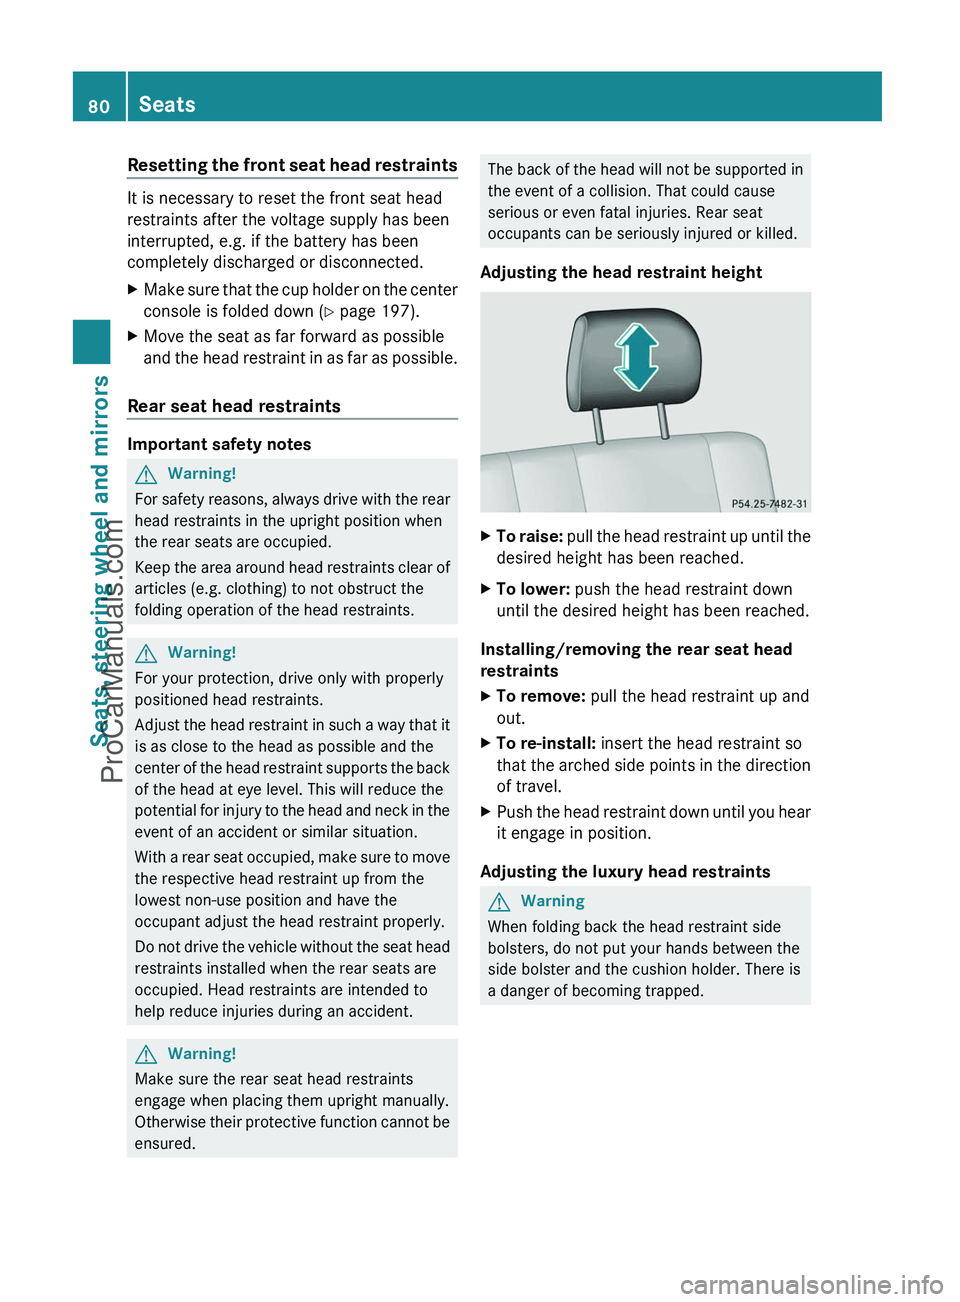
XPush or pull the lower edge of the head
restraint in the direction of the arrow.Seats79Seats, steering wheel and mirrorsZProCarManuals.com
Page 82 of 288
Resetting the front seat head restraints
It is necessary to reset the front seat head
restraints after the voltage supply has been
interrupted, e.g. if the battery has been
completely discharged or disconnected.
XMake sure that the cup holder on the center
console is folded down ( Y page 197).XMove the seat as far forward as possible
and the head restraint in as far as possible.
Rear seat head restraints
Important safety notes
GWarning!
For safety reasons, always drive with the rear
head restraints in the upright position when
the rear seats are occupied.
Keep the area around head restraints clear of
articles (e.g. clothing) to not obstruct the
folding operation of the head restraints.
GWarning!
For your protection, drive only with properly
positioned head restraints.
Adjust the head restraint in such a way that it
is as close to the head as possible and the
center of the head restraint supports the back
of the head at eye level. This will reduce the
potential for injury to the head and neck in the
event of an accident or similar situation.
With a rear seat occupied, make sure to move
the respective head restraint up from the
lowest non-use position and have the
occupant adjust the head restraint properly.
Do not drive the vehicle without the seat head
restraints installed when the rear seats are
occupied. Head restraints are intended to
help reduce injuries during an accident.
GWarning!
Make sure the rear seat head restraints
engage when placing them upright manually.
Otherwise their protective function cannot be
ensured.
The back of the head will not be supported in
the event of a collision. That could cause
serious or even fatal injuries. Rear seat
occupants can be seriously injured or killed.
Adjusting the head restraint heightXTo raise: pull the head restraint up until the
desired height has been reached.XTo lower: push the head restraint down
until the desired height has been reached.
Installing/removing the rear seat head
restraints
XTo remove: pull the head restraint up and
out.XTo re-install: insert the head restraint so
that the arched side points in the direction
of travel.XPush the head restraint down until you hear
it engage in position.
Adjusting the luxury head restraints
GWarning
When folding back the head restraint side
bolsters, do not put your hands between the
side bolster and the cushion holder. There is
a danger of becoming trapped.
80SeatsSeats, steering wheel and mirrors
ProCarManuals.com
Page 85 of 288
XMake sure that the SmartKey is in position
2 in the ignition lock.XTo switch on: press button : repeatedly
until the desired ventilation level is set.
i If you open the side windows and the
sliding sunroof using the key ( Y page 71),
the driver's seat ventilation automatically
switches to the highest level.
XTo switch off: press button : repeatedly
until all the indicator lamps go out.
Problems with the seat ventilation
If one or all of the indicator lamps in the seat
ventilation button are flashing, the seat
ventilation has switched off automatically.
The vehicle's electrical system voltage is too
low because too many electrical consumers
are switched on.
XSwitch off electrical consumers which you
do not need, such as the rear window
defroster or interior lighting.
Once the battery is sufficiently charged, the
seat ventilation will switch back on
automatically.
Steering wheel
Important safety notes
You can adjust the steering wheel electrically.
GWarning!
Do not adjust the steering wheel while driving.
Adjusting the steering wheel while driving
could cause the driver to lose control of the
vehicle.
The electrical steering wheel adjustment
feature can be operated at any time.
Therefore, do not leave children unattended
in the vehicle, or with access to an unlocked
vehicle. A child's unsupervised access to a
vehicle could result in an accident and/or
serious personal injury.
When you adjust the steering wheel, make
sure that:
R the steering wheel can be reached with
your arms slightly bent.
R you can move your legs freely.
R you can see all the displays in the
instrument cluster clearly.
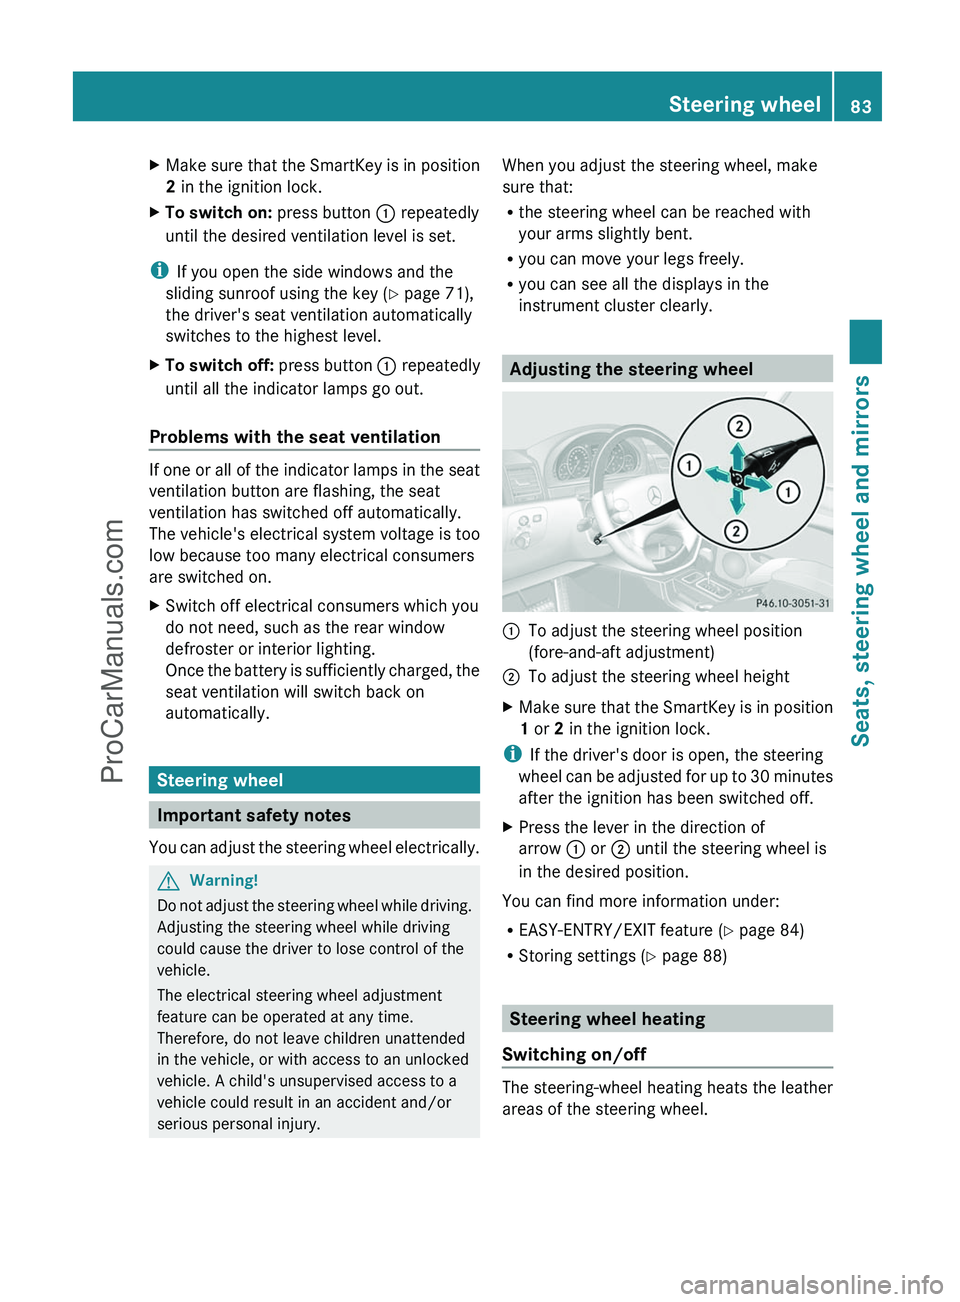
Adjusting the steering wheel
:To adjust the steering wheel position
(fore-and-aft adjustment);To adjust the steering wheel heightXMake sure that the SmartKey is in position
1 or 2 in the ignition lock.
i
If the driver's door is open, the steering
wheel can be adjusted for up to 30 minutes
after the ignition has been switched off.
XPress the lever in the direction of
arrow : or ; until the steering wheel is
in the desired position.
You can find more information under:
R EASY-ENTRY/EXIT feature ( Y page 84)
R Storing settings ( Y page 88)
Steering wheel heating
Switching on/off
The steering-wheel heating heats the leather
areas of the steering wheel.
Steering wheel83Seats, steering wheel and mirrorsZProCarManuals.com
Page 86 of 288
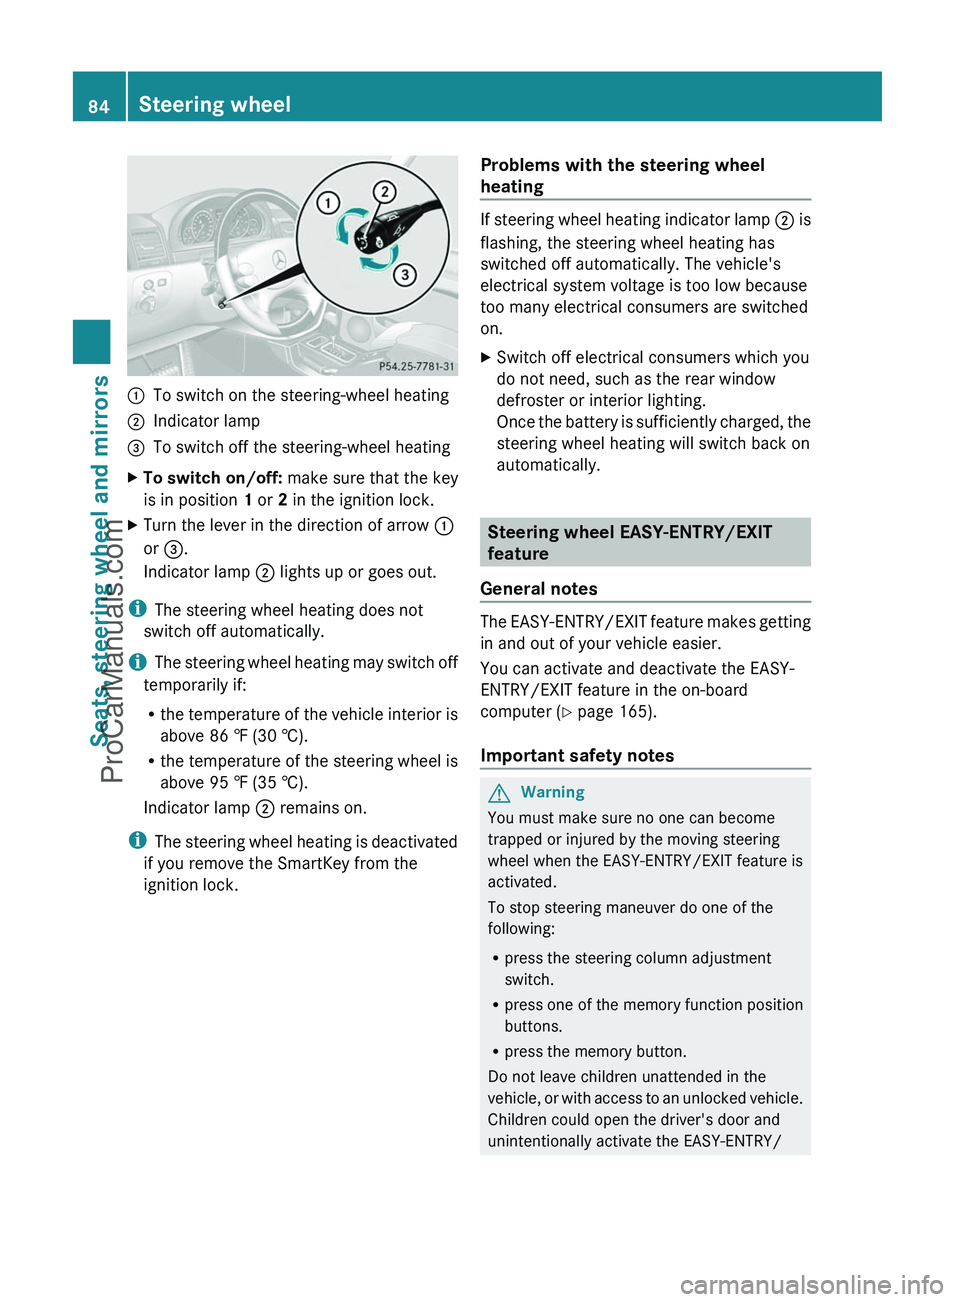
:To switch on the steering-wheel heating;Indicator lamp=To switch off the steering-wheel heatingXTo switch on/off: make sure that the key
is in position 1 or 2 in the ignition lock.XTurn the lever in the direction of arrow :
or = .
Indicator lamp ; lights up or goes out.
i
The steering wheel heating does not
switch off automatically.
i The steering wheel heating may switch off
temporarily if:
R the temperature of the vehicle interior is
above 86 ‡ (30 †).
R the temperature of the steering wheel is
above 95 ‡ (35 †).
Indicator lamp ; remains on.
i The steering wheel heating is deactivated
if you remove the SmartKey from the
ignition lock.
Problems with the steering wheel
heating
If steering wheel heating indicator lamp ; is
flashing, the steering wheel heating has
switched off automatically. The vehicle's
electrical system voltage is too low because
too many electrical consumers are switched
on.
XSwitch off electrical consumers which you
do not need, such as the rear window
defroster or interior lighting.
Once the battery is sufficiently charged, the
steering wheel heating will switch back on
automatically.
Steering wheel EASY-ENTRY/EXIT
feature
General notes
The EASY-ENTRY/EXIT feature makes getting
in and out of your vehicle easier.
You can activate and deactivate the EASY-
ENTRY/EXIT feature in the on-board
computer ( Y page 165).
Important safety notes
GWarning
You must make sure no one can become
trapped or injured by the moving steering
wheel when the EASY-ENTRY/EXIT feature is
activated.
To stop steering maneuver do one of the
following:
R press the steering column adjustment
switch.
R press one of the memory function position
buttons.
R press the memory button.
Do not leave children unattended in the
vehicle, or with access to an unlocked vehicle.
Children could open the driver's door and
unintentionally activate the EASY-ENTRY/
84Steering wheelSeats, steering wheel and mirrors
ProCarManuals.com
Page 87 of 288
EXIT feature. This could result in an accident
and/or serious personal injury.GWarning
Let the system complete the adjustment
procedure before setting the vehicle in
motion. All steering wheel adjustment must
be completed before setting the vehicle in
motion. Driving off with the steering wheel
still adjusting could cause the driver to lose
control of the vehicle.
! Do not activate the EASY-ENTRY/EXIT
feature, if the seat backrest is reclined too
far backwards. This can damage the front
or rear seats. You must first move the
backrest to a vertical position.
Position of the steering wheel when the
EASY-ENTRY/EXIT feature is active
The steering wheel moves upwards and
towards the dashboard if:
R an easy-entry/exit steering wheel position
has been stored for the key and
R you remove the key from the ignition lock
or
R you open the driver's door with the key in
position 0 or 1 in the ignition lock.
If you insert the key into the ignition lock with
the driver's door closed, the steering wheel is
automatically moved to the previously set
position.
The last position of the steering wheel is
stored when you switch off the ignition or
when you store the setting with the memory
function ( Y page 88).
i The steering wheel only moves upwards
and towards the dashboard if it has not
already reached the upper end stop.
Mirrors
Rear-view mirror
XAdjust the rear-view mirror by hand so you
have a good overview of the traffic
conditions.
Exterior mirrors
Important safety notes
GWarning
Exercise care when using the passenger-side
exterior rear view mirror. The mirror surface
is convex (outwardly curved surface for a
wider field of view). Objects in mirror are
closer than they appear. Check your interior
rear view mirror and glance over your
shoulder before changing lanes.
At low outside temperatures, the exterior
mirrors are heated automatically.
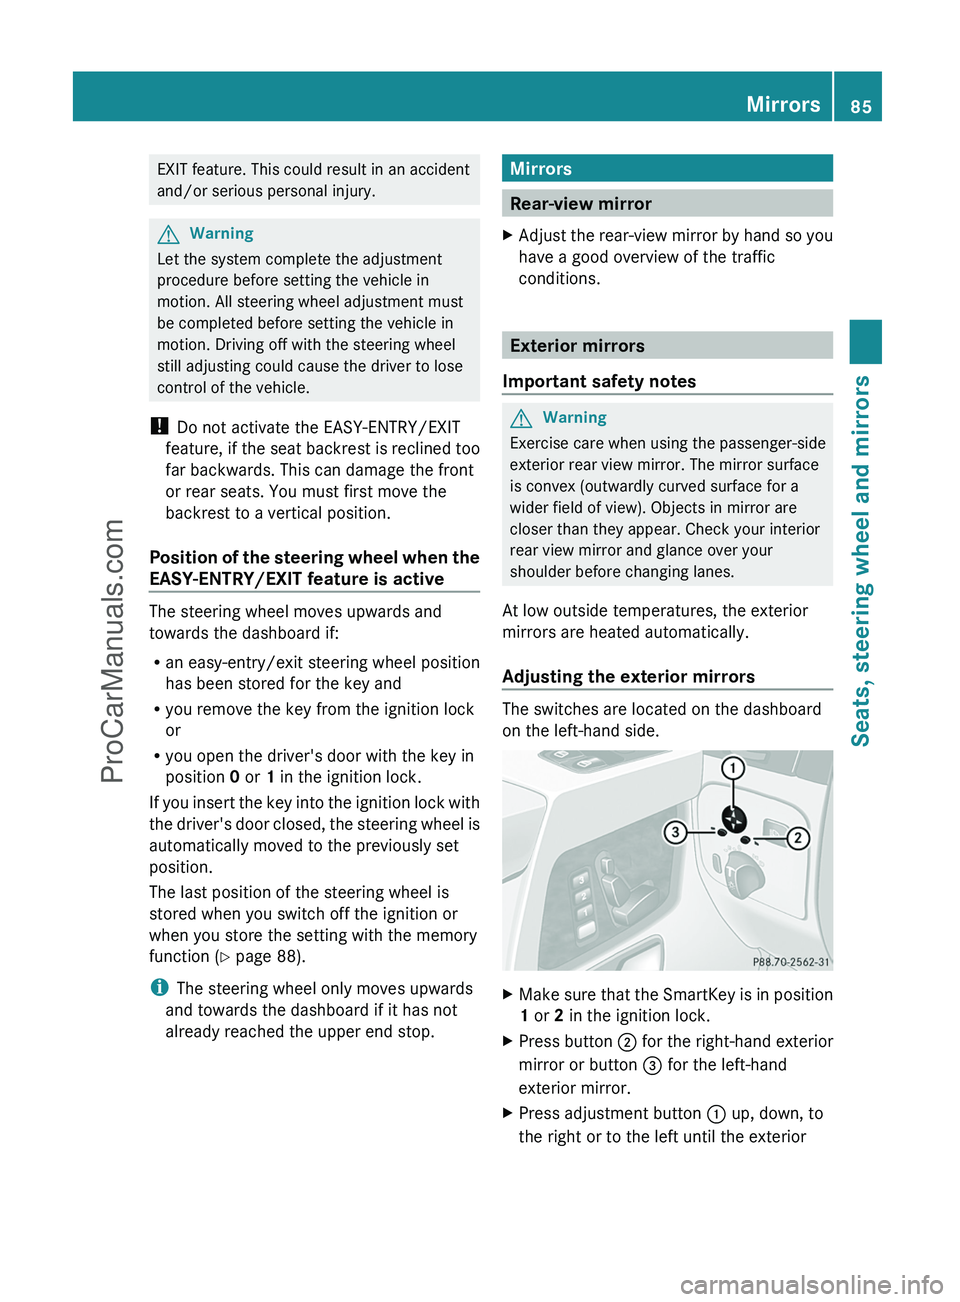
Adjusting the exterior mirrors
The switches are located on the dashboard
on the left-hand side.
XMake sure that the SmartKey is in position
1 or 2 in the ignition lock.XPress button ; for the right-hand exterior
mirror or button = for the left-hand
exterior mirror.XPress adjustment button : up, down, to
the right or to the left until the exteriorMirrors85Seats, steering wheel and mirrorsZProCarManuals.com
Page 89 of 288

Problems with the exterior mirrorsProblemPossible causes/consequences and M SolutionsAn exterior mirror has
been pushed out of
position.XMove the exterior mirror into the correct position manually.Automatic anti-glare mirrorsGWarning!
The auto-dimming function does not react if
incoming light is not aimed directly at sensors
in the interior rear view mirror.
The interior rear view mirror and the exterior
rear view mirror on the driver’s side do not
react, for example, when transporting cargo
which covers the rear window.
Light hitting the mirror(s) at certain angles
(incident light) could blind you. As a result,
you may not be able to observe traffic
conditions and could cause an accident.
The rear-view mirror and the exterior mirror
on the driver's side automatically go into anti-
glare mode if the ignition is switched on and
incident light from headlamps strikes the
sensor in the rear-view mirror.
The mirrors do not go into anti-glare mode if
reverse gear is engaged or the interior lighting
is switched on.
Parking position for the exterior
mirror on the front-passenger side
General notes
To make it easier to park, you can store the
front-passenger side exterior mirror position
in such a way that you can see the rear wheel
on that side as soon as you engage reverse
gear R.
Using the memory buttons on the driver's
side, you can store three parking positions
per key.
Setting and storing the parking position:Adjustment button;Right-hand exterior mirror=Left-hand exterior mirror?Memory buttonXMake sure that the vehicle is stationary and
that the key is in position 1 or 2 in the
ignition lock.XPress button ; for the exterior mirror on
the front-passenger side.XEngage reverse gear R.
The exterior mirror on the front-passenger
side moves to the preset parking position.XUse adjustment button : to adjust the
exterior mirror to a position which allows
you to see the rear wheel and the curb.XPress memory button ? and adjustment
button : within three seconds.
The parking position is stored if the exterior
mirror does not move.
i If the mirror moves out of position, repeat
the steps.
i If you shift the transmission to another
position, the exterior mirror on the front-
Mirrors87Seats, steering wheel and mirrorsZProCarManuals.com