2011 MERCEDES-BENZ G-CLASS brake
[x] Cancel search: brakePage 187 of 288
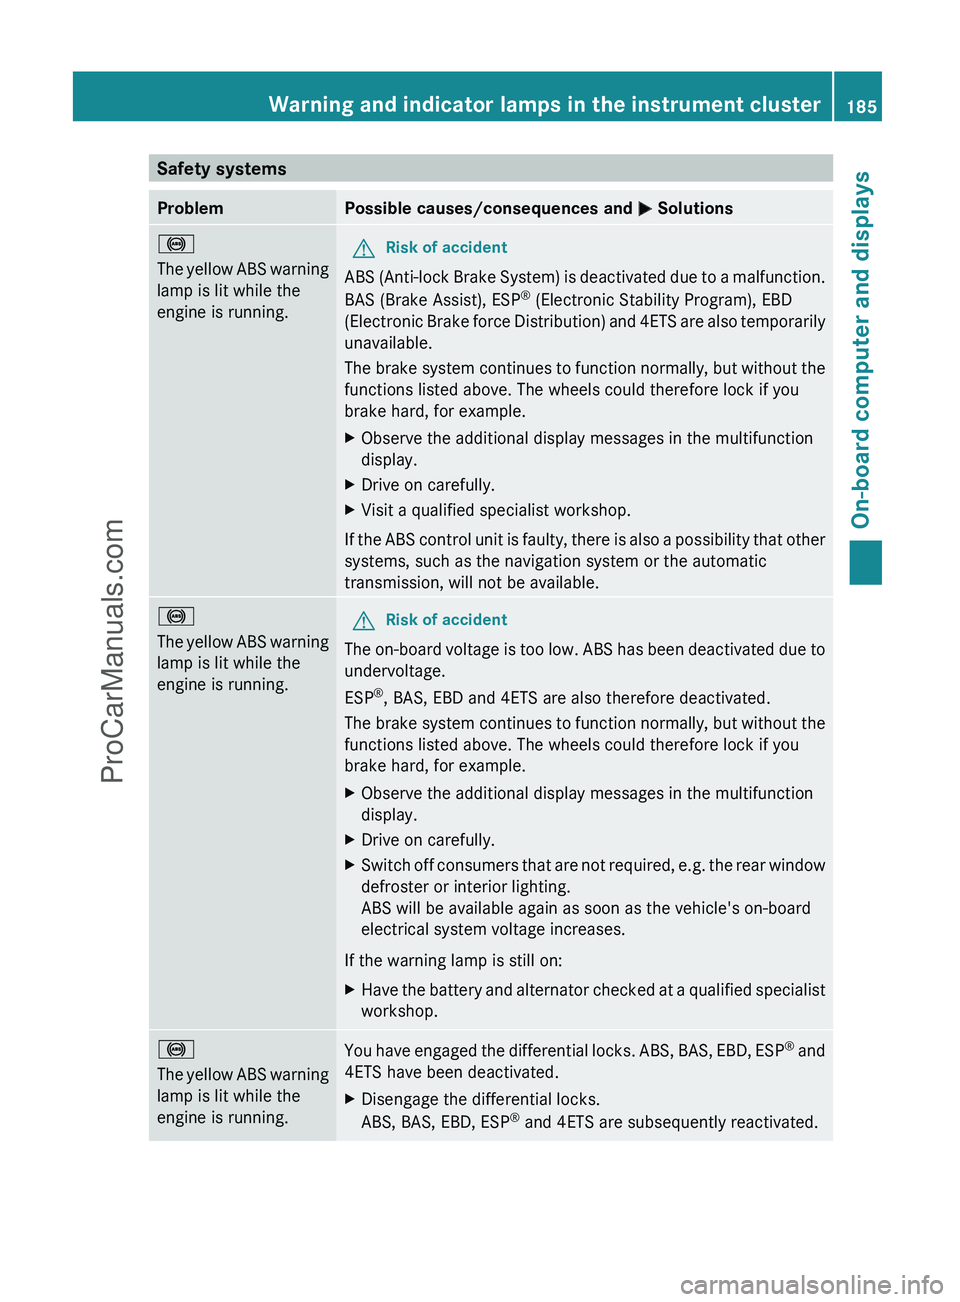
Safety systemsProblemPossible causes/consequences and M Solutions!
The yellow ABS warning
lamp is lit while the
engine is running.GRisk of accident
ABS (Anti-lock Brake System) is deactivated due to a malfunction.
BAS (Brake Assist), ESP ®
(Electronic Stability Program), EBD
(Electronic Brake force Distribution) and 4ETS are also temporarily
unavailable.
The brake system continues to function normally, but without the
functions listed above. The wheels could therefore lock if you
brake hard, for example.
XObserve the additional display messages in the multifunction
display.XDrive on carefully.XVisit a qualified specialist workshop.
If the ABS control unit is faulty, there is also a possibility that other
systems, such as the navigation system or the automatic
transmission, will not be available.
!
The yellow ABS warning
lamp is lit while the
engine is running.GRisk of accident
The on-board voltage is too low. ABS has been deactivated due to
undervoltage.
ESP ®
, BAS, EBD and 4ETS are also therefore deactivated.
The brake system continues to function normally, but without the
functions listed above. The wheels could therefore lock if you
brake hard, for example.
XObserve the additional display messages in the multifunction
display.XDrive on carefully.XSwitch off consumers that are not required, e.g. the rear window
defroster or interior lighting.
ABS will be available again as soon as the vehicle's on-board
electrical system voltage increases.
If the warning lamp is still on:
XHave the battery and alternator checked at a qualified specialist
workshop.!
The yellow ABS warning
lamp is lit while the
engine is running.You have engaged the differential locks. ABS, BAS, EBD, ESP ®
and
4ETS have been deactivated.XDisengage the differential locks.
ABS, BAS, EBD, ESP ®
and 4ETS are subsequently reactivated.Warning and indicator lamps in the instrument cluster185On-board computer and displaysZProCarManuals.com
Page 188 of 288
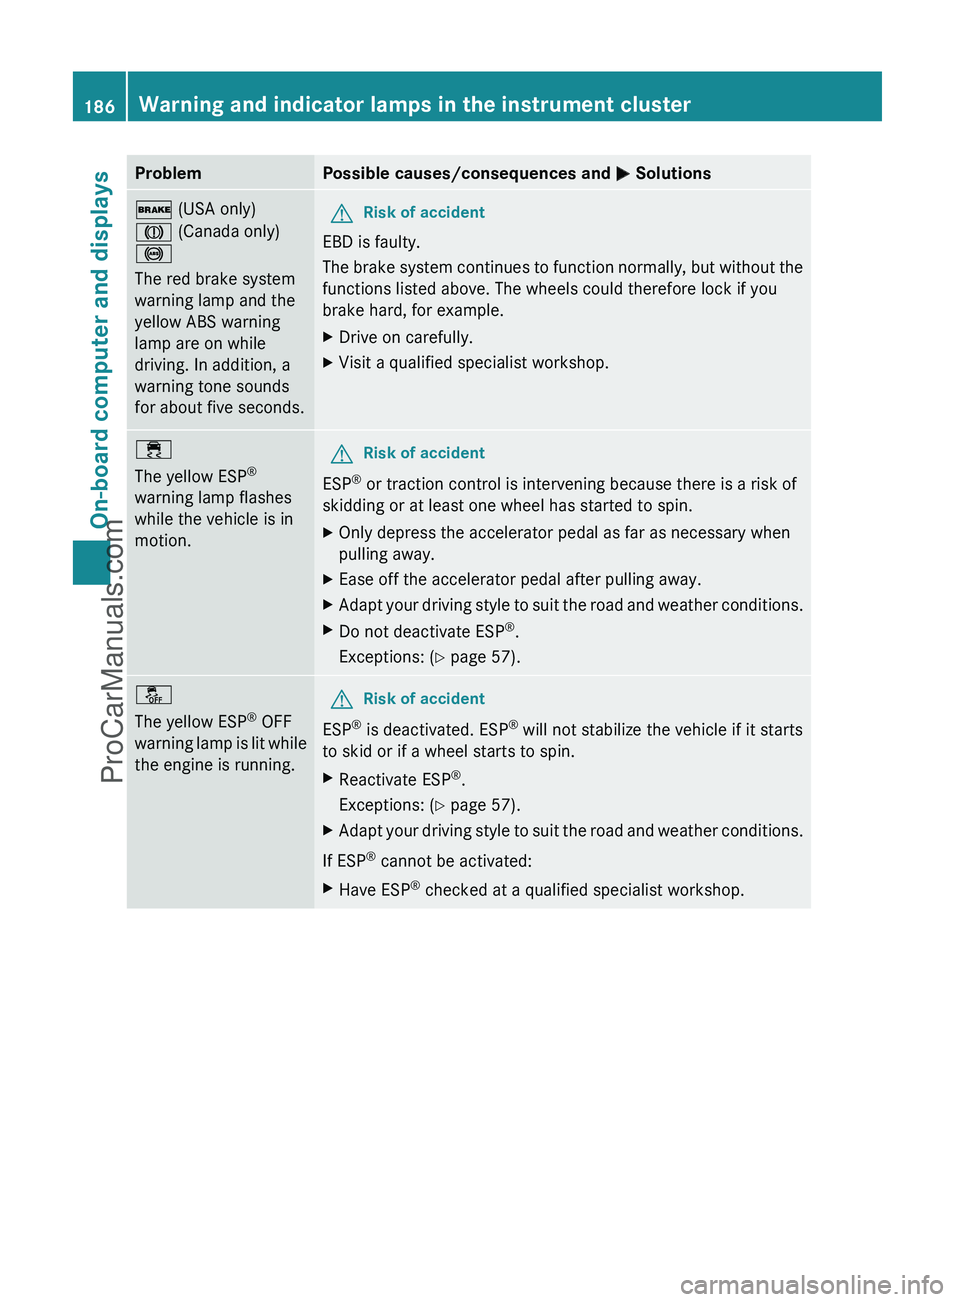
ProblemPossible causes/consequences and M Solutions$ (USA only)
J (Canada only)
!
The red brake system
warning lamp and the
yellow ABS warning
lamp are on while
driving. In addition, a
warning tone sounds
for about five seconds.GRisk of accident
EBD is faulty.
The brake system continues to function normally, but without the
functions listed above. The wheels could therefore lock if you
brake hard, for example.
XDrive on carefully.XVisit a qualified specialist workshop.÷
The yellow ESP ®
warning lamp flashes
while the vehicle is in
motion.GRisk of accident
ESP ®
or traction control is intervening because there is a risk of
skidding or at least one wheel has started to spin.
XOnly depress the accelerator pedal as far as necessary when
pulling away.XEase off the accelerator pedal after pulling away.XAdapt your driving style to suit the road and weather conditions.XDo not deactivate ESP ®
.
Exceptions: ( Y page 57).å
The yellow ESP ®
OFF
warning lamp is lit while
the engine is running.GRisk of accident
ESP ®
is deactivated. ESP ®
will not stabilize the vehicle if it starts
to skid or if a wheel starts to spin.
XReactivate ESP ®
.
Exceptions: ( Y page 57).XAdapt your driving style to suit the road and weather conditions.
If ESP ®
cannot be activated:
XHave ESP ®
checked at a qualified specialist workshop.186Warning and indicator lamps in the instrument clusterOn-board computer and displays
ProCarManuals.com
Page 198 of 288
being thrown forwards from the cargo
compartment.
Securing a load
Lashing eyelets
GWarning
Distribute the load on the cargo tie down rings
evenly.
Otherwise, vehicle occupants could be
injured by objects being thrown around if you:
R brake sharply
R change direction suddenly
R are involved in an accident
Please observe the loading guidelines.
Observe the following notes on securing
loads:
R secure the load using the cargo tie down
rings.
R do not use elastic straps or nets to secure
a load, as these are only intended as an
anti-slip protection for light loads.
R do not route tie downs across sharp edges
or corners.
R pad sharp edges for protection.
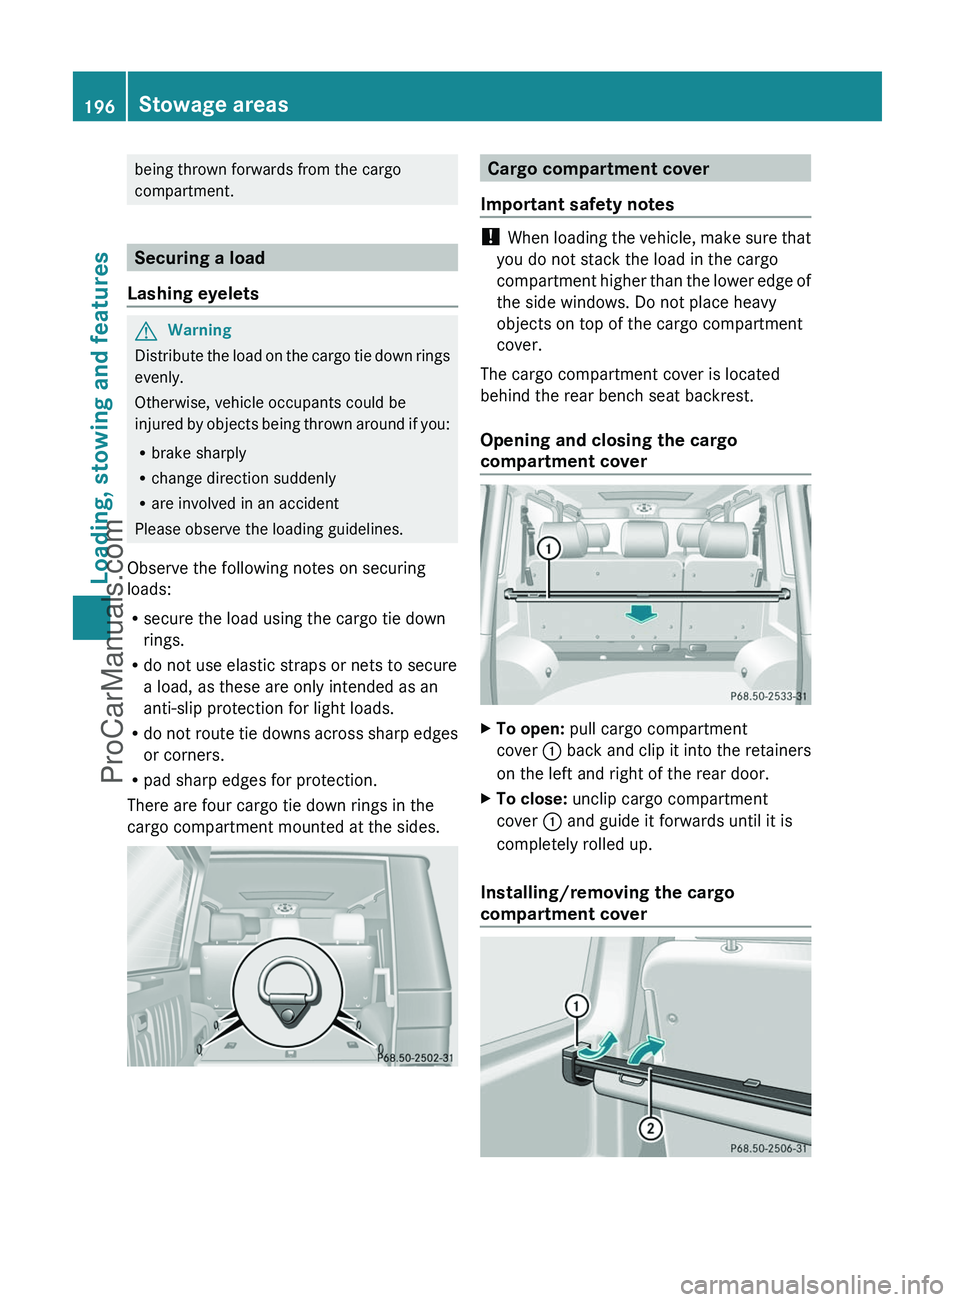
There are four cargo tie down rings in the
cargo compartment mounted at the sides.
Cargo compartment cover
Important safety notes
! When loading the vehicle, make sure that
you do not stack the load in the cargo
compartment higher than the lower edge of
the side windows. Do not place heavy
objects on top of the cargo compartment
cover.
The cargo compartment cover is located
behind the rear bench seat backrest.
Opening and closing the cargo
compartment cover
XTo open: pull cargo compartment
cover : back and clip it into the retainers
on the left and right of the rear door.XTo close: unclip cargo compartment
cover : and guide it forwards until it is
completely rolled up.
Installing/removing the cargo
compartment cover
196Stowage areasLoading, stowing and features
ProCarManuals.com
Page 200 of 288
If you do not require the cup holder, it can be
stored in the glove box or in the stowage
compartment in the center console, for
example.
Cup holders in the rear compartment
! Ensure that you remove all containers
from the cup holder in the rear before
folding the seat backrest and the seat
cushion of the rear bench seat forwards.
Sun visors
Overview of sun visors
GWarning
Do not use the vanity mirror while driving.
Keep the vanity mirrors in the sun visors
closed while the vehicle is in motion.
Reflected glare can endanger you and others.
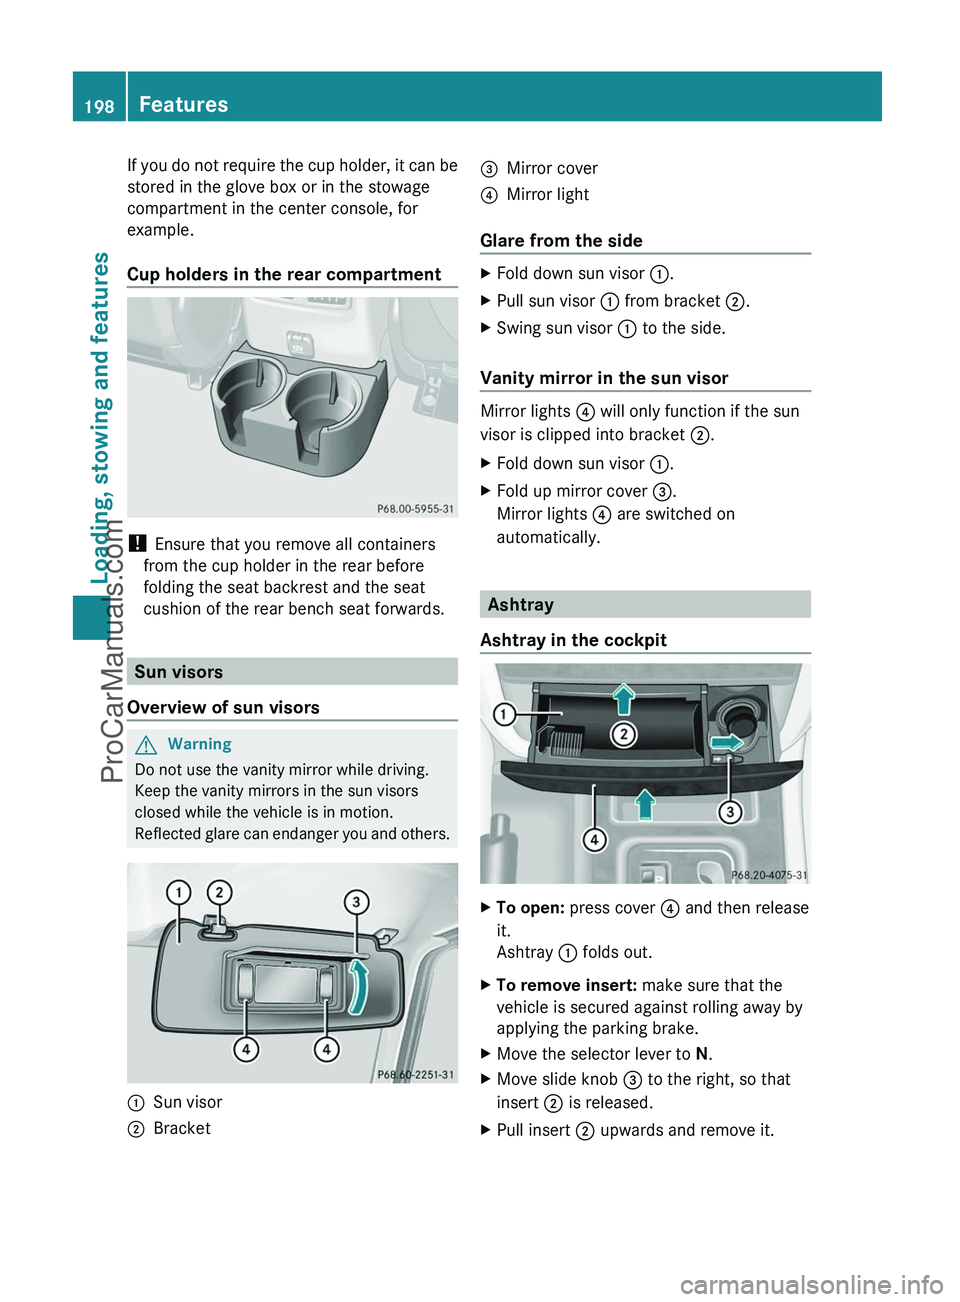
:Sun visor;Bracket=Mirror cover?Mirror light
Glare from the side
XFold down sun visor :.XPull sun visor : from bracket ;.XSwing sun visor : to the side.
Vanity mirror in the sun visor
Mirror lights ? will only function if the sun
visor is clipped into bracket ;.
XFold down sun visor :.XFold up mirror cover =.
Mirror lights ? are switched on
automatically.
Ashtray
Ashtray in the cockpit
XTo open: press cover ? and then release
it.
Ashtray : folds out.XTo remove insert: make sure that the
vehicle is secured against rolling away by
applying the parking brake.XMove the selector lever to N.XMove slide knob = to the right, so that
insert ; is released.XPull insert ; upwards and remove it.198FeaturesLoading, stowing and features
ProCarManuals.com
Page 221 of 288
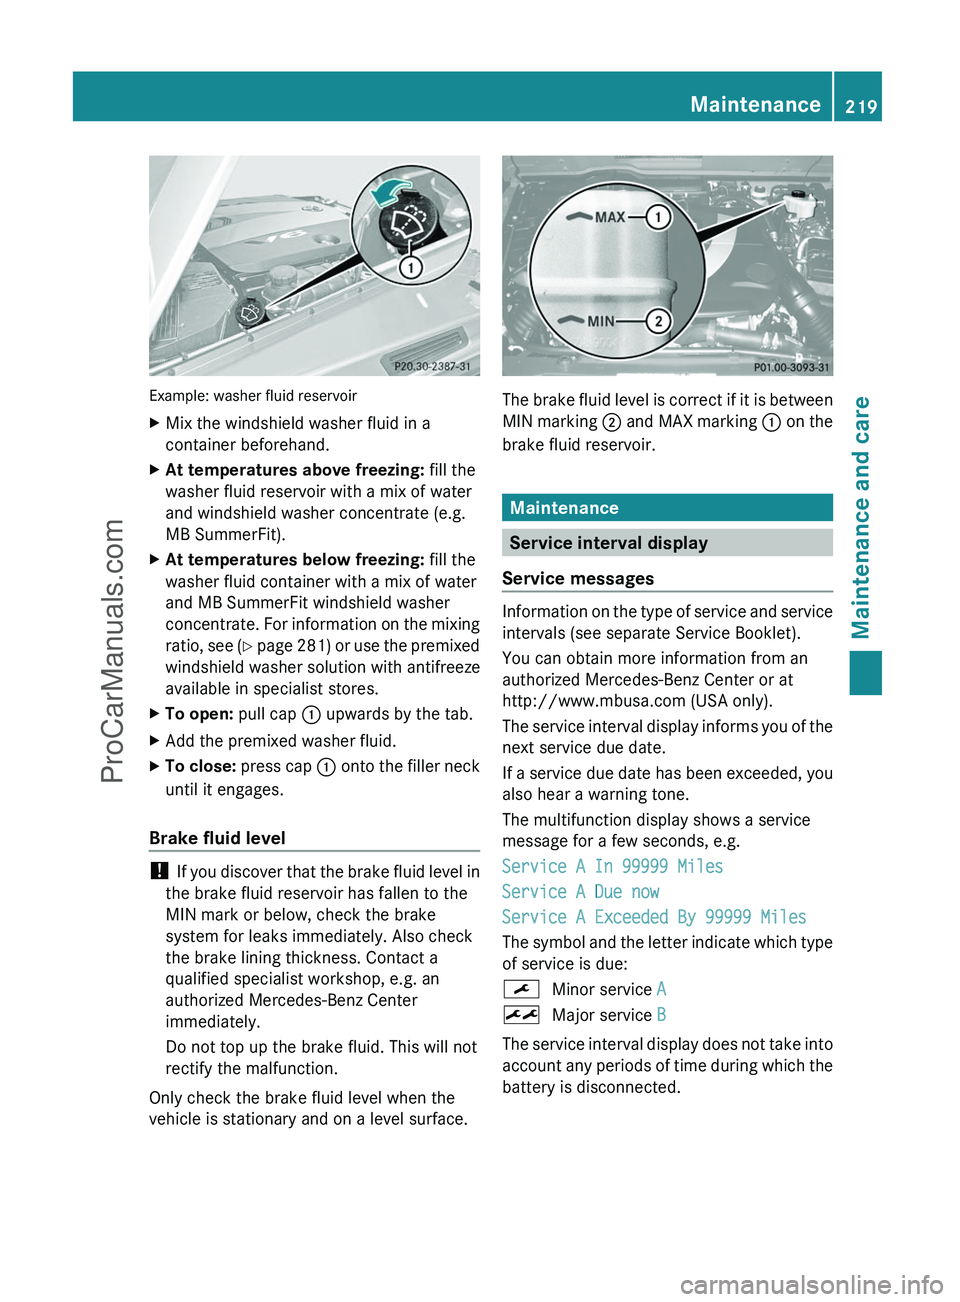
Example: washer fluid reservoir
XMix the windshield washer fluid in a
container beforehand.XAt temperatures above freezing: fill the
washer fluid reservoir with a mix of water
and windshield washer concentrate (e.g.
MB SummerFit).XAt temperatures below freezing: fill the
washer fluid container with a mix of water
and MB SummerFit windshield washer
concentrate. For information on the mixing
ratio, see (Y page 281) or use the premixed
windshield washer solution with antifreeze
available in specialist stores.XTo open: pull cap : upwards by the tab.XAdd the premixed washer fluid.XTo close: press cap : onto the filler neck
until it engages.
Brake fluid level
! If you discover that the brake fluid level in
the brake fluid reservoir has fallen to the
MIN mark or below, check the brake
system for leaks immediately. Also check
the brake lining thickness. Contact a
qualified specialist workshop, e.g. an
authorized Mercedes-Benz Center
immediately.
Do not top up the brake fluid. This will not
rectify the malfunction.
Only check the brake fluid level when the
vehicle is stationary and on a level surface.
The brake fluid level is correct if it is between
MIN marking ; and MAX marking : on the
brake fluid reservoir.
Maintenance
Service interval display
Service messages
Information on the type of service and service
intervals (see separate Service Booklet).
You can obtain more information from an
authorized Mercedes-Benz Center or at
http://www.mbusa.com (USA only).
The service interval display informs you of the
next service due date.
If a service due date has been exceeded, you
also hear a warning tone.
The multifunction display shows a service
message for a few seconds, e.g.
Service A In 99999 Miles
Service A Due now
Service A Exceeded By 99999 Miles
The symbol and the letter indicate which type
of service is due:
¯Minor service A±Major service B
The service interval display does not take into
account any periods of time during which the
battery is disconnected.
Maintenance219Maintenance and careZProCarManuals.com
Page 223 of 288
GWarning
Many cleaning products can be hazardous.
Some are poisonous, others are flammable.
Always follow the instructions on the
particular container. Always open your
vehicle's doors or windows when cleaning the
inside.
Never use fluids or solvents that are not
designed for cleaning your vehicle.
Always lock away cleaning products and keep
them out of reach of children.
! For cleaning your vehicle, do not use any
of the following:
R dry, rough or hard cloths
R abrasive cleaning agents
R solvents
R cleaning agents containing solvents
Do not scrub.
Do not touch the surfaces or protective
films with hard objects, e.g. a ring or ice
scraper. You could otherwise scratch or
damage the surfaces and protective film.
HEnvironmental note
Dispose of empty packaging and cleaning
cloths in an environmentally responsible
manner.
! Do not park up the vehicle for an extended
period straight after cleaning it, particularly
after having cleaned the wheels with wheel
cleaner. Wheel cleaners could cause
increased corrosion of the brake discs and
brake pads/linings. For this reason, you
should drive for a few minutes after
cleaning. Braking heats the brake discs and
the brake pads/linings, thus drying them.
The vehicle can then be parked up.
Care of the exterior
Automatic car washGWarning
Braking efficiency is reduced after washing
the vehicle. This could cause an accident. For
this reason, you must drive particularly
carefully after washing the vehicle until the
brakes have dried.
You can wash the vehicle in an automatic car
wash from the very start.
! Never clean your vehicle in a Touchless
Automatic Car Wash as these use special
cleaning agents. These cleaning agents can
damage the paintwork or plastic parts.
If the vehicle is very dirty, pre-wash it before
cleaning it in an automatic car wash.
! Make sure that the automatic car wash is
suitable for the size of the vehicle. Fold in
the exterior mirrors before the vehicle is
washed. The exterior mirrors could
otherwise be damaged.
! In car washes with a towing mechanism,
make sure that AUTOTRONIC is in
transmission position N, otherwise the
vehicle could be damaged.
! Make sure that:
R the side windows and sliding sunroof are
closed completely.
R the blower for the ventilation/heating is
switched off (airflow control is turned to
position 0/the à and Á buttons
are switched off).
R the windshield wiper switch is at position
0 .
The vehicle could otherwise be damaged.
After using an automatic car wash, wipe off
wax from the windshield and the wiper
blades. This will prevent smears and reduce
wiping noises caused by residue on the
windshield.
Care221Maintenance and careZProCarManuals.com
Page 224 of 288
Washing by hand
When using the vehicle in winter, remove all
traces of road salt deposits carefully and as
soon as possible.
When washing the vehicle underbody, also
clean the inside of the wheels.
XDo not use hot water and do not wash the
vehicle in direct sunlight.XUse a soft sponge to clean.XUse a mild cleaning agent, such as a car
shampoo approved by Mercedes-Benz.XThoroughly hose down the vehicle with a
gentle jet of water.XDo not point the water jet directly towards
the air inlets.XUse plenty of water and rinse out the
sponge frequently.XRinse the vehicle with clean water and dry
thoroughly with a chamois.XDo not let the cleaning agent dry on the
paintwork.
High-pressure cleaning equipment
GWarning
Do not use power washers with circular jet
nozzles (concentrated-power jets) to clean
your vehicle, especially for cleaning tires. You
could otherwise damage the tires and cause
an accident.
! Maintain a minimum distance of
11.8 in (30 cm) between the vehicle and the
power washer nozzle. Information about
the correct distance is available from the
equipment manufacturer.
Move the power washer nozzle around
when cleaning your vehicle.
Do not aim directly at any of the following:
R tires
R door gaps, roof gaps, joints, etc.
R electrical components
R battery
R connectors
Rlights
R seals
R trim elements
R ventilation slots
Damaged seals or electrical components
can lead to leaks or failures.
Cleaning the wheels
! Do not use acidic wheel cleaning products
to remove brake dust. This could damage
wheel bolts and brake components.
! Do not park the vehicle for an extended
period right after cleaning it, particularly
after having cleaned the wheels with wheel
cleaner. Wheel cleaners could cause
increased corrosion of the brake discs and
brake pads/linings. For this reason, you
should drive for a few minutes after
cleaning. Braking heats the brake discs and
brake pads, thus drying them. The vehicle
can then be parked up.
Cleaning the paintwork
Scratches, corrosive deposits, areas affected
by corrosion and damage caused by
inadequate care cannot always be completely
repaired. In such cases, visit a qualified
specialist workshop immediately, e.g. an
authorized Mercedes-Benz Center.
XRemove impurities immediately, where
possible, whilst avoiding rubbing too hard.XSoak insect remains with insect remover
and rinse off the treated areas afterwards.XSoak bird droppings with water and rinse
off the treated areas afterwards.XRemove coolant, brake fluid, tree resin,
oils, fuels and greases by rubbing gently
with a cloth soaked in petroleum ether or
lighter fluid.XUse tar remover to remove tar stains.XUse silicone remover to remove wax.222CareMaintenance and care
ProCarManuals.com
Page 234 of 288
Flat tire
Preparing the vehicle
XStop the vehicle as far away as possible
from traffic on solid, non-slippery and level
ground.XSwitch on the hazard warning lamps.XApply the parking brake.XBring the front wheels into the straight-
ahead position.XMove the selector lever to P.XSwitch off the engine.XRemove the SmartKey from the ignition
lock.XAll occupants must get out of the vehicle.
Make sure that they are not endangered as
they do so.XMake sure that no one is near the danger
area while a wheel is being changed.
Anyone who is not directly assisting in the
wheel change should, for example, stand
behind the barrier.XGet out of the vehicle. Pay attention to
traffic conditions when doing so.XClose the driver's door.
Changing a wheel and mounting the
spare wheel
Important safety notes
GWarning!
If the spare tire is more than 6 years old or is
not the same model as the regular tires, have
the spare tire replaced with a new tire at the
nearest Mercedes-Benz Center.
Never operate the vehicle with more than one
spare wheel mounted.
GWarning
G 55 AMG:
Rim and tire sizes are different for the spare
wheel and the normal wheel. With the spare
wheel mounted, handling is impaired.
Do not exceed a maximum speed of
50 mph(80 km/h).
Preparing the vehicleXPrepare the vehicle as described
( Y page 232).GWarning!
You must remove the spare wheel from the
spare wheel carrier before lifting the vehicle.
Otherwise the vehicle could fall off the jack
and injure you or others.
XRemove the vehicle tool kit and the jack
( Y page 229).XRemove the spare wheel from the spare
wheel bracket ( Y page 230).
i
Vehicles without an emergency spare
wheel/spare wheel are not equipped with
a wheel-changing tool kit at the factory. For
more information on which tools are
required to perform a wheel change on your
vehicle e.g. lug wrench or jack, consult an
authorized Mercedes-Benz Center.
Securing the vehicle to prevent it from
rolling away
XSecure the vehicle to prevent it from rolling
away.
On level ground: place chocks or similar
items under the front and rear of the wheel
that is diagonally opposite to the wheel you
wish to change.XOn downhill gradients: place chocks or
similar items behind both wheels of the
other axle.GWarning
Only jack up the vehicle on level ground or on
slight inclines/declines. The vehicle could
otherwise fall off the jack and injure you or
others.
232Flat tireRoadside Assistance
ProCarManuals.com