2011 MERCEDES-BENZ G-CLASS instrument cluster
[x] Cancel search: instrument clusterPage 94 of 288
from à to L will briefly switch off the
headlamps. Doing so while driving in low
ambient lighting conditions may result in an
accident.
The automatic headlamp feature is only an aid
to the driver. The driver is responsible for the
operation of the vehicle’s lights at all times.
The parking lamps, low-beam headlamps and
license plate lamp are switched on or off
automatically, depending on the brightness of
the ambient light.XTo switch on: turn the light switch to
à .
SmartKey in position 1 in the ignition lock:
the standing lamps are switched on or off
automatically depending on the brightness
of the ambient light.
When the engine is running: depending on
the ambient light, the parking lamps, the
low-beam headlamps and the license plate
lamp are switched on or off automatically.
When the low-beam headlamps are
switched on, the L indicator lamp in the
instrument cluster lights up.
Canada only: if the light switch is in position
$ or à , you cannot switch on the high-
beam headlamps. However, the high-beam
flasher can always be used. Turn the light
switch to L when driving at night. You can
switch on the high-beam headlamps in this
position.
Front fog lamps and rear fog lamp
Front fog lamps
GWarning
If you suspect that driving conditions will be
foggy, turn the light switch to L before you
start your journey. Your vehicle may
otherwise not be visible and you could
endanger yourself and others.
GWarning
In low ambient lighting or foggy conditions,
only switch from position à to L with
the vehicle at a standstill in a safe location.
Switching from à to L will briefly
switch off the headlamps. Doing so while
driving in low ambient lighting conditions may
result in an accident.
XTo switch on: turn the SmartKey to
position 2 in the ignition lock or start the
engine.XTurn the light switch to L or T . If the
light switch is set to Ã, you cannot
switch on the fog lamps.XPull the light switch out to the first detent.
The green N indicator lamp on the light
switch lights up.XTo switch off: press the light switch in as
far as it will go.
The green N indicator lamp on the light
switch goes out.
Rear fog lamp
XTo switch on: turn the SmartKey to
position 2 in the ignition lock or start the
engine.XTurn the light switch to L or T . When
the light switch is set to Ã, you cannot
switch on the rear fog lamp.XPull the light switch out to the second stop.
The yellow R indicator lamp on the light
switch lights up.XTo switch off: press the light switch in as
far as it will go.
The yellow R indicator lamp on the light
switch goes out.92Exterior lightingLights and windshield wipers
ProCarManuals.com
Page 95 of 288
Combination switch
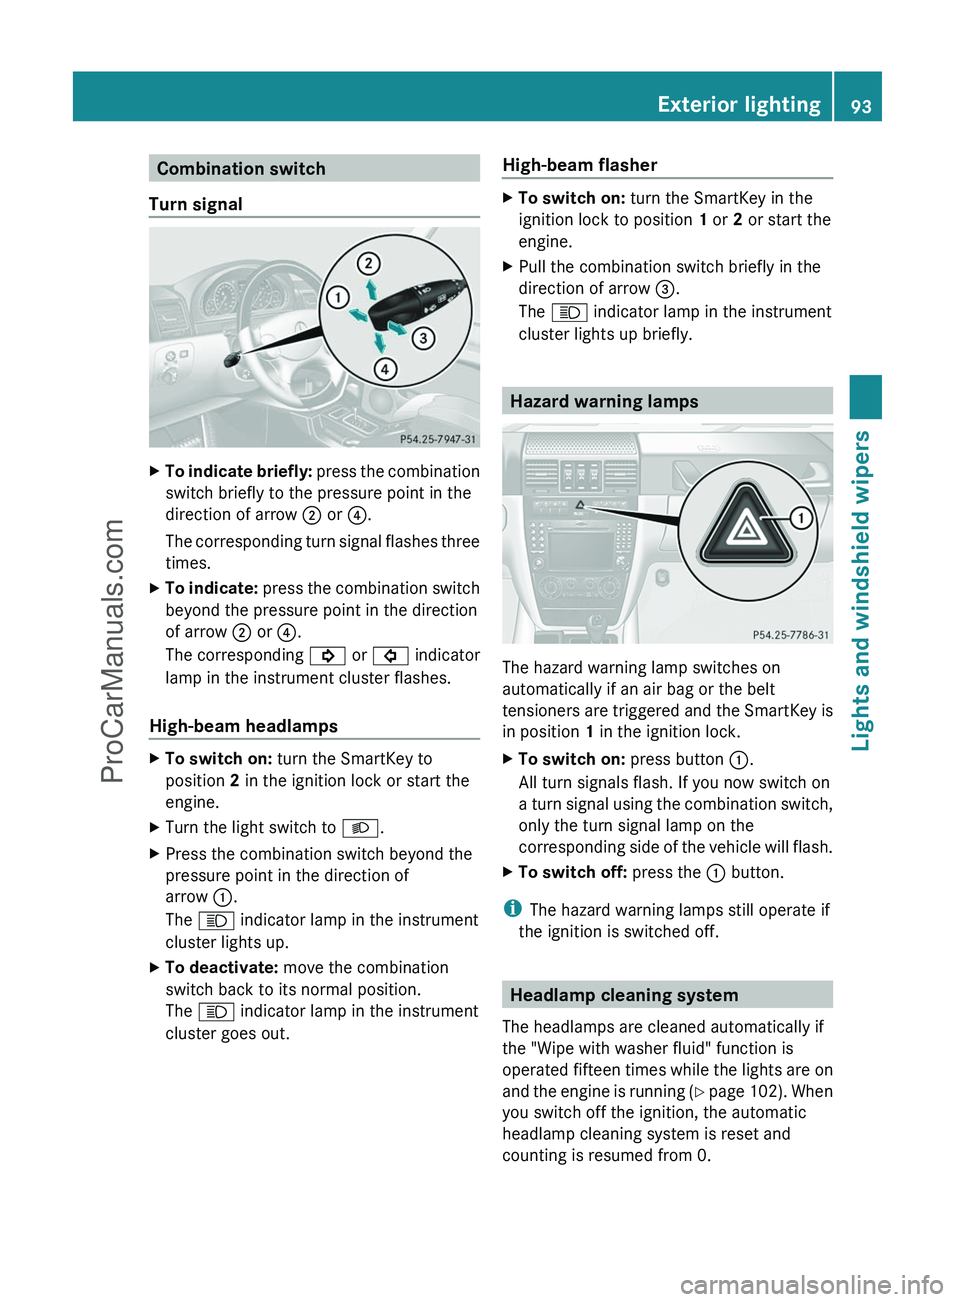
Turn signalXTo indicate briefly: press the combination
switch briefly to the pressure point in the
direction of arrow ; or ?.
The corresponding turn signal flashes three
times.XTo indicate: press the combination switch
beyond the pressure point in the direction
of arrow ; or ?.
The corresponding ! or # indicator
lamp in the instrument cluster flashes.
High-beam headlamps
XTo switch on: turn the SmartKey to
position 2 in the ignition lock or start the
engine.XTurn the light switch to L.XPress the combination switch beyond the
pressure point in the direction of
arrow :.
The K indicator lamp in the instrument
cluster lights up.XTo deactivate: move the combination
switch back to its normal position.
The K indicator lamp in the instrument
cluster goes out.High-beam flasherXTo switch on: turn the SmartKey in the
ignition lock to position 1 or 2 or start the
engine.XPull the combination switch briefly in the
direction of arrow =.
The K indicator lamp in the instrument
cluster lights up briefly.
Hazard warning lamps
The hazard warning lamp switches on
automatically if an air bag or the belt
tensioners are triggered and the SmartKey is
in position 1 in the ignition lock.
XTo switch on: press button :.
All turn signals flash. If you now switch on
a turn signal using the combination switch,
only the turn signal lamp on the
corresponding side of the vehicle will flash.XTo switch off: press the : button.
i
The hazard warning lamps still operate if
the ignition is switched off.
Headlamp cleaning system
The headlamps are cleaned automatically if
the "Wipe with washer fluid" function is
operated fifteen times while the lights are on
and the engine is running (Y page 102). When
you switch off the ignition, the automatic
headlamp cleaning system is reset and
counting is resumed from 0.
Exterior lighting93Lights and windshield wipersZProCarManuals.com
Page 119 of 288

Only shift the automatic transmission to
the desired drive position when the vehicle
is stationary.
Where possible, avoid spinning the drive
wheels when pulling away on slippery
roads. You could otherwise damage the
drive train.
! Avoid high engine speeds when the
engine is cold. The engine's service life
could otherwise be significantly shortened.
Do not use the engine's full performance
until it has reached operating temperature.
SmartKey positions
gTo remove the SmartKey1Power supply for some consumers, such
as the windshield wipers2Ignition (power supply for all consumers)
and drive position3To start the engine
i You can only remove the SmartKey if:
R the SmartKey is in position 0 in the
ignition lock.
R the automatic transmission selector
lever is in P.
As soon as the ignition is switched on, all the
indicator lamps in the instrument cluster light
up. If an indicator lamp does not go out after
the engine is started or if it lights up while the
vehicle is in motion, see ( Y page 183).
If the SmartKey is in position 0 in the ignition
lock for an extended period of time, it can no
longer be turned in the ignition lock. The
steering is then locked. To unlock, remove the
SmartKey and reinsert it into the ignition lock.
The steering is locked when you remove the
SmartKey from the ignition lock.XRemove the SmartKey when the engine is
switched off.
The starter battery could otherwise be
discharged.
If you cannot turn the SmartKey in the ignition
lock, the starter battery may not be charged
sufficiently.
XCheck the starter battery and charge if
necessary ( Y page 236).
or
XJump-start the vehicle ( Y page 238).
Starting the engine
Important safety notes
GWarning
Inhalation of exhaust gas is hazardous to your
health. All exhaust gas contains carbon
monoxide (CO), and inhaling it can cause
unconsciousness and possible death.
Do not run the engine in confined areas (such
as a garage) which are not properly ventilated.
If you think that exhaust gas fumes are
entering the vehicle while driving, have the
cause determined and corrected
immediately. If you must drive under these
conditions, drive only with at least one
window fully open at all times.
! Do not depress the accelerator pedal
when starting the engine.
Starting procedure
XShift the automatic transmission to
position P.
The transmission position display in the
multifunction display shows P.Driving117Driving and parkingZProCarManuals.com
Page 124 of 288
Selector lever
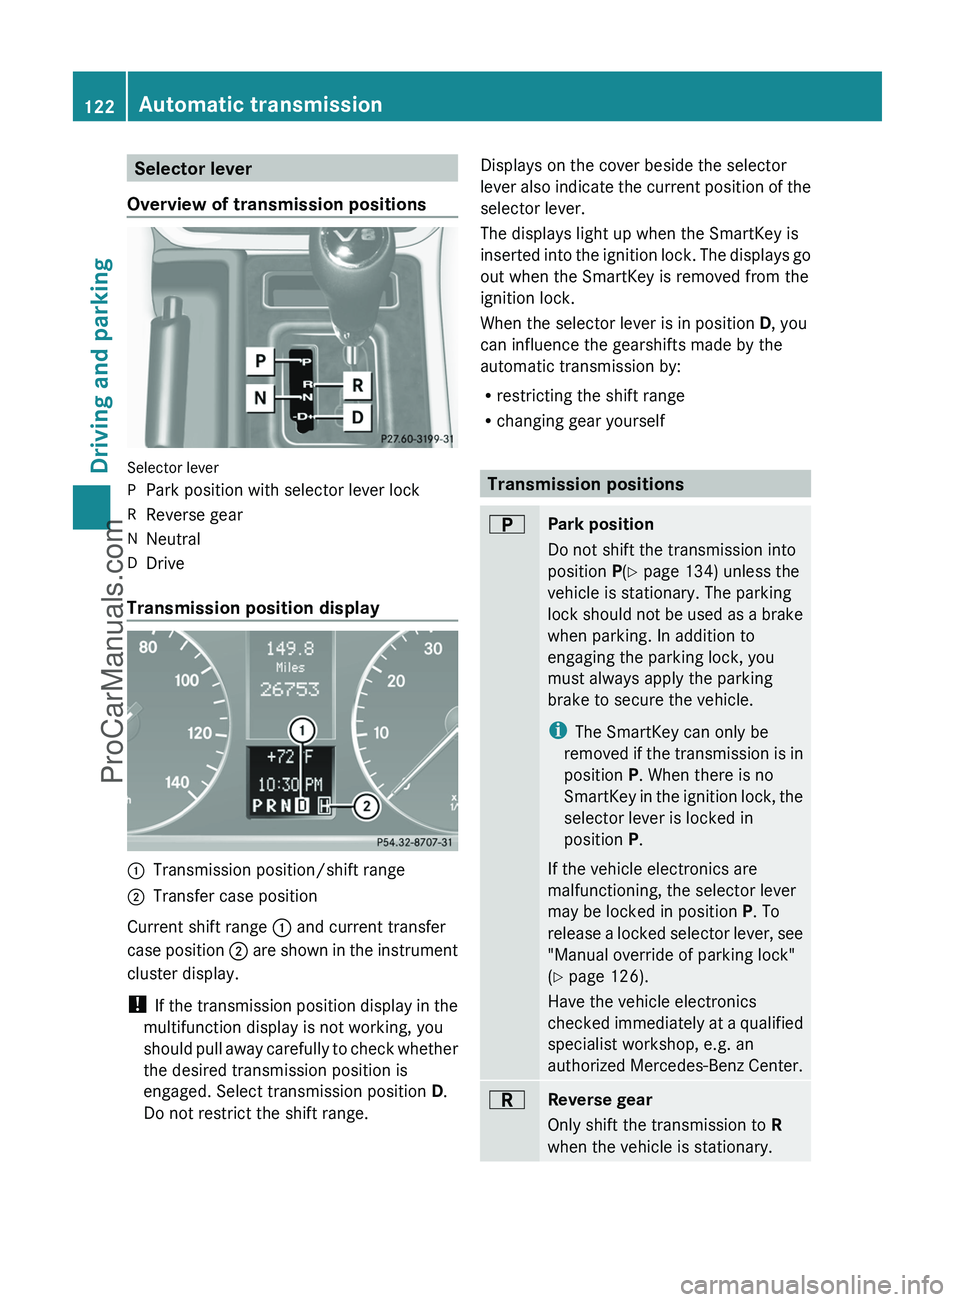
Overview of transmission positions
Selector lever
PPark position with selector lever lockRReverse gearNNeutralDDrive
Transmission position display
:Transmission position/shift range;Transfer case position
Current shift range : and current transfer
case position ; are shown in the instrument
cluster display.
! If the transmission position display in the
multifunction display is not working, you
should pull away carefully to check whether
the desired transmission position is
engaged. Select transmission position D.
Do not restrict the shift range.
Displays on the cover beside the selector
lever also indicate the current position of the
selector lever.
The displays light up when the SmartKey is
inserted into the ignition lock. The displays go
out when the SmartKey is removed from the
ignition lock.
When the selector lever is in position D, you
can influence the gearshifts made by the
automatic transmission by:
R restricting the shift range
R changing gear yourself
Transmission positions
BPark position
Do not shift the transmission into
position P(Y page 134) unless the
vehicle is stationary. The parking
lock should not be used as a brake
when parking. In addition to
engaging the parking lock, you
must always apply the parking
brake to secure the vehicle.
i The SmartKey can only be
removed if the transmission is in
position P. When there is no
SmartKey in the ignition lock, the
selector lever is locked in
position P.
If the vehicle electronics are
malfunctioning, the selector lever
may be locked in position P. To
release a locked selector lever, see
"Manual override of parking lock"
( Y page 126).
Have the vehicle electronics
checked immediately at a qualified
specialist workshop, e.g. an
authorized Mercedes-Benz Center.CReverse gear
Only shift the transmission to R
when the vehicle is stationary.122Automatic transmissionDriving and parking
ProCarManuals.com
Page 129 of 288
Shift rangesHHIGH
Position for all normal on-road
driving conditions.LLOW
Low-range position for driving off-
road.
Also for use on steep uphill or
downhill gradients, especially
when towing a trailer.
! When the transfer case is in the
off-road driving position LOW
range, the automatic
transmission does not shift up,
even when the engine has
reached the overrevving limit.
There is then a risk of engine
damage. Make sure that you do
not exceed the maximum
permissible engine speed.
The vehicle travels around half the
speed of on-road driving range
HIGH . The drive power is
correspondingly higher.NNeutral
Neutral position.
No power is transmitted to the
drive wheels.
Shifting the transfer case
General notes
GWarning!
Always wait until the procedure of shifting
from HIGH to LOW – and from LOW to HIGH
– has been entirely completed. During this
procedure do not turn off the engine or shift
the automatic transmission into another gear.
If you do not wait until the shifting procedure
has been entirely completed then it might not
be correctly performed. The transfer case
might be in neutral, thus interrupting the
transfer of power between the engine and the
drive axle.
The vehicle is then freely movable, even if a
gear has been selected, and could
unintentionally be set into motion –
particularly on up – or downhill grades. This
could lead to an accident and cause injury to
yourself and others.
Please observe related messages appearing
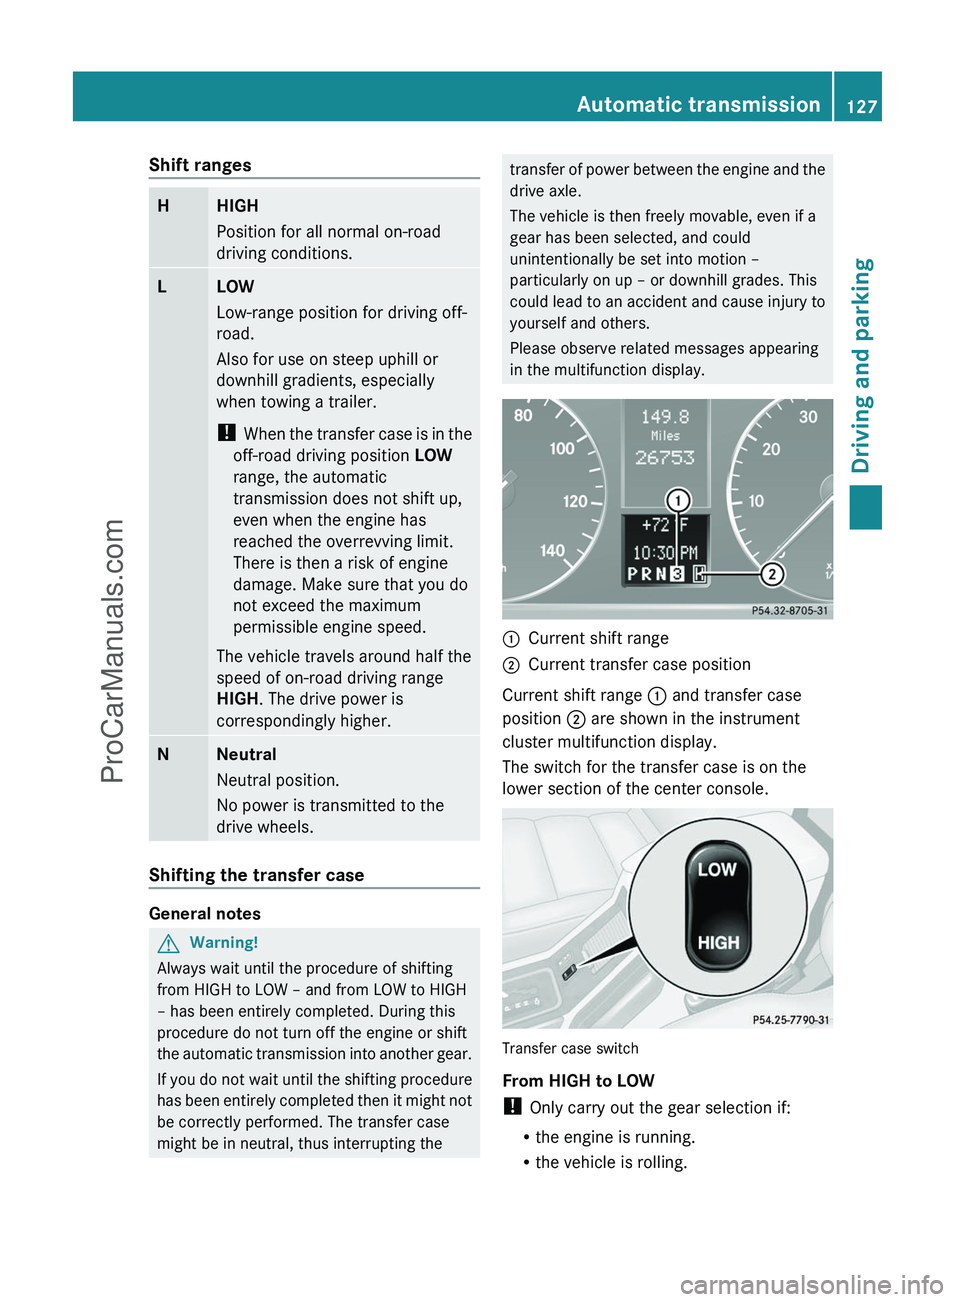
in the multifunction display.:Current shift range;Current transfer case position
Current shift range : and transfer case
position ; are shown in the instrument
cluster multifunction display.
The switch for the transfer case is on the
lower section of the center console.
Transfer case switch
From HIGH to LOW
! Only carry out the gear selection if:
R the engine is running.
R the vehicle is rolling.
Automatic transmission127Driving and parkingZProCarManuals.com
Page 133 of 288
ABS not available Differential
Locked message.
The å!÷ warning lamps light up
in the instrument cluster.
The differential lock for the transfer case is
engaged.
4ETS, ESP ®
, BAS and ABS are deactivated.
The vehicle's ability to steer is severely
restricted. Drive carefully and accelerate
gently for optimum traction.
i You can now engage differential lock for
the rear axle ? and differential lock for the
front axle ; as desired.
Differential lock for the rear axle
XTo engage: press switch ?.
First, the yellow activation indicator lamp
lights up, followed by the red function
indicator lamp.
The differential lock for the rear axle is
engaged.
Differential lock for the front axle
XTo engage: press switch ;.
First, the yellow activation indicator lamp
lights up, followed by the red function
indicator lamp.
The differential lock for the front axle is
engaged.
Deactivating the differential lock
You can deactivate the differential locks in
the reverse order: ;, ? , = .
XTo simultaneously deactivate all
differential locks: press switch =.
Yellow activation indicator lamps A go
out. Red function indicator lamps : go out
once the differential locks have
disengaged.
After approximately three seconds of
normal driving, ABS, 4ETS, ESP ®
and BAS
are activated.
The ABS not available Differential
Locked message disappears from themultifunction display and the å, !
and ÷ warning lamps in the instrument
cluster go out.XSwitch the transfer case to road gear
HIGH (Y page 126).
i
If red function indicator lamps : do not
go out when you disengage the differential
locks, bring the vehicle to a stop in
accordance with the traffic conditions,
then begin driving again. The load change
can disengage the differential locks.
GWarning!
Always remember to disengage the
differential locks when returning to drive on
paved roads, see “A few words about
differentials and differential locks”.
Refueling
Important safety notes
GWarning
Gasoline is highly flammable and poisonous.
It burns violently and can cause serious
personal injury.
Never allow sparks, flames or smoking
materials near gasoline.
Turn off the engine before refueling.
Whenever you are around gasoline, avoid
inhaling fumes and any skin or clothing
contact.
Direct skin contact with fuels and the
inhalation of fuel vapors are damaging to your
health.
GWarning
Overfilling of the fuel tank may create
pressure in the system which could cause a
gas discharge. This could cause the gasoline
to spray back out when removing the fuel
pump nozzle, which could cause personal
injury.
Refueling131Driving and parkingZProCarManuals.com
Page 134 of 288
! Do not use diesel to refuel vehicles with a
gasoline engine. Even small amounts of the
wrong fuel result in damage to the fuel
system and engine.
! Do not switch on the ignition if you
accidentally refuel with the wrong fuel.
Otherwise, the fuel will enter the fuel lines.
Notify a qualified specialist workshop and
have the fuel tank and fuel lines drained
completely.
Gasoline
Fuel grade
! You should only refuel with unleaded
premium-grade gasoline as this avoids
damaging the catalytic converter.
If engine running problems are apparent,
have the cause checked immediately and
repaired. Excess unburned fuel can
otherwise enter the catalytic converter,
leading to overheating and possibly
causing a fire.
i Only refuel with unleaded premium-grade
gasoline with a specified minimum octane
number of 91 (average value of 96 RON/
86 MON).
Usually, you will find information about the
fuel grade on the pump. If you cannot find
the label on the gasoline pump, ask the gas
station staff.
You can find further information under
"Fuel" ( Y page 277), by consulting an
authorized Mercedes-Benz Center or
visiting http://www.mbusa.com (USA
only).
! Use a filter when refueling from a fuel can.
Otherwise, the fuel lines and/or injection
system could be blocked by particles from
the fuel can.
Refueling
Fuel filler flap
When you open or close the vehicle with the
key, the fuel filler flap is automatically
unlocked or locked.
The position of the fuel filler cap is displayed
in the instrument cluster 8. The arrow
next to the filling pump indicates the side of
the vehicle. The fuel filler flap is located to the
rear on the right.
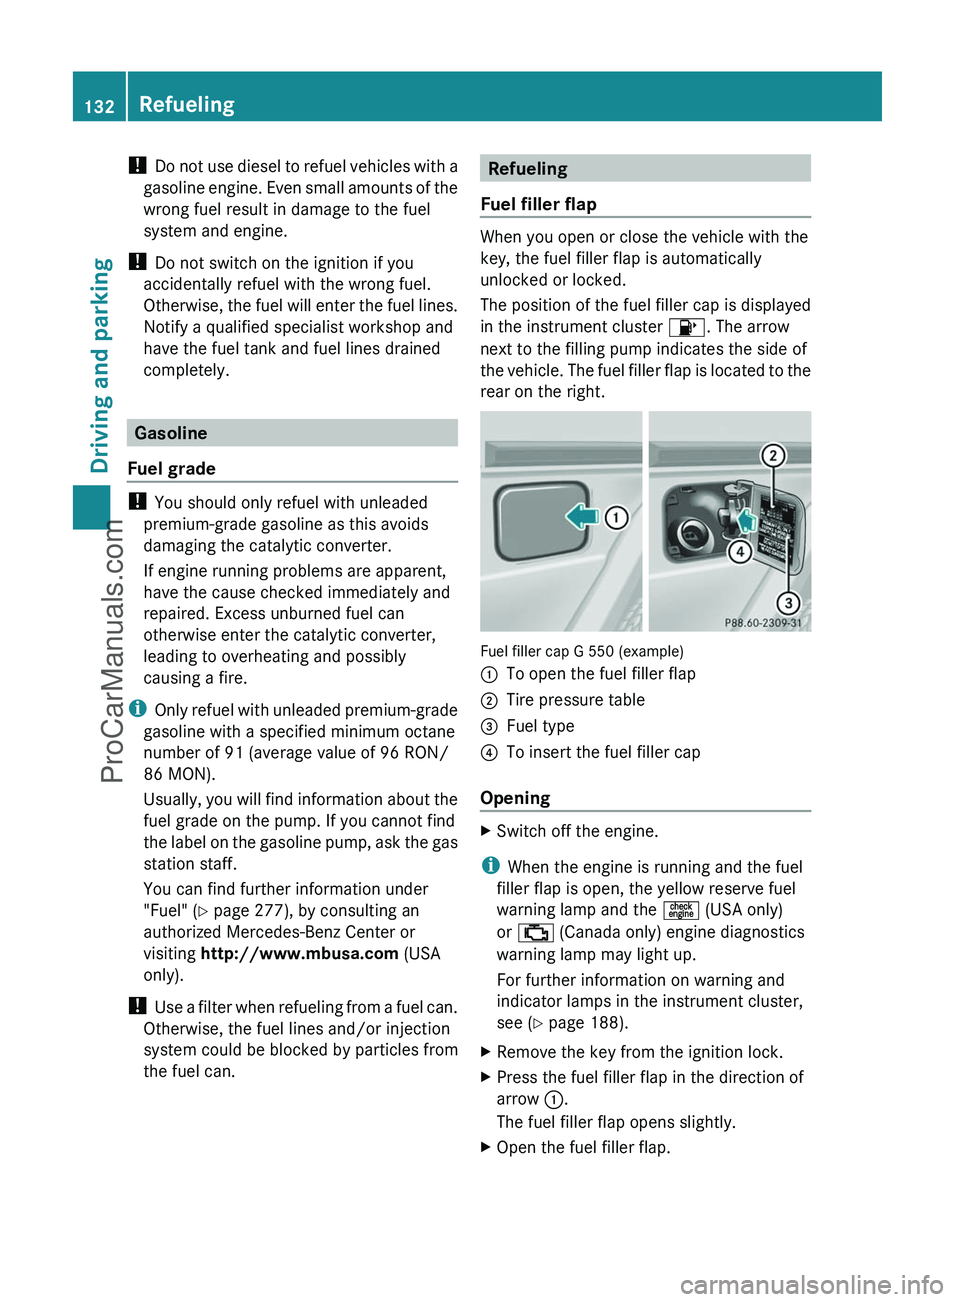
Fuel filler cap G 550 (example)
:To open the fuel filler flap;Tire pressure table=Fuel type?To insert the fuel filler cap
Opening
XSwitch off the engine.
i When the engine is running and the fuel
filler flap is open, the yellow reserve fuel
warning lamp and the = (USA only)
or ; (Canada only) engine diagnostics
warning lamp may light up.
For further information on warning and
indicator lamps in the instrument cluster,
see ( Y page 188).
XRemove the key from the ignition lock.XPress the fuel filler flap in the direction of
arrow :.
The fuel filler flap opens slightly.XOpen the fuel filler flap.132RefuelingDriving and parking
ProCarManuals.com
Page 137 of 288
Rturn the SmartKey in the ignition lock to
position 0 and remove the SmartKey from
the ignition lock.
R take the SmartKey with you and lock the
vehicle when leaving.
Switching off the engine
GWarning
Do not turn off the engine before the vehicle
has come to a complete stop. With the engine
not running, there is no power assistance for
the brake and steering systems. In this case,
it is important to keep in mind that a
considerably higher degree of effort is
necessary to brake and steer the vehicle.
GWarning!
Keep in mind that turning off the engine alone
only will shift AUTOTRONIC into neutral
position N automatically.
Always shift AUTOTRONIC into park position
P before turning off the engine.
Otherwise the vehicle could roll away which
could result in an accident and/or serious
personal injury.
XShift the transmission to position P.XTurn the SmartKey to position 0 in the
ignition lock and remove it.
The immobilizer is activated.XApply the parking brake firmly.
i The SmartKey can only be removed if the
automatic transmission is in position P.
Parking brake
GWarning
Engaging the parking brake while the vehicle
is in motion can cause the rear wheels to lock
up. You could lose control of the vehicle and
cause an accident. In addition, the vehicle's
brake lights do not light up when the parking
brake is engaged.
GWarning!
When leaving the vehicle, always remove the
SmartKey from the starter switch, take it with
you, and lock the vehicle. Do not leave
children unattended in the vehicle, or with
access to an unlocked vehicle. Children could
release the parking brake and/or shift the
automatic transmission out of park position
P , either of which could result in an accident
and/or serious personal injury.
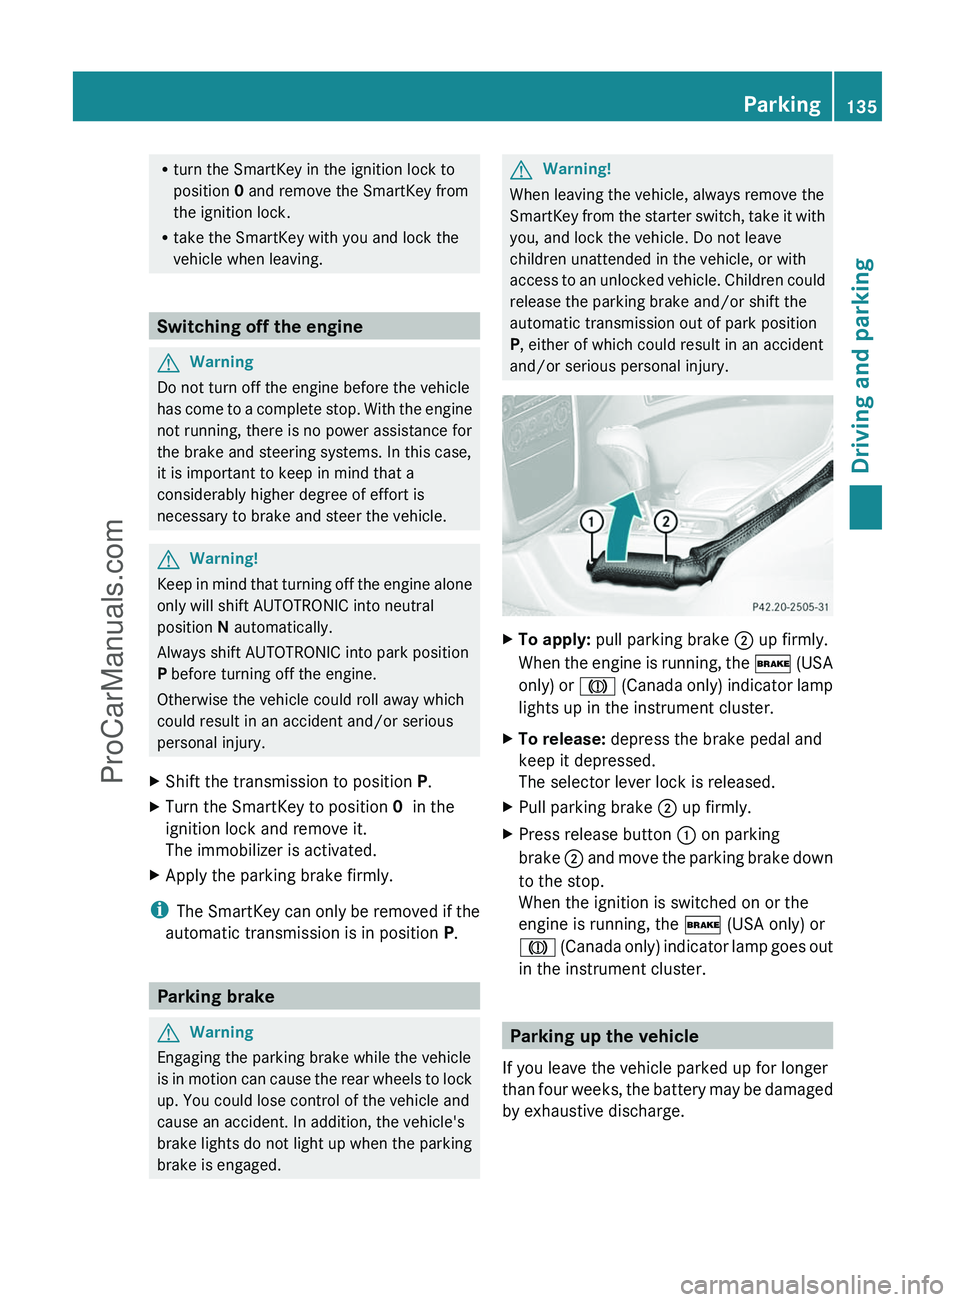
XTo apply: pull parking brake ; up firmly.
When the engine is running, the $ (USA
only) or J (Canada only) indicator lamp
lights up in the instrument cluster.XTo release: depress the brake pedal and
keep it depressed.
The selector lever lock is released.XPull parking brake ; up firmly.XPress release button : on parking
brake ; and move the parking brake down
to the stop.
When the ignition is switched on or the
engine is running, the $ (USA only) or
J (Canada only) indicator lamp goes out
in the instrument cluster.
Parking up the vehicle
If you leave the vehicle parked up for longer
than four weeks, the battery may be damaged
by exhaustive discharge.
Parking135Driving and parkingZProCarManuals.com