2011 MERCEDES-BENZ G-CLASS instrument cluster
[x] Cancel search: instrument clusterPage 58 of 288

Rbraking distance is increased
R vehicle stability in standard driving
maneuvers is increased
Make sure the differential locks are switched
on at all times except when driving off-road
for example. Switch on the differential locks
immediately when returning from off-road
driving.
i In wintry driving conditions, always use
winter tires (M+S tires) and if necessary,
snow chains. Only in this way will the
driving safety systems described in this
section work as effectively as possible.
ABS (Anti-lock Braking System)
Important safety notes
GWarning
Observe "Important safety notes"
( Y page 55).
GWarning
Do not pump the brake pedal. Use firm, steady
brake pedal pressure instead. Pumping the
brake pedal defeats the purpose of the ABS
and significantly reduces braking
effectiveness.
ABS regulates brake pressure in such a way
that the wheels do not lock when you brake.
This allows you to continue steering the
vehicle when braking.
ABS operates above a speed of about
5 mph(8 km/h) regardless of road-surface
conditions, provided the differential locks are
not active. ABS works on slippery surfaces,
even when you only brake gently.
The ! warning lamp in the instrument
cluster lights up when the ignition is switched
on. It goes out when the engine is running.
Braking
If ABS intervenes when braking, you will feel
a pulsing in the brake pedal.
XIf ABS intervenes: continue to depress the
brake pedal with force until the braking
situation is over.XTo make a full brake application:
depress the brake pedal with full force.
The pulsating brake pedal can be an
indication of hazardous road conditions and
functions as a reminder to take extra care
while driving.
GWarning
If the ABS malfunctions, other driving systems
such as the BAS or the ESP ®
are also switched
off. Observe indicator and warning lamps that
may come on as well as messages in the
multifunction display that may appear.
If the ABS malfunctions, the wheels may lock
during hard braking, reducing the steering
capability and extending the braking distance.
Off-road ABS
If the LOW shift range ( Y page 126) is
selected on the transfer case, an ABS system
specifically suited to off-road terrain is
activated.
At speeds below 37 mph(60 km/h) , the front
wheels lock periodically when braking. The
digging-in effect achieved in the process
reduces the stopping distance on off-road
terrain. This limits steering capability.
BAS (Brake Assist)
GWarning
Observe "Important safety notes"
( Y page 55).
BAS operates in emergency braking
situations. If you depress the brake pedal
quickly, BAS automatically boosts the braking
force, thus shortening the stopping distance.
56Driving safety systemsSafety
ProCarManuals.com
Page 59 of 288
XKeep the brake pedal firmly depressed until
the emergency braking situation is over.
ABS prevents the wheels from locking.
The brakes will function as usual once you
release the brake pedal. BAS is deactivated.
GWarning
If the BAS malfunctions, the brake system still
functions, but without the additional brake
boost available that the BAS would normally
provide in an emergency braking maneuver.
Therefore, the braking distance may increase.
ESP ®
(Electronic Stability Program)
Important safety notes
GWarning
Observe "Important safety notes"
( Y page 55).
ESP ®
monitors driving stability and traction.
Traction is the power transmission between
the tires and the road surface.
If ESP ®
detects that the vehicle is deviating
from the direction desired by the driver, one
or more wheels are braked to stabilize the
vehicle. If necessary, the engine output is also
modified to keep the vehicle on the desired
course within physical limits. ESP ®
assists
the driver when pulling away on wet or
slippery roads. ESP ®
can also stabilize the
vehicle during braking.
If ESP ®
intervenes, the ÷ warning lamp
flashes in the instrument cluster.
GWarning
Under no circumstances should you
deactivate ESP ®
when the ÷ ESP®
warning lamp in the instrument cluster
flashes. Proceed as follows:
R when driving off, apply as little throttle as
possible.
R while driving, ease up on the accelerator
pedal.
R adapt your speed to suit the prevailing road
and weather conditions.
failure to observe these guidelines could
cause the vehicle to skid. ESP ®
cannot
prevent accidents resulting from excessive
speed.
! Switch the ignition off when:
R the parking brake is being tested using a
dynamometer
R the vehicle is being towed with the front/
rear axle raised
Application of the brakes by ESP ®
may
otherwise destroy the brake system.
! Only operate the vehicle for a maximum
of ten seconds on a brake test
dynamometer. Switch off the ignition.
Application of the brakes by ESP ®
may
otherwise destroy the brake system.
! Function or performance tests may only
be performed on a 2-axle dynamometer. If
you wish to operate the vehicle on such a
dynamometer, please consult an
authorized Mercedes-Benz Center
beforehand. You could otherwise damage
the drive train or the brake system.
i Only use wheels with the recommended
tire sizes. Only then will ESP ®
function
properly.
i If differential locks are switched on, ABS,
BAS and ESP ®
switch themselves off
automatically.
Driving safety systems57SafetyZProCarManuals.com
Page 60 of 288

4ETS (Electronic Traction System)GWarning
Observe "Important safety notes"
( Y page 55).
Traction control is part of ESP ®
.
Traction control brakes the drive wheels
individually if they spin. This enables you to
pull away and accelerate on slippery surfaces,
for example if the road surface is slippery on
one side. In addition, more drive torque is
transferred to the wheel or wheels with
traction.
Traction control remains active if you
deactivate ESP ®
.
Traction control is no longer active at speeds
above approximately 37 mph (60 km/h).
Activating/deactivating ESP ®
GWarning!
The ESP
®
should not be switched off during
normal driving other than in the
circumstances described below. Disabling
the system will reduce vehicle stability in
driving maneuvers.
ESP ®
is activated automatically when the
engine is started.
It may be best to deactivate ESP ®
in the
following situations:
R when using snow chains
R in deep snow
R on sand or gravel
GWarning
Switch on ESP ®
immediately if one of the
previously stated conditions is longer met.
Otherwise, ESP ®
cannot stabilize the vehicle
if it begins to lurch or when a wheel spins.
When you deactivate ESP ®
:
R ESP ®
no longer improves driving stability.
R the engine's torque is no longer limited and
the drive wheels can spin. The spinning of
the wheels results in a cutting action, which
provides better grip.
R traction control is still activated.
R ESP ®
still provides support when you
brake.
R and drive over 37 mph (60 km/h), ESP ®
intervenes when the grip limit of a wheel is
reached, even if it is deactivated.
If ESP ®
is deactivated and one or more wheels
start to spin, the ÷ warning lamp in the
instrument cluster flashes. In such situations,
ESP ®
will not stabilize the vehicle.
If you have deactivated ESP ®
, it is
automatically reactivated if you exceed a
speed of 37 mph (60 km/h) or a certain
lateral acceleration.XTo deactivate: press button : until the
å warning lamp lights up in the
instrument cluster.GWarning
When the å ESP®
OFF warning lamp is lit,
ESP ®
is deactivated.
If the ÷ ESP®
warning lamp and the
å ESP®
OFF warning lamp remain lit,
ESP ®
is not available due to a malfunction.
When ESP ®
is deactivated or not operational,
vehicle stability in standard driving
maneuvers is reduced.
Adapt your speed and driving to the prevailing
road conditions and to the non-operating
status of the ESP ®
.
58Driving safety systemsSafety
ProCarManuals.com
Page 61 of 288
! Avoid spinning a drive wheel for an
extended period with ESP ®
switched off.
This could cause serious damage to the
drive train.XTo activate: press button : until the
å warning lamp goes out in the
instrument cluster.
EBD (Electronic Brake force
Distribution)
GWarning
Observe "Important safety notes"
( Y page 55).
EBD monitors and controls the brake
pressure on the rear wheels to improve
driving stability while braking.
GWarning!
If the EBD malfunctions, the brake system will
still function with full brake boost. However,
the rear wheels could lock up during
emergency braking situations, for example.
You could lose control of the vehicle and
cause an accident.
Adapt your driving style to the changed
driving characteristics.
Anti-theft systems
Immobilizer
The immobilizer prevents your vehicle from
being started without the correct key.
When leaving the vehicle, always take the
SmartKey with you and lock the vehicle. The
engine can be started by anyone with a valid
SmartKey that is left inside the vehicle.
XTo activate: remove the SmartKey from
the ignition lock.XTo deactivate: switch on the ignition.
i
The immobilizer is always deactivated
when you start the engine.
In the event that the engine cannot be
started when the starter battery is fully
charged, the immobilizer may be faulty.
Contact an authorized Mercedes-Benz
Center or call 1-800-FOR-MERCedes (in
USA) or 1-800-387-0100 (in Canada).
ATA (Anti-Theft Alarm system)
A visual and audible alarm is triggered if the
alarm system is armed and you open:
R a door
R a door using the mechanical key
R the rear door
R the hood
The alarm is also triggered if:
R the position of the vehicle is changed.
R a window is smashed.
The alarm is not switched off, even if you
close the open door that has triggered it, for
example.
i If the alarm stays on for more than 30
seconds, the emergency call system
mbrace (USA only) or TELEAID (Canada
only) initiates a call to the Customer
Assistance Center automatically. The
emergency call system initiates the call
provided that:
R you have subscribed to the mbrace/
TELEAID service.
R the mbrace/TELEAID service has been
activated properly.
R the required mobile phone, power supply
and GPS are available.
Anti-theft systems59SafetyZProCarManuals.com
Page 78 of 288
Vehicle equipment
i This manual describes all the standard
and optional equipment of your vehicle
which was available at the time of
purchase. Country-specific differences are
possible. Please note that your vehicle may
not be equipped with all features
described. This also applies to safety-
relevant systems and functions.
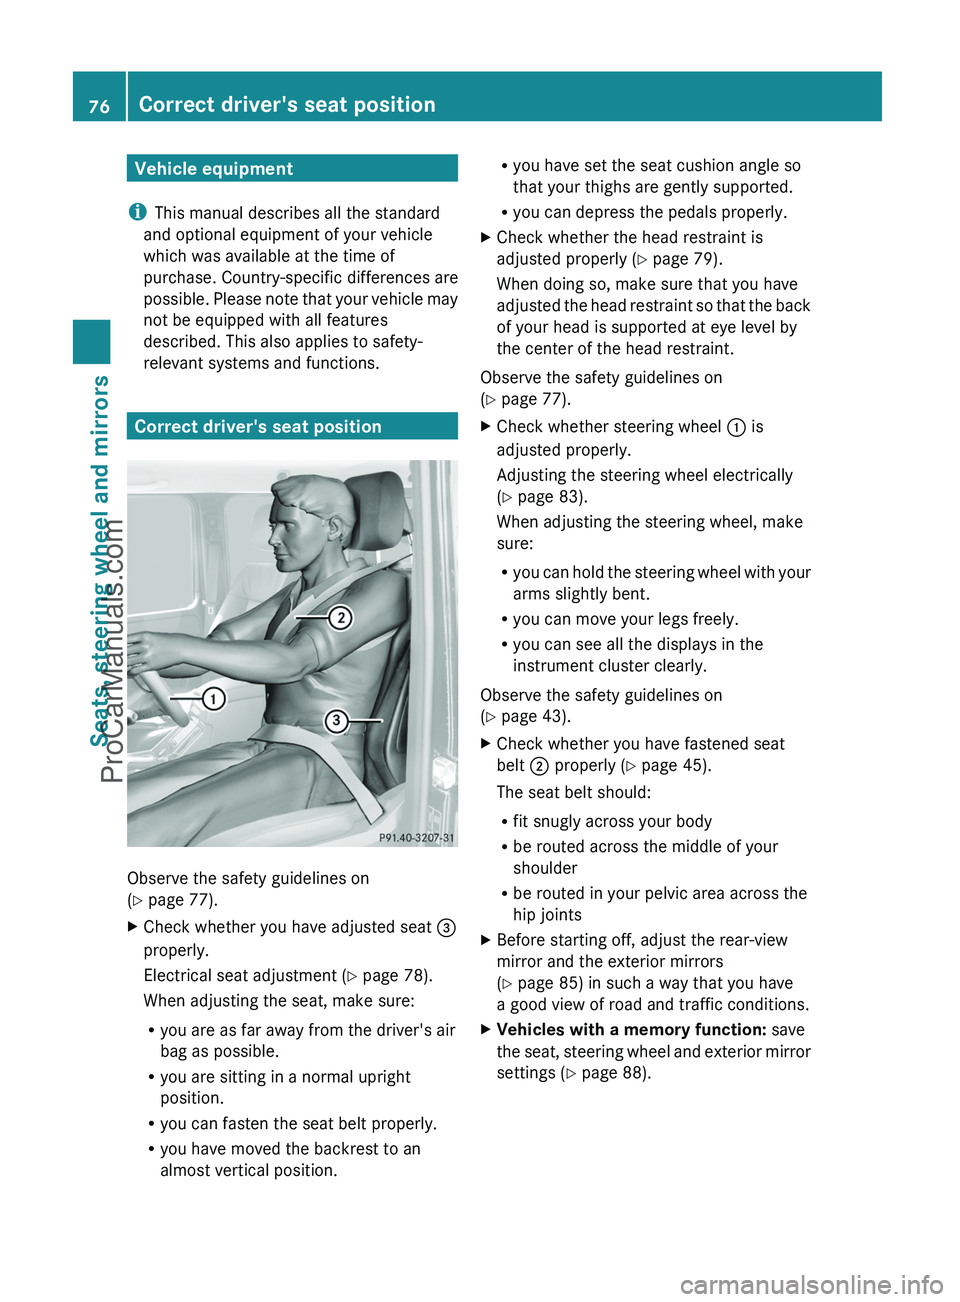
Correct driver's seat position
Observe the safety guidelines on
( Y page 77).
XCheck whether you have adjusted seat =
properly.
Electrical seat adjustment ( Y page 78).
When adjusting the seat, make sure:
R you are as far away from the driver's air
bag as possible.
R you are sitting in a normal upright
position.
R you can fasten the seat belt properly.
R you have moved the backrest to an
almost vertical position.R you have set the seat cushion angle so
that your thighs are gently supported.
R you can depress the pedals properly.XCheck whether the head restraint is
adjusted properly ( Y page 79).
When doing so, make sure that you have
adjusted the head restraint so that the back
of your head is supported at eye level by
the center of the head restraint.
Observe the safety guidelines on
( Y page 77).
XCheck whether steering wheel : is
adjusted properly.
Adjusting the steering wheel electrically
( Y page 83).
When adjusting the steering wheel, make
sure:
R you can hold the steering wheel with your
arms slightly bent.
R you can move your legs freely.
R you can see all the displays in the
instrument cluster clearly.
Observe the safety guidelines on
( Y page 43).
XCheck whether you have fastened seat
belt ; properly ( Y page 45).
The seat belt should:
R fit snugly across your body
R be routed across the middle of your
shoulder
R be routed in your pelvic area across the
hip jointsXBefore starting off, adjust the rear-view
mirror and the exterior mirrors
( Y page 85) in such a way that you have
a good view of road and traffic conditions.XVehicles with a memory function: save
the seat, steering wheel and exterior mirror
settings ( Y page 88).76Correct driver's seat positionSeats, steering wheel and mirrors
ProCarManuals.com
Page 85 of 288
XMake sure that the SmartKey is in position
2 in the ignition lock.XTo switch on: press button : repeatedly
until the desired ventilation level is set.
i If you open the side windows and the
sliding sunroof using the key ( Y page 71),
the driver's seat ventilation automatically
switches to the highest level.
XTo switch off: press button : repeatedly
until all the indicator lamps go out.
Problems with the seat ventilation
If one or all of the indicator lamps in the seat
ventilation button are flashing, the seat
ventilation has switched off automatically.
The vehicle's electrical system voltage is too
low because too many electrical consumers
are switched on.
XSwitch off electrical consumers which you
do not need, such as the rear window
defroster or interior lighting.
Once the battery is sufficiently charged, the
seat ventilation will switch back on
automatically.
Steering wheel
Important safety notes
You can adjust the steering wheel electrically.
GWarning!
Do not adjust the steering wheel while driving.
Adjusting the steering wheel while driving
could cause the driver to lose control of the
vehicle.
The electrical steering wheel adjustment
feature can be operated at any time.
Therefore, do not leave children unattended
in the vehicle, or with access to an unlocked
vehicle. A child's unsupervised access to a
vehicle could result in an accident and/or
serious personal injury.
When you adjust the steering wheel, make
sure that:
R the steering wheel can be reached with
your arms slightly bent.
R you can move your legs freely.
R you can see all the displays in the
instrument cluster clearly.
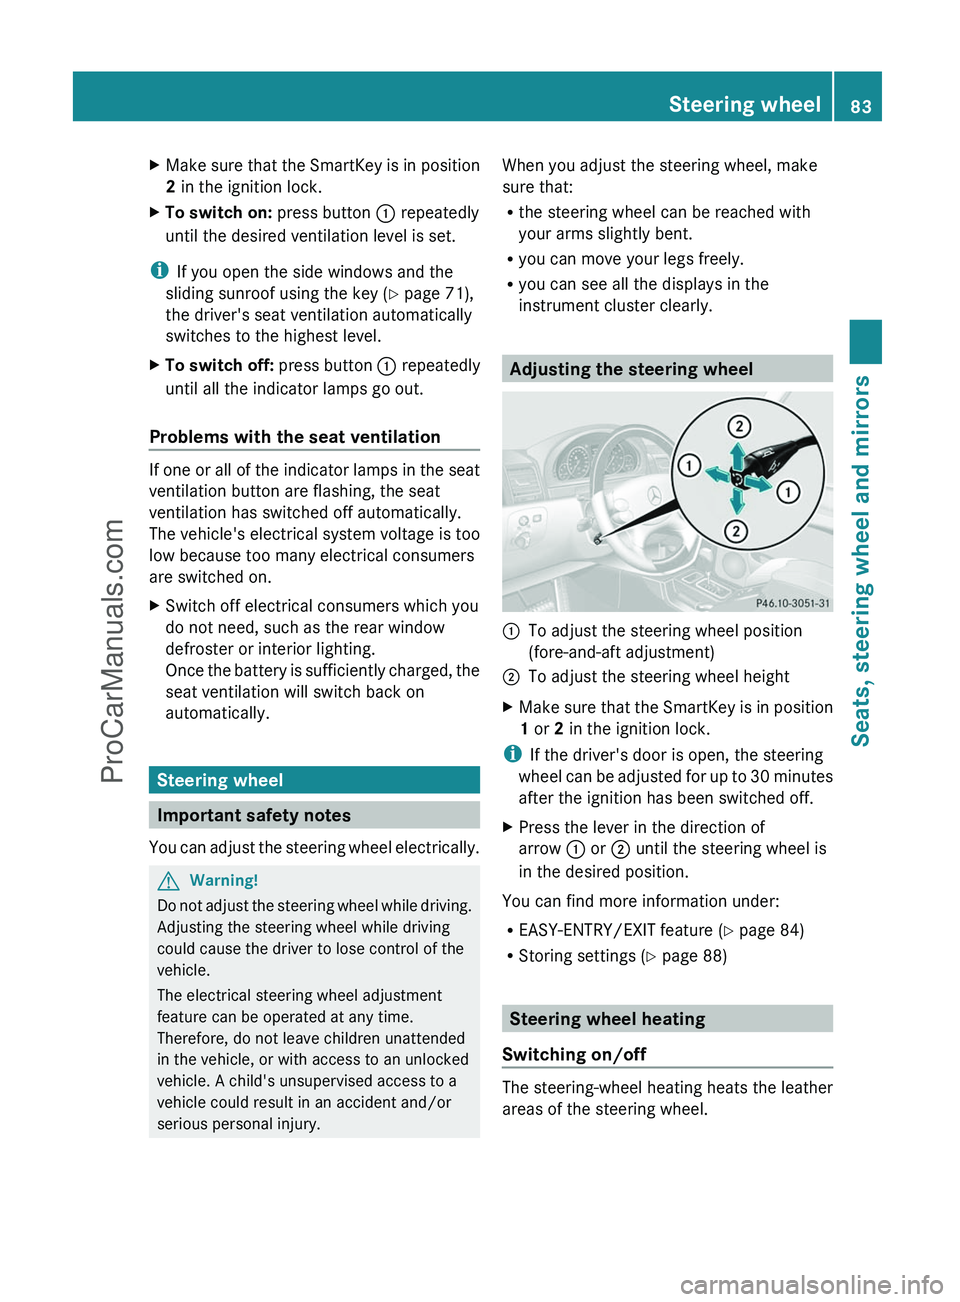
Adjusting the steering wheel
:To adjust the steering wheel position
(fore-and-aft adjustment);To adjust the steering wheel heightXMake sure that the SmartKey is in position
1 or 2 in the ignition lock.
i
If the driver's door is open, the steering
wheel can be adjusted for up to 30 minutes
after the ignition has been switched off.
XPress the lever in the direction of
arrow : or ; until the steering wheel is
in the desired position.
You can find more information under:
R EASY-ENTRY/EXIT feature ( Y page 84)
R Storing settings ( Y page 88)
Steering wheel heating
Switching on/off
The steering-wheel heating heats the leather
areas of the steering wheel.
Steering wheel83Seats, steering wheel and mirrorsZProCarManuals.com
Page 92 of 288
Vehicle equipment
i This manual describes all the standard
and optional equipment of your vehicle
which was available at the time of
purchase. Country-specific differences are
possible. Please note that your vehicle may
not be equipped with all features
described. This also applies to safety-
relevant systems and functions.
Exterior lighting
Important safety notes
For reasons of safety, Mercedes-Benz
recommends that you drive with the lights
switched on even during the daytime. In some
countries, operation of the headlamps varies
due to legal requirements and self-imposed
obligations. In these countries, the daytime
running lamps are automatically switched on
when the engine is started.
Information about driving abroad
Converting to symmetrical low beam
when driving abroad: switch the headlamps
to symmetrical low beam in countries in
which traffic drives on the opposite side of the
road to the country where the vehicle is
registered. This prevents glare to oncoming
traffic. Symmetrical lights do not illuminate
as large an area of the edge of the road.
Have the headlamps converted at a qualified
specialist workshop, e.g. an authorized
Mercedes-Benz Center, as close to the border
as possible before driving in these countries.
Converting to asymmetrical low beam
after returning: have the headlamps
converted back to asymmetrical low beam at
a qualified specialist workshop, e.g. an
authorized Mercedes-Benz Center, as soon as
possible after crossing the border when
returning.
Light switch
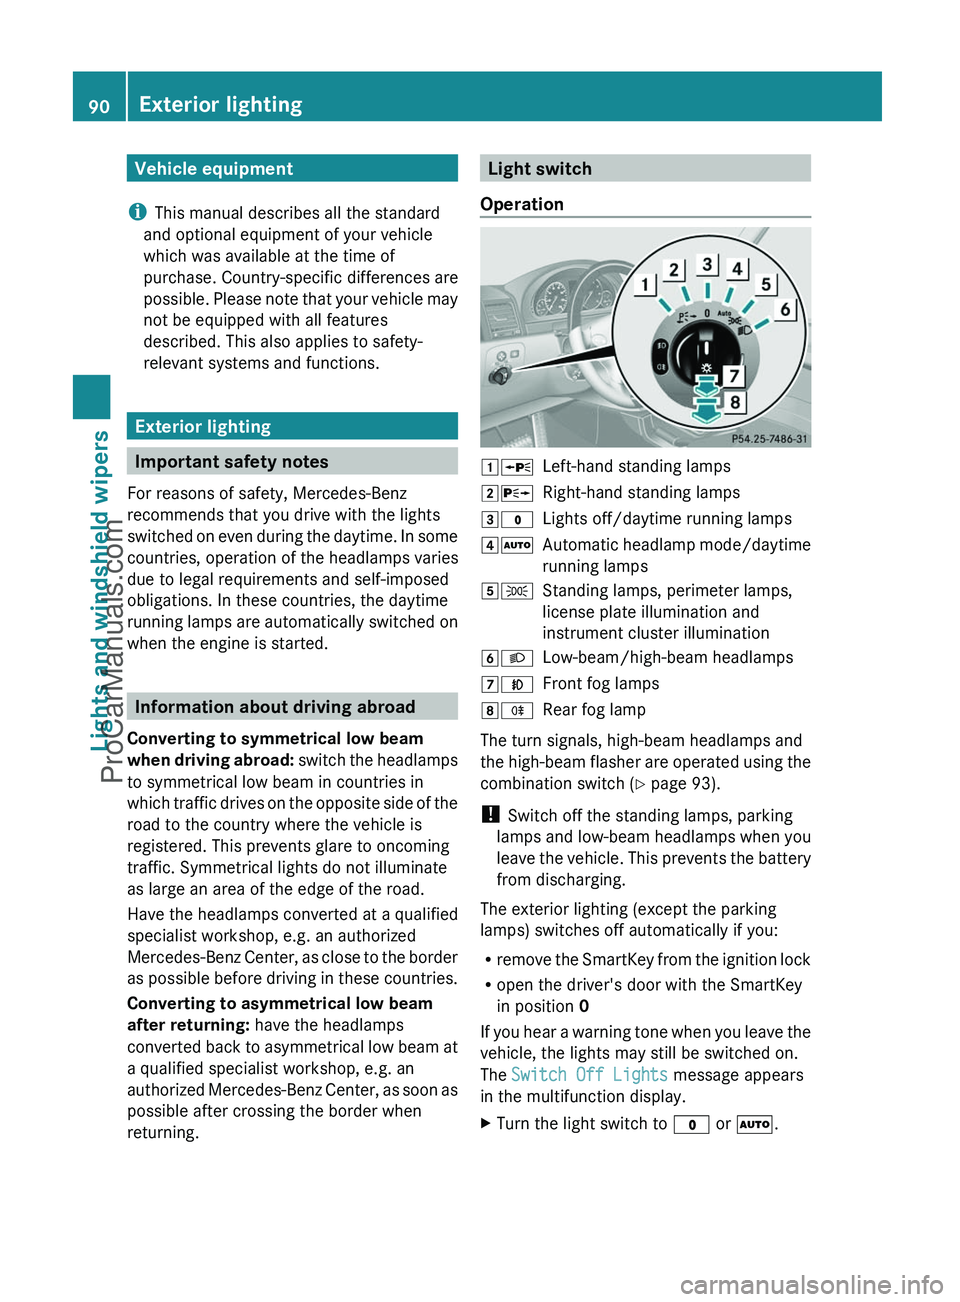
Operation1 WLeft-hand standing lamps2XRight-hand standing lamps3$Lights off/daytime running lamps4ÃAutomatic headlamp mode/daytime
running lamps5 TStanding lamps, perimeter lamps,
license plate illumination and
instrument cluster illumination6 LLow-beam/high-beam headlamps7NFront fog lamps8RRear fog lamp
The turn signals, high-beam headlamps and
the high-beam flasher are operated using the
combination switch ( Y page 93).
! Switch off the standing lamps, parking
lamps and low-beam headlamps when you
leave the vehicle. This prevents the battery
from discharging.
The exterior lighting (except the parking
lamps) switches off automatically if you:
R remove the SmartKey from the ignition lock
R open the driver's door with the SmartKey
in position 0
If you hear a warning tone when you leave the
vehicle, the lights may still be switched on.
The Switch Off Lights message appears
in the multifunction display.
XTurn the light switch to $ or à .90Exterior lightingLights and windshield wipers
ProCarManuals.com
Page 93 of 288
XIf you see the Turn off lights or
remove key message in the multifunction
display, remove the SmartKey from the
ignition lock.
or
XTurn the light switch to $ or à .
Low-beam headlamps
XTo switch on: turn the SmartKey to
position 2 in the ignition lock or start the
engine.XTurn the light switch to L.
The L indicator lamp in the instrument
cluster lights up.XTo switch off: turn the light switch to
$ .
Daytime running lamps
Daytime running lamps in Canada
The "daytime running lamps" function is
required by law in Canada. It cannot therefore
be deactivated.
XTurn the light switch to $ or à .
When the engine is running: depending on
the ambient light, the low-beam headlamps
or the parking lamps are switched on.
When the low-beam headlamps are
switched on, the L indicator lamp in the
instrument cluster lights up.
If the light switch is set to $ or à , you
cannot activate the high-beam headlamps.
However, the high-beam flasher can always
be used. Turn the light switch to L when
driving at night. You can switch on the high-
beam headlamps in this position.
When the engine is running and the vehicle is
stationary: if you move the selector lever from
a driving position to N or P, the low-beam
headlamps go out after three minutes.
When the engine is running: if you turn the
light switch to T, you turn on the parking
lamps and low-beam headlamps.
When the engine is running: if you turn the
light switch to L, the manual settings take
precedence over the daytime running lamps.
Daytime running lamps in the USA
In the USA, the daytime running lamps are
deactivated upon delivery from the factory.XTo switch on: activate the daytime
running lamps function in the on-board
computer ( Y page 164).XTurn the light switch to $ or à .
When the engine is on: the low-beam
headlamps are switched on. The L
indicator lamp in the instrument cluster
lights up.
If the light switch is set to $ or à , you
cannot switch on the high-beam headlamps
in bright conditions. Turn the light switch to
L . You can switch on the high-beam
headlamps in this position.
If the light switch is set to $, Ã or
L , you can switch on the high-beam
headlamps in less bright conditions.
However, the high-beam flasher can always
be used.
Turn the light switch to L when driving at
night.
When the engine is running: if you turn the
light switch to T or L , the manual
settings take precedence over the daytime
running lamps.
Automatic headlamp mode
GWarning
If the exterior lamp switch is set to Ã, the
headlamps will not automatically come on
under foggy conditions.
To minimize risk to you and to others, activate
headlamps by turning exterior lamp switch to
L when traffic and/or ambient lighting
conditions require you to do so.
In low ambient lighting conditions, only switch
from position à to L with the vehicle
at a standstill in a safe location. Switching
Exterior lighting91Lights and windshield wipersZProCarManuals.com