2011 MERCEDES-BENZ G-CLASS headlamp
[x] Cancel search: headlampPage 102 of 288
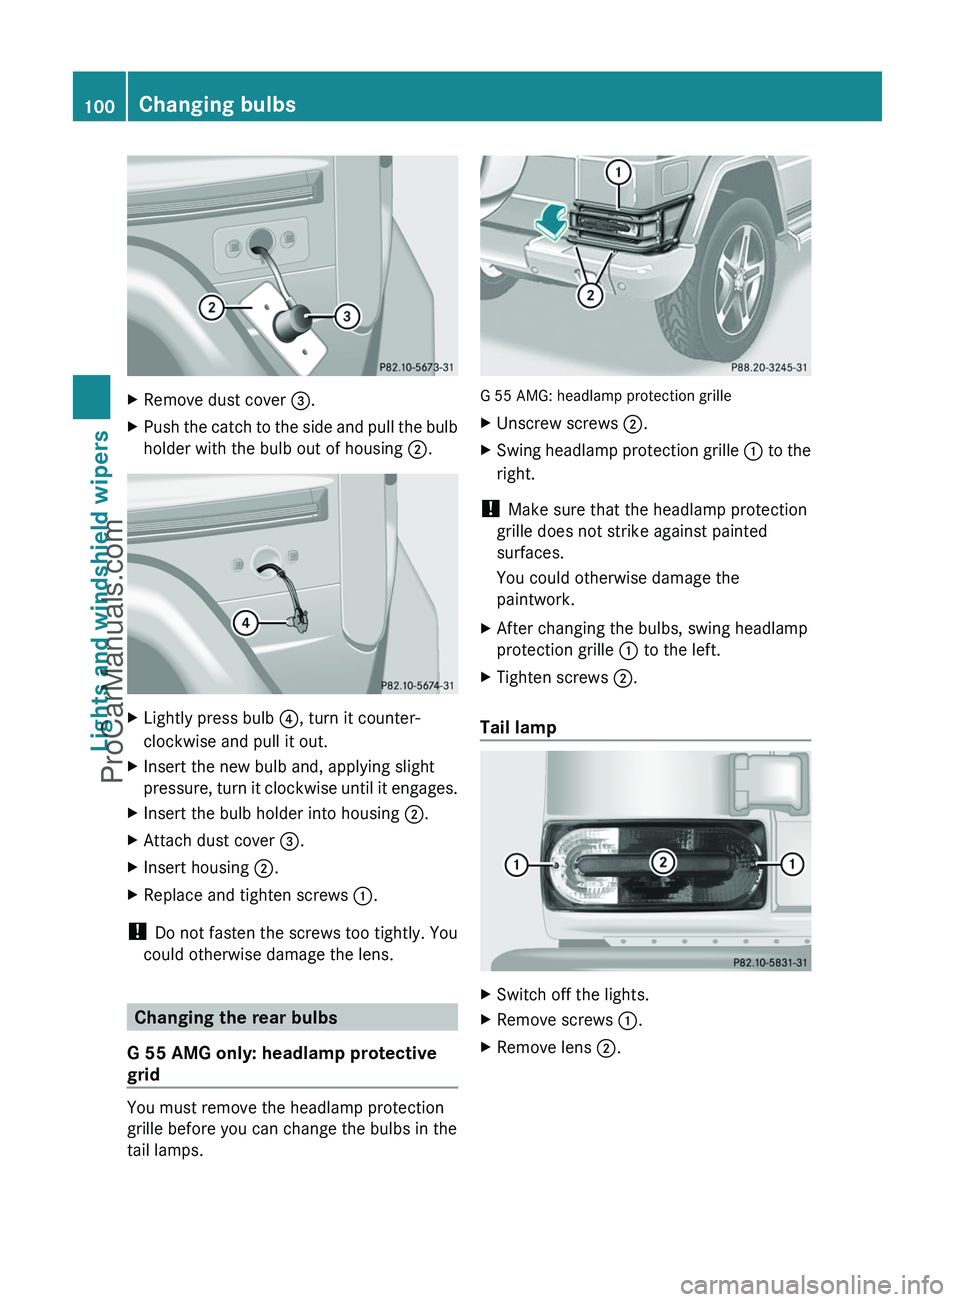
XRemove dust cover =.XPush the catch to the side and pull the bulb
holder with the bulb out of housing ;.XLightly press bulb ?, turn it counter-
clockwise and pull it out.XInsert the new bulb and, applying slight
pressure, turn it clockwise until it engages.XInsert the bulb holder into housing ;.XAttach dust cover =.XInsert housing ;.XReplace and tighten screws :.
!
Do not fasten the screws too tightly. You
could otherwise damage the lens.
Changing the rear bulbs
G 55 AMG only: headlamp protective
grid
You must remove the headlamp protection
grille before you can change the bulbs in the
tail lamps.
G 55 AMG: headlamp protection grille
XUnscrew screws ;.XSwing headlamp protection grille : to the
right.
! Make sure that the headlamp protection
grille does not strike against painted
surfaces.
You could otherwise damage the
paintwork.
XAfter changing the bulbs, swing headlamp
protection grille : to the left.XTighten screws ;.
Tail lamp
XSwitch off the lights.XRemove screws :.XRemove lens ;.100Changing bulbsLights and windshield wipers
ProCarManuals.com
Page 103 of 288
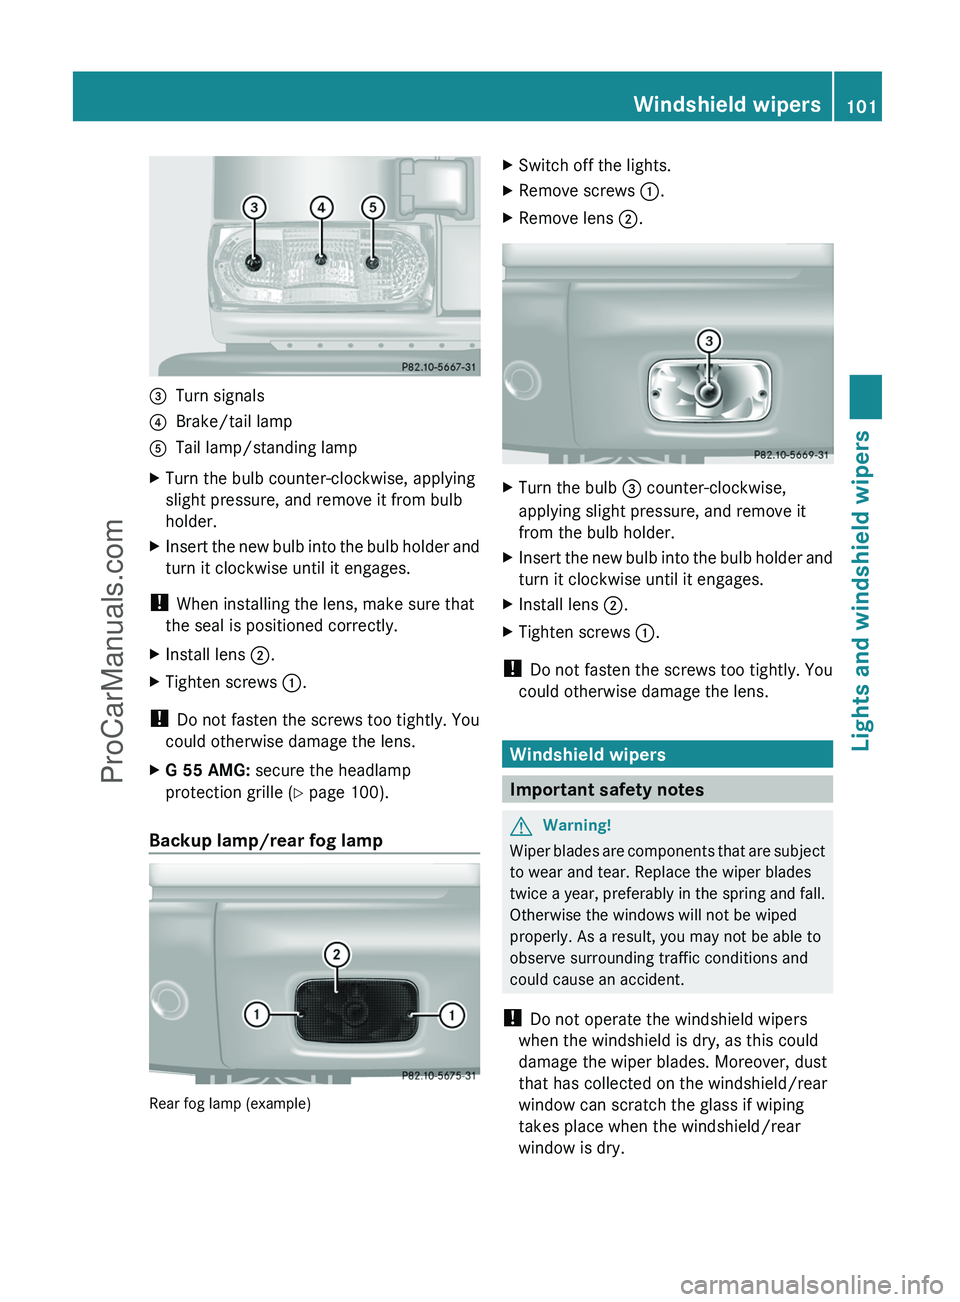
=Turn signals?Brake/tail lampATail lamp/standing lampXTurn the bulb counter-clockwise, applying
slight pressure, and remove it from bulb
holder.XInsert the new bulb into the bulb holder and
turn it clockwise until it engages.
! When installing the lens, make sure that
the seal is positioned correctly.
XInstall lens ;.XTighten screws :.
!
Do not fasten the screws too tightly. You
could otherwise damage the lens.
XG 55 AMG: secure the headlamp
protection grille ( Y page 100).
Backup lamp/rear fog lamp
Rear fog lamp (example)
XSwitch off the lights.XRemove screws :.XRemove lens ;.XTurn the bulb = counter-clockwise,
applying slight pressure, and remove it
from the bulb holder.XInsert the new bulb into the bulb holder and
turn it clockwise until it engages.XInstall lens ;.XTighten screws :.
!
Do not fasten the screws too tightly. You
could otherwise damage the lens.
Windshield wipers
Important safety notes
GWarning!
Wiper blades are components that are subject
to wear and tear. Replace the wiper blades
twice a year, preferably in the spring and fall.
Otherwise the windows will not be wiped
properly. As a result, you may not be able to
observe surrounding traffic conditions and
could cause an accident.
! Do not operate the windshield wipers
when the windshield is dry, as this could
damage the wiper blades. Moreover, dust
that has collected on the windshield/rear
window can scratch the glass if wiping
takes place when the windshield/rear
window is dry.
Windshield wipers101Lights and windshield wipersZProCarManuals.com
Page 146 of 288
XClean the headlamps and rear lights and
check for damage.XClean the front and rear license plates.XClean the wheels and tires with a water jet
and remove any foreign objects.XClean the wheels, tires, wheel arches and
the vehicle underside with a water jet;
check for any foreign objects and damage.XCheck whether twigs or other parts of
plants have become trapped. These
increase the risk of fire and can damage
fuel pipes, brake hoses or the rubber
bellows of the axle joints and propeller
shafts.XAfter the trip, examine without fail the
entire undercarriage, wheels, tires, brakes,
bodywork structure, steering, chassis and
exhaust system for damage.XAfter driving for extended periods across
sand, mud, gravel, water or in similarly dirty
conditions, have the brake discs, wheels,
brake pads/linings and axle joints checked
and cleaned.XIf you detect strong vibrations after off-road
driving, check for foreign objects in the
wheels and drivetrain and remove any that
you find. Foreign objects can disturb the
balance and cause vibrations.XTest the brakes.
Driving on sand
GWarning!
Do not reduce the tire inflation pressure
before driving through sand. However, if you
do so, remember to correct the tire inflation
pressure before continuing your trip. Driving
with reduced tire inflation pressure increases
the risk of losing control of the vehicle and
rolling over.
Observe the following rules when driving on
sand:
R shift the transfer case to
LOW (Y page 126).
R avoid high engine speeds.
R limit the shift range of the automatic
transmission according to the off-road
conditions.
R drive quickly to overcome the rolling
resistance. Otherwise, the vehicle could dig
itself into the sand.
R drive in the tracks of other vehicles if
possible. Make sure that the ruts are not
too deep, that the sand is firm enough and
that your vehicle has sufficient ground
clearance.
Tire ruts and gravel roads
Observe the following rules when driving
along ruts in off-road terrain or on roads with
loose gravel:
! Check that the ruts are not too deep and
that your vehicle has sufficient clearance.
Otherwise, your vehicle could be damaged
or bottom out and get stuck.
R shift the transfer case to
LOW (Y page 126).
R avoid high engine speeds.
R observe the safety notes (Y page 142) and
the general notes (Y page 142) on off-road
driving.
R restrict the shift range of the automatic
transmission to 1 (Y page 123).
R drive slowly.
R where ruts are too deep, drive with the
wheels of one side on the center grassy
area, if possible.
144Driving tipsDriving and parking
ProCarManuals.com
Page 164 of 288
XPress the & or * button to select a
scene.
Navigation menu
Displaying navigation instructions
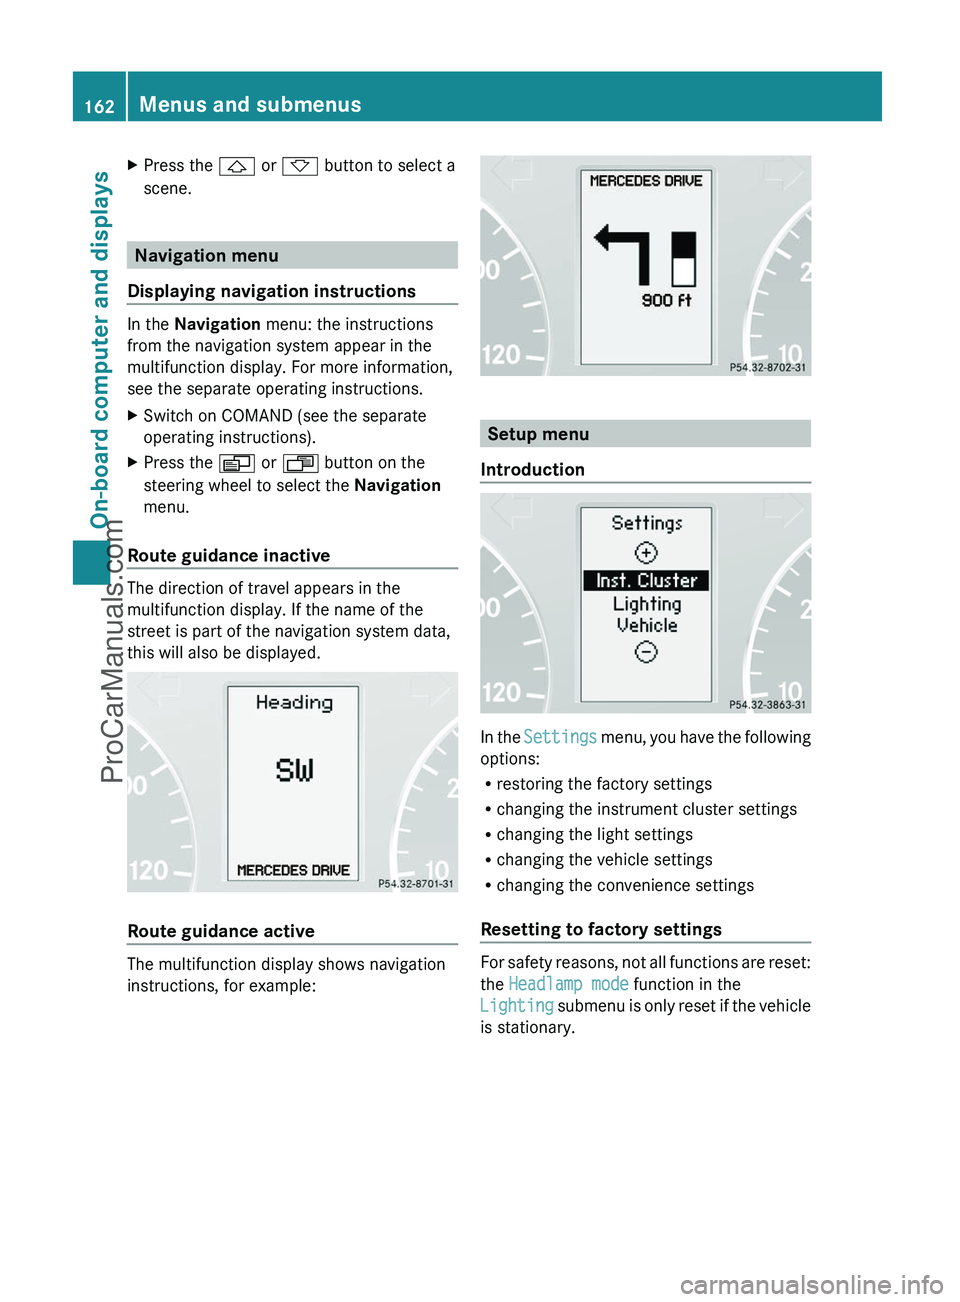
In the Navigation menu: the instructions
from the navigation system appear in the
multifunction display. For more information,
see the separate operating instructions.
XSwitch on COMAND (see the separate
operating instructions).XPress the V or U button on the
steering wheel to select the Navigation
menu.
Route guidance inactive
The direction of travel appears in the
multifunction display. If the name of the
street is part of the navigation system data,
this will also be displayed.
Route guidance active
The multifunction display shows navigation
instructions, for example:
Setup menu
Introduction
In the Settings menu, you have the following
options:
R restoring the factory settings
R changing the instrument cluster settings
R changing the light settings
R changing the vehicle settings
R changing the convenience settings
Resetting to factory settings
For safety reasons, not all functions are reset:
the Headlamp mode function in the
Lighting submenu is only reset if the vehicle
is stationary.
162Menus and submenusOn-board computer and displays
ProCarManuals.com
Page 166 of 288
Switching the daytime running lamps on/
off
This function is not available in Canada.
If you have activated the daytime running
lamps function and the light switch is in the
$ or à position, the low-beam
headlamps are switched on automatically
when the engine is running.
In the dark, the following also light up:
R the low-beam headlamps
R the standing lamps
R the tail lamps
R the license plate lamp
R the side marker lamp
In countries where daytime running lamps are
legally required, Constant is the factory
setting.XPress the V or U button on the
steering wheel to select the Settings
menu.XPress the & button to select submenus.XPress the W or X button to select the
Lighting submenu.XPress the & button to select Headlamp
mode .XPress the W or X button to set the
mode for the headlamps to Manual or
Constant (daytime running lamps).XPress the &, V or U button to
select a different display.
Switching the surround lighting on or off
If you activate the surround lighting function
and the light switch is set to Ã, the
following will light up if it is dark and you
unlock the vehicle using the key:
R the standing lamps
R the license plate lamp
R the tail lamps
R the fog lamps
R the side marker lamp
The surround lighting switches off
automatically after 40 seconds or when the
driver's door is opened.XPress the V or U button on the
steering wheel to select the Settings
menu.XPress the & button to select submenus.XPress the W or X button to select the
Lighting submenu.XPress the & button to select Surround
lighting .XPress the W or X button to switch
the Surround lighting on or off.XWhen leaving the vehicle, turn the light
switch to position Ã.
The surround lighting is activated.XPress the &, V or U button to
select a different display.
Activating/deactivating the exterior
lighting delayed switch-off
If you have activated the delayed switch-off
function, the light switch is set to à and
you switch off the engine, the following
remain lit:
R the standing lamps
R the license plate lamp
R the tail lamps
R the fog lamps
R the side marker lamp
If the engine is switched off and then none of
the doors are opened, or if an open door is
not closed, the exterior lighting goes out after
60 seconds.
XPress the V or U button on the
steering wheel to select the Settings
menu.XPress the & button to select submenus.XPress the W or X button to select the
Lighting submenu.XPress the & button to select Headl.
Delayed Switch Off .164Menus and submenusOn-board computer and displays
ProCarManuals.com
Page 174 of 288

LightsDisplay messagesPossible causes/consequences and M Solutionsb
Low Beam Left
or
Low Beam RightThe left or right-hand low-beam headlamp is defective.XVisit a qualified specialist workshop.b
AUTO-Light
InoperativeThe light sensor is defective. The low-beam headlamps are
switched on.XUSA only: set the lights to manual operation in the on-board
computer ( Y page 164).XSwitch the lights on and off using the light switch.XVisit a qualified specialist workshop.b
Turn Signal Rear
Left Auxiliary
Bulb On
or
Turn Signal Rear
Right Auxiliary
Bulb OnThe rear left-hand or rear right-hand turn signal is defective.
Another lamp has taken over its function.XReplace the bulb ( Y page 96).b
Turn Signal Left
Side Mirror
or
Turn Signal Right
Side MirrorThe turn signal in the left-hand or right-hand exterior mirror is
defective. These messages will only appear if all of the turn signal's
LEDs have failed.XVisit a qualified specialist workshop.b
Turn Signal Front
Left Auxiliary
Bulb On
or
Turn Signal Front
Right Auxiliary
Bulb OnThe front left-hand or front right-hand turn signal is defective.
Another lamp has taken over its function.XReplace the bulb ( Y page 96).b
Brake Lamp Left
or
Brake Lamp RightThe left or right-hand brake lamp is defective.XReplace the bulb ( Y page 96).172Display messagesOn-board computer and displays
ProCarManuals.com
Page 209 of 288
section using your ID number and
password 20
.
i Vehicle remote unlocking is only possible
if the corresponding mobile phone network
is accessible.
The SOS button flashes and the
Connecting Call message appears in the
multifunction display to confirm that the
command for vehicle remote unlocking has
been received.
If you press the rear door's locking cylinder
for more than 20 seconds before receiving
authorization for remote unlocking, you
must wait 15 minutes before you can press
the rear door's locking cylinder again.
Service for recovering stolen vehicles
If your vehicle has been stolen:
XContact the police.
The police will issue an incident report. This
report has a number.XForward this number to the Response
Center together with your PIN.
The Response Center will then attempt to
covertly contact the mbrace system. The
Response Center contacts you and the
local law enforcement authority if the
vehicle is located. However, only the law
enforcement is informed of the location of
the vehicle.
i If the anti-theft alarm system remains
activated for longer than thirty seconds,
mbrace is automatically connected to the
Response Center.
Brush guard (USA only)
GWarning
The brush guard is designed solely to enhance
the appearance of the vehicle and help
protect grille and headlamps from minor
mishaps, either on or off road.
Since the safety characteristics are limited in
the event of an accident, brush guard are not
intended to prevent injury or damage in the
event of an accident. Also observe state and
local regulations on installation and use.
Raise and lower the brush guard in an open
space with plenty of room.
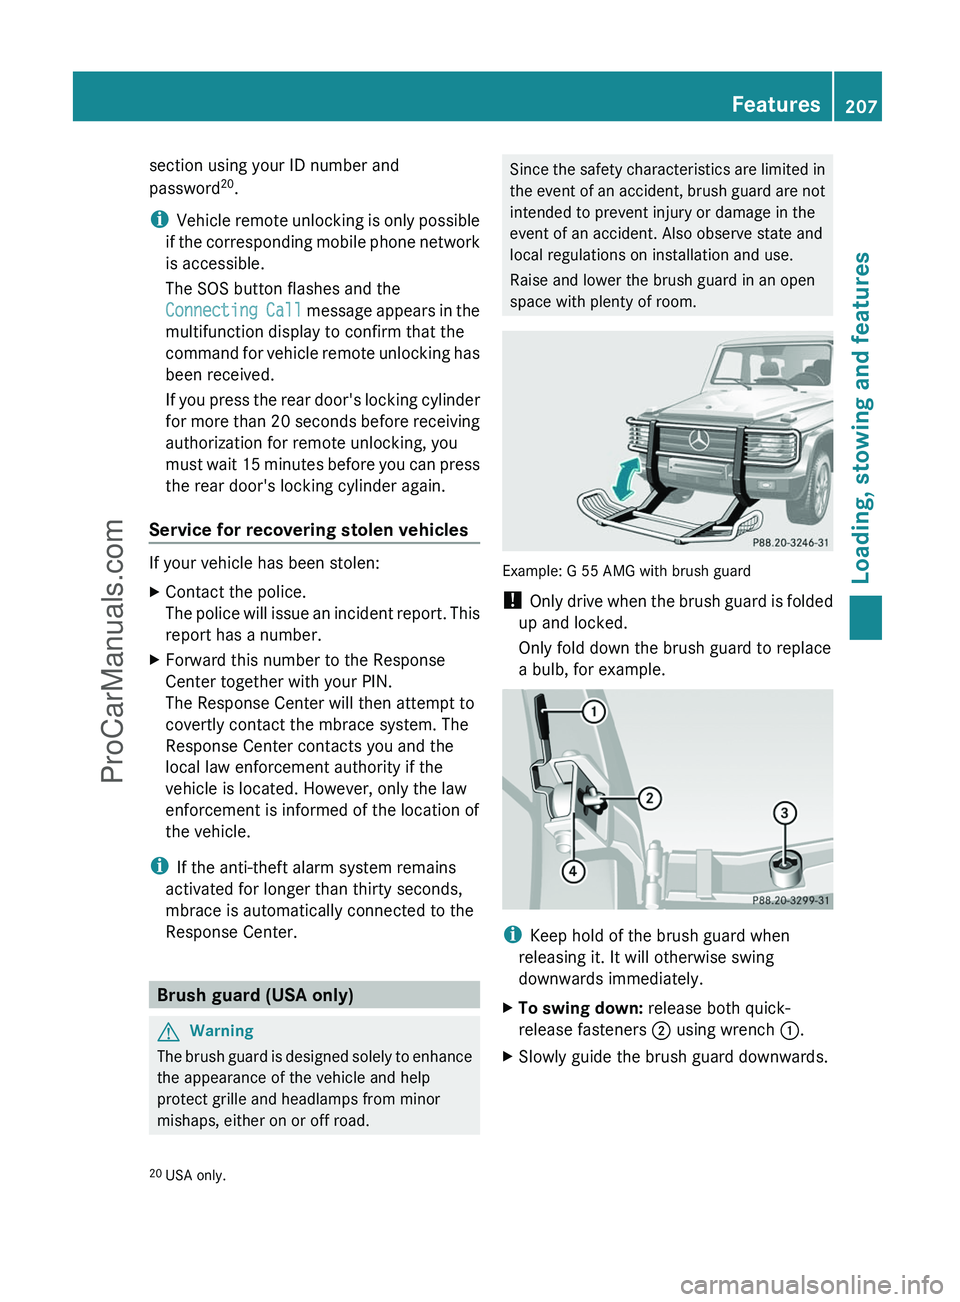
Example: G 55 AMG with brush guard
! Only drive when the brush guard is folded
up and locked.
Only fold down the brush guard to replace
a bulb, for example.
i Keep hold of the brush guard when
releasing it. It will otherwise swing
downwards immediately.
XTo swing down: release both quick-
release fasteners ; using wrench :.XSlowly guide the brush guard downwards.20
USA only.Features207Loading, stowing and featuresZProCarManuals.com
Page 220 of 288

if the coolant temperature display indicates
that the coolant is overheated.
R do not remove the pressure cap on the
coolant reservoir if the coolant temperature
is above 158 ‡ (70 †). Allow the engine to
cool down before removing the cap. The
coolant reservoir contains hot fluid and is
under pressure.
R using a rag, slowly turn the cap
approximately 1
/ 2 turn to relieve excess
pressure. If opened immediately, scalding
hot fluid and steam will be blown out under
pressure.
R do not spill antifreeze on hot engine parts.
Antifreeze contains ethylene glycol which
may burn if it comes into contact with hot
engine parts.
The coolant expansion tank is located in the
engine compartment on the right when
viewed in the direction of travel.XSlowly turn cap : half a turn counter-
clockwise and allow excess pressure to
escape.XTurn cap : further counter-clockwise and
remove it.
If the coolant is at the level of marker bar
= in the filler neck when cold, there is
enough coolant in coolant expansion
tank ;.
If the coolant is approximately 0.6 in
(1.5 cm) above marker bar = in the filler
neck when warm, there is enough coolant
in coolant expansion tank ;.XIf necessary, add coolant that has been
tested and approved by Mercedes-Benz.XReplace cap : and turn it clockwise as far
as it will go.
For further information on coolant, see
( Y page 280).
Windshield washer system and
headlamp cleaning system
The washer fluid reservoir is used for both the
windshield washer system and the headlamp
cleaning system.
GWarning
Washer solvent/antifreeze is highly
flammable. Do not spill washer solvent/
antifreeze on hot engine parts, because it may
ignite and burn. You could be seriously
burned.
! At temperatures below freezing, always
fill the washer fluid container with a mix of
windshield washer concentrate and
antifreeze additive. There is otherwise a
risk of damaging the windshield washer
system/headlamp cleaning system.
! Only use washer fluid concentrate which
is suitable for plastic lenses. Unsuitable
washer fluid concentrate could damage the
plastic lenses of the headlamps.
! Do not add distilled or de-ionized water to
the washer fluid container. Otherwise, the
level sensor may be damaged.
i Add windshield washer concentrate, e.g.
MB SummerFit, to the washer fluid all year
round.
218Engine compartmentMaintenance and care
ProCarManuals.com