2011 MERCEDES-BENZ G-CLASS headlamp
[x] Cancel search: headlampPage 93 of 288
XIf you see the Turn off lights or
remove key message in the multifunction
display, remove the SmartKey from the
ignition lock.
or
XTurn the light switch to $ or à .
Low-beam headlamps
XTo switch on: turn the SmartKey to
position 2 in the ignition lock or start the
engine.XTurn the light switch to L.
The L indicator lamp in the instrument
cluster lights up.XTo switch off: turn the light switch to
$ .
Daytime running lamps
Daytime running lamps in Canada
The "daytime running lamps" function is
required by law in Canada. It cannot therefore
be deactivated.
XTurn the light switch to $ or à .
When the engine is running: depending on
the ambient light, the low-beam headlamps
or the parking lamps are switched on.
When the low-beam headlamps are
switched on, the L indicator lamp in the
instrument cluster lights up.
If the light switch is set to $ or à , you
cannot activate the high-beam headlamps.
However, the high-beam flasher can always
be used. Turn the light switch to L when
driving at night. You can switch on the high-
beam headlamps in this position.
When the engine is running and the vehicle is
stationary: if you move the selector lever from
a driving position to N or P, the low-beam
headlamps go out after three minutes.
When the engine is running: if you turn the
light switch to T, you turn on the parking
lamps and low-beam headlamps.
When the engine is running: if you turn the
light switch to L, the manual settings take
precedence over the daytime running lamps.
Daytime running lamps in the USA
In the USA, the daytime running lamps are
deactivated upon delivery from the factory.XTo switch on: activate the daytime
running lamps function in the on-board
computer ( Y page 164).XTurn the light switch to $ or à .
When the engine is on: the low-beam
headlamps are switched on. The L
indicator lamp in the instrument cluster
lights up.
If the light switch is set to $ or à , you
cannot switch on the high-beam headlamps
in bright conditions. Turn the light switch to
L . You can switch on the high-beam
headlamps in this position.
If the light switch is set to $, Ã or
L , you can switch on the high-beam
headlamps in less bright conditions.
However, the high-beam flasher can always
be used.
Turn the light switch to L when driving at
night.
When the engine is running: if you turn the
light switch to T or L , the manual
settings take precedence over the daytime
running lamps.
Automatic headlamp mode
GWarning
If the exterior lamp switch is set to Ã, the
headlamps will not automatically come on
under foggy conditions.
To minimize risk to you and to others, activate
headlamps by turning exterior lamp switch to
L when traffic and/or ambient lighting
conditions require you to do so.
In low ambient lighting conditions, only switch
from position à to L with the vehicle
at a standstill in a safe location. Switching
Exterior lighting91Lights and windshield wipersZProCarManuals.com
Page 94 of 288
from à to L will briefly switch off the
headlamps. Doing so while driving in low
ambient lighting conditions may result in an
accident.
The automatic headlamp feature is only an aid
to the driver. The driver is responsible for the
operation of the vehicle’s lights at all times.
The parking lamps, low-beam headlamps and
license plate lamp are switched on or off
automatically, depending on the brightness of
the ambient light.XTo switch on: turn the light switch to
à .
SmartKey in position 1 in the ignition lock:
the standing lamps are switched on or off
automatically depending on the brightness
of the ambient light.
When the engine is running: depending on
the ambient light, the parking lamps, the
low-beam headlamps and the license plate
lamp are switched on or off automatically.
When the low-beam headlamps are
switched on, the L indicator lamp in the
instrument cluster lights up.
Canada only: if the light switch is in position
$ or à , you cannot switch on the high-
beam headlamps. However, the high-beam
flasher can always be used. Turn the light
switch to L when driving at night. You can
switch on the high-beam headlamps in this
position.
Front fog lamps and rear fog lamp
Front fog lamps
GWarning
If you suspect that driving conditions will be
foggy, turn the light switch to L before you
start your journey. Your vehicle may
otherwise not be visible and you could
endanger yourself and others.
GWarning
In low ambient lighting or foggy conditions,
only switch from position à to L with
the vehicle at a standstill in a safe location.
Switching from à to L will briefly
switch off the headlamps. Doing so while
driving in low ambient lighting conditions may
result in an accident.
XTo switch on: turn the SmartKey to
position 2 in the ignition lock or start the
engine.XTurn the light switch to L or T . If the
light switch is set to Ã, you cannot
switch on the fog lamps.XPull the light switch out to the first detent.
The green N indicator lamp on the light
switch lights up.XTo switch off: press the light switch in as
far as it will go.
The green N indicator lamp on the light
switch goes out.
Rear fog lamp
XTo switch on: turn the SmartKey to
position 2 in the ignition lock or start the
engine.XTurn the light switch to L or T . When
the light switch is set to Ã, you cannot
switch on the rear fog lamp.XPull the light switch out to the second stop.
The yellow R indicator lamp on the light
switch lights up.XTo switch off: press the light switch in as
far as it will go.
The yellow R indicator lamp on the light
switch goes out.92Exterior lightingLights and windshield wipers
ProCarManuals.com
Page 95 of 288
Combination switch
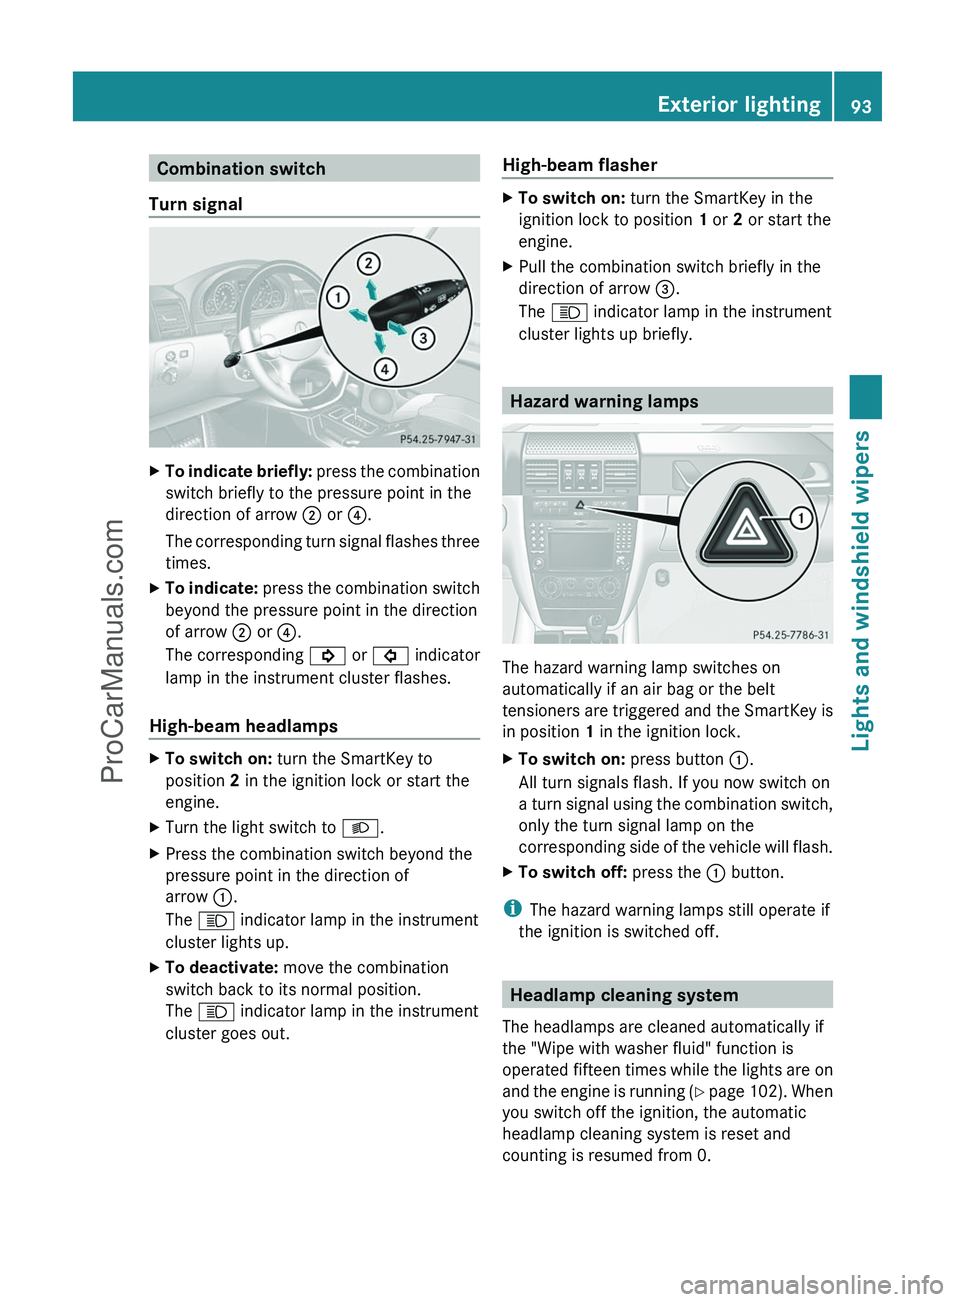
Turn signalXTo indicate briefly: press the combination
switch briefly to the pressure point in the
direction of arrow ; or ?.
The corresponding turn signal flashes three
times.XTo indicate: press the combination switch
beyond the pressure point in the direction
of arrow ; or ?.
The corresponding ! or # indicator
lamp in the instrument cluster flashes.
High-beam headlamps
XTo switch on: turn the SmartKey to
position 2 in the ignition lock or start the
engine.XTurn the light switch to L.XPress the combination switch beyond the
pressure point in the direction of
arrow :.
The K indicator lamp in the instrument
cluster lights up.XTo deactivate: move the combination
switch back to its normal position.
The K indicator lamp in the instrument
cluster goes out.High-beam flasherXTo switch on: turn the SmartKey in the
ignition lock to position 1 or 2 or start the
engine.XPull the combination switch briefly in the
direction of arrow =.
The K indicator lamp in the instrument
cluster lights up briefly.
Hazard warning lamps
The hazard warning lamp switches on
automatically if an air bag or the belt
tensioners are triggered and the SmartKey is
in position 1 in the ignition lock.
XTo switch on: press button :.
All turn signals flash. If you now switch on
a turn signal using the combination switch,
only the turn signal lamp on the
corresponding side of the vehicle will flash.XTo switch off: press the : button.
i
The hazard warning lamps still operate if
the ignition is switched off.
Headlamp cleaning system
The headlamps are cleaned automatically if
the "Wipe with washer fluid" function is
operated fifteen times while the lights are on
and the engine is running (Y page 102). When
you switch off the ignition, the automatic
headlamp cleaning system is reset and
counting is resumed from 0.
Exterior lighting93Lights and windshield wipersZProCarManuals.com
Page 96 of 288
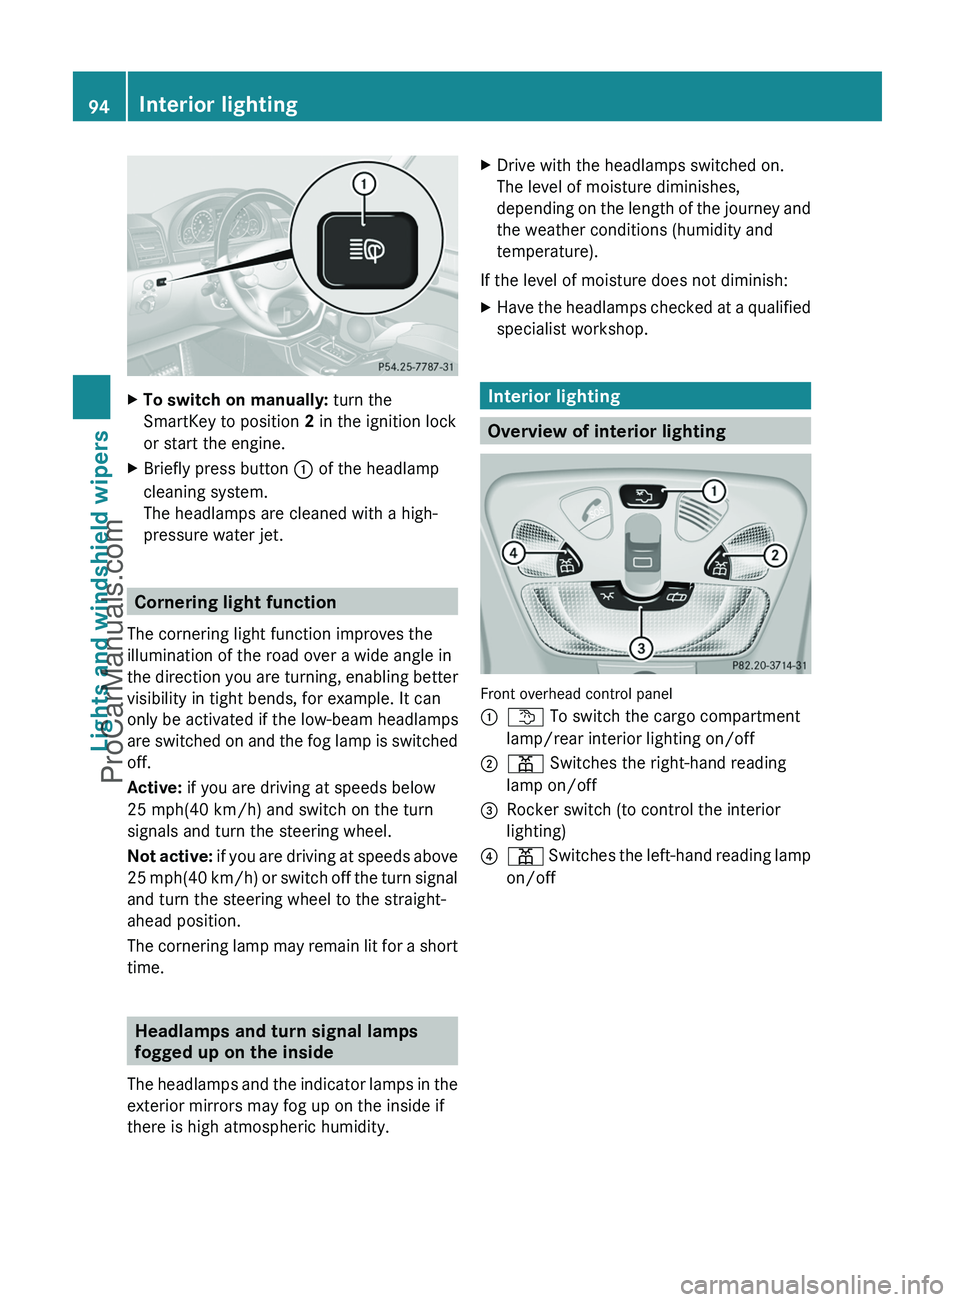
XTo switch on manually: turn the
SmartKey to position 2 in the ignition lock
or start the engine.XBriefly press button : of the headlamp
cleaning system.
The headlamps are cleaned with a high-
pressure water jet.
Cornering light function
The cornering light function improves the
illumination of the road over a wide angle in
the direction you are turning, enabling better
visibility in tight bends, for example. It can
only be activated if the low-beam headlamps
are switched on and the fog lamp is switched
off.
Active: if you are driving at speeds below
25 mph(40 km/h) and switch on the turn
signals and turn the steering wheel.
Not active: if you are driving at speeds above
25 mph (40 km/h) or switch off the turn signal
and turn the steering wheel to the straight-
ahead position.
The cornering lamp may remain lit for a short
time.
Headlamps and turn signal lamps
fogged up on the inside
The headlamps and the indicator lamps in the
exterior mirrors may fog up on the inside if
there is high atmospheric humidity.
XDrive with the headlamps switched on.
The level of moisture diminishes,
depending on the length of the journey and
the weather conditions (humidity and
temperature).
If the level of moisture does not diminish:
XHave the headlamps checked at a qualified
specialist workshop.
Interior lighting
Overview of interior lighting
Front overhead control panel
:t To switch the cargo compartment
lamp/rear interior lighting on/off;p Switches the right-hand reading
lamp on/off=Rocker switch (to control the interior
lighting)?p Switches the left-hand reading lamp
on/off94Interior lightingLights and windshield wipers
ProCarManuals.com
Page 98 of 288
! Switch off the cargo compartment lamp if
you wish to leave the rear door open for a
longer period. The battery may otherwise
discharge.XTo switch on/off: press the t button.
i
If you open the rear door, the cargo
compartment lamp comes on. Then, you
cannot switch it off using the t button.
Switch off the cargo compartment lamp if
you wish to leave the rear door open for a
longer period. This prevents the battery
from discharging.
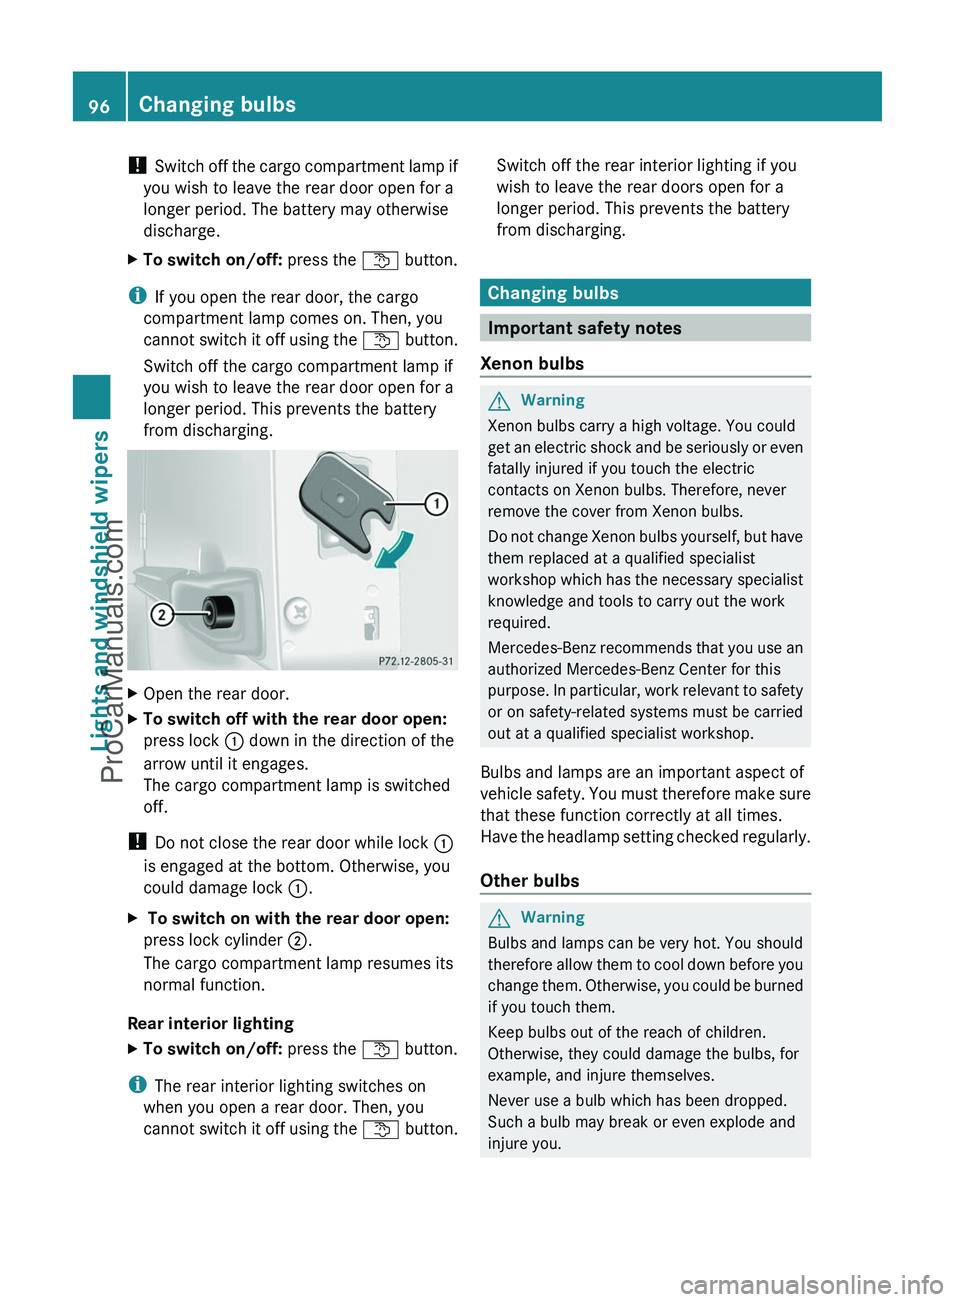
XOpen the rear door.XTo switch off with the rear door open:
press lock : down in the direction of the
arrow until it engages.
The cargo compartment lamp is switched
off.
! Do not close the rear door while lock :
is engaged at the bottom. Otherwise, you
could damage lock :.
X To switch on with the rear door open:
press lock cylinder ;.
The cargo compartment lamp resumes its
normal function.
Rear interior lighting
XTo switch on/off: press the t button.
i
The rear interior lighting switches on
when you open a rear door. Then, you
cannot switch it off using the t button.
Switch off the rear interior lighting if you
wish to leave the rear doors open for a
longer period. This prevents the battery
from discharging.
Changing bulbs
Important safety notes
Xenon bulbs
GWarning
Xenon bulbs carry a high voltage. You could
get an electric shock and be seriously or even
fatally injured if you touch the electric
contacts on Xenon bulbs. Therefore, never
remove the cover from Xenon bulbs.
Do not change Xenon bulbs yourself, but have
them replaced at a qualified specialist
workshop which has the necessary specialist
knowledge and tools to carry out the work
required.
Mercedes-Benz recommends that you use an
authorized Mercedes-Benz Center for this
purpose. In particular, work relevant to safety
or on safety-related systems must be carried
out at a qualified specialist workshop.
Bulbs and lamps are an important aspect of
vehicle safety. You must therefore make sure
that these function correctly at all times.
Have the headlamp setting checked regularly.
Other bulbs
GWarning
Bulbs and lamps can be very hot. You should
therefore allow them to cool down before you
change them. Otherwise, you could be burned
if you touch them.
Keep bulbs out of the reach of children.
Otherwise, they could damage the bulbs, for
example, and injure themselves.
Never use a bulb which has been dropped.
Such a bulb may break or even explode and
injure you.
96Changing bulbsLights and windshield wipers
ProCarManuals.com
Page 99 of 288
Halogen bulbs are pressurized and could
explode when you change them, particularly
if they are very hot. You should therefore wear
eye protection and gloves when you are
changing them.
There are bulbs other than the Xenon bulbs
that you cannot replace. Replace only the
bulbs listed ( Y page 97). Have the bulbs that
you cannot replace yourself changed at a
qualified specialist workshop.
Mercedes-Benz recommends that you use an
authorized Mercedes-Benz Center for this
purpose. In particular, work relevant to safety
or on safety-related systems must be carried
out at a qualified specialist workshop.
If you require assistance changing bulbs,
consult a qualified specialist workshop.
Do not touch the glass tube of new bulbs with
your bare hands. Even minor contamination
can burn into the glass surface and reduce
the service life of the bulbs. Always use a lint-
free cloth or only touch the base of the bulb
when installing.
Only use bulbs of the correct type.
If the new bulb still does not light up, consult
a qualified specialist workshop.
Bulbs and lamps are an important aspect of
vehicle safety. You must therefore make sure
that these function correctly at all times.
Have the headlamp setting checked regularly.
Before changing bulbs
Have the following bulbs changed at a
qualified specialist workshop, e.g. an
authorized Mercedes-Benz Center:
R additional turn signals in the exterior
mirrors
R high-mounted brake lamp
R high-beam/low-beam headlamps (Xenon
bulbs)
R parking lamp/standing lamp
R license plate lamp
i Individual segments of the license plate
lamp LEDs may fail without a display
message appearing in the multifunction
display. Check the license plate lamp
regularly. Consult a qualified specialist
workshop if necessary.
You can replace the following bulbs:
R fog lamp/cornering light with fog lamp
function
R turn signal lamp (front)
R brake/tail lamp
R turn signal lamp (rear)
R tail lamp/standing lamp
R backup lamp
R rear fog lamp
R side marker lamp
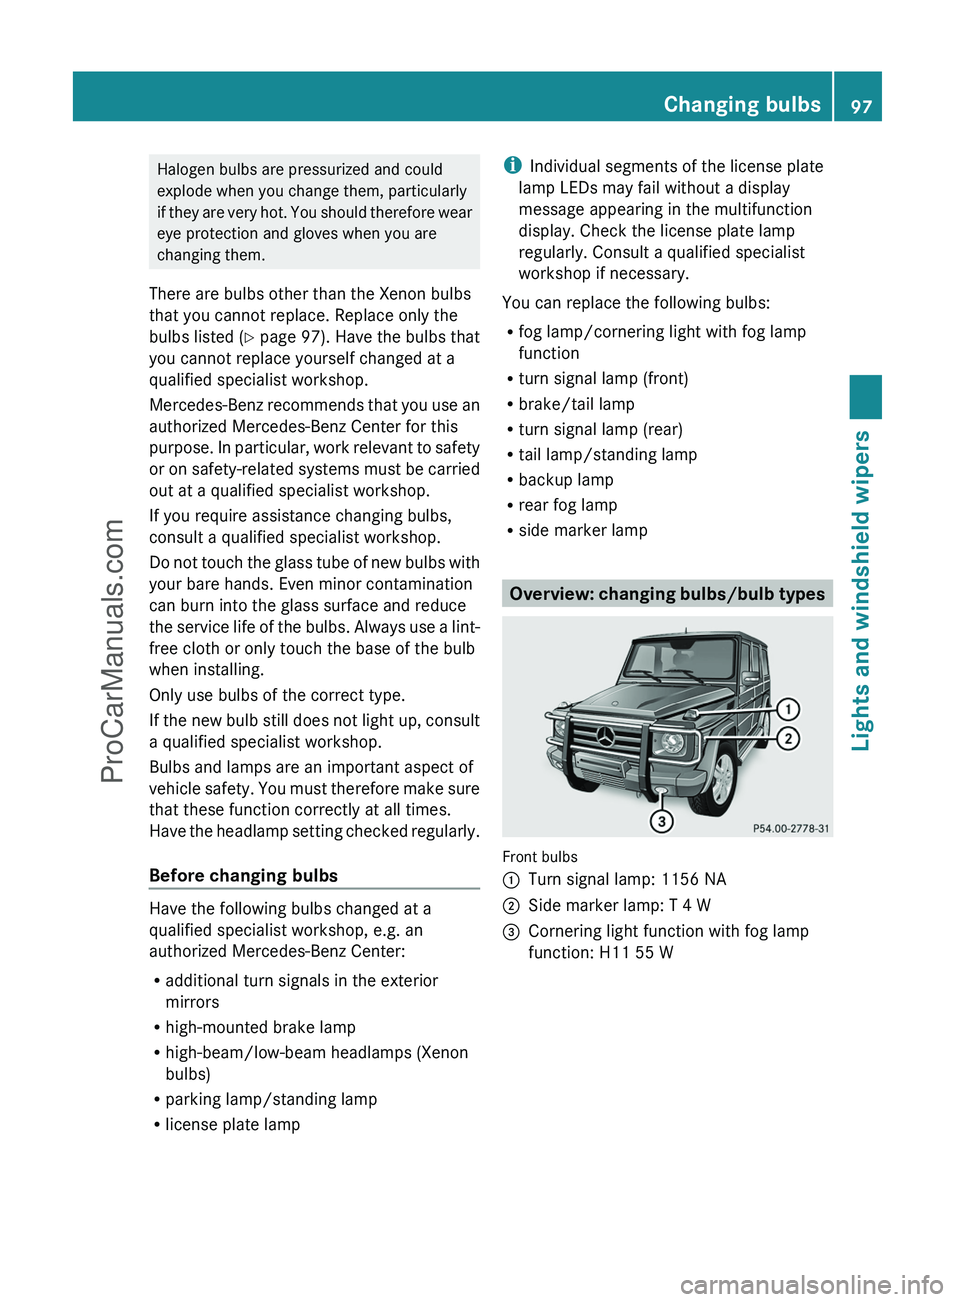
Overview: changing bulbs/bulb types
Front bulbs
:Turn signal lamp: 1156 NA;Side marker lamp: T 4 W=Cornering light function with fog lamp
function: H11 55 WChanging bulbs97Lights and windshield wipersZProCarManuals.com
Page 100 of 288
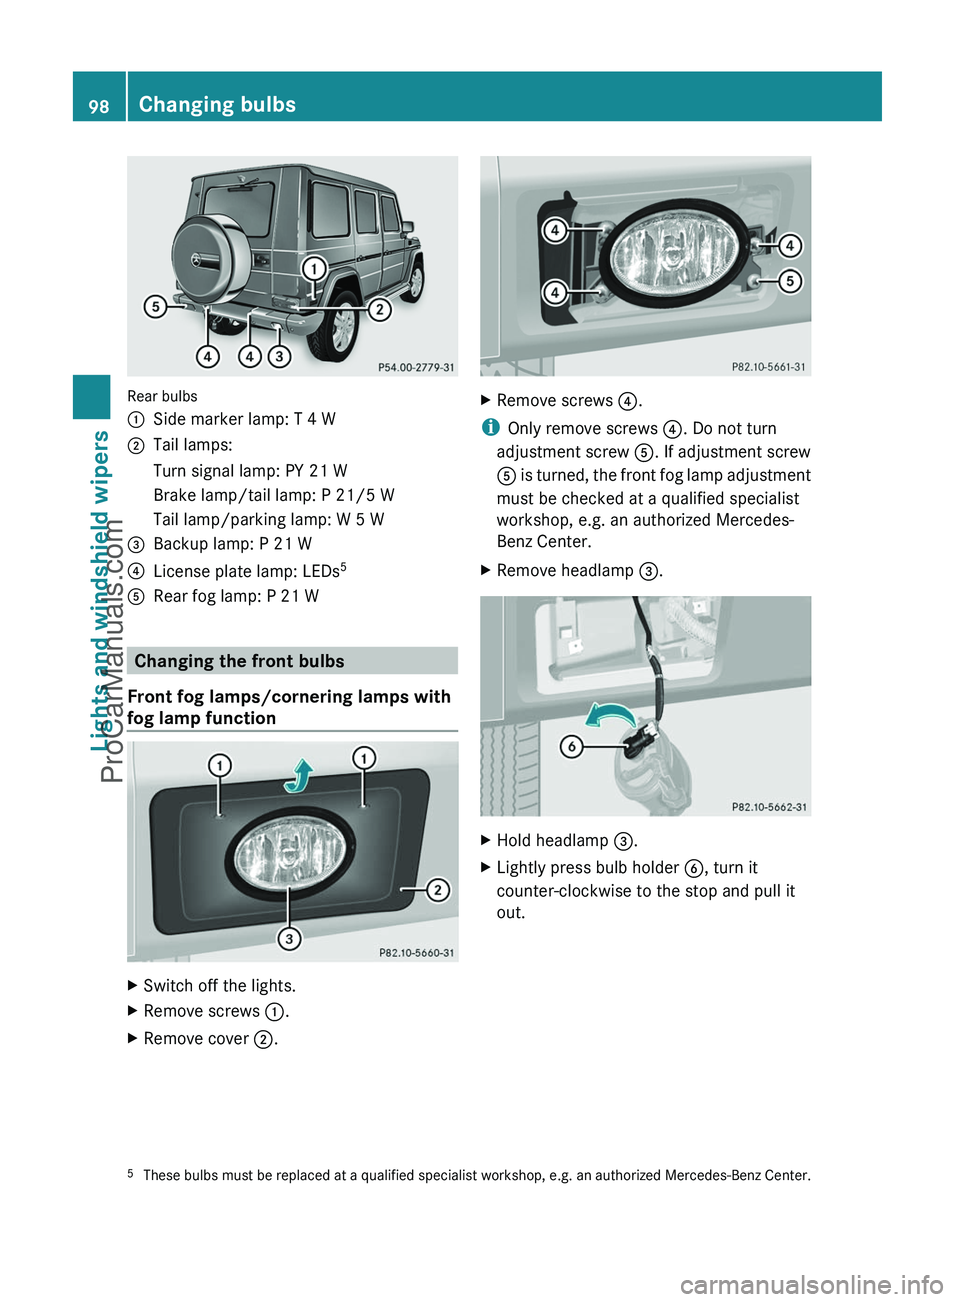
Rear bulbs
:Side marker lamp: T 4 W;Tail lamps:Turn signal lamp: PY 21 WBrake lamp/tail lamp: P 21/5 WTail lamp/parking lamp: W 5 W=Backup lamp: P 21 W?License plate lamp: LEDs5ARear fog lamp: P 21 W
Changing the front bulbs
Front fog lamps/cornering lamps with
fog lamp function
XSwitch off the lights.XRemove screws :.XRemove cover ;.XRemove screws ?.
i
Only remove screws ?. Do not turn
adjustment screw A. If adjustment screw
A is turned, the front fog lamp adjustment
must be checked at a qualified specialist
workshop, e.g. an authorized Mercedes-
Benz Center.
XRemove headlamp =.XHold headlamp =.XLightly press bulb holder B, turn it
counter-clockwise to the stop and pull it
out.5 These bulbs must be replaced at a qualified specialist workshop, e.g. an authorized Mercedes-Benz Center.98Changing bulbsLights and windshield wipers
ProCarManuals.com
Page 101 of 288
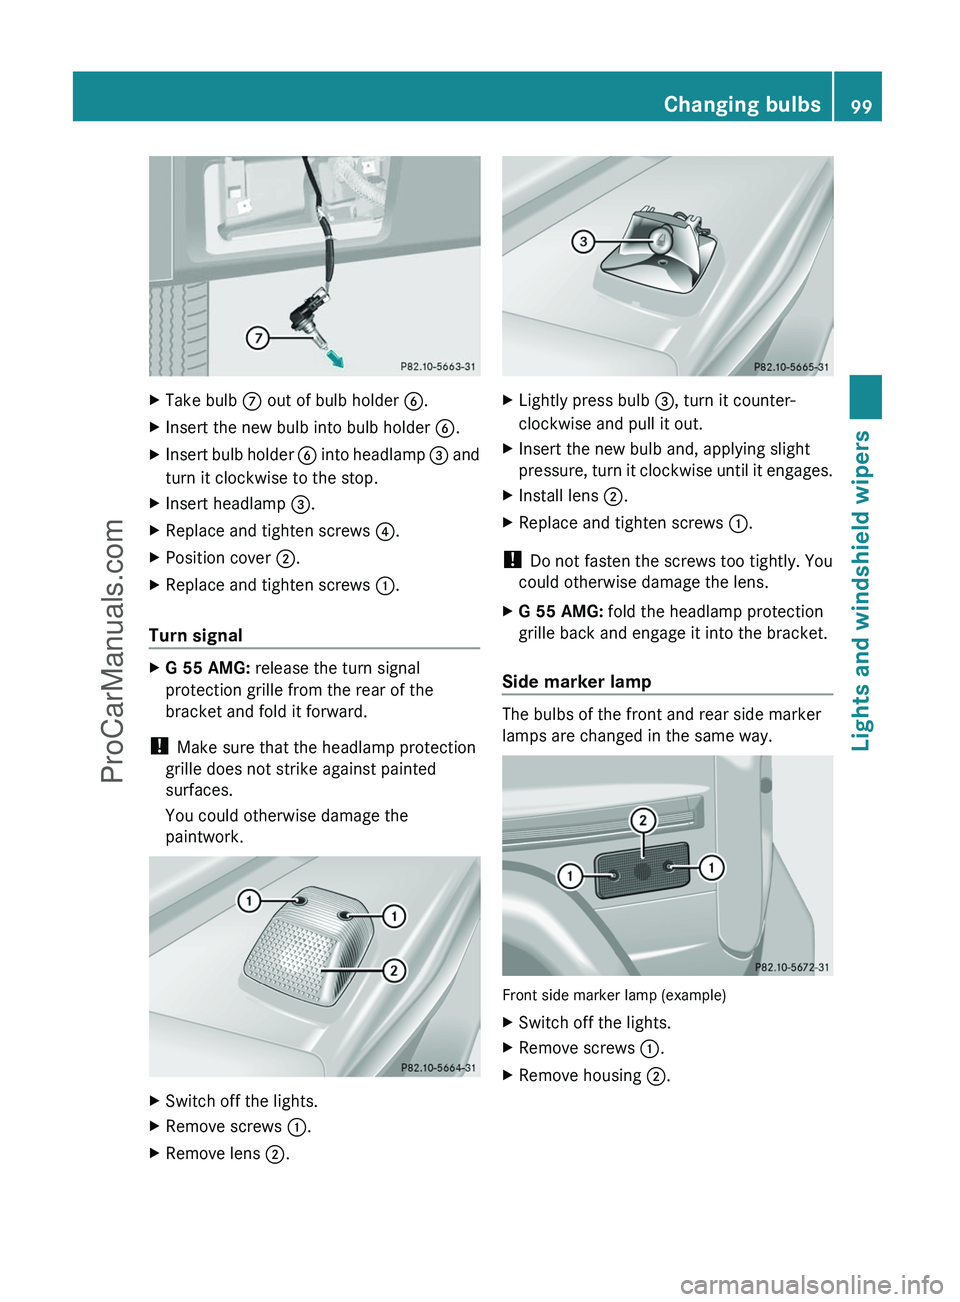
XTake bulb C out of bulb holder B.XInsert the new bulb into bulb holder B.XInsert bulb holder B into headlamp = and
turn it clockwise to the stop.XInsert headlamp =.XReplace and tighten screws ?.XPosition cover ;.XReplace and tighten screws :.
Turn signal
XG 55 AMG: release the turn signal
protection grille from the rear of the
bracket and fold it forward.
! Make sure that the headlamp protection
grille does not strike against painted
surfaces.
You could otherwise damage the
paintwork.
XSwitch off the lights.XRemove screws :.XRemove lens ;.XLightly press bulb =, turn it counter-
clockwise and pull it out.XInsert the new bulb and, applying slight
pressure, turn it clockwise until it engages.XInstall lens ;.XReplace and tighten screws :.
!
Do not fasten the screws too tightly. You
could otherwise damage the lens.
XG 55 AMG: fold the headlamp protection
grille back and engage it into the bracket.
Side marker lamp
The bulbs of the front and rear side marker
lamps are changed in the same way.
Front side marker lamp (example)
XSwitch off the lights.XRemove screws :.XRemove housing ;.Changing bulbs99Lights and windshield wipersZProCarManuals.com