2011 MERCEDES-BENZ G-CLASS seats
[x] Cancel search: seatsPage 54 of 288

slacken once the child restraint system is
secured.
Installing a child restraint system:XAlways comply with the manufacturer's
installation instructions.XPull the seat belt smoothly from the inertia
reel.XEngage the seat belt tongue in the belt
buckle.
Activating the special seat belt retractor:
XPull the seat belt out fully and let the inertia
reel retract it again.
While the seat belt is retracting, you should
hear a ratcheting sound. The special seat
belt retractor function is enabled.XPush down on the child restraint system to
take up any slack.
Removing a child restraint system/
deactivating the special seat belt retractor:
XAlways comply with the manufacturer's
installation instructions.XPress the seat belt release button and
guide the belt tongue to the belt outlet.
The special seat belt retractor function is
deactivated.GWarning
Never release the seat belt buckle while the
vehicle is in motion, since the special seat belt
retractor will be deactivated.
ISOFIX child seat securing system for
the rear seats
GWarning
Observe "Important safety notes"
( Y page 49).
GWarning
Children that are too large for a child restraint
must travel in seats using normal seat belts.
Position shoulder belt across the chest and
shoulder, not face or neck.
In order to attain the correct seating position
for children weighing over 41 lb (18 kg), it may
be necessary to use a booster seat until they
reach a height where a normal lap/shoulder
seat belt lies properly across their bodies
without the need for a booster seat.
Install the child restraint system according to
the manufacturer's instructions.
The child restraint system must be installed
firmly on both brackets.
An incorrectly installed child restraint system
can come loose in the event of an accident,
causing the child to be severely or fatally
injured.
Child restraint systems/child restraint
retaining brackets that are damaged or have
suffered damage due to an impact must be
replaced.
ISOFIX is a standardized securing system for
specially designed child restraint systems on
the rear seats. Securing rings for two ISOFIX
child restraint systems are installed on the
left and right of the rear seats.
Non LATCH-type (ISOFIX) child seats must be
secured using the vehicle's seat belts. Follow
the manufacturer's instructions for
installation of child restraint systems.:Securing ringsXInstall the ISOFIX child restraint system.
Comply with the manufacturer's52Children in the vehicleSafety
ProCarManuals.com
Page 55 of 288
instructions when installing the ISOFIX
child restraint system.XWhen an ISOFIX child seat securing system
is installed, make sure that the center seat
belt in the rear compartment is fully
functional and can move freely.
Top Tether
GWarning
Observe "Important safety notes"
( Y page 49).
GWarning
Always lock the rear seat backrests in their
upright position when the rear seats are
occupied by passengers. Lock the rear seat
backrests in their upright position before
installing the Top Tether straps or when the
cargo compartment is not in use. Make sure
that rear seat backrests are secured properly
by pushing and pulling on the seat backrests.
If the seat backrest is not locked properly, the
seat backrest could fold forward. The child
restraint system is no longer supported
properly or held in position and can no longer
fulfill its function. This could cause serious or
even fatal injuries.
Top Tether provides an additional connection
between the child restraint system secured
with ISOFIX and the rear seat. It helps reduce
the risk of injury even further.
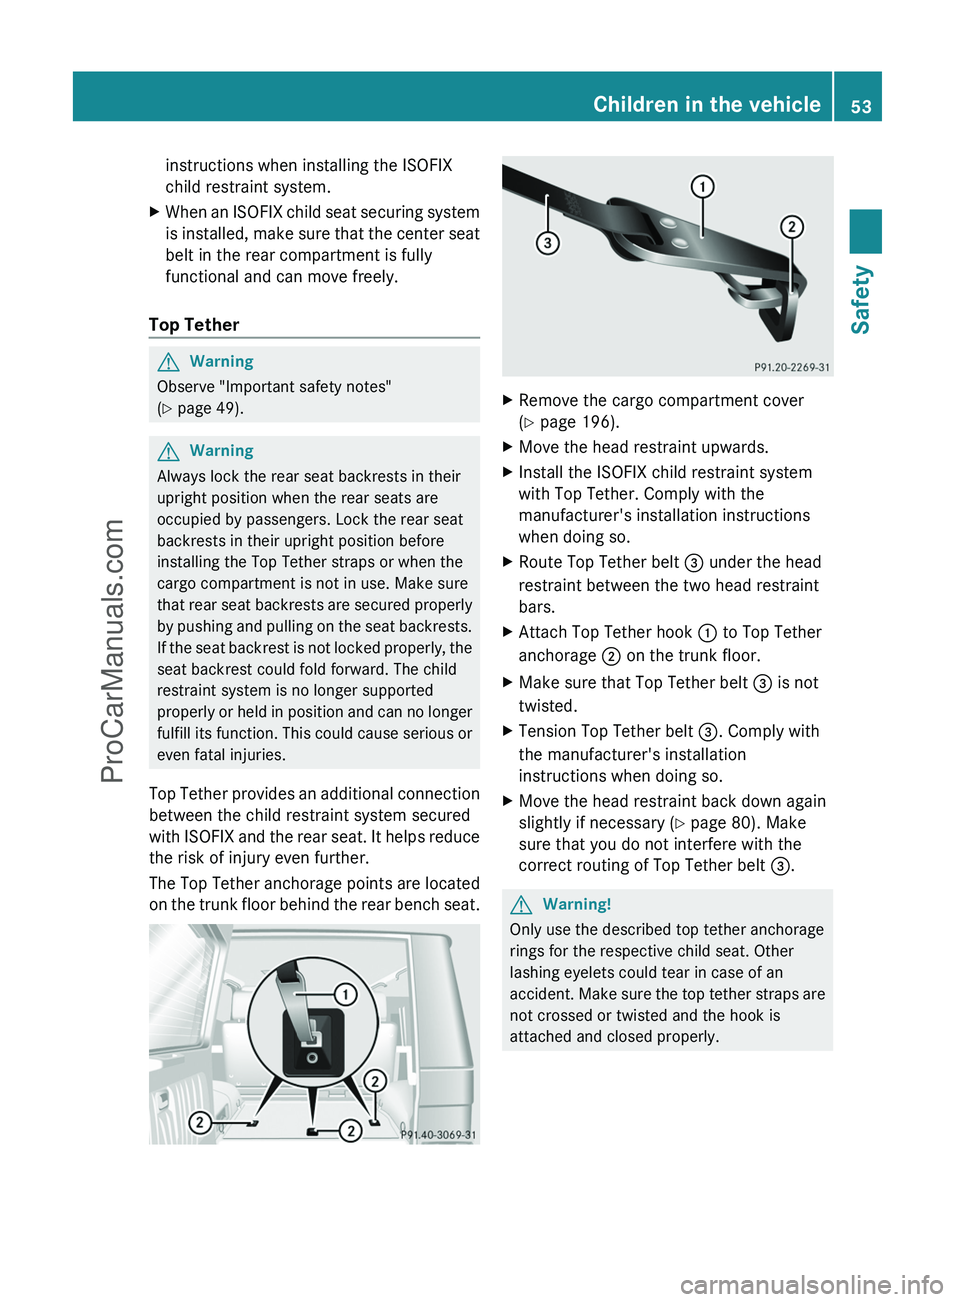
The Top Tether anchorage points are located
on the trunk floor behind the rear bench seat.
XRemove the cargo compartment cover
( Y page 196).XMove the head restraint upwards.XInstall the ISOFIX child restraint system
with Top Tether. Comply with the
manufacturer's installation instructions
when doing so.XRoute Top Tether belt = under the head
restraint between the two head restraint
bars.XAttach Top Tether hook : to Top Tether
anchorage ; on the trunk floor.XMake sure that Top Tether belt = is not
twisted.XTension Top Tether belt =. Comply with
the manufacturer's installation
instructions when doing so.XMove the head restraint back down again
slightly if necessary ( Y page 80). Make
sure that you do not interfere with the
correct routing of Top Tether belt =.GWarning!
Only use the described top tether anchorage
rings for the respective child seat. Other
lashing eyelets could tear in case of an
accident. Make sure the top tether straps are
not crossed or twisted and the hook is
attached and closed properly.
Children in the vehicle53SafetyZProCarManuals.com
Page 56 of 288
Child-proof locks
Child-proof locks for the rear doorsGWarning
Observe "Important safety notes"
( Y page 49).
GWarning
Children could open a rear door from inside
the vehicle. This could result in serious
injuries or an accident. Therefore, when
children ride in the rear always secure the rear
doors with the child-proof locks.
You secure each door individually with the
child-proof locks on the rear doors. A door
secured with a child-proof lock cannot be
opened from inside the vehicle. When the
vehicle is unlocked, the door can be opened
from the outside.
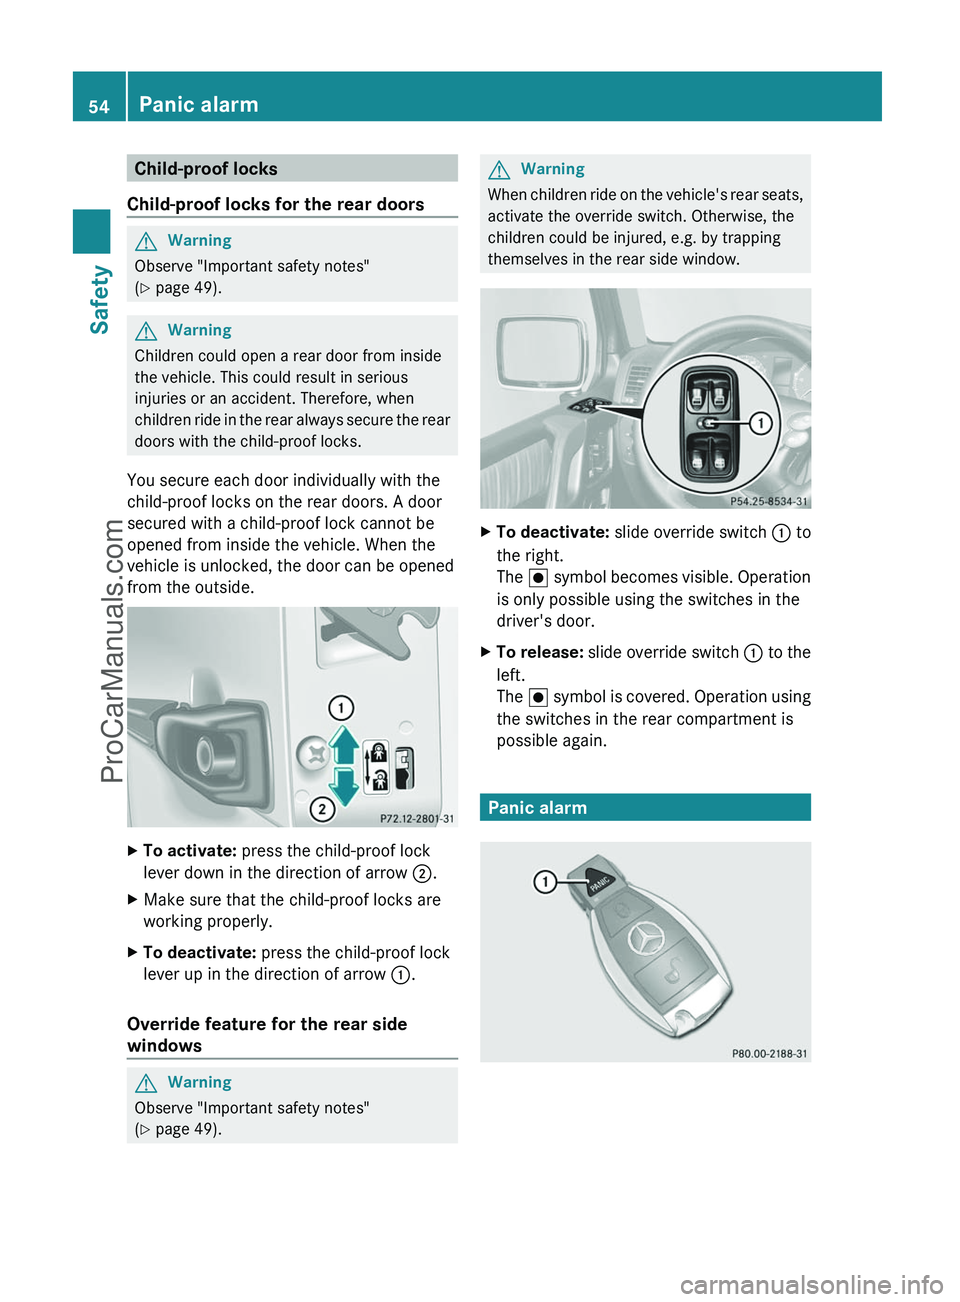
XTo activate: press the child-proof lock
lever down in the direction of arrow ;.XMake sure that the child-proof locks are
working properly.XTo deactivate: press the child-proof lock
lever up in the direction of arrow :.
Override feature for the rear side
windows
GWarning
Observe "Important safety notes"
( Y page 49).
GWarning
When children ride on the vehicle's rear seats,
activate the override switch. Otherwise, the
children could be injured, e.g. by trapping
themselves in the rear side window.
XTo deactivate: slide override switch : to
the right.
The . symbol becomes visible. Operation
is only possible using the switches in the
driver's door.XTo release: slide override switch : to the
left.
The . symbol is covered. Operation using
the switches in the rear compartment is
possible again.
Panic alarm
54Panic alarmSafety
ProCarManuals.com
Page 73 of 288
GWarning!
When closing the door windows, make sure
there is no danger of anyone being harmed by
the closing procedure.
Activate the override switch when children
are riding in the back seats of the vehicle. The
children may otherwise injure themselves,
e.g. by becoming trapped in the window
opening.
The closing of the door windows can be
immediately halted by releasing the switch or
by releasing button & on the SmartKey.
GWarning!
Do not keep any part of your body up against
the window pane when opening a window. The
downward motion of the pane may pull that
part of your body down between the window
pane and the door frame and trap it there. If
there is a risk of entrapment, release the
switch and pull it to close the window.
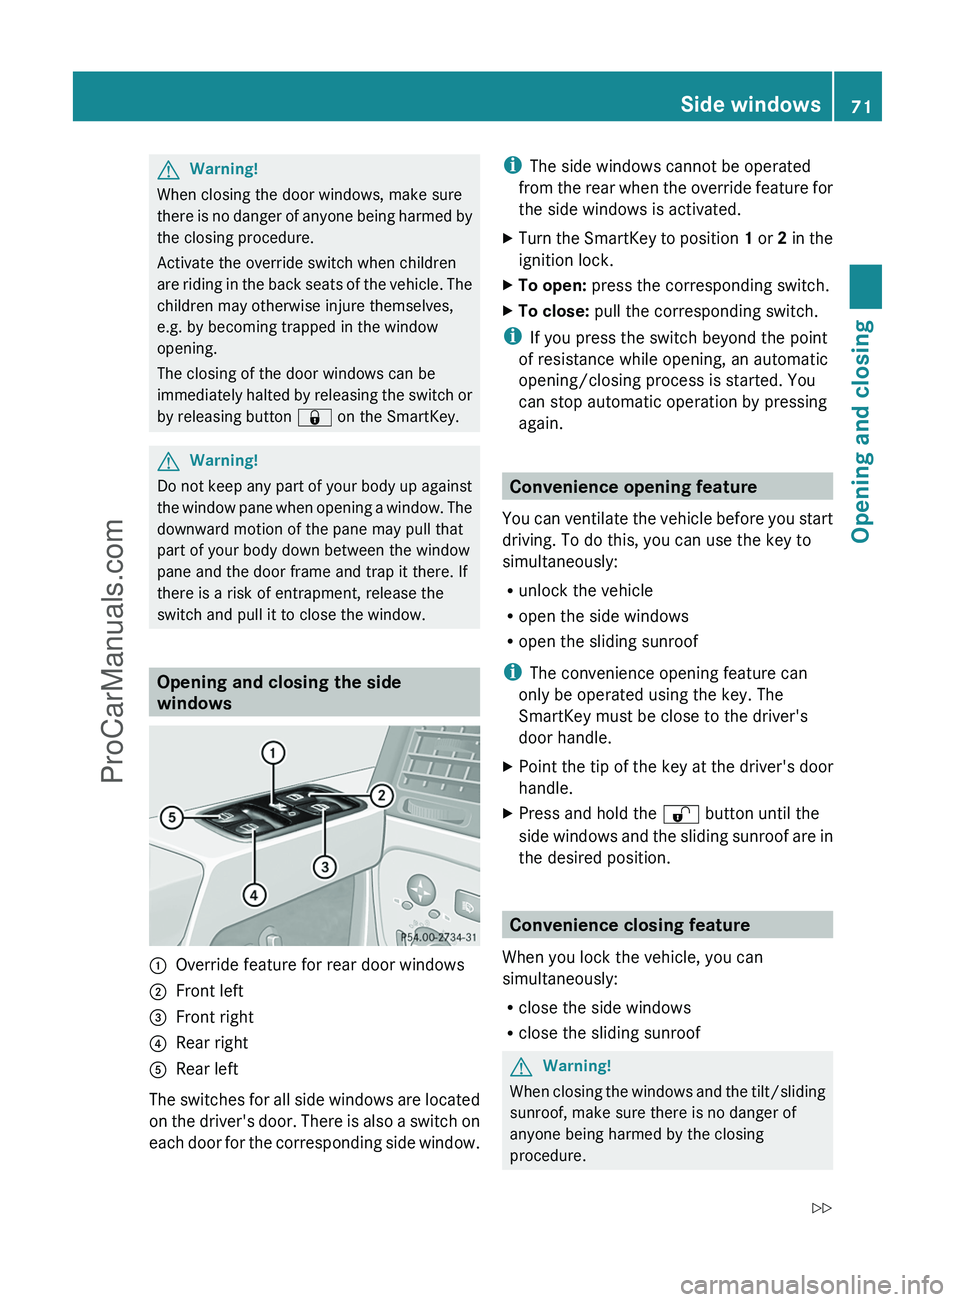
Opening and closing the side
windows
:Override feature for rear door windows;Front left=Front right?Rear rightARear left
The switches for all side windows are located
on the driver's door. There is also a switch on
each door for the corresponding side window.
i The side windows cannot be operated
from the rear when the override feature for
the side windows is activated.XTurn the SmartKey to position 1 or 2 in the
ignition lock.XTo open: press the corresponding switch.XTo close: pull the corresponding switch.
i
If you press the switch beyond the point
of resistance while opening, an automatic
opening/closing process is started. You
can stop automatic operation by pressing
again.
Convenience opening feature
You can ventilate the vehicle before you start
driving. To do this, you can use the key to
simultaneously:
R unlock the vehicle
R open the side windows
R open the sliding sunroof
i The convenience opening feature can
only be operated using the key. The
SmartKey must be close to the driver's
door handle.
XPoint the tip of the key at the driver's door
handle.XPress and hold the % button until the
side windows and the sliding sunroof are in
the desired position.
Convenience closing feature
When you lock the vehicle, you can
simultaneously:
R close the side windows
R close the sliding sunroof
GWarning!
When closing the windows and the tilt/sliding
sunroof, make sure there is no danger of
anyone being harmed by the closing
procedure.
Side windows71Opening and closingZProCarManuals.com
Page 77 of 288
Vehicle equipment ..............................76
Correct driver's seat position ............76
Seats .................................................... 77
Steering wheel .................................... 83
Mirrors ................................................. 85
Memory functions ............................... 8875Seats, steering wheel and mirrorsProCarManuals.com
Page 78 of 288
Vehicle equipment
i This manual describes all the standard
and optional equipment of your vehicle
which was available at the time of
purchase. Country-specific differences are
possible. Please note that your vehicle may
not be equipped with all features
described. This also applies to safety-
relevant systems and functions.
Correct driver's seat position
Observe the safety guidelines on
( Y page 77).
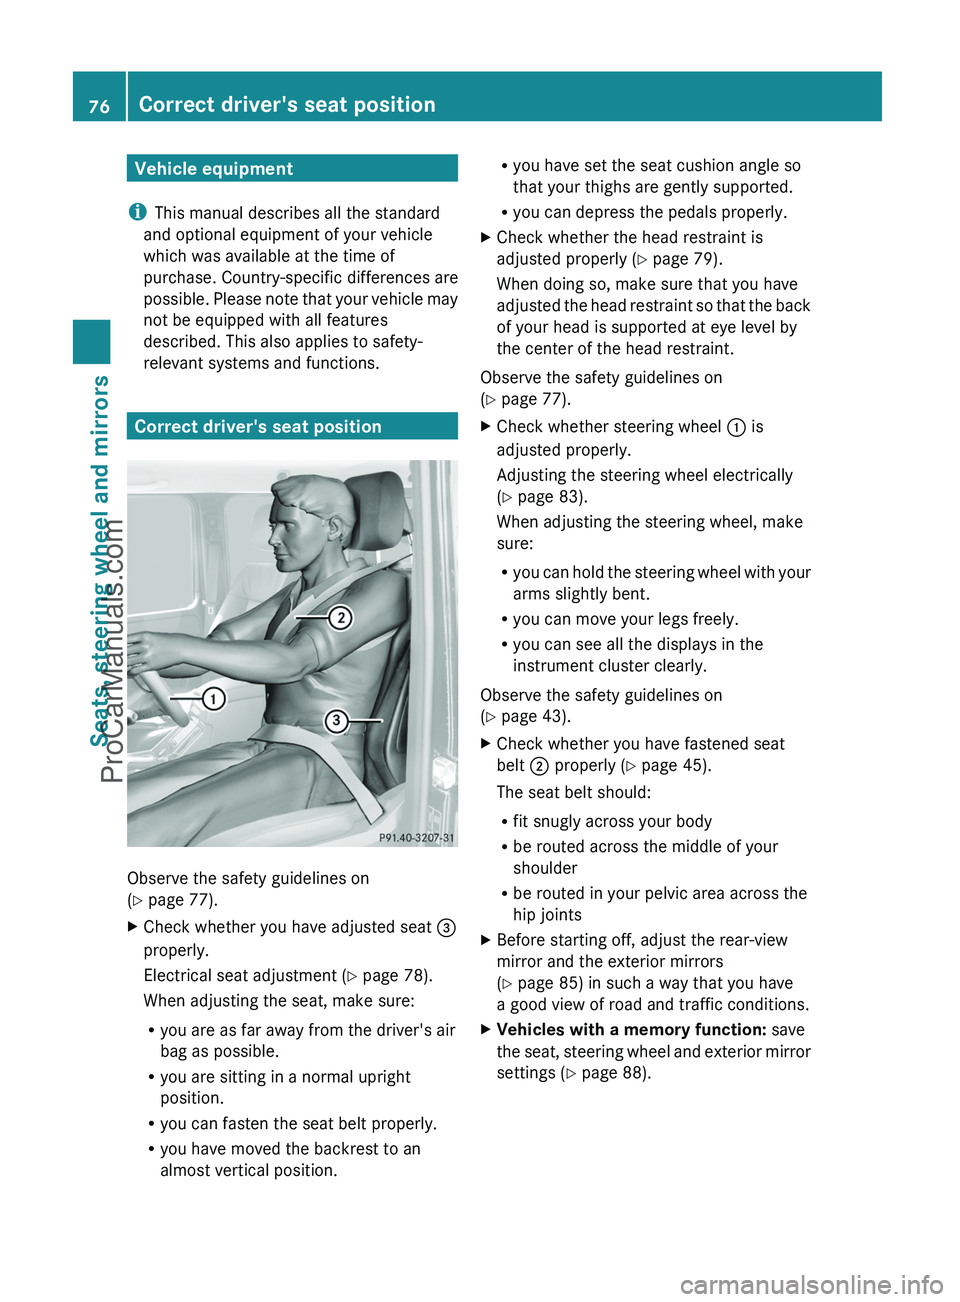
XCheck whether you have adjusted seat =
properly.
Electrical seat adjustment ( Y page 78).
When adjusting the seat, make sure:
R you are as far away from the driver's air
bag as possible.
R you are sitting in a normal upright
position.
R you can fasten the seat belt properly.
R you have moved the backrest to an
almost vertical position.R you have set the seat cushion angle so
that your thighs are gently supported.
R you can depress the pedals properly.XCheck whether the head restraint is
adjusted properly ( Y page 79).
When doing so, make sure that you have
adjusted the head restraint so that the back
of your head is supported at eye level by
the center of the head restraint.
Observe the safety guidelines on
( Y page 77).
XCheck whether steering wheel : is
adjusted properly.
Adjusting the steering wheel electrically
( Y page 83).
When adjusting the steering wheel, make
sure:
R you can hold the steering wheel with your
arms slightly bent.
R you can move your legs freely.
R you can see all the displays in the
instrument cluster clearly.
Observe the safety guidelines on
( Y page 43).
XCheck whether you have fastened seat
belt ; properly ( Y page 45).
The seat belt should:
R fit snugly across your body
R be routed across the middle of your
shoulder
R be routed in your pelvic area across the
hip jointsXBefore starting off, adjust the rear-view
mirror and the exterior mirrors
( Y page 85) in such a way that you have
a good view of road and traffic conditions.XVehicles with a memory function: save
the seat, steering wheel and exterior mirror
settings ( Y page 88).76Correct driver's seat positionSeats, steering wheel and mirrors
ProCarManuals.com
Page 79 of 288
Seats
Important safety notes
GWarning
In order to avoid possible loss of vehicle
control, all seat, head restraint, steering
wheel and rear view mirror adjustments, as
well as fastening of seat belts, must be done
before setting the vehicle in motion.
GWarning
Do not adjust the driver's seat while driving.
Adjusting the seat while driving could cause
the driver to lose control of the vehicle.
Never travel in a moving vehicle with the seat
backrest in an excessively reclined position as
this can be dangerous. You could slide under
the seat belt in a collision. If you slide under
it, the seat belt would apply force at the
abdomen or neck. This could cause serious or
fatal injuries. The seat backrest and seat belts
provide the best restraint when the wearer is
in a position that is as upright as possible and
seat belts are properly positioned on the
body.
GWarning
Your seat belt must be adjusted so that you
can correctly fasten your seat belt.
Observe the following points:
R adjust the seat backrest until your arms are
slightly angled when holding the steering
wheel.
R adjust the seat to a comfortable seating
position that still allows you to reach the
accelerator/brake pedal safely. The
position should be as far back as possible
with the driver still able to operate the
controls properly.
R adjust the head restraint so that it is as
close to the head as possible and the center
of the head restraint supports the back of
the head at eye level.
R never place hands under the seat or near
any moving parts while a seat is being
adjusted.
Failure to do so could result in an accident
and/or serious personal injury.GWarning
The electrically adjustable seats can be
operated at any time. Therefore, do not leave
children unattended in the vehicle, or with
access to an unlocked vehicle. A child's
unsupervised access to a vehicle could result
in an accident and/or serious personal injury.
GWarning
According to accident statistics, children are
safer when properly restrained on the rear
seats than on the front-passenger seat. Thus,
we strongly recommend that children be
placed in the rear seat whenever possible.
Regardless of seating position, children 12
years old and under must be seated and
properly secured in an appropriately sized
child restraint system or booster seat
recommended for the size and weight of the
child. For additional information, see the
"Children in the vehicle" section.
A child's risk of serious or fatal injuries is
significantly increased if the child restraints
are not properly secured in the vehicle and/
or the child is not properly secured in the child
restraint.
GWarning
For your protection, drive only with properly
positioned head restraints.
Adjust the head restraint so that it is as close
to the head as possible and the center of the
head restraint supports the back of the head
at eye level. This will reduce the potential for
injury to the head and neck in the event of an
accident or similar situation.
Seats77Seats, steering wheel and mirrorsZProCarManuals.com
Page 80 of 288
Do not drive the vehicle without the seat head
restraints. Head restraints are intended to
help reduce injuries during an accident.
! To avoid damage to the seats and the seat
heating, observe the following information:
R do not spill any liquids on the seats. If
liquid is spilled on the seats, dry them as
soon as possible.
R if the seat covers are damp or wet, do not
switch on the seat heating. The seat
heating should also not to be used to dry
the seats.
R clean the seat covers as recommended;
see the "Interior care" section.
R do not transport heavy loads on the
seats. Do not place sharp objects on the
seat cushions, e.g. knives, nails or tools.
The seats should only be occupied by
passengers, if possible.
R when the seat heating is in operation, do
not cover the seats with insulating
materials, e.g. blankets, coats, bags,
seat covers, child seats or booster seats.
! Make sure that there are no objects in the
footwell or behind the seats when resetting
the seats. There is a risk that the seats
and/or the objects could be damaged.
! When the rear bench seat is folded
forwards, the front seats cannot be moved
to their rearmost position. You could
otherwise damage the seats and the rear
bench seat.
! Make sure that the sun visor is folded up
before adjusting the backrest and head
restraint height. The head restraint and sun
visor could otherwise collide when the head
restraint is fully extended.
i If the front door is open, the seats can be
adjusted for up 30 minutes after the
ignition has been switched off.
i The head restraints in the front and rear
seats can be removed ( Y page 80).Please contact an authorized Mercedes-
Benz Center for more information.
i You can find further information about
enlarging the cargo compartment (folding
the rear bench seat forwards) on
( Y page 194).
Adjusting the seat electrically
Front seat adjustment
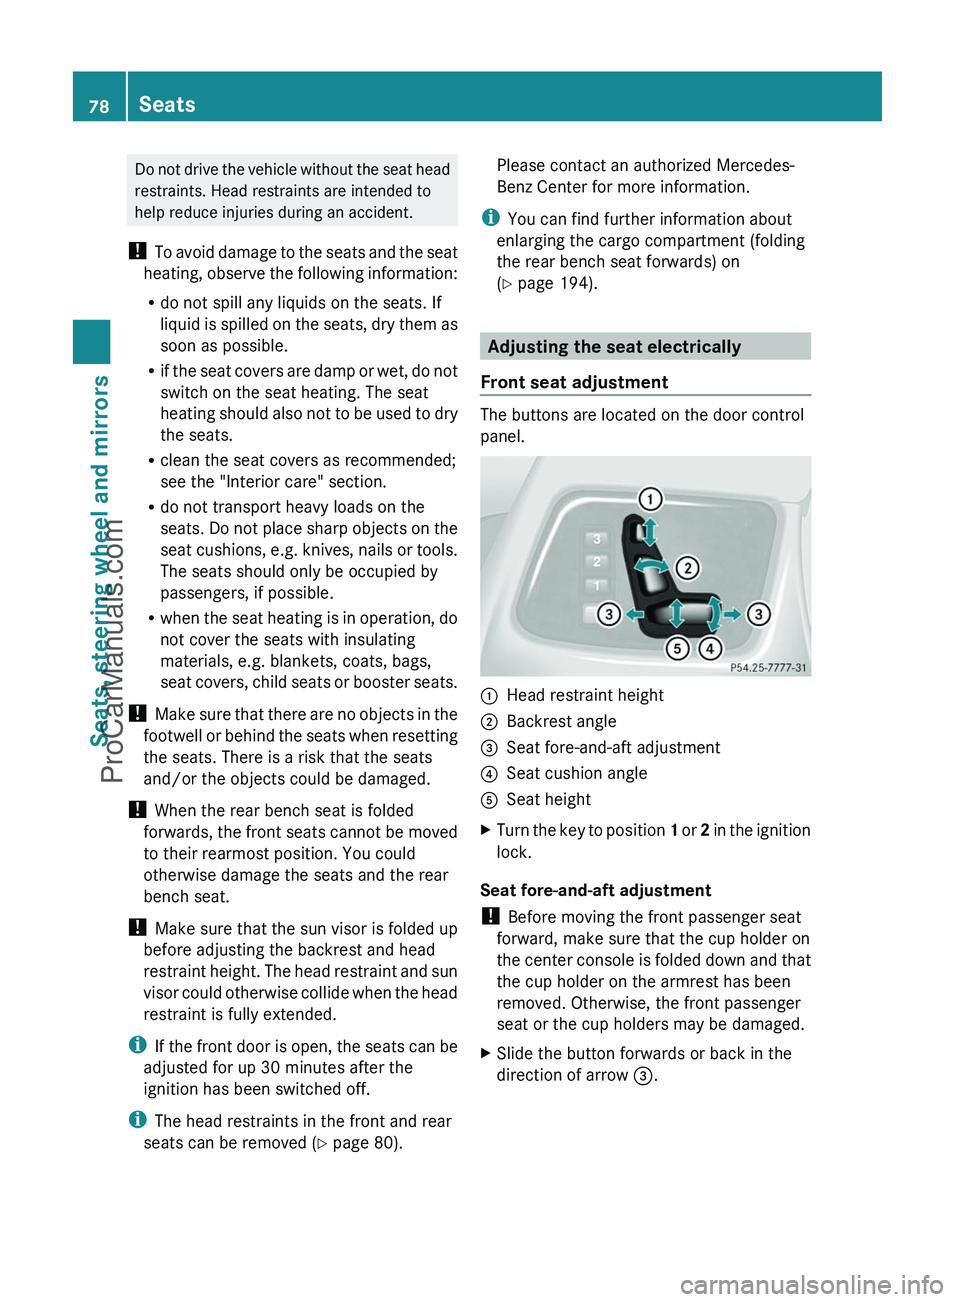
The buttons are located on the door control
panel.
:Head restraint height;Backrest angle=Seat fore-and-aft adjustment?Seat cushion angleASeat heightXTurn the key to position 1 or 2 in the ignition
lock.
Seat fore-and-aft adjustment
! Before moving the front passenger seat
forward, make sure that the cup holder on
the center console is folded down and that
the cup holder on the armrest has been
removed. Otherwise, the front passenger
seat or the cup holders may be damaged.
XSlide the button forwards or back in the
direction of arrow =.78SeatsSeats, steering wheel and mirrors
ProCarManuals.com