2011 MERCEDES-BENZ G-CLASS clock
[x] Cancel search: clockPage 111 of 288

Problems with the cooling with air
dehumidification function
If the indicator lamp in the Á button does
not go out or flashes when switched on, the
cooling with air dehumidification function is
switched off due to a malfunction. You can no
longer switch on the cooling with air
dehumidification function.
XConsult a qualified specialist workshop.
Setting climate control to automatic
GWarning
If you switch off the cooling function, the
vehicle will not be cooled when weather
conditions are warm. The windows can fog up
more quickly. Window fogging may impair
visibility and endanger you and others.
In automatic mode, the set temperature is
maintained automatically at a constant level.
The system automatically regulates the
temperature of the dispensed air, the airflow
and the air distribution.
Automatic mode will achieve optimal
operation if cooling with air dehumidification
is also activated. If desired, cooling with air
dehumidification can be deactivated.
XTurn the key to position 2 in the ignition
lock.XSet the desired temperature.XTo switch on: press the à button.
The indicator lamp in the à button lights
up. Automatic air distribution and airflow
are activated.XTo switch off: press the à button.
The indicator lamp in the à button goes
out. Automatic air distribution and airflow
are deactivated.
Setting the temperature
Different temperatures can be set for the
driver's and front-passenger sides.
XTurn the key to position 2 in the ignition
lock.XTo increase/reduce: turn controls ; and
= clockwise or counter-clockwise
( Y page 107).
Only change the temperature setting in
small increments. Start at 72 ‡ (22 †).
i If you turn the temperature control on one
side of the vehicle fully clockwise or
counter-clockwise, you will increase or
reduce the temperature on the other side
of the vehicle at the same time.
Setting the air distribution
You can set the air distribution for the entire
vehicle.
The symbols for the air distribution have the
following meanings:
SymbolMeaningMDirects the airflow through the
defroster vents to the
windshield and side windowsQDirects the airflow to the entire
vehicle interiorODirects the airflow through the
footwell and side air ventsPDirects the airflow through the
center and side air ventsXTurn the key to position 2 in the ignition
lock.XPress the à button.
The indicator lamp in the à button goes
out.XTurn control ?(Y page 107) to the
corresponding symbol. The control can
also be turned to the area between two
symbols.Operating the climate control system109Climate controlZProCarManuals.com
Page 112 of 288

Setting the airflowXTurn the key to position 2 in the ignition
lock.XPress the à button.
The indicator lamp in the à button goes
out.XTo increase/reduce: turn
thumbwheel : clockwise or counter-
clockwise ( Y page 107).
i
The airflow from the rear-compartment
vents and the center vents is the same.
Defrosting the windshield
You can use this function to defrost the
windshield or to defrost the inside of the
windshield and the side windows.
i You should only select the defrosting
function until the windshield is clear again.
i When you switch on the "defrosting"
function using the ¥7
or z 8
button,
you cannot adjust any of the other settings.
XTurn the key to position 2 in the ignition
lock.XTo switch on: press the ¥7
or z 8
button.
The indicator lamp in the ¥7
or z 8
button comes on.
The climate control system switches to the
following functions:
R cooling with air dehumidification on
R high airflow
R high temperature
R air distribution to the windshield and
front side windows
R air-recirculation mode off
i If necessary, also activate the windshield
defroster ( Y page 110).
XTo deactivate: press the ¥7
or z 8
button.
The indicator lamp in the ¥7
or z 8
button goes off. The previously selected
settings come into effect again.
or
XPress the à button.
The indicator lamp in the à button lights
up. The indicator lamp in the z button
goes out. Airflow and air distribution are set
to automatic mode.
Defrosting the windows
Windows fogged up on the inside
XActivate the "defrosting" function.XIf necessary, activate the windshield
defroster ( Y page 110).
i
You should only select this setting until
the windshield is clear again.
Windows fogged up on the outside
XSwitch on the windshield wipers.XClose the center air vents.
When automatic air distribution is switched
off:
XTurn the air distribution thumbwheel to the
O or P symbol.
i
You should only select this setting until
the windshield is clear again.
XIf necessary, activate the windshield
defroster ( Y page 110).
Activating/deactivating windshield
heating
GWarning
Any accumulation of snow and ice should be
removed from the windshield before driving.
7 USA only.
8 Canada only.110Operating the climate control systemClimate control
ProCarManuals.com
Page 135 of 288

XTurn the fuel filler cap counter-clockwise
and remove it.XInsert the fuel filler cap into the holder
bracket on the inside of filler flap ?.XCompletely insert the fuel pump nozzle into
the filler neck and refuel.XOnly fill the tank until the pump nozzle
switches off.
! Overfilling the fuel tank could damage the
fuel system.
Closing
XReplace the fuel filler cap and turn it
clockwise. The fuel filler cap audibly
engages.XClose the fuel filler flap.
i Close the fuel filler flap before locking the
vehicle. A locking pin otherwise prevents
the fuel filler flap from closing after the
vehicle has been locked.
Fuel filler flap emergency release
GWarning!
Avoid contact with the vehicle walls as they
may contain sharp edges. Otherwise, you
could injure yourself while releasing the fuel
filler flap.
The emergency release is located in the cargo
compartment, on the right-hand side when
viewed in the direction of travel, behind the
rear panel trim.
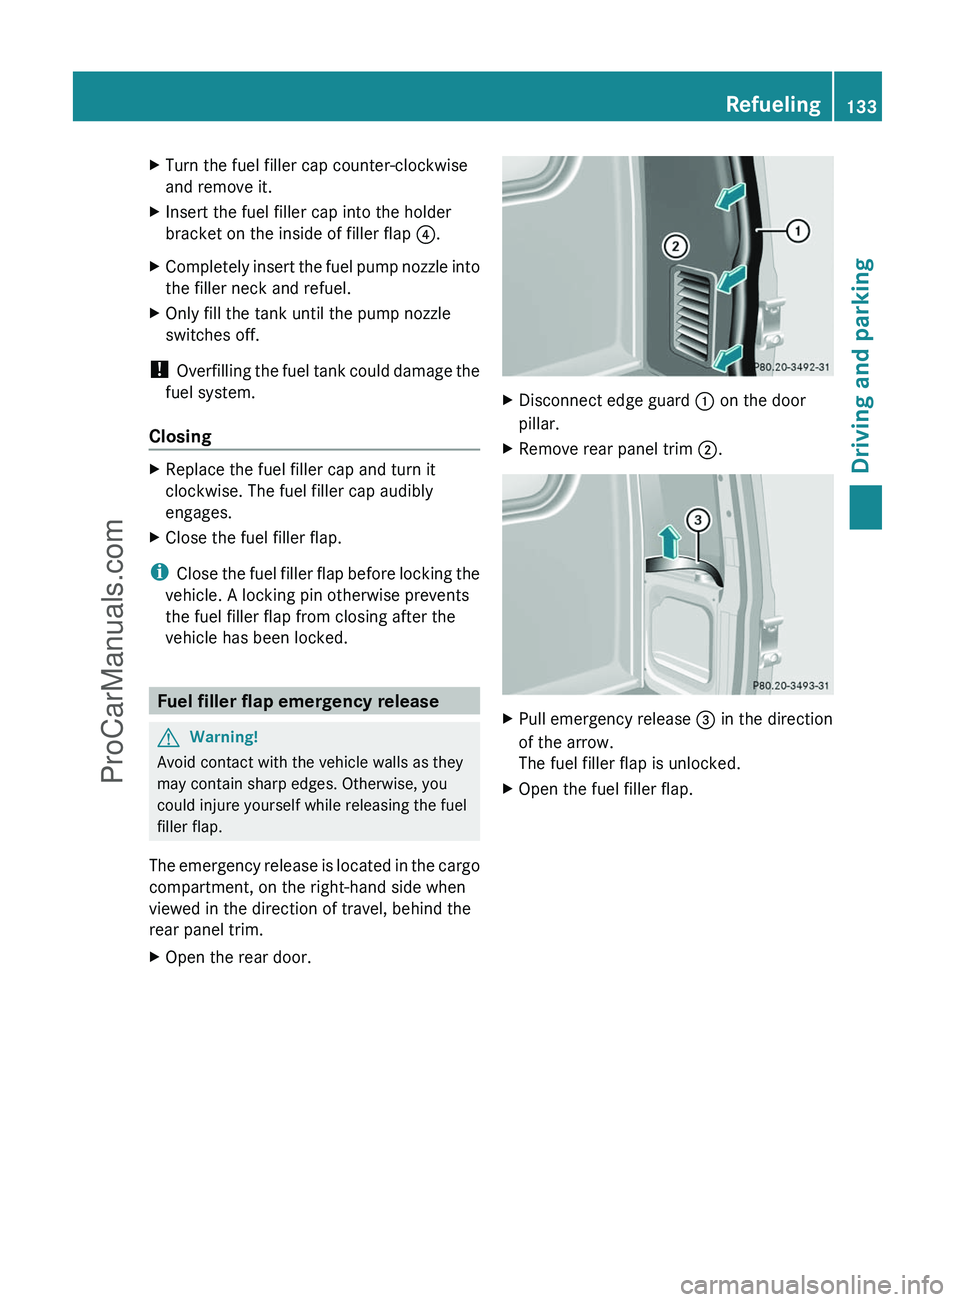
XOpen the rear door.XDisconnect edge guard : on the door
pillar.XRemove rear panel trim ;.XPull emergency release = in the direction
of the arrow.
The fuel filler flap is unlocked.XOpen the fuel filler flap.Refueling133Driving and parkingZProCarManuals.com
Page 165 of 288

XPress the V or U button on the
steering wheel to select the Settings
menu.XPress and hold the reset button on the left
of the instrument cluster for approximately
three seconds.
A prompt appears in the multifunction
display asking you to confirm by pressing
the reset button again.XPress the reset button again.
The settings of most functions are restored
to the factory settings.
or
XIf you want to retain the settings, do not
press the reset button a second time.
The Settings menu appears again after
approximately five seconds.XPress the V or U button to select a
different menu.
Instrument cluster
Selecting the unit of measurement for
distance
The selected unit of measurement for
distance applies to:
R the odometer and the trip odometer
R the trip computer
R the digital speedometer
XPress the V or U button on the
steering wheel to select the Settings
menu.XPress the & button to select submenus.XPress the W or X button to select the
Inst. Cluster submenu.XPress the & button to select Disp.
Unit Speed-/Odom.XPress the W or X button to select
Km (kilometers) or Miles as the unit of
measurement for distance.XPress the &, V or U button to
select a different display.Selecting the language
The Language function allows you to select
the language for the instrument cluster.XPress the V or U button on the
steering wheel to select the Settings
menu.XPress the & button to select submenus.XPress the W or X button to select the
Inst. cluster submenu.XPress the & button to select Language.XPress the W or X button to select the
desired language.XPress the &, V or U button to
select a different display.
Selecting the status line display
XPress the V or U button on the
steering wheel to select the Settings
menu.XPress the & button to select submenus.XPress the W or X button to select the
Inst. cluster submenu.XPress the & button to select Status
line display .XPress the W or X button to select the
status line display: speed ( Speed) or
outside temperature ( Outside temp.).
The selected display now appears
constantly in the lower multifunction
display. When you scroll through the
Standard display menu (Y page 160), you
will see the display you have not selected.XPress the &, V or U button to
select a different display.
Lighting
Adjusting the instrument cluster lighting
The instrument cluster lighting automatically
adjusts to the ambient light.
XBrighter or dimmer: turn reset button
( Y page 26) clockwise or counter-
clockwise.Menus and submenus163On-board computer and displaysZProCarManuals.com
Page 195 of 288

Rif the rear bench seat is not occupied, insert
the belt tongue on the outer seat belts into
the buckle of opposite seat belt :.
R secure the load with sufficiently strong and
wear-resistant tie down. Pad sharp edges
for protection.
Stowage compartments
Important safety notes
GWarning!
To help avoid personal injury during a collision
or sudden maneuver, exercise care when
storing objects in the vehicle. Put luggage or
cargo in the cargo compartment if possible.
Do not pile luggage or cargo higher than the
seat backrests.
Keep compartment lids closed. This will help
to prevent stored objects from being thrown
about and injuring vehicle occupants during
R braking
R vehicle maneuvers
R an accident
Front stowage compartments
Glove box
i Depending on the vehicle's equipment,
you will find an AUX-IN jack or a Media
Interface installed in the glove box. A Media
Interface is a universal interface for
portable audio equipment, e.g. for an
iPod ®
or USB device (see the separate
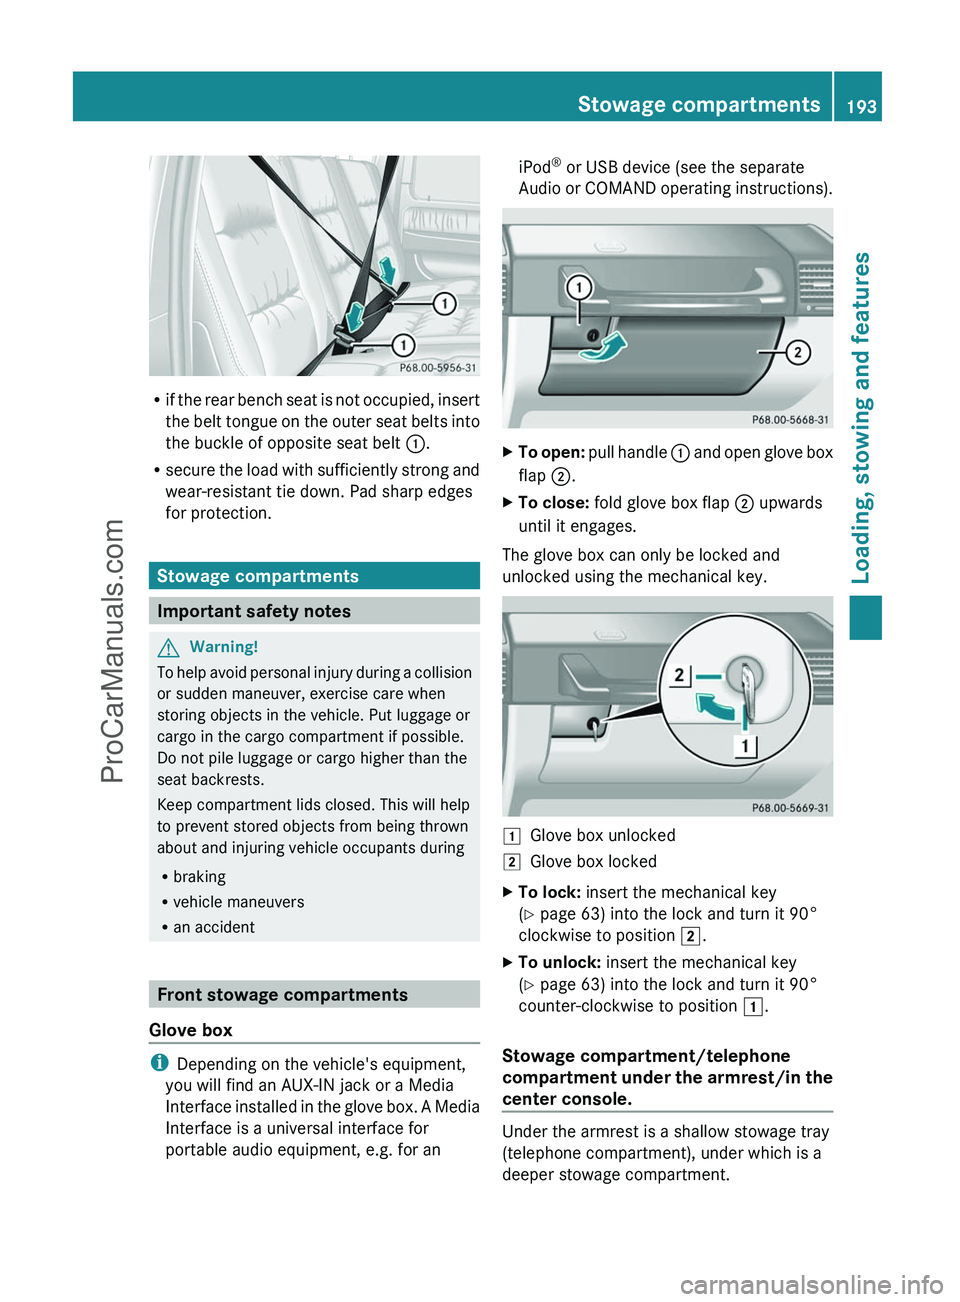
Audio or COMAND operating instructions).XTo open: pull handle : and open glove box
flap ;.XTo close: fold glove box flap ; upwards
until it engages.
The glove box can only be locked and
unlocked using the mechanical key.
1Glove box unlocked2Glove box lockedXTo lock: insert the mechanical key
( Y page 63) into the lock and turn it 90°
clockwise to position 2.XTo unlock: insert the mechanical key
( Y page 63) into the lock and turn it 90°
counter-clockwise to position 1.
Stowage compartment/telephone
compartment under the armrest/in the
center console.
Under the armrest is a shallow stowage tray
(telephone compartment), under which is a
deeper stowage compartment.
Stowage compartments193Loading, stowing and featuresZProCarManuals.com
Page 219 of 288

! Only use engine oils and oil filters which
have been approved for vehicles with a
service system. A list of the engine oils and
oil filters that have been tested and
approved according to the Mercedes-Benz
specifications for service products can be
found on the Internet at http://
www.mbusa.com (USA only). Further
information on tested and approved engine
oils and oil filters can be obtained from any
authorized Mercedes-Benz Center.
The following causes engine failure or
damage to the exhaust system:
Rusing engine oils and oil filters that are
not specifically approved for the service
system
Rreplacing the engine oil and oil filter after
having exceeded the interval for
replacement prescribed by the
maintenance system
Rusing engine oil additives
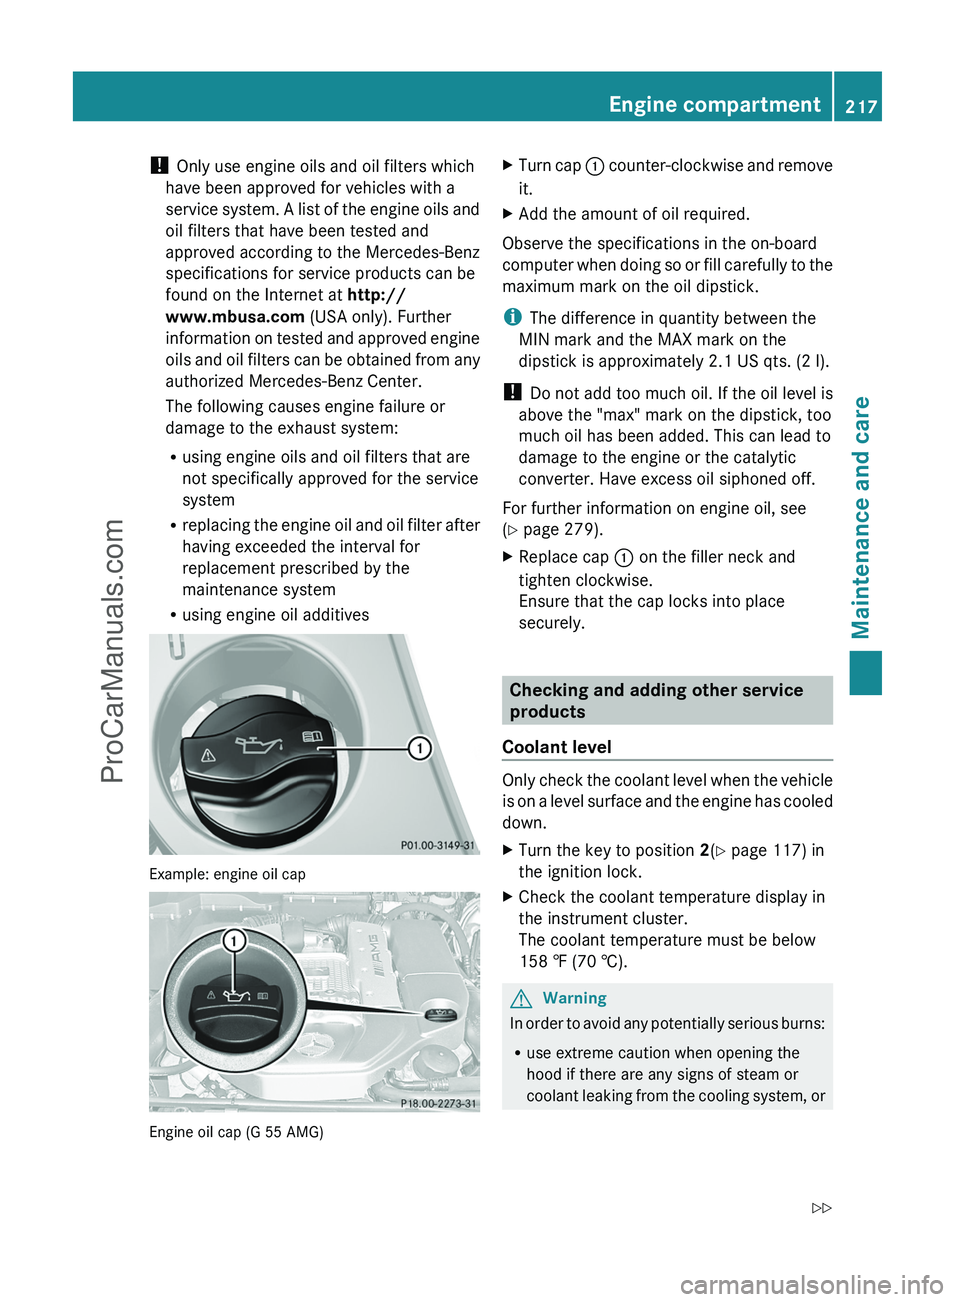
Example: engine oil cap
Engine oil cap (G 55 AMG)
XTurn cap : counter-clockwise and remove
it.
XAdd the amount of oil required.
Observe the specifications in the on-board
computer when doing so or fill carefully to the
maximum mark on the oil dipstick.
iThe difference in quantity between the
MIN mark and the MAX mark on the
dipstick is approximately 2.1 US qts. (2 l).
! Do not add too much oil. If the oil level is
above the "max" mark on the dipstick, too
much oil has been added. This can lead to
damage to the engine or the catalytic
converter. Have excess oil siphoned off.
For further information on engine oil, see
(Y page 279).
XReplace cap : on the filler neck and
tighten clockwise.
Ensure that the cap locks into place
securely.
Checking and adding other service
products
Coolant level
Only check the coolant level when the vehicle
is on a level surface and the engine has cooled
down.
XTurn the key to position 2(Y page 117) in
the ignition lock.
XCheck the coolant temperature display in
the instrument cluster.
The coolant temperature must be below
158 ‡ (70 †).
GWarning
In order to avoid any potentially serious burns:
Ruse extreme caution when opening the
hood if there are any signs of steam or
coolant leaking from the cooling system, or
Engine compartment217Maintenance and careZProCarManuals.com
Page 220 of 288

if the coolant temperature display indicates
that the coolant is overheated.
R do not remove the pressure cap on the
coolant reservoir if the coolant temperature
is above 158 ‡ (70 †). Allow the engine to
cool down before removing the cap. The
coolant reservoir contains hot fluid and is
under pressure.
R using a rag, slowly turn the cap
approximately 1
/ 2 turn to relieve excess
pressure. If opened immediately, scalding
hot fluid and steam will be blown out under
pressure.
R do not spill antifreeze on hot engine parts.
Antifreeze contains ethylene glycol which
may burn if it comes into contact with hot
engine parts.
The coolant expansion tank is located in the
engine compartment on the right when
viewed in the direction of travel.XSlowly turn cap : half a turn counter-
clockwise and allow excess pressure to
escape.XTurn cap : further counter-clockwise and
remove it.
If the coolant is at the level of marker bar
= in the filler neck when cold, there is
enough coolant in coolant expansion
tank ;.
If the coolant is approximately 0.6 in
(1.5 cm) above marker bar = in the filler
neck when warm, there is enough coolant
in coolant expansion tank ;.XIf necessary, add coolant that has been
tested and approved by Mercedes-Benz.XReplace cap : and turn it clockwise as far
as it will go.
For further information on coolant, see
( Y page 280).
Windshield washer system and
headlamp cleaning system
The washer fluid reservoir is used for both the
windshield washer system and the headlamp
cleaning system.
GWarning
Washer solvent/antifreeze is highly
flammable. Do not spill washer solvent/
antifreeze on hot engine parts, because it may
ignite and burn. You could be seriously
burned.
! At temperatures below freezing, always
fill the washer fluid container with a mix of
windshield washer concentrate and
antifreeze additive. There is otherwise a
risk of damaging the windshield washer
system/headlamp cleaning system.
! Only use washer fluid concentrate which
is suitable for plastic lenses. Unsuitable
washer fluid concentrate could damage the
plastic lenses of the headlamps.
! Do not add distilled or de-ionized water to
the washer fluid container. Otherwise, the
level sensor may be damaged.
i Add windshield washer concentrate, e.g.
MB SummerFit, to the washer fluid all year
round.
218Engine compartmentMaintenance and care
ProCarManuals.com
Page 235 of 288

Raising the vehicleGWarning!
When jacking up the vehicle, only use the jack
which has been specifically approved by
Mercedes-Benz for your vehicle.
The jack is designed exclusively for jacking up
the vehicle under the axle housing. Make sure
the jack is positioned correctly under the axle
housing. The jack must always be vertical
when in use, especially on inclines or
declines.
The jack is intended only for lifting the vehicle
briefly for wheel changes. It is not suited for
performing maintenance work under the
vehicle. To help avoid personal injury, use the
jack only to lift the vehicle during a wheel
change.
Never get beneath the vehicle while it is
supported by the jack. Keep hands and feet
away from the area under the lifted vehicle.
Always lower the vehicle onto sufficient
capacity jackstands before working under the
vehicle.
Always firmly engage the parking brake and
block the wheels with wheel chocks or other
sizeable objects before raising the vehicle
with the jack. Do not disengage the parking
brake while the vehicle is raised.
Make sure that the ground on which the
vehicle is standing and where you place the
jack is solid, level and not slippery. If
necessary, use a large underlay. On slippery
surfaces, such as tiled floors, you should use
a non-slip underlay, for example a rubber mat.
Do not use wooden blocks or similar objects
to support the jack. Otherwise the jack may
not be able to achieve its load-bearing
capacity if it is not at its full height.
Never start the engine when the vehicle is
raised.
Also observe the notes on the jack.
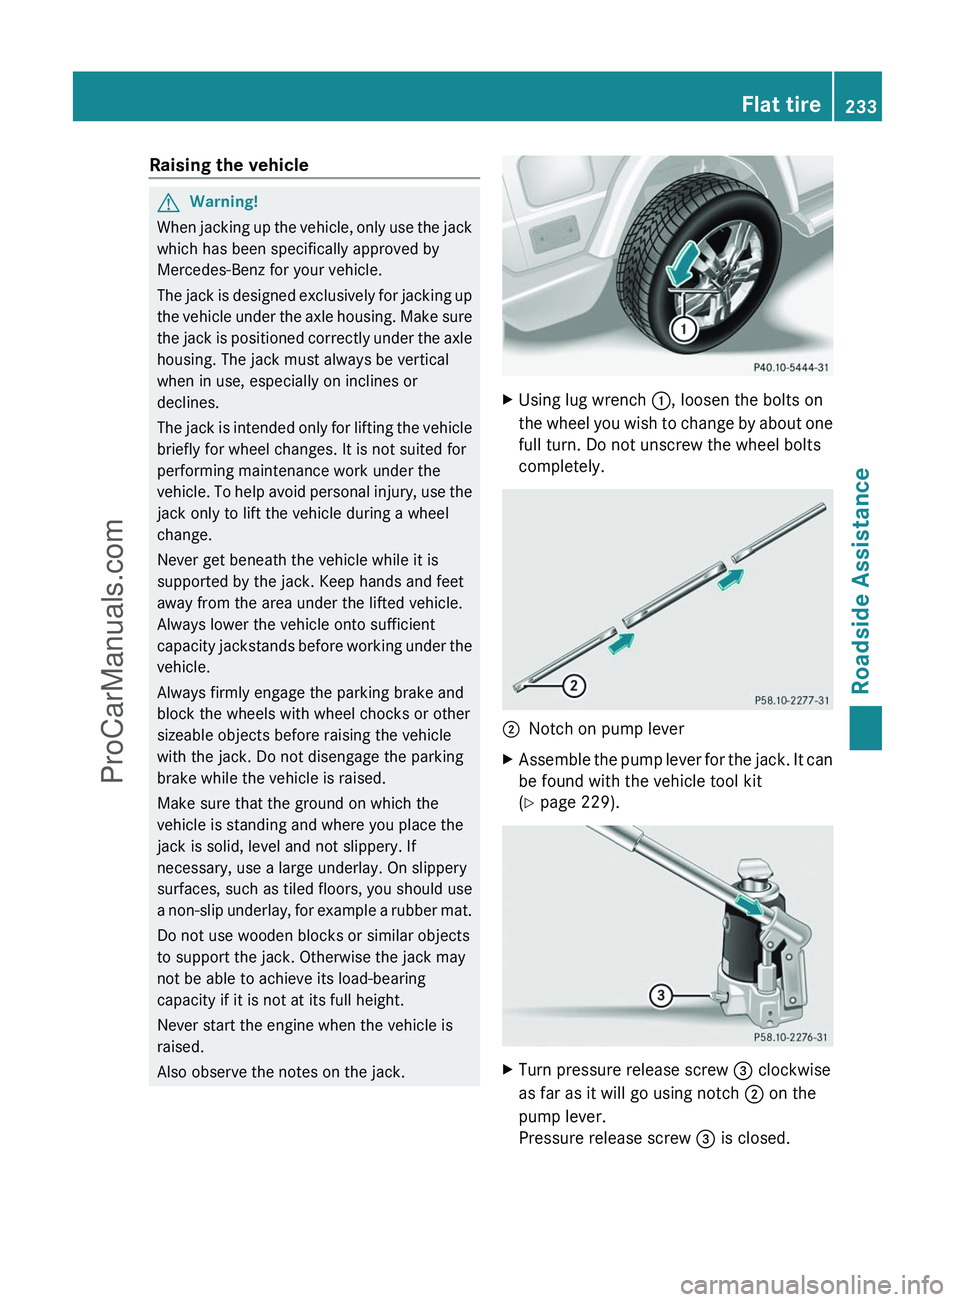
XUsing lug wrench :, loosen the bolts on
the wheel you wish to change by about one
full turn. Do not unscrew the wheel bolts
completely.;Notch on pump leverXAssemble the pump lever for the jack. It can
be found with the vehicle tool kit
( Y page 229).XTurn pressure release screw = clockwise
as far as it will go using notch ; on the
pump lever.
Pressure release screw = is closed.Flat tire233Roadside AssistanceZProCarManuals.com