2011 MERCEDES-BENZ E350 4MATIC remove seat cushion
[x] Cancel search: remove seat cushionPage 48 of 400

If the SmartKey has been removed from the
ignition lock or is in position 0, indicator lamp
45 : does not light up.GWarning
If the red 6 SRS warning lamp in the
instrument cluster and the 45
indicator lamp light up simultaneously, the
OCS is malfunctioning. The front passenger
front air bag will be deactivated in this case.
Have the system checked by qualified
technicians as soon as possible. Contact an
authorized Mercedes-Benz Center.
Only have the seat repaired or replaced at an
authorized Mercedes-Benz Center.
In order to ensure proper operation of the air
bag system and OCS:
R Sit with the seat belt properly fastened in a
position that is as upright as possible with
your back against the seat backrest.
R When seated, a passenger should not
position him/herself in such a way as to
cause the passenger's weight to be lifted
from the seat cushion as this may result in
the OCS being unable to correctly
approximate the passenger's weight
category.
R Read and observe all warnings in this
chapter.
System self-test
The 45 indicator lamp illuminates
when you:
R turn the SmartKey to position 1 or 2 in the
ignition lock
R on vehicles with KEYLESS-GO, press the
Start/Stop button once or twice
If an adult is seated properly on the passenger
seat and the OCS classifies the occupant as
an adult, the 45 indicator lamp
illuminates and goes out again after
approximately 6 seconds.
If the seat is not occupied and the OCS
classifies the front passenger seat as being
unoccupied, the 45 indicator lamp
will illuminate and not go out.GWarning!
If the 4 5 indicator lamp does not
illuminate, the system is not functioning. You
must contact an authorized Mercedes-Benz
Center before seating any child on the front
passenger seat.
For more information, see "Problems with the
Occupant Classification System"
( Y page 47).
GWarning
Never place anything between seat cushion
and child seat (e.g. a pillow), since it reduces
the effectiveness of the OCS. The underside
and rear side child restraint system must be
placed entirely on the seat cushion and the
backrest of the front-passenger seat
backrest.
If necessary, adjust the tilt of the passenger
seat backrest.
An incorrectly mounted child seat could cause
injuries to the child in case of an accident,
instead of increasing protection for the child.
Follow the manufacturer's instructions for
installation of child restraint systems.
46Occupant safetySafety
BA 212 USA, CA Edition B 2011; 1; 5, en-USdimargiVersion: 3.0.3.62010-05-20T13:33:46+02:00 - Seite 46
Page 51 of 400

injured or even killed if the front-passenger
front air bag inflates.
R If you have to place a child in a forward-
facing child restraint system on the front-
passenger seat, you must:
- move the seat as far back as possible
- use the proper child restraint
recommended for the age, size and
weight of the child
- secure child restraint with the vehicle's
seat belt according to the child seat
manufacturer's instructionsGWarning
The BabySmart™ air bag disabling system
ONLY works with specially adapted child
restraint systems. It does not work with child
restraint systems that are not compatible with
BabySmart™.
Never place anything between the seat
cushion and the child restraint system (e.g. a
cushion), as this reduces the effectiveness of
the BabySmart™ air bag deactivation system.
The underside of the child restraint system
must lie against the seat cushion of the front-
passenger seat. In the event of an accident,
an incorrectly installed child restraint system
could injure the child instead of offering
protection.
Observe the manufacturer's instructions
when installing special child restraint
systems.
GWarning
When using a BabySmart™-compatible child
restraint system on the front-passenger seat,
the front-passenger front air bag is only
disabled if the 45 indicator lamp is
illuminated.
Check the 45 indicator lamp
repeatedly, every time you use a
BabySmart™-compatible child restraint
system on the front-passenger seat. Should
the 45 indicator lamp not illuminate
or go out while the restraint is installed,
please check installation. If the 45
indicator lamp remains out, do not use the
BabySmart™ child restraint system to carry a
child on the front-passenger seat until the
system has been repaired.
Special child restraint systems which are
compatible with BabySmart™ are necessary
for deactivating the front-passenger front air
bag. When the special child restraint system
which is compatible with BabySmart™ is
installed correctly and is recognized by the
sensor system in the front-passenger seat,
the front-passenger front air bag is
deactivated. In this case, 45 indicator
lamp : illuminates. If you have any
questions regarding the special child
restraint systems which are compatible with
BabySmart™, consult an authorized
Mercedes-Benz Center.
If the key has been removed from the ignition
lock or is in position 0, indicator lamp
45 : does not light up.
The system does not deactivate:
R the side impact air bag
R the pelvis air bag
R the window curtain air bag
R the Emergency Tensioning Devices
Occupant safety49SafetyBA 212 USA, CA Edition B 2011; 1; 5, en-USdimargiVersion: 3.0.3.62010-05-20T13:33:46+02:00 - Seite 49Z
Page 106 of 400

Do not drive the vehicle without the seat head
restraints. Head restraints are intended to
help reduce injuries during an accident.
! To avoid damage to the seats and the seat
heating, observe the following information:
Rdo not spill any liquids on the seats. If
liquid is spilled on the seats, dry them as
soon as possible.
Rif the seat covers are damp or wet, do not
switch on the seat heating. The seat
heating should also not to be used to dry
the seats.
Rclean the seat covers as recommended;
see the " Interior care" section.
Rdo not transport heavy loads on the
seats. Do not place sharp objects on the
seat cushions, e.g. knives, nails or tools.
The seats should only be occupied by
passengers, if possible.
Rwhen the seat heating is in operation, do
not cover the seats with insulating
materials, e.g. covers, bags, seat covers,
child seats or booster seats.
! When you move the seats, make sure that
there are no objects in the footwell or
behind the seats. Otherwise, you could
damage the seats and the objects.
iThe head restraints in the front seats are
installed with the NECK-PRO system
(Y page 52). For this reason, it is not
possible to remove the head restraints
from the front seats.
Vehicles without the through-loading
feature: the head restraints cannot be
removed from the rear compartment seats.
Please contact an authorized Mercedes-
Benz Center for more information.
iRelated topics:
RThrough-loading feature in the rear
bench seat (Sedan) (Y page 278)
REASY-PACK through-loading feature in
the rear bench seat (Wagon)
(Y page 279)
Adjusting the seats:Head restraint height;Seat cushion angle=Seat height?Seat fore-and-aft adjustmentABackrest angle
iIf PRE-SAFE® is triggered, the front-
passenger seat will be moved to a better
position if it was previously in an
unfavorable position.
iYou can store the seat settings using the
memory function (Y page 115).
iVehicles with the through-loading
feature: if you fold down a rear seat
backrest, the respective front seat is
moved forwards slightly, if necessary, to
prevent contact with the backrest.
104SeatsSeats, steering wheel and mirrors
BA 212 USA, CA Edition B 2011; 1; 5, en-USdimargiVersion: 3.0.3.62010-05-20T13:33:46+02:00 - Seite 104
Page 109 of 400

XRelease the rear seat backrest and fold it
slightly forwards (Y page 278).
XTo remove: pull the head restraint up to
the stop.
XPress release catch : and pull the head
restraint out of the guides.
XTo refit: insert the head restraint so that
the notches on the bar are on the left when
viewed in the direction of travel.
XPush the head restraint down until you hear
it engage in position.
XFold back the rear seat backrest until it
engages.
Adjusting the active multicontour
seat
The active multicontour seat on the driver's
side automatically adapts the sides of the
backrest to your current driving style. You can
adjust the contour of the seat individually so
as to provide optimum support for your back
and sides.
:To adjust the seat cushion length;To switch the dynamic function on or off=To adjust the side bolsters of the seat
backrest
?To switch the massage function on or offATo adjust the contour of the backrest to
increase/decrease support
BTo adjust the height/depth of the
backrest contour
Dynamic function
The dynamic function adapts the air cushions
in the side bolsters of the seat backrest so
that ideal lateral support is ensured at all
times.
You can choose between two different levels.
Level 1 (one
indicator lamp)
Standard setting:
slightly increased
lateral support and
slow build up of air
pressure in the side
bolsters of the seat
backrest.
Level 2 (two
indicator lamps)
Sport setting:
increased lateral
support and fast
build up of pressure
in the side bolsters
of the seat backrest.
XTo switch on: press button ; once or
twice until the desired level is set.
One or two indicator lamps in button ;
light up.
XTo switch off: press button ; repeatedly
until all indicator lamps in button ; go out.
Massage function (PULSE)
The massage function helps you to prevent
muscle tension on long journeys. You can
choose between two levels.
XTo switch on: press button ? once or
twice until the desired level is set.
One or two indicator lamps in button ?
light up. The air cushions in the lumbar
region vibrate for approximately 20
minutes.
Seats107Seats, steering wheel and mirrorsBA 212 USA, CA Edition B 2011; 1; 5, en-USdimargiVersion: 3.0.3.62010-05-20T13:33:46+02:00 - Seite 107Z
Page 111 of 400
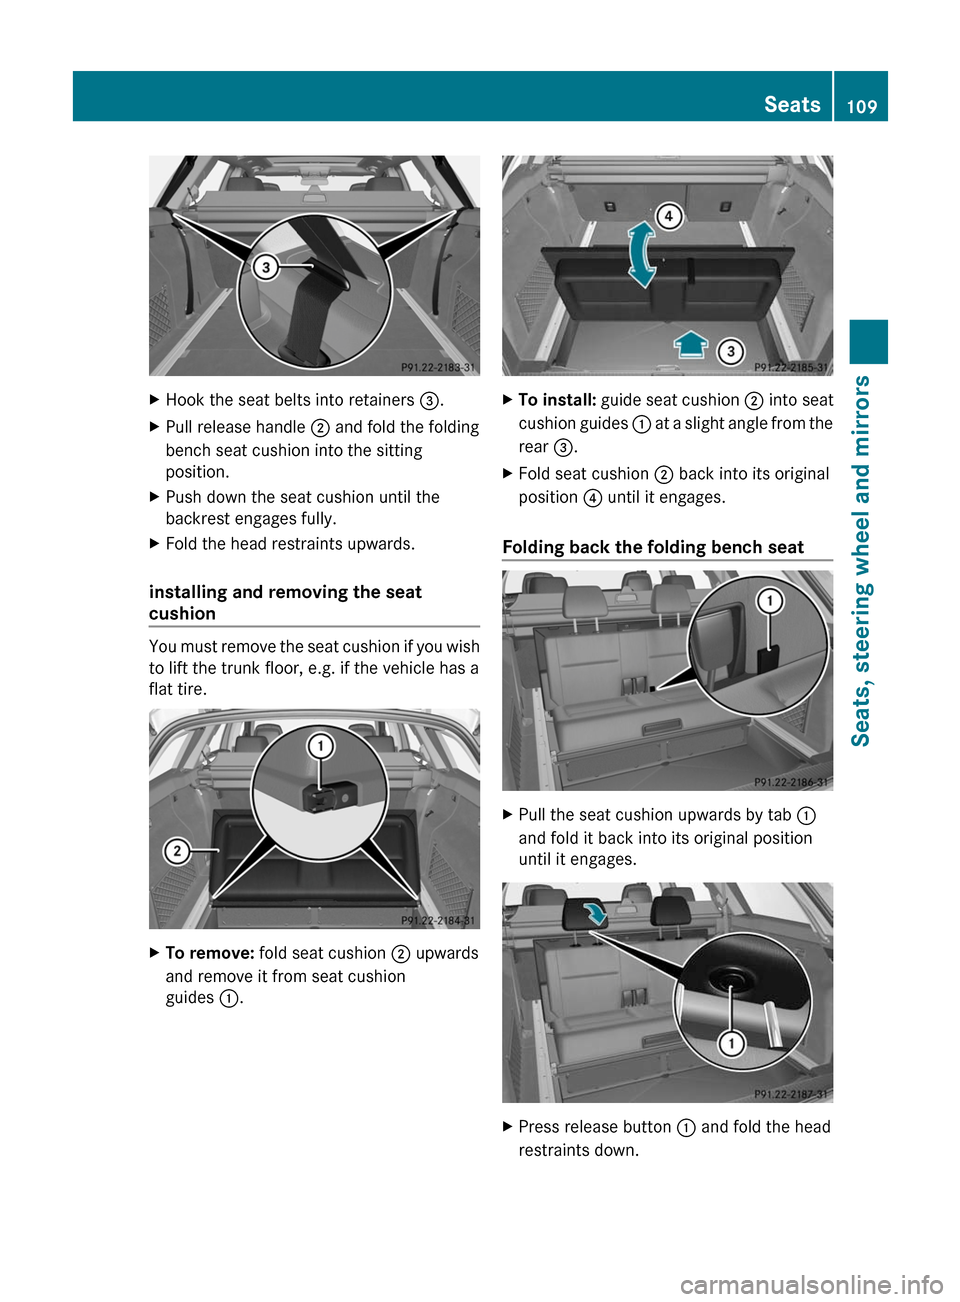
XHook the seat belts into retainers =.XPull release handle ; and fold the folding
bench seat cushion into the sitting
position.
XPush down the seat cushion until the
backrest engages fully.
XFold the head restraints upwards.
installing and removing the seat
cushion
You must remove the seat cushion if you wish
to lift the trunk floor, e.g. if the vehicle has a
flat tire.
XTo remove: fold seat cushion ; upwards
and remove it from seat cushion
guides :.
XTo install: guide seat cushion ; into seat
cushion guides : at a slight angle from the
rear =.
XFold seat cushion ; back into its original
position ? until it engages.
Folding back the folding bench seat
XPull the seat cushion upwards by tab :
and fold it back into its original position
until it engages.
XPress release button : and fold the head
restraints down.
Seats109Seats, steering wheel and mirrorsBA 212 USA, CA Edition B 2011; 1; 5, en-USdimargiVersion: 3.0.3.62010-05-20T13:33:46+02:00 - Seite 109Z
Page 326 of 400
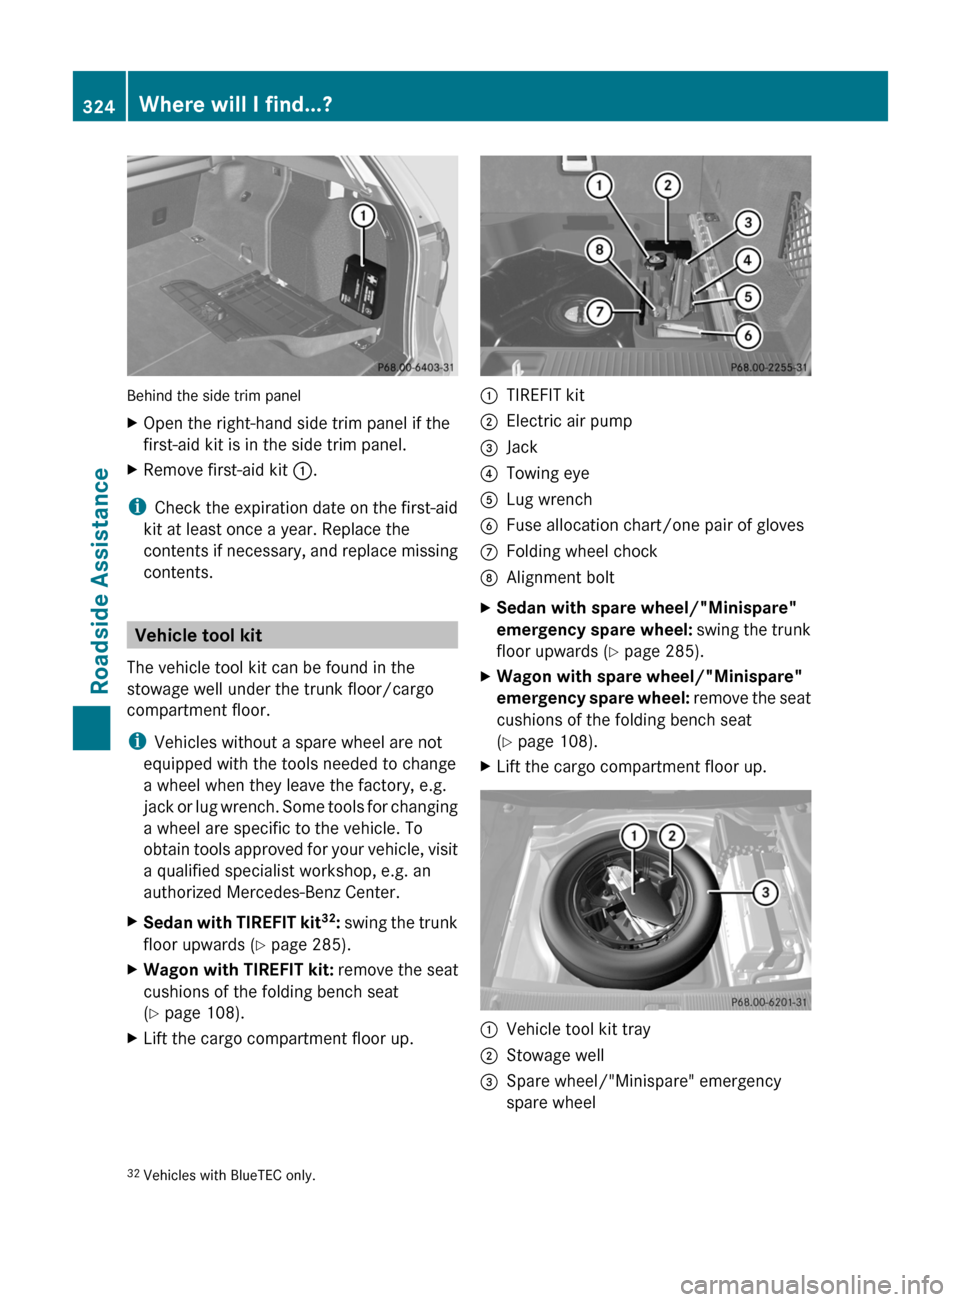
Behind the side trim panel
XOpen the right-hand side trim panel if the
first-aid kit is in the side trim panel.
XRemove first-aid kit :.
iCheck the expiration date on the first-aid
kit at least once a year. Replace the
contents if necessary, and replace missing
contents.
Vehicle tool kit
The vehicle tool kit can be found in the
stowage well under the trunk floor/cargo
compartment floor.
iVehicles without a spare wheel are not
equipped with the tools needed to change
a wheel when they leave the factory, e.g.
jack or lug wrench. Some tools for changing
a wheel are specific to the vehicle. To
obtain tools approved for your vehicle, visit
a qualified specialist workshop, e.g. an
authorized Mercedes-Benz Center.
XSedan with TIREFIT kit32: swing the trunk
floor upwards (Y page 285).
XWagon with TIREFIT kit: remove the seat
cushions of the folding bench seat
(Y page 108).
XLift the cargo compartment floor up.:TIREFIT kit;Electric air pump=Jack?Towing eyeALug wrenchBFuse allocation chart/one pair of glovesCFolding wheel chockDAlignment boltXSedan with spare wheel/"Minispare"
emergency spare wheel: swing the trunk
floor upwards (Y page 285).
XWagon with spare wheel/"Minispare"
emergency spare wheel: remove the seat
cushions of the folding bench seat
(Y page 108).
XLift the cargo compartment floor up.:Vehicle tool kit tray;Stowage well=Spare wheel/"Minispare" emergency
spare wheel32Vehicles with BlueTEC only.324Where will I find...?Roadside Assistance
BA 212 USA, CA Edition B 2011; 1; 5, en-USdimargiVersion: 3.0.3.62010-05-20T13:33:46+02:00 - Seite 324
Page 327 of 400

The vehicle tool kit contains:
RFoldable wheel chock
RFuse allocation chart
RJack
RAlignment bolt
ROne pair of gloves
RLug wrench
RTowing eye
XVehicles with "Minispare" emergency
spare wheel33: swing the trunk floor
upwards (Y page 285).
:Towing eye;One pair of gloves=Jack?Folding wheel chockAAlignment boltBSheet for faulty wheelCElectric air pumpDLug wrenchEFuse allocation chart
"Minispare" emergency spare tire/
collapsible emergency spare tire
Removing the "Minispare" emergency
spare wheel/collapsible spare wheel
Opening the stowage well
Sedan: the emergency spare wheel can be
found in the stowage well under the trunk
floor.
XLift the trunk floor upwards (Y page 285).
Example: well insert
XRelease tabs : on the right of well
insert ;.
XReach into recess = of well insert ;,
swing the insert up and remove it.
Wagon: the emergency spare wheel is
located in the stowage well under the cargo
compartment floor.
XRemove the seat cushions of the folding
bench seat (Y page 108).
XLift the cargo compartment floor up.
Removing the emergency spare wheel:
Sedan
Example: Sedan
XRemove vehicle tool kit tray :.XTurn stowage well ; counter-clockwise
and remove it.
XRemove "Minispare" emergency spare
wheel =.33AMG vehicles only.Where will I find...?325Roadside AssistanceBA 212 USA, CA Edition B 2011; 1; 5, en-USdimargiVersion: 3.0.3.62010-05-20T13:33:46+02:00 - Seite 325Z