2011 MERCEDES-BENZ E300 BLUETEC trunk
[x] Cancel search: trunkPage 301 of 400

XTo end a call: press the ~ button on the
multifunction steering wheel.
or
XPress the corresponding button for ending
a phone call on COMAND.
Call priority
An emergency call can still be initiated even
if a service call is currently active, e.g. a
Roadside Assistance call or an MB info call.
In this case, an emergency call will take
priority and override all other active calls.
The indicator lamp of the respective button
flashes until the call is ended. An emergency
call can only be terminated by the Response
Center. All other calls can be ended by
pressing the ~ button on the
multifunction steering wheel or the
corresponding button for ending a telephone
call on COMAND.
i When an mbrace call has been initiated,
COMAND is muted. The mobile phone is no
longer connected to COMAND. If you must
use your mobile phone, we recommend
that you do this only when the vehicle is
stationary and in a safe location.
Downloading destinations in COMAND
Destination Download gives you access to a
database with over 10 million points of
interest (POIs) which can be downloaded to
the navigation system of your vehicle. If you
know the destination, you can download the
address or obtain the location of points of
interest (POIs) or important destinations in
the surrounding area.
You are prompted to confirm route guidance
to the entered address.
The system calculates the route and
subsequently starts the route guidance with
the address entered.
i If you select No, the address can be stored
in the address book.
i The Destination Download function is
available if the corresponding cellular
phone network is available and data
transfer is possible.
Search & Send
"Search & Send" is a destination entry
service. You can find further information on
"Search & Send" in the separate COMAND
operating instructions.
Vehicle remote opening
If you have unintentionally locked your
vehicle (e.g. the SmartKey is inside the
vehicle) and a replacement key is not
available:
XContact the following service hotlines:
R USA: Response Center under the
number 866-990-9007
R Canada: Customer Service under
1-888-923-8367
You will be asked for your password.XReturn to your vehicle at the time arranged
with the Response Center.XPull the trunk handle/tailgate handle for at
least 20 seconds until the indicator lamp in
the SOS button ( Y page 296)flashes.
The Connecting Call message appears in
the multifunction display.
Alternatively, the vehicle can also be opened
via the Internet in the "Owners Online"
section using your ID number and
password 31
.
i Vehicle remote unlocking is only possible
if the corresponding cellular phone
network is accessible.
The SOS button flashes and the
Connecting Call message appears in the
multifunction display to confirm that the
31 USA only.Features299Loading, stowing and featuresBA 212 USA, CA Edition B 2011; 1; 5, en-USdimargiVersion: 3.0.3.62010-05-20T13:33:46+02:00 - Seite 299Z
Page 302 of 400

command for vehicle remote unlocking has
been received.
If you pull the trunk handle for more than
20 seconds before receiving authorization
for remote unlocking, you must wait 15
minutes before you can pull on the handle
of the trunk lid again.
Vehicle remote closing in an emergency
If you forget to lock your vehicle but are no
longer in the vicinity of the vehicle, it can be
locked for you by the Response Center.
The vehicle can be locked remotely up to four
days after the ignition was last switched off.
XContact the following service hotlines:
R USA: Response Center under
866-990-9007
R Canada: Customer Service under
1-888-923-8367
You will be asked for your PIN.
The next time you are in your vehicle and
switch on the ignition, the Tele Aid Doors
locked by remote control message
appears in the multifunction display.
i The vehicle remote locking feature is
available when the relevant mobile phone
network is available and data connection is
possible.
Stolen Vehicle Recovery Services
If your vehicle has been stolen:
XContact the police.
The police will issue an incident report. This
report has a number.XThis number will be forwarded to the
Response Center together with your PIN.
The Response Center will then attempt to
covertly contact the mbrace system. The
Response Center contacts you and the
local law enforcement authority if the
vehicle is located. However, only the law
enforcement authority is informed of the
location of the vehicle.i If the anti-theft alarm system remains
activated for longer than thirty seconds,
mbrace is automatically connected to the
Customer Assistance Center.
Garage door opener
Important safety notes
Up to three different door and gate systems
can be operated using the remote control
integrated in the overhead control panel.
i Certain garage door openers are not
compatible with the integrated remote
control. If you experience difficulties with
the programming of the integrated remote
control, contact an authorized Mercedes-
Benz Center or call the following telephone
assistance service:
R USA: Mercedes-Benz Customer
Assistance Center on
1-800-FOR-MERCedes
R Canada: Customer Service
on1-800-387-0100
GWarning
Before programming the integrated remote
control to a garage door opener or gate
operator, make sure people and objects are
out of the way of the device to prevent
potential harm or damage. When
programming a garage door opener, the door
moves up or down. When programming a gate
operator, the gate opens or closes.
Do not use the integrated remote control with
any garage door opener that lacks safety stop
and reverse features as required by U.S.
federal safety standards (this includes any
garage door opener model manufactured
before April 1, 1982). A garage door that
cannot detect an object - signaling the door
to stop and reverse - does not meet current
U.S. federal safety standards.
When programming a garage door opener,
park vehicle outside the garage.
300FeaturesLoading, stowing and features
BA 212 USA, CA Edition B 2011; 1; 5, en-USdimargiVersion: 3.0.3.62010-05-20T13:33:46+02:00 - Seite 300
Page 306 of 400

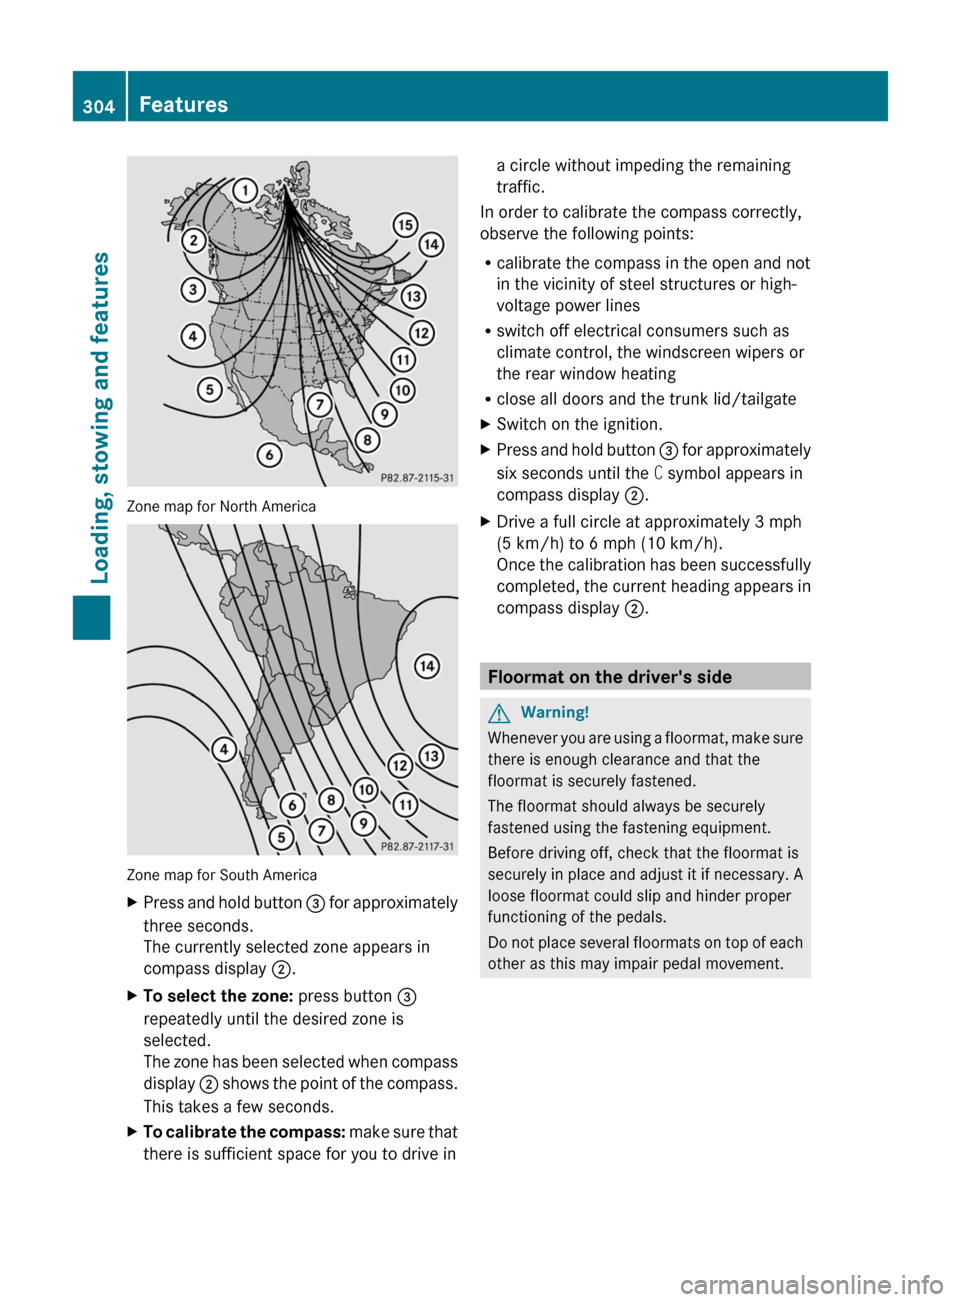
Zone map for North America
Zone map for South America
XPress and hold button = for approximately
three seconds.
The currently selected zone appears in
compass display ;.XTo select the zone: press button =
repeatedly until the desired zone is
selected.
The zone has been selected when compass
display ; shows the point of the compass.
This takes a few seconds.XTo calibrate the compass: make sure that
there is sufficient space for you to drive ina circle without impeding the remaining
traffic.
In order to calibrate the compass correctly,
observe the following points:
R calibrate the compass in the open and not
in the vicinity of steel structures or high-
voltage power lines
R switch off electrical consumers such as
climate control, the windscreen wipers or
the rear window heating
R close all doors and the trunk lid/tailgate
XSwitch on the ignition.XPress and hold button = for approximately
six seconds until the C symbol appears in
compass display ;.XDrive a full circle at approximately 3 mph
(5 km/h) to 6 mph (10 km/h).
Once the calibration has been successfully
completed, the current heading appears in
compass display ;.
Floormat on the driver's side
GWarning!
Whenever you are using a floormat, make sure
there is enough clearance and that the
floormat is securely fastened.
The floormat should always be securely
fastened using the fastening equipment.
Before driving off, check that the floormat is
securely in place and adjust it if necessary. A
loose floormat could slip and hinder proper
functioning of the pedals.
Do not place several floormats on top of each
other as this may impair pedal movement.
304FeaturesLoading, stowing and features
BA 212 USA, CA Edition B 2011; 1; 5, en-USdimargiVersion: 3.0.3.62010-05-20T13:33:46+02:00 - Seite 304
Page 325 of 400

After an accidentProblemPossible causes/consequences and M SolutionsFuel is leaking from the
vehicle.GRisk of explosion or fire
The fuel line or the fuel tank is faulty.
XImmediately turn the key to position 0(Y page 149)in the ignition
lock and remove it.XDo not restart the engine under any circumstances.XConsult a qualified specialist workshop.You are unable to
determine the extent of
the damage.XConsult a qualified specialist workshop.You cannot detect any
damage.XStart the engine as normal.The NECK-PRO head
restraints on the
driver's and front-
passenger seats have
been triggered.Your vehicle has been involved in a rear-end collision.XReset the triggered NECK-PRO head restraints ( Y page 53).Where will I find...?
First-aid kit
Sedan: the first-aid kit is in the right-hand
stowage compartment in the trunk.
XOpen the trunk lid.XSlide down the parcel net.XOpen the stowage compartment.XRelease strap :.XRemove first-aid kit ;.
Wagon: depending on the vehicle's
equipment, the first-aid kit is in the parcel net
or behind the side trim panel.
XOpen the tailgate.
In the parcel net
Where will I find...?323Roadside AssistanceBA 212 USA, CA Edition B 2011; 1; 5, en-USdimargiVersion: 3.0.3.62010-05-20T13:33:46+02:00 - Seite 323Z
Page 326 of 400

Behind the side trim panel
XOpen the right-hand side trim panel if the
first-aid kit is in the side trim panel.
XRemove first-aid kit :.
iCheck the expiration date on the first-aid
kit at least once a year. Replace the
contents if necessary, and replace missing
contents.
Vehicle tool kit
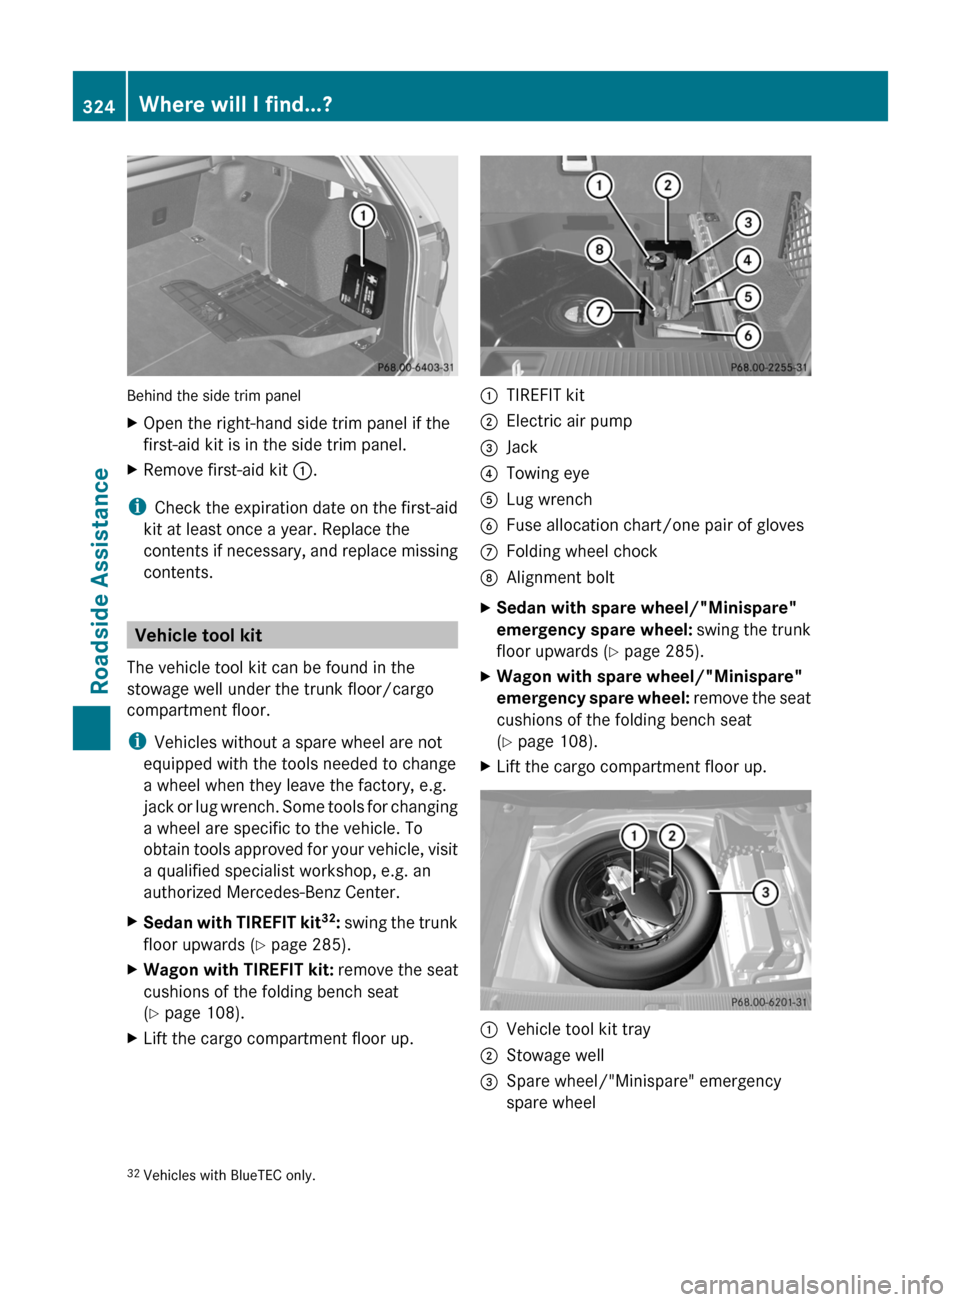
The vehicle tool kit can be found in the
stowage well under the trunk floor/cargo
compartment floor.
iVehicles without a spare wheel are not
equipped with the tools needed to change
a wheel when they leave the factory, e.g.
jack or lug wrench. Some tools for changing
a wheel are specific to the vehicle. To
obtain tools approved for your vehicle, visit
a qualified specialist workshop, e.g. an
authorized Mercedes-Benz Center.
XSedan with TIREFIT kit32: swing the trunk
floor upwards (Y page 285).
XWagon with TIREFIT kit: remove the seat
cushions of the folding bench seat
(Y page 108).
XLift the cargo compartment floor up.:TIREFIT kit;Electric air pump=Jack?Towing eyeALug wrenchBFuse allocation chart/one pair of glovesCFolding wheel chockDAlignment boltXSedan with spare wheel/"Minispare"
emergency spare wheel: swing the trunk
floor upwards (Y page 285).
XWagon with spare wheel/"Minispare"
emergency spare wheel: remove the seat
cushions of the folding bench seat
(Y page 108).
XLift the cargo compartment floor up.:Vehicle tool kit tray;Stowage well=Spare wheel/"Minispare" emergency
spare wheel32Vehicles with BlueTEC only.324Where will I find...?Roadside Assistance
BA 212 USA, CA Edition B 2011; 1; 5, en-USdimargiVersion: 3.0.3.62010-05-20T13:33:46+02:00 - Seite 324
Page 327 of 400

The vehicle tool kit contains:
RFoldable wheel chock
RFuse allocation chart
RJack
RAlignment bolt
ROne pair of gloves
RLug wrench
RTowing eye
XVehicles with "Minispare" emergency
spare wheel33: swing the trunk floor
upwards (Y page 285).
:Towing eye;One pair of gloves=Jack?Folding wheel chockAAlignment boltBSheet for faulty wheelCElectric air pumpDLug wrenchEFuse allocation chart
"Minispare" emergency spare tire/
collapsible emergency spare tire
Removing the "Minispare" emergency
spare wheel/collapsible spare wheel
Opening the stowage well
Sedan: the emergency spare wheel can be
found in the stowage well under the trunk
floor.
XLift the trunk floor upwards (Y page 285).
Example: well insert
XRelease tabs : on the right of well
insert ;.
XReach into recess = of well insert ;,
swing the insert up and remove it.
Wagon: the emergency spare wheel is
located in the stowage well under the cargo
compartment floor.
XRemove the seat cushions of the folding
bench seat (Y page 108).
XLift the cargo compartment floor up.
Removing the emergency spare wheel:
Sedan
Example: Sedan
XRemove vehicle tool kit tray :.XTurn stowage well ; counter-clockwise
and remove it.
XRemove "Minispare" emergency spare
wheel =.33AMG vehicles only.Where will I find...?325Roadside AssistanceBA 212 USA, CA Edition B 2011; 1; 5, en-USdimargiVersion: 3.0.3.62010-05-20T13:33:46+02:00 - Seite 325Z
Page 328 of 400

For further information on changing a wheel
and mounting the spare wheel, see
( Y page 331).
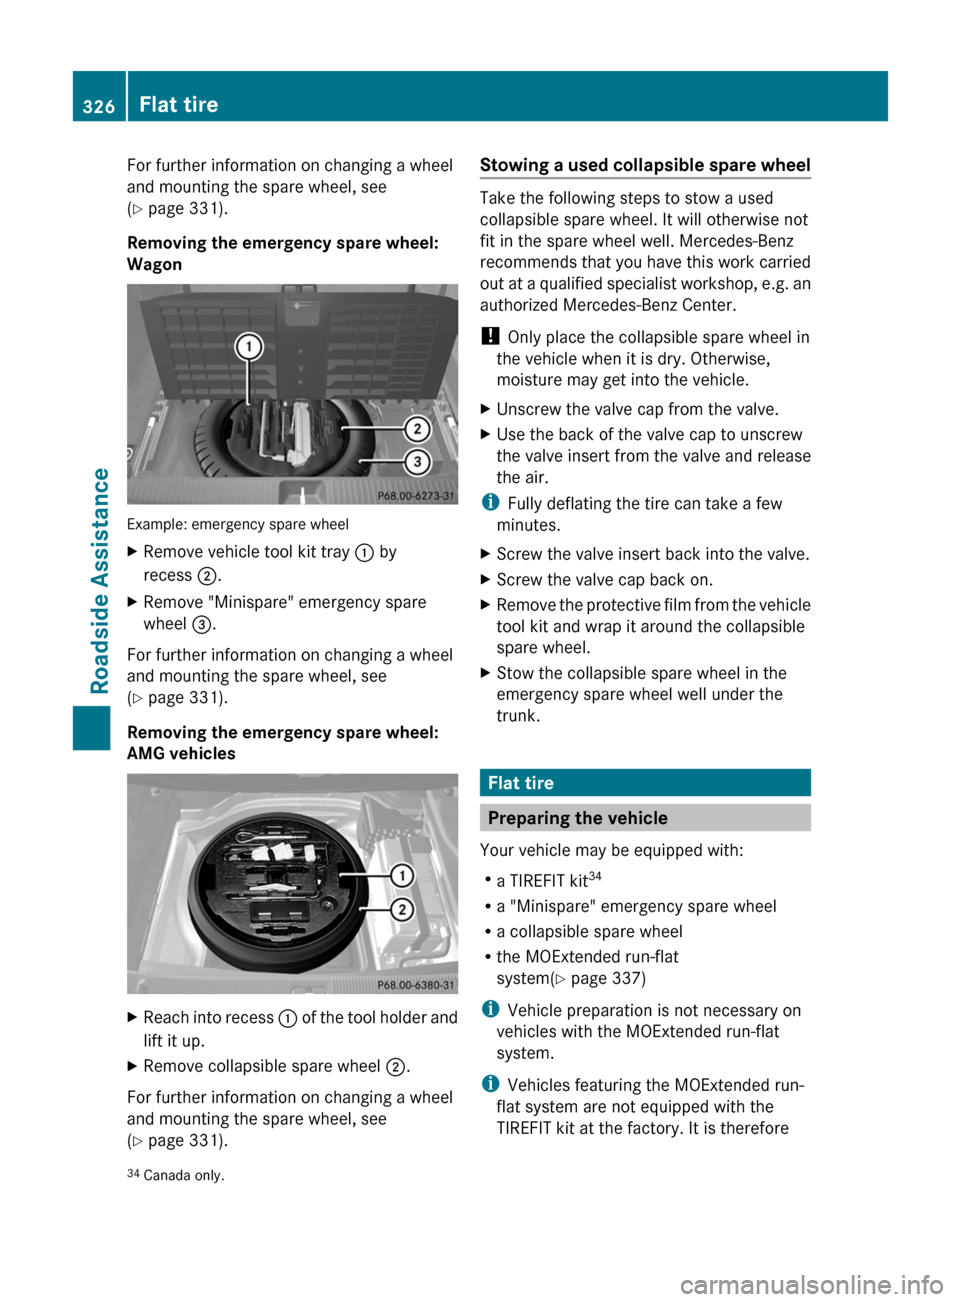
Removing the emergency spare wheel:
Wagon
Example: emergency spare wheel
XRemove vehicle tool kit tray : by
recess ;.XRemove "Minispare" emergency spare
wheel =.
For further information on changing a wheel
and mounting the spare wheel, see
( Y page 331).
Removing the emergency spare wheel:
AMG vehicles
XReach into recess : of the tool holder and
lift it up.XRemove collapsible spare wheel ;.
For further information on changing a wheel
and mounting the spare wheel, see
( Y page 331).
Stowing a used collapsible spare wheel
Take the following steps to stow a used
collapsible spare wheel. It will otherwise not
fit in the spare wheel well. Mercedes-Benz
recommends that you have this work carried
out at a qualified specialist workshop, e.g. an
authorized Mercedes-Benz Center.
! Only place the collapsible spare wheel in
the vehicle when it is dry. Otherwise,
moisture may get into the vehicle.
XUnscrew the valve cap from the valve.XUse the back of the valve cap to unscrew
the valve insert from the valve and release
the air.
i Fully deflating the tire can take a few
minutes.
XScrew the valve insert back into the valve.XScrew the valve cap back on.XRemove the protective film from the vehicle
tool kit and wrap it around the collapsible
spare wheel.XStow the collapsible spare wheel in the
emergency spare wheel well under the
trunk.
Flat tire
Preparing the vehicle
Your vehicle may be equipped with:
R a TIREFIT kit 34
R a "Minispare" emergency spare wheel
R a collapsible spare wheel
R the MOExtended run-flat
system( Y page 337)
i Vehicle preparation is not necessary on
vehicles with the MOExtended run-flat
system.
i Vehicles featuring the MOExtended run-
flat system are not equipped with the
TIREFIT kit at the factory. It is therefore
34 Canada only.326Flat tireRoadside Assistance
BA 212 USA, CA Edition B 2011; 1; 5, en-USdimargiVersion: 3.0.3.62010-05-20T13:33:46+02:00 - Seite 326
Page 329 of 400

recommended that you additionally equip
your vehicle with the TIREFIT kit if you
mount tires that do not feature run-flat
properties, e.g. winter tires. You can obtain
a TIREFIT kit from an authorized Mercedes-
Benz Center, for example.
XVehicles with AIRMATIC: make sure that
"normal" level is selected (Y page 191).
XStop the vehicle as far away as possible
from traffic on solid, non-slippery and level
ground.
XSwitch on the hazard warning lamps.XFirmly depress the parking brake.XBring the front wheels into the straight-
ahead position.
XMove the selector lever/DIRECT SELECT
lever to P.
XSwitch off the engine.XVehicles without KEYLESS-GO: remove
the key from the ignition lock.
XVehicles with KEYLESS-GO: open the
driver's door.
The on-board electronics have status 0,
which is the same as the key having been
removed.
XVehicles with KEYLESS-GO: remove the
Start/Stop button from the ignition lock
(Y page 150).
XAll occupants must get out of the vehicle.
Make sure that they are not endangered as
they get out of the vehicle.
XMake sure that no one is near the danger
area whilst a wheel is being changed.
Anyone who is not directly assisting in the
wheel change should, for example, stand
behind the barrier.
XGet out of the vehicle. Pay attention to
traffic conditions when doing so.
XClose the driver's door.TIREFIT kit
Using the TIREFIT kit
You can use the TIREFIT kit to seal small
punctures, particularly those in the tire tread.
You can use TIREFIT at outside temperatures
down to -4 ‡ (-20 †).
GWarning
TIREFIT is a limited repair device. TIREFIT
cannot be used for cuts or punctures larger
than approximately 0.16 in (4 mm) and tire
damage caused by driving with extremely low
tire inflation pressure, or on a flat tire, or a
damaged wheel.
Do not drive the vehicle under such
circumstances.
Contact the nearest authorized Mercedes-
Benz Center for assistance or call roadside
assistance.
XDo not remove any foreign objects which
have penetrated the tire, e.g. screws or
nails.
XRemove the TIREFIT kit, the accompanying
"max. 80 km/h" sticker and the electric air
pump from the stowage well underneath
the trunk/trunk floor (Y page 324).
XAffix part : of the sticker within the
driver's field of vision.
XAffix part ; of the sticker near the valve
on the wheel with the defective tire.
Flat tire327Roadside AssistanceBA 212 USA, CA Edition B 2011; 1; 5, en-USdimargiVersion: 3.0.3.62010-05-20T13:33:46+02:00 - Seite 327Z