2011 MERCEDES-BENZ E300 BLUETEC trunk
[x] Cancel search: trunkPage 168 of 400

Problems with the fuel and fuel tankProblemPossible causes/consequences and M SolutionsFuel is leaking from the
vehicle.GRisk of explosion or fire
The fuel line or the fuel tank is defective.
XTurn the key to position 0(Y page 149) in the ignition lock
immediately and remove it.XDo not restart the engine under any circumstances.XConsult a qualified specialist workshop.The fuel filler flap
cannot be opened.The fuel filler flap is not unlocked.
or
The key batteries are discharged.XUnlock the vehicle using the mechanical key ( Y page 79).XOpen the trunk lid or the tailgate.XManually unlock the fuel filler flap using the emergency release
( Y page 164).166RefuelingDriving and parking
BA 212 USA, CA Edition B 2011; 1; 5, en-USdimargiVersion: 3.0.3.62010-05-20T13:33:46+02:00 - Seite 166
Page 170 of 400

specialist workshop, e.g. an authorized
Mercedes-Benz Center.
Use the special AdBlue ®
refill bottle when
adding between maintenance intervals. For
more information, please contact an
authorized Mercedes-Benz Center or
Roadside Assistance if applicable
( Y page 21).
Further information about BlueTEC exhaust
gas aftertreatment and AdBlue ®
is available
at any authorized Mercedes-Benz Center.
Adding AdBlue ®GWarning!
Make sure
R AdBlue ®
does not come into contact with
skin, eyes, or clothing
R to keep AdBlue ®
out of the reach of children
If you and/or others have come into contact
with AdBlue ®
:
R If AdBlue ®
has gotten into contact with
eyes, flush with plenty of water immediately
and seek medical help.
R Clean affected skin immediately with plenty
of water.
R If AdBlue ®
was swallowed, rinse mouth
immediately with plenty of water and drink
plenty of water. Consult a physician.
GWarning!
When opening the filler cap of the AdBlue ®
tank ammonia gas vapors may escape. Refill
AdBlue ®
in a well ventilated area only.
Ammonia gas vapors have a pungent odor and
are particularly irritating for your skin,
mucous membranes, and eyes. Inhaling
ammonia gas vapors will cause burning eyes,
nose, and throat, as well as coughing and
watering eyes.
! Only use AdBlue ®
that complies with
ISO 22241. Do not add any special
additives to AdBlue ®
and do not thin
AdBlue ®
with water. This could destroy the
BlueTEC exhaust gas aftertreatment.
! Rinse surfaces that have come into
contact with AdBlue ®
immediately with
water or remove AdBlue ®
using a damp
cloth and cold water. If the AdBlue ®
has
already crystallized, use a sponge and cold
water to clean it. AdBlue ®
residues
crystallize after time and contaminate the
affected surfaces.
! AdBlue ®
is not a additive and must not be
added to the diesel tank. If AdBlue ®
is
added to the diesel tank this could damage
the engine.
i If you are adding between maintenance
intervals, add approximately 1 gallon (3.8 l)
of AdBlue ®
to the AdBlue ®
tank. 1 gallon
(3.8 l) of AdBlue ®
is approximately
2 AdBlue ®
refill bottles.
Further information about
AdBlue ®
(Y page 390).
The AdBlue ®
filler neck is under the trunk
floor.XSwitch off the ignition.XOpen the trunk.XLift the trunk floor ( Y page 285).XTurn AdBlue ®
cap : anti-clockwise and
remove it.168RefuelingDriving and parking
BA 212 USA, CA Edition B 2011; 1; 5, en-USdimargiVersion: 3.0.3.62010-05-20T13:33:46+02:00 - Seite 168
Page 171 of 400

XUnscrew the covering cap from AdBlue®
refill bottle =.XPlace AdBlue ®
refill bottle = on the filler
neck as shown and screw on clockwise
hand-tight.
! Only screw on the AdBlue ®
refill bottle
hand-tight. It could otherwise be damaged.
XPress AdBlue ®
refill bottle = down.
The AdBlue ®
tank is filled. This may take up
to one minute.
i If the AdBlue ®
refill bottle is no longer
pressed down, the filling process stops and
the partially emptied bottle can be
removed.
XRelease AdBlue ®
refill bottle =.XTurn AdBlue ®
refill bottle = anti-clockwise
and remove it.XPlace AdBlue ®
filler cap ; on the filler
neck and turn it clockwise.XInsert AdBlue ®
cap : as shown and turn
it clockwise as far as it will go.XFold the trunk floor down.XClose the trunk lid.XDrive at a speed above 10 mph (16 km/h).
The Check Additive See Operator's
Manual message disappears after
approximately one minute.
i If the Check Additive See
Operator's Manual message is still
displayed in the multifunction display, top
up with another bottle of AdBlue ®
.
i Then, have the AdBlue ®
supply checked
and filled completely if necessary.
Mercedes-Benz recommends that you use
a qualified specialist workshop such as an
authorized Mercedes-Benz Center for this
purpose.
Parking
Important safety notes
GWarning!
Do not park this vehicle in areas where
combustible materials such as grass, hay or
leaves can come into contact with the hot
exhaust system. These materials could be
ignited and cause a vehicle fire.
Parking169Driving and parkingBA 212 USA, CA Edition B 2011; 1; 5, en-USdimargiVersion: 3.0.3.62010-05-20T13:33:46+02:00 - Seite 169Z
Page 202 of 400

XTo reverse into the parking space:
maintain the steering wheel angle and
reverse carefully.
XStop as soon as you hear an acoustic
signal, at the latest when PARKTRONIC
sounds the continuous warning tone.
The Parking Guidance Finished
message appears in the multifunction
display and a tone sounds. You may be
asked to steer in a different direction and
then change gear. In this case, further
displays in the multifunction display will
direct you to the final position.
XManeuver if necessary.XAlways observe the warning messages
displayed by PARKTRONIC (Y page 195).
Canceling Parking Guidance
XPress the PARKTRONIC button on the
center console (Y page 196).
Parking Guidance is canceled immediately
and PARKTRONIC is deactivated.
Parking Guidance is canceled automatically if
it is no longer possible to guide you into the
parking space or if a malfunction occurs.
The parking space symbol disappears and the
Parking Guidance canceled message
appears in the multifunction display.
Rear view camera
Important safety notes
The rear view camera is an optical parking aid.
It shows the area behind your vehicle in the
COMAND display.
GWarning!
Make sure no persons or animals are in or
near the area in which you are parking/
maneuvering. Otherwise, they could be
injured.
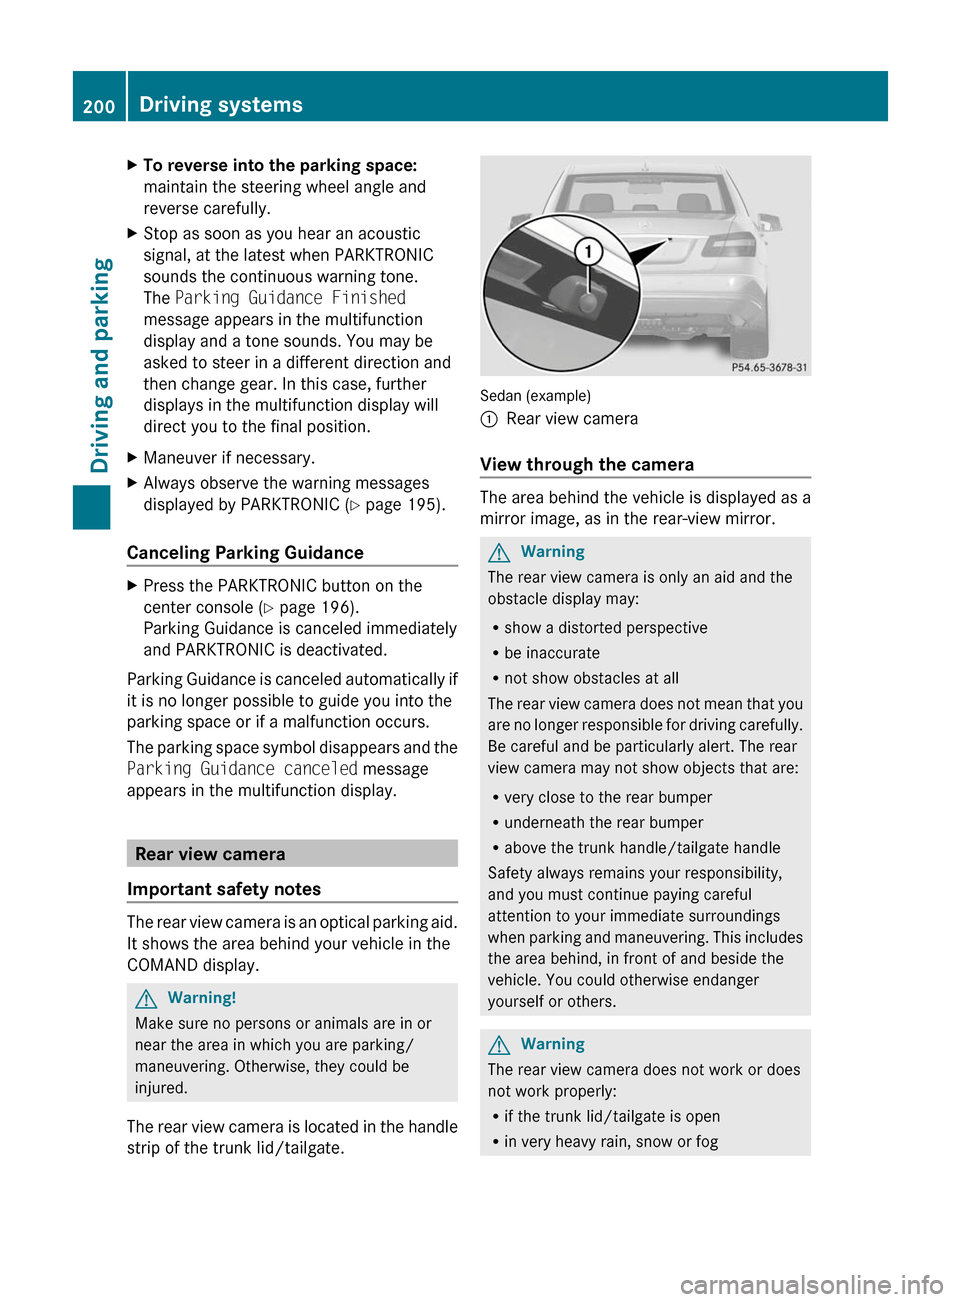
The rear view camera is located in the handle
strip of the trunk lid/tailgate.
Sedan (example)
:Rear view camera
View through the camera
The area behind the vehicle is displayed as a
mirror image, as in the rear-view mirror.
GWarning
The rear view camera is only an aid and the
obstacle display may:
Rshow a distorted perspective
Rbe inaccurate
Rnot show obstacles at all
The rear view camera does not mean that you
are no longer responsible for driving carefully.
Be careful and be particularly alert. The rear
view camera may not show objects that are:
Rvery close to the rear bumper
Runderneath the rear bumper
Rabove the trunk handle/tailgate handle
Safety always remains your responsibility,
and you must continue paying careful
attention to your immediate surroundings
when parking and maneuvering. This includes
the area behind, in front of and beside the
vehicle. You could otherwise endanger
yourself or others.
GWarning
The rear view camera does not work or does
not work properly:
Rif the trunk lid/tailgate is open
Rin very heavy rain, snow or fog
200Driving systemsDriving and parking
BA 212 USA, CA Edition B 2011; 1; 5, en-USdimargiVersion: 3.0.3.62010-05-20T13:33:46+02:00 - Seite 200
Page 261 of 400

Display messagesPossible causes/consequences and M SolutionsService Required
Do Not Shift Gears
Visit DealerYou cannot change the transmission position due to a malfunction.
A warning tone also sounds.
If transmission position D is selected:XDrive to a qualified specialist workshop without shifting the
transmission from position D.
If transmission position R, N or P is selected:
XNotify a qualified specialist workshop or breakdown service.Only shift to P
when Vehicle is
StationaryThe vehicle is moving.XPull over and stop the vehicle safely as soon as possible, paying
attention to road and traffic conditions.XShift the transmission to position P.NSedan: the trunk lid is open. XClose the trunk lid.AWagon: the tailgate is open. XClose the tailgate.M
or
?GRisk of accident
The hood is open.
XPull over and stop the vehicle safely as soon as possible, paying
attention to road and traffic conditions.XEngage the parking brake.XClose the hood.CAt least one door is open. XClose all doors._
Rear Lt. Backrest
Not Latched
or
Rear Rt. Backrest
Not LatchedGRisk of injury
The backrest in the rear is not engaged on the left-hand and/or
right-hand side.
XPush the backrest back until it engages.Display messages259On-board computer and displaysBA 212 USA, CA Edition B 2011; 1; 5, en-USdimargiVersion: 3.0.3.62010-05-20T13:33:46+02:00 - Seite 259Z
Page 276 of 400

Vehicle equipment
i This manual describes all the standard
and optional equipment of your vehicle
which was available at the time of
purchase. Country-specific differences are
possible. Bear in mind that your vehicle
may not feature all functions described
here. This also refers to safety-related
systems and functions.
Loading guidelines
GWarning!
Always fasten items being carried as securely
as possible. Use cargo tie-down rings and
fastening materials appropriate for the weight
and size of the load.
In an accident, during hard braking or sudden
maneuvers, loose items will be thrown around
inside the vehicle. This can cause injury to
vehicle occupants unless the items are
securely fastened in the vehicle.
To help avoid personal injury during a collision
or sudden maneuver, exercise care when
transporting cargo. Do not pile luggage or
cargo higher than the seat backrests.
The trunk is the preferred place to carry
objects.
Never drive a vehicle with the trunk open.
Deadly carbon monoxide (CO) gases may
enter vehicle interior resulting in
unconsciousness and death.
The handling characteristics of a laden
vehicle are dependent on the distribution of
the load within the vehicle. For this reason,
you should observe the following notes when
transporting a load:
R When transporting a load, never exceed the
maximum permissible gross vehicle weight
or the permissible axle loads for the vehicle
(including occupants). The values are
stated on the vehicle identification plate on
the B-pillar on the driver's side.
R Position heavy loads as far forwards as
possible and as low down in the trunk/
cargo compartment as possible.
R The load must not protrude above the
upper edge of the seat backrests.
R always place the load against the rear or
front seat backrests. Make sure that the
seat backrests are securely locked into
place.
R Always place the load behind unoccupied
seats if possible.
R Secure the load with sufficiently strong and
wear-resistant tie down. Pad sharp edges
for protection.
Stowage compartments
Important safety notes
GWarning!
To help avoid personal injury during a collision
or sudden maneuver, exercise care when
storing objects in the vehicle. Put luggage or
cargo in the trunk if possible.
Do not pile luggage or cargo higher than the
seat backrests.
Keep compartment lids closed. This will help
to prevent stored objects from being thrown
about and injuring vehicle occupants during
R braking
R vehicle maneuvers
R an accident
Stowage compartments in the front
Glove box
i Depending on the vehicle equipment,
there is an AUX-IN connection or a Media
Interface installed in the glove box. Media
Interface is a universal interface for mobile
audio equipment, e.g. for an iPod ®
or USB
274Stowage compartmentsLoading, stowing and features
BA 212 USA, CA Edition B 2011; 1; 5, en-USdimargiVersion: 3.0.3.62010-05-20T13:33:46+02:00 - Seite 274
Page 278 of 400

XTo open: press left-hand button ; or right-
hand button :.
The stowage compartment opens.
Stowage compartments in the rear
Stowage pockets
GWarning!
Storage bags are intended for storing light-
weight items only.
Heavy objects, objects with sharp edges or
fragile objects may not be transported in the
storage bag. In an accident, during hard
braking, or sudden maneuvers, they could be
thrown around inside the vehicle and cause
injury to vehicle occupants.
Storage bags cannot protect transported
goods in the event of an accident.
Storage bags are located in the rear
compartment on the driver's and front-
passenger seat backrests.
Stowage areas
Parcel nets
GWarning
Parcel nets are intended for storing light-
weight items only, such as road maps, mail,
etc.
Heavy objects, objects with sharp edges, or
fragile objects may not be transported in the
parcel nets. In an accident, during hard
braking, or sudden maneuvers, they could be
thrown around inside the vehicle and cause
injury to vehicle occupants.
Parcel nets cannot protect transported goods
in the event of an accident.
Parcel nets are located in the front-passenger
footwell and on the left and right-hand sides
of the trunk/cargo compartment.
Skibag
Unfolding the skibag and loading the
skis
GWarning
The skibag is designed for up to four pairs of
skis. Do not load the skibag with any other
objects.
Always fasten the skibag securely. In an
accident, an unfastened ski bag can cause
injury to vehicle occupants.
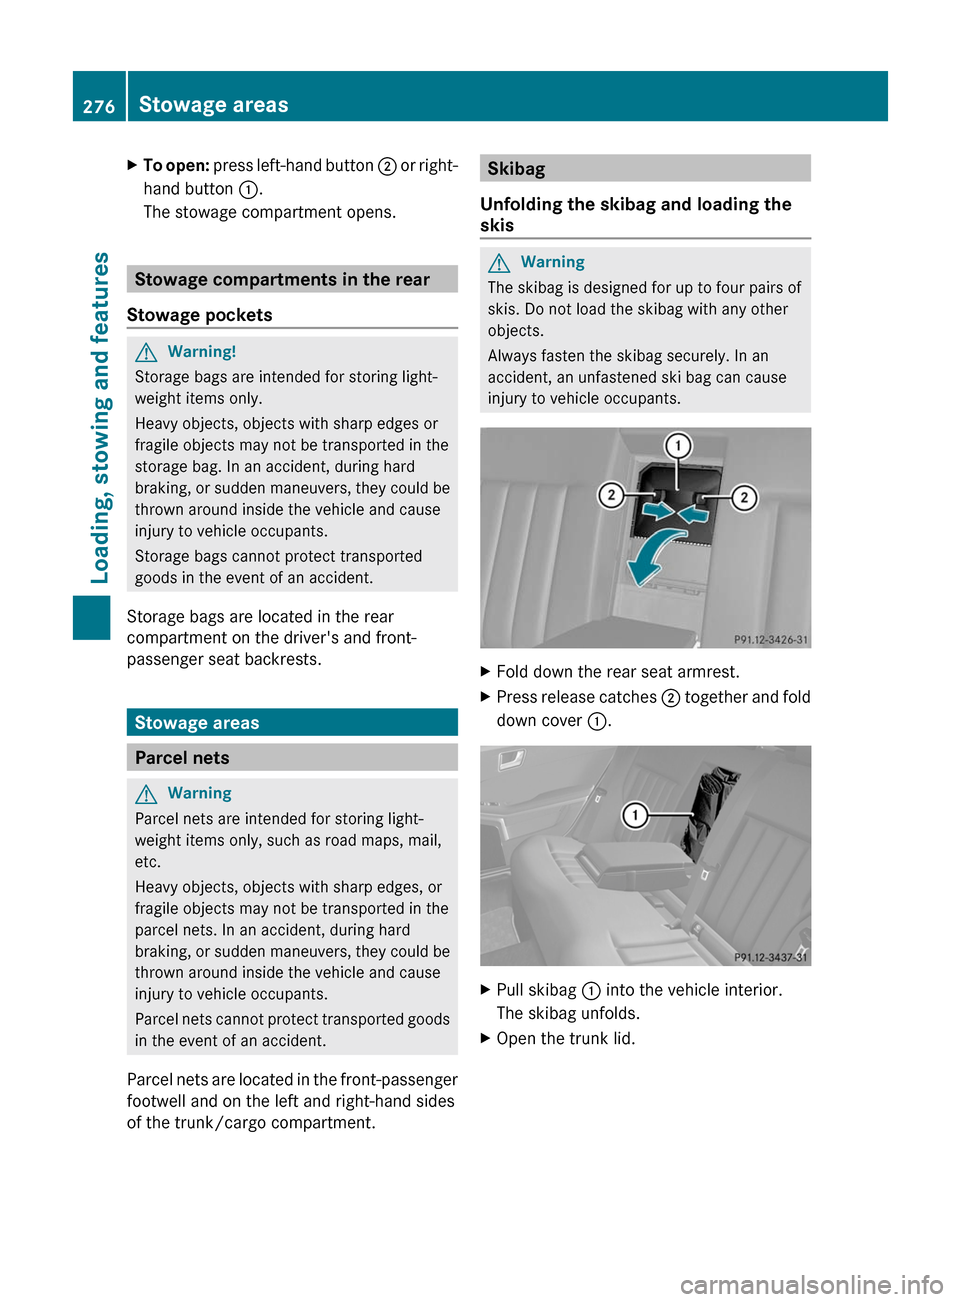
XFold down the rear seat armrest.XPress release catches ; together and fold
down cover :.
XPull skibag : into the vehicle interior.
The skibag unfolds.
XOpen the trunk lid.276Stowage areasLoading, stowing and features
BA 212 USA, CA Edition B 2011; 1; 5, en-USdimargiVersion: 3.0.3.62010-05-20T13:33:46+02:00 - Seite 276
Page 279 of 400

XPress release button :.
The flap opens downwards.
XSlide the skis into the skibag from the
trunk.
XPull strap : tight by the loose end until the
skis are held firmly inside the skibag.
XEngage hook : in securing ring ;.XPull the strap tight by the loose end.Removing the skis and folding up the
skibag
XLoosen the two straps.XRemove hook : from securing ring ;.XTake the skis out of the skibag.XClose the flap in the trunk.XSmooth out the skibag and fold it up.XPut the skibag into the backrest.XFold the cover back up.
iYou should always close the flap in the
trunk if you do not require the skibag. This
will prevent unauthorized access to the
trunk from the vehicle interior.
Removing the skibag
GRisk of poisoning
When the skibag has been removed, always
drive with the trunk lid closed. Exhaust fumes
could otherwise enter the vehicle interior.
The skibag can be removed for cleaning or
drying.
XOpen the trunk lid.XPress release button :.
Flap ; folds down.
XPress catch = in and pull out frame ?
containing the skibag.
Stowage areas277Loading, stowing and featuresBA 212 USA, CA Edition B 2011; 1; 5, en-USdimargiVersion: 3.0.3.62010-05-20T13:33:46+02:00 - Seite 277Z