2011 MERCEDES-BENZ E-Class COUPE immobilizer
[x] Cancel search: immobilizerPage 11 of 344

Premium-grade unleaded gasoline . 336
Refueling ........................................ 162
Specifications ................................ 336
Troubleshooting ............................. 165
Fuel consumption
Current (on-board computer) .........202
Notes ............................................. 167
Fuel filler cap (display message) ..... 229
Fuel filler flap Opening/closing ....... 163
Fuel level Calling up the range (on-board
computer) ...................................... 202
Fuses
Dashboard fuse box .......................300
Fuse allocation chart .....................300
Fuse box in the engine
compartment ................................. 301
Fuse box in the trunk .....................301
Notes ............................................. 300
G
Garage door opener Clearing the memory .....................268
Notes ............................................. 265
Opening/closing the garage door ..267
Programming the remote control ...265
Gear or selector lever (cleaning
guidelines) ......................................... 283
Genuine Mercedes-Benz parts ......... 332
Genuine wood trim and trim strips
(cleaning instructions) ...................... 283
Glove box ........................................... 250
H
Head bags ............................................ 40
Head bags ........................................ 40
Headlamp cleaning system .............. 124
Adding washer fluid .......................275
Notes ............................................. 339
Headlamp mode (daytime driving)
see Daytime running lamps
Headlamps
Cleaning ......................................... 282
Misting up ...................................... 125
Head level heating
AIRSCARF ...................................... 112
Head restraint
Lowering manually (rear) ...............109
Head restraints
Adjusting (electrically) ...................108
Adjusting (rear) .............................. 109
see NECK-PRO head restraints
Heating
see Climate control
High beam flasher ............................. 124
Hill start assist .................................. 154
HOLD function Display message ............................ 229
Function/notes ............................. 184
Hood
Closing ........................................... 273
Display message ............................ 237
Opening ......................................... 272
Hydroplaning ..................................... 170
I
Immobilizer .......................................... 70
Indicator and warning lamps DISTRONIC PLUS ........................... 247
Installing/removing the AIRCAP
wind screen ......................................... 98
Instrument cluster Overview .......................................... 26
Submenu (on-board computer) ......208
Warning and indicator lamps ...........27
Instrument cluster lighting ................ 26
Instrument lighting see Instrument cluster lighting
Interior lighting
Automatic control ..........................125
Delayed switch-off (on-board
computer) ...................................... 210
Emergency lighting ........................126
Manual control ............................... 126
Reading lamp ................................. 125
J
Jack Storage location ............................ 287
Using ............................................. 290
Jump-starting ..................................... 296
Index9BA 207 USA, CA Edition B 2011; 1; 3, en-USd2sboikeVersion: 3.0.3.62010-05-20T10:38:09+02:00 - Seite 9
Page 17 of 344

Stowage wellTrunk floor (under) .........................254
Submenu (on-board computer)
Convenience .................................. 211
Factory setting ............................... 212
Instrument cluster .........................208
Lights ............................................. 209
Standard display ............................ 202
Vehicle ........................................... 210
Summer opening
see Convenience opening feature
Sun visor ............................................ 256
Supplemental Restraint System see SRS
Surround lighting (on-board
computer) .......................................... 209
Switching off the alarm (ATA) ............ 71
T
Tachometer ........................................ 199
Tail lamps (Display message) ........... 224
Tank content Fuel gauge ....................................... 26
Technical data ................................... 332
E 350 ............................................. 339
E 550 ............................................. 340
Tires/wheels ................................. 327
TELEAID
Call priority .................................... 263
Display message ............................ 214
Downloading destinations
(COMAND) ..................................... 263
Emergency call .............................. 260
Important safety notes ..................259
Locating a stolen vehicle ...............264
MB info call button ........................262
Remote vehicle locking ..................264
Roadside Assistance button ..........262
Self-test ......................................... 260
System .......................................... 260
Vehicle remote unlocking ..............264
Telephone
Accepting a call ............................. 206
Display message ............................ 237
Menu (on-board computer) ............205
Number from the phone book ........ 206
Redialing ........................................ 206
Rejecting/ending a call .................206
Telephone compartment .................. 251
Temperature Coolant .......................................... 198
Outside temperature ...................... 199
Setting ........................................... 141
Theft deterrent locking system
Immobilizer ...................................... 70
Through-loading ................................ 252
Through-loading feature ................... 252
Tiredness assistant see ATTENTION ASSIST
Tire pressure
Calling up (on-board computer) .....311
Checking manually ........................309
Display message ............................ 233
Maximum ....................................... 313
Notes ............................................. 307
Pressure loss warning ....................309
Recommended ............................... 306
Tire pressure monitoring system
Function/notes ............................. 311
Restarting ...................................... 313
Warning lamp ................................. 247
Tires
Aspect ratio (definition) .................326
Average weight of the vehicle
occupants (definition) ....................324
Bar (definition) ............................... 324
Characteristics .............................. 324
Checking ........................................ 305
Cleaning ......................................... 306
Definition of terms .........................324
Direction of rotation ......................318
Distribution of the vehicle
occupants (definition) ....................326
DOT, Tire Identification Number
(TIN) ............................................... 323
DOT (Department of
Transportation) (definition) ............324
Flat tire .......................................... 288
GAWR (Gross Axle Weight Rating)
(definition) ..................................... 325
Guidelines to be observed .............305
GVW (Gross Vehicle Weight)
(definition) ..................................... 325Index15BA 207 USA, CA Edition B 2011; 1; 3, en-USd2sboikeVersion: 3.0.3.62010-05-20T10:38:09+02:00 - Seite 15
Page 72 of 344

GWarning
Depending on the vehicle speed, PRE-SAFE®
Brake brakes your vehicle with a maximum of
13 ft/s 2
(4 m/s 2
) before a possible hard stop.
This corresponds to about 40 % of the
maximum deceleration ability of your vehicle.
The driver must apply the brakes additionally
in order to prevent a collision. The self-acting
hard stop will be initiated when the imminent
danger of a collision exists, e.g. when an
evasive maneuver cannot avoid an accident.
In order to maintain the appropriate distance
to the vehicle in front and thus prevent a
collision, you must apply the brakes yourself.
At speeds up to approximately
40 mph (70 km/h), PRE-SAFE ®
Brake can
also detect stationary obstacles, for example
stopped or parked vehicles.
GWarning!
If you do not receive visual or acoustic
warning signals, the PRE-SAFE ®
Brake may
R not have recognized the collision risk
R have been deactivated
R be malfunctioning
Apply the brakes yourself to avoid a collision.
XTo activate: activate PRE-SAFE ®
Brake in
the on-board computer ( Y page 207).
The Ä symbol appears in the lower
multifunction display, as long as the HOLD
function is not activated ( Y page 184).
On vehicles with parking guidance, the P
gear must be engaged for the icon to be
displayed.
For PRE-SAFE ®
Brake to assist you when
driving, the radar sensor system must be
switched on and operational.
PRE-SAFE ®
Brake does not always detect
complex traffic situations properly. You can
terminate the braking action of PRE-SAFE ®
Brake in a non-critical driving situation at any
time if:
R an acoustic and visual warning occurs
R the vehicle brakes
To end this, you can either depress the
accelerator pedal further, activate kickdown
or release the brake pedal.
The braking action of PRE-SAFE ®
Brake is
ended automatically if:
R you maneuver to avoid the obstacle
R you drive slower than approximately
9 mph (15 km/h)
R there is no longer an obstacle detected in
front of your vehicle
R there is no longer any danger of a collision
Following a collision or accident-related
damage to the front end of the vehicle, have
the configuration and operation of the radar
sensors checked. Choose a qualified
specialist workshop for this which has the
necessary specialist knowledge and tools for
the work required. Mercedes-Benz
recommends that you use an authorized
Mercedes-Benz Center for this purpose.
Anti-theft systems
Immobilizer
The immobilizer prevents your vehicle from
being started without the correct key.
When leaving the vehicle, always take the
SmartKey with you and lock the vehicle. The
engine can be started by anyone with a valid
key that is left inside the vehicle.
XTo activate with the SmartKey: remove
the SmartKey from the ignition lock.XTo activate with KEYLESS-GO: switch the
ignition off and open the driver's door.XTo deactivate: switch on the ignition.70Anti-theft systemsSafety
BA 207 USA, CA Edition B 2011; 1; 3, en-USd2sboikeVersion: 3.0.3.62010-05-20T10:38:09+02:00 - Seite 70
Page 73 of 344

iThe immobilizer is always deactivated
when you start the engine.
In the event that the engine cannot be
started when the starter battery is fully
charged, the immobilizer may be faulty.
Contact an authorized Mercedes-Benz
Center or call 1-800-FOR-MERCedes (in
USA) or 1-800-387-0100 (in Canada).
ATA (Anti-Theft Alarm system)
A visual and audible alarm is triggered if the
alarm system is armed and you open:
Ra door
Rthe vehicle with the mechanical key
Rthe trunk lid
Rthe hood
The alarm is not switched off, even if you
close the open door that has triggered it, for
example.
iIf the alarm stays on for more than 30
seconds, the emergency call system
mbrace (USA only) or TELEAID (Canada
only) initiates a call to the Customer
Assistance Center automatically. The
emergency call system initiates the call
provided that:
Ryou have subscribed to the mbrace/
TELEAID service.
Rthe mbrace/TELEAID service has been
activated properly.
Rthe required mobile phone, power supply
and GPS are available.
XTo arm: lock the vehicle with the SmartKey
or KEYLESS-GO.
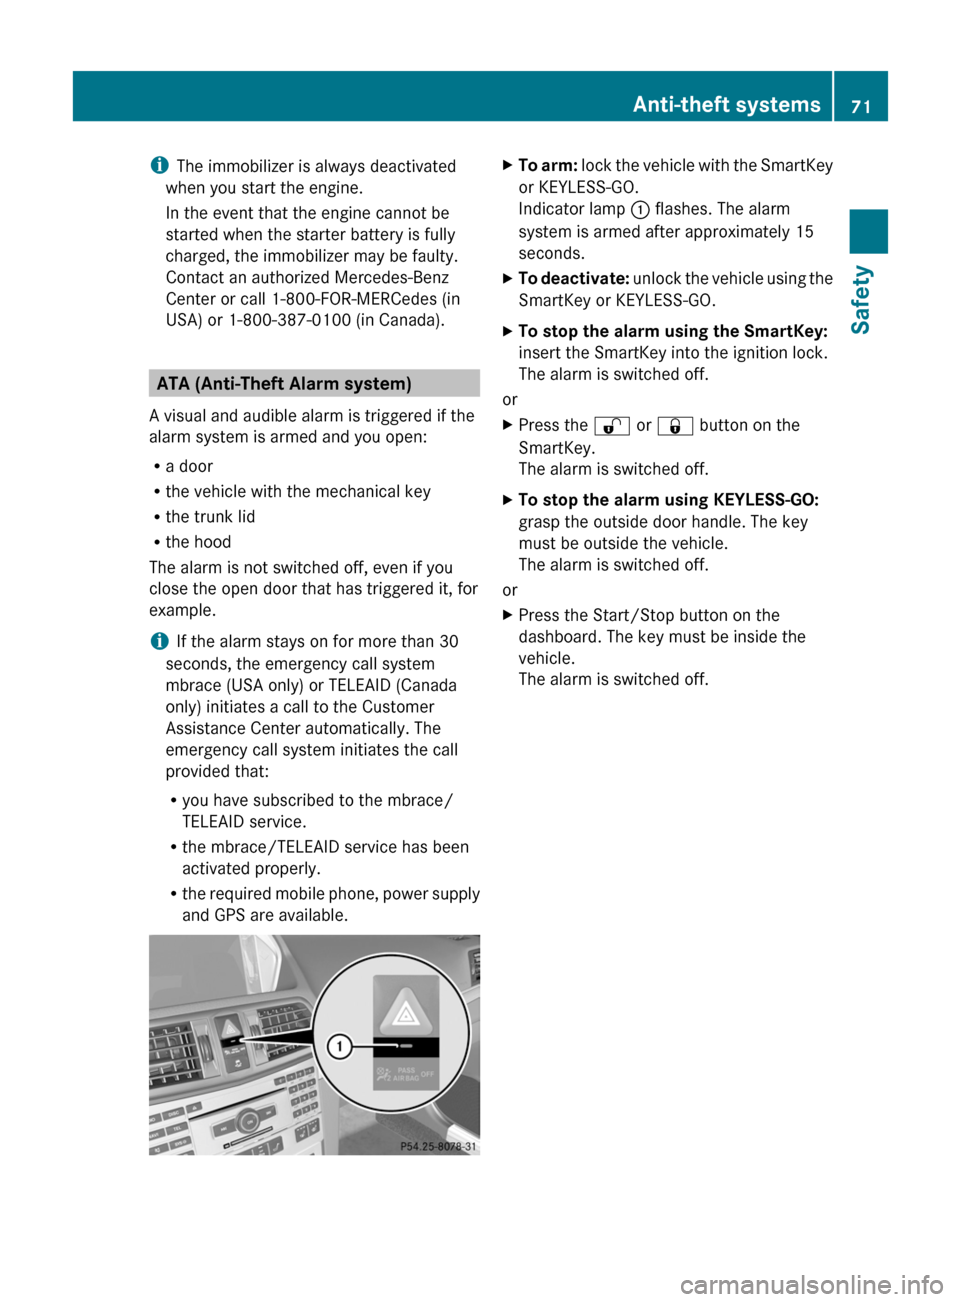
Indicator lamp : flashes. The alarm
system is armed after approximately 15
seconds.
XTo deactivate: unlock the vehicle using the
SmartKey or KEYLESS-GO.
XTo stop the alarm using the SmartKey:
insert the SmartKey into the ignition lock.
The alarm is switched off.
or
XPress the % or & button on the
SmartKey.
The alarm is switched off.
XTo stop the alarm using KEYLESS-GO:
grasp the outside door handle. The key
must be outside the vehicle.
The alarm is switched off.
or
XPress the Start/Stop button on the
dashboard. The key must be inside the
vehicle.
The alarm is switched off.
Anti-theft systems71SafetyBA 207 USA, CA Edition B 2011; 1; 3, en-USd2sboikeVersion: 3.0.3.62010-05-20T10:38:09+02:00 - Seite 71Z
Page 168 of 344

Vehicles with automatic transmissionXApply the parking brake firmly.XShift the transmission to position P.
Using the SmartKey
XTurn the SmartKey to position 0 in the
ignition lock and remove it.
The immobilizer is activated.
iThe SmartKey can only be removed if the
transmission is in position P.
Using KEYLESS-GO
XPress the Start/Stop button (Y page 151).
When the driver's door is closed, the Start/
Stop button is in position 1. When the
driver's door is opened, the Start/Stop
button moves to position 0. This
corresponds to removing the SmartKey.
If you attempt to turn off the engine when the
selector lever is not in position P, a warning
signal sounds.
Observe the messages in the multifunction
display.
iIn an emergency, you can turn off the
engine while the vehicle is in motion by
pressing and holding the Start/Stop button
for three seconds.
Parking brake
GWarning
Engaging the parking brake while the vehicle
is in motion can cause the rear wheels to lock
up. You could lose control of the vehicle and
cause an accident. In addition, the vehicle's
brake lights do not light up when the parking
brake is engaged.
GWarning!
When leaving the vehicle, always remove the
SmartKey from the starter switch, take it with
you, and lock the vehicle. Do not leave
children unattended in the vehicle, or with
access to an unlocked vehicle. Children could
release the parking brake and/or shift the
automatic transmission out of park position
P, either of which could result in an accident
and/or serious personal injury.
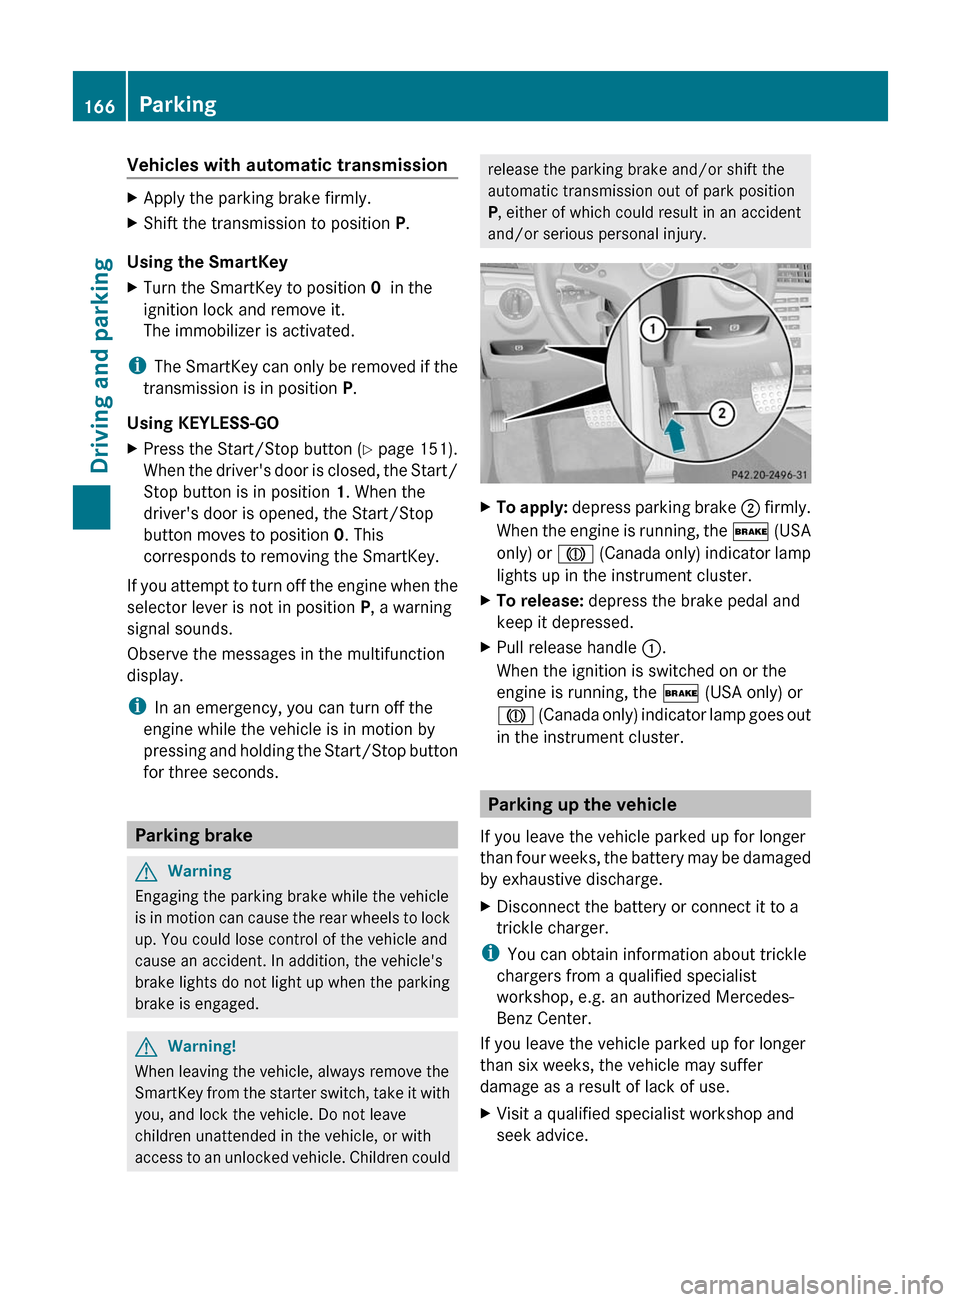
XTo apply: depress parking brake ; firmly.
When the engine is running, the $ (USA
only) or J (Canada only) indicator lamp
lights up in the instrument cluster.
XTo release: depress the brake pedal and
keep it depressed.
XPull release handle :.
When the ignition is switched on or the
engine is running, the $ (USA only) or
J (Canada only) indicator lamp goes out
in the instrument cluster.
Parking up the vehicle
If you leave the vehicle parked up for longer
than four weeks, the battery may be damaged
by exhaustive discharge.
XDisconnect the battery or connect it to a
trickle charger.
iYou can obtain information about trickle
chargers from a qualified specialist
workshop, e.g. an authorized Mercedes-
Benz Center.
If you leave the vehicle parked up for longer
than six weeks, the vehicle may suffer
damage as a result of lack of use.
XVisit a qualified specialist workshop and
seek advice.
166ParkingDriving and parking
BA 207 USA, CA Edition B 2011; 1; 3, en-USd2sboikeVersion: 3.0.3.62010-05-20T10:38:09+02:00 - Seite 166