2011 MERCEDES-BENZ E-Class COUPE light
[x] Cancel search: lightPage 100 of 344
Retracting AIRCAPXTurn the key to position 2 in the ignition
lock.XOpen the cover on the lower center
console.XPress AIRCAP button :.
The two indicator lamps on the AIRCAP
button go out. Wind deflector ; retracts.
The head restraints on the rear bench seats
and AIRCAP wind screen = move to the
lowest position simultaneously.
i If there are passengers wearing seat belts
in the rear compartment, the head
restraints on the rear bench seats and the
AIRCAP wind screen remain in the upper
position.
Retracting the head restraints on the
rear bench seats from the driver's seat
To improve the rear view, you can retract the
head restraints on the rear bench seats
individually ( Y page 109). The wind deflector
remains in its current position.
Installing and removing the AIRCAP
wind screen
Preparation
You will need a 4 mm Allen key to install/
remove the AIRCAP wind screen.
Before installing or removing the AIRCAP
wind screen:
XTurn the key to position 2 in the ignition
lock.XOpen the folding roof fully ( Y page 90).XExtend the head restraints in the rear
compartment fully ( Y page 109).Removing
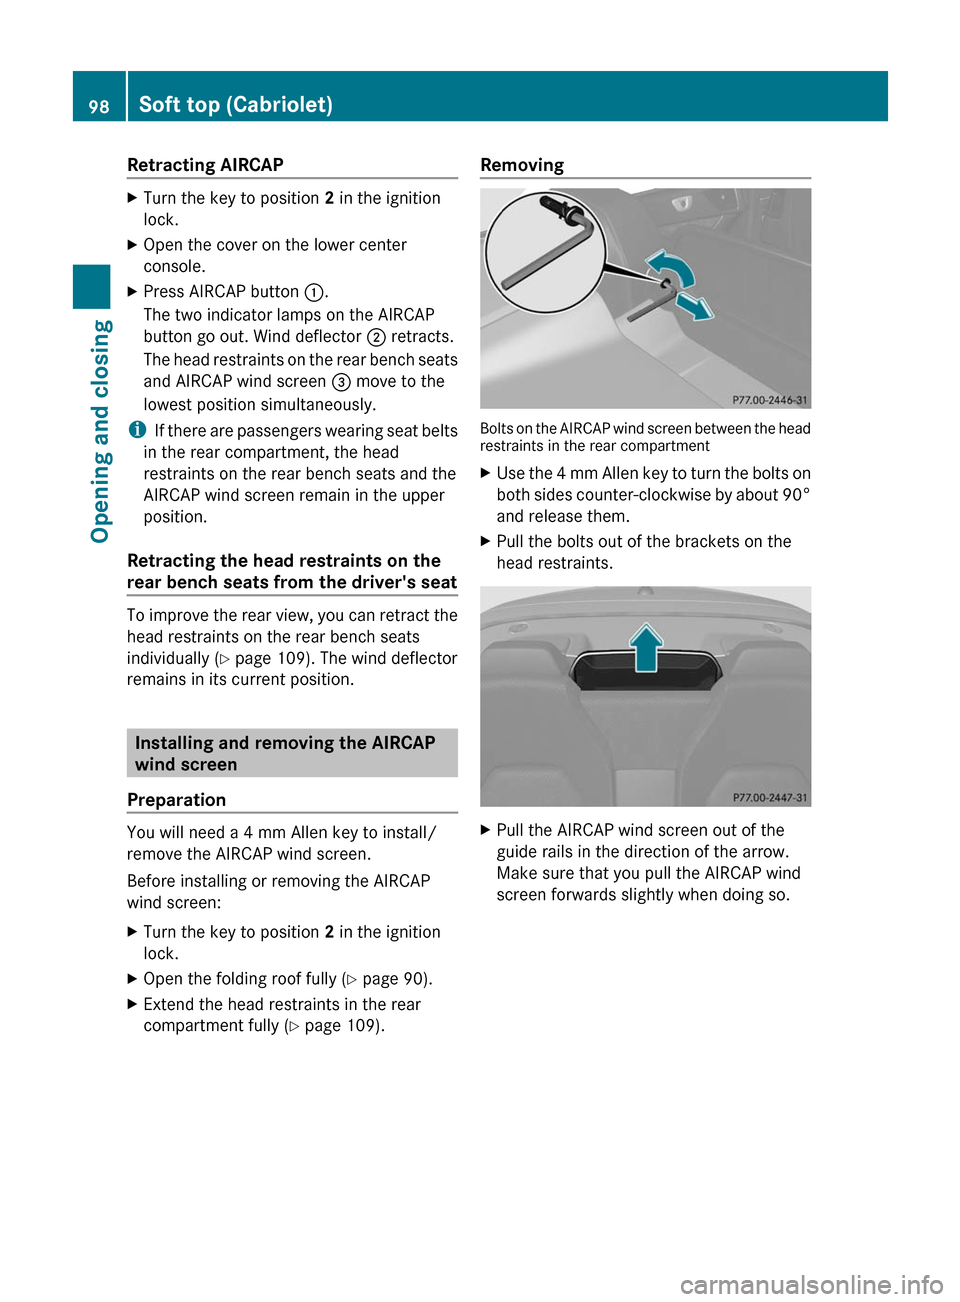
Bolts on the AIRCAP wind screen between the head
restraints in the rear compartment
XUse the 4 mm Allen key to turn the bolts on
both sides counter-clockwise by about 90°
and release them.XPull the bolts out of the brackets on the
head restraints.XPull the AIRCAP wind screen out of the
guide rails in the direction of the arrow.
Make sure that you pull the AIRCAP wind
screen forwards slightly when doing so.98Soft top (Cabriolet)Opening and closing
BA 207 USA, CA Edition B 2011; 1; 3, en-USd2sboikeVersion: 3.0.3.62010-05-20T10:38:09+02:00 - Seite 98
Page 103 of 344

Sliding sunroof3
Important safety notes
GWarning!
When leaving the vehicle, always remove the
SmartKey from the starter switch. Always
take the SmartKey with you and lock the
vehicle. Do not leave children unattended in
the vehicle, even if they are secured in a child
restraint system, or with access to an
unlocked vehicle. A child's unsupervised
access to a vehicle could result in an accident
and/or serious personal injury. The children
could
R injure themselves on parts of the vehicle
R be seriously or fatally injured through
excessive exposure to extreme heat or cold
R injure themselves or cause an accident with
vehicle equipment that can be operated
even if the SmartKey is removed from the
starter switch or removed from the vehicle,
such as seat adjustment, steering wheel
adjustment, or the memory function
If children open a door, they could injure other
persons or get out of the vehicle and injure
themselves or be injured by following traffic.
Do not expose the child restraint system to
direct sunlight. The child restraint system's
metal parts, for example, could become very
hot, and the child could be burned by these
parts.
GWarning!
Do not carry heavy or hard objects in the
passenger compartment or trunk unless they
are firmly secured in place.
Unsecured or improperly positioned cargo
increases a child's risk of injury in the event
of
R strong braking maneuvers
R sudden changes of direction
R an accident
GWarning!
When opening or closing the tilt/sliding panel,
make sure there is no danger of anyone being
harmed by the opening/closing procedure.
The tilt/sliding panel is equipped with the
automatic operation and anti-entrapment
features. If the movement of the tilt/sliding
panel is blocked during the closing procedure,
the tilt/sliding panel will stop and open
slightly.
The tilt/sliding panel operates differently
when the roof panel switch is pressed and
held. See the relevant section in this chapter
for details.
The opening/closing procedure of the tilt/
sliding panel can be immediately halted by
releasing the roof panel switch or, if the roof
panel switch was moved past the resistance
point and released, by moving the roof panel
switch in any direction.
GWarning!
The panorama roof with tilt/sliding panel is
made out of glass. In the event of an accident,
the glass may shatter. This may result in an
opening in the roof.
In a vehicle rollover, occupants not wearing
their seat belts or not wearing them properly
may be thrown out of the opening. Such an
opening also presents a potential for injury for
occupants wearing their seat belts properly as
entire body parts or portions of them may
protrude from the passenger compartment.
! Only open the sliding sunroof if it is free
of snow and ice. Otherwise, malfunctions
may occur.
Do not allow anything to protrude from the
sliding sunroof. Otherwise, the seals could
be damaged.
! Do not forget that the weather can
change abruptly. Make certain that the
sliding sunroof is closed when you leave the
vehicle. The vehicle electronics can be
3 Coupe onlySliding sunroof101Opening and closingBA 207 USA, CA Edition B 2011; 1; 3, en-USd2sboikeVersion: 3.0.3.62010-05-20T10:38:09+02:00 - Seite 101Z
Page 104 of 344
damaged if water enters the vehicle
interior.
i Resonance noises can occur in addition
to the usual airflow noises when the sliding
sunroof is open. They are caused by minor
pressure fluctuations in the vehicle interior.
Change the position of the sliding sunroof
or open a side window slightly to reduce or
eliminate these noises.
Operating the panorama sliding
sunroof
Opening and closing
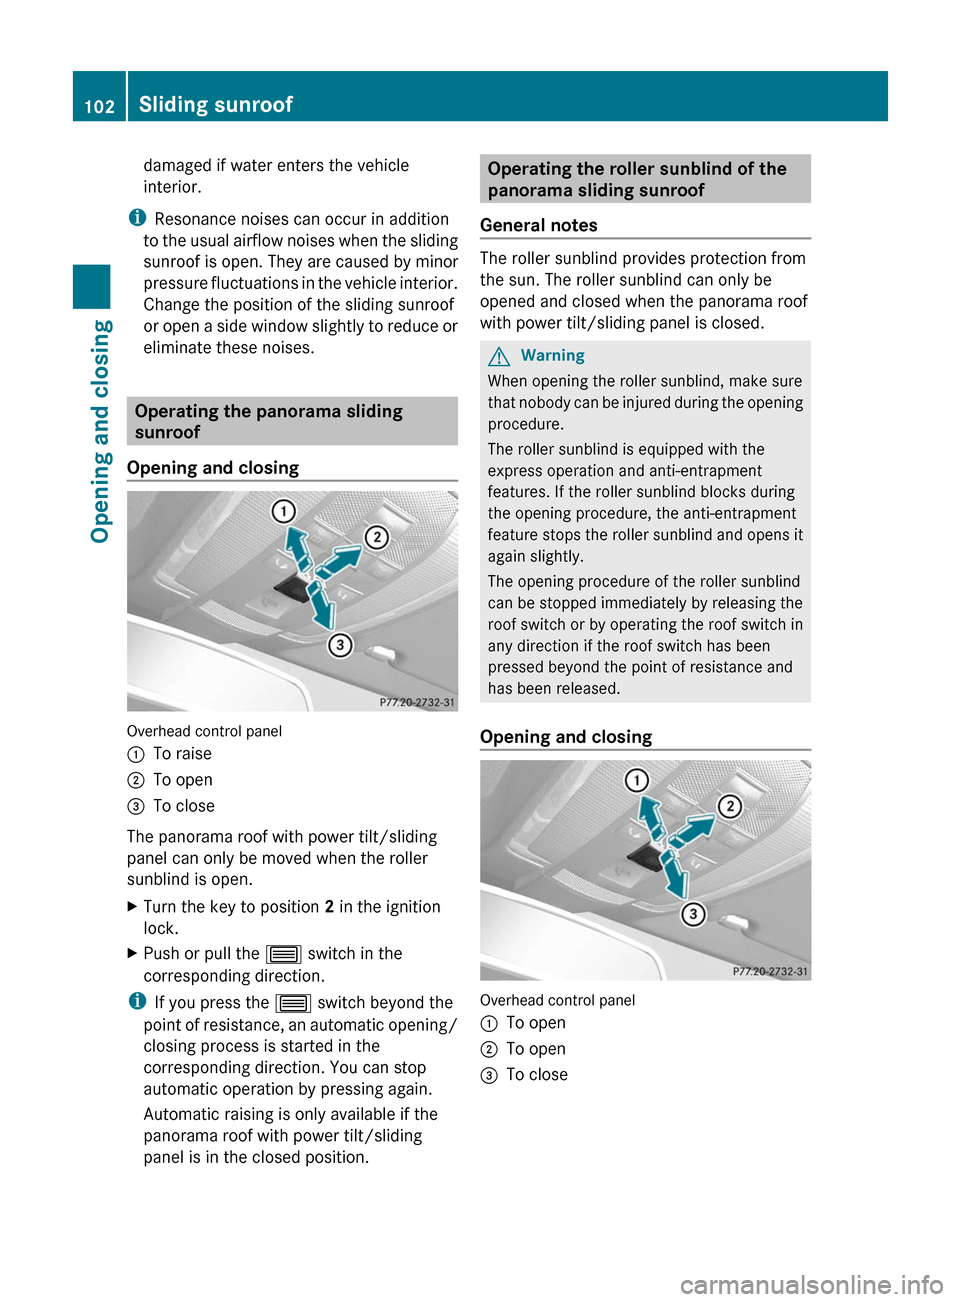
Overhead control panel
:To raise;To open=To close
The panorama roof with power tilt/sliding
panel can only be moved when the roller
sunblind is open.
XTurn the key to position 2 in the ignition
lock.XPush or pull the 3 switch in the
corresponding direction.
i If you press the 3 switch beyond the
point of resistance, an automatic opening/
closing process is started in the
corresponding direction. You can stop
automatic operation by pressing again.
Automatic raising is only available if the
panorama roof with power tilt/sliding
panel is in the closed position.
Operating the roller sunblind of the
panorama sliding sunroof
General notes
The roller sunblind provides protection from
the sun. The roller sunblind can only be
opened and closed when the panorama roof
with power tilt/sliding panel is closed.
GWarning
When opening the roller sunblind, make sure
that nobody can be injured during the opening
procedure.
The roller sunblind is equipped with the
express operation and anti-entrapment
features. If the roller sunblind blocks during
the opening procedure, the anti-entrapment
feature stops the roller sunblind and opens it
again slightly.
The opening procedure of the roller sunblind
can be stopped immediately by releasing the
roof switch or by operating the roof switch in
any direction if the roof switch has been
pressed beyond the point of resistance and
has been released.
Opening and closing
Overhead control panel
:To open;To open=To close102Sliding sunroofOpening and closing
BA 207 USA, CA Edition B 2011; 1; 3, en-USd2sboikeVersion: 3.0.3.62010-05-20T10:38:09+02:00 - Seite 102
Page 108 of 344

Vehicle equipment
i This manual describes all the standard
and optional equipment of your vehicle
which was available at the time of
purchase. Country-specific differences are
possible. Bear in mind that your vehicle
may not feature all functions described
here. This also refers to safety-related
systems and functions.
Correct driver's seat position
Observe the important safety notes on
( Y page 107).
XCheck whether you have adjusted seat =
properly.
Electrical seat adjustment ( Y page 108)
When adjusting the seat, make sure:
R you are as far away from the driver's air
bag as possible.
R you are sitting in a normal upright
position.
R you can fasten the seat belt properly.
R you have moved the backrest to an
almost vertical position.R you have set the seat cushion angle so
that your thighs are gently supported.
R you can depress the pedals properly.XCheck whether the head restraint is
adjusted properly ( Y page 108).
When doing so, make sure that you have
adjusted the head restraint so that the back
of your head is supported at eye level by
the center of the head restraint.
Observe the important safety notes on
( Y page 113).
XCheck whether steering wheel : is
adjusted properly.
Adjusting the steering wheel electrically
( Y page 113)
When adjusting the steering wheel, make
sure:
R you can hold the steering wheel with your
arms slightly bent.
R you can move your legs freely.
R you can see all the displays in the
instrument cluster clearly.
Observe the important safety notes on
( Y page 53).
XCheck whether you have fastened seat
belt ; properly ( Y page 54).
The seat belt should:
R fit snugly across your body
R be routed across the middle of your
shoulder
R be routed in your pelvic area across the
hip jointsXBefore starting off, adjust the rear-view
mirror and the exterior mirrors
( Y page 114) in such a way that you have
a good view of road and traffic conditions.XVehicles with memory function: save the
seat, steering wheel and exterior mirror
settings ( Y page 116).106Correct driver's seat positionSeats, steering wheel and mirrors
BA 207 USA, CA Edition B 2011; 1; 3, en-USd2sboikeVersion: 3.0.3.62010-05-20T10:38:09+02:00 - Seite 106
Page 109 of 344

Seats
Important safety notes
GWarning
In order to avoid possible loss of vehicle
control, all seat, head restraint, steering
wheel and rear view mirror adjustments, as
well as fastening of seat belts, must be done
before setting the vehicle in motion.
GWarning
Do not adjust the driver's seat while driving.
Adjusting the seat while driving could cause
the driver to lose control of the vehicle.
Never travel in a moving vehicle with the seat
backrest in an excessively reclined position as
this can be dangerous. You could slide under
the seat belt in a collision. If you slide under
it, the seat belt would apply force at the
abdomen or neck. This could cause serious or
fatal injuries. The seat backrest and seat belts
provide the best restraint when the wearer is
in a position that is as upright as possible and
seat belts are properly positioned on the
body.
GWarning
Your seat belt must be adjusted so that you
can correctly fasten your seat belt.
Observe the following points:
R adjust the seat backrest until your arms are
slightly angled when holding the steering
wheel.
R adjust the seat to a comfortable seating
position that still allows you to reach the
accelerator/brake pedal safely. The
position should be as far back as possible
with the driver still able to operate the
controls properly.
R adjust the head restraint so that it is as
close to the head as possible and the center
of the head restraint supports the back of
the head at eye level.
R never place hands under the seat or near
any moving parts while a seat is being
adjusted.
Failure to do so could result in an accident
and/or serious personal injury.GWarning
The electrically adjustable seats can be
operated at any time. Therefore, do not leave
children unattended in the vehicle, or with
access to an unlocked vehicle. A child's
unsupervised access to a vehicle could result
in an accident and/or serious personal injury.
GWarning!
According to accident statistics, children are
safer when properly restrained in the rear
seating positions than in the front seating
position. Thus, we strongly recommend that
children be placed in the rear seats whenever
possible. Regardless of seating position,
children 12 years old and under must be
seated and properly secured in an
appropriately sized infant restraint, toddler
restraint, or booster seat recommended for
the size and weight of the child. For additional
information, see "Children in the vehicle".
A child's risk of serious or fatal injuries is
significantly increased if the child restraints
are not properly secured in the vehicle and/
or the child is not properly secured in the child
restraint.
GWarning
For your protection, drive only with properly
positioned head restraints.
Adjust the head restraint so that it is as close
to the head as possible and the center of the
head restraint supports the back of the head
at eye level. This will reduce the potential for
injury to the head and neck in the event of an
accident or similar situation.
Seats107Seats, steering wheel and mirrorsBA 207 USA, CA Edition B 2011; 1; 3, en-USd2sboikeVersion: 3.0.3.62010-05-20T10:38:09+02:00 - Seite 107Z
Page 110 of 344
Do not drive the vehicle without the seat head
restraints. Head restraints are intended to
help reduce injuries during an accident.
! To avoid damage to the seats and the seat
heating, observe the following information:
Rdo not spill any liquids on the seats. If
liquid is spilled on the seats, dry them as
soon as possible.
Rif the seat covers are damp or wet, do not
switch on the seat heating. The seat
heating should also not to be used to dry
the seats.
Rclean the seat covers as recommended;
see the " Interior care" section.
Rdo not transport heavy loads on the
seats. Do not place sharp objects on the
seat cushions, e.g. knives, nails or tools.
The seats should only be occupied by
passengers, if possible.
Rwhen the seat heating is in operation, do
not cover the seats with insulating
materials, e.g. covers, bags, seat covers,
child seats or booster seats.
! When you move the seats, make sure that
there are no objects in the footwell or
behind the seats. Otherwise, you could
damage the seats and the objects.
iThe head restraints in the front seats are
installed with the NECK-PRO system
(Y page 51). For this reason, it is not
possible to remove the head restraints
from the front seats.
Please contact an authorized Mercedes-
Benz Center for more information.
iRelated topics:
RThrough-loading feature in the rear
bench seat4 (folding the rear bench seat
forwards) (Y page 252)
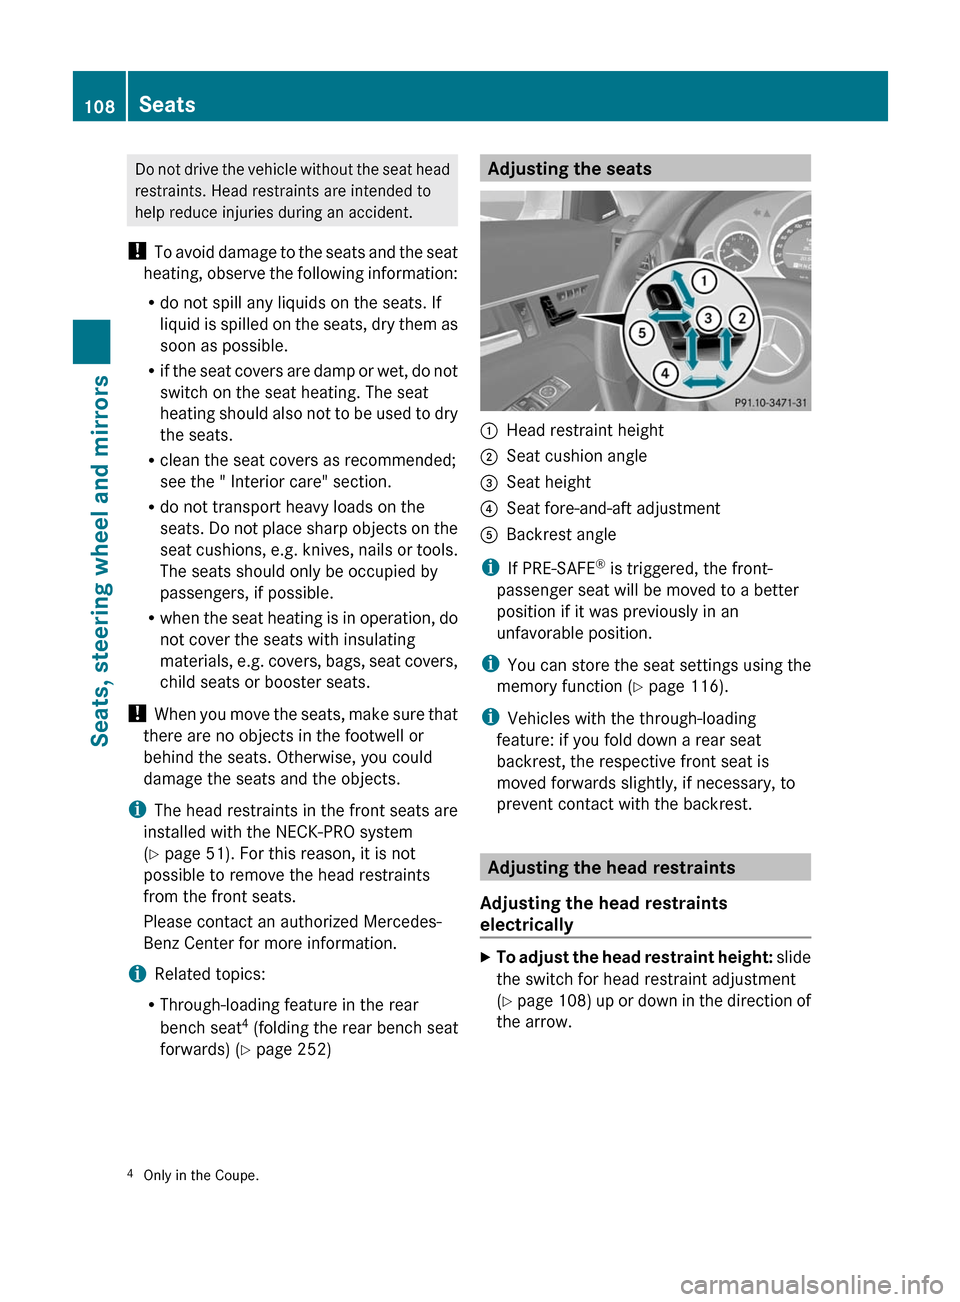
Adjusting the seats:Head restraint height;Seat cushion angle=Seat height?Seat fore-and-aft adjustmentABackrest angle
iIf PRE-SAFE® is triggered, the front-
passenger seat will be moved to a better
position if it was previously in an
unfavorable position.
iYou can store the seat settings using the
memory function (Y page 116).
iVehicles with the through-loading
feature: if you fold down a rear seat
backrest, the respective front seat is
moved forwards slightly, if necessary, to
prevent contact with the backrest.
Adjusting the head restraints
Adjusting the head restraints
electrically
XTo adjust the head restraint height: slide
the switch for head restraint adjustment
(Y page 108) up or down in the direction of
the arrow.
4Only in the Coupe.108SeatsSeats, steering wheel and mirrors
BA 207 USA, CA Edition B 2011; 1; 3, en-USd2sboikeVersion: 3.0.3.62010-05-20T10:38:09+02:00 - Seite 108
Page 114 of 344
Problems with the seat heating
The seat heating has switched itself off
prematurely or cannot be switched on. The
vehicle's electrical system voltage is too low
because too many electrical consumers are
switched on.
XSwitch off electrical consumers which you
do not need, such as the rear window
defroster or interior lighting.
Switching the seat ventilation on/off
Switching on/off
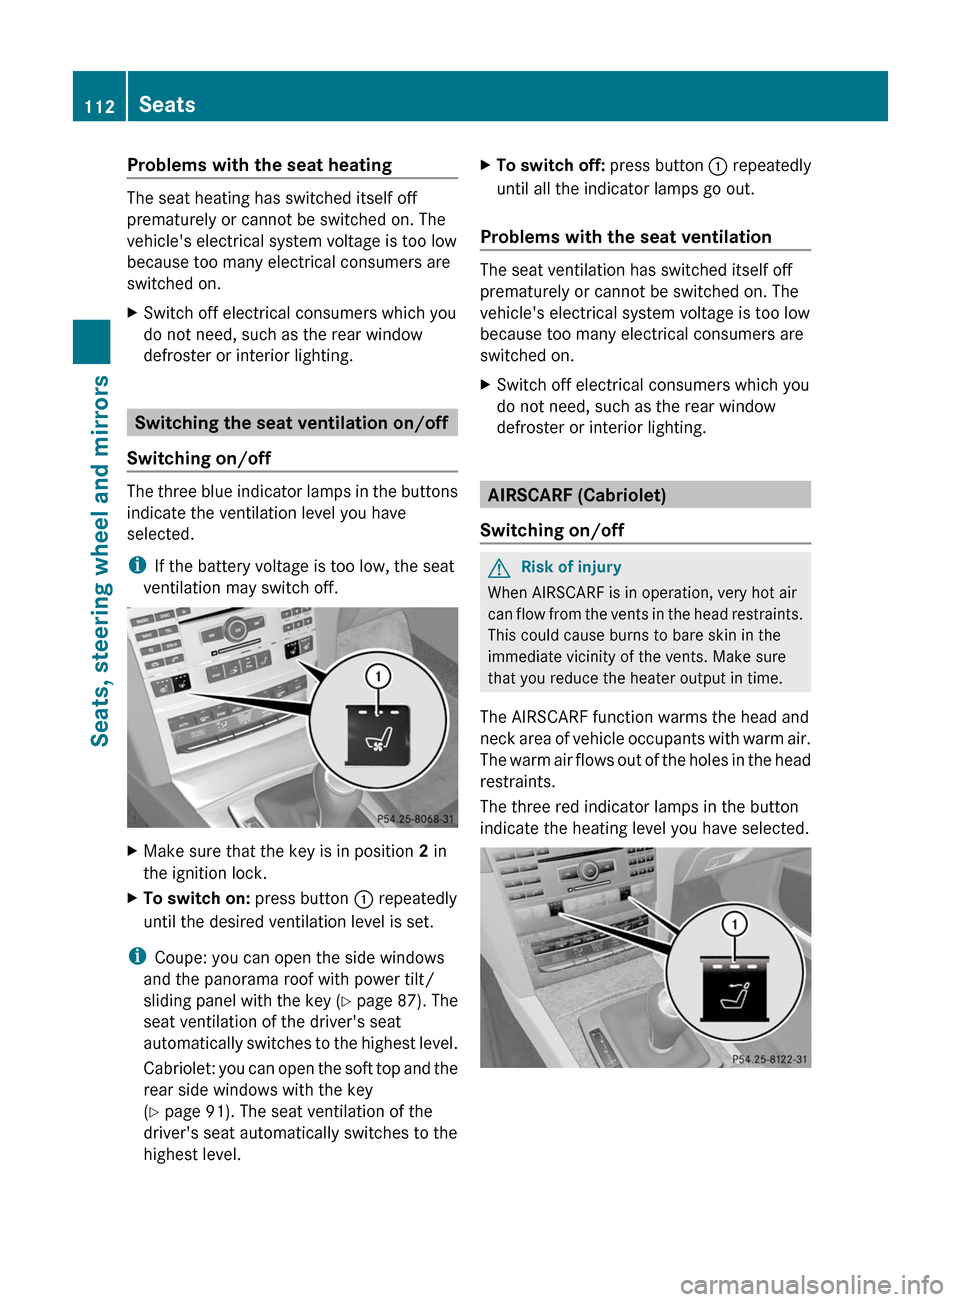
The three blue indicator lamps in the buttons
indicate the ventilation level you have
selected.
iIf the battery voltage is too low, the seat
ventilation may switch off.
XMake sure that the key is in position 2 in
the ignition lock.
XTo switch on: press button : repeatedly
until the desired ventilation level is set.
iCoupe: you can open the side windows
and the panorama roof with power tilt/
sliding panel with the key (Y page 87). The
seat ventilation of the driver's seat
automatically switches to the highest level.
Cabriolet: you can open the soft top and the
rear side windows with the key
(Y page 91). The seat ventilation of the
driver's seat automatically switches to the
highest level.
XTo switch off: press button : repeatedly
until all the indicator lamps go out.
Problems with the seat ventilation
The seat ventilation has switched itself off
prematurely or cannot be switched on. The
vehicle's electrical system voltage is too low
because too many electrical consumers are
switched on.
XSwitch off electrical consumers which you
do not need, such as the rear window
defroster or interior lighting.
AIRSCARF (Cabriolet)
Switching on/off
GRisk of injury
When AIRSCARF is in operation, very hot air
can flow from the vents in the head restraints.
This could cause burns to bare skin in the
immediate vicinity of the vents. Make sure
that you reduce the heater output in time.
The AIRSCARF function warms the head and
neck area of vehicle occupants with warm air.
The warm air flows out of the holes in the head
restraints.
The three red indicator lamps in the button
indicate the heating level you have selected.
112SeatsSeats, steering wheel and mirrors
BA 207 USA, CA Edition B 2011; 1; 3, en-USd2sboikeVersion: 3.0.3.62010-05-20T10:38:09+02:00 - Seite 112
Page 115 of 344
XMake sure that the key is in position 2 in
the ignition lock.
XTo activate: press button :.
Three red indicator lamps in the button light
up. The blower starts up after a preheating
phase of seven seconds.
XPress button : repeatedly until the
desired heating level is set.
XTo switch off: press button : repeatedly
until all the indicator lamps go out.
You can use the adjustable fins on the head
restraint to adjust the height of the current of
air blown out according to your height.
Make sure that there are no objects covering
the intake grille on the back of the driver's
seat backrest.
iThe blower continues running for seven
seconds to cool down the heating
elements.
iIf the battery voltage is too low, AIRSCARF
may switch off.
Steering wheel
Important safety notes
GWarning!
Do not adjust the steering wheel while driving.
Adjusting the steering wheel while driving
could cause the driver to lose control of the
vehicle.
The electrical steering wheel adjustment
feature can be operated at any time.
Therefore, do not leave children unattended
in the vehicle, or with access to an unlocked
vehicle. A child's unsupervised access to a
vehicle could result in an accident and/or
serious personal injury.
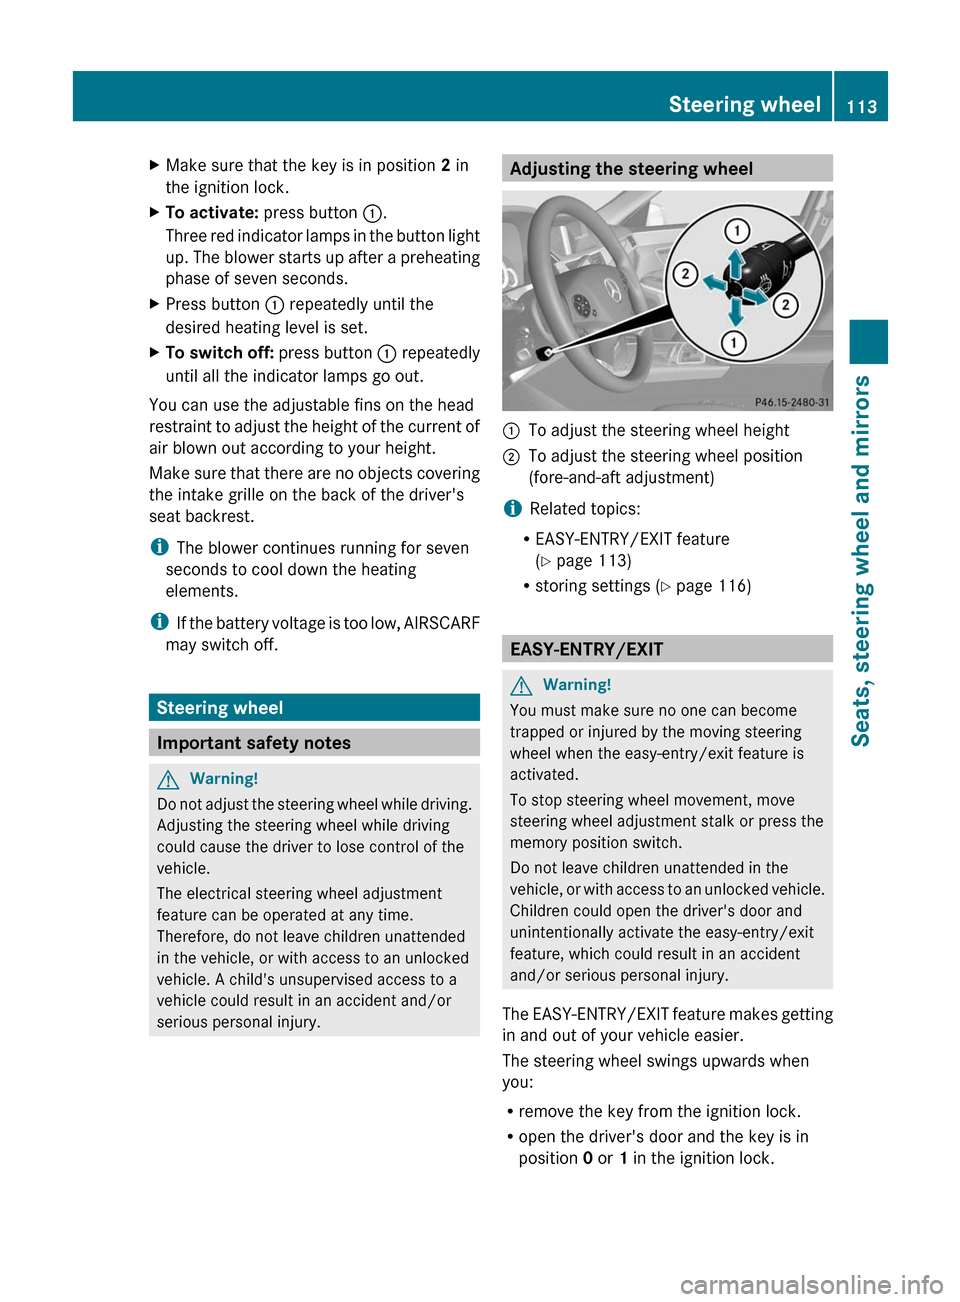
Adjusting the steering wheel:To adjust the steering wheel height;To adjust the steering wheel position
(fore-and-aft adjustment)
iRelated topics:
REASY-ENTRY/EXIT feature
(Y page 113)
Rstoring settings (Y page 116)
EASY-ENTRY/EXIT
GWarning!
You must make sure no one can become
trapped or injured by the moving steering
wheel when the easy-entry/exit feature is
activated.
To stop steering wheel movement, move
steering wheel adjustment stalk or press the
memory position switch.
Do not leave children unattended in the
vehicle, or with access to an unlocked vehicle.
Children could open the driver's door and
unintentionally activate the easy-entry/exit
feature, which could result in an accident
and/or serious personal injury.
The EASY-ENTRY/EXIT feature makes getting
in and out of your vehicle easier.
The steering wheel swings upwards when
you:
Rremove the key from the ignition lock.
Ropen the driver's door and the key is in
position 0 or 1 in the ignition lock.
Steering wheel113Seats, steering wheel and mirrorsBA 207 USA, CA Edition B 2011; 1; 3, en-USd2sboikeVersion: 3.0.3.62010-05-20T10:38:09+02:00 - Seite 113Z